This video demonstrates the visualization of axonal projections in Drosophila embryos. Immunolabeling of motor neurons, precise dissection to expose neuronal structures, and differential interference contrast microscopy collectively reveal detailed neuronal architecture, emphasizing the axonal projection patterns.
A subscription to JoVE is required to view this content. Sign in or start your free trial.
Method Article
Visualization of Axonal Projection Patterns of Embryonic Motor Neurons in Drosophila
626 views
⸱
June 17th, 2025
In This Article
Abstract
Protocol
1. Preparation
- Prepare 500 mL of phosphate-buffered saline (PBS) with t-Octylphenoxypolyethoxyethanol (PBT) solution by adding 0.5 g of bovine serum albumin (BSA) and 0.5 mL of t-Octylphenoxypolyethoxyethanol (see the Table of Materials) to 500 mL of 1X PBS and stirring for at least 30 min. Store at 4 °C. Use when relatively fresh and store the solution in a clean bottle.
- Make 10 mL of 4% paraformaldehyde by adding 2.5 mL of 16% stock paraformaldehyde solution and 1 mL of 10x PBS to 6.5 mL of deionized water. Store at 4 °C and use within one week.
CAUTION: Avoid skin contact with paraformaldehyde solution because it is highly toxic. - Make 5-bromo-4-chloro-3-indolyl-β-D-galactopyranoside (X-Gal) substrate (10% w/v X-Gal in dimethyl sulfoxide (DMSO)) by dissolving 0.1 g of X-Gal substrate per 1 mL of DMSO. Store at -20 °C in 100 µL aliquots.
- Make X-Gal staining solution using 10 mM phosphate buffer (pH 7.2), 150 mM sodium chloride, NaCl, 1 mM magnesium chloride, MgCl2, 3 mM potassium ferrocyanide, K4[FeII(CN)6], 3 mM potassium ferricyanide, K3[FeIII(CN)6], and 0.3% t-Octylphenoxypolyethoxyethanol. Store at 4 °C in the dark.
- Make 3% hydrogen peroxide solution by diluting 30% stock hydrogen peroxide 1:10 with deionized water.
- Make 3,3′-diaminobenzidine (DAB) solution by completely dissolving 1 tablet (10 mg) of DAB in 35 mL of fresh PBT solution. Filter through a 0.2-µm syringe filter and store at -20 °C in 910 µL aliquots.
CAUTION: Dispose of all DAB waste in bleach to destroy the DAB. - Make egg plates with apple juice. Add 35 g of agar and 1 L of deionized water to a 2 L flask. Add 33 g of sucrose, 2 g of tegosept, and 375 mL of apple juice to a 1-L flask. Melt them by autoclaving for 30 min. Allow both solutions to cool to around 60 °C. Combine and mix these solutions well by stirring. Pour ~11 mL of the combined solution per 60 mm culture dish.
- Make yeast paste by blending baker's yeast into deionized water (1:0.8 ratio) and store at 4 °C.
2. Embryo Collection (Day 1)
- Collect young female and male flies (younger than 5 days), and for 1-2 days, maintain them in a plastic beaker cage with an egg plate (60 mm x 15 mm) that contains a small amount of yeast paste in the center.
- For the optimal collection of late-stage-16 embryos, set up a bottle cage with flies (> 50) at around 5 PM and let them lay eggs at 25 °C for 3 h.
- Transfer the flies to a fresh food bottle.
- Close the egg plate with the lid and incubate it upside down at 25 °C in a humidified incubator (~70% humidity) overnight.
3. Preparation of Embryos for Immunostaining (Day 2)
- Add 1.8 mL of PBT solution to the egg plate around 10:20 AM and use a cotton swab to loosen the embryos from the plate while tilting it.
NOTE: By gently mashing the yeast paste using a cotton swab, dissolve it in case a large number of embryos are found on it. Begin collecting the embryos ~40 min before fixation (around 11:00 AM). - Transfer the embryos from the egg plate to a 1.5-mL microtube using a 1-mL pipette tip.
- Allow the embryos to settle down and aspirate the PBT solution as much as possible. Rinse the embryos twice with 1 mL of PBT solution. Aspirate the PBT solution as much as possible.
- Fill the tube with 1 mL of 50% bleach (i.e., diluted in deionized water) and dechorionate the embryos by incubating them on a nutator for 3 min at room temperature (RT).
NOTE: This step does not kill the dechorionated embryos. - Allow the dechorionated embryos to settle down, aspirate the 50% bleach as much as possible, and rinse the embryos 3 times with 1 mL of PBT solution.
- Add 0.5 mL of heptane and subsequently add 0.5 mL of 4% paraformaldehyde solution to the tube at RT at around 11:00 AM.
- Incubate the embryos on a nutator for 15 min at RT.
- Remove the 4% paraformaldehyde solution (the bottom layer).
- Add 0.5 mL of 100% methanol and devitellinize the embryos by shaking the tube vigorously for 30 s.
- Remove the heptane (i.e., the top layer).
- Add 0.5 mL of 100% methanol and shake the tube vigorously for 10 s.
- Allow the embryos to settle down by tapping the tube and aspirate the methanol as much as possible. Rinse the embryos with 1 mL of 100% methanol, shaking for less than 10 s.
NOTE: Extended exposure to methanol destroys β-Gal activity. - Remove the methanol and rinse the devitellinized embryos 3 times with 1 mL of PBT solution.
4. Genotyping the Embryos Using LacZ Staining (Day 2)
- Add 1 mL of PBT solution to the tube and incubate the tube in a 37 °C heat block or water bath for 15 min.
- During incubation, place X-Gal staining solution (1 mL per tube) at 65 °C in a water bath until it gets cloudy. Incubate it in a 37 °C water bath.
- Aspirate the PBT solution and add 1 mL of X-Gal staining solution and 20 µL of X-Gal substrate to the tube.
- Incubate the tube at 37 °C with nutation until a blue precipitate is evident.
NOTE: The incubation time for the 2nd and 3rd blue balancers in general ranges from 2-4 h. - Remove the X-Gal staining solution and rinse the embryos 3 times with 1 mL of RT PBT solution.
- Using a needle probe or forceps, hand-sort the embryos of the desired genotype (i.e., non-stained white embryos) with a light dissecting microscope (1.6X-2.5X objectives).
NOTE: Since some blue balancers, such as CyO, actin-LacZ and TM3, actin-LacZ, carry a transgenic construct expressing bacterial β-Gal (LacZ) under the control of the actin promoter, embryos stained blue in a ubiquitous manner contain one or two copies of blue balancer chromosomes. Therefore, non-stained white embryos are homozygous for the desired lethal allele.
5. Immunostaining of Embryos with Anti-Fasciclin II Antibodies (Day 2-3)
- Collect and transfer the embryos of the desired genotype (i.e., non-stained white embryos) to a 0.5 mL microtube using a 1 mL pipette tip.
NOTE: In this step, the embryos can be roughly staged according to morphological criteria, including the segmentation patterns of the cuticle and the structures of the head and tail. During head involution, between 10 and 16 h after the eggs are laid, the embryo undergoes a pronounced reduction of the anterior segment. - Wash the embryos once with 0.4 mL of PBT solution and add 0.3 mL of blocking solution (5% normal goat serum and 5% DMSO in PBT solution).
- Block the embryos with nutation at RT for 15 min.
- Add 75 µL of anti-Fasciclin II antibody and incubate the tube with nutation at RT overnight.
- Wash the embryos 4 times with 0.4 mL of PBT solution for at least 20 min per wash.
- Add 0.3 mL of blocking solution (5% normal goat serum in PBT solution) containing goat anti-mouse-horseradish peroxidase (anti-mouse-HRP) antibody (2 µg/mL) and incubate the tube with nutation at RT overnight.
- Wash the embryos 6 times with 0.4 mL of PBT solution for at least 20 min per wash.
- Add 0.3 mL of DAB solution to the tube.
CAUTION: Wear gloves and place all DAB wastes/tubes/tips into bleach. - Add 2 µL of 3% hydrogen peroxide and incubate the tube in the dark with nutation at RT until the desired amount of precipitate is produced.
NOTE: The incubation time for 1D4 immunohistochemistry in general ranges from 0.5-1 h. - Wash the embryos 4 times with 0.4 mL of PBT solution.
CAUTION: Remove the DAB solution and the first two washes with a pipette and discard them in bleach. - Add 0.2 mL of mounting 70% glycerol/PBS solution to the tube and store at RT or 4 °C.
NOTE: Keep the tube away from light. Clearer preparations can be obtained by placing the embryos in a 90% glycerol/PBS solution. However, it is more difficult to dissect embryos cleared in 90% glycerol/PBS solution than those cleared in 70% glycerol/PBS solution.
6. Staging, Dissecting, Mounting, and Imaging the Embryos (Day 4)
- For staging, transfer the embryos equilibrated with 70% glycerol/PBS onto a glass slide.
- Collect late-stage-16 embryos that have abdominal segment 7 (A7), A8, and A9 intersegmental nerve (ISN) nerves converging to touch each other or/and have midgut that is subdivided into three bands.
NOTE: Embryos stained with 1D4 antibody can be staged based on the projection patterns of ISN and ISNb motor axons. After exiting the central nervous system (CNS), A7, A8, and A9 ISN nerves of late stage-16 embryos converge to touch each other and subsequently diverge to extend far out to the dorsal muscles (arrowhead in Figure 1A). In mid-stage-16 embryos, however, A7 ISN nerves extend in parallel with A8/A9 nerves (square bracket in Figure 1B). In addition, the projection axes of A6 ISNb nerves (perpendicular to the ventrolateral muscles) in both hemisegments are roughly aligned with the posterior end of the CNS longitudinal axon fascicles (arrows and a line in Figure 1C). These morphological criteria vary between different genotypes. Alternatively, embryos can be staged based on gut morphology. Prior to stage 17, the midgut has a heart-like shape, whereas the midgut is subdivided into three bands by stage 17. - Dissect the embryos.
- Using a 1 mL syringe, move each embryo out of the glycerol drop and place the embryo ventral-face up. Cut off the anterior part at 1/4 of the body length and the most posterior region that is free of motor axons.
- Using a needle probe, move the end-cut embryo out of the glycerol drop, roll it to orient it dorsal-side up, and place it horizontally in the field.
NOTE: When the embryo is moved out of the glycerol drop, a little bit of glycerol associated with the embryo makes it sticky. - Cut the embryo along the dorsal midline using a single very fine tungsten needle. Make a small cut at the posterior end of the embryo and then continue to cut down the dorsal midline toward the anterior; cutting in the opposite direction is also fine.
- Using a needle probe, move the midline-cut embryo into the glycerol drop, place it dorsal-side up, and detach the gut from the body wall by unfolding each body wall in a ventrolateral (diagonal) direction (2.5X objective).
NOTE: Make sure that the dorsal midline is fully cut, resulting in the complete separation between the left and right body walls. - Carefully move the midline-cut embryo out of the glycerol drop and then lay two flaps of the body wall down on the glass slide using a fine needle probe (2.5X objective).
- Using a very fine tungsten needle, remove the internal organs from the dissected embryo by pushing them laterally (5X objective).
NOTE: A more detailed description of another similar dissection procedure can be found on the website.
- For mounting, add 2-3 µL of 70% glycerol/PBS solution to clean, dissected embryos and, using a fine needle probe, transfer them to a new glass slide onto which 8 µL of 70% glycerol/PBS solution has been spread in the center (2.5X objective).
- Put on a coverslip (18 mm x 18 mm). Seal the edges of the coverslip with regular nail polish (either clear or colored is fine).
- Capture images at high resolution (20X, 40X, and 63X oil-immersion objectives) under a differential interference contrast (DIC) light microscope, according to the manufacturer's instructions.
NOTE: Better visualization and phenotypic characterization, especially for ISNb motor axons, can be produced by using a 63X oil-immersion objective.
Access restricted. Please log in or start a trial to view this content.
Results
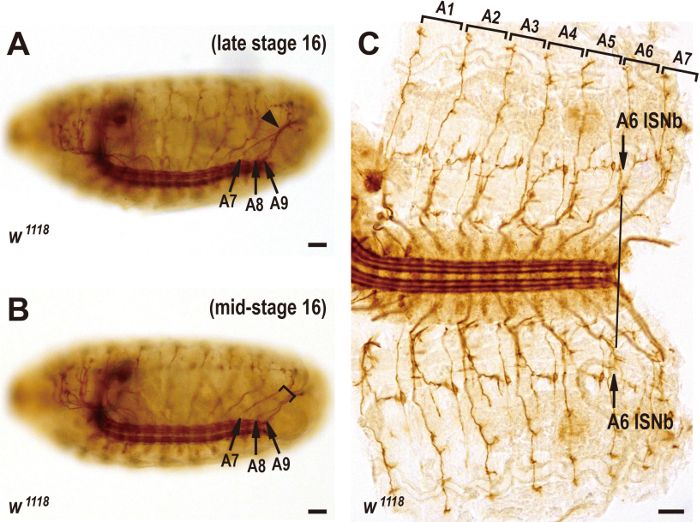
Figure 1: Staging of embryos based on the projection patterns of ISN and ISNb motor axons. (A)...
Access restricted. Please log in or start a trial to view this content.
Materials
| Name | Company | Catalog Number | Comments |
|---|---|---|---|
| Bovine serum albumin | Sigma-Aldrich | A7906 | |
| Triton X-100 | Sigma-Aldrich | X100 | t-Octylphenoxypolyethoxyethanol |
| 16% Paraformaldehyde solution | Ted Pella | 18505 | |
| Sodium chloride | Sigma-Aldrich | S5886 | |
| Potassium chloride | Sigma-Aldrich | P5405 | |
| Sodium phosphate dibasic | Sigma-Aldrich | 30435 | |
| Sodium phosphate monobasic | Sigma-Aldrich | 71500 | |
| X-Gal Substrate | US Biological | X1000 | X-Gal (5-Bromo-4-chloro-3-indolyl-b-D-galactoside galactopyranoside) |
| Dimethyl sulfoxide | Sigma-Aldrich | D4540 | |
| Magnesium chloride | Sigma-Aldrich | M8266 | |
| Potassium hexacyanoferrate(II) trihydrate | Sigma-Aldrich | P9387 | |
| Potassium hexacyanoferrate(III) | Sigma-Aldrich | 244023 | |
| Hydrogen peroxide | Sigma-Aldrich | 216763 | |
| 3,3'-diaminobenzidine tetrahydrochloride | Sigma-Aldrich | D5905 | |
| Agar | US Biological | A0930 | |
| Sucrose | Fisher Scientific | S5-3 | |
| Tegosept (Methy 4-Hydroxybenzoate) | Sigma-Aldrich | H5501 | |
| Culture dish (60 mm) | Corning | 430166 | |
| Tricon beaker | Simport | B700-100 | This is used to make a plastic beaker cage for embryo collection. |
| Yeast | Societe Industrielle Lesaffre | Saf Instant Yeast Red | |
| Cotton swab (Wooden single tip cotton PK100) | VWR | 14220-263 | |
| Eppendorf tube (1.5 ml) | Sarstedt | #72.690 | |
| Bleach | The Clorox Company | Clorox | |
| Heptane | Sigma-Aldrich | 246654 | |
| Methanol | J.T. Baker | UN1230 | |
| Normal goat serum | Life Technologies | 16210-064 | |
| Anti-FasciculinII antibody | Developmental Studies Hybridoma Bank | 1D4 anti-Fasciclin II | |
| Goat anti-mouse-HRP antibody | Jackson Immunoresearch | 115-006-068 | AffiniPure F(ab')2 fragment goat anti-mouse IgG+IgM (H+L)(min X Hu, Bov, Hrs Sr Prot |
| Glycerol | Sigma-Aldrich | G9012 | |
| Slide glass | Duran Group | 235501403 | |
| Coverslip | Duran Group | 235503104 | 18 x 18 mm |
| 1 ml Syringe | Becton Dickinson Medical(s) | 301321 | |
| Tungsten needle | Ted Pella | #27-11 | Tungsten Wire, ø0.13mm/6.1m (ø.005"/20 ft.) |
| Nutator (Mini twister) | Korean Science | KO.VS-96TWS | Alternatively, BD clay adams brand nutator (BD 421125) |
