This video demonstrates the in vivo imaging of cerebellar neurons in transgenic zebrafish larvae, which express fluorescent proteins in Purkinje neurons. The process involves anesthetizing the larvae, immobilizing them in agarose, and carefully removing the pigmented skin to enhance light penetration and fluorescence intensity. Finally, the prepared specimens are imaged under a confocal microscope to visualize the labeled neurons clearly.
A subscription to JoVE is required to view this content. Sign in or start your free trial.
Method Article
In Vivo Imaging of Zebrafish Larval Brain for Visualizing Cerebellar Neurons
926 views
⸱
June 17th, 2025
In This Article
Abstract
Protocol
All procedures involving animal models have been reviewed by the local institutional animal care committee and the JoVE veterinary review board.
- Anesthesia of larvae and preparations for embedding
- When starting the experiment for the day, transfer the animals that are needed with a plastic Pasteur pipette to a 90 mm diameter Petri dish, which is filled with either Danieau (for larvae which are still kept in a Petri dish with Danieau) or water from the fish facility (for larvae which are older than 7 days post-fertilization [dpf] and are kept in the fish facility).
- When pipetting fish older than 2 weeks, make sure the opening of the pipette is large enough to avoid injuring the fish when transferring them. Do not use a net because it will physically damage the fish, especially the younger larvae.
- Add rotifera or artemia nauplii suited for the size of the larvae kept in the Petri dish to ensure free access to food and maximum health status of the larvae and reduce stress.
- For embedding, transfer the selected larvae to a 35 mm diameter Petri dish filled with artificial cerebrospinal fluid (ACSF). Add the necessary volume of d-Tubocurarine to reach a working concentration/effective dose of 10 µM and wait for a few minutes until the larvae are completely immobilized.
NOTE: When the fish grow older or if a faster full anesthesia is needed (under 5 min), it is possible to increase the concentration of d-Tubocurarine (LD50 for mice is 0.13 mg/kg intravenously). It is also possible to use a different anesthetic, such as α-bungarotoxin (working concentration: 1 mg/mL), which has the same effect as curare and also keeps the brain fully active. If a fully active brain is not necessary for the subject of interest, Tricaine in a non-lethal dose (0.02%) is also an option to fully anesthetize the larvae. However, Tricaine blocks sodium channels, thereby impairing brain activity. - Prepare the mounting chamber by taking the lid of the 35 mm diameter Petri dish, flip the lid upside down, and place a square glass coverslip (24 x 24 mm) on the bottom of the lid. See Figure 1 (upper part) for a schematic description of these steps. The smoother surface of the glass prevents slipping away of the agarose block, which contains the larvae during the skull opening procedure.
- Aliquot the amount of ACSF needed for the day in an appropriate vial (e.g., 50 mL tube, beaker, Schott bottle, etc.) and oxygenate it with carbogen (5% CO2, 95% O2). If imaging only morphology (e.g., fluorescence patterns) ACSF is still necessary to ensure the integrity of the brain and that cells are not negatively influenced by osmolarity effects but oxygenation of the ACSF is not needed. This step only needs to be performed when full brain activity is necessary for imaging.
NOTE: For optimal oxygen saturation of the medium, add an air stone to the end of the carbogen tube. To guarantee a sufficiently high oxygen level, it is necessary to exchange the ACSF in the imaging chambers with freshly oxygenated ACSF every 20-60 min, depending on the number and age of larvae embedded in the same imaging chamber (e.g., for a single embedded larva ACSF exchange every hour is sufficient. For six larvae older than 14 dpf embedded in parallel, exchanging ACSF every 20 min is necessary) so plan the necessary amount of oxygen saturated ACSF according to the planned experiment.
- When starting the experiment for the day, transfer the animals that are needed with a plastic Pasteur pipette to a 90 mm diameter Petri dish, which is filled with either Danieau (for larvae which are still kept in a Petri dish with Danieau) or water from the fish facility (for larvae which are older than 7 days post-fertilization [dpf] and are kept in the fish facility).
- Embedding of the larvae
- Transfer the fully anesthetized larvae with a plastic Pasteur pipette to the (in step 1.4) prepared mounting chamber. Then, carefully remove the excess medium to avoid dilution of the low melting (LM) agarose. All the following steps should be performed under a stereo microscope with sufficient magnification.
NOTE: Tilting the mounting chamber can help to fully remove the medium. - Proceed immediately to the next step, by adding a sufficiently large LM-agarose drop on top of the larvae (circa 1 mL, depending on the size of the larvae) to protect the animals from drying out and to reduce unnecessary stress.
- Orient the larvae in position before the agarose solidifies. Ensure that the dorsal part of the larvae is directed upward. Also, make sure to embed the larvae as close to the surface of the agarose as possible.
NOTE: Depending on the size and number of larvae planned to embed at the same time, it is possible to adjust the agarose concentration. For example, for 1-3 larvae that are 30 dpf old, a concentration of 1.8%-2% LM-agarose is recommended. For 1-4 larvae that are 7 dpf old, it is most practicable to use 2.5% LM-agarose, whereas for 5-8 larvae, 2% is more suited. If a fully active brain is required, embedding only three fish at the same time is recommended to reduce the time needed to operate the larvae. In general, it is recommended to use lower concentrations (1.8%-2%) the older the larvae get, or the more larvae are planned to be embedded at the same time. - If images are recorded using an inverted microscope, trim the agarose block containing the larvae into a small cuboid shape. This is important for transferring the larvae to the imaging chamber later on. If using an upright microscope, such trimming is not necessary, because the mounting chamber can also be used as the imaging chamber. In Figure 1 (upper part), one can find a schematic description of these steps.
- Transfer the fully anesthetized larvae with a plastic Pasteur pipette to the (in step 1.4) prepared mounting chamber. Then, carefully remove the excess medium to avoid dilution of the low melting (LM) agarose. All the following steps should be performed under a stereo microscope with sufficient magnification.
- Exposing the brain
NOTE: All the following steps should be performed with greatest care to not unnecessarily injure the larvae. If a fully active brain is required for the experiment, keep in mind that with every second that passes, while the fish is still fully mounted in agarose and has an open skull without oxygenated ACSF, the brain will suffer from a lack of oxygen and dry out. The effects of oxygen deficiency will become even more dramatic the older the embedded larvae are. Therefore, it is important to perform the surgery not only within the shortest time possible, but also with maximum precision to avoid mechanical brain damage with the needle. Steps 3.2-3.4 should not take more than 30 s per fish when trained. - Begin the surgery as soon as the agarose has solidified. First, trim away all of the excess agarose above the brain region of interest to obtain free access to the head and a clear working space. If the dorsal part of the head is already sticking out of the agarose, skip this step.
- Depending on the region of interest, pick a spot to begin with the surgery. Take the glass needle and make a small incision through the skin without penetrating too deeply into the tissue. This will be the starting point for peeling away the overlaying skin.
NOTE: For optimal results, never start directly above the region of interest to reduce the risk of damaging important structures. If necessary, it is possible to start posterior to the hindbrain and work forward until the unwanted area of skin is peeled away. - Continue with very small cuts along the part of the skin, aiming to remove by barely moving the needle just underneath the surface. Most of the time it is not necessary to move completely around the brain and to cut out a circle-like piece of skin and skull, but rather just make two incisions along the head and then push the skin away to one or the other side. Figure 2 shows a schematic representation of the optimal cutting strategy to obtain free access to the cerebellum.
NOTE: This microsurgery is a delicate procedure, and it will most likely need some training to remove the skin perfectly without damaging the underlying brain. It is also recommended to find the optimal cutting strategy for the brain region of interest and stick with it for the duration of the experiment. - Immediately after removing the skin from all embedded larvae, pour (oxygenated) ACSF over the agarose to flood away unwanted skin particles and blood, keep the brain fully active, and protect it from drying out.
NOTE: If a healthy brain is needed for the experiment, it is recommended to go for a maximum of three fish at a time. - If using an upright microscope, start directly with imaging.
- When using an inverted microscope, slide a small spatula underneath the cuboid agarose block (step 2.4).
- Add a small drop of LM-agarose to the bottom of the imaging chamber (e.g., glass-bottom dish) and immediately flip the agarose block containing the larvae with the spatula for 180° and gently push it to the bottom of the imaging chamber, while the liquid agarose drop acts as glue.
- When the agarose has solidified, fill the imaging chamber with (oxygenated) ACSF, then begin imaging. See Figure 1 (lower part) for a schematic description.
- When full brain activity is required for the experiment, always ensure that the ACSF in the imaging chamber has a sufficiently high oxygen level. To ensure this, the medium should be exchanged carefully with freshly oxygenated ACSF every 20-60 min (depending on the number and size of the fish, the size and surface of the imaging chamber, and the imaging duration).
Access restricted. Please log in or start a trial to view this content.
Results
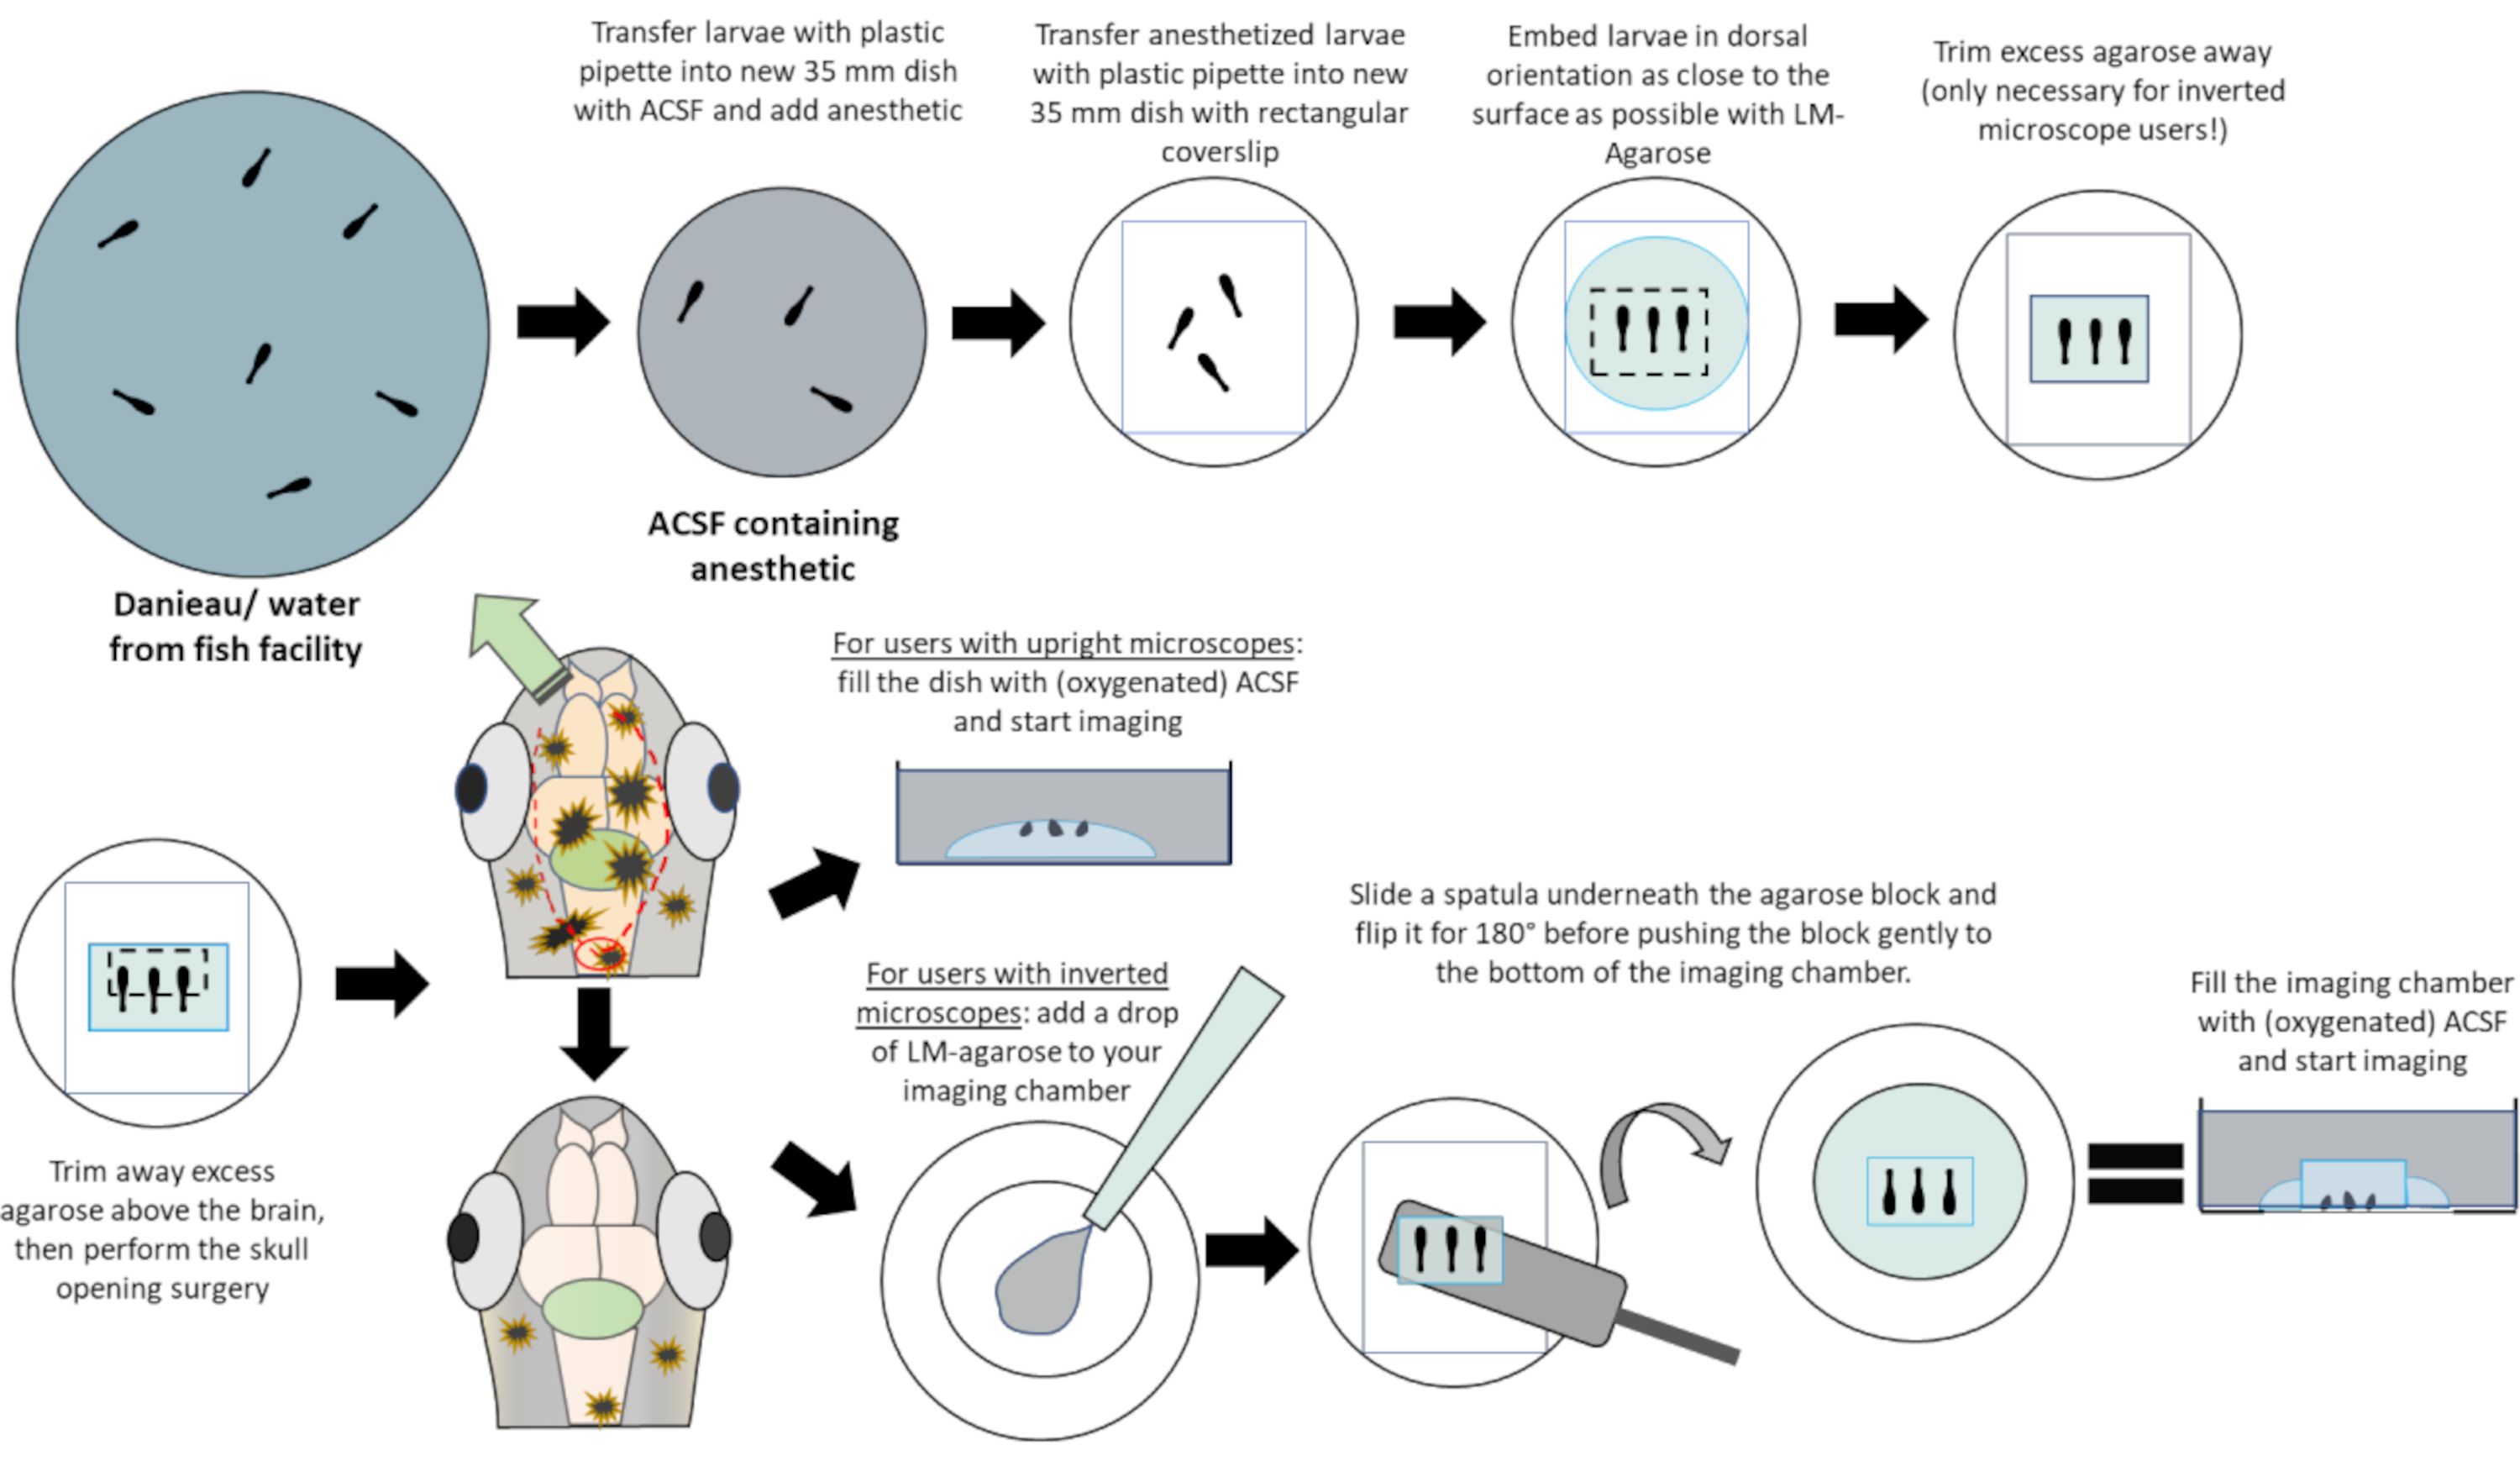
Figure 1: Schematic procedure for the preparation of open skull zebrafish for in...
Access restricted. Please log in or start a trial to view this content.
Materials
| Name | Company | Catalog Number | Comments |
|---|---|---|---|
| Confocal Laser scanning microscope | Leica | TCS SP8 | |
| d-Tubocurare | Sigma-Aldrich | T2379-100MG | |
| Glass Capillary type 1 | WPI | 1B150F-4 | |
| Glass Capillary type 2 | Harvard Apparatus | GC100F-10 | |
| Glass Coverslip | deltalab | D102424 | |
| Imaging chamber | Ibidi | 81156 | |
| LM-Agarose | Condalab | 8050.55 | |
| Microscope Camera | Leica | DFC9000 GTC | |
| Needle-Puller type 1 | NARISHIGE | Model PC-10 | |
| Needle-Puller type 2 | Sutter Instruments | Model P-2000 | |
| Pasteur-Pipettes 3ml | A.Hartenstein | 20170718 | |
| Tricain | Sigma-Aldrich | E10521-50G | |
| 35 mm petri dish | Sarstedt | 833900 | |
| 90 mm petri dish | Sarstedt | 821473001 |
