This video demonstrates the quantification of brain glucose metabolism using positron emission tomography (PET). The participant is infused with the tracer F-18 fluorodeoxyglucose (FDG) during scanning. FDG accumulates in active neurons and emits positrons upon F-18 decay. These positrons interact with electrons, producing photons detected by the PET scanner to create high-resolution brain activity maps.
A subscription to JoVE is required to view this content. Sign in or start your free trial.
Method Article
Positron Emission Tomography Imaging of the Human Brain Using a Radiotracer
998 views
⸱
June 17th, 2025
In This Article
Abstract
Protocol
All procedures involving human participants have been performed in compliance with the institutional, national, and international guidelines for human welfare and have been reviewed by the local institutional review board.
1. Required equipment and personnel
- See the Table of Materials for the scanner room, radiochemistry lab, and general materials. A commercial supplier was used for the radiotracer.
- In the simultaneous Magnetic Resonance Imaging - Positron Emission Tomography (MRI-PET) environment, use four personnel: a radiographer (RG) to run the scan, a nuclear medicine technologist (NMT) to oversee the administration of the radiotracer and acquisition of blood samples, a laboratory assistant (LA) to spin blood, and a research assistant (RA) responsible to oversee the experimental design and stimulus presentation.
2. Preparation
- Tracer dose preparation by the NMT
- Calculate the infusion volume that will be administered over the course of the scan. In this protocol, the rate of infusion is 0.01 mL/s over 95 min. So, in a 95 min scan, participants receive 0.01 mL/s x 60 s x 95 min = 57 mL.
- Calculate the tracer dose that will be diluted into the administered saline solution. In this protocol, a total dose of 260 MBq is administered to the participant over 95 min. This dose was chosen to limit radiation exposure to 4.9 mSv, to keep within the 'low-level risk' categorization according to Australian Radiation Protection and Nuclear Safety Agency (ARPANSA) guidelines for exposure of humans to ionizing radiation. Decay correct 260 MBq from the mid-infusion point (47.5 min) back to T0. Using Equation 1, solve for A0
 Where At is the radioactivity (MBq) at the mid-timepoint of the infusion, A0 is the initial radioactivity, and λ is the radioactive decay constant specific to the tracer. For FDG, the value of is λ ≈ 0.693/T1/2. T1/2 is the half-life of 18F (110 min).
NOTE: In this example, At = 260 MBq, λ = 0.693/110, and t = -47.5, so A0 = 350.942 MBq. - Calculate the required radiotracer dose for the 100 mL saline bag that will be used to administer the dose to the participant. The required radiotracer for the saline bag is diluted up to a total volume of 5 mL and drawn up in a 5 mL syringe. Therefore, for the 100 mL saline bag, the dilution factor is the volume of saline (100 mL) in addition to the 5 mL volume of the syringe with radiotracer. This total volume of 105 mL is divided by the infusion volume of 57 mL (i.e., 105 mL/57 mL = 1.842). So, the total radioactivity in a volume of 5 mL required for addition to the 100 mL bag is A0 x the dilution factor (i.e., 350.942 MBq x 1.842 = 646.44 MBq). Aseptically add the radiotracer to the saline bag.
NOTE: It is important to note that the calculated activity of 646.44 MBq that is added to the saline bag is the activity required at the commencement of the infusion. Generally, the doses for this protocol are prepared between 15 minutes to 1 hour before administration. Therefore, it is important to factor in the decay of the radioisotope. Equation 1 in 2.1.2. can be used to account for this, where time (t) is the total number of minutes from the preparation of the dose to when the activity will be administered, At = 646.44 MBq, by solving for A0. - Prepare the priming dose. Withdraw 20 mL from the bag into a syringe and cap it. Calibrate this 20 mL syringe and label. The syringe is calibrated as a reference check to ensure that the radioactivity is evenly dispersed within the saline bag.
- Prepare the dose. Using a 50 mL syringe, withdraw 60 mL from the bag and cap it with a red Combi stopper. This syringe is not calibrated, as the concentration of the radioactivity is known from the time it was added to the saline bag (step 2.1.3). Store both syringes in the radiochemistry lab until ready to scan.
NOTE: It is possible to draw a 60 mL volume in a 50 mL syringe because Terumo syringes are marked to 20% above the labeled volume (i.e., a 50 mL syringe is marked to 60 mL). - Prepare the reference dose. Fill a 500 mL volumetric flask with approximately 480 mL of distilled water. Draw up 10 MBq of 18F fluorodeoxyglucose (18F-FDG) into a syringe, decay-corrected to the scan start time (using Equation 1), and add it to the flask. Top the volume up to the 500 mL mark with more distilled water and mix thoroughly. Affix labels pre- and post-calibration for the syringe.
- Scanner room preparation by the NMT
- Once the participant is positioned in the scanner, there is very little room to manipulate or salvage the line for infusion or blood samples if blockage occurs. Prepare the scanner room to minimize the chance of line blockage.
- Ensure that all blood-collection equipment is within easy reach of the collection site. Place underpads at the end of the cannula and on any surface that will hold blood containers. Place bins for regular waste and biohazardous waste within easy reach of the blood collection site.
- Infusion pump preparation by the NMT
- Set up the infusion pump in the scanner room on the side that will be connected to the participant. Build lead bricks around the base of the pump and place the lead shield in front of the pump. Connect the tubing for the infusion pump that delivers the infusion to the participant and ensure the correct infusion rate has been entered. For this protocol, the rate is 0.01 mL/s.
- Prime the tubing before it is connected to the participant's cannula. Connect the 20 mL priming dose to the infusion pump. On the end of the tubing that will be connected to the participant, attach a three-way tap and an empty 20 mL syringe. Ensure that the tap is positioned to allow the 18F-FDG solution to flow from the priming dose through the tubing and collect only into the empty syringe.
- Pre-set the infusion pump to prime a volume of 15 mL. Select the Prime button on the pump and follow the prompts to prime the line.
- Attach the 50 mL dose syringe to the infusion pump in place of the priming dose. The 15 mL primed dose on the three-way tap can remain there until the participant is ready to be connected to the pump.
- Participant preparation by the NMT, RA, and RG
- Advise participants to fast for 6 h, and to consume only water (approximately two glasses), prior to the scan.
- Have the RA conduct the consent procedures and acquire additional measures (e.g., demographic surveys, cognitive batteries, etc.). Have the NMT and RG conduct the safety screens, the NMT review safety for PET scanning (e.g., exclusion for pregnancy, diabetes, chemotherapy or radiotherapy in the previous 8 weeks, and known allergies), and the RG review participant safety for MRI scanning (e.g., exclusion for pregnancy, medical or non-medical metallic implants, non-removable dental implants, claustrophobia).
- Cannulate the participant.
- Use two cannulas: one for dose administration and the other for blood sampling. The most appropriate cannula varies across participants, but the most suitable vein should be reserved for blood collection. A 22 G cannula is the preferred minimum size. Collect a 10 mL baseline blood sample while cannulating. Disconnect all saline flushes under pressure to maintain the patency of the line.
- Test the participant's blood sugar level and other baseline blood measures (e.g., hemoglobin) from the baseline sample.
- Participant positioning in the scanner by the RG and NMT
- Have the RG position the participant in the scanner bore. For long scans, it is imperative to ensure comfort in order to reduce the risk of the participant dropping out and motion artifacts due to discomfort. The participant should be covered with a disposable blanket to maintain a comfortable body temperature.
- Have the NMT flush the cannula to ensure it is patent and has minimal resistance before connecting the infusion line. Once connected, the tubing can be lightly taped near the wrist. Instruct the participant to keep their arm straightened. Use supports such as foam or cushions for comfort. Have the NMT also check the cannula that will be used for plasma samples to ensure that it is able to withdraw blood with minimal resistance. It may be necessary to connect an extension tube primed with normal saline to make the cannula more accessible while the participant is in the scanner. If this is required, it should be checked for leakages.
- Once the subject is in the scanner bore, have the NMT check that they have suitable access to both cannulas.
- Have the NMT notify the RG and RA if there are any issues with the blood collection cannula, infusion cannula, or infusion pump (e.g., occlusion, battery, extravasation) at any time during the scan.
3. Scan the participant
- Starting the scan with the NMT, RG, and RA
- At the start of the scan, situate the NMT in the scanner room to monitor the infusion equipment. Ensure the NMT is wearing hearing protection and using the barrier shield to minimize radiation exposure from the dose, where possible.
- As the RG performs the localizer scan to ensure that the participant is in the correct position, check the details for the PET acquisition (e.g., scan duration, list-mode data collection, correct isotope).
- Design the protocol so that the PET acquisition will commence with the first MRI sequence. The RG prepares and starts the MRI sequence. The start time of the 95 min PET acquisition is time-locked to the start of the MRI sequence. If required, the NMT should deliver the bolus at the time of PET acquisition (Figure 1).
- Start the infusion pump. The RG should signal the NMT (e.g., via a thumbs-up sign) to start the pump 30 s after the start of the PET acquisition. This protocol starts the infusion pump 30 s after the scan start time to provide a safety buffer in case of scan failure. This also ensures that the first image taken during the PET scan indexes the brain prior to radiotracer administration for complete time activity curve data collection. Have the NMT observe the pump to ensure it has started to infuse the 18F-FDG and that there is no immediate occlusion of the line.
- Have the RA initiate any external stimulus at the agreed-upon time (i.e., at the start of a functional run/experimental block) and calculate the times for blood samples. Have the RA calculate the predicted time of each blood sample and provide copies to the NMT and lab assistant (LA). Have the RA ensure that the NMT takes the blood samples at approximately the correct time and monitors equipment (e.g., infusion pump, stimulus) for any signs of errors.
Access restricted. Please log in or start a trial to view this content.
Results
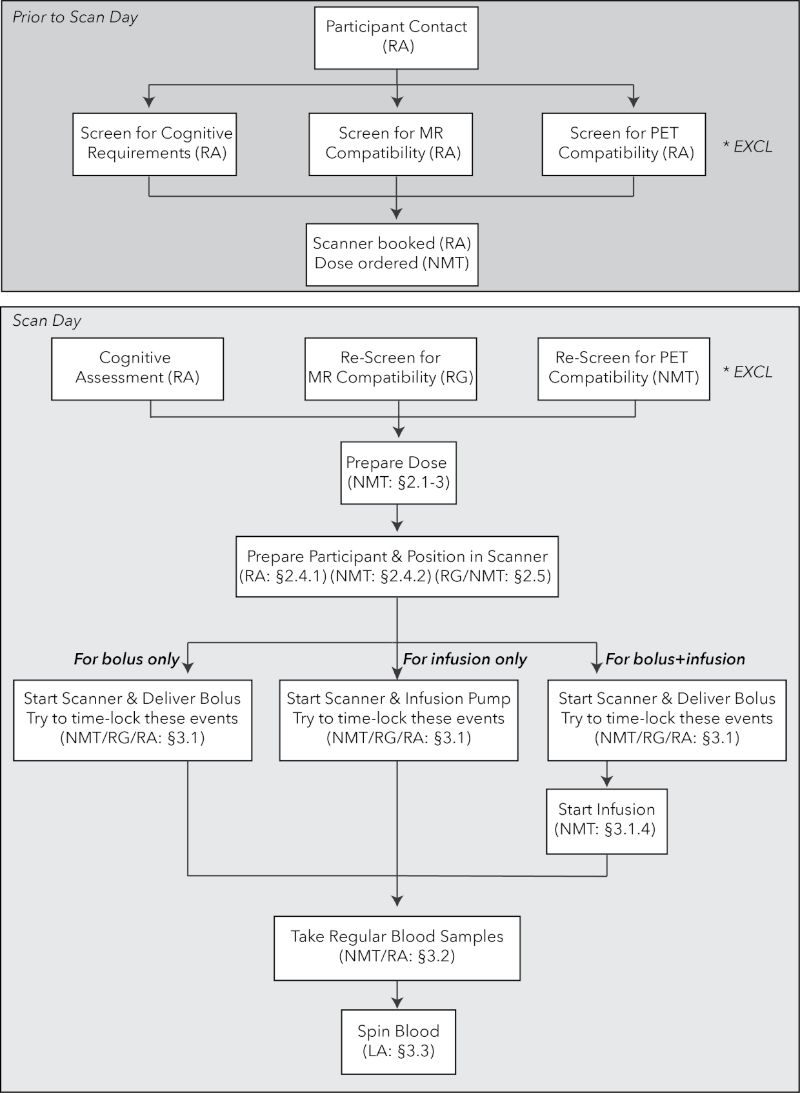
Figure 1: Flowchart of procedures for FDG-fPET experiments. Top: procedures for prescreening...
Access restricted. Please log in or start a trial to view this content.
Materials
| Name | Company | Catalog Number | Comments |
|---|---|---|---|
| Blood Collection Equipment | |||
| --12-15 vacutainers | Becton Dickinson, NJ USA | 364880 | Remain in sterile packaging until required to put blood in tube |
| --12-15 10mL LH blood collecting tubes | Becton Dickinson | 367526 | Marked with the sample number (e.g., S1, S2…) and subsequently marked with the sample time (e.g., time 0 + x min [T0+x]) |
| --2-15 10mL Terumo syringe | Terumo Tokyo, Japan | SS+10L | These are drawn up on the day of the study and capped with the ampoule that contained the saline |
| -- pre-drawn 0.9% saline flushes | Pfizer, NY, USA | 61039117 | |
| --12-15 5mL Terumo syringes | Terumo Tokyo, Japan | SS+05S | Remain in sterile packaging until ready to withdraw a blood sample |
| Safety & Waste Equipment | All objects arranged on a plastic chair inside the scanner room on the same side as the arm from which the blood samples will be taken. Biohazard and non-biohazard waste bags to be used. Gloves and waste bags to be easily accessible when preparing the radioactivity in the dispensing area and when pipetting the plasma samples. Biohazard and non-biohazard waste bags to be used. All waste generated is checked with the Geiger counter to ensure that radioactive contaminated waste is stored until it is safe to be disposed of according to Australian Radiation Protection and Nuclear Safety Agency (APRANSA) guidelines for Radiation protection series No.6 (2017). | ||
| -- Gloves | Westlab, VIC, Australia | 663-219 | |
| -- waste bags | Austar Packaging, VIC, Australia | YIW6090 | |
| --cello underpads ‘blueys’ Underpads 5 Ply | Halyard Health, NSW, Australia | 2765A | |
| --Blue Sharpie pen | Sharpie, TN, USA | S30063 | |
| Dose Syringes | Remain in sterile packaging until ready for use. All syringes used in this facility have an additional 20% volume capacity above the stated volume on the packaging. This is important for the 50mL syringe where the total capacity of 60mL is used | ||
| --5mL | Terumo Tokyo, Japan | SS+05S | |
| -- 20mL | Terumo Tokyo, Japan | SS+20L | |
| --50mL | Terumo Tokyo, Japan | SS*50LE | |
| --1 Terumo 18-gauge needle | Terumo Tokyo, Japan | NN+1838R | Remain in sterile packaging until ready to inject [18F]FDG into the saline bag |
| --100mL 0.9% saline bag | Baxter Pharmaceutical, IL, USA | AHB1307 | Remain in sterile packaging until ready to inject [18F]FDG |
| Radiochemistry Lab Supplies | |||
| --Heraeus Megafuge 16 centrifuge; Rotor Bioshield 720 | ThermoScientific MA, USA | 75004230 | Relative Centrifugal Force = 724 Our settings are 2000RPM for 5mins. Acceleration and deceleration curves set to 8 |
| --Single well counter | Laboratory Technologies, Inc. IL, USA | 630-365-1000 | Complete daily quality control (includes background count) and protocol set to 18F and 4mins. Cross calibration is performed between the well counter, dose calibrator and scanner on a bi-monthly basis. |
| --Pipette | ISG Xacto, Vienna, Austria | LI10434 | We use a 100-1000 μL set to 1000μL. It is calibrated annually. |
| --12-15 plasma counting tubes | Techno PLAS; SA Australia | P10316SU | Marked in the same manner as the LH blood tubes |
| --12-15 pipette tips | Expell Capp, Denmark | 5130140-1 | |
| --3 test tube racks | Generic | Checked with a Geiger counter to ensure there is no radiation contamination on them | |
| --500mL volumetric flask and distilled water | Generic | Need approximately 500mL of distilled water to prepare the reference for gamma counting | |
| --Synchronised clocks in scanner room, console and radiochemistry lab | Generic | Synchronisation checks are routinely completed in the facility on a weekly basis | |
| --Haemoglobin Monitor | EKF Diagnostic Cardiff, UK Haemo Control. | 3000-0810-6801 | Manufacturer recommended quality control performed before testing on participant’s blood sample. |
| --Glucometre | Roche Accu-Chek | 6870252001 | Accu-Chek Performa is used to measure participant blood sugar levels in mmol/L. Quality control is performed daily using high and low concentration solution control test. |
| Cannulating Equipment | Check expiry dates and train NMT to prepare aseptically for cannulation. | ||
| --Regulation tourniquet | CBC Classic Kimetec GmBH | K5020 | |
| --20, 22 and 24 gauge cannulas | Braun, Melsungen Germany | 4251644-03; 4251628-03; 4251601-03 | |
| --tegaderm dressings | 3M, MN USA | 1624W | |
| --alcohol and chlorhexidine swabs | Reynard Health Supplies, NSW Australia | RHS408 | |
| --0.9% saline 10mL ampoules; for flushes | Pfizer, NY, USA | 61039117 | |
| --10mL syringes | Terumo Tokyo, Japan | SS+10L | |
| --3-way tap | Becton Dickinson Connecta | 394600 | |
| --IV bung | Safsite Braun PA USA | 415068 | |
| --Optional extension tube, microbore extension set | M Devices, Denmark | IV054000 | |
| Scanner Room Equipment | |||
| --Siemens Biograph 3T mMR | Siemens, Erlangen, Germany | ||
| --Portable lead barrier shield | Gammasonics | Custom-built | MR-conditional lead barrier shield. Positioned at the 2000 Gauss line with the castors locked to provide additional shielding of the radioactivity connected to the infusion pump. |
| --Infusion pump BodyGuard 323 MR-conditional infusion pump | Caesarea Medical Electronics | 300-040XP | MR-compatible. This model is cleared for use on 1.5 and 3T scanners at 2000 Gauss with castors locked. |
| --Infusion pump tubing | Caesarea Medical Electronics | 100-163X2YNKS | Tubing is administration set with an anti-siphon valve and male luer lock (REF 100-163X2YNKS). |
| --Lead bricks | Custom built | Tested for ferromagnetic translational force | |
| Other Equipment | |||
| --Syringe shields | Biodex, NY USA | Custom-built | There is a 5mL tungsten syringe shield that is MR-safe, as well as a 50mL lead shield that has been tested for ferromagnetic attraction prior to use in the MR-PET scanner. It is used to transport the radioactive dose from the radiochemistry lab into the scanner to minimise radiation exposure to the NMT. |
| --Geiger counter Model 26-1 Integrated Frisker | Ludlum Measurements, Inc. TX USA | 48-4007 | This is calibrated annually and used to monitor potential contamination and waste. It is not taken into the MR-PET scanner. |
