This video demonstrates the transplantation of a GFP-labeled donor neural tube from a stage-matched transgenic chicken embryo into a recipient embryo at the level of somites one to seven, followed by vascular labeling using a lipophilic fluorescent dye. The combined approach allows for direct visualization of the embryo under a stereofluorescence microscope, enabling the study of neural graft integration and vascular network development in ovo.
A subscription to JoVE is required to view this content. Sign in or start your free trial.
Method Article
Visualization of Neural and Vascular Networks in a Chicken Embryo
1K views
⸱
June 17th, 2025
In This Article
Abstract
Protocol
All procedures involving animal models have been reviewed by the local institutional animal care committee and the JoVE veterinary review board.
1. Graft the Tissue
- Using a glass micro-pipette, carefully transfer the dissected neural tube from the watch glass to the host embryo. Position the neural tube in the correct anterior-posterior orientation and gently push the explant adjacent to the excised region of the chick host using the micro-scalpel. Leave a small fragment of ectoderm attached to, or by cutting a small nick in, the dorsal surface to identify the orientation of the neural tube.
- If necessary, use the mi....
Access restricted. Please log in or start a trial to view this content.
Results
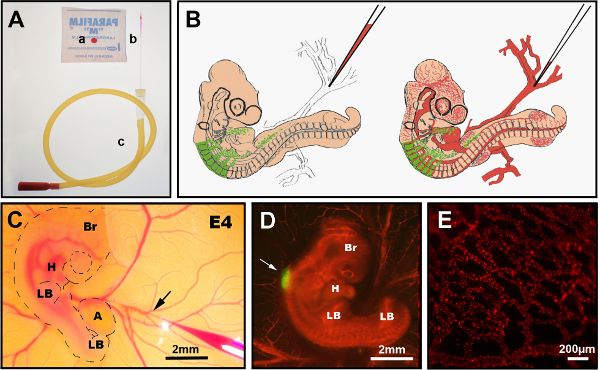
Figure 1. Intravenous DiI injection. (A) Recommended instruments: a) CellTracker CM-DiI drop on paraf.......
Access restricted. Please log in or start a trial to view this content.
Materials
| Name | Company | Catalog Number | Comments |
|---|---|---|---|
| Fertilized chick eggs | Henry Stewart and Co, Louth, UK | ||
| Fertilized GFP chick eggs | The Transgenic Chicken Facility, The Roslin Institute, The University of Edinburgh | ||
| Egg incubator (Profi-H Hatcher) | Lyon Technologies, CA, USA | 910-033 | |
| 14C Incubator | Precision Cooled Incubator, Leec Ltd., Nottingham, UK | Model LT2 | |
| Stereo-microscope | LEICA | Model MZ 12.5 | |
| Digital Camera | LEICA | DC500 | |
| Image acquisition software | LEICA | IM50 | |
| Goose neck halogen cold light source | Advanced Imaging Concepts, Inc | KL 1500 LCD | |
| Mouth tube | SIGMA - ALDRICH | A5177 | |
| Transfer pipettes, polyethylene | SIGMA - ALDRICH | Z350796 | |
| Dumont #5 forceps | Fine Science Tools | 11251-30 | |
| Minutien pins | Fine Science Tools | 26002-15 | |
| Dumont AA forceps, Inox Epoxy- coated | Fine Science Tools | 11210-10 | |
| Sellotape (clear, 24mm width) | Any Supplier | ||
| CellTracker CM-DiI | Molecular Probes | C-7001 | |
| Borosillicate glass capillaries, thinwall without filament | Harvard apparatus | PY8 30-0035 |
