This video demonstrates the imaging technique of recording fast calcium transients at nerve endings using confocal microscopy. By stimulating the nerve and capturing fluorescence changes from calcium-binding dyes, it visualizes dynamic calcium influx and clearance at the nerve ending, offering precise insights into synaptic activity and neuromuscular signaling.
A subscription to JoVE is required to view this content. Sign in or start your free trial.
Method Article
Imaging Fast Calcium Transients in Mouse Nerve Endings Using Confocal Microscopy
894 views
⸱
June 17th, 2025
In This Article
Abstract
Protocol
All procedures involving animal samples have been reviewed and approved by the appropriate animal ethical review committee.
Experiments were performed on isolated nerve-muscle preparations of levator auris longus (m. LAL) from the Mice BALB/C (20-23 g, 2-3 months old).
1. Preparation of the Ringer's and Filing solutions
- Prepare the Ringer's solution for mammalian muscle by mixing the following ingredients: sodium chloride, NaCl (137 mM), potassium chloride, KCl (5 mM), calcium chloride, CaCl2 (2 mM), MgCl2 (1 mM), NaH2PO4 (1 mM), NaHCO3 (11.9 mM), and glucose (11 mM). Bubble through the solution with 95% oxygen (O2) and 5% carbon dioxide (CO2) and adjust its pH to 7.2-7.4 by adding hydrochloric acid/ sodium hydroxide (HCl/NaOH) if necessary.
- Prepare the dye loading solution.
- Prepare (4-(2-hydroxyethyl)-1-piperazineethanesulfonic acid (HEPES) (10 mM) solution with pH in the 7.2-7.4 range. 500 µg of commercial dye comes in a 500 µL vial. Dissolve the dye in 14 µL of the HEPES solution to obtain a dye concentration of 30 mM. Shake well and centrifuge until totally dissolved.
- Dilute the solution of Ca2+ indicator with HEPES solution down to 1 mM concentration. Keep it in a freezer (-20 °C) and avoid exposure to light.
2. Dye loading procedure
NOTE: The dye loading procedure is performed according to the protocol for loading through the nerve stump, adapted from the protocols previously published.
- Dissect LAL muscle according to the dissection procedure for this preparation as described in the previously published protocols.
- Fix the tissue slightly stretched (no more than 30% from initial length) in the elastomer-coated Petri dish with fine stainless-steel pins and add Ringer's solution until the muscle is fully covered.
NOTE: The Petri dish was pre-filled with elastomer according to the manufacturer's instructions (see Table of Materials).
- Fix the tissue slightly stretched (no more than 30% from initial length) in the elastomer-coated Petri dish with fine stainless-steel pins and add Ringer's solution until the muscle is fully covered.
- Prepare the Filling Pipette
- Using a micropipette puller (see Table of Materials), prepare a micropipette with a fine tip that is as sharp as possible for the intracellular recordings. Use capillaries without internal filaments (1.5 mm in outer diameter and 0.86 or 1.10 mm in inner diameter).
- Break off the micropipette tip after scoring the taper with an abrasive, leaving the tip open to about 100 µm in diameter. Fire-polish the tip down to limit when the internal diameter shrinks from >80 µm to 12-13 µm. Attach a silicone tube to one side of the Filling Pipette and a syringe (without a needle) to the other side.
- Under a stereomicroscope, find the place where the nerve trunk turns into separate nerve branches. Place the Filling Pipette with the mounted tube and the syringe on the Petri dish using wax. Move the pipette tip until it stands above the nerve.
- With fine scissors, cut the nerve close to the muscle fiber, leaving a small piece of the nerve stump about 1 mm long. Gently aspirate the nerve stump together with some Ringer's solution, without pinching it, into the tip of the Filling Pipette. Remove the silicone tube from the Filling Pipette.
- Draw some amount of the dye-loading solution (~0.3 µL) using a syringe with a long filament. This volume corresponds to approximately 3 cm of the filament.
NOTE: Initially, it is necessary to make a filament from a pipette tip with a volume of 10 µL by pulling on the fire using an alcohol lamp or a gas burner. - Gently insert the filament tip with the loading solution into the Filling Pipette. Release the mixture directly onto the nerve stump. Incubate the preparation at room temperature in the dark for 30 min.
- After that, rinse the preparation with fresh Ringer's solution and incubate at 25 °C for up to 2 h in a glass beaker with 50 mL (or more) Ringer's solution (preparation must be covered with the solution). During this time, the dye will reach the synapses.
3. Video capture with confocal microscopy
NOTE: Registration of calcium transients is performed with a laser scanning confocal microscope (LSCM) (see Table of Materials). To register fast calcium transients, an original protocol that permitted recordings of signals with a sufficient spatial and temporal resolution was used. The microscope was equipped with a 20x water immersion objective (1.00 numerical aperture (NA)). The 488 nm laser line was attenuated to 10% intensity, and emission fluorescence was collected from 503 to 558 nm.
- Mount the preparation into the silicon elastomer-coated experimental chamber and fix it, slightly stretched, with a set of steel micro-needles. Rinse the preparation extensively with Ringer's solution.
NOTE: A simple custom-made perfusion experimental chamber made of organic glass with the bottom of the chamber covered with an elastomer (prepared in accordance with the manufacturer's instructions; see Table of Materials) was used. The chamber has a solution supply tube. The solution is pumped out via a syringe needle, mounted on a magnetic holder (see Table of Materials). As an experimental chamber, a Petri dish could be used (like the one used for incubation of the preparation), but with attached supply and suction tubes. - Install a suction electrode, which will be used to stimulate the nerve.
NOTE: Place and fix the electrode by waxing it beside the bath. Move the tip close to the nerve stump and aspirate it into the electrode. - Mount the preparation chamber onto the microscope stage and place the inlet and outlet fittings into the chamber.
- To perfuse the preparation, use a simple gravity-flow-driven system. Turn on the perfusion suction pump to remove the excess solution.
- Plug the stimulating suction electrode into an electric stimulator and ensure that muscular contractions occur after stimulation. See sections 3.9-3.12 for stimulation conditions and recording.
- Fill up the perfusion system with the Ringer's solution with d-tubocurarine (10 µM).
NOTE: This solution helps to prevent muscular contractions. D-tubocurarine or alpha-bungarotoxin-specific blockers of nicotinic acetylcholine receptors on the postsynaptic membrane would completely or partially block muscle contractions50. Also, for preventing muscular contractions, specific blockers of postsynaptic sodium channels such as µ-conotoxin GIIIB could be used51. - Switch on the perfusion suction pump and start perfusion of the preparation with the Ringer's solution containing d-tubocurarine.
- Set imaging parameters in the LSCM software as follows.
- In the LSCM software (LAS AF; see Table of Materials), choose Electrophysiology.
NOTE: In this mode, when an image is captured at the time point, a synchronizing pulse is sent to the stimulator with the help of the trigger box. This elicits action potential generation in the preparation (Figure 1; stimulator unit). - Select Acquisition Mode. For triggering the stimulator using the microscope sync pulse, in the Job menu settings, select the Trigger settings. Set the Trigger Out On Frame field to the out1 channel.
- Use the following settings: Scanning Mode: XYT, Frequency of Scanning: 1400 Hz, Zoom Factor: 6.1, Pinhole: fully open. Ensure that sequential trans-passing Bidirectional X mode is on.
- Set minimum time to form a frame at 52 ms and frames to be collected in a raw video at 20 frames.
NOTE: These settings permit image capturing with a resolution of 128 x 128 pixels while taking a single frame every 52 ms. - Set excitation wavelength of the argon laser at 488 nm with 8% of output power.
- In the LSCM software (LAS AF; see Table of Materials), choose Electrophysiology.
Press the Live Mode button to switch to Live mode, which helps to get a preview of nerve terminals loaded with the dye.
- Stimulation unit
NOTE: This device allows for setting temporal parameters of stimulation via the MATLAB software.- Create a new file, paste the code from the above-mentioned article to the MatLab code window, and save the file. Click on Run, so a window with stimulation parameters appears. Set the delay time and duration of the stimulus.
NOTE: The delay determines the temporal resolution of the reconstituted fluorescent signal. The electric pulse of 0.2 ms duration is delayed and then sent to the isolation unit. The latter forms the amplitude and polarity of the stimulating pulse and electrically isolates the biological object from the recording equipment. - To stimulate the nerve, select supramaximal amplitude of the stimulating impulse (25%-50% greater than the maximum stimulation intensity necessary to activate all the nerve fibers).
NOTE: The presented method is based on a special algorithm for recording single fast fluorescent signals using LSCM with minimized sweep. At each step of the developed algorithm, the recorded fluorescent signal is shifted from the previous one by a time interval that is shorter than the microscope sweep. The value of time shifts determines the temporal resolution of the required signal. The number of steps (shifts) in the algorithm depends on the required temporal resolution and the original temporal resolution. With this method of registration, the stimulation of the preparation is carried out with a frequency of 0.25 Hz.
- Create a new file, paste the code from the above-mentioned article to the MatLab code window, and save the file. Click on Run, so a window with stimulation parameters appears. Set the delay time and duration of the stimulus.
- In the Live mode, search for the ROI and obtain the best focus. Run the data acquisition software.
- Shift the delay on the stimulator by 2 ms less relative to the previous value and run the data acquisition software.
- Repeat step 3.11 26 times to acquire 26 sequences, with each sequence shifted by 2 ms from the previous one.
Access restricted. Please log in or start a trial to view this content.
Results
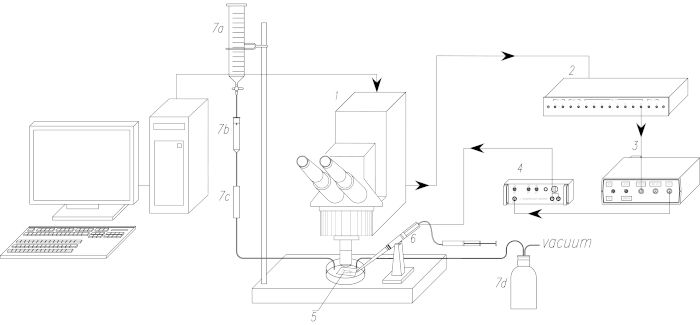
Figure 1: The schematic of the experimental setup. 1. Laser scanning confocal microscope (LSCM). 2. Synchroniz...
Access restricted. Please log in or start a trial to view this content.
Materials
| Name | Company | Catalog Number | Comments |
|---|---|---|---|
| Capillary Glass | Clark Electromedical instruments, UK | GC150-10 | |
| Confocal and multiphoton microscope system Leica TCS SP5 MP | Leica Microsystems , Heidelberg, Germany | ||
| Flaming/Brown Micropipette Puller P 97 | Sutter Instrument, USA | P-97 | |
| Flow regulator | KD Medical GmbH Hospital Products, Germany | KD REG | Disposable infusion set with Flow regulator |
| HEPES | Sigma-Aldrich, USA | H0887 | 100mL |
| Illumination system Leica CLS 150X | Leica Microsystems, Germany | ||
| Magnetic holder with suction tubing | BIOSCIENCE TOOLS, USA | MTH-S | |
| Microspin FV 2400 | Biosan, Latvia | BS-010201-AAA | |
| Minutien Pins | Fine science tools, Canada | 26002-20 | |
| Multi-spin MSC 3000 | Biosan, Latvia | BS-010205-AAN | |
| Oregon Green 488 BAPTA-1 pentapotassium salt | Molecular Probes, USA | O6806 | 500 μg |
| Pipette | Biohit, Russia | 720210 | 0.5-10 µL |
| Pipette tip | Biohit, Russia | 781349 | 10 µL |
| Plasticine | local producer | ||
| Single-use hypodermic needles | Bbraun | 100 Sterican | 0.4×40 mm |
| Spreadsheet program | Microsoft, USA | Microsoft Office Excel | |
| Stereomicroscope, Leica M80 | Leica Microsystems , Germany | ||
| Suction electrode | http://research-journal.org/biology/prostoj-vsasyvayushhij-elektrod-dlya-elektricheskoj-stimulyacii-biologicheskix-obektov/ | ||
| Sylgard 184 elastomer | Dow Corning, USA | ||
| Syringe | local producer | 0.5 mL | |
| Syringe | local producer | 60 mL |
