The video demonstrates fluorescence and Coherent Anti-Stokes Raman Spectroscopy (CARS) imaging to visualize neuronal architecture in rodent brain tissue. Nissl staining labels cell bodies by binding to ribosomal RNA, while CARS imaging targets lipid-rich myelin through laser-induced signals. Overlaying the fluorescence and CARS images provides a detailed view of cell bodies and myelinated axons.
A subscription to JoVE is required to view this content. Sign in or start your free trial.
Method Article
Coherent Anti-Stokes Raman Spectroscopy to Visualize Myelinated Neurons in Mouse Brain Tissue
622 views
⸱
June 17th, 2025
In This Article
Abstract
Protocol
All procedures involving animal samples have been reviewed and approved by the appropriate animal ethical review committee.
1. Staining
- Stain free floating sections for Nissl, to visualize cell bodies (1:100), in antibody media (AB media: 0.1 M phosphate buffer (PB: 50 mM KH2PO4, 150 mM Na2HPO4), 150 mM NaCl, 3 mM Triton-X, 1% bovine serum albumin (BSA)) for 30 min at room temperature on a standard laboratory shaker.
- Protect sections from light using aluminum foil and/or a cover. 550 nm or below wavelengths are compatible with CARS imaging (Figure 1).
NOTE: While we do not expect that Triton-X or other reagents have an impact on CARS imaging of lipids, additional controls with specific antibody media may be warranted.
- Protect sections from light using aluminum foil and/or a cover. 550 nm or below wavelengths are compatible with CARS imaging (Figure 1).
- PAUSE POINT: Store free-floating sections (while protected from light) in phosphate-buffered saline (PBS) until imaging. Once sectioned, image brain sections within 2 weeks.
2. Imaging
NOTE: The CARS laser set up contains a fiber laser that provides the 80 MHz clock, and an OPO (Optical Parametric Oscillator) laser with a tunable range of 770-990 nm with the Stokes beam fixed at 1031 nm, which are needed for collecting the CARS signal. There is one aperture for both beams.
- Before bringing samples to the microscope, turn on and warm up CARS laser for at least 1 h, align the CARS laser, and Koehler the condenser optics and the diaphragm of the microscope for forward CARS imaging.NOTE: This step is critical for proper function of CARS microscopy.
- For spatial alignment of the two laser beams (pump and stokes), access the two internal PSDs (position sensitive detectors) via the CARS laser GUI (graphical user interface).
- Achieve temporal alignment by using the delay function in the CARS laser GUI, which can help overlap the pulses of the two lasers (pump and stokes) that have different dispersions because of their different wavelengths. Therefore, both the temporal and spatial overlapping of the pump and stokes beams are done with the user input through the GUI.
- Adjust the external periscope (last two mirrors of the setup) to center the spatially overlapped two lasers onto the scanning head mirrors of the microscope.
- For best forward CARS non-descanned detection, make sure the condenser is Koehler-ed (meaning the condenser is centered and focused onto the diaphragm to achieve uniform illumination)
- For immunofluorescence confocal imaging and CARS imaging, fit the CARS laser, with both forward and epi CARS non-descanned detectors (NDDs), by incorporating a confocal microscope equipped with visible lasers for fluorescence imaging (Figure 2).
- Place sections in a culture dish with coverslip (for inverted microscopy), PBS to avoid the tissue drying out, and a glass weight to keep tissue near coverslip.
- Take z-stacks or single images with a 60X, 1.2 numerical aperture (NA) infrared corrected water objective, which serves for collection of the CARS signal in the epi direction and through a 0.55 NA condenser in the forward direction for imaging brain areas such as the medial nucleus of the trapezoid body (MNTB).
- Take the CARS images at approximately 600 mW pump/probe and 300 mW Stokes, by using the CARS laser GUI. These laser power values are measured internally by the system. Both lasers' powers at the sample location are less than 25 mW and safe for the tissue sample.
- Overlap the pump and Stokes beams spatially and temporally. Tune the OPO to 797.2 nm. This yields a CARS wavelength of 650 nm. Because of the higher energy level, the resulting return to the ground state is anti-Stokes (blue shifted) to the excitation.
- Capture the CARS signal in epi or forward non-descanned detectors using bandpass filters (640-680 nm) followed by sequential detection of the immunofluorescence label (in this instance fluorescently labeled Nissl).NOTE: The Nissl neuronal soma marker is not caught in the CARS 640-680 nm bandpass filter, allowing the combination of fluorescence and CARS imaging in the images presented below.
- The CARS and fluorescence do not share PMTs. Use these settings for optimal lipid signal to selectively image myelination in the brain area.CAUTION: Shield the user from the laser beam
- Save the images as .oib files, which can be imported into an image analysis program for further quantification (Figure 3).
Access restricted. Please log in or start a trial to view this content.
Results
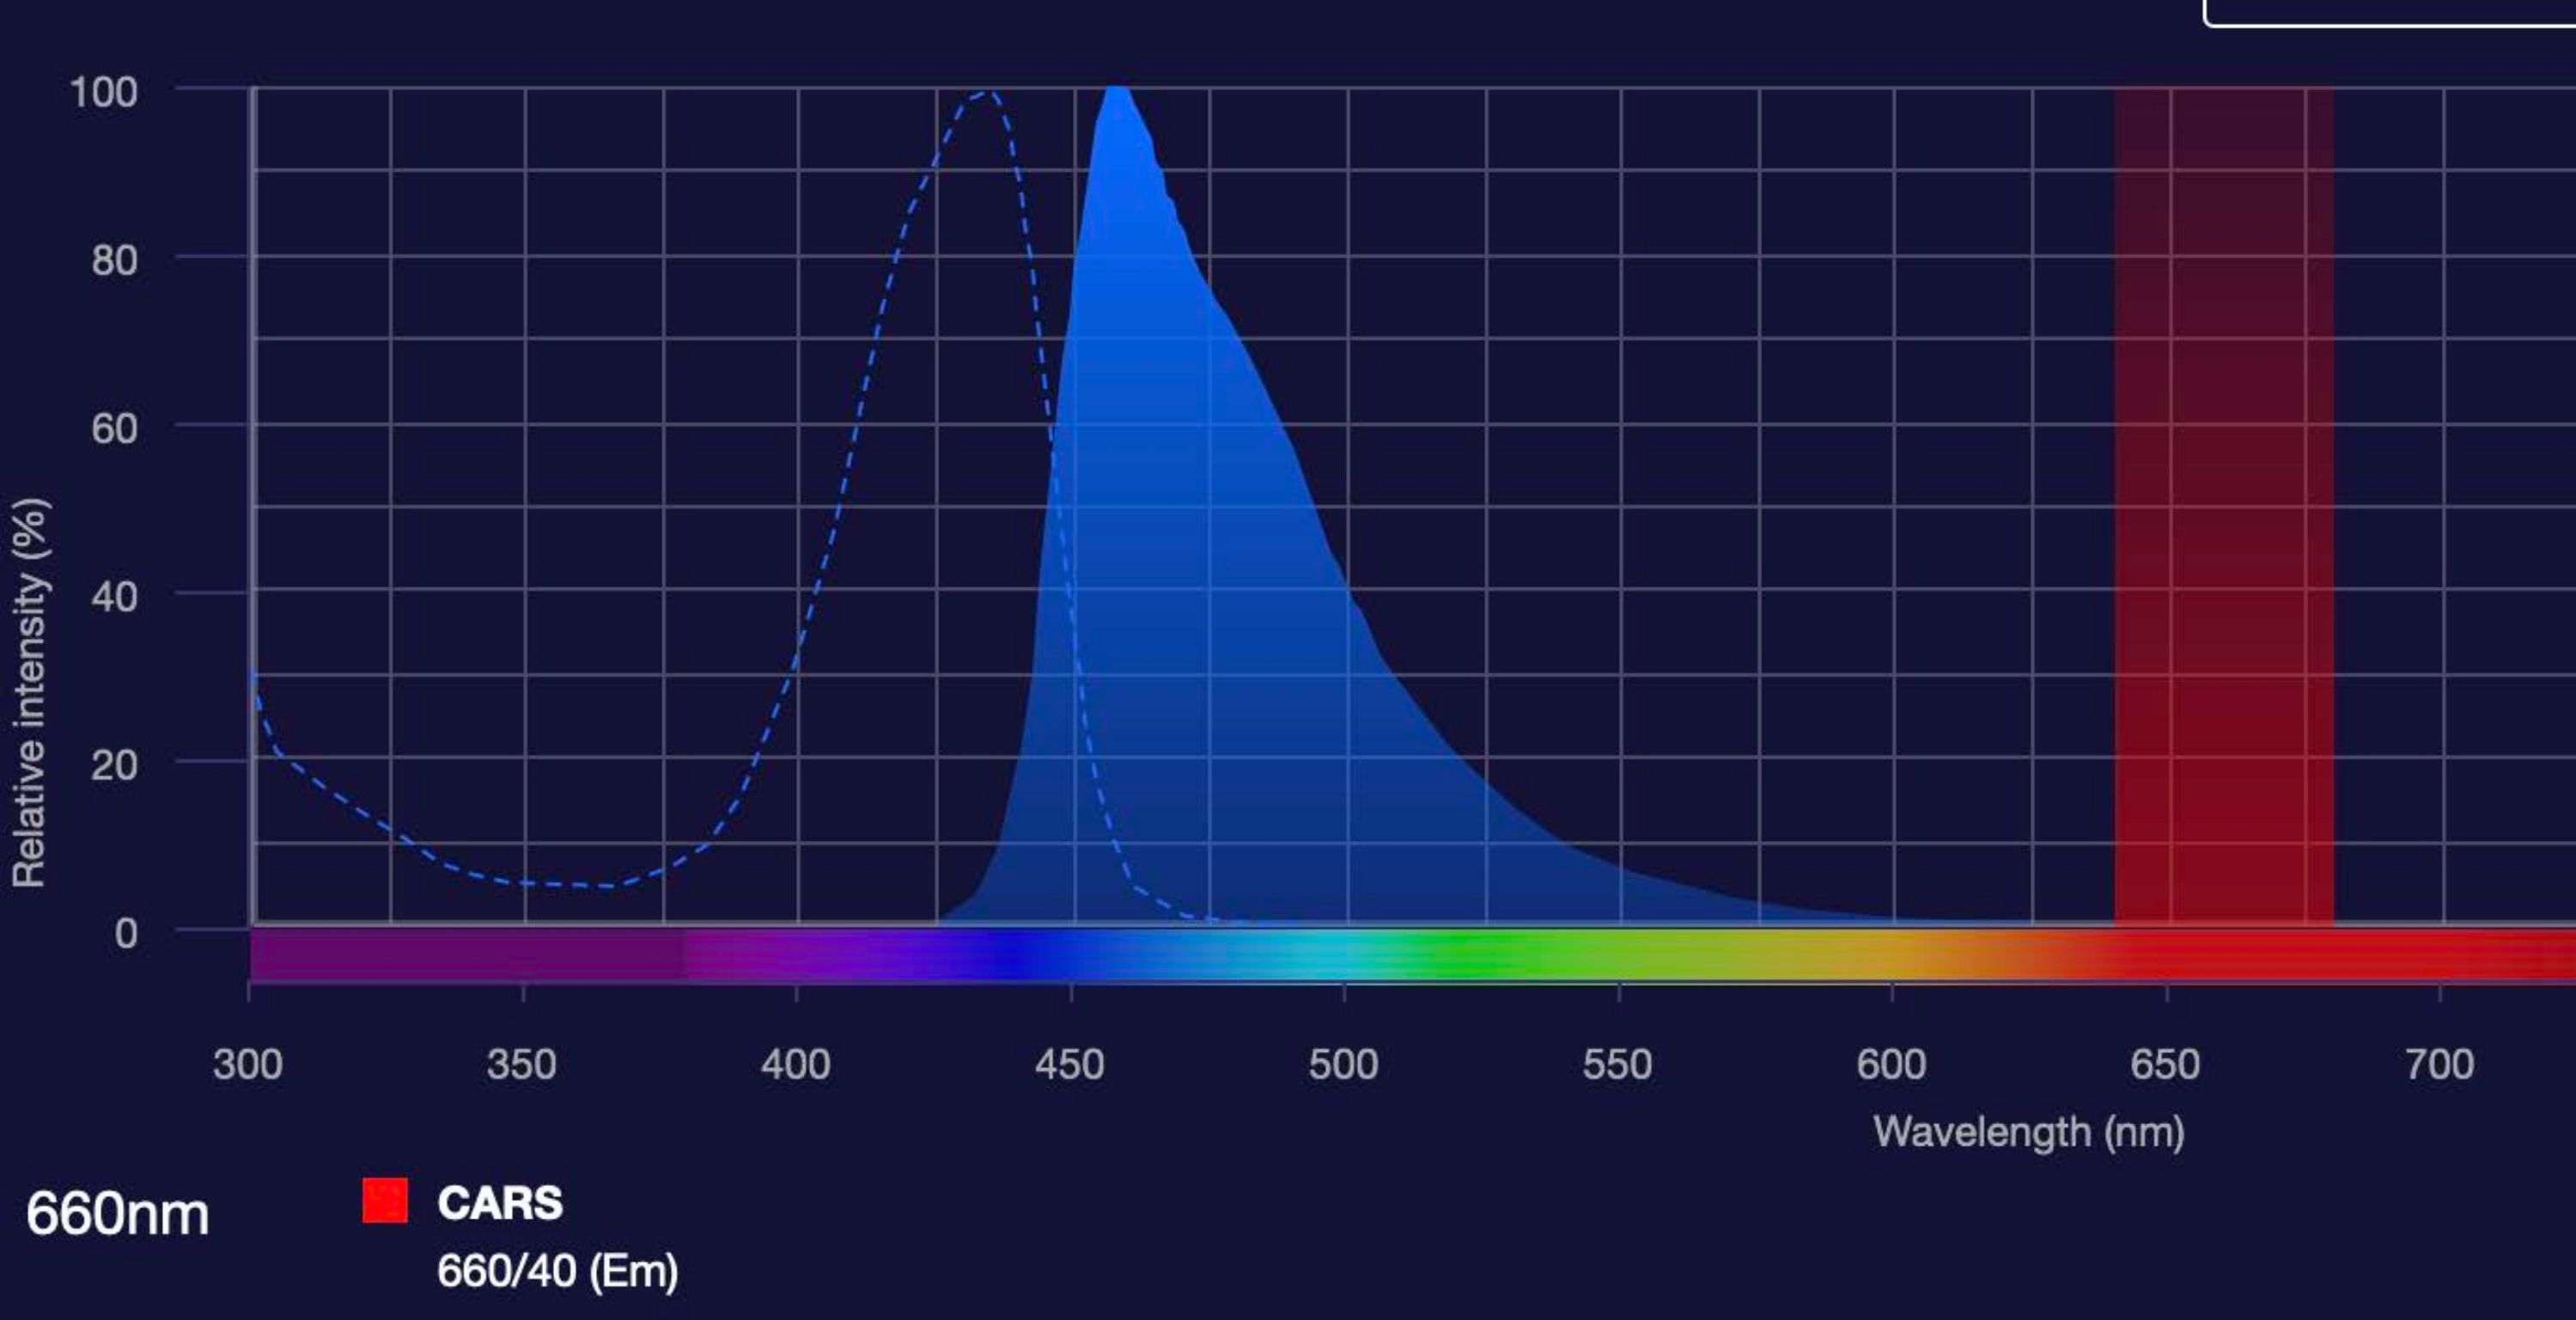
Figure 1: CARS imaging can be combined with immunofluorescent imaging. The graphs shows that CARS...
Access restricted. Please log in or start a trial to view this content.
Materials
| Name | Company | Catalog Number | Comments |
|---|---|---|---|
| Staining: | |||
| AB Media: | 1n 1,000 mL of Millipore H2O | ||
| Phosphate buffered (PB): | |||
| Potassium Phosphate Monobase | Sigma | P5655 | |
| Sodium Phosohate Dibasic | Sigma | S7907 | |
| BSA (Bovine serum albumin) | Sigma life science | A2153-100g | |
| Sodium Chloride | Fisher Chemical | s271-1 | |
| Triton X-100 | Sigma - Aldrich | x100-500ml | |
| Nissl 435/455 | Invitrogen | N21479 | |
| CARS: | |||
| APE picoemerald laser | Angewandte Physik & Elektronik GmbH | ||
| bandpass filter (420-520 nm) | Chroma Technology | HQ470/100m-2P | |
| bandpass filter (500-530 nm) | Chroma Technology | HQ515/30m-2P | |
| bandpass filters (640-680 nm) | Chroma Technology | HQ660/40m-2P | |
| Confocal microscope | Olympus | FV1000 | |
| Cut Transfer pipet | Fisher | 13-711-7M | |
| dichroic longpass 565 nm | Chroma Technology | 565dcxr | |
| dichroic longpass 585 nm | Chroma Technology | 585dcxr | |
| dichroic shortpass 750 nm | Chroma Technology | T750spxrxt | |
| glass bottom culture dish | MatTek | P35G-0-10-C | |
| glass weight (10 mm x 10 mm boro rod) | Allen Scientific Glass Inc | ||
| multiphoton shortpass emission filter 680 nm | Chroma Technology | ET680sp-2p8 | |
| PBS |
