This video demonstrates the setup and execution of three-photon imaging in an anesthetized zebrafish brain. The protocol enables deep-tissue visualization of fluorescently labeled neurons, revealing real-time neuronal activity and structures for neuroscience research applications.
A subscription to JoVE is required to view this content. Sign in or start your free trial.
Method Article
Deep-Tissue Imaging of a Zebrafish Brain Using a Three-Photon Fluorescence Microscope
674 views
⸱
June 17th, 2025
In This Article
Abstract
Protocol
All procedures involving animal models have been reviewed by the local institutional animal care committee and the JoVE veterinary review board.
- Intravital imaging in the zebrafish brain
NOTE: To properly locate the fish brain under the objective lens, a secondary charge-coupled device (CCD) camera is used on the same path as the excitation light for widefield imaging.
- Set up the microscope and calibrate the power.
- Place a low magnification (typically 4x) objective on the microscope.
- Place the Petri dish containing the fish and the tubes under the microscope.
- Use a light-emitting diode (LED) light source to illuminate the Petri dish.
- Open the Camera mode of the image acquisition software (Figure 1).
- Click Live.
- Choose channel A on the right side of the screen.
- Adjust the histogram settings to see the image clearly.
NOTE: These need to be updated as needed. - Set the motor setting on the motor controller to Base.
- Lower the objective until the fish is visible.
NOTE: Ensure that the objective lens does not make any physical contact with the head. - Place the center of the fish head at the center of the field of view.
- Move the objective up and away from the fish head.
- Replace the low magnification objective lens with the high numerical aperture (NA) objective lens for 3PM (three-photon microscopy).
NOTE: The low magnification lens and the high NA objective lens do not need to be parfocal but must be close enough to ensure the fish is within the field of view of the high NA objective lens. - Slowly lower the objective lens, ensuring that the objective does not make any physical contact with the head. In the CCD camera software, stop moving the objective when the top of the head is visible. Set the z location to 0 μm.
NOTE: Ensure that there are no air bubbles under the objective lens when using a water-immersion objective. - Turn off the LED light source and close the dark curtain around the system.
- Set the imaging acquisition software to Multiphoton GG mode for 3P imaging and set the power under the objective lens to less than 1 mW (with ~1 MHz pulse repetition rate).
- Change the motor setting button from Base to Objective on the motor controller.
- Turn down the lights in the room.
- Turn on the photomultiplier tubes (PMTs) and open the 3PM excitation source shutter. Ensure that an outline of the bone appears in the fluorescence signal channel due to autofluorescence and in the third harmonic generation (THG) signal channel due to THG of the bone (Figure 1C).
- Perform imaging at different depths by increasing the power levels when imaging deeper.
Access restricted. Please log in or start a trial to view this content.
Results
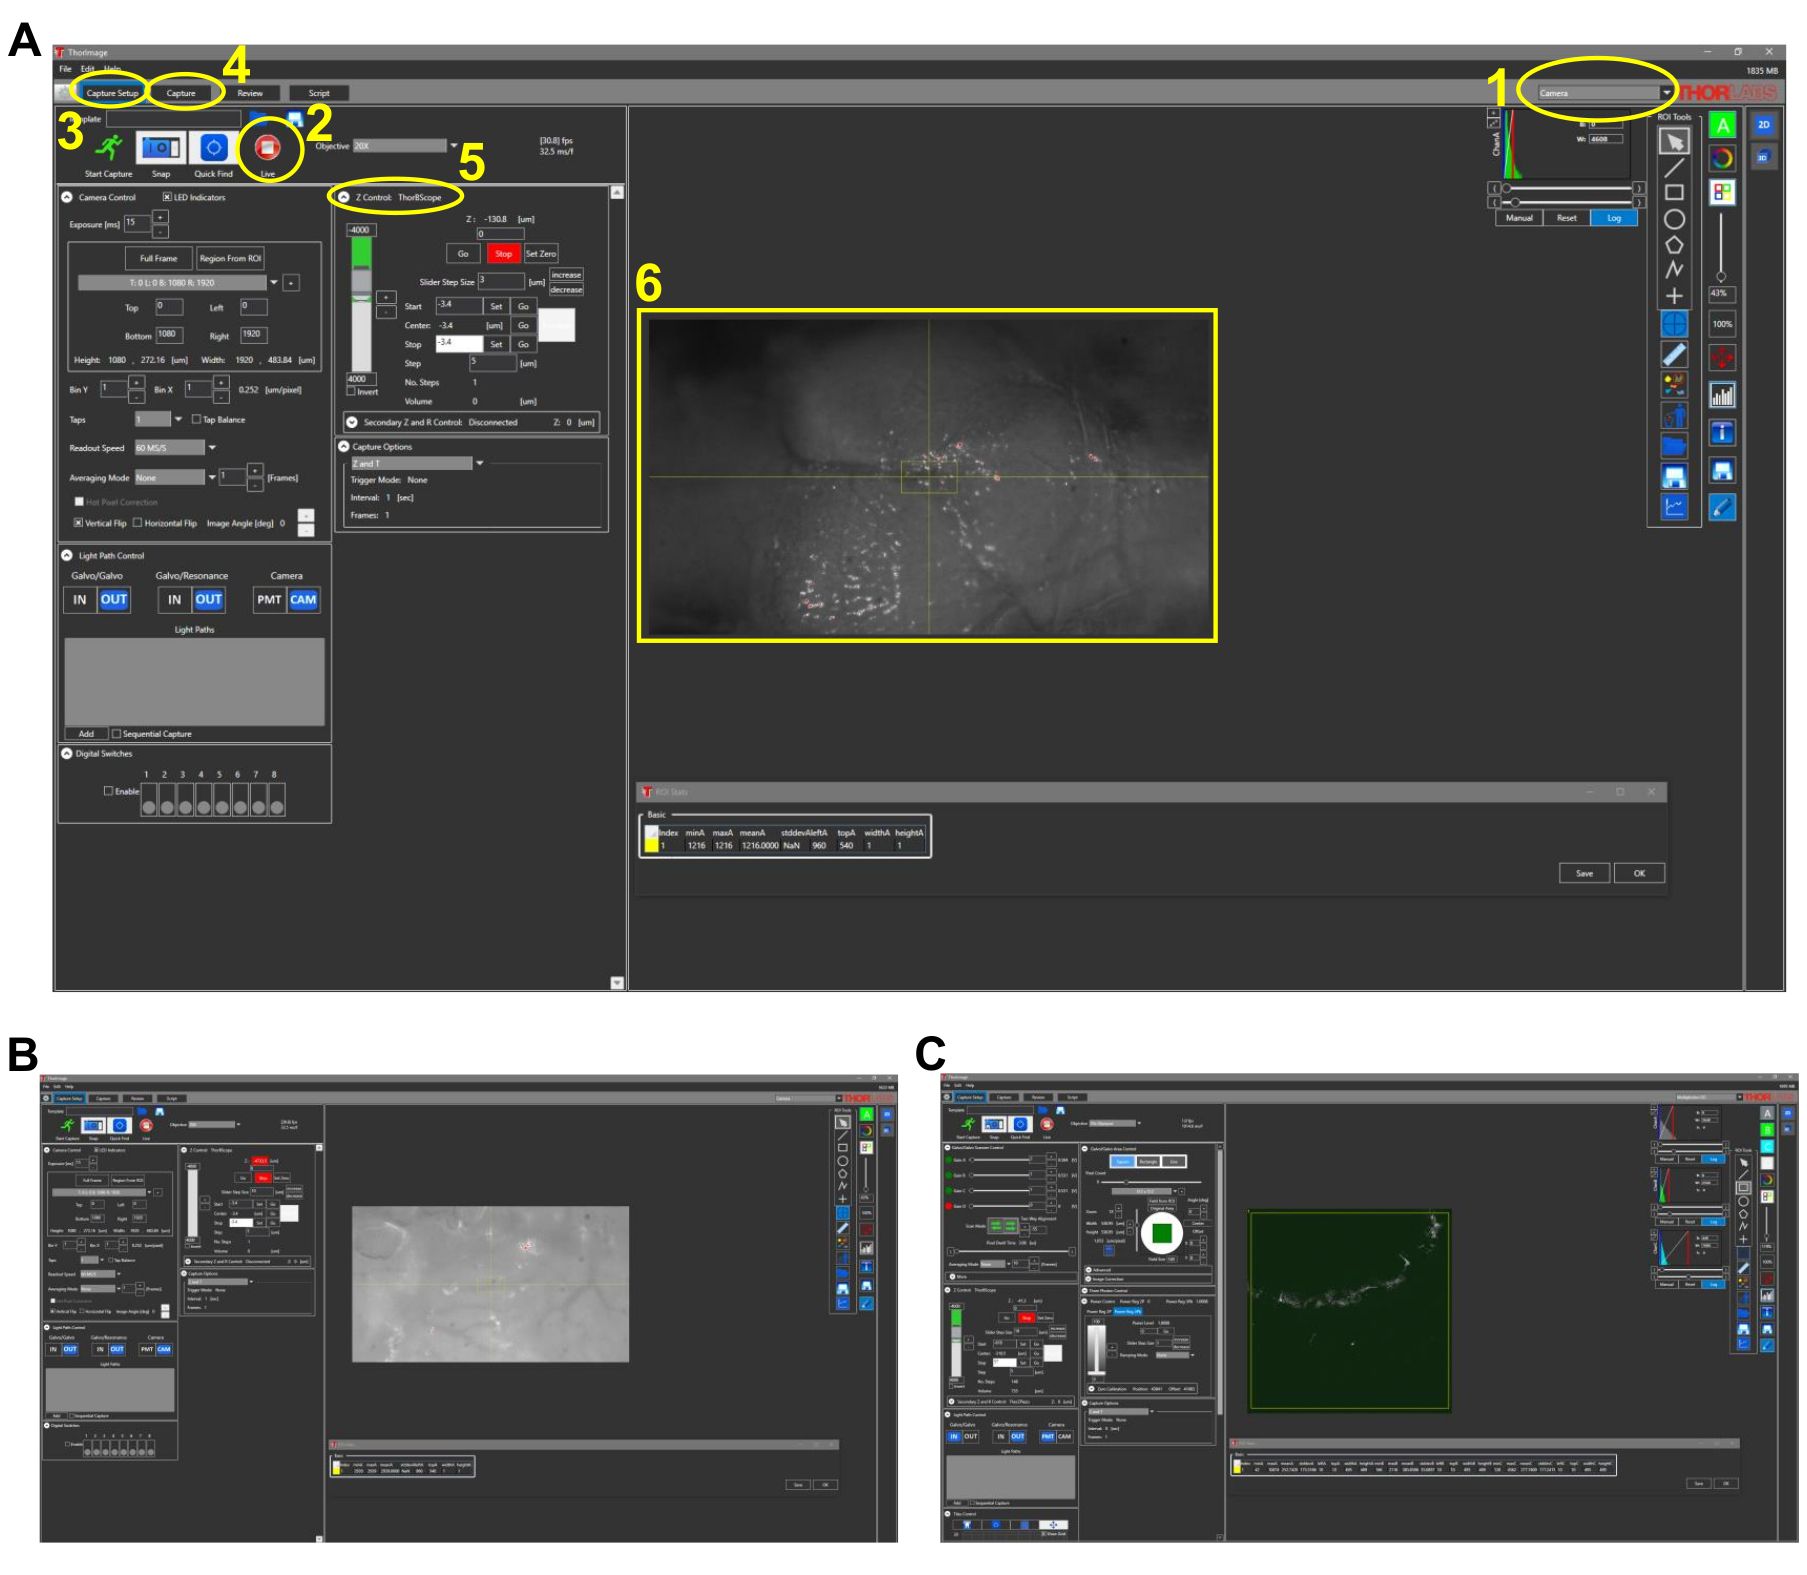
Figure 1: Representative screenshots for intravital Imaging in fish (protocol section 1). (A
Access restricted. Please log in or start a trial to view this content.
Materials
| Name | Company | Catalog Number | Comments |
|---|---|---|---|
| 5% Povidone-iodine | Amazon | NDC 67818-155-32 | Aceptical cleaning of surgical areas |
| 70% Ethanol | Thermo Fisher Scientific | CAS 64-17-5 | Aceptical cleaning of surgical areas |
| Agarose | Sigma | A4718-256 | Preparing zebrafish chamber |
| Bergamo II | Thorlabs | Multiphoton Imaging Microscope | |
| Bupivacaine | Cornell Veterinary Care | ||
| GaAsP Amplified PMT | Thorlabs | PMT2100 | PMT detector |
| Heater (800 W) | Finnex | Aquarium heater for zebrafish water) | |
| Kimwipes | Kimtech | Laboratory tissue for preparing zebrafish | |
| Nanofil syringe (10 micrometer) with 36 G needle | WPI | NANOFIL + NF36BV | Syringe and needle for injection of pancuronium bromide |
| Peristaltic Pump | Elemental Science | ESI MP2 | Water pump for zebrafish setup |
| Polyethylene tubing (I.D. 0.58 mm., O.D. 0.965 mm.) | Elemental Science | MP2 pump tubing | Tubing that goes in the mouth of the zebrafish |
| SR400 | Stanford Research Systems | SR400 | Photon counter |
| Standard Photodiode Power Sensor | Thorlabs | S122C | Power detector |
| Thin strip boxing wax | Corning Rubber Co., Inc. | Holding tubing in place in zebrafish chamber | |
| ThorImage | Thorlabs | Image acquisition software | |
| Tricaine (Ethyl-m-aminobenzoate methanesulfonate salt) | MP | 103106 | Zebrafish anesthesia and euthanasia |
| Tygon tubing (I.D. 1/16 in., O.D. 1/8 in.) | Tygon | Tubing for water flow for zebrafish preparation | |
| VaporGuard | VetEquip | 931401 | For recycling isoflurane |
| Vetbond tissue adhesive | 3M | 1469SB | To glue the glass window on the mouse skull, and to glue the laboratory tissue when preparing the fish. |
| XLPLN25XWMP2 | Olympus | Multiphoton Excitation Dedicated Objective |
