Intracellular Ca2+ dynamics are very important in sperm physiology and Ca2+-sensitive fluorescent dyes constitute a versatile tool to study them. Population experiments (fluorometry and stopped flow fluorometry) and single cell experiments (flow cytometry and single cell imaging) are used to track spatio-temporal [Ca2+] changes in human sperm cells.
A subscription to JoVE is required to view this content. Sign in or start your free trial.
Method Article
Measuring Intracellular Ca2+ Changes in Human Sperm using Four Techniques: Conventional Fluorometry, Stopped Flow Fluorometry, Flow Cytometry and Single Cell Imaging
In This Article
Summary
Abstract
Spermatozoa are male reproductive cells especially designed to reach, recognize and fuse with the egg. To perform these tasks, sperm cells must be prepared to face a constantly changing environment and to overcome several physical barriers. Being in essence transcriptionally and translationally silent, these motile cells rely profoundly on diverse signaling mechanisms to orient themselves and swim in a directed fashion, and to contend with challenging environmental conditions during their journey to find the egg. In particular, Ca2+-mediated signaling is pivotal for several sperm functions: activation of motility, capacitation (a complex process that prepares sperm for the acrosome reaction) and the acrosome reaction (an exocytotic event that allows sperm-egg fusion). The use of fluorescent dyes to track intracellular fluctuations of this ion is of remarkable importance due to their ease of application, sensitivity, and versatility of detection. Using one single dye-loading protocol we utilize four different fluorometric techniques to monitor sperm Ca2+ dynamics. Each technique provides distinct information that enables spatial and/or temporal resolution, generating data both at single cell and cell population levels.
Introduction
Ca2+ is a universal second messenger of signal transduction pathways in eukaryotic cells. Intracellular Ca2+ (Ca2+i) participates in the regulation of many fundamental physiological processes in both excitable and non-excitable cells. The importance and universality of Ca2+ as second messenger during signal transduction events is derived from its spatio-temporal versatility in the transmission of information within the cell. While Ca2+ cannot be synthesized de novo or degraded within the cell, its intracellular concentration ([Ca2+]i) is maintained within very strict limits through different cellular mechanisms that continuously buffer, sequester, compartmentalize, and/or accumulate Ca2+. Changes in the concentration of this ion can occur in highly localized areas within the cell 1, and deciphering such fluctuations is essential for gaining a deeper understanding of (1) their role in the signaling mechanism, (2) their physiological significance, and (3) general mechanisms of cell signaling. Ca2+-mediated signaling is of particular importance in sperm physiology 2. Sperm motility is one of the most important functions for fertilization success, and in fact, several sperm motility defects can cause sterility 3-5. The importance of Ca2+ in flagellar movement has been long recognized 6; however, the mechanism of how Ca2+ controls the specific form of flagellar bending is not fully understood.
Before fusing with the egg, spermatozoa must undergo capacitation, a complex process dependent on sperm residence inside the female tract. During capacitation, the sperm membrane's lipid architecture and organization are modified, mainly as a result of cholesterol removal from the plasma membrane. Additionally, several proteins are tyrosine-phosphorylated 7. Importantly, during capacitation there is an increase in intracellular pH (pHi) and in [Ca2+]i, and the membrane potential hyperpolarizes in some species 2. Capacitation only takes place in a subpopulation of spermatozoa (20-40%), and the mechanisms involved in all these cellular changes are far from clear. It is generally accepted that only a subpopulation of capacitated sperm undergo the acrosome reaction (AR) when exposed to physiological inductors. The AR is also a Ca2+-regulated event required for fertilization in all species possessing an acrosome (specialized organelle with outer and inner membranes). During this process the outer acrosomal membrane fuses with the sperm's plasma membrane, releasing hydrolytic enzymes that allow the sperm cell to penetrate the glyco-proteinaceous matrix surrounding the egg (zona pellucida, or ZP). The AR also exposes a new fusogenic sperm cell surface that interacts with the egg plasma membrane for the final fusion of both gametes. There are several cellular ligands that induce the AR, progesterone being one of the most studied among them.
In this work we present four different techniques involving the use of a Ca2+-sensitive fluorescent dye to measure [Ca2+]i changes in human sperm triggered by progesterone (except for flow cytometry, in which we measured the [Ca2+]i increase induced during the in vitro capacitation process). In this particular case we used Fluo-3 AM (Life Technologies, Grand Island, NY), a membrane-permeable dye with a Kd = 325 nM. In vitro we monitored fluorescence changes as a function of time with three of the methodologies, and with the fourth technique we measured fluorescence values at a single given point in time. These different approaches complement each other, since altogether they provide spatial and temporal resolution at both the single cell and cell population levels.
Cell Population or Bulk Experiments
Bulk techniques are extensively used not only because the instruments they require are readily available, but also because they are simple, well established, and allow for the averaging of information from measurements performed on millions of cells in a single experiment.
Technique #1. Conventional Fluorometry
This technique monitors changes in fluorescence as a function of time; the experiments are performed in glass cuvettes with sample volumes ranging from 200 to 1,000 μl. Proper mixing of added reagents requires magnetic stirring, and therefore the temporal resolution obtained is in the order of seconds. The typical cell concentration range of the samples analyzed is 105-108 cells/ml.
Technique #2. Stopped Flow Fluorometry
This technique also monitors changes in fluorescence as a function of time, but the reagents are rapidly mixed together (using pressure) into a recording cuvette containing a very small sample volume (ranging from 25-100 μl). Therefore, homogenization of reagents is instantaneous, enabling a high temporal resolution in the order of milliseconds. Analysis of the resulting fluorescence vs. time traces are suitable for determining reaction rates, elucidating the complexity of the reaction mechanism, obtaining information on short-lived reaction intermediates, etc. The common cell concentration range of the samples analyzed is 105-107 cells/ml.
Single Cell Experiments
Bulk experiments report the average behavior of a large number of cells; however, a population may frequently exhibit heterogeneous properties that are overlooked during such type of measurements. Single cell techniques are thus used to complement the information obtained with cell population experiments.
Technique #3. Flow Cytometry
Despite the importance of the information arising from single cell measurements, it is important to analyze a large number of cells in order to prevent the erroneous extrapolation of cell-specific properties to an entire population. For this reason, high-throughput techniques are favored and the most popular method is flow cytometry, in which 10,000 cells per condition are conventionally analyzed. This method enables multi-parametric analysis of heterogeneous populations as it categorizes cells according to their size (forward scatter (FSC)), granularity (side scatter (SSC)) and fluorescence intensity (specific labeling with an antibody, viability marker, etc.), thus providing information on the parameters' distribution for a group of cells. Flow cytometry provides instant rather than time-dependent information 8. Forward and side scatter values are also useful for selecting a gate that includes cells but discriminates cellular debris, dust, etc. For fluorescence measurements, negative and positive fluorescence controls must also be included. If more than one fluorescence channel is used, a process known as compensation must be performed (for details see http://www.bdbiosciences.com/resources/protocols/setting_compensation.jsp). Compensation allows for spectral overlap discrimination among fluorophores. Flow cytometry also allows discrimination of dead cells, generally by means of propidium iodide staining.
Technique #4. Single Cell Imaging
Microscopy is another common method to study single cell behavior; it is well suited for time-dependent studies and it also provides spatial resolution. A major drawback is that high-throughput analysis is only in its infancy at the present time 9.
Access restricted. Please log in or start a trial to view this content.
Protocol
In this paper we report the use of the four aforementioned techniques to measure [Ca2+]i changes in human sperm cells. We used progesterone to trigger a Ca2+ response, as it is well established that this steroid produces a transient [Ca2+]i increase in spermatozoa. Particularly, in human sperm, progesterone directly activates a Ca2+ channel (namely CatSper) expressed exclusively in the plasma membrane of sperm cells 10,11. We also measured resting [Ca2+]i before and after capacitation given that it is also widely accepted that an increase in [Ca2+]i occurs during capacitation. For techniques requiring a positive control we used a Ca2+ ionophore -ionomycin- to induce maximal Ca2+ uptake into the cell, and thus, maximal fluorescence response; for the minimal fluorescence value, we used Mn2+ to quench fluorescence.
1. Sperm Sample Preparation by the Swim-up Method (See Figure 1)
Use only ejaculated samples (obtained by masturbation) whose characteristics fulfill the parameters established by the latest edition of the World Health Organization laboratory manual (available at http://whqlibdoc.who.int/publications/2010/9789241547789_eng.pdf ) for the examination and processing of human semen.
- Obtain the semen sample inside a sterile container and place it (with loosened cap) inside an incubator at 37 °C and CO2 5%/air 95% during 30 min. This step is for sample liquefaction.
- Place 500 μl aliquots of the liquefied semen sample on the bottom of clean glass test tubes (1.0 x 7.5 cm). Approximately eight test tubes are needed for an average size sample (4 ml).
- Carefully layer 1 ml of Ham's F-10 medium (supplemented with 2 mM CaCl2 and 5 mg/ml bovine serum albumin to promote capacitation in vitro) on top of each semen aliquot (See Figure 1). TIP: Touch the wall of the tube with the tip of the micropipette, and gently dispense the medium above the sample. It is crucial to do it slowly as the mixing of both layers (sample and medium) must be avoided.
- Carefully lean the tubes to a 30 ° angle approximately. This will increase surface area between the two liquids, thus enhancing the displacement (swim-up) of human cells from the sample to the medium during incubation.
- Place the group of leaned test tubes inside an incubator at 37 °C and CO2 5%/air 95% for 1 hr.
- Using a micropipette carefully remove the upper 700 μl of HAM's F-10 medium (now containing motile spermatozoa) from each tube and pool all the collected samples into a single clean glass tube (1.0 x 7.5 cm; for larger volumes use a 15 ml Falcon tube), avoiding bubble formation. Place 10 μl of pooled sample on the optical flat glass of a Makler Counting Chamber base, and then place the cover glass (once the cover is in place, avoid lifting or covering again to maintain the uniform spread of sperm sample). Make sure to avoid bubble formation inside the chamber as this would result on an inaccurate cell count.
- Observe under a compound microscope (the use of a 20X objective is recommended). The cover glass of the Makler Counting Chamber has a big square composed of 100 smaller squares (i.e. a 10 by 10 grid). Count the cells in any strip of 10 squares. This number represents their concentration in millions of cells/ml. Repeat the count in two additional 10-square strips, and calculate the average of the three counts. NOTE: If a Makler Counting chamber (which is especially designed to count sperm cells) is not available, any hemocytometer chamber may be used.
- Adjust the sample's final concentration to 1x10⁷ cells/ml in supplemented Ham's F-10 medium. When required, incubate the sample at 37 °C and CO2 5%/Air 95% for 5 hr to promote capacitation.
2. Fluorescent Dye Loading for Ca2+ Measurements
There are several fluorescent dyes available to measure intracellular Ca2+; the appropriate one must be selected according to its Kd, and its emission and excitation wavelengths (for qualitative and quantitative measurements, single and double emission and excitation wavelengths, respectively, must be used) (visit http://es-mx.invitrogen.com/search/global/searchAction.action?query=ion+indicators&resultPage=1&resultsPerPage=15 for more information). For the present qualitative application we used Fluo-3 AM, a cell-permeant dye with a Kd = 325 nM, and single emission and excitation wavelengths of 506/526 nm, respectively 12.
- Prepare 50 μl of a 1 mM Fluo-3 AM stock solution by dissolving the content of one 50 μg dye vial (MW = 1130 g/mol) in 44 μl of anhydrous DMSO.
- Using a 1.5 ml microfuge tube mix the required volume of sperm suspension (see required amount for each specific technique below) with enough 1 mM Fluo-3 AM stock solution to obtain a final concentration of 2 μM Fluo-3 AM (i.e. 1 μl of stock Fluo-3 AM is added for every 500 μl of sperm suspension).
- Incubate for 30 min at 37 °C and protected from light.
- Centrifuge the tube at 750 x g for 5 min using a microcentrifuge, aspirate and discard the supernatant, and resuspend the pellet in the appropriate volume (see required concentration for each specific technique below) of Human Sperm Medium (HSM; mM: 120 NaCl, 15 NaHCO3, 4 KCl, 1.8 CaCl2, 1 MgCl2, 10 HEPES, 10 Na lactate, 5 D-glucose, 1 Na pyruvate, pH = 7.4). NOTE: The formation of a cloud rather than a pellet indicates that the cells are in good condition.
- The cells are now loaded with the dye; they remain viable (kept at 37 °C and protected from light) for approximately two hr, and may be used in any of the following techniques.
3. Technique #1. Conventional Fluorometry (Average Information from a Large Cell Population)
Equipment: For our sperm population [Ca2+]i measurements we use an SLM Aminco spectrofluorometer operated by Olis software (Bogart, GA, USA) with magnetic stirrer control (SIM Aminco), and coupled to a Blue LED (Luxeon Star LXHL-LB3C, from LUMILEDS) and a 465-505 nm band-pass filter (Chroma Technology Corp.) for Fluo-3 AM excitation. The LED is controlled by a custom-built power supply (700 mA). Emission light is measured by setting the emission wavelength (λEm) to 525 nm on the spectrofluorometer's monochromator.
- Place 570 μl of HSM and 30 μl of sperm cell suspension (previously loaded with Fluo-3 AM and resuspended in HSM to obtain 1x10⁸ cells/ml) in a flat bottom glass tube (I.D. 8 x 50 mm). Place a magnetic stir bar inside the tube and insert the tube into the reading chamber of the spectrofluorometer (preheated to 37 °C), stir the sample during all the acquisition time.
- Start the experiment using the equipment´s software (Olis software in this case) and proceed to acquire fluorescence values at a frequency of 0.5 Hz during 300 sec. Apply the desired test compounds by injection of the appropriate volume from a stock solution (generally 100X more concentrated than the desired final concentration) using a Hamilton micro-syringe as follows:
- Acquire basal fluorescence for 30 sec.
- Add 4 μM progesterone (Pg).
- At 100 sec add 20 μM ionomycin (as a positive control, to obtain the maximum fluorescence value).
- Run a negative control by repeating steps 3.1 to 3.2.3 above, but adding instead of Pg only the solvent used to dissolve it (HSM with 0.01% anhydrous DMSO).
- Export raw fluorescence intensity values to Microsoft Excel and normalize them using the following equation: (F/F0) - 1. Where F is the fluorescence intensity measured at any given time (t), and F0 is the mean basal fluorescence taken during the initial 30 sec. Plot the total series of (F/F0) - 1 values vs. time (Figure 2A). Measure the difference between the fluorescence intensity values before and after the addition of the test compounds (ΔF), plot them on a bar graph and process the data applying the appropriate statistical analysis methods (Figure 2B).
4. Technique #2. Stopped Flow Fluorometry (Information with High Temporal Resolution from a Large Cell Population)
Equipment: Intracellular [Ca2+] changes are measured with high temporal resolution using a SFM-20 stopped-flow mixer coupled to a MOS-200 rapid kinetics optical system, both from BioLogic science instruments (Grenoble, France). All data are analyzed with Bio-Kine32 software from the same company.
- Set the appropriate conditions in the equipment; the illumination source should be turned on at least 15 min before starting the experiment; adjust excitation and emission filters, adjust the photomultiplier to a voltage value within the range established by the stopped-flow manufacturer, and set the bath temperature at 37 °C.
- Fill one of the instrument's syringes with 1 ml of Fluo-3 AM-loaded sperm cells (1X10⁷ cells/ml) and the second syringe with 1 ml of the compound to be tested, either HSM (negative control), 10 μM ionomycin (positive control) or 10 μM Pg dissolved in HSM. Note: In this step it is crucial to avoid bubble formation while drawing the liquids into the syringes.
- Lift both instrument pistons until they touch the tip of the syringe plungers.
- Set the flow rate to the minimum value that will provide a measurable response in order to minimize cell damage. The flow rate we use in the SFM-20 system is 1 ml/sec 13.
- Set the frequency (in this case 10 msec) and the total sampling time (in this case 50 sec).
- Trigger the mixing of reagents. NOTE: While one single trigger at a time may be made manually, a set of automatic consecutive triggers may be pre-programmed as well.
- The trace of raw fluorescence (arbitrary units) vs. time is displayed on the computer screen.
- The mixing of reagents per se will generate a trace that is not a straight line. Thus, in order to obtain the actual [Ca2+] change derived from a stimulus, the control trace obtained from mixing cells with medium (negative control) must be subtracted from each one of the experimental traces. Analyze data as required; some kinetics parameters may also be obtained with the Bio-Kine32 acquisition software. Raw traces without subtraction are shown in Supplementary Figure 1 for comparison.
- To change the reagent in the test compound syringe, clean it out thoroughly with distilled water. Then fill the syringe to its maximum volume with distilled water, place it in the corresponding piston of the stopped-flow fluorometer and push the water through the internal mechanism (the rinse water must be directed to the waste container). Repeat this step twice more.
- Repeat steps 4.2 to 4.9, filling the second syringe with the next desired test compound.
- At the end of the experiment, rinse the entire equipment with distilled water, completely draining the water from the internal hoses.
5. Technique #3. Flow Cytometry (Single Cell Information Obtained from a Large Number of Cells)
Equipment: This technique allows the simultaneous measurement of several parameters in a single moment in time, but unlike the previous techniques, it does not measure changes over time; rather it provides the parameter values at the time of measurement. Therefore, instead of adding Pg to trigger the response, in this case we measured intracellular Ca2+ levels in sperm cells before and after inducing capacitation. We used a FACSCanto Cytometer (Becton Dickinson) and data were analyzed with FlowJo software (Tree Star 9.3.3).
- Prepare the experimental samples in cytometer tubes by placing 500 μl of cell suspension (4x10⁶ cells/ml) per tube under each condition to be tested (in this case, ten conditions; see Table 1). Collect fluorescence data from 10,000 events per sample.
- To set up an experiment use the equipment software to:
- Create a new: folder, experiment, specimen and number of tubes.
- Select appropriate cytometer settings for Fluo-3 AM (use FITC -Fluorescein isothiocyanate- filter) and PI (use PI -Propidium Iodide- filter).
- Run the unstained control tubes 1 and 2 in the cytometer. Collect FSC and SSC data to verify that threshold settings are appropriate and to create the corresponding gate in order to discriminate debris from cells.
- To create compensation controls, run the following control samples, collecting auto and maximum fluorescence data (PI and FITC channels) (NOTE: this task is usually performed by the equipment´s technician):
- Unstained cells (tubes 1 and 2).
- Cells loaded with Fluo-3 AM (2 μM) (tubes 3 and 4).
- Dead cells (spermatozoa suspended in 0.1% Triton X-100 in HSM for 10 min at room temperature) stained with PI (1.2 μM PI; i.e. 0.25 μl of 2.4 mM PI is added to 500 μl of sperm suspension) during 30 min at 37 °C, protected from light (tubes 5 and 6).- View recorded data and select the gate for the desired populations.
- Adjust the gate and select "Apply" to All Compensation Controls.
- Select experiment > compensation setup > calculate compensation.
- Rename the compensation setup and link & save.
- Run all experimental tubes (in this case, tubes 7-10). At the end, export all data to the software available for analysis (see step 5.6).
- Analyze the results of each experiment using the equipment's software, the commercially available FlowJo software or Cytobank free software (http://www.cytobank.org/).
6. Technique #4. Single Cell Imaging (Single Cell Information with High Spatial Resolution)
Equipment: Custom-built Imaging set-up. Our imaging set-up is composed of an inverted Nikon Diaphot 300 microscope equipped with a temperature controller (Medical System Corp., Greenvale, N.Y.), a Nikon PlanApo 60X (1.4 NA oil immersion) objective. Fluorescence illumination is provided by a Luxeon V Star Lambertian Cyan LED part # LXHL-LE5C (Lumileds Lighting LLC, San Jose, CA) attached to a custom-built stroboscopic control box. The LED was mounted into a FlashCube40 assembly with dichroic mirror M40-DC400 (Rapp Opto Electronic, Hamburg, Germany) (bandwidths: excitation 450-490 nm, dichroic mirror 505 nm, and emission 520-560 nm). LED output was synchronized to the Exposure Out signal of a Cool Snap CCD camera via the control box to produce a single flash of 2 msec duration per individual exposure. The camera exposure time was set equivalent to the flash duration (2 msec). Images are collected every 250 msec (or may be adjusted according to the desired temporal resolution) using IQ software (Andor Bioimaging, Wilmington, NC).
- Prepare round cover slips (diameter = 25 mm) by applying a 5-μl drop of poly-L-lysine solution (0.01 % w/v) on the center. Let it stand for at least 1 hr (it may dry). Using a squirt bottle rinse treated area with water before use. This procedure will allow sperm cells to adhere to the cover slip from their head, while their flagellum can still move.
- Prepare the compounds to be tested by dissolving them in HSM according to Table 2. Compounds are added sequentially into the same recording chamber, making sure to always add the same volume, and to adjust the concentration of the stock solution taking into consideration the dilution it will have when mixed with the volume already present in the chamber (as indicated in Table 2). Keep all test solutions in a bath at 37 °C until they are used.
- Assemble the cover slip inside the recording chamber and place 10 μl of Fluo-3 AM-loaded cells (1 x10⁷ cells/ml) in the center. Cover the cells with 200 μl of pre-warmed HSM.
- Place the chamber on the stage of the microscope pre-heated to 37 °C, view the cells (using phase contrast) and select an area for imaging. It is important to select an area where cell density is appropriate (see Figure 5A); too many cells make analysis difficult due to overlapping signals. NOTE: Cells should be firmly attached to the cover slip by their head but exhibiting flagellar movement, which confirms viability.
- Acquire fluorescence images in live mode to adjust focus and brightness.
- Start the experiment by activating the time-series image acquisition software (IQ in this case). Typically four images are acquired per second with illumination of 2 msec per image.
- Use a micropipette to carefully add (drop-wise) the test compound (Pg in this case), continue image acquisition as required and perform two sequential control additions into the same chamber: (1) 20 μM ionomycin to obtain maximum fluorescence and (2) 5 mM MnCl2 to obtain minimum fluorescence. Alternatively, compounds may be added using a perfusion chamber which offers the advantages of enabling stimulus removal, and the ability to uniformly bathe the cells with the compound. At the same time, it does have the disadvantages of requiring larger quantities of solution, and of making temperature control more problematic.
- Repeat acquisition in a new chamber with every desired test compound.
- Perform image analysis online using the equipment´s software, or offline using either IQ Software or Image J freeware. Draw the regions of interest (ROIs) around each cell (or part of cell) and also select a cell-free area (for automatic background subtraction by the software). A time-fluorescence intensity series is then obtained for each ROI and these data may be exported to Microsoft Excel for further analysis. We normalize fluorescence intensity values using the following equation: (F/F0) - 1. Where F is the fluorescence intensity measured at any given time (t) and F0 is the mean fluorescence taken during the initial 30 sec. Plot the total series of (F/F0) - 1 vs. time (Figure 5B). Values may also be normalized using the fluorescence value obtained after ionomycin addition as 100%.
- Image Analysis may alternatively be performed using Image J free Software.
Technique #1. Conventional Fluorometry
Progesterone is one of the known AR inducers and, as expected, it does provoke a transient [Ca2+]i increase in human sperm (shown in Figure 2). Addition of a calcium ionophore (ionomycin) causes the maximum [Ca2+]i increase, which does not return to basal levels.
Technique #2. Stopped Flow Fluorometry
The progesterone-induced [Ca2+]i increase was measured as before (conventional fluorometry), but this time with greater temporal resolution; in this case the frequency of acquisition was 0.1 Hz. As shown in Figure 3, both progesterone (transient, red line) and ionomycin (sustained, blue line) caused a very fast [Ca2+]i increase. The absence of a delay in the progesterone-induced [Ca2+]i increase is consistent with previous reports suggesting that progesterone directly activates the Ca2+ channel CatSper, without intermediate signaling 10,14.
Technique #3. Flow Cytometry
[Ca2+]i was measured in capacitated and non-capacitated human sperm. As previously reported in mouse 15, bovine sperm 16 and human sperm 17, we also observed increased [Ca2+]i in capacitated compared to non-capacitated human sperm. Baldi, et al. (1991) 17 reported higher basal [Ca2+]i in capacitated than in non-capacitated human sperm using conventional fluorometry. In this work we used flow cytometry to measure [Ca2+]i before and after in vitro capacitation. Flow cytometry enables us to see that the distribution of fluorescence values for capacitated sperm (Figure 4D, blue trace) is shifted to higher values compared to non-capacitated sperm (Figure 4D, red trace). The fluorescence values for each individual cell can be observed in the two-dimensional dot plots shown in Figure 4G; importantly, the signal arising from dead cells (15% approximately) can be eliminated (Figure 4G, upper quadrants).
Technique #4. Single Cell Imaging
The progesterone-induced [Ca2+]i change was measured in single sperm cells. Progesterone addition causes an increment in [Ca2+]i both in the sperm head and in the flagellum. As observed in population experiments, single cell analysis revealed a transient and a sustained increase for progesterone and ionomycin, respectively.
Access restricted. Please log in or start a trial to view this content.
Results
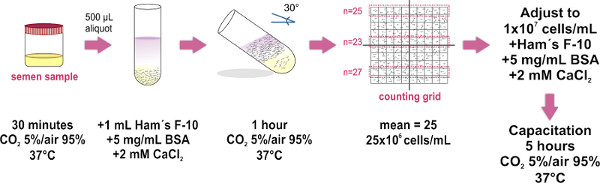
Figure 1. Schematic diagram of the experimental protocol for sperm sample preparation by the swim-up method. The major steps for separation of motile sperm and for adjustment of...
Access restricted. Please log in or start a trial to view this content.
Discussion
Intracellular signaling is vital for most cellular activities; Ca2+ is a ubiquitous messenger that accompanies mammalian cells throughout their entire lifespan, from their origin at fertilization, to the end of their life cycle. In response to different stimuli, [Ca2+]i increases, oscillates and decreases with spatio-temporal codification; accordingly, diverse processes are activated, modulated or terminated by Ca2+-encoded messages. Intracellular Ca2+ dynamics are very ...
Access restricted. Please log in or start a trial to view this content.
Disclosures
We have nothing to disclose.
Acknowledgements
The authors thank Jose Luis De la Vega, Erika Melchy and Dr. Takuya Nishigaki for technical assistance. This work was supported by Consejo Nacional de Ciencia y Tecnología (CONACyT-Mexico) (99333 and 128566 to CT); Dirección General de Asuntos del Personal Académico/ Universidad Nacional Autónoma de México (IN202212-3 to CT).
Access restricted. Please log in or start a trial to view this content.
Materials
| Name | Company | Catalog Number | Comments |
|---|---|---|---|
| Ham's F-10 | Sigma-Aldrich | N-6013 | |
| Bovine Serum Albumin | Sigma-Aldrich | A-7906 | |
| Calcium Chloride Dihydrate approx. 99% | Sigma-Aldrich | C-3881 | |
| Makler Counting Chamber | SEFI Medical Insruments LTD | SEF-MAKL | |
| Fluo-3 AM | Invitrogen | F-1242 | 20 vials/50 μg each |
| Ionomycin | Alomone | I-700 | |
| Progesterone | Sigma-Aldrich | P0130 | |
| Sodium chloride | Sigma-Aldrich | S-9888 | Reagents for human sperm medium (HSM) |
| Potassium chloride | Sigma-Aldrich | P-3911 | Reagents for human sperm medium (HSM) |
| Sodium bicarbonate | JT Baker | 3506 | Reagents for human sperm medium (HSM) |
| Magnesium chloride | Sigma-Aldrich | M-2670 | Reagents for human sperm medium (HSM) |
| Calcium chloride anhydrous | Sigma-Aldrich | C-1016 | Reagents for human sperm medium (HSM) |
| HEPES | Sigma-Aldrich | H-3125 | Reagents for human sperm medium (HSM) |
| D-Glucose | JT Baker | 1906-01 | Reagents for human sperm medium (HSM) |
| Sodium pyruvate | Sigma-Aldrich | P-2256 | Reagents for human sperm medium (HSM) |
| Sodium L-lactate (aprox. 99%) | Sigma-Aldrich | L- 7022 | Reagents for human sperm medium (HSM) |
| Propidium Iodide | Invitrogen | L-7011 | Component B |
| Triton X-100 (t-Octylphenoxypolyethoxyethanol) | Sigma- Aldrich | X-100 | 2.4 mM solution in water |
| Round coverslip | VWR | 48380 080 | 25 mm diameter |
| Poly-L-lysine solution | Sigma-Aldrich | P8920 | |
| Manganese chloride | Sigma-Aldrich | M-3634 | |
| Attofluor; Cell Chamber, for microscopy | Life technologies | A-7816 | |
| Dimethyl Sulphoxide | Sigma-Aldrich | D2650 | 5x5 ml |
References
- Bouschet, T., Henley, J. M. Calcium as an extracellular signalling molecule: perspectives on the Calcium Sensing Receptor in the brain. Comptes Rendus Biologies. 328, 691-700 (2005).
- Darszon, A., Nishigaki, T., Beltran, C., Trevino, C. L. Calcium channels in the development, maturation, and function of spermatozoa. Physiol. Rev. 91, 1305-1355 (2011).
- Esposito, G., et al. Mice deficient for soluble adenylyl cyclase are infertile because of a severe sperm-motility defect. Proc. Natl. Acad. Sci. U.S.A. 101, 2993-2998 (2004).
- Avenarius, M. R., et al. Human male infertility caused by mutations in the CATSPER1 channel protein. American Journal of Human Genetics. 84, 505-510 (2009).
- Carlson, A. E., et al. Pharmacological targeting of native CatSper channels reveals a required role in maintenance of sperm hyperactivation. PLoS ONE. 4, e6844(2009).
- Brokaw, C. J. Calcium and flagellar response during the chemotaxis of bracken spermatozoids. J. Cell. Physiol. 83, 151-158 (1974).
- Visconti, P. E., et al. Capacitation of mouse spermatozoa. II. Protein tyrosine phosphorylation and capacitation are regulated by a cAMP-dependent pathway. Development. 121, 1139-1150 (1995).
- Svahn, H. A., van den Berg, A. Single cells or large populations. Lab on a chip. 7, 544-546 (2007).
- Pepperkok, R., Ellenberg, J. High-throughput fluorescence microscopy for systems biology. Nat. Rev. Mol. Cell Biol. 7, 690-696 (2006).
- Strunker, T., et al. The CatSper channel mediates progesterone-induced Ca2+ influx in human sperm. Nature. 471, 382-386 (2011).
- Lishko, P., et al. The Control of Male Fertility by Spermatozoan Ion Channels. Annu. Rev. Physiol. , (2011).
- Kao, J. P., Harootunian, A. T., Tsien, R. Y. Photochemically generated cytosolic calcium pulses and their detection by fluo-3. J. Biol. Chem. 264, 8179-8184 (1989).
- Kilic, F., et al. Caged progesterone: a new tool for studying rapid nongenomic actions of progesterone. Journal of the American Chemical Society. 131, 4027-4030 (2009).
- Lishko, P. V., Botchkina, I. L., Kirichok, Y. Progesterone activates the principal Ca2+ channel of human sperm. Nature. 471, 387-391 (2011).
- Xia, J., Ren, D. The BSA-induced Ca2+ influx during sperm capacitation is CATSPER channel-dependent. Reprod. Biol. Endocrinol. 7, 119(2009).
- Galantino-Homer, H. L., Florman, H. M., Storey, B. T., Dobrinski, I., Kopf, G. S. Bovine sperm capacitation: assessment of phosphodiesterase activity and intracellular alkalinization on capacitation-associated protein tyrosine phosphorylation. Mol. Reprod. Dev. 67, 487-500 (2004).
- Baldi, E., et al. Intracellular calcium accumulation and responsiveness to progesterone in capacitating human spermatozoa. J. Androl. 12, 323-330 (1991).
Access restricted. Please log in or start a trial to view this content.
Reprints and Permissions
