Implantation of autologous and allogeneic bone grafts constitute accepted approaches to treat major craniofacial bone loss. Yet the effect of graft composition on the interplay among neovascularization, cell differentiation and bone formation is unclear. We present a multimodal imaging protocol aimed to elucidate the angiogenesis-osteogenesis interdependence at the graft proximity.
A subscription to JoVE is required to view this content. Sign in or start your free trial.
Method Article
Computed Tomography and Optical Imaging of Osteogenesis-angiogenesis Coupling to Assess Integration of Cranial Bone Autografts and Allografts
In This Article
Summary
Abstract
A major parameter determining the success of a bone-grafting procedure is vascularization of the area surrounding the graft. We hypothesized that implantation of a bone autograft would induce greater bone regeneration by abundant blood vessel formation. To investigate the effect of the graft on neovascularization at the defect site, we developed a micro–computed tomography (µCT) approach to characterize newly forming blood vessels, which involves systemic perfusion of the animal with a polymerizing contrast agent. This method enables detailed vascular analysis of an organ in its entirety. Additionally, blood perfusion was assessed using fluorescence imaging (FLI) of a blood-borne fluorescent agent. Bone formation was quantified by FLI using a hydroxyapatite-targeted probe and µCT analysis. Stem cell recruitment was monitored by bioluminescence imaging (BLI) of transgenic mice that express luciferase under the control of the osteocalcin promoter. Here we describe and demonstrate preparation of the allograft, calvarial defect surgery, µCT scanning protocols for the neovascularization study and bone formation analysis (including the in vivo perfusion of contrast agent), and the protocol for data analysis.
The 3D high-resolution analysis of vasculature demonstrated significantly greater angiogenesis in animals with implanted autografts, especially with respect to arteriole formation. Accordingly, blood perfusion was significantly higher in the autograft group by the 7th day after surgery. We observed superior bone mineralization and measured greater bone formation in animals that received autografts. Autograft implantation induced resident stem cell recruitment to the graft-host bone suture, where the cells differentiated into bone-forming cells between the 7th and 10th postoperative day. This finding means that enhanced bone formation may be attributed to the augmented vascular feeding that characterizes autograft implantation. The methods depicted may serve as an optimal tool to study bone regeneration in terms of tightly bounded bone formation and neovascularization.
Introduction
Craniofacial bone loss due to trauma, tumor resection, decompressive craniotomy, and congenital defect rarely heals by itself and presents a clear unmet clinical need. Autologous bone grafts and allogeneic bone grafts are extensively used to treat these conditions1.
It is widely accepted that osteogenesis is tightly coupled with angiogenesis2,3. Thus, the complete study of a proposed therapy for bone regeneration should include a comprehensive investigation of the vascular tree forming throughout the entire defect site. There are several available methods to characterize vascularization in research models. The vascular tree can be investigated by histological analysis. Since histology relies on sectioning tissue, there is a high probability that the resulting image will be distorted. To address this problem, intravital microscopy can be performed to image intact blood vessels4; however, this method is limited to one-plane imaging. µCT scanning of specimens obtained from an animal perfused with contrast agent allows 3D imaging of the vascular network that feeds the regeneration site5. This approach allows a highly detailed demonstration of an organ’s vasculature as a whole, as well as a meticulous analysis of blood vessel distribution. Furthermore, µCT enables differentiation between varied diameters of blood vessels, which characterize the different subtypes of blood vessels.
We hypothesized that implantation of a calvarial autograft will induce greater neovascularization than implantation of an allograft, and this increased neovascularization will lead, in turn, to enhanced bone formation.To pursue this hypothesis we employed a variety of techniques. We investigated patterns of the newly formed vascular tree by performing a µCT-based analysis. We measured blood perfusion using a blood-pool fluorescent probe. Next, we assessed bone tissue mineralization by FLI of a hydroxyapatite-directed probe and µCT analysis. Finally, we monitored stem cell recruitment and differentiation, performing BLI in transgenic mice in which luciferase is expressed in osteocalcin-positive cells.
Access restricted. Please log in or start a trial to view this content.
Protocol
The protocol follows the guidelines of the institutional animal care and use committee (IACUC) of The Hebrew University of Jerusalem, Israel (Request No. MD-12-13524-4), an AAALAC approved facility, and by the Cedars-Sinai Medical Center IACUC (Request No. 3770). The animals were treated in strict adherence to NIH guidelines.
1. Preparation of Bone Allografts
- Euthanize 7- to 8-week-old Balb/C mice, or any strain different from the recipient, using the standard method of CO2 inhalation or intraperitoneal injection of 50 μl phenobarbital (65 mg/ml.; 100 mg/kg). Confirm the absence of a heartbeat and perform cervical dislocation. Alternatively, harvest the allografts from carcasses that have been kept in –20 °C and thawed prior to harvest.
- Shave the calvarial region using a hair clipper, applying it against the direction of hair growth. Disinfect the carcass head by applying 70% isopropanol. Cut the scalp skin using a No. 11 scalpel and remove the periosteum.
- Using a dental drill and a 4.5-mm inner-diameter trephine, detach a circular fragment of calvarial bone. Transfer the bone fragment to a 100-mm plastic dish containing sterile saline. At this point, observe blood and soft tissue attached to the bone fragment (Figure 1A). Obtain bone fragments in this manner from 22 donors.
- Hold one bone fragment at a time using curved tweezers. Swab it thoroughly using cotton tipped applicator and remove any brain tissue, soft tissue, and blood (Figure 1B). Gently cut away any bone chips that remain attached to the graft using fine scissors so that the graft will have a perfect rounded shape.
- Dip each graft once in a 15 ml tube containing 70% ethanol and twice in 15 ml tubes containing phosphate-buffered saline to wash the ethanol.
- Freeze the allografts in a –80 °C refrigerator in cryotubes for at least 1 week. At this point, make sure the allografts appear transparent (Figure 1C).
2. Calvarial Defect Surgery
- For recipients use transgenic mice that express luciferase under the control of the osteocalcin promoter6.
- Sterilize the tips of the surgical tools using a glass bead heater for 30 sec. Transfer the tools to a jar containing 70% isopropanol to maintain sterile conditions. Use sterile gloves.
- Anesthetize a 7- to 8-week-old female mouse by intraperitoneal injection of a ketamine- medetomidine mixture (75 mg/kg and 1 mg/kg, respectively). Pinch the animal limb to make sure it is deeply anesthetized. Do not leave an animal unattended until it regained sufficient consciousness to maintain sternal recumbency.
- Shave the calvarial region using a hair clipper by applying it against the direction of hair growth. Apply hair-removing cream to remove any fur remnants and wipe it after no longer than 2 min using dry gauze followed by saline soaked gauze. Care should be taken to avoid getting it in the eyes. Alternatively, the vet eye ointment can be applied prior to hair removal as an extra layer of protection for the eyes. It is imperative that all traces of the depilatory cream be removed in order to avoid possible irritation from excessive exposure to the chemical agent. Disinfect the scalp by applying 5% chlorhexidine (Figure 1D).
- Inject subcutaneously 5 mg/kg carprofen diluted in 200 µl saline. Apply vet eye ointment to prevent dryness and keep the animal on a thermal pad at all times. Position the animal under the operating binoculars.
- Make a 1-cm-long oval cut in the scalp skin using fine scissors and tweezers (Figure 1E). Hold the periosteum using curved tweezers and cut away using fine scissors.
- Drill the calvarial defect 2 mm anterior to the lambdoid suture by using a dental drill and a 5-mm outer-diameter trephine (Figure 1F and G). To avoid penetration of the dura mater, drill three-fourths of the way into the bone and detach the bone fragment using a spatula.
- To implant an autograft, retrieve the bone fragment and wash it in a 10 mm plastic plate containing 10 ml sterile saline to remove debris. Do not remove the soft tissues. To implant an allograft, thaw in advance an allograft and normalize it to RT, and then wash it.
- Place the bone graft in the defect using curved tweezers so it will not touch the defect margins ( Figure 1H). Glue the graft to the host bone using fibrin gel (5 µl of 46 mg/ml fibrinogen mixed with 5 µl of 25 U/ml thrombin).
- Suture the skin using 4-0 vicryl suture ( Figure 1I). Apply povidone-iodine to the surgical cut. Care should be taken to prevent the contamination of the suture by fur. Mark the mouse ear and inject 0.25 mg/kg Antisedan to reverse the anesthetic effect of medetomidine.
- If the animal does wake up in 10 min, make sure it is situated on a warmed pad. Inject 200 µl sterile saline, and if needed inject 0.1 mg/kg Antisedan. Do not return an animal that has undergone surgery to the company of other animals until fully recovered.
- Keep the animals in separated cages for a week to prevent them from opening the sutures. Place mouse chow soaked in water in a petri dish on the cage floor for a few days post-op. Inject subcutaneously 200 µl of 1mg/ml Carprofen solution diluted in sterile saline once a day for 3 days after surgery to treat post-surgical pain.
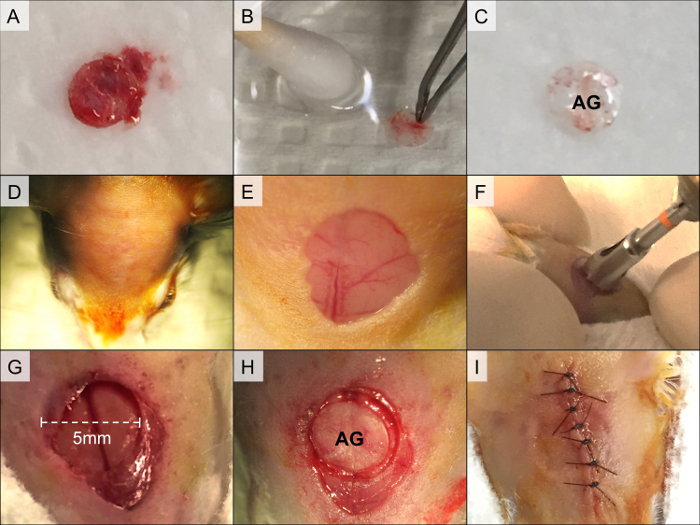
Figure 1. Calvarial Allograft Preparation and Calvarial Defect Surgery. The bone fragment is isolated from the calvarial region (A). Soft tissue, bone marrow, and blood are swabbed (B), and the graft is rinsed in 70% ethanol followed by two washes in phosphate-buffered saline (C, AG = allograft). The recipient mouse is prepared for surgery by shaving and disinfection of skin in the calvarial region (D). An oval cut is created in the scalp skin, and the periosteum is removed (E). Next, the calvarial defect is drilled using a 5-mm-diameter trephine (F). The bone fragment is detached using a spoon-shaped spatula, leaving the superior sagittal sinus intact (G). The allograft is then placed in the defect and secured using fibrin gel (H). Finally, the skin is sutured (I). Please click here to view a larger version of this figure.
3. Micro-Computed Tomography for Characterization of the Vascular Tree
- Prepare heparinized saline. Weight 2,000 U sodium heparin and place it in 50ml plastic tube. Add 20 ml saline and shake well the tube. Fill a 20-ml Luer lock syringe with 15 ml warmed heparinized saline and connect the syringe to a 23-G scalp vein set. Affix the syringe to a syringe pump, and set it to pump 10 ml at 1 ml/min.
- Sedate a mouse using an intraperitoneal injection of 50µl phenobarbital (65 mg/ml.; 100 mg/kg). Pinch the animal’s limb to make sure it is deeply sedated. Secure the mouse on its back to a fixation board wrapped with an absorbent surface liner (Figure 2A). Place the fixed mouse in a fume hood to prevent personnel exposure to fume.
- Cut the skin from the abdomen to the neck using fine scissors and tweezers (Figure 2B). Cut the abdominal wall up to the xiphoid process (Figure 2C). Cut the rib cage along its lateral aspect. Avoid injuring the lungs and heart, and make sure the heart is fully exposed. Use a hemostat to retract the sternum (Figure 2D).
- Insert the butterfly needle 3 mm into the left ventricle (Figure 2E). Glue the needle to the heart and chest wall using 3-sec glue (Figure 2F).
- Activate the pump immediately. After a minute, dissect the inferior vena cava in order to depressurize the vasculature (Figure 2G). Tilt the board so that liquids will flow away from the head. Successful perfusion will result in clearing the liver and blood vessels.
- When the heparinized saline perfusion is completed, perfuse 10 ml of 4% formaldehyde. Avoid penetration of air bubbles into the vasculature and avoid exposure to formaldehyde fumes. Successful formaldehyde perfusion will result in stiffening of the tail. Flush out the formaldehyde with 10 ml heparinized saline.
- Prepare the radio-opaque contrast agent according to manufacturer instructions. Typically, it will require mixing of the compound, diluent, and a curing agent. Use serological pipettes and mix the solution in a 15 ml plastic tube.
- Perfuse the animal with the contrast agent mixture at a rate of 1 ml/min. Observe the coronary, intestinal and hepatic blood vessels and make sure they are turning yellow after perfusion of 2 - 3 ml, indicating successful perfusion (Figure 2H). Upon completion of perfusion, cut the butterfly needle’s tubing, obtain the carcass alone and wrap it with toilet paper to prevent leakage of the solution to the calvarial region. Allow polymerization in 4 °C O/N.
- Dissect the calvarial region (Figure 2I); First use a scalpel to cut the skin as lateral as possible, avoiding damaging the cranial region of interest. Locate the bone graft and then use fine scissors to cut the cranial bone 10 mm away from the graft.
- Scan the isolated calvarial bone sample using a μCT scanner; set field of view to 20.5 mm, X-ray energy of 55 kVp, Intensity of 145 μA, using 1,000 projections per 360° and integration time of 200 msec. Adjust μCT parameters7 to image other bone defect models.
- Observe the 2D reconstructed slices that were generated by the μCT software. Make sure to scan the region of interest is properly and then locate the calvarial defect. Assess the quality of the perfusion. After successful identification of blood vessels (Figure 2J), continue and decalcify the sample using 6% Trichloroacetic Acid (TCA) diluted in Double Distilled Water (DDW).
- Rescan the sample using the parameters indicated in Section 3.10. Locate the Lambdoid suture in the reconstructed 2D slices. Define a cylindrical volume of interest (VOI) in height of 2 mm and 8 mm diameter, that is tangent to the suture – this is the anatomical site of defect.
- Segment the bone tissue from soft tissues using a global thresholding procedure; set the lower threshold to 130, and apply a constrained 3D Gaussian filter (sigma [σ] = 2.0 and support = 2) to partially suppress noise in the volumes. Generate a 3D reconstruction and make sure the VOI is properly positioned (Figure 2K).
- Generate a thickness map using the IPL software and the “dt_object_param” function (Figure 2L).
NOTE:This function describes the vessel volume for each vessel diameter.
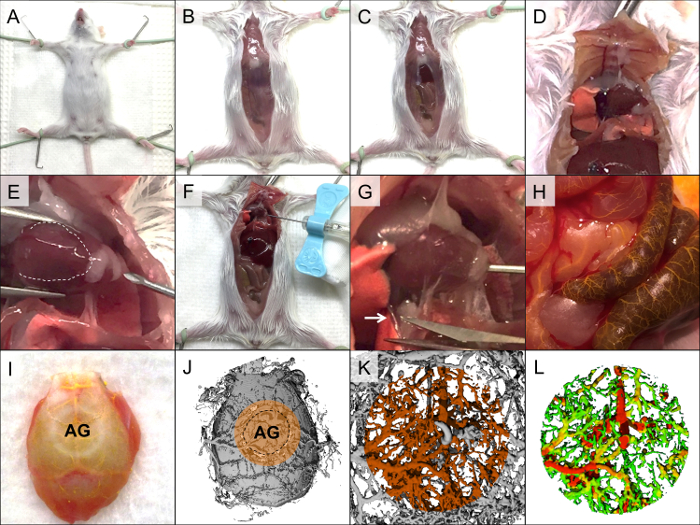
Figure 2. Perfusion using a radio-opaque agent via the cardiac approach. The mouse is affixed to the fixation board (A), and the skin is cut along the abdomen up to the neck (B). The abdominal wall is cut along the medial line up to the xiphoid process (C), and the rib cage is cut laterally (D). A butterfly needle is inserted into the left ventricle, avoiding insertion into the right ventricle, which is markedly darker (E, the right ventricle is indicated by the white dashed line), and the needle is affixed to the heart and chest wall (F). Heparinized saline (2–3 ml) is pumped into the heart, and the inferior vena cava is dissected (G, white arrow indicates the inferior vena cava). Formaldehyde (4%) is perfused and washed out; this is followed by a perfusion of yellow-dyed radio-opaque contrast agent. Successful perfusion will be evident by clearance of the blood vessels, which change color to yellow (H). After polymerization, the calvarial region is isolated (I, AG = allograft) and imaged using a µCT scanner to confirm proper perfusion (J, volume of interest is marked with orange). The sample is decalcified and rescanned (K), followed by generation of a colored thickness map (L). Please click here to view a larger version of this figure.
4. Fluorescence Imaging of Bone Mineralization and Blood Perfusion
- Reconstitute probes to a concentration of 2 nmol/100 µl PBS in a 1.5 ml tube (use a bisphosphonate-conjugated fluorescent probe to monitor bone mineralization and a blood-borne fluorescent agent to measure blood perfusion). Pipette gently several times to ensure homogenous dissolving of the probe.
- 24 hr before the designated imaging session take a time-zero image; anesthetize 3 mice using 2 L/min inhalation of 100% medical-grade oxygen supplemented with 3% isoflurane in an induction chamber. After proper anesthesia has been established, lower the isoflurane concentration to 1.5% – 2%.
- Apply vet eye ointment to prevent dryness and make sure thermal pad is switched on at all times. Pinch the animal limb to make sure it is deeply anesthetized. Do not leave an animal unattended until it regained sufficient consciousness to maintain sternal recumbency.
- Shave the calvarial region using a hair clipper applying it against the direction of hair growth. Remove fur remnants using hair-removing cream. Any fur remnant will interfere with optical imaging. Remove sutures using fine scissors and tweezers.
- Place three animals on the IVIS stage warmed to 37 °C for each imaging session. Set exposure time to auto, view field to C, and adjust filters. e.g., for a bisphosphonate-conjugated fluorescent probe characterized with maximal excitation at light wavelength of 680 nm, use an excitation filter of 675 nm and an emission filter of Cy5.5. Similarly, when using a blood-borne fluorescent agent with peak excitation at light wavelength 750 nm use an excitation filter of 710 nm and an emission filter of 780 nm.
- Image the mice through Living Image software by pressing the “Acquire” button. Make sure the calvarial region is completely visible (Figure 3B) For a comprehensive guide advise Lim et al 20098.
- Allow the mice to awake inhaling 100% oxygen.
- Inject the 2-nmol fluorescent probe via an intravenous tail injection. At the designated imaging session, perform imaging as described above.
5. Micro-Computed Tomography for Bone Regeneration
- For quantification of bone formation, anesthetize the mouse by inhalation of 3% isoflurane, as depicted in step 4.2 - 4.3. Transfer the mouse to the μCT scanner bed, and place it in the scanner.
- Set the μCT scanner’s x-ray tube potential energy to 55 kVp and intensity of 145 µA medium resolution. Using a field of view of 20.5 mm, perform a scout (single x-ray) scan and define a region of interest extending from the mouse’s eyes to the back of its skull. Perform a CT scan, using 1,000 projections per 360° and integration time of 200 msec.
- Reconstruct the 2D slices using a nominal spatial resolution of 20 µm. Align the defect margins to a standardized position using μCT software9.
- Similar to step 3.20, define a cylindrical volume of interest and apply the constrained 3D Gaussian filter (σ = 0.8 and support = 1) to partially suppress noise in the volumes. Segment the bone tissue from soft tissues using a global thresholding procedure.
- Determine the volume of mineralized bone tissue in the volume of interest.
6. Bioluminescence Imaging of Stem Cell Recruitment and Differentiation
- Prepare the mouse for imaging as depicted in Sections 4.2-4.4 and awake the mice by inhalation of 100% oxygen.
- Administer 126 mg/kg beetle luciferin to each mouse via intraperitoneal injection, and return the animal to the induction chamber. After 2 min, anesthetize the animal using 3% isoflurane. Place the mice on the IVIS warmed stage.
- Via Living Image software, set the exposure time to “auto,” and the field of view to C. Image the mice 5 min after luciferin administration. Image the animals as depicted in step 4.6, using the “Bioluminescence” modality Define regions of interest because transgene expression varies between mice. Normalize the calvarial signal to the tail.
Access restricted. Please log in or start a trial to view this content.
Results
Neovascularization was assessed by µCT volumetric analysis and by FLI using a fluorescent blood-borne agent to quantify blood perfusion. Seven days after surgery, µCT scanning demonstrated a significantly higher volume of small- and medium-diameter blood vessels in mice that had received autografts than in mice that had received allografts harvested from C57BL/6 (Figure 3A). Interestingly, in the autograft group the newly formed vascular tree appeared to reach the entire defect area, whereas in the allog...
Access restricted. Please log in or start a trial to view this content.
Discussion
The aim of the multimodal imaging approaches described here is to enable meticulous investigation of the angiogenesis-osteogenesis axis in the context of cranial bone grafting. Neovascularization was imaged using a µCT protocol, which allowed an accurate high-resolution 3D demonstration of the vascular tree feeding the entire cranial defect. µCT data can be readily analyzed using advanced tools such as IPL software. For example, the thickness analysis shown in Figure 3C revealed that the main d...
Access restricted. Please log in or start a trial to view this content.
Disclosures
The authors have nothing to disclose.
Acknowledgements
The authors acknowledge funding from the NIDCR (Grant No. DE019902) and from the Israeli Science Foundation (Grant No. 382/13).
Access restricted. Please log in or start a trial to view this content.
Materials
| Name | Company | Catalog Number | Comments |
|---|---|---|---|
| C57BL/C Mice | Harlan laboratories | 57 | |
| FVB/n Mice | Harlan laboratories | 862 | |
| Phenobarbital | West waro | NDC 0641-0477-25 | |
| Rodent hair clipper | Wahl animal | 8786-451A | |
| Scalpel 11 | Miltex | 27111504 | |
| Dental micro motor | marathon III | ||
| 5 mm trephine | Fine Science tools | 18004-50 | |
| Hair removing cream | Veet | ||
| KetaVed (Ketamine) | Vedco | NDC 50989-996-06 | |
| Domitor | Zoetis | NADA 141-267 | |
| carprofen | Norbrook | 02000/4229 | |
| Eye ointment | Puralube | NDC 17033-211-38 | |
| Operating binocular | Kent scientific | KSCXTS-1121 | |
| Fine scissors | Fine Science tools | 14060-11 | |
| Curve tweezers | Fine Science tools | 11274-20 | |
| Spoon shaped spatula | Fine Science tools | 10090-13 | |
| Tisseel Fibin gel kit | Baxter | 718971 | |
| needle holder | Fine Science tools | 12060-01 | |
| vicryl suture 4-0 | Ethicon | J392H | |
| Antisedan | Zoetis | NADA#141033 | |
| Heparin | Sigma | H3393 | |
| 20 ml luerlock | BD | 302830 | |
| 23G scalp vein set (butterfly needle) | BD | 367342 | |
| Hemostat | Fine Science tools | 13008-12 | |
| Syringe pump | Harvard apparatus | PHD 2000 | |
| 3-sec gel glue | Scotch | ||
| rodent dissection board | Leica | 38DI02313 | |
| Microfil MV-122 | flow-tech | MV-122 | |
| μCT40 scanner | Scanco | μCT40 | |
| TCA6% | Sigma | T6399 | |
| Osteosense 680 | PerkinElmar | NEV10020EX | |
| Angiosense750 | PerkinElmar | NEV10011 | |
| Oxigen 100% medical grade | |||
| isoflurane (furane) | Baxter | 1001936040 | |
| IVIS kinetics | Xenogen | ||
| Beetle luciferin | Promega | E160A |
References
- Finkemeier, C. G. Bone-grafting and bone-graft substitutes. J Bone Joint Surg Am. 84-A (3), 454-464 (2002).
- Kanczler, J. M., Oreffo, R. O. Osteogenesis and angiogenesis: the potential for engineering bone. Eur Cell Mater. 15, 100-114 (2008).
- Schipani, E., Maes, C., Carmeliet, G., Semenza, G. L. Regulation of osteogenesis-angiogenesis coupling by HIFs and VEGF. J Bone Miner Res. 24 (8), 1347-1353 (2009).
- Huang, C., et al. Spatiotemporal Analyses of Osteogenesis and Angiogenesis via Intravital Imaging in Cranial Bone Defect. J Bone Miner Res. , (2015).
- Kimelman-Bleich, N., et al. The use of a synthetic oxygen carrier-enriched hydrogel to enhance mesenchymal stem cell-based bone formation in vivo. Biomaterials. 30 (27), 4639-4648 (2009).
- Iris, B., et al. Molecular imaging of the skeleton: quantitative real-time bioluminescence monitoring gene expression in bone repair and development. J Bone Miner Res. 18 (3), 570-578 (2003).
- Bouxsein, M. L., et al. Guidelines for assessment of bone microstructure in rodents using micro-computed tomography. J Bone Miner Res. 25 (7), 1468-1486 (2010).
- Lim, E., Modi, K. D., Kim, J. In vivo bioluminescent imaging of mammary tumors using IVIS spectrum. J Vis Exp. (26), (2009).
- Kallai, I., et al. Microcomputed tomography-based structural analysis of various bone tissue regeneration models. Nat Protoc. 6 (1), 105-110 (2011).
- Fleming, J. T., et al. Bone blood flow and vascular reactivity. Cells Tissues Organs. 169 (3), 279-284 (2001).
- Dhillon, R. S., et al. PTH-enhanced structural allograft healing is associated with decreased angiopoietin-2-mediated arteriogenesis, mast cell accumulation, and fibrosis. J Bone Miner Res. 28 (3), 586-597 (2013).
- Nebuloni, L., Kuhn, G. A., Vogel, J., Muller, R. A. A novel in vivo vascular imaging approach for hierarchical quantification of vasculature using contrast enhanced micro-computed tomography. PLoS One. 9 (1), e86562(2014).
- Zhang, X., et al. Periosteal progenitor cell fate in segmental cortical bone graft transplantations: implications for functional tissue engineering. J Bone Miner Res. 20 (12), 2124-2137 (2005).
- Movahed, R., Pinto, L. P., Morales-Ryan, C., Allen, W. R., Wolford, L. M. Application of cranial bone grafts for reconstruction of maxillofacial deformities. Proc (Bayl Univ Med Cent). 26 (3), 252-255 (2013).
- Putters, T. F., Schortinghuis, J., Vissink, A., Raghoebar, G. M. A prospective study on the morbidity resulting from calvarial bone harvesting for intraoral reconstruction. Int J Oral Maxillofac Surg. , (2015).
- Kline, R. M., Wolfe, S. A. Complications associated with the harvesting of cranial bone grafts. Plast Reconstr Surg. 95 (1), 5-13 (1995).
- Hassanein, A. H., et al. Effect of calvarial burring on resorption of onlay cranial bone graft. J Craniofac Surg. 23 (5), 1495-1498 (2012).
- Yin, J., Jiang, Y. Completely resorption of autologous skull flap after orthotopic transplantation: a case report. Int J Clin Exp Med. 7 (4), 1169-1171 (2014).
- Schuss, P., et al. Bone flap resorption: risk factors for the development of a long-term complication following cranioplasty after decompressive craniectomy. J Neurotrauma. 30 (2), 91-95 (2013).
- Ben Arav, A., et al. Adeno-associated virus-coated allografts: a novel approach for cranioplasty. J Tissue Eng Regen Med. 6 (10), e43-e50 (2012).
- Ito, H., et al. Remodeling of cortical bone allografts mediated by adherent rAAV-RANKL and VEGF gene therapy. Nat Med. 11 (3), 291-297 (2005).
- Sheyn, D., et al. PTH promotes allograft integration in a calvarial bone defect. Mol Pharm. 10 (12), 4462-4471 (2013).
- Jain, R. K. Molecular regulation of vessel maturation. Nat Med. 9 (6), 685-693 (2003).
- Reginato, S., Gianni-Barrera, R., Banfi, A. Taming of the wild vessel: promoting vessel stabilization for safe therapeutic angiogenesis. Biochem Soc Trans. 39 (6), 1654-1658 (2011).
- Moutsatsos, I. K., et al. Exogenously regulated stem cell-mediated gene therapy for bone regeneration. Mol Ther. 3 (4), 449-461 (2001).
- Deckers, M. M., et al. Bone morphogenetic proteins stimulate angiogenesis through osteoblast-derived vascular endothelial growth factor. A. Endocrinology. 143 (4), 1545-1553 (2002).
- Cornejo, A., et al. Effect of adipose tissue-derived osteogenic and endothelial cells on bone allograft osteogenesis and vascularization in critical-sized calvarial defects. Tissue Eng Part A. 18 (15-16), 1552-1561 (2012).
Access restricted. Please log in or start a trial to view this content.
Reprints and Permissions
