The following protocol describes the preparation and utilization of buffers for the quantitative measurement of rates of glucose and fatty acid oxidation in the isolated working rat heart. The methods used for sample analysis and data interpretation are also discussed.
A subscription to JoVE is required to view this content. Sign in or start your free trial.
Method Article
Methods for the Determination of Rates of Glucose and Fatty Acid Oxidation in the Isolated Working Rat Heart
In This Article
Summary
Abstract
The mammalian heart is a major consumer of ATP and requires a constant supply of energy substrates for contraction. Not surprisingly, alterations of myocardial metabolism have been linked to the development of contractile dysfunction and heart failure. Therefore, unraveling the link between metabolism and contraction should shed light on some of the mechanisms governing cardiac adaptation or maladaptation in disease states. The isolated working rat heart preparation can be used to follow, simultaneously and in real time, cardiac contractile function and flux of energy providing substrates into oxidative metabolic pathways. The present protocol aims to provide a detailed description of the methods used in the preparation and utilization of buffers for the quantitative measurement of the rates of oxidation for glucose and fatty acids, the main energy providing substrates of the heart. The methods used for sample analysis and data interpretation are also discussed. In brief, the technique is based on the supply of 14C- radiolabeled glucose and a 3H- radiolabeled long-chain fatty acid to an ex vivo beating heart via normothermic crystalloid perfusion. 14CO2 and 3H2O, end byproducts of the enzymatic reactions involved in the utilization of these energy providing substrates, are then quantitatively recovered from the coronary effluent. With knowledge of the specific activity of the radiolabeled substrates used, it is then possible to individually quantitate the flux of glucose and fatty acid in the oxidation pathways. Contractile function of the isolated heart can be determined in parallel with the appropriate recording equipment and directly correlated to metabolic flux values. The technique is extremely useful to study the metabolism/contraction relationship in response to various stress conditions such as alterations in pre and after load and ischemia, a drug or a circulating factor, or following the alteration in the expression of a gene product.
Introduction
Clinical Relevance
In the mammalian heart, there is a strong positive relationship between the flux of substrates through oxidative metabolic pathways, ATP generation and cardiac work1. Over the past two decades, the investigation of the intricate link between cardiac metabolism and function has led to recognize that alterations in cardiac metabolism are a cause for contractile dysfunction and possibly pathological structural remodeling in the setting of different types of heart disease2-4.Therefore, it is expected that our understanding of the mechanisms governing metabolic remodeling of the stressed heart will lead to the identification of therapeutic targets for the prevention or treatment of heart failure5-7. The recent publication of a scientific statement from the American Heart Association on "Assessing Cardiac Metabolism" emphasizes the growing interest of the scientific community for this field of research8. But while the technological advances in cardiac imaging now allow for a rapid and accurate evaluation of cardiac morphology and function, the in vivo study of cardiac metabolism remains limited and burdensome: Nuclear Magnetic Resonance (NMR) spectroscopy and Positron Emission Tomography (PET) imaging can be used to follow cardiac high energy phosphate metabolism and Krebs cycle activity, but these techniques are plagued by high operating costs and by their inability to determine the contribution of various substrates to oxidative metabolism in steady-state conditions9.To this date the ex vivo working heart preparation represents the sole and unique technique available to study, simultaneously and in real time, contractile function and flux of substrates into oxidative metabolic pathways7,9. The following protocol aims to provide guidelines in the preparation and utilization of reagents used to determine the rates of substrates utilization in the isolated working rat heart.
The Isolated Working Rodent Heart Apparatus
Although the technique is almost half a century old, the isolated working rat heart preparation remains a method of choice for cardiovascular research. As with the Langendorff heart preparation, the working rodent heart offers a relatively simple, reliable, and inexpensive way to measure a wide range of cardiac parameters independently from the confounding effects of other organs, neurohormonal and other circulating factors. But in contrast to the Langendorff-perfused heart, the working heart continues to perform near-physiological cardiac work, a prerequisite for the generation of oxidative metabolic flux to levels that are relevant to in vivo conditions. This is achieved by delivering the perfusion buffer to the left ventricle (LV) via a cannula connected to the left atrium, and as the LV fills and contracts, the buffer is ejected through the aortic line against a determined afterload hydrostatic pressure. The design of the perfusion apparatus originally described by Neely and colleagues10 was subsequently improved by Taegtmeyer, Hems and Krebs11, but has changed very little ever since. As described in the original apparatus, contractile function can be assessed through determination of cardiac output, using no more than graduated cylinders and a stopwatch to measure aortic and coronary flows10,11. Several vendors now offer complete working rodent heart perfusion systems. These commercially available apparatus can be acquired with flowprobes, pressure transducers, a pressure-volume catheter and all the equipment necessary for cardiac functional data acquisition and analysis. The vendors provide extensive documentation and training sessions to familiarize the new user with their equipment. Several review articles also detail protocols on the working heart instrumentation and on the use of catheters to measure cardiac function in rodents12-15. For this reason, we will only briefly mention the set-up of the perfusion apparatus and the recording equipment. The present protocol rather aims to complement the already available information with a description of the methods that can be implemented to simultaneously measure the rates of glucose and long-chain fatty acid oxidation, the two major energy providing substrates in the normal heart. We describe here all the steps involved in the use of radiolabeled energy substrates for the assessment of myocardial oxidative metabolism, from the preparation of reagents and buffers to the recovery and processing of samples, to the data analysis.
Principles of the Method
Cardiomyocytes generate the bulk of their energy for contraction from the oxidative phosphorylation of fatty acids (principally long-chain fatty acids) and carbohydrates (glucose and lactate). The heart has very limited energetic reserves and relies on a constant supply of these energy providing substrates from the circulation. The catabolism of glucose through the glycolytic pathway yields pyruvate which is then decarboxylated by the pyruvate dehydrogenase complex of the inner mitochondrial membrane. Long-chain fatty acids, extracted from circulating albumin or lipoprotein triglycerides, are first activated into acyl-CoA molecules in the cytosol and subsequently transported inside the mitochondrial matrix through the carnitine shuttle to enter the beta-oxidation pathway. The acetyl-CoA molecules produced by the catabolism of glucose and fatty acids fuel the Krebs cycle to generate the reducing equivalents (NADH and FADH2) which are used by the electron transport chain to build the proton-motive force across the inner mitochondrial membrane and generate ATP through the activity of the ATP synthase. Water and carbon dioxide are the end byproducts of the enzymatic reactions taking place inside the Krebs cycle. The supply of 14C- and 3H- radiolabeled substrates (such as 14C-radiolabeled glucose and 3H-radiolabeled oleic acid) to the isolated working heart will consequently lead to the production of 14CO2 and 3H2O which can be quantitatively recovered from the coronary effluent. The collection of 14CO2 is carried out by keeping the isolated perfused heart into a sealed chamber and by immediately recovering the coronary effluent as it exits the heart. A small anion exchange column is used to separate and recover 3H2O from the coronary effluent. The radioactivity from the processed samples is measured with a liquid scintillation counter, and with knowledge of the specific activity of the radiolabeled substrates used, it is then possible to individually quantitate the flux of glucose and fatty acid in the oxidation pathways16,17.
Access restricted. Please log in or start a trial to view this content.
Protocol
NOTE: All animal procedures were performed according to the NIH Public Health Service Policy on the Human Care and Use of Animals and were approved by the Institutional Animal Care and Use Committee of the University of Mississippi Medical Center. All procedures involving the use of radioisotopes were approved and performed according to the guidelines set by the radiation safety office of the University of Mississippi Medical Center.
1. Preparation of Stock Buffer Solutions and Reagents
- Krebs-Henseleit (KH) Buffer Stock Solutions
- Prepare 2 L of a 20x concentrated salt stock solution containing (in mol/L) 2.37 NaCl, 0.0948 KCl, 0.0236 KH2PO4, and 0.0236 MgSO4*7H2O. Filter on a 0.45 µm pore size filtration unit and store at room temperature for up to 1 month.
- Prepare 2 L of a 20x concentrated (0.5 mol/L) solution of NaHCO3. The solution can be stored at room temperature for an indefinite period of time.
- Prepare 250 ml of a 1 mol/L stock solution of CaCl2. Filter on a 0.45 µm pore size filtration unit and store at room temperature for up to 1 month.
- Conversion of Anion Exchange Resin from the Chloride Form to the Hydroxide Form
- Wash the anion exchange resin by resuspending it in 1 L ultrapure water. Allow the resin to settle and pour off the excess water. Repeat this step 4 more times.
- Pour the resin in a glass microanalysis vacuum filter holder mounted on a filtering flask.
- Convert the resin to the hydroxide form by slowly passing through 22 volumes of 1 N NaOH. Mix the slurry intermittently with a stainless steel spatula.
- Wash the resin with ultrapure water until the pH falls below 9.0. Check the pH regularly by dipping a pH test strip near the surface of the resin slurry. Cover and store the resin with ultrapure water into a borosilicate glass bottle and protect from light. Do not allow the resin to dry before use.
NOTE: When stored properly, the resin will last at least 3 months.
- Oleic Acid-albumin 8x Concentrated Stock Solution
- In a 4 L Erlenmeyer flask, mix 200 ml of the 20x concentrated salt stock solution and 200 ml of the 20x concentrated NaHCO3 solution with 3.6 L ultrapure water.
- Using a gas dispersion tube with a fritted cylinder, gas the solution for 15 min with a mixture of carbon dioxide 5% and oxygen 95% to stabilize the pH.
- Pour 470 ml buffer in a 1 L glass beaker. Add 8.75 ml of the 1 mol/L CaCl2 stock solution to the 3530 ml buffer remaining in the 4 L Erlenmeyer flask and set aside.
- Add 40 g of fatty acid-free BSA to the 1 L glass beaker and stir with a stir bar until dissolved.
- In a 15 ml conical tube, prepare 4 ml of a 50% (v:v) ethanol solution in ultrapure water. Add 487 mg sodium oleate and vortex until the powder is fully dissolved.
NOTE: Some investigators use palmitic acid instead of oleic acid in the perfusion buffer. A palmitic acid-albumin stock solution may be prepared following the same procedure. However, it is recommended to warm the solution at 70 ºC to achieve complete solubilization of sodium palmitate. - Add the oleate solution dropwise to the fatty acid-free BSA solution under constant stirring and wait 10 more min for the oleic acid-BSA complex to form.
NOTE: The solution should have a light yellow color and be devoid of visible particles. Presence of a precipitate or insoluble particles may indicate incomplete conjugation of the fatty acid to BSA. If this happens, the solution should be discarded and the process started over again.
NOTE: Palmitate will precipitate if it is allowed to sit in a pipette and cannot be added dropwise. The stirred solution of BSA may be warmed at 37 ºC to facilitate binding of palmitic acid. Do not overheat as this may cause denaturation and aggregation of BSA.
CAUTION: The next steps of this protocol involve the manipulation of radioactive material. Wear appropriate PPE and follow the safety and waste disposal regulations set by the institution's radiation safety office. - Add 160 µl (0.8 mCi) [9,10-3H]oleic acid to the stirring solution of oleic acid-BSA and stir for another 10 min.
- Add 2.5 ml of the 1 mol/L CaCl2 stock solution to the stirring solution of oleic acid-BSA.
- Cut approximately 1.2 m dialysis membrane tubing and rinse both inside and outside with tap water. Scrub the dialysis tubing vigorously under tap water for 10 to 15 min to remove the glycerol coating of the membrane. Alternatively, remove the coating by soaking the dialysis tubing in warm water for 1 hr before use. Finish by rinsing the dialysis tubing with ultrapure water.
- Securely tie off one end of the dialysis tubing. Fill with the oleic acid-BSA solution and tie off the other end of the dialysis tubing.
- Place the filled dialysis tubing into the 4 L Erlenmeyer flask of KH buffer and allow dialyzing overnight at 4 ºC under gentle stirring with a stir bar.
- The next day, remove the 8x concentrated oleic acid-BSA solution from the dialysis tubing. Use the oleic acid-BSA solution immediately for perfusion or aliquot and store at -20 ºC. Frozen aliquots are stable for at least 2 months. Avoid multiple freeze-thaw cycles as this may compromise the solubility of the oleic acid-BSA complex.
NOTE: Use only ultrapure water (Resistivity of 18.2 MΩ.cm at 25 ºC, total organic carbon <10 ppb, micro-organisms ≤ 1 CFU/ml, particulates with size over 0.22 µm ≤1/ml) to prepare the reagents and buffers used for heart perfusion. Conversion of the anion exchange resin from its chloride form to the hydroxide form can be avoided by direct purchase of the hydroxide form at an additional expense (see Materials Table). Besides oleate or palmitate, any other type of naturally occurring fatty acid can also be used, as long as a tritiated version of the fatty acid is available to follow its oxidation.
2. Preparation of the Perfusion Buffer
- In a 4 L Erlenmeyer flask, mix 200 ml of the 20x concentrated salt stock solution and 200 ml of the 20x concentrated NaHCO3 solution with 3.6 L ultrapure water. Gas the solution for 15 min with a mixture of carbon dioxide 5% and oxygen 95%, and then add 10 ml of the 1 mol/L CaCl2 stock solution to set the concentration of free Ca2+at 2.5 mmol/L.
CAUTION: The following steps involve the manipulation of radioactive material. Wear appropriate PPE and follow the safety and waste disposal regulations set by the institution's radiation safety office. - Transfer 1.750 L KH buffer to a 2 L borosilicate glass bottle. Add 250 ml of the 8x concentrated oleic acid-BSA solution, 1.802 g D-glucose, 400 µl insulin at 0.4 U/ml, and 200 µl (0.2 mCi) [U-14C]Glucose. Invert bottle to mix. This will give 2 L of complete perfusion buffer containing oleic acid (0.4 mmol/L), D-glucose (5 mmol/L), and insulin (40 µU/ml).
NOTE: A volume of 2 L is sufficient to perfuse a working adult rat heart in non-recirculating conditions for at least 60 min. - Use some of the non-radioactive KH buffer to fill two dissection dishes and place on ice to cool.
3. Preparation of the Perfusion Apparatus
NOTE: The investigator can choose to use a custom-built perfusion apparatus such as the one described by Taegtmeyer, Hems and Krebs11, or one of the commercially available systems. Perfusion systems are typically composed of the elements described in Figure 1 below. Besides the tubing and glassware, the rest of the recording equipment is optional and its utilization will depend on the investigator's needs to address the experimental question being asked. Nonetheless, we recommend the use of oxygen microelectrodes to determine the O2 concentration in the buffer entering and exiting the coronary circulation (Figure 1). This will help the investigator control that the heart is supplied with an appropriate amount of oxygen, and that the oxygen supply doesn't vary between experiments. In addition, the determination of the "arteriovenous" oxygen difference can be used to calculate myocardial oxygen consumption and cardiac efficiency16,18.
- Turn on the circulating water bath and set at 37 ºC to warm up the perfusion apparatus.
- Turn on the computer and the data acquisition system that will be used to measure cardiac function.
- Connect the recording devices (pressure catheter, pressure-volume catheter, oxygen microelectrodes, flowmeters, etc.) to the data acquisition system and perform calibration of the instruments following the manufacturer's instructions.
- Fill the buffer reservoir with ultrapure water. Turn on the peristaltic pump and flush out the water through all the tubing and glassware to rinse the system. Turn off the peristaltic pump and make sure no water stays in the tubing and/or glassware as this may affect the concentration of the perfusion buffer and the heart preparation.
- Connect a new 1.0 µm glass fiber filter to the system. Connect the gas tank containing a mixture of carbon dioxide 5% and oxygen 95% to the oxygenating chamber.
CAUTION: The following steps involve the manipulation of radioactive material. Wear appropriate PPE and follow the safety and waste disposal regulations set by the institution's radiation safety office. - Fill the buffer reservoir with perfusion buffer. Turn on the pump and ensure filling of all tubing and glassware with the perfusion buffer. Run the perfusion buffer through the perfusion apparatus in the recirculating mode and oxygenate for at least 30 min prior to use.
- Tightly attach the tube of a 20 ml syringe underneath the heart chamber to recover the coronary effluent. Connect the tip of the syringe to the top of a three-way stopcock. Connect the side arm to a 3 ml syringe. Connect the bottom arm via tubing to a container for liquid radioactive waste.
NOTE: When using the fatty acid-BSA complex, oxygenation of the perfusion buffer cannot be carried out through direct bubbling with a gas dispersion tube as this will cause excessive foaming of the solution. Use a membrane oxygenator (Figure 1) or a sheet flow oxygenating chamber for that purpose. It is highly recommended to verify that an appropriate level of oxygenation is reached by placing an oxygen microelectrode in the perfusion circuit ( Figure 1).
4. Rat Heart Isolation and Cannulation
- Weigh rat on a scale.
- Prepare a syringe with anesthetic dose of 150 mg/kg thiobutabarbital sodium salt hydrate and a tuberculin syringe with 200 USP units heparin.
- Inject thiobutabarbital I.P. and wait for the animal to lose consciousness. Other induction agents can be used as long as this will not interfere with the purpose of the experiment (See Choice of the anesthetic in the Discussion Section below).
- Check for appropriate level of anesthesia by confirming lack of toe pinch reflex. Make sure to maintain proper depth of anesthesia to assure that the animal does not feel pain during the procedure.
- Once the rat is fully unconscious and does not respond to toe pinch, place it on its back on the operating table and secure limbs with tape or pins.
- Clip the abdomen free of hair and perform a midline incision of the abdomen. Do not open the chest cavity at this point yet. Move the stomach and intestine aside to reveal the inferior vena cava. Inject the heparin directly into the inferior vena cava and wait 5 to 10 sec before proceeding.
- Using scissors cut the diaphragm and the sides of the rib cage to expose the content of the chest cavity.
- Delicately grab the heart between the thumb, index and middle fingers and excise both heart and lungs together. Cut at the level of the descending aorta, being careful not to damage the aortic arch and ascending aorta in the process. Immediately transfer heart and lungs to one of the dissection dishes filled with ice-cold KH buffer.
- After the heart stops beating, transfer into the second dissection dish and trim off any large pieces of lung tissue attached while keeping the heart submerged in ice-cold KH buffer. Cut the descending aorta right above the aortic arch.
CAUTION: The following steps involve the manipulation of radioactive material. Wear appropriate PPE and follow the safety and waste disposal regulations set by the institution's radiation safety office. - Flush the aortic line of the perfusion apparatus to fill the aortic cannula with warm buffer and to eliminate any water or air that may still be present in the tubing. Allow the perfusion buffer to drip from the aortic cannula to minimize the chance of air emboli at the time the heart is attached to the cannula.
- Using two micro dissecting forceps carefully open the aorta and slide the heart up onto the aortic cannula. Secure the aorta on the cannula with a micro clip and initiate Langendorff perfusion of the heart. Observe the heart start beating again and expel all the blood remaining in the coronary vasculature in the seconds following the beginning of perfusion.
NOTE: It is very important to perform steps 4.6 through 4.10 as fast as possible to prevent irreversible ischemic damage to the heart. With experience, the whole procedure should take between 1 and 2 min. When sliding the aorta up on the cannula, be careful not to pass the aortic root as this may result in myocardial hypoperfusion and damage to the aortic valve. - Tie the aorta to the aortic cannula with a 3-0 silk suture and remove the micro clip. Locate the pulmonary vein. It may be necessary to trim the non-cardiac tissues to find it, but do not cut too much of the non-cardiac tissues as they will serve to tie the left atrium to the cannula.
- Flush the left atrial line of the perfusion apparatus to fill the atrial cannula with warm buffer and to eliminate any water or air that may still be present in the tubing. Be particularly careful to remove any air bubble from the apparatus to minimize the chance of air emboli at the time the heart is attached to the cannula.
- Using two micro dissecting forceps delicately grab the opening of the pulmonary vein and slide the heart up onto the atrial cannula. It may be necessary to reposition the heart by gently rotating the atrial and/or aortic cannula to accomplish this step. In any case, ensure that the procedure does not impose excessive strain on the heart and cause bending of the aorta. Tie the left atrium to the atrial cannula with a 3-0 silk suture.
- Open the atrial line and simultaneously switch the aortic line from the Langendorff mode to the working mode. If buffer leaks out from the left atrium, close the atrial line, switch back the aortic line to Langendorff perfusion, and use another 3-0 silk suture to tie the left atrium more securely to the cannula.
5. Measurement of Cardiac Function and Sample Collection
NOTE: The determination of metabolic fluxes will require the knowledge of the coronary flow (CF). As described below, coronary flow values can be obtained with the simple use of a stopwatch. Additionally, the measurement of aortic flow (AF) with the same method will allow the determination of cardiac output (CO = CF + AF), which can then be used to calculate cardiac power (CP) as a general measure of cardiac function by applying the formula CP = CO (m3/s) * Afterload (Pa). Another method available for the assessment of cardiac function relies on real time measurement of pulse pressure with a pressure transducer (Figures 3 and 4). Although optional, the most accurate and detailed measurements of cardiac contractile function and hemodynamics, including the determination of left ventricular systolic and diastolic functions, will be achieved with the use of a pressure-volume (PV) conductance catheter. This section briefly describes the catheterization of the isolated heart. Additional information regarding the calibration of PV catheters and data analysis with statistical software can be found in references14,15.
CAUTION: The following steps involve the manipulation of radioactive material. Wear appropriate PPE and follow the safety and waste disposal regulations set by the institution’s radiation safety office.
- If the experiment includes direct measurement of LV function with a catheter, puncture the LV apex with a 26 G needle and introduce the catheter via the puncture.
- When using a pressure-volume catheter, carefully position the catheter so that its shaft is aligned with the LV longitudinal axis, with the distal electrode right below the aortic valve and adjacent to the endocardial border, and the proximal electrode just inside the ventricular wall.
- Seal the heart into the water-jacketed heart chamber and monitor cardiac functional parameters with the data acquisition software. Start recording after baseline cardiac parameters have been stable for more than 5 min.
- Determine the coronary flow by measuring the time required to fill the 20 ml syringe tube attached underneath the heart chamber. After the measurement, open the three-way stopcock to empty the coronary effluent into the radioactive liquid waste container.
NOTE: Flow measurements can also be performed using a flowmeter and flowprobes. - Use the 3 ml syringe attached to the side arm of the three-way stopcock to recover ~2 ml coronary effluent as it exits the heart. Transfer 0.5 ml of the coronary effluent into a 2 ml capless microcentrifuge tube and immediately proceed with the determination of the rates of glucose oxidation (Section 6 below).
- Transfer the rest of the coronary effluent sample (~1.5 ml) in an appropriately labeled microcentrifuge tube and store on ice.
- Repeat steps 5.4 to 5.6 at regular intervals (e.g. every 5 or 10 min) until the end of the perfusion experiment.
- If using a pressure-volume catheter, inject a 10 µl bolus of hypertonic saline (15%) into the atrial line and right before the atrial cannula before concluding the experiment. Use this bolus injection to calculate the parallel conductance (Vp), which is critical for accurate determination of cardiac volume15.
- Unseal the heart chamber and remove the catheter from the LV if one was used in the experiment. Recover the heart using one of the following options:
- If there is no need to isolate specific areas of the heart for downstream analyses and if the perfusion apparatus allows it, close both atrial and aortic lines and immediately freeze-clamp the heart on its cannulas using Wollenberger tongs pre-cooled in liquid nitrogen.
- Alternatively, cut the heart off the cannulas and drop it into ice-cold KH buffer. Quickly dry the heart on a paper towel and measure its wet weight. The heart can then be dissected and tissue samples collected for specific measurements. Freeze the remaining tissue using Wollenberger tongs pre-cooled in liquid nitrogen.
- Store the frozen heart tissue at -80 ºC until determination of dry weight (See section 8. Calculations).
6. Determination of Myocardial Glucose Oxidation Rates
NOTE: The method consists in the quantitative recovery of 14CO2 from the coronary effluent with a trapping solution of hydroxide of hyamine. The 14CO2 dissolved as H14CO3- is recovered following acidification of the buffer with perchloric acid. Samples should be processed immediately after their recovery as passive diffusion of gas between air and sample will result in a loss of 14CO2 over time. The scintillation vials should be tightly sealed with the rubber sleeve stoppers to prevent the loss of 14CO2 after adding perchloric acid. If necessary, parafilm can be used to secure the rubber sleeve stoppers to the vials (Figure 2).
- Add 1 ml of 10x concentrated hydroxide of hyamine to glass scintillation vials (one vial per sample + two extra vials for determination of the background activity).
CAUTION: Hydroxide of hyamine is highly toxic and causes severe burns. Consult the product MSDS for appropriate handling and storage. - Using tweezers delicately transfer the 2 ml capless microcentrifuge tube containing the 0.5 ml coronary effluent sample to a vial pre-filled with the hydroxide of hyamine. Use 0.5 ml perfusion buffer for the determination of the background activity.
- Cap the vial with a rubber sleeve stopper. Parafilm may be used to secure sealing of the vial. Using a 1 ml syringe and a 23 G long needle, inject 200 µl of perchloric acid (60% w:w%) through the rubber sleeve stopper and directly into the 2 ml capless tube.
NOTE: The coronary effluent should turn white due to the precipitation of BSA. - Let the vials sit overnight.
CAUTION: Perchloric acid is highly corrosive, may act as an oxidizer and/or cause an explosion hazard. Consult the product MSDS for appropriate handling and storage. - The next day, remove the rubber sleeve stoppers. Carefully retrieve each 2 ml capless tube with tweezers and wash the bottom of the tube on top of the open vial with 1 ml scintillation cocktail to retrieve all of the hydroxide of hyamine. Discard the capless tube in an appropriately labeled radioactive waste container.
- Add an additional 9 ml scintillation cocktail per vial. Add 0.5 ml perfusion buffer directly to two vials filled with 10 ml liquid scintillation cocktail for the determination of the specific activity. Shake the vials vigorously by hand and wait at least 6 hr to allow air bubbles to dissipate before measuring in a liquid scintillation counter appropriately set up for dual label experiments.
NOTE: Use clear glass vials to visualize the needle when piercing the rubber sleeve stoppers. Do not drop perchloric acid into the hydroxide of hyamine as this will ruin the reaction. Adding the perchloric acid releases the 14CO2 from the coronary effluent into the air. Although the vials should be tightly sealed and all of the 14CO2 should be trapped into the hyamine of hydroxide, it is recommended to perform this assay under the chemical fume hood.
7. Determination of Myocardial Oleate Oxidation Rates
NOTE: The method is based on the quantitative separation and recovery of 3H2O from the coronary effluent using a strong anion exchange resin. Unlike the recovery of 14CO2, there is no sample stability issue and the coronary effluent can be kept on ice or stored in the freezer before performing the assay.
- Prepare anion exchange resin columns (one column per sample + two extra columns for determination of the background activity) by filling the tip of 3 ml syringe tubes with glass wool. Add the resin/water slurry with a transfer pipette until the resin reaches the 2 ml mark on the syringe tube.
- Wash the resin by passing 2 ml ultrapure water through the column. Repeat this step two more times.
- Place open scintillation vials under the columns and load 0.5 ml coronary effluent per column. Load 0.5 ml perfusion buffer for determination of the background activity.
- Wash the columns successively with 0.5, 1 and 2 ml ultrapure water. Once the elution is done, discard the columns in an appropriately labeled radioactive waste container.
- Add 13 ml liquid scintillation cocktail per scintillation vial. Add 0.5 ml perfusion buffer directly to two vials filled with 13 ml liquid scintillation cocktail for determination of the specific activity. Shake the vials vigorously and wait at least 6 hr before measuring in a liquid scintillation counter appropriately set up for dual label experiments.
8. Calculations
- If not already done, determine the wet weight of the whole perfused heart.
NOTE: Do not allow the frozen tissue to thaw if molecular and biochemical analyses are to be subsequently performed on the remaining tissue. - Determine the wet weight of a tissue sample from the whole perfuse-heart (use approximately 15 to 30% of the whole heart). Place the tissue sample in an oven set at 50 °C overnight and measure its dry weight. Use the wet weight/dry weight ratio of the tissue sample to determine the dry weight of the whole heart in grams (g dry wt.).
- For each time point x express the value of coronary flow CFx in ml/min.
- Determination of the rate of glucose oxidation
- Average the two disintegration/min (d.p.m.) values measured for the background activity of 14C to determine the correction factor 14Cd.p.m.ba.
- Determine the 14C averaged value of specific activity 14Cd.p.m.sa.
- Determine the specific radioactivity of glucose in d.p.m./µmol (FGlu) by applying the formula
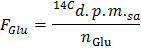
NOTE: Where nGlu (µmol) = CGlu (µmol/L) * sample volume (L) = 2.5 when using glucose at 5 mmol/L and a 0.5 ml sample. - Determine for each time point x the rate of production of 14CO2 in d.p.m./min (A) by applying the formula

NOTE: Where Volx (ml) = 0.5 - Divide A by the determined value of dry heart weight to obtain the normalized rate of production of 14CO2 (ANorm) in d.p.m./min per g dry wt.
- Apply the formula GO = ANorm/FGlu to obtain the rate of glucose oxidation (GO) in µmol of glucose/min per g dry wt.
- Determination of the Rate of Oleate Oxidation
- Average the two disintegration/min (d.p.m.) values measured for the background activity of 3H to determine the correction factor 3Hd.p.m.ba.
- Determine the 3H averaged value of specific activity 3Hd.p.m.sa.
- Determine the specific radioactivity of oleate in d.p.m./µmol (FOle) by applying the formula
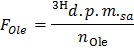
NOTE: Where nOle (µmol) = COle (µmol/L) * sample volume (L) = 0.2 when using oleate at 0.4 mmol/L and a 0.5 ml sample. - Determine for each time point x the rate of production of 3H2O in d.p.m./min (B) by applying the formula

NOTE: Where Volx (ml) = 0.5 - Divide B by the determined value of dry heart weight to obtain the normalized-rate of production of 3H2O (BNorm) in d.p.m./min per g dry wt.
- Apply the formula OO = BNorm/FOle to obtain the rate of oleate oxidation (OO) in µmol of oleate/min per g dry wt.
Access restricted. Please log in or start a trial to view this content.
Results
Two representative experiments are described in the figures below. In both cases, the heart of a 16 week old male Sprague Dawley rat was isolated and perfused in the working mode with KH buffer prepared according to the preceding protocol. In each experiment, the heart was subjected to a stress condition to affect cardiac work. Cardiac contractile function was assessed by continuous recording of pulse pressure through insertion of a pressure transducer in the aortic line and by determinat...
Access restricted. Please log in or start a trial to view this content.
Discussion
The preceding protocol details the methods to simultaneously quantify the flux of substrate through glucose oxidation and fatty acid oxidation in the isolated working rat heart. The measurements can then be superimposed to the recorded cardiac functional parameters to determine the relationship between substrates metabolism and cardiac work under baseline and stress conditions (change in workload, ischemia-reperfusion, etc…). It is also possible to evaluate how the metabolism/contraction relationship is af...
Access restricted. Please log in or start a trial to view this content.
Disclosures
The authors declare that they have no competing financial interests.
Acknowledgements
This work was supported by National Institutes of Health Grants R00 HL112952 (to R. H.), R01 HL108618 (to J.P.G.), P01 HL051971, and P20 GM104357. The content is solely the responsibility of the authors and does not necessarily represent the official views of the National Institutes of Health.
Access restricted. Please log in or start a trial to view this content.
Materials
| Name | Company | Catalog Number | Comments |
|---|---|---|---|
| Sodium Chloride (NaCl) | Fisher Scientific | BP358 | |
| Potassium Chloride (KCl) | Fisher Scientific | BP366 | |
| Potassium Phosphate Monobasic (KH2PO4) | Fisher Scientific | P284 | |
| Magnesium Sulfate Heptahydrate (MgSO4*7H2O) | Fisher Scientific | M63 | |
| Sodium Bicarbonate (NaHCO3) | Fisher Scientific | S233 | |
| Calcium Chloride (CaCl2) | Sigma-Aldrich | C5670 | |
| AG 1-X8 resin, chloride form, 100 - 200 dry mesh size, 500 g | Bio-Rad | 1401441 | This item can be replaced by purchasing directly the hydoxide form (see reference below), but this will cost almost 8 times more |
| AG 1-X8 resin, hydroxide form, 100 - 200 dry mesh size, 100 g | Bio-Rad | 1432445 | Purchasing this item allows to bypass the conversion of the anion exchange resin from the chloride form to the hydroxide form (See section 1.2 of protocol) |
| Glass Microanalysis Vacuum Filter Holder | Fisher Scientific | 09-753-2 | |
| Sodium Hydroxide (NaOH) | Fisher Scientific | S318 | Corrosive. Consult the product MSDS for appropriate handling and storage. |
| Gas Dispersion Tube with Fritted Cylinder | Fisher Scientific | 11-138B | |
| Probumin Bovine Serum Albumin Fatty Acid Free, Powder | EMD Millipore | 820027 | We recommend the use of a charcoal-defatted BSA, as other purification process such as cold ethanol fractionation may leave residues toxic for the heart. |
| Sodium Oleate | Sigma-Aldrich | O7501 | |
| Oleic Acid, [9,10-3H(N)]- | PerkinElmer | NET289005MC | Radioactive material. Follow your Institution's radiation safety office guidelines for ordering and handling. |
| Dialysis Membrane Tubing, 29 mm diameter | Fisher Scientific | 08-667E | |
| D-(+)-Glucose | Sigma-Aldrich | G7021 | |
| Glucose, D-[14C(U)]- | PerkinElmer | NEC042B005MC | Radioactive material. Follow your Institution's radiation safety office guidelines for ordering and handling. |
| Humulin R U-100 | Eli Lilly and Company | NDC 0002-8215-01 (HI-210) | |
| Inactin Hydrate | Sigma-Aldrich | T133 | Controlled substance on USDEA Schedule III |
| 3-0 Silk Black Braid | Roboz Surgical | SUT-15-3 | |
| 10x Hyamine Hydroxide | PerkinElmer | 6003005 | Highly toxic and causes severe burns. Consult the product MSDS for appropriate handling and storage |
| 20 ml Glass Scintillation Vials | Fisher Scientific | 03-341-25E | Use glass vials for quantitative recovery of 14CO2 |
| 20 ml HDPE Scintillation Vials | Fisher Scientific | 03-337-23B | Use HDPE vials for quantitative recovery of 3H2O |
| Red Rubber Sleeve Stoppers | Fisher Scientific | 14-126DD | Fit 20 mL scintillation vials; Reusable |
| BD PrecisionGlide Needle 23G x 40 mm | BD | 305194 | Use to inject perchloric acid through the rubber sleeve stopper of the CO2 trap |
| Perchloric Acid, 60% | Fisher Scientific | A228 | Highly corrosive and may act as an oxidizer and/or cause an explosion hazard. Consult the product MSDS for appropriate handling and storage |
| Ultima Gold, Scintillation Cocktail | PerkinElmer | 6013327 | |
| Glass Wool | Fisher Scientific | AC38606 | |
| Decon Dri-Clean Detergent Powder | Fisher Scientific | 04-355 | For cleaning of glassware, plastic parts, and tubing |
| Alconox Tergazyme Enzyme-Active Powered Detergent | Fisher Scientific | 16-000-115 | For cleaning of "hard to reach" surfaces (tubing, glassware) contaminated by fatty acid-BSA residue |
References
- Neely, J. R., Morgan, H. E. Relationship between carbohydrate and lipid metabolism and the energy balance of heart muscle. Annu Rev Physiol. 36, 413-459 (1974).
- Sen, S., et al. Glucose regulation of load-induced mTOR signaling and ER stress in mammalian heart. J Am Heart Assoc. 2, e004796(2013).
- Young, M. E., McNulty, P., Taegtmeyer, H. Adaptation and maladaptation of the heart in diabetes: Part II: potential mechanisms. Circulation. 105, 1861-1870 (2002).
- Stanley, W. C., Recchia, F. A., Lopaschuk, G. D. Myocardial substrate metabolism in the normal and failing heart. Physiol Rev. 85, 1093-1129 (2005).
- Fillmore, N., Lopaschuk, G. D. Targeting mitochondrial oxidative metabolism as an approach to treat heart failure. Biochim Biophys Acta. 1833, 857-865 (2013).
- Jaswal, J. S., Keung, W., Wang, W., Ussher, J. R., Lopaschuk, G. D. Targeting fatty acid and carbohydrate oxidation--a novel therapeutic intervention in the ischemic and failing heart. Biochim Biophys Acta. 1813, 1333-1350 (2011).
- Taegtmeyer, H. Cardiac metabolism as a target for the treatment of heart failure. Circulation. 110, 894-896 (2004).
- Taegtmeyer, H., et al. Assessing Cardiac Metabolism: A Scientific Statement From the American Heart Association. Circ Res. , (2016).
- Barr, R. L., Lopaschuk, G. D. Methodology for measuring in vitro/ex vivo cardiac energy metabolism. J Pharmacol Toxicol Methods. 43, 141-152 (2000).
- Neely, J. R., Liebermeister, H., Battersby, E. J., Morgan, H. E. Effect of pressure development on oxygen consumption by isolated rat heart. Am J Physiol. 212, 804-814 (1967).
- Taegtmeyer, H., Hems, R., Krebs, H. A. Utilization of energy-providing substrates in the isolated working rat heart. Biochem J. 186, 701-711 (1980).
- Liao, R., Podesser, B. K., Lim, C. C. The continuing evolution of the Langendorff and ejecting murine heart: new advances in cardiac phenotyping. Am J Physiol Heart Circ Physiol. 303, H156-H167 (2012).
- Cingolani, O. H., Kass, D. A. Pressure-volume relation analysis of mouse ventricular function. Am J Physiol Heart Circ Physiol. 301, H2198-H2206 (2011).
- Pacher, P., Nagayama, T., Mukhopadhyay, P., Batkai, S., Kass, D. A. Measurement of cardiac function using pressure-volume conductance catheter technique in mice and rats. Nat Protoc. 3, 1422-1434 (2008).
- Abraham, D., Mao, L. Cardiac Pressure-Volume Loop Analysis Using Conductance Catheters in Mice. J Vis Exp. , (2015).
- Harmancey, R., et al. Insulin resistance improves metabolic and contractile efficiency in stressed rat heart. FASEB J. 26, 3118-3126 (2012).
- Harmancey, R., Vasquez, H. G., Guthrie, P. H., Taegtmeyer, H. Decreased long-chain fatty acid oxidation impairs postischemic recovery of the insulin-resistant rat heart. FASEB J. 27, 3966-3978 (2013).
- Goodwin, G. W., Taylor, C. S., Taegtmeyer, H. Regulation of energy metabolism of the heart during acute increase in heart work. J Biol Chem. 273, 29530-29539 (1998).
- Lopaschuk, G. D., Ussher, J. R., Folmes, C. D., Jaswal, J. S., Stanley, W. C. Myocardial fatty acid metabolism in health and disease. Physiol Rev. 90, 207-258 (2010).
- Neely, J. R., Denton, R. M., England, P. J., Randle, P. J. The effects of increased heart work on the tricarboxylate cycle and its interactions with glycolysis in the perfused rat heart. Biochem J. 128, 147-159 (1972).
- Katz, J., Dunn, A. Glucose-2-t as a tracer for glucose metabolism. Biochemistry. 6, 1-5 (1967).
- Gillis, A. M., Kulisz, E., Mathison, H. J. Cardiac electrophysiological variables in blood-perfused and buffer-perfused, isolated, working rabbit heart. Am J Physiol. 271, H784-H789 (1996).
- Qiu, Y., Hearse, D. J. Comparison of ischemic vulnerability and responsiveness to cardioplegic protection in crystalloid-perfused versus blood-perfused hearts. J Thorac Cardiovasc Surg. 103, 960-968 (1992).
- Cotter, D. G., Schugar, R. C., Crawford, P. A. Ketone body metabolism and cardiovascular disease. Am J Physiol Heart Circ Physiol. 304, H1060-H1076 (2013).
- Huang, Y., Zhou, M., Sun, H., Wang, Y. Branched-chain amino acid metabolism in heart disease: an epiphenomenon or a real culprit? Cardiovasc Res. 90, 220-223 (2011).
- Buse, M. G., Biggers, J. F., Friderici, K. H., Buse, J. F. Oxidation of branched chain amino acids by isolated hearts and diaphragms of the rat. The effect of fatty acids, glucose, and pyruvate respiration. J Biol Chem. 247, 8085-8096 (1972).
- Liepinsh, E., et al. The heart is better protected against myocardial infarction in the fed state compared to the fasted state. Metabolism. 63, 127-136 (2014).
- Niu, Y. G., Hauton, D., Evans, R. D. Utilization of triacylglycerol-rich lipoproteins by the working rat heart: routes of uptake and metabolic fates. J Physiol. 558, 225-237 (2004).
- Goodwin, G. W., Arteaga, J. R., Taegtmeyer, H. Glycogen turnover in the isolated working rat heart. J Biol Chem. 270, 9234-9240 (1995).
- Sender, P. M., Garlick, P. J. Synthesis rates of protein in the Langendorff-perfused rat heart in the presence and absence of insulin, and in the working heart. Biochem J. 132, 603-608 (1973).
- Hindlycke, M., Jansson, L. Glucose tolerance and pancreatic islet blood flow in rats after intraperitoneal administration of different anesthetic drugs. Ups J Med Sci. 97, 27-35 (1992).
- Zuurbier, C. J., Keijzers, P. J., Koeman, A., Van Wezel, H. B., Hollmann, M. W. Anesthesia's effects on plasma glucose and insulin and cardiac hexokinase at similar hemodynamics and without major surgical stress in fed rats. Anesth Analg. 106, 135-142 (2008).
- Oguchi, T., Kashimoto, S., Yamaguchi, T., Nakamura, T., Kumazawa, T. Is pentobarbital appropriate for basal anesthesia in the working rat heart model? J Pharmacol Toxicol Methods. 29, 37-43 (1993).
- Segal, J., Schwalb, H., Shmorak, V., Uretzky, G. Effect of anesthesia on cardiac function and response in the perfused rat heart. J Mol Cell Cardiol. 22, 1317-1324 (1990).
- Webster, I., Smith, A., Lochner, A., Huisamen, B. Sanguinarine non- versus re-circulation during isolated heart perfusion--a Jekyll and Hyde effect? Cardiovasc Drugs Ther. 28, 489-491 (2014).
- Belke, D. D., Larsen, T. S., Lopaschuk, G. D., Severson, D. L. Glucose and fatty acid metabolism in the isolated working mouse heart. Am J Physiol. 277, R1210-R1217 (1999).
- Iannaccone, P. M., Jacob, H. J. Rats! Dis Model Mech. 2, 206-210 (2009).
Access restricted. Please log in or start a trial to view this content.
Reprints and Permissions
