The described RNA in situ hybridization protocol allows the detection of RNA in whole Drosophila embryos or dissected tissues. Using 96-well microtiter plates and tyramide signal amplification, transcripts can be detected at high resolution, sensitivity, and throughput, and at a relatively low cost.
Method Article
High Resolution Fluorescent In Situ Hybridization in Drosophila Embryos and Tissues Using Tyramide Signal Amplification
Opens in a new tab
In This Article
Summary
Loading...
$$\rightleftharpoonup{xx}$$
$$\longleftharp{xx}$$,
$$\longrightharp{xx}$$,
Abstract
Loading...
$$\rightleftharpoonup{xx}$$
$$\longleftharp{xx}$$,
$$\longrightharp{xx}$$,
In our efforts to determine the patterns of expression and subcellular localization of Drosophila RNAs on a genome-wide basis, and in a variety of tissues, we have developed numerous modifications and improvements to our original fluorescent in situ hybridization (FISH) protocol. To facilitate throughput and cost effectiveness, all steps, from probe generation to signal detection, are performed using exon 96-well microtiter plates. Digoxygenin (DIG)-labelled antisense RNA probes are produced using either cDNA clones or genomic DNA as templates. After tissue fixation and permeabilization, probes are hybridized to transcripts of interest and then detected using a succession of anti-DIG antibody conjugated to biotin, streptavidin conjugated to horseradish peroxidase (HRP) and fluorescently conjugated tyramide, which in the presence of HRP, produces a highly reactive intermediate that binds to electron dense regions of immediately adjacent proteins. These amplification and localization steps produce a robust and highly localized signal that facilitates both cellular and subcellular transcript localization. The protocols provided have been optimized to produce highly specific signals in a variety of tissues and developmental stages. References are also provided for additional variations that allow the simultaneous detection of multiple transcripts, or transcripts and proteins, at the same time.
Introduction
Loading...
$$\rightleftharpoonup{xx}$$
$$\longleftharp{xx}$$,
$$\longrightharp{xx}$$,
New genome-wide RNA detection methods such as RNA-seq have greatly expanded our knowledge of when and where genes are expressed, and at what levels1. However, these provide relatively poor temporal and spatial resolution. RNA in situ hybridization allows the spatial distribution of transcripts to be visually observed in fixed tissues, thus revealing the details of cellular and subcellular localization2. Using fluorescent in situ hybridization (FISH) allows even more spatial resolution as it allows the use of powerful microscopy techniques, such as confocal and light sheet microscopy3. Fluorescent markers such as DAPI can also be used to establish subcellular relationships4. FISH also facilitates the observation of multiple RNAs and proteins simultaneously with clear indications of overlap at the subcellular level. Unique reagents and steps required for double-labeling can be found in the following references3,5.
The procedures described here utilize 96-well microtiter plates for all steps, including cDNA template production (colony PCR), RNA probe production (using T7, T3 or SP6 polymerase-dependent run-off transcription), in situ hybridization, and fluorescent signal development. Sufficient numbers of embryos or tissues are added to each well of the 96-well plate to allow evaluation of consistency and variability. Each well then receives a different probe. After signal development, embryos or tissues from each well are arrayed on individual microscope slides for microscopic analysis.
The use of tyramide signal amplification (TSA) for probe detection produces robust signals with exceptional subcellular resolution 5,6,7,8. The subcellular localization of RNAs is an important regulatory mechanism 9 that appears to occur with virtually all RNAs 4,10,11. These analyses have also shown that many transcripts that are not detected by RNA-seq are readily detected by FISH 8. The adaptation of RNA in situ hybridization to 96-well plates allows analysis of up to 96 genes of interest at a time (more if additional plates are used), making analysis of large datasets possible. By cutting the plates into smaller sections, the method is also easily adapted to just a few samples. The protocol provided is appropriate for analysis of RNA distributions in most types of tissues. Although not shown, it is adaptable to non-Drosophila tissues as well.
Protocol
Loading...
$$\rightleftharpoonup{xx}$$
$$\longleftharp{xx}$$,
$$\longrightharp{xx}$$,
1. PCR amplification of cDNA templates from plasmids
NOTE: Use high quality plasmid or PCR-generated DNA templates for RNA probe synthesis. The Drosophila Gene Collection (DGC) libraries generated by the Berkeley Drosophila genome project provides coverage of most coding genes found in the Drosophila genome (see Table 1a). These also allow the use of universal primers for the amplification of any cDNA insert. These PCR amplifications are performed on plasmid DNAs present in the lysates of plasmid-containing bacterial cultures. The DNA products are then used as templates for in vitro transcription to generate antisense RNA probes (see Table 1b).
- Design primers to amplify a specific exon region of a gene of interest by PCR (e.g. from genomic DNA), preferably with the T7 polymerase recognition site on the antisense end.
- For experiments with fewer than 96 samples, cut off unneeded portions of 96-well plates. Cover plates with sealing tape (see Materials) for all incubations and storage. If microcentrifuge tubes are used, adjust volumes accordingly.
NOTE: 96-well plates allow the use of multichannel pipettes for increased throughput, as well as smaller volumes for cost saving.
| Table 1a | ||||
Vector | Antibiotic working concentration 1:1000 | Primers | RNA polymerase for antisense | RNA polymerase. for sense |
| pFLC-I | Amp | pBst_SK(-)_F/R | T3 | T7 |
| pBSt(-) | Amp | pBSt_SK(-) | T7 | T3 |
| pOT2 | Chlor | pOT2_F/R | SP6 | T7 |
| pOTB7 | Chlor | pOT2_F/R | T7 | SP6 |
| Table 1b | ||||
| Primer | Sequence | |||
| pOT2_Forward | 5'-AAT-GCA-GGT-TAA-CCT-GGC-TTA-TCG-3' | |||
| pOT2_Reverse | 5'-AAC-GCG-GCT-ACA-ATT-AAT-ACA-TAA-CC-3' | |||
| pBst_SK(-)_Forward | 5'-GAA-ACA-GCT-ATG-ACC-ATG-ATT-ACG-CC-3' | |||
| pBst_SK(-)_Reverse | 5'-CGG-CCA-GTG-AAT-TGT-AAT-ACG-ACT-C-3' | |||
Table 1: A) General DGC clone information for amplifying cDNA inserts in plasmids. B) Sequences of Universal Primers for DGC plasmids.
- Grow 250 µL of plasmid-containing bacterial culture in 96-well culture plates by adding 240 µL of LB media per well with proper antibiotic selection (1:1000 dilution of a 1000 X antibiotic stock), and 10 µL of the original plasmid-containing bacteria (from a glycerol stock). Seal with sealing tape.
- Incubate by shaking at 215 rpm at 37 °C overnight (O/N).
NOTE: Make a new copy of bacterial glycerol cDNA plasmid clone stock to replace the original. Do not refreeze original bacterial stock, as this may kill the bacteria. - To produce the PCR templates, dilute 10 µL of the O/N bacterial culture in 90 µL autoclaved ddH2O in each well of a new 96-well PCR plate. Denature the DNA for 5 min at 95 °C in thermocycler. Immediately place the plate on ice for at least 5 min.
- Prepare PCR reactions using appropriate universal primers as per Table 2.
| Reagents | 50 μl sample reaction | 96 Well mix (112x reaction) | Final concentration |
| 2 X PCR polymerase Mix | 25 μl | 2800 μl | 1 X |
| Primer_For (25 pmol/μl) | 0.5 μl | 56 μl | 0.25 pmol/μl |
| Primer_Rev (25 pmol/μl) | 0.5 μl | 56 μl | 0.25 pmol/μl |
| ddH2O | 22 μl | 2464 μl | |
| Total | 48 μl | 5376 μl |
Table 2: PCR Master Mix.
- Using a pipette, aliquot 48 µL of the PCR master mix into each well of a new 96-well PCR plate.Add 2 µL of each denatured plasmid DNA template per well.
NOTE: Use between 1 picogram (pg) to 1 nanogram (ng) of plasmid DNA. Excessive DNA template reduces PCR yield and specificity. - Program the 96-well PCR machine as per Table 3 and perform the amplification.
NOTE: The extension time at 72°C is determined by the size of the PCR product (45 s for ≤2.0 kb, 1.5 min for ≤3.0 kb, 3 min for ≤4.0 kb and 3.5 min for 4.0-5.0 kb). The annealing temperature (Tm) is determined by the sequence of primers. When a primer is equal or longer than 20 nt, the Tm is calculated as:
Tm (°C )=(4 X number of CG) + (2 X number of AT)-4.
| STEP | Temperature | Time | Cycle(s) |
| Initial Denaturation | 95 °C | 3 min | 1 cycle |
| Amplification Denaturation, annealing and extension | 95 °C | 45 sec | 30 cycles |
| 54-58 °C | 45 sec | ||
| 72 °C | 45 sec-3.5 min | ||
| Final Extension | 72 °C | 7 min | 1 cycle |
| Storage | 4 °C | hold |
Table 3: Recommended PCR Program.
- PCR product precipitation with Ethanol (EtOH) and Sodium acetate (NaOAC) (see Table 4).
NOTE: If the PCR reaction volume is less than 50 µL, fill to 50 µL with ddH2O.- To precipitate the DNA, mix the components from Table 4 and store samples O/N at -20 °C or for 30 min at -80 °C.Centrifuge the 96-well plate for 45-60 min at 2,250 x g at 4 °C. Use an 8-channel manifold pipette to carefully remove the supernatant. Wash once with 160 µL of cold 70 % EtOH (RNase-free) for 30 min at 2,250 x g at 4 °C.
NOTE: The precipitated DNA can be seen at the bottom of wells. Shorter PCR products require longer centrifugations. - Gently invert the 96-well plate on a paper towel to remove the last drops of liquid in each well (as much as possible). Air dry DNA pellet for 1 h at room temperature (RT). Resuspend the precipitated DNA in 25 µL RNase free water.
NOTE: The 1 h air dry will allow all traces of EtOH to evaporate. However, a very small volume of liquid (about 1 µL) should remain in each well to prevent the DNA pellet from completely drying. Use 25 µL for a 50 µL PCR reaction. Do not use DEPC treated water at this stage to avoid interference with in vitro transcription in the following steps.
- To precipitate the DNA, mix the components from Table 4 and store samples O/N at -20 °C or for 30 min at -80 °C.Centrifuge the 96-well plate for 45-60 min at 2,250 x g at 4 °C. Use an 8-channel manifold pipette to carefully remove the supernatant. Wash once with 160 µL of cold 70 % EtOH (RNase-free) for 30 min at 2,250 x g at 4 °C.
| Component | Volume | Portion |
| PCR | 50 μl | |
| 100 % Ethanol | 125 μl | 2.5 X vol. of PCR |
| 3M NaOAc (pH=5.2, RNase free) | 5 μl | 10% of vol. of PCR |
| Total | 180 μl |
Table 4: Example of a 50 µL PCR reaction.
- Check the size and yield of PCR products by running 5 µL of the resuspended DNA solution on a 1 % agarose gel in 1 X TAE buffer.
NOTE: A total of 250-500 ng of DNA template is required for the 15 µL in vitro transcription reaction. Samples with higher yields can be further diluted. The RNA yield also depends on the sequence and length of the DNA template. According to the general guide for DIG-RNA labeling with T7 RNA polymerase, approximately 10 µg of DIG-labeled RNA is produced from 1 µg linearized template.
2. In vitro transcription to generate antisense probes.
NOTE: It is crucial to work in an RNase-free environment. All reagents and lab-ware must be RNase free (such as certified DNase/RNase free plastic ware).
| Component | Stock concentration | Volume | Final concentration |
| ATP | 100 mM | 7 μl | 10 mM |
| CTP | 100 mM | 7 μl | 10 mM |
| GTP | 100 mM | 7 μl | 10 mM |
| UTP | 100 mM | 4.5 μl | 6.5 mM |
| Dig-11-UTP | 10 mM | 25 μl | 3.5 mM |
| RNase free water | 19.5 μl | ||
| Total | 70 μl |
Table 5: DIG-NTP Mix preparation.
| Component | 15 μl reaction | 96 Well mix (112x reaction) | Final Conc. |
| 5X Transcription Buffer | 3.00 μl | 3.00 μl | 1 x |
| Dig-NTP mix (10 mM) | 0.75 μl | 0.75 μl | 0.5 mM |
| RNase inhibitor | 0.25 μl | 0.25 μl | 0.67 U/ μl |
| RNA polymerase (T7 or T3 or SP6) | 2.00 μl | 2.00 μl | 2.67 U/ μl |
| RNase free water | 1.50 μl | 1.50 μl | |
| Total | 7.50 μl | 7.50 μl |
Table 6: 2X transcription Master Mix.
- Prepare the DIG-NTP mix as per Table 5.
NOTE: To avoid mistakes, always align the plate such that A1 is at the top left corner of the plate. - Add components described in Table 6 to each well in a new 96-well PCR plate (probe plate). Add 7.5 µL of PCR product (DNA template) to each corresponding well, using a multichannel pipette. Cover the plate with sealing tape.
NOTE: The optimum amount of PCR product added per transcription reaction should be between 0.5 and 1 µg. If bands on the gel are significantly weaker or more intense, the volume of DNA added to the reaction can be adjusted accordingly. The exact amount is not critical. - Incubate the probe plate at 37 °C for 3.5-4 h. Mix 15 µL of synthesized probe with 35 µL of DEPC treated ddH2O, 125 µL of 100 % EtOH, and 5 µL of 3 M NaOAC (pH=5.2, RNase free). Store at -80 °C for at least 30 min. Centrifuge and wash as described in steps 1.10.2 and 1.10.3.
- Resuspend the precipitated probe in 25 µL of DEPC treated ddH2O. Run 5 µL on a 1% agarose gel (running time < 20 min) to check the integrity and yield of the probe (Figure 2).
NOTE: The agarose gel must be made with DEPC treated ddH2O and TAE buffer. Gel electrophoresis apparatus should be assigned for RNA work only. Longer gel running time at low speed can lead to RNA degradation during electrophoresis. - Mix the remaining 20 µL of the synthesized probe with 100 µL hybridization solution (Table 7) and store at -80 °C until needed.
NOTE: The probe concentration can be diluted more if bands are particularly robust (see Figure 2 for examples). Hybridization solution is very effective at preventing RNase contamination. Immediately add hybridization solution to the resuspended probe to avoid RNA degradation. Hybridization solution has to be filtered through a 0.2 µm filter. For tissue samples, increase the detergent concentration in the hybridization solution by adding Triton-X-100 to a final concentration of 0.3 %.
| Component | Volume | Final concentration |
| DEPC treated ddH2O | 11.85 ml | 23.7 % |
| 20 X SSC | 12.5 ml | 25 % (5 X) |
| Formamide | 25 ml | 50 % |
| Heparin (50 mg/ml) | 0.1 ml | 0. 2 % (0.1 mg/ml) |
| Salmon sperm single stranded DNA | 0.5 ml | 1.0 % |
| Tween-20 | 0.05 ml | 0.1 % |
| Total | 50.00 ml | 100 % |
Table 7: Hybridization solution.
3. Drosophila rearing and embryo, larva and adult tissue collection.
NOTE: For both small scale (bottles) and mass (boxes) fly rearing, use standard fly lab protocols on cornmeal based food at 25 °C. Keep proper adult and larval density and provide additional active yeast powder on food surfaces.
- Collect embryos following standard protocols. The major steps of embryo collection are illustrated in Figure 3.
NOTE: After rinsing devitillinized embryos in methanol, the fixed embryos can be stored at -20 °C for up to one year. Embryo permeabilization and post-fixation are performed on Day 1 of the FISH protocol. - Prepare fresh 40 % PFA stock solution.
- Prepare a freshly made stock solution of 40% paraformaldehyde (PFA) by mixing 10 mL of DEPC treated ddH2O to 3.68 g of PFA and 70 µL of 2N KOH in a 20 mL glass scintillation vial containing a small stir bar.
Caution: PFA is highly toxic with potential acute and chronic health effects. Read MSDS (Material Safety Data Sheets) and use with proper protection for eyes, skin, and respiratory tract. - In a fume hood, heat and stir the vial for 3-5 min on a heating plate at 200 °C until the PFA is fully dissolved. Remove the PFA stock solution from the heat as soon as the PFA is dissolved (do not overheat).
- Cool the dissolved 40 % PFA stock solution on ice for 5 min, and filter with a 0.2 µm filter and 10 mL syringe.
- Prepare a freshly made stock solution of 40% paraformaldehyde (PFA) by mixing 10 mL of DEPC treated ddH2O to 3.68 g of PFA and 70 µL of 2N KOH in a 20 mL glass scintillation vial containing a small stir bar.
- Third instar larvae (L3) or adult tissue fixation, quenching and permeabilization
NOTE: This protocol should be finished in one day. It includes tissue dissection, fixation, quenching of endogenous HRP, permeabilization and post-fixation.- Prepare fixing solutions (Fix-I and Fix-II) as per Table 8.
NOTE: Picric acid is used as an additional fixative when tissue has a delicate structure that must be preserved. It is not a good fixative when tissue ultrastructure must be preserved for electron microscopy (EM).
Warning: Picric acid is unstable and has the ability to react with other materials and create explosive compounds. Use and store according to safety guidelines. - Place larvae or adult flies in a 50 mL plastic tube containing 10 mL of cold 1 X PBS and 100 µL of Fix-I solution. Chill on ice for 2 min to reduce larval or adult fly motility.
- Cut off the tip of a 1 mL plastic tip to create a 2-3 mm opening. Transfer 10-30 larvae or adult flies with the 1 mL tip into a Petri dish (9 cm diameter) with a shallow layer of 1 X PBS from the 50 mL tube (step 3.3.2). Adding a bit of PBTT can decrease surface tension. Carefully dissect larval (open from anterior and squeeze tissues from posterior to anterior) or adult tissues of interest with a pair of sharp forceps under a dissecting scope.
NOTE: About 200-300 larvae or adult testes can be dissected and fixed in one day by experienced individuals. - Transfer dissected tissues with a 200 µL pipette (with the tip cut off to create a 2 mm diameter opening) into a 1.5 mL tube and store on ice. Complete each round of dissection within 10-15 min before progressing to the next step.
NOTE: Continue with additional rounds (within a 2 h time window) as required to generate sufficient material. - Fix tissues with 800 µL of Fix-I solution for 30 min on a bench top mixer. Rinse tissues once with 800 µL 1 X PBTT and keep tubes on ice for a maximum of 2.5 h. Due to the 30 min limit, this needs to be performed batch-wise until sufficient tissue has been collected.
- Pool all dissected and fixed tissues into a single 15 mL plastic tube containing mesh in the lid (see Figure 4 for tube design). Aspirate excess liquid through the mesh in the tube lid. Wash 3 X 5 min each with 10 mL of 1 X PBTT.Rinse twice with 10 mL of 1 X PBS to remove detergent. This prevents excess bubbles in the next step.
NOTE: If dissected tissues sink to the bottom of the tube, steps can be performed in regular microtiter plates or 0.5-1.5 mL microcentrifuge tubes (300-800 µL volume per tube). - Quench endogenous HRP activity with 5 mL of 0.3 % H2O2 in PBS for 15 min at RT. Repeat once more. Keep the lid open during this step without mixing. Rinse twice using 10 mL of 1 X PBTT. Wash twice for 5 min with 10 mL of 1 X PBTT.
- Permeabilize tissues with 10 mL of 80% acetone (-20 °C, pre-chilled) at -20 °C for 10 min. Invert the tube twice during the incubation period. Wash twice for 10 min with 10 mL of 1 X PBTT to rehydrate the tissues.
- Rinse with 10 mL mixture of 5 ml PBTT plus 5 ml hybridization solution (1:1). Discard mix and replace with 10 ml hybridization solution. Samples can be stored at -20 °C until needed. For best results, do not store samples for more than a week.
- Prepare fixing solutions (Fix-I and Fix-II) as per Table 8.
| Component | Fix I (10 ml) | Fix II (10 ml) |
| 40 % PFA stock | 1 ml | 1 ml |
| PBTT | 8.99 ml | 9 ml |
| Picric acid solution | 10 μl | - |
Table 8: Fixing Solutions for tissues.
4. In situ hybridization
NOTE: This portion of the protocol requires a minimum of 2 days, with sample preparation, pre-hybridization and hybridization taking place on day 1 and probe detection on day 2. If the number of samples is relatively high, if unfamiliar with the protocol, or a full day is not possible, the protocol should be performed in 3 days with the steps of probe detection and signal amplification divided into 2 days. Large numbers of embryos or dissected tissue samples may also require additional days to process. For dissected tissue samples, replace 1 X PBT with 1 X PBTT in all steps, unless otherwise indicated. The extra detergent is required for penetration of many larval and adult tissues, such as the brain and testis. Although not tested, 1 X PBTT may also be used for embryos. Use 100 µL per well for 96-well plates and 800 µL for 1.5 mL tubes.
- Pre-hybridization and hybridization
NOTE: Steps 4.1.1-4.1.6.2 are for embryo in situ hybridization. For larval or adult tissue in situ hybridizations, skip these steps.- Remove 2 mL of fixed embryos (stored in methanol at -20 °C) to a new 15 mL tube. Wash embryos twice for 7 min with 10 mL of methanol in each wash. Wash embryos for 7 min with 10 mL mixture of methanol and 1 X PBTT (1:1). Wash embryos twice for 7 min with 10 mL of 1 X PBTT to rehydrate.
- For embryo permeabilization, prepare an intermediate proteinase K solution (40 µL/mL) by diluting 1:500 from stock solution (20 mg/mL). Store at -20 °C. Make a working proteinase K solution by diluting the intermediate proteinase K solution 1/15 in 1 X PBTT for a final working concentration of 2.667 ug/mL.
- Permeabilize embryos with 10 mL of working proteinase K solution (use less for smaller numbers of embryos). Incubate the tube at RT for 13 min. Gently invert the tube 4 times during the incubation. Incubate the samples in proteinase K solution on ice for 1 h without mixing.
NOTE: This relatively long incubation with dilute proteinase K ensures reproducibly uniform permeabilization and subsequent staining. - While embryos permeabilize, make a 2 mg/mL glycine solution from 10 X stock (20 mg/mL) in 1 X PBTT for a total volume of 30 mL.
- Remove proteinase K solution, rinse with 10 mL of glycine solution (2 mg/mL) and wash twice for 2 min each. Rinse three times with 10 mL of 1 X PBTT to remove the glycine.
- Post-fixation of embryos.
- Prepare 10 mL of 4% PFA (1 mL of 40% PFA in 9 mL of PBTT, filtered through 0.45 µm filter).
- Incubate the samples in 4% PFA for 20 min. Wash 3 X for 2 min each with PBTT.
- To prepare denatured hybridization solution, boil the hybridization solution for 5 min. For a full 96-well plate, use three tubes of 12 mL. Cool on ice immediately for 5 min.
- Rinse embryos once with 10 mL of 1 X PBTT: hybridization solution (1:1). Rinse twice with 5 mL of hybridization solution. Aliquot ~20 µL per well of settled embryos (30-40 embryos) or fixed tissues into a 96-well PCR plate on ice.Remove hybridization solution from tissues or embryos using an 8-channel manifold pipette (Figure 1/video).
NOTE: The manifold pipette has a ‘stop’ that prevents the tips from going to the bottom of the wells and removing sample. For experiments using tissues that float, remove liquid carefully with a 100 µL pipette from the top.
- Add 100 µL of the denatured hybridization solution to each well. Pre-hybridize embryos for a minimum of 2.5-3 h at 56 °C using a dry bath heating unit containing metal beads (see materials and Figure 1).
- Denature 100 µL of the prepared probe in a 96-well PCR plate using a thermocycler for 5 min at 80 °C. Immediately cool on ice for 5 min.Remove pre-hybridization solution from embryos or tissues. Add denatured gene-specific probes to each sample, cover with sealing tape and hybridize at 56 °C for 16-18 h O/N, under metal beads in dry bath heating unit.
5. Probe detection
- Pre-warm the solutions in Table 9 in the 56 °C heating unit. Remove probes from the plate.
NOTE: Probes can be reused between 2-3 times if stored at -80 °C (never store any RNA samples in -20 °C). After hybridization, the double stranded RNA is more stable than single strand RNA, and is less susceptible to degradation caused by RNase contamination.
If using a a multi-well plate vacuum filtration system for tissues, a collection plate should be included under the filter plate to collect the probes (see video for assembly details). Hybridized tissues will need to be transferred from the regular 96-well microtiter plate used for hybridization to one with 1.2 µm pore size PVDF membranes on the bottom of each well.
| Step | Pre-warmed solution (56 °C) | Time | Volume per well |
| 1 | Hybridization Solution:PBTT (3:1) | 15 min | 100 μl |
| 2 | Hybridization Solution:PBTT (3:1) | 15 min | 100 μl |
| 3 | Hybridization Solution:PBTT (1:1) | 15 min | 100 μl |
| 4 | Hybridization Solution:PBTT (1:3) | 15 min | 100 μl |
| 5 | PBTT 3 washes | 5 min | 100 μl |
Table 9: Washing probes after hybridization.
- If using normal plates, wash samples as per Table 9 in a heating unit at 56 °C. If using the vacuum manifold system, use heated solutions with vacuum system on bench and remove solutions immediately from below by vaccuum. After the 3rd wash with 1 X PBTT, the normal plate can be removed from the heating unit.
- Prepare antibodies.
- Prepare 11 mL of primary antibody solution (2.5 µg/mL) from stock (1 mg/mL) by diluting biotin-conjugated mouse monoclonal anti-DIG antibody (see material list) in PBTTB (1:400). If processing fewer samples, adjust volumes accordingly.
- Prepare 11 mL of streptavidin-HRP solution (1 µg/mL) from stock (1 mg/mL) by diluting 1:1000 streptavidin-HRP conjugate (see material list) in PBTTB. If using fewer samples, adjust volumes accordingly.
- Block embryos or tissues with PBTTB (1 % skim milk in 1 X PBTT) for 20 min on a bench top mixer at RT.
NOTE: Filter PBTTB using filter paper (grade 3, 6 µm) before using it on 96-well filter plates to avoid clogging the filters. Instead of PBTB, PBTTB (PBTB with additional 0.3 % Triton-X-100) is used for all tissues during the protocol. - Incubate embryos or tissues in antibody solution (100 µL/well) for 2 h on bench-top sample mixer. Rinse twice with 1x PBTTB. Wash 3 X for 5 min and 5 X for 10 min with PBTTB. Incubate embryos or tissues with streptavidin-HRP solution (100 µL/well) for 1.5 h using a bench-top sample mixer. Wash 2 X for 5 min with PBTTB. Keep samples in the dark from this point on.
Note: during all antibody washes, if tissue is being lost due to the opacity produced by the milk, try washing without the milk (PBTT instead of PBTTB). - Prepare a DAPI solution by diluting 100 X DAPI in PBTTB (1:100).
- Incubate embryos or tissues with DAPI solution (100 µL/well) for 15 min on a bench-top sample mixer. Wash 4 X for 10 min with PBTT. Store the 96-well plate with samples O/N at 4 °C or proceed to the next step.
NOTE: The procedure can be paused here.
6. Antibody detection using tyramide (see Figure 5)
NOTE: Here homemade cyanine 3-conjugated tyramide was used, which was prepared according to the protocol described in 12. If performing many experiments or testing many samples, this saves a significant amount of money and is effective compared to commercial reagents (from experience). For fewer experiments and samples, commercially available cyanine 3-tyramide can be used (see Materials).
- Wash sample plates 3 X for 5 min with 1 X PBTT.
- Prepare tyramide activation buffer (activation buffer) containing 0.006 % of H2O2 in PBTT (dilute 30% (w/w) H2O2 stock 1:5000).
- Rinse the plates with the activation buffer.
- Prepare cyanine 3-tyramide solution by diluting it in activation buffer in a 15 mL tube.
- For embryos, use 1:80 dilution (137 µL of cyanine 3-tyramide in 11 mL of activation buffer). For larval tissues, use 1:150 dilution (73 µL of cyanine 3-tyramide in 11 mL of activation buffer). For adult testes, use 1:200 dilution (55 µL of cyanine 3-tyramide in 11 mL of activation buffer). For adult ovaries, use 1:300 dilution (36 µL of cyanine 3-tyramide in 11 mL of activation buffer).
- Incubate samples with cyanine 3-tyramide solution for 2 h on bench-top sample mixer. Rinse four times with PBTT. Wash 6 X for 10 min with PBTT. Wash 3 X for 5 min with PBS to remove the detergent.
- Add 150 µL/well of anti-fade mounting media. Keep samples O/N at 4 °C to allow tissues or embryos to sink to the bottom of the tube. Mount samples on microscope slides (under dissecting scope for tissues) and cover with coverslip. Seal the edges of the coverslip with transparent nail polish.
- Image using a fluorescence microscope.
Note: analyze negative control first to get an idea of ‘non-specific’ background.
Results
Loading...
$$\rightleftharpoonup{xx}$$
$$\longleftharp{xx}$$,
$$\longrightharp{xx}$$,
Figure 6 shows examples of results obtained using this procedure. The top 3 panels show examples of early Drosophila embryos (Figure 6, panels A-C), the next 3 panels show examples of late Drosophila embryos with signals in different tissues (amnioserosa, muscles and central nervous system, respectively (Figure 6, panels D-F). Next are examples from 3rd instar larval tissues (Figure 6, panels G-J). Panels K and L show representative images from adult gonads (ovary and testis, respectively). Hundreds of images have been uploaded and annotated in our searchable 'fluorescent in situ fruit fly database' (FlyFISH (http://fly-fish.ccbr.utoronto.ca)).
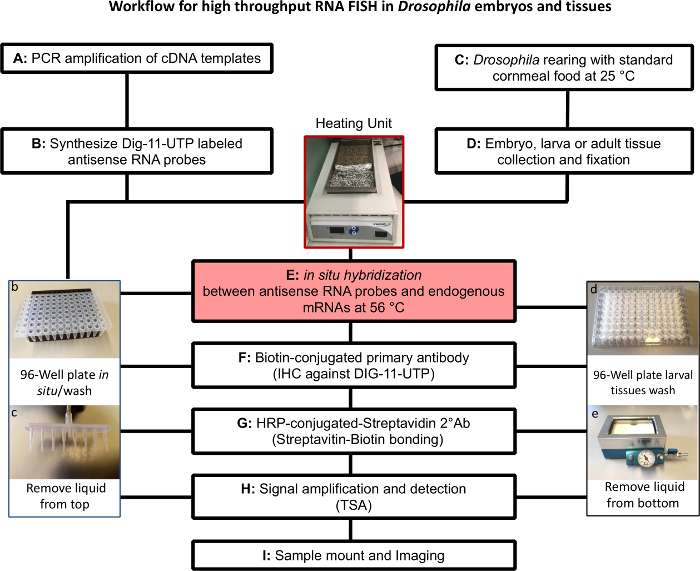
Figure 1. Outline of Fluorescent in situ hybridization (FISH) protocol and key equipment. (A) PCR amplification of cDNA. (B) In vitro transcription to generate gene-specific antisense DIG- labeled RNA probes in a 96-well plate (photo of the plate shown in b). (C) and (D): Adults (female: male ratio 2:1. 300-400 flies/bottle) flies are allowed to mate for 3-4 days. Embryos from an overnight collection on standard cornmeal food at 25 °C are transferred to a well ventilated plastic box (1 L of cornmeal food in a container sized: 8" X 8" X 3" LWH) or to new bottles keeping a proper larval density. For tissue collection, active yeast powder should be sprinkled on top of the food at 24, 48 h after egg laying (AEL). (E to H): Fluorescent in situ hybridization experiments performed over 3 consecutive days. For embryos or tissues that do not float, use a 96-well PCR plate as shown in photograph b with 8-channel aspirator (photograph c). For tissues that float, like most larval tissues, use a filter-bottomed plate (photograph in d) and remove liquid from bottom with a manifold aspirator using low pressure (photograph in e). Please click here to view a larger version of this figure.
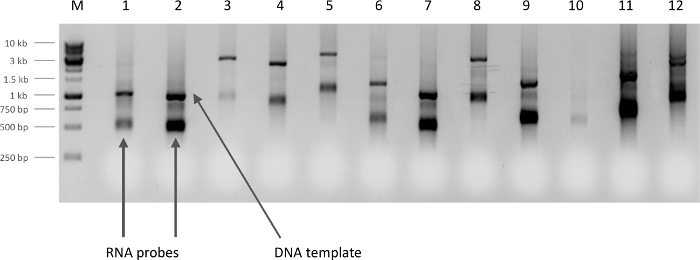
Figure 2. Determination of RNA probe yield. Newly synthesized antisense RNA probes observed on a 1 % agarose gel (5 µL/lane). The yield can be categorized (based on the intensity of the band) as 'low yield' in lanes 3 and 10, 'typical yield' in lanes 1, 4, 5, 6 and 8, or 'high yield' in lanes 2, 7, 9, 11, and 12. For samples with 'typical yields', use 10-15 µL of probe diluted in 100 µL of hybridization solution for each in situ experiment. Dilute samples with 'high yields' of probe with additional hybridization solution according to the band intensity relative to a 'typical probe' intensity. Aim to have roughly equal final probe concentrations in each well. The arrow points to one of the 'RNA probes', the higher band on each lane is the original DNA template. Please click here to view a larger version of this figure.
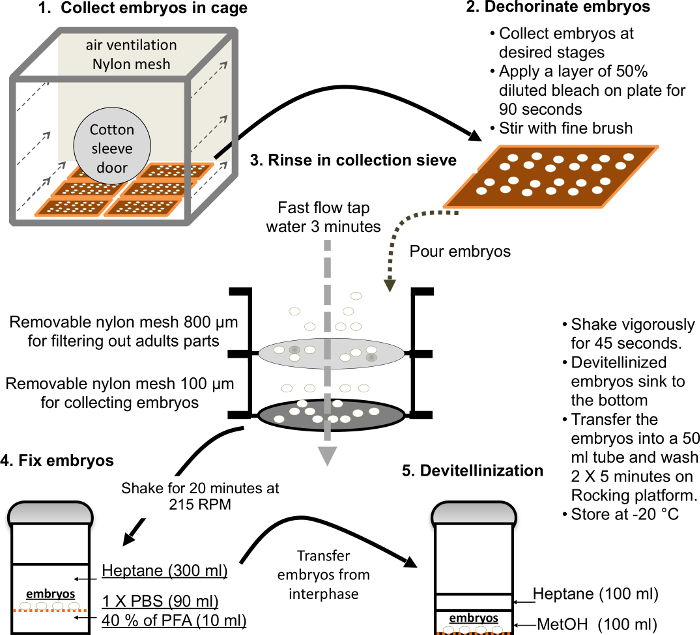
Figure 3. Major steps for a large-scale embryo collection and fixation. Please click here to view a larger version of this figure.

Figure 4. Homemade tube for removing liquid from larval or floating tissues. Some larval and adult tissues float in solution during fixation. This simple tool consists of a nylon mesh held by a 200 µL cut tip, followed by a 1 mL tip as an adaptor to connect to an aspirator. Liquid can be safely removed without losing any tissue. Please click here to view a larger version of this figure.

Figure 5. Tyramide Signal Amplification. (1) DIG-labeled antisense RNA probe hybridizes with endogenous sense RNA. (2) Immuno-affinity binding between biotin-conjugated primary antibody and DIG-UTP. (3) HRP conjugated streptavidin binds biotin. (4) HRP catalyzes the cyanine 3-tyramide and hydrogen peroxide reaction to form short-lived cyanine 3-tyramide radicals. (5) Cyanine 3-tyramide radicals bind to tyrosine residues on nearby proteins. Please click here to view a larger version of this figure.
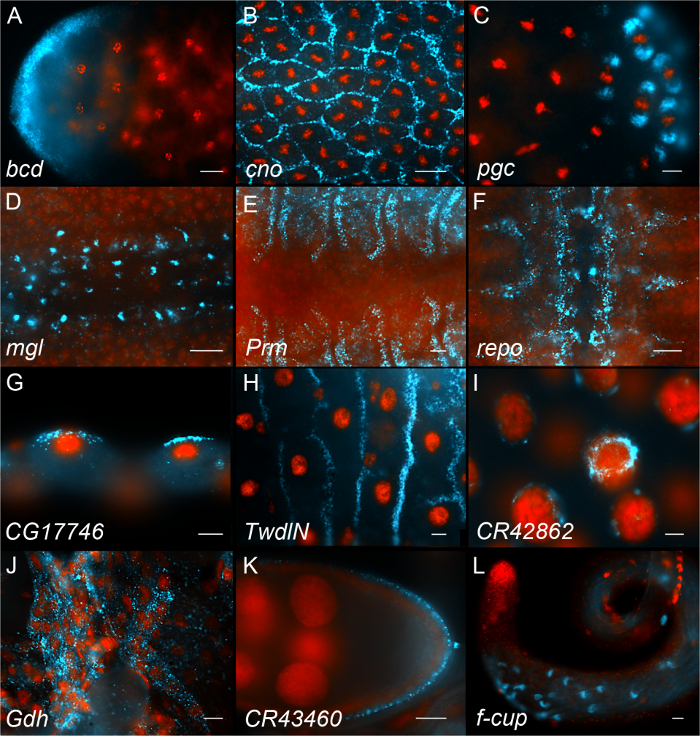
Figure 6. Representative in situ hybridization images. Each panel shows an example of a different RNA (shown in Cyan) and nuclei stained with DAPI (shown in red). (A-C) Examples of early Drosophila embryos. (D, F) Examples of late Drosophila embryos. (G-J) Examples of 3rd instar Drosophila larval tissues (malphigian tubules, midgut, salivary gland and muscle respectively). (K) Adult ovary. (L) Adult testis. Each panel displays the name of the gene that the probe is hybridizing to. Scale bars = 10 µm. Please click here to view a larger version of this figure.
Discussion
Loading...
$$\rightleftharpoonup{xx}$$
$$\longleftharp{xx}$$,
$$\longrightharp{xx}$$,
The described protocol provides a highly reproducible, sensitive, and economical method for the detection of most RNAs in fixed Drosophila embryos or tissues. Although slightly more complicated than the more traditionally used alkaline phosphatase method of probe detection, the resolution obtained by FISH is far greater and the sensitivity is comparable or improved 7,8. By using whole or partial microtiter plates, the protocols can be used for large-scale or limited analyses of genes of interest. It should be noted that the probes generated may detect all or multiple transcript splice forms unless probes are more specifically designed (i.e., single exons). Although we have tested probes as small as 200 nucleotides with reasonable success, smaller probes tend to be less effective and may be less specific. Clearly, this protocol is not appropriate for the detection of small introns, exons, or processed microRNAs.
Although this approach uses an enzymatic step to boost the strength of signals, signal intensity appears to be proportional to target gene expression in a relatively linear and broad range of expression levels. At higher magnification, the signal is seen as puncta or speckles within cells and tissues. For relatively rare transcripts only a few tiny puncta are seen. As transcript abundance increases, these grow in number and size. As with single molecule FISH (smFISH), single small puncta may also correspond to single RNAs and should also be readily quantified using imaging and informatics software. Comparisons of published images obtained using smFISH with images that we have curated for the same targets suggest that the overall, sensitivity and resolution of the two methods are relatively similar, although this should be tested by more rigorous comparisons. Given the much higher expense of smFISH, the method provided here should give similar results at a fraction of the cost. However, if the goal is to detect small transcripts, or distinct parts of transcripts, smFISH is recommended.
Due to the smaller size of some FISH probes, this method may also be better at penetrating tissues that are large or have significant barriers. However, our use of higher detergent levels and tissue fixation and permeabilization tweaks appear to have solved this problem. Finally, although developed for Drosophila tissues, the high detergent buffers described here for dissected tissues should also work for Drosophila embryos as well as most other organisms and tissues.
Disclosures
Loading...
$$\rightleftharpoonup{xx}$$
$$\longleftharp{xx}$$,
$$\longrightharp{xx}$$,
Authors have no competing financial interests.
Acknowledgements
Loading...
$$\rightleftharpoonup{xx}$$
$$\longleftharp{xx}$$,
$$\longrightharp{xx}$$,
Funding support for this project was provided by a grant to HMK by the Canadian Institutes of Health Research (grant MOP 133473).
Materials
| Name | Company | Catalog Number | Comments |
|---|---|---|---|
| 15 ml Polypropylene conical centrifuge tubes | Frogga Bio | TB15-500 | Certified DNase and RNase free |
| 2x PCR Master Mix with dye(Ambiogene) | Biomart (Canada) | 141106-1K | Certified DNase and RNase free |
| 50 ml Polypropylene conical centrifuge tubes | Frogga Bio | TB50-500 | Certified DNase and RNase free |
| 96-well filteration plate (1.2 um, hydrophilic PVDF membrane | EMD MILLIPORE | MSBVS1210 | Used to remove liguid from bottom of the plate with floting tissues |
| 96-well PCR plate (200 μl) | Denville | C18096-10 | |
| Acrodisc syringe filter (0.2 u) | PALL | PN4612 | |
| Acrodisc syringe filter (0.45 u) | PALL | PN4614 | |
| Agarose | Bioshop | AGA002.500 | |
| AXYGEN 96-well assay storage plates | UltiDent Scientific | 24-P96-450V-C | To store bacterial glycerol stocks |
| AXYGEN Aluminum Plate Seals | UltiDent Scientific | 24-PCR-AS-200 | To seal plates |
| AXYGEN Wide-bore tips (200 ul) | UltiDent Scientific | 24-T205-WB-C | To transfer samples |
| Biotin-SP (long spacer) IgG Fraction Monoclonal Mouse Anti-Digoxin | Jackson ImmunoResearch Lab | 200062156 | Primary antibody for in situ (stock conc. 1 mg/ml, working conc. 2.5 μg/ml or 1/400 dilution. |
| BRAND 8-channel manifold (autoclavable) | BrandTech Scientific Inc. | 704526 | To remove liquids from the top of 96-well PCR plates |
| Chloramphenicol | Sigma-aldrich | C1919 | Stock concentration 34 mg/ml dissolved and 0.2μm filtered in 100 % EtOH (use as 1/1000) |
| Cyanine 3 Tyramide (Cy3-TSA) | Home made | Could be ordered from Perkin-Elmer Cat# SAT704A001EA | |
| DABCO (1,4-Diazabicyclo[2.2.2]octane) | Sigma-aldrich | D2522 | Antifade reagent in mounting media |
| Digoxigenin-11-uridine-5’-triphosphate | Roche | 11-209-256-910 | |
| Embryo collection cage | Home made | N/A | Size: 75 cm X 75 cm X 75 cm made with Polymethyl methacrylate |
| Eppendorf centrifuge 5804 | Eppendorf | Model 5804 | Centrifuge for 96-well plates on A-Z-DWP rotor |
| Formamide | Bioshop | FOR001.500 | |
| Glycerol | Bioshop | GLY002.4 | |
| Glycine | Bioshop | GLN001.500 | |
| Heparin | Sigma-Aldrich | H4784-250MG | Stock: 50 mg/ml. Working concentration 1 mg/ml in Hybridization solution |
| Lab Armor Beads | DiaMed | LAA42370-001 | Fill in heating unit |
| Labnet Gyro M Mini Nutating Mixer | Fisher Scientific | 50-998-347 | Sample mixing |
| Mesh - 100 micons | FlyStuff | 57-103 | For collecting embryos |
| Mesh - 800 microns | SEFAR - Nytex | 06-780/53 | For catching loose tissue / may be used for special tube in figure 4. |
| Micro Cover Glasses | VWR | 48366-067 | Size: 22 X 22 mm |
| Micro slides,frstd | VWR | 48312-003 | Size: 25 X 75 mm |
| Multi-Well Plate Vacuum Manifold | Pall Corporation | P/N 5017 | Remove liquid from bottom of 96-well filter plate |
| Paraformaldehyd (PFA) | Bioshop | PAR070.500 | Fixation |
| PCR machine | Bio-Rad | Model: DNA Engine PTC-200 | 96-well plate PCR and probe denature |
| Picric acid solution | Sigma-aldrich | 80456 | For tissue fixation I solution |
| Potassium Chloride (KCL) | Bioshop | POC308 | |
| PP lid for 96-well plates, 100/case | UltiDent Scientific | 24-P-LID-PP | Lid for storing plates |
| Progene disposable Reagent Reservoirs (50 ml, sterile) | UltiDent Scientific | 825-1-50-5S | Liquid handling |
| Progene Pierceable Aluminum Foil | UltiDent Scientific | 87-CFILM-AL | Seal 96-well plate, DNase and RNase free |
| Proteinase K | Sigma-aldrich | P2308- 5MG | Embryo permeabilization |
| RiboLock Ribonuclease Inhibitor | Thermo Scientific | EO0381 | 40 Unit/ul |
| Ribonucleoside Triphosphate (NTP) set | Roche | 11277057001 | RNA probe sythesis |
| RNase free water | GIBCO | 10977015-500ml | RNA probe sythesis |
| RNaseZap | Ambion | AM9780 | Remove RNase contamination |
| Single stranded DNA from salmon testes | Sigma-aldrich | D9156 | For hybridization solution |
| Skim milk (non fat power) | Bioshop | SKI400.500 | Working concentration is 1 % in 1 X PBT or PBTT as a blocking reagent |
| Sodium Acetate (NaOAc) 3 M, pH=5.2 (RNase free) | Bioshop | SAA333 | Working concentration is 10 % (v/v) for DNA or RNA precipitation |
| SP6 RNA Polymerase | Thermo Scientific | EP0131 | 20 Unit/ul |
| Stainless Steel Shot for Sand Bath | VWR | 13259-274. | To fill the heating unit |
| Stereomicroscope & gooseneck light source | Leica | Model: MZ6 | Tissue dissection and mounting |
| Streptavidin, horseradish peroxidase (HRP) conjugate | Molecular Probes | S911 | Secondary antibody stock: 1 mg/ml, use 1/1000 dilution (1 μg/ml) for in situ. |
| T3 RNA Polymerase | Thermo Scientific | EP0101 | 20 Unit/ul |
| T7 RNA Polymerase | Thermo Scientific | EP0111 | 20 Unit/ul |
| Tip station (10 ul) | Axygen | T-300-STK-S | Certified DNase and RNase free |
| Tip station (200 ul) | Sorbio | 27770T | Certified DNase and RNase free |
| Tips ( 1ml) | Sorbio | 10200 | Certified DNase and RNase free |
| TRITON X-100 | Bioshop | TRX506 | Working concentration is 0.3% in 1 X PBT for tissue in situ |
| Tween 20 | Bioshop | TWN510 | Working concentration is 0.1% in 1 X PBT for embryo in situ |
| Whatman qualitative filter paper, Grade 3 | Sigma-aldrich | WHA1003917 | |
| Name | Company | Catalog Number | Comments |
| Solutions | Preparation | ||
| DABCO (1,4-Diazabicyclo[2.2.2]octane) glycerol anti-fade mounting media | DABCO (1.25 g), Glycerol (35 ml or v/v 70 %) and 1 X PBS (15 ml, or v/v 30 %). Keep dark and rock in cold room. store at -20 °C | ||
| 1 X PBT (1L) | 1 X PBS with 1 ml Tween 20 (0.1 %) | ||
| 1 X PBTT (1L) | 1 X PBS with 1 ml Tween 20 (0.1 %) and 3 ml of Triton-X-100 (0.3 %) | ||
| 1 X PBTB (1L) | 1 % Skim milk in 1 X PBT | ||
| 1 X PBTTB (1L) | 1 % Skim milk in 1 X PBTT |
References
Loading...
$$\rightleftharpoonup{xx}$$
$$\longleftharp{xx}$$,
$$\longrightharp{xx}$$,
- RNA-Seq: a revolutionary tool for transcriptomics. Nature Rev Genet. 10, 57-63 (2009).">Wang, Z., Gerstein, M., Snyder, M. RNA-Seq: a revolutionary tool for transcriptomics. Nature Rev Genet. 10, 57-63 (2009).
- A non-radioactive in situ hybridization method for the localization of specific RNAs in Drosophila embryos reveals translational control of the segmentation gene hunchback. Chromosoma. 98, 81-85 (1989).">Tautz, D., Pfeifle, C. A non-radioactive in situ hybridization method for the localization of specific RNAs in Drosophila embryos reveals translational control of the segmentation gene hunchback. Chromosoma. 98, 81-85 (1989).
- Double labeling with fluorescence in situ hybridization in Drosophila whole-mount embryos. Biotechniques. 24, 530-532 (1998).">Hughes, S. C., Krause, H. M. Double labeling with fluorescence in situ hybridization in Drosophila whole-mount embryos. Biotechniques. 24, 530-532 (1998).
- Global analysis of mRNA localization reveals a prominent role in organizing cellular architecture and function. Cell. 131, 174-187 (2007).">Lecuyer, E., et al. Global analysis of mRNA localization reveals a prominent role in organizing cellular architecture and function. Cell. 131, 174-187 (2007).
- Multiplex detection of RNA expression in Drosophila embryos. Science. 305, 846-846 (2004).">Kosman, D., et al. Multiplex detection of RNA expression in Drosophila embryos. Science. 305, 846-846 (2004).
- Ultra-sensitive FISH using peroxidase-mediated deposition of biotin- or fluorochrome tyramides. Human Mol Genet. 4, 529-534 (1995).">Raap, A. K., et al. Ultra-sensitive FISH using peroxidase-mediated deposition of biotin- or fluorochrome tyramides. Human Mol Genet. 4, 529-534 (1995).
- Fluorescent in situ hybridization protocols in Drosophila embryos and tissues. Methods Mol Biol. 420, 289-302 (2008).">Lecuyer, E., Parthasarathy, N., Krause, H. M. Fluorescent in situ hybridization protocols in Drosophila embryos and tissues. Methods Mol Biol. 420, 289-302 (2008).
- Current Protocols Essential Laboratory Techniques. , Wiley Online Library. Vol. 9.3.1-9.3.24 1-9 (2010).">Wilk, R., Murthy, S. U. M., Yan, H., Krause, H. M. Current Protocols Essential Laboratory Techniques. , Wiley Online Library. Vol. 9.3.1-9.3.24 1-9 (2010).
- Subcellular mRNA Localization in Animal Cells and Why It Matters. Science. 326, 1212-1216 (2009).">Holt, C. E., Bullock, S. L. Subcellular mRNA Localization in Animal Cells and Why It Matters. Science. 326, 1212-1216 (2009).
- mRNA Localization: Gene Expression in the Spatial Dimension. Cell. , 719-730 (2009).">Martin, K. C., Ephrussi, A. mRNA Localization: Gene Expression in the Spatial Dimension. Cell. , 719-730 (2009).
- Diverse and pervasive subcellular distributions for both coding and long noncoding RNAs. Genes Dev. 30, 594-609 (2016).">Wilk, R., Hu, J., Blotsky, D., Krause, H. M. Diverse and pervasive subcellular distributions for both coding and long noncoding RNAs. Genes Dev. 30, 594-609 (2016).
- Proximo-distal specialization of epithelial transport processes within the Xenopus pronephric kidney tubules. Dev Biol. 271, 322-338 (2004).">Zhou, X. L., Vize, P. D. Proximo-distal specialization of epithelial transport processes within the Xenopus pronephric kidney tubules. Dev Biol. 271, 322-338 (2004).
Reprints and Permissions
Request permission to reuse the text or figures of this JoVE article
Request Permission