The health of wild fishes can be used as an indicator of aquatic ecosystem health. Necropsy-based fish health assessments provide documentation of visible lesions or abnormalities, data used to calculate condition indices as well as the opportunity to collect tissues for microscopic evaluation, gene expression and other more in-depth analyses.
Method Article
Necropsy-based Wild Fish Health Assessment
Opens in a new tab
In This Article
Summary
Loading...
$$\rightleftharpoonup{xx}$$
$$\longleftharp{xx}$$,
$$\longrightharp{xx}$$,
Abstract
Loading...
$$\rightleftharpoonup{xx}$$
$$\longleftharp{xx}$$,
$$\longrightharp{xx}$$,
Anthropogenic influences from increased nutrients and chemical contaminants, to habitat alterations and climate change, can have significant effects on fish populations. Adverse effects monitoring, utilizing biomarkers from the organismal to the molecular level, can be used to assess the cumulative effects on fishes and other organisms. Fish health has been used worldwide as an indicator of aquatic ecosystem health. The necropsy-based fish health assessment provides data on visible abnormalities and lesions, parasites, condition and organosomatic indices. These can be compared by site, season and sex, as well as temporally, to document change over time. Severity ratings can be assigned to various observations to calculate a fish health index for more quantitative assessment. A drawback of the necropsy-based assessment is that it is based on visual observations and condition factors, which are not as sensitive as tissue and subcellular biomarkers for sublethal effects. Additionally, it is rarely possible to identify causes or risk factors associated with observed abnormalities. So, for instance a raised lesion or "tumor" on the fins, lips or body surface may be a neoplasm. However, it could also be a response to a parasite, chronic inflammation or hyperplasia of normal cells in response to an irritant. Conversely, neoplasms, certain parasites, other infectious agents and many tissue changes are not visible and so may be underestimated. However, during the necropsy-based assessment, blood (plasma), tissues for histopathology (microscopic pathology), genomics and other molecular analyses, and otoliths for aging can be collected. These downstream analyses, together with geospatial analyses, habitat assessments, water quality and contaminant analyses can all be important in comprehensive ecosystem evaluations.
Introduction
Loading...
$$\rightleftharpoonup{xx}$$
$$\longleftharp{xx}$$,
$$\longrightharp{xx}$$,
Human activities have numerous adverse effects on aquatic environments. Fish inhabit various water bodies that the human population recreates in and often uses as a drinking water source and hence are important indicators of the health of the aquatic environment. Wild fish that live and reproduce in a particular habitat are exposed throughout their lives to various stressors including pathogens, parasites, poor water quality and chemical contaminants. Thousands of chemicals enter our waterways through industrial and human wastewater, suburban/urban stormwater and agricultural runoff. These complex mixtures of chemicals can have additive, synergistic or antagonistic effects on exposed organisms1,2,3. In addition, other environmental stressors such as elevated nutrients, elevated temperature, low dissolved oxygen or fluctuating pH can exacerbate the effects of chemical contaminants4,5. Environmental stressors can also influence infectious disease outcomes directly by increasing the number of infectious agents6, increasing the virulence of opportunistic pathogens7 or suppressing the immune response and disease resistance of the host8,9,10. For these reasons, there is increasing interest in biological or adverse effects monitoring11,12,13,14, utilizing fish and other aquatic organisms to identify populations and ecosystems at risk.
Adverse effects monitoring utilizes biomarkers at various levels of organization, from the organismal to the subcellular or molecular, to identify sublethal effects which may influence populations and be indicative of exposure to various stressors. Indicators at the organism level include visible abnormalities and conditions. Condition indices based on length and weight are calculated to evaluate the well-being or fitness of fish populations. The most common is Fulton's condition factors (K) = (weight/length3) 15. Another indicator is the presence of visible abnormalities. A variety of methods have been used in individual studies and monitoring programs to assess, document, and evaluate visible abnormalities. Assessment based only on external abnormalities, i.e., the proportion of individuals with disease, fin damage, tumors and skeletal anomalies, is one of the metrics for the index of biotic integrity (IBI) that evaluates community health16. A similar assessment termed DELTs (deformities, erosions, lesions, tumors) has also been used to evaluate the health of fish communities17. However, these methods only assess external visual abnormalities and not internal lesions or early sublethal indicators.
Necropsy-based assessments include external and internal observations and allow for the measurement of additional condition indices. Hepatosomatic index (liver weight/total body weight) has also been used as an indicator of fitness or energy reserves15 for which a higher index value indicates healthier fish. However, a number of studies have shown that hypertrophy or an increase in liver size occurs due to exposure to various contaminants metabolized by the liver18,19,20. In this case a higher index would be indicative of exposure to certain chemical classes. The gonadosomatic index (gonad weight/total body weight) is another condition index directed toward reproductive health21. Observations made during the necropsy-based assessment can be used to compare the prevalence of individual lesion types or percentage of normal individuals. However, they can also be used in a more quantitative health assessment22,23.
The standardized necropsy-based assessment described here can be used to augment the grossly visible assessment in multiple ways depending on the question(s) to be answered, expertise and other available resources. Our routine approach is to collect biometric data (length, weight, liver weight, gonad weight), blood for plasma/serum analyses, document external and internal visible abnormalities, preserve pieces of organs for microscopic analyses and collect otoliths for age analyses. The necropsy-based assessment plus age analysis and histopathology of various organs, allows for the calculation and comparison of various condition indices, prevalence of visible abnormalities, as well as microscopic tissue changes, by sex, age, site and sampling period. Additional tissue collections can be made for many other analyses including electron microscopy, bacteriology, virology, parasitology and chemical concentrations. These methods can also be part of more in-depth analyses used to diagnose the cause of fish kills24 or mortalities of captive fishes25. Methods for collection of tissue for two additional analyses, gene expression and functional immune analyses are illustrated.
Protocol
Loading...
$$\rightleftharpoonup{xx}$$
$$\longleftharp{xx}$$,
$$\longrightharp{xx}$$,
Methods described here have been approved by the Leetown Science Center's Institutional Animal Care and Use Committee.
1. Fish Collection
- Collect live fish with a minimum of stress. Use boat or backpack electrofishing, hook and line or nets.
- Hold fish in live wells or aerated containers until sampling.
NOTE: The American Fisheries Society has published a number of guides for fish collection, handling and anesthesia/euthanasia26,27,28. Wear gloves when handling fish.
2. Fish Necropsy
- Euthanize a fish.
- Place fish in the anesthetic until opercular movement ceases and the fish loses equilibrium. After another 2–10 min the fish will be euthanized; however, this may also vary by species.
NOTE: Fish can be euthanized with a number of anesthetics (see Table of Materials for most commonly used). The method of euthanasia will depend on the laboratory measurements that will be conducted on tissues collected29.
- Place fish in the anesthetic until opercular movement ceases and the fish loses equilibrium. After another 2–10 min the fish will be euthanized; however, this may also vary by species.
- Measure biometric characteristics.
- Weigh the fish to the nearest gram.
- Measure the fish length to the nearest millimeter.
- Measure the total length from the tip of the snout with the mouth closed to the end of the tail when pinched together.
- Measure the fork length from the fork in the tail to the tip of the snout, and the standard length from the tip of the snout to the end of the body (beginning of the tail).
- Calculate the condition factor using the following formula:
Condition factor = (total body weight - gonad weight)/total length3.
Note: Gonad weight is subtracted from the total body weight since gonads can contribute significantly to the total body weight, particularly in prespawn female fish.
- Obtain a blood sample.
NOTE: Blood is most commonly taken from the caudal vein but can also be withdrawn from the dorsal aorta or by cardiac puncture30.- Extract a peripheral blood sample from the caudal vein with a 22 or 23 G needle on a 1 to 5 mL syringe, depending on size of the fish. Insert the needle anterior to the caudal area below the lateral line (Figure 1A and 1B). Angle it upwards until hitting the spine and then withdraw slightly. The vein is ventral to the overlying spine.
NOTE: If blood smears will be made or serum is required, no anticoagulant is used. In most cases, plasma will be collected and, hence, an anticoagulant such as sodium heparin, EDTA or lithium is used to coat the needle and syringe and is also in the blood collection tube (e.g., vacutainer). - Remove the needle and place into a sharps disposal container prior to putting the blood into the collection tube.
NOTE: Blood can be held on ice but depending on subsequent analyses should be centrifuged as soon as possible30. - If nuclear abnormalities or differential blood counts will be evaluated, immediately place a drop of blood on duplicate clean glass microscope slides. Back a second slide at a 45° angle into the drop, which is then drawn across the surface by capillary action. Allow to air-dry31.
- Centrifuge blood at 1,500–2,500 x g for 15 min to sediment the cells. Remove plasma/serum with a sterile transfer pipet, aliquot into cryogenic vials, and store at -80 °C.
- Extract a peripheral blood sample from the caudal vein with a 22 or 23 G needle on a 1 to 5 mL syringe, depending on size of the fish. Insert the needle anterior to the caudal area below the lateral line (Figure 1A and 1B). Angle it upwards until hitting the spine and then withdraw slightly. The vein is ventral to the overlying spine.
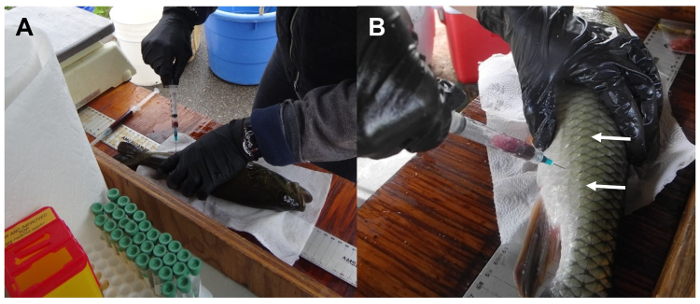
Figure 1: Obtaining a blood sample from a fish. (A) A recently euthanized fish is laid on its side and the lateral line located. (B) A needle is inserted ventral to lateral line (arrow), angled upward until needle touches the backbone. It is then slightly withdrawn, and suction initiated to withdraw blood. Please click here to view a larger version of this figure.
- Conduct a necropsy-based health assessment on each fish.
NOTE: A number of publications illustrating and describing lesions and abnormalities are available32,33,34,35.- Document external abnormalities including lesions on body surface and fins (Figure 2), eyes and gills (Figure 3), external parasites such as leeches (Figure 2D), grubs or trematode metacercarial cysts (Figure 2D, 3B) and gill parasites (Figure 3D). Document type, location and size of observed abnormalities on data sheets, as well as photographically, if possible.
- Open the abdominal cavity (Figure 4A) using a scissors by cutting from the anal area to the operculum and then removing the flap of muscle to expose the internal organs.
NOTE: If anterior kidney will be collected for immune function (see step 5 below) or samples collected for bacteriology or virology, the external body surface should be disinfected with 70% alcohol and those samples should be obtained before the necropsy performed. If tissues are only being used for visual observations, plasma analyses and histopathology sterile technique is not necessary. - Document internal abnormalities (Figure 4) including general or focal discolorations of the various organs (Figure 4B-4D), presence of raised areas (Figure 4E), cysts, parasites, and size abnormalities (enlarged, atrophied).
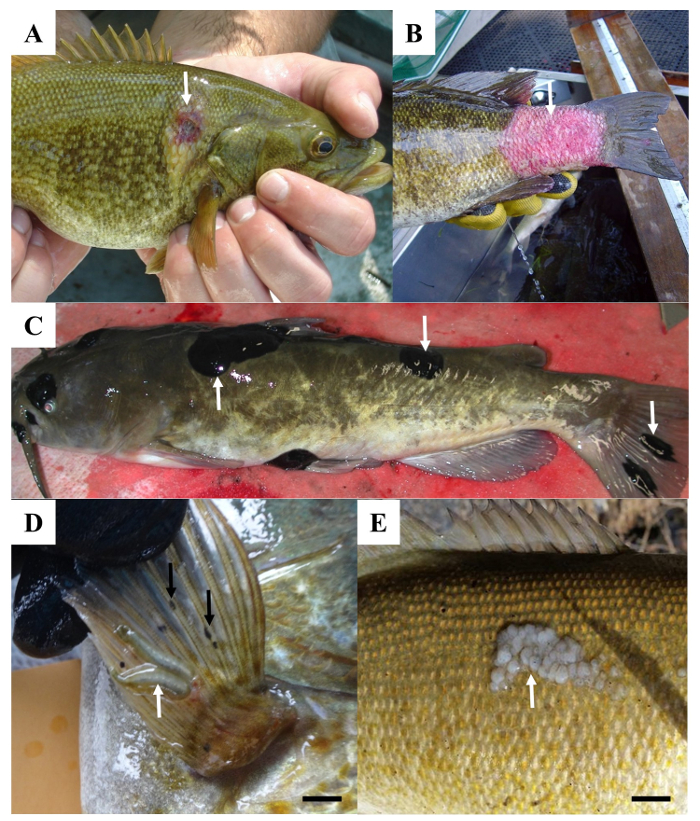
Figure 2: Examples of visible lesions observed on body surface and fins of fish. (A) A small, slightly eroded lesion (arrow) on the lateral body surface. (B) A large reddened area (arrow) involving the caudal body surface. (C) Raised, black lesions (arrows) on the body surface and fins. (D) Leeches (white arrow) and small black spots (black arrows) on the fin. Scale bar = 3 mm. (E) A raised, multilobed, pale lesion (arrow) on the body surface. Please click here to view a larger version of this figure.
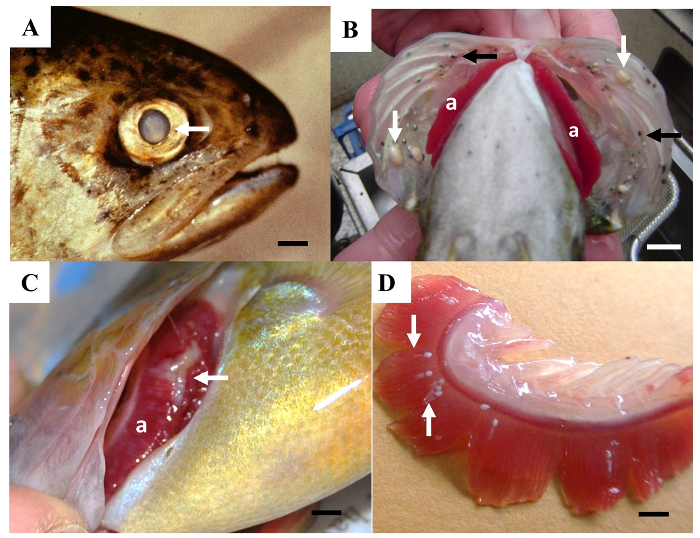
Figure 3: Examples of visible lesions of the gills and eyes of fish. (A) A pale area (arrow) within the lens of an eye. Scale bar = 5 mm. (B) White cysts (white arrows) and small black spots (black arrows) caused by trematode parasites on the operculum covering the gills (a). Scale bar = 1 cm. (C) A pale, eroded area (arrow) on the gill (a). Scale bar = 5 mm. (D) A gill that has been removed showing parasites (arrows) attached to the gill filaments. Scale bar = 2 mm. Please click here to view a larger version of this figure.

Figure 4: Examples of a necropsy and internal abnormalities of fish. (A) During a necropsy the fish is cut open (along the white arrow) and a flap of muscle (black arrow) removed to expose the gonad (a) and the spleen, being held by forceps and scissors. (B) Mottled liver (a), testes (b), intestine surrounded by adipose fat (c) and stomach (d). Scale bar = 5 mm. (C) Liver (a) with a dark red area (arrow), ovary (b) and intestines (c). Scale bar = 5 mm. (D) Liver with greenish discolored areas (arrows). Scale bar = 1 cm. (E) Example of a normal (a) and abnormal (b) testes with raised nodules. Scale bar = 1 cm. Please click here to view a larger version of this figure.
- Obtain hepatosomatic index (HSI).
- Remove liver by severing the hepatic artery and the connective tissue of the anterior end. Gently lift out while trimming adhesions and other connections to intestine and adipose fat. Take care to not puncture the gallbladder. Weigh the liver.
NOTE: Some fish, such as cyprinids, do not have a discrete liver but rather hepatic tissue wrapped around intestines and other organs. For these species, it may not be possible to obtain liver weights. - Calculate hepatosomatic index (HSI) using the formula:
HSI=liver weight/total body weight
- Remove liver by severing the hepatic artery and the connective tissue of the anterior end. Gently lift out while trimming adhesions and other connections to intestine and adipose fat. Take care to not puncture the gallbladder. Weigh the liver.
- Calculate the gonadosomatic index.
- Remove the gonads and weigh it.
- Calculate gonadosomatic index (GSI) using the formula:
GSI = gonad weight/total body weight
3. Preserve Tissues for Microscopic Pathology
NOTE: A number of fixatives including 10% neutral buffered formalin and Z-fix, a formalin-based fixative with zinc, can be used for preservation of tissue in the field. The latter is preferred if methods such as in situ hybridization or fluorescent antibody staining may be used.
- Carefully cut but do not pull out tissue samples. Keep individual tissue pieces <2 cm in size and <5 mm thick for proper fixation. As a rule of thumb, use approximately 10x more fixative by volume than the tissue for proper preservation. Place all tissue samples from one fish in the same leak-proof container of the appropriate size, depending on the size of fish being sampled.
- Place pieces of any external abnormalities in the fixative container. Also, include an adjacent piece of normal tissue.
NOTE: Improper handling such as compression or other mechanical damage, long exposure to air or sunlight, and freezing can cause artifacts. - Cut at least five 3–4 mm thick pieces of liver from various regions and place into the fixative container. Include normal and abnormal areas, if observed.
- Depending on size, place a whole gonad or multiple pieces along one gonad into the fixative container.
- Place either whole organs, if small, or pieces of all other organs (spleen, anterior and posterior kidney, gills, heart, intestine and stomach) in the fixative container. If abnormal tissue is observed, preserve an adjacent piece of normal tissue as well.
4. Remove the Otoliths for Age Analyses
NOTE: Age can be an important variable in fish disease/fish health studies. While a number of structures, including scales and spines, have been used for age determination, most studies comparing structures have found the otoliths to give the best results36,37. Teleost fishes have three pairs of otoliths - lapillus, sagitta and asteriscus. Generally, the sagittal or lapillus otoliths are collected for aging although that may vary by species. Removal and aging techniques have been previously described38.
- Cut through the gill isthmus, and bend the head back. Strip away connective and muscular tissue around the inferior portions of the neurocranium to locate prootic bullae, a raised bony area.
- Score or cut with bone cutters and crack to expose the otoliths. They can be seen with the naked eye.
- Place otoliths in a labelled vial or a coin envelope and store at room temperature until analyzed for age by counting the rings or increments38. If placing in a vial, open cap once returned to the laboratory and allow to thoroughly dry prior to storage.

Figure 5: Removal of otoliths. (A) The isthmus is cut and the connective tissue and muscle pulled away to expose the base of spine and neurospinal area. (B) The bone is cracked to expose the otoliths. (C) Lapillar otoliths are removed. Please click here to view a larger version of this figure.
5. Obtain Tissue for Immune Function Assays
NOTE: The anterior kidney is the major hematopoietic organ, the source of lymphocytes and macrophages for functional assays, and must be removed aseptically if cells will be cultured for functional assays, such as mitogenesis, phagocytic and killing ability of macrophages39,40.
- Spray the external surface of the fish with 70% ethanol. Use sterile scissors, a scalpel and forceps to open the abdominal cavity and remove the anterior kidney tissue, which is a dark red organ located anterior to the swim bladder.
- Place the anterior kidney sample in media (e.g., Leibovitz's L-15) to keep the cells alive. Homogenize kidney samples with a sterile hand-held tissue grinder (e.g., Tenbroeck tissue grinder) into single cell suspensions. Hold on wet ice until returned to the laboratory.
6. Preserve Tissue for Nucleic Acid Analyses
NOTE: If downstream molecular analysis will be conducted, such as gene expression using transcript abundance41 or quantitative PCR42 (polymerase chain reaction), place the pieces of tissue to be assessed in an appropriate preservative (e.g., RNAlater stabilization solution) as soon as possible.
- For RNA preservation, place two to three small (2–3 mm) pieces in the appropriate preservative at a 10:1 ratio of preservative volume to tissue.
NOTE: Samples should be shielded from sunlight or excessive heat and transported on wet ice. - For DNA preservation, place two to three small pieces of tissue into 95% ethanol (10:1 ethanol to tissue by volume). Then hold the samples on wet ice and then store at -20 °C.
Results
Loading...
$$\rightleftharpoonup{xx}$$
$$\longleftharp{xx}$$,
$$\longrightharp{xx}$$,
Great Lakes Areas of Concern (AOC) are geographic areas that were designated due to impairments of various beneficial uses. One of the beneficial use impairments (BUIs) at many AOC is the fish tumors or other deformities. Millions of dollars have been spent for remediation and restoration of each of these areas in order to delist the various BUIs and ultimately the AOC43. The criteria for delisting the fish tumor BUI differs from state to state (see epa.ohio.gov/portals/35/lakeerie/ohio_AOC_delisting_guidance.pdf and dnr.wi.gov/topic/GreatLakes/documents/SheboyganRiverFinalReport2008.pdf); however, as noted in the delisting documents, there is a requirement to determine the prevalence of liver tumors and in some cases skin tumors. In many cases, the prevalence is compared to a non-AOC reference site.
The fish tumor BUI was evaluated at three AOCs (St. Louis River, Milwaukee River and Sheboygan River) and a non-AOC reference site (Kewaunee River) on Lakes Superior and Michigan, utilizing a necropsy-based assessment of white sucker (Catostomus commersonii), followed by microscopic pathology of skin and liver tissue. Fish were collected from the Milwaukee, Sheboygan and Kewaunee rivers in 2012 and 201344 and from the St. Louis River in 2015 (unpublished data). Two hundred white suckers were assessed from Milwaukee, Kewaunee and St. Louis, and 193 from Sheboygan.
By definition, a tumor can be any swelling or raised area, although it is generally considered that a swelling caused by an abnormal growth of tissue with abnormal cells is either a benign or malignant neoplasm. White sucker collected from all sites exhibited a variety of external raised lesions including small, discrete white spots, larger white areas, slightly raised mucoid lesions and multilobed raised areas on the body surface and lips (Figure 6). Fish were weighed and measured to obtain a condition factor, external and internal abnormalities were documented, and skin and liver tissue was collected for histopathology.
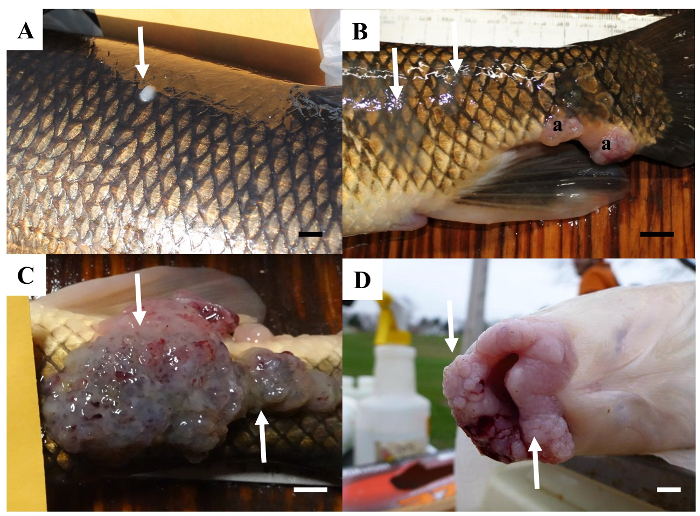
Figure 6: Raised skin lesions observed on white sucker from the Great Lakes. (A) A discrete white spot on the body surface. Scale bar = 5 mm. (B) A slightly raised mucoid (arrows) and multilobed lesions (a) on the posterior body surface. Scale bar = 1 cm. (C) A large, multilobed lesion on the body surface. Scale bar = 1 cm. (D) Numerous multi-lobed lesions on the lips. Please click here to view a larger version of this figure.
The percent of fish with external tumors or raised discolored areas ranged from 15.5% at the St. Louis AOC to 58.0% at the Milwaukee AOC. In general, the discrete white spots were the least common visual lesion while the multilobed lip and body surface lesions were most common. The number of fish with observable liver nodules was low, ranging from 1.5% at Kewaunee and St. Louis to 2.5% at Milwaukee (Table 1).
| Rivers and Year Sampled | ||||
| Visible Lesions | Kewaunee 2013 | St. Louis 2015 | Sheboygan 2012 | Milwaukee 2013 |
| Discrete white spots | 16 | 3 | 3.1 | 5 |
| Mucoid | 20 | 9.5 | 9.8 | 30.5 |
| Multilobed | 22.5 | 3 | 29.5 | 40 |
| Total Raised Skin Abnormalitiesa | 46 | 15.5 | 38.3 | 58 |
| Visible liver nodules | 1.5 | 1.5 | 1.6 | 2.5 |
| aTotal number of fish with raised lesions. Some fish had multiple types of abnormalities. | ||||
Table 1: Necropsy-based Observations of White Sucker Collected at Great Lakes Areas of Concern and a Reference Site (Kewaunee River), Presented as a Percentage.
Visual examination can be used to document the percent of fish with various abnormalities. However, to definitively diagnose the presence and type of neoplasia, tissues must be examined microscopically (histopathology). Upon microscopic examination, it was found that not all of the raised lesions were neoplastic. Many of the discrete white spots and the mucoid lesions, particularly at Kewaunee, were hyperplastic lesions rather than neoplasia (Table 2). Additionally, at Kewaunee and St. Louis, all of the skin tumors observed were benign papillomas. At Sheboygan and Milwaukee both papillomas and squamous cell carcinomas, malignant skin tumors, were observed (Table 2).
| Rivers Sampled | ||||
| Neoplasm Type | Kewaunee 2013 | St. Louis 2015 | Sheboygan 2012 | Milwaukee 2013 |
| Papilloma | 21 | 5.2 | 30.5 | 37.5 |
| Squamous cell carcinoma | 0 | 0 | 2.1 | 10.5 |
| Total skin neoplasms | 21 | 5.2 | 32.6 | 48 |
| Bile duct neoplasmsa | 2.5 | 4 | 6.2 | 9.5 |
| Hepatic cell neoplasmsb | 1 | 0 | 2.1 | 8 |
| Total liver neoplasms | 3.5 | 4 | 8.3 | 15.0c |
| aIncludes cholangioma and cholangiocarcinoma | ||||
| bIncludes hepatic cell adenoma and hepatic cell carcinoma | ||||
| cSome fish had both bile duct and hepatic neoplasms | ||||
Table 2: Microscopically Verified Neoplastic Lesions of White Sucker Collected at Great Lakes Areas of Concern and a Reference Site (Kewaunee River), Presented as a Percentage.
The histopathological analysis also identified liver tumors that were not identified by visual observation. While only 1.5% of the fish collected from Kewaunee and St. Louis had visible liver nodules (Table 1), 3.5% and 4.0%, respectively, had microscopically identified neoplasms (Table 2). A larger difference was seen at Sheboygan (1.6% visible versus 8.3% microscopic) and Milwaukee (2.5% visible versus 15.0% microscopic). Microscopic examination also provides a differentiation of neoplasms of bile duct versus hepatic cell origin (Table 2) and benign versus malignant tumors.
Discussion
Loading...
$$\rightleftharpoonup{xx}$$
$$\longleftharp{xx}$$,
$$\longrightharp{xx}$$,
The necropsy-based assessment of fish health can be utilized on any fish species for which the investigator has an understanding of the normal appearance of both external and internal structures. Using a standardized approach allows for comparisons between sites and species as well as seasonal and temporal changes in a population. The findings can be used to identify effects associated with point and nonpoint sources of contaminants and to inform management actions. It can also be used to track improvements once management actions are initiated. The methodology can be modified to augment the documentation of visual external abnormalities in a variety of ways. Assessments, based only on visual observations, can be non-lethal, relatively inexpensive and data can be generated quickly for a large number of individuals. Consequently, they can be useful for exploratory or initial assessments, to monitor change over time or in combination with other indicators. If the length and weight of fish are measured during visual observations, the condition factor can also be calculated. Although assessments based only on visual observation do not provide information on cause or associated risk factors, long term trends of certain skin abnormalities45 and biometric parameters46 have indicated improvement in some areas associated with water quality improvements.
The necropsy-based assessment provides more information as internal organs are also examined and other condition factors such as hepatosomatic index and gonadosomatic index can be calculated. Goede and Barton22 developed a field necropsy method that included blood parameters, biometric factors, the percentage of abnormalities, and index values for specific abnormalities. A refinement of the method included a severity rating for some variables that allowed for calculation of a health assessment index that could be compared statistically23. This health assessment index has been used in regional site comparisons23,47,48 and in combination with other biological indicators including plasma and histopathological analyses in the U.S. Geological Survey's Biomonitoring of Environmental Status and Trends Program evaluating potential effects of contaminant exposure in large rivers nationwide49,50,51. A Fish Disease Index based on externally visible diseases and parasites, visible liver neoplasms and other histopathologically detected liver lesions has been developed and used extensively in the North Sea, Baltic Sea, and off Iceland. This index was found to be an important tool as an ecosystem health indicator52.
There are some critical factors in conducting the necropsy-based assessment on fish. First, assessments must be conducted on fish immediately after death. Changes in organ color and consistency can occur fairly rapidly after death. Additionally, some parasites may leave the host soon after death. Second, it is important to know what is normal for the species of interest. For instance, some fish normally have fatty and consequently, pale livers, while for most species a pale liver would be abnormal. It is also important to recognize seasonal changes that naturally occur. Some fish will have color changes or develop breeding tubercles during the spawning season.
The limitations of the necropsy-based assessment as a method for fish health assessment include the inability to 1) consistently identify the "cause" of specific lesions and 2) identify effects that may not be visible to the naked eye. These drawbacks can be overcome with the addition of histopathology, molecular or cultural identification of pathogens and parasites, and gene expression. For instance, a "tumor" or raised lesion (swelling) may be actual neoplasia or it may be a parasite, inflammation, edema or hyperplasia (increase in number of normal cells), caused by chemical exposure, infectious agents or other irritants. As shown in the representative results, definitive tumor or neoplasia diagnosis requires microscopic pathology to identify the lesion type and severity (i.e., benign or malignant). Assessment of white sucker external "tumors" by visual observation overestimated the prevalence, particularly at the reference site. Many of the raised lesions were not neoplasms but rather hyperplastic lesions. It is currently not known whether these hyperplastic lesions are pre-neoplastic. Conversely, the observation of raised nodules in the liver significantly underestimated the prevalence of liver neoplasms. Hence, collection of tissue for microscopic pathology was necessary to adequately address the potential for delisting.
Disclosures
Loading...
$$\rightleftharpoonup{xx}$$
$$\longleftharp{xx}$$,
$$\longrightharp{xx}$$,
The authors have nothing to disclose.
Acknowledgements
Loading...
$$\rightleftharpoonup{xx}$$
$$\longleftharp{xx}$$,
$$\longrightharp{xx}$$,
This work was funded by the U.S. Geological Survey's Ecosystems (Chesapeake Bay Environments and Fisheries) and Environmental Health (Contaminants Biology) programs and the West Virginia Department of Natural Resources. Use of trade names is for identification purposes only and does not imply endorsement by the U.S. government.
Materials
| Name | Company | Catalog Number | Comments |
|---|---|---|---|
| Folding tables | Any | ||
| Folding chairs | Any | ||
| Dissecting boards | Any | ||
| Measuring board (mm) | Any | ||
| Battery powered scale (g) for fish weight | Any | ||
| Battery powered scale (mg) for organ weights | Any | ||
| Dissecting forceps | Any | ||
| Bone cutters | Any | ||
| Scalpel and blades | Any | ||
| Disposable gloves | Any | ||
| Buckets | Any | ||
| Leak-proof Nalgene bottles (250 mL) | ThermoFischer Scientific | 02-924-5C | |
| Vacutainer tubes with sodium heparin | ThermoFischer Scientific | 02-689-6 | For blood collection |
| Disposable 3 mL syringes with 23 G needle | ThermoFischer Scientific | 14-826-11 | |
| 1 – 2 mL cryovials | Any | Used for plasma and RNAlater samples | |
| Invitrogen RNAlater Stabilization solution | ThermoFischer Scientific | AM7021 | |
| Z-Fix Formaldehyde Zinc fixative | Anatech LTD | SKU-174 | |
| Tricaine-S (MS-222) | Syndel USA | fish anesthetic | |
| Coin Envelopes | Any | for otoliths | |
| Pencils and pens | Any | ||
| 70% alcohol | Any | ||
| Data sheets | Any |
References
Loading...
$$\rightleftharpoonup{xx}$$
$$\longleftharp{xx}$$,
$$\longrightharp{xx}$$,
- Cocktail effects on biomarker responses in fish. Aquatic Toxicology. (105 Supplement), 72-77 (2011).">Celander, M. C. Cocktail effects on biomarker responses in fish. Aquatic Toxicology. (105 Supplement), 72-77 (2011).
- Health effects in fish of long-term exposure to effluents from wastewater treatment works. Environmental Health Perspectives. 114, 81-89 (2006).">Liney, K. E., et al. Health effects in fish of long-term exposure to effluents from wastewater treatment works. Environmental Health Perspectives. 114, 81-89 (2006).
- Something from "nothing" - eight weak estrogenic chemicals combined at concentrations below NOECs produce significant mixture effects. Environmental Science & Technology. 36, 1751-1756 (2002).">Silva, E., Rajapakse, N., Kortenkamp, A. Something from "nothing" - eight weak estrogenic chemicals combined at concentrations below NOECs produce significant mixture effects. Environmental Science & Technology. 36, 1751-1756 (2002).
- The toxicology of climate change: environmental contaminants ina warming world. Environment International. 35, 971-986 (2009).">Noyes, P. D., et al. The toxicology of climate change: environmental contaminants ina warming world. Environment International. 35, 971-986 (2009).
- The effect of environmental factors on metal toxicity to fish. Fresenius Environmental Bulletin. 12, 824-829 (2003).">Witeska, M., Jezierska, B. The effect of environmental factors on metal toxicity to fish. Fresenius Environmental Bulletin. 12, 824-829 (2003).
- Elevated resource availability sufficient to turn opportunistic into virulent fish pathogens. Ecology. 91, 1251-1256 (2010).">Wedekind, C., Gessner, M. O., Vazquez, F., Maerki, M., Steiner, D. Elevated resource availability sufficient to turn opportunistic into virulent fish pathogens. Ecology. 91, 1251-1256 (2010).
- High nutrient concentration can induce virulence factor expression and cause higher virulence in an environmentally transmitted pathogen. Microbial Ecology. 72, 955-964 (2016).">Penttinen, R., Kinnula, H., Lipponen, A., Bamford, J. K. H., Sundberg, L. R. High nutrient concentration can induce virulence factor expression and cause higher virulence in an environmentally transmitted pathogen. Microbial Ecology. 72, 955-964 (2016).
- Ecotoxicology and innate immunity in fish. Developmental & Comparative Immunology. 25, 853-873 (2001).">Bols, N. C., Brubacher, J. L., Ganassin, R. C., Lee, L. E. J. Ecotoxicology and innate immunity in fish. Developmental & Comparative Immunology. 25, 853-873 (2001).
- Effect of pesticides and other organic pollutants in the aquatic environment on immunity of fish: a review. Fish and Shellfish Immunology. 3, 423-438 (1993).">Dunier, M., Siwicki, A. K. Effect of pesticides and other organic pollutants in the aquatic environment on immunity of fish: a review. Fish and Shellfish Immunology. 3, 423-438 (1993).
- The effects of estrogenic and androgenic endocrine disruptors on the immune system of fish: a review. Ecotoxicology. 20, 305-319 (2011).">Milla, S., Depiereux, S., Kestemont, P. The effects of estrogenic and androgenic endocrine disruptors on the immune system of fish: a review. Ecotoxicology. 20, 305-319 (2011).
- Effect-based tools for monitoring and predicting the ecotoxicological effects of chemicals in the aquatic environment. Sensors. 12, 12741-12771 (2012).">Connon, R. E., Geist, J., Werner, I. Effect-based tools for monitoring and predicting the ecotoxicological effects of chemicals in the aquatic environment. Sensors. 12, 12741-12771 (2012).
- Biological effects-based tools for monitoring impacted surface waters in the Great Lakes: A multiagency program in support of the Great Lakes restoration initiative. Environmental Practice. 15, 409-426 (2013).">Eckman, D. R., et al. Biological effects-based tools for monitoring impacted surface waters in the Great Lakes: A multiagency program in support of the Great Lakes restoration initiative. Environmental Practice. 15, 409-426 (2013).
- Adverse effects of pesticides and related chemicals on enzyme and hormone systems of fish, amphibians and reptiles: A review. Proceedings of the Pakistan Academy of Sciences. 42, 315-323 (2005).">Khan, M. Z., Law, F. C. P. Adverse effects of pesticides and related chemicals on enzyme and hormone systems of fish, amphibians and reptiles: A review. Proceedings of the Pakistan Academy of Sciences. 42, 315-323 (2005).
- The European technical report on aquatic effect-based monitoring tools under the water framework directive. Environmental Sciences Europe. 27, (2015).">Wernersson, A. S., et al. The European technical report on aquatic effect-based monitoring tools under the water framework directive. Environmental Sciences Europe. 27, (2015).
- The selection of suitable indices for the measurement and analysis of fish condition. Journal of Fish Biology. 34, 171-182 (1989).">Bolger, T., Connolly, P. L. The selection of suitable indices for the measurement and analysis of fish condition. Journal of Fish Biology. 34, 171-182 (1989).
- Biological integrity: A long-neglected aspect of water resource management. Ecological Applications. 1, 66-84 (1991).">Karr, J. R. Biological integrity: A long-neglected aspect of water resource management. Ecological Applications. 1, 66-84 (1991).
- Assessing the sustainability and biological integrity of water resources using fish communities. Simon, I. nT. P. , CRC Press. Florida. 225-246 (1999).">Sanders, R. E., Miltner, R. J., Yoder, C. O., Rankin, E. T. The use of external deformities, erosions, lesions, and tumors (DELT anomalies) in fish assemblages for characterizing aquatic resources: a case study of seven Ohio stream. Assessing the sustainability and biological integrity of water resources using fish communities. Simon, I. nT. P. , CRC Press. Florida. 225-246 (1999).
- Bioaccumulation of micropollutants and biomarker responses in caged carp (Cyprinus carpio). Ecotoxicology and Environmental Safety. 72, 720-728 (2009).">Bervoets, L., et al. Bioaccumulation of micropollutants and biomarker responses in caged carp (Cyprinus carpio). Ecotoxicology and Environmental Safety. 72, 720-728 (2009).
- Adaptive liver growth induced by xenobiotic compounds: its nature and mechanism. Archives of Toxicology. Supplement. 2, 113-124 (1979).">Schulte-Hermann, R. Adaptive liver growth induced by xenobiotic compounds: its nature and mechanism. Archives of Toxicology. Supplement. 2, 113-124 (1979).
- Relative liver weights and xenobiotic-metabolizing enzymes of fish from polluted surface waters in the Netherlands. Aquatic Toxicology. 4, 1-14 (1983).">Slooff, W., van Kreijl, C. F., Baars, A. J. Relative liver weights and xenobiotic-metabolizing enzymes of fish from polluted surface waters in the Netherlands. Aquatic Toxicology. 4, 1-14 (1983).
- Comparing histology and gonadosomatic index for determining spawning condition of small-bodied riverine fishes. Ecology of Freshwater Fish. 17, 54-58 (2003).">Brewer, S. K., Rabeni, C. F., Papoulias, D. M. Comparing histology and gonadosomatic index for determining spawning condition of small-bodied riverine fishes. Ecology of Freshwater Fish. 17, 54-58 (2003).
- Organismic indices and an autopsy-based assessment as health and condition of fish. American Fisheries Society Symposium. 8, 93-108 (1990).">Goede, R. W., Barton, B. A. Organismic indices and an autopsy-based assessment as health and condition of fish. American Fisheries Society Symposium. 8, 93-108 (1990).
- A quantitative health assessment index for rapid evaluation of fish condition in the field. Transactions of the American Fisheries Society. 122, 63-73 (1993).">Adams, S. M., Brown, A. M., Goede, R. W. A quantitative health assessment index for rapid evaluation of fish condition in the field. Transactions of the American Fisheries Society. 122, 63-73 (1993).
- Field sampling and necropsy examination of fish. Virginia journal of science. 50, 345-363 (1999).">Kane, A. S., et al. Field sampling and necropsy examination of fish. Virginia journal of science. 50, 345-363 (1999).
- Necropsy techniques for fish. Seminars in Avian and Exotic Pet Medicine. 12, 89-105 (2003).">Yanong, R. P. E. Necropsy techniques for fish. Seminars in Avian and Exotic Pet Medicine. 12, 89-105 (2003).
- Guidelines for the Use of Fishes in Research. , American Fisheries Society. Bethesda, Maryland. (2004).">American Fisheries Society (AFS) Use of Fishes in Research Committee, American Institute of Fishery Research Biologists and the Society of Ichthyologists and Herpetologists. Guidelines for the Use of Fishes in Research. , American Fisheries Society. Bethesda, Maryland. (2004).
- Standard methods for sampling North American freshwater fishes. , American Fisheries Society. Bethesda, Maryland. (2009).">Bonar, S. A., Hubert, W. A., Willis, D. W. Standard methods for sampling North American freshwater fishes. , American Fisheries Society. Bethesda, Maryland. (2009).
- Fisheries Techniques, third edition. , American Fisheries Society. Bethesda, Maryland. 1009(2013).">Zale, A. V., Parrish, D. L., Sutton, T. M. Fisheries Techniques, third edition. , American Fisheries Society. Bethesda, Maryland. 1009(2013).
- Fish sedation, anesthesia, analgesia, and euthanasia: considerations, methods, and types of drugs. Institute for Laboratory Animal Research. , 343-360 (2009).">Neiffer, D. L., Stamper, M. A. Fish sedation, anesthesia, analgesia, and euthanasia: considerations, methods, and types of drugs. Institute for Laboratory Animal Research. , 343-360 (2009).
- The efficacy of field techniques for obtaining and storing blood samples from fishes. Journal of Fish Biology. 795, 1322-1333 (2011).">Clark, T. D., et al. The efficacy of field techniques for obtaining and storing blood samples from fishes. Journal of Fish Biology. 795, 1322-1333 (2011).
- Peripheral blood film - a review. Annals of Ibadan Postgraduate Medicine. 12, 71-79 (2014).">Adewoyin, A. S., Nwogoh, B. Peripheral blood film - a review. Annals of Ibadan Postgraduate Medicine. 12, 71-79 (2014).
- Illustrated field guide for assessing external and internal anomalies in fish. Information and Technology Report USGS/BRD/ITR. 2002-007, 46(2002).">Smith, S. B., et al. Illustrated field guide for assessing external and internal anomalies in fish. Information and Technology Report USGS/BRD/ITR. 2002-007, 46(2002).
- Descriptive guide to observing fish lesions. , Available at http://aquaticpath.phhp.ufl.edu/Lesionguide/Lesionguide.pdf (2005).">Kane, A. S. Descriptive guide to observing fish lesions. , Available at http://aquaticpath.phhp.ufl.edu/Lesionguide/Lesionguide.pdf (2005).
- Field manual for assessing internal and external anomalies in brown bullhead (Ameiurus nebulosus). , Pennsylvania Sea Grant. Erie, PA. Available at: https://seagrant.psu.edu/sites/default/files/Bullhead%20field%20manual.pdf (2018).">Rafferty, S. D., Grazio, J. Field manual for assessing internal and external anomalies in brown bullhead (Ameiurus nebulosus). , Pennsylvania Sea Grant. Erie, PA. Available at: https://seagrant.psu.edu/sites/default/files/Bullhead%20field%20manual.pdf (2018).
- Necropsy manual. , Available at www.necropsymanual.net (2018).">European Association of Fish Pathologists. Necropsy manual. , Available at www.necropsymanual.net (2018).
- Validity of otoliths and pectoral spines for estimating ages of channel catfish. North American Journal of Fisheries Management. 22, 934-942 (2002).">Buckmeier, D. L., Irwin, E. R., Betsill, R. K., Prentice, J. A. Validity of otoliths and pectoral spines for estimating ages of channel catfish. North American Journal of Fisheries Management. 22, 934-942 (2002).
- An evaluation of different structures to age freshwater fish from a northeastern US river. Fisheries Management and Ecology. 13, 237-242 (2006).">Maceina, M. J., Sammons, S. M. An evaluation of different structures to age freshwater fish from a northeastern US river. Fisheries Management and Ecology. 13, 237-242 (2006).
- Otolith Microstructure Examination and Analysis. Stevenson, D. K., Campana, S. E. 117, Canadian Special Publication of Fisheries and Aquatic Sciences. 19-57 (1992).">Secor, D. H., Dean, J. M., Laban, E. H. Otolith removal and preparation for microstructural examination. Otolith Microstructure Examination and Analysis. Stevenson, D. K., Campana, S. E. 117, Canadian Special Publication of Fisheries and Aquatic Sciences. 19-57 (1992).
- Measurement of in vitro leucocyte mitogenesis in fish: ELISA based detection of the thymidine analogue 5'-bromo-2'-deoxyuridine. Fish and Shellfish Immunology. 14, 279-288 (2003).">Gauthier, D. T., Cartwrwight, D. D., Densmore, C. L., Blazer, V. S., Ottinger, C. A. Measurement of in vitro leucocyte mitogenesis in fish: ELISA based detection of the thymidine analogue 5'-bromo-2'-deoxyuridine. Fish and Shellfish Immunology. 14, 279-288 (2003).
- Biomarkers of immunotoxicity in fish:from the lab to the ocean. Toxicology Letters. , 325-331 (2000).">Zelikoff, J. T., et al. Biomarkers of immunotoxicity in fish:from the lab to the ocean. Toxicology Letters. , 325-331 (2000).
- Transcriptome discovery in non-model wild fish species for the development of quantitiative transcript abundance assays. Comparative Biochemistry and Physiology - Part D: Genomics and Proteomics. 20, 27-40 (2016).">Hahn, C. M., Iwanowicz, L. R., Corman, R. S., Mazik, P. M., Blazer, V. S. Transcriptome discovery in non-model wild fish species for the development of quantitiative transcript abundance assays. Comparative Biochemistry and Physiology - Part D: Genomics and Proteomics. 20, 27-40 (2016).
- Quantitative polymerase chain reaction for transforming growth factor-B applied to a field study of fish health in Chesapeake Bay tributaries. Environmental Health Perspectives. 108, 1-6 (2000).">Harms, C. A., et al. Quantitative polymerase chain reaction for transforming growth factor-B applied to a field study of fish health in Chesapeake Bay tributaries. Environmental Health Perspectives. 108, 1-6 (2000).
- Economic benefits of remediating the Sheboygan River, Wisconsin Area of Concern. Journal of Great Lakes Research. 34, 649-660 (2008).">Braden, J. B., et al. Economic benefits of remediating the Sheboygan River, Wisconsin Area of Concern. Journal of Great Lakes Research. 34, 649-660 (2008).
- Tumours in white suckers from Lake Michigan tributaries: pathology and prevalence. Journal of Fish Diseases. 40, 377-393 (2017).">Blazer, V. S., et al. Tumours in white suckers from Lake Michigan tributaries: pathology and prevalence. Journal of Fish Diseases. 40, 377-393 (2017).
- Long-term trends in the prevalence of cancer and other major diseases among flatfish in the southeastern North Sea as indicators of changing ecosystem health. Environmental Science & Technology. 43, 2151-2158 (2009).">Vethaak, A. D., Jol, J. G., Pieters, J. P. F. Long-term trends in the prevalence of cancer and other major diseases among flatfish in the southeastern North Sea as indicators of changing ecosystem health. Environmental Science & Technology. 43, 2151-2158 (2009).
- Biometric parameters of the bream (Abramis brama) as indicators for long-term changes in fish health and environmental quality - data from the German ESB. Environmental Science and Pollution Research. 22, 1620-1627 (2015).">Teubner, D., Paulus, M., Veith, M., Klein, R. Biometric parameters of the bream (Abramis brama) as indicators for long-term changes in fish health and environmental quality - data from the German ESB. Environmental Science and Pollution Research. 22, 1620-1627 (2015).
- Fish health assessment index study of four reservoirs in north-central Georgia. North American Journal of Fisheries Management. 24, 1173-1180 (2004).">Schleiger, S. L. Fish health assessment index study of four reservoirs in north-central Georgia. North American Journal of Fisheries Management. 24, 1173-1180 (2004).
- Health assessment of a tailwater trout fishery associated with a reduced winter flow. North American Journal of Fisheries Management. 20, 267-275 (2000).">Sutton, R. J., Caldwell, C. A., Blazer, V. S. Health assessment of a tailwater trout fishery associated with a reduced winter flow. North American Journal of Fisheries Management. 20, 267-275 (2000).
- Biomonitoring of environmental status and trends (BEST) program: selected methods for monitoring chemical contaminants and their effects in aquatic ecosystems. Schmitt, C. J., Dethloff, G. M. , U.S. Geological Survey Information and Technology Report USGS/BRD-2000-005 18-21 (2000).">Blazer, V. S. The necropsy-based fish health assessment. Biomonitoring of environmental status and trends (BEST) program: selected methods for monitoring chemical contaminants and their effects in aquatic ecosystems. Schmitt, C. J., Dethloff, G. M. , U.S. Geological Survey Information and Technology Report USGS/BRD-2000-005 18-21 (2000).
- Biomonitoring of environmental status and trends (BEST) program: Environmental contaminants and their effects on fish in the Mississippi River basin. Biological Science Report USGS/BRD/BSR. 2002-0004, 241(2002).">Schmitt, C. J. Biomonitoring of environmental status and trends (BEST) program: Environmental contaminants and their effects on fish in the Mississippi River basin. Biological Science Report USGS/BRD/BSR. 2002-0004, 241(2002).
- Chemical contaminants, health indicators, and reproductive biomarker responses in fish from rivers in the Southeastern United States. Science of the Total Environment. 390, 538-557 (2008).">Hinck, J. E., et al. Chemical contaminants, health indicators, and reproductive biomarker responses in fish from rivers in the Southeastern United States. Science of the Total Environment. 390, 538-557 (2008).
- Diseases of dab (Limanda limanda): Analysis and assessment of data on externally visible diseases, macroscopic liver neoplasms and liver histopathology in the North Sea, Baltic Sea and off Iceland. Marine Environmental Research. 124, 61-69 (2017).">Lang, T., et al. Diseases of dab (Limanda limanda): Analysis and assessment of data on externally visible diseases, macroscopic liver neoplasms and liver histopathology in the North Sea, Baltic Sea and off Iceland. Marine Environmental Research. 124, 61-69 (2017).
Reprints and Permissions
Request permission to reuse the text or figures of this JoVE article
Request Permission