Analysis of the morphology, composition, and spacing of exsolution lamellae can provide essential information to understand geological processes related to volcanism and metamorphism. We present a novel application of APT for the characterization of such lamellae and compare this approach to the conventional use of electron microscopy and FIB-based nanotomography.
A subscription to JoVE is required to view this content. Sign in or start your free trial.
Method Article
Atom Probe Tomography Analysis of Exsolved Mineral Phases
In This Article
Summary
Abstract
Element diffusion rates and temperature/pressure control a range of fundamental volcanic and metamorphic processes. Such processes are often recorded in lamellae exsolved from host mineral phases. Thus, the analysis of the orientation, size, morphology, composition and spacing of exsolution lamellae is an area of active research in the geosciences. The conventional study of these lamellae has been conducted by scanning electron microscopy (SEM) and transmission electron microscopy (TEM), and more recently with focused ion beam (FIB)-based nanotomography, yet with limited chemical information. Here, we explore the use of atom probe tomography (APT) for the nanoscale analysis of ilmenite exsolution lamellae in igneous titanomagnetite from ash deposits erupted from the active Soufrière Hills Volcano (Montserrat, British West Indies). APT allows the precise calculation of interlamellar spacings (14–29 ± 2 nm) and reveals smooth diffusion profiles with no sharp phase boundaries during the exchange of Fe and Ti/O between the exsolved lamellae and the host crystal. Our results suggest that this novel approach permits nanoscale measurements of lamellae composition and interlamellar spacing that may provide a means to estimate the lava dome temperatures necessary to model extrusion rates and lava dome failure, both of which play a key role in volcanic hazard mitigation efforts.
Introduction
The study of chemical mineralogy has been a major source of information within the field of Earth Sciences for more than a century, as minerals actively record geological processes during and after their crystallization. Physio-chemical conditions of these processes, such as temperature changes during volcanism and metamorphism, are recorded during mineral nucleation and growth in the form of chemical zonation, striations, and lamellae, among others. Exsolution lamellae form when a phase unmixes into two separate phases in the solid state. The analysis of the orientation, size, morphology, and spacing of such exsolution lamellae can provide essential information to understand temperature and pressure changes during volcanism and metamorphism1,2,3 and the formation of ore mineral deposits4.
Traditionally, the study of exsolution lamellae was conducted with the observation of micrographs by simple scanning electron imaging5. More recently, this has been substituted by the use of energy-filtered transmission electron microscopy (TEM) providing detailed observations at the nanoscale level1,2,3. Nevertheless, in both cases, the observations are made in two dimensions (2D), which is not fully adequate for three dimensional (3D) structures represented by these exsolution lamellae. Nanotomography6 is emerging as a new technique for the 3D observation of nanoscale features inside minerals grains, yet there is insufficient information about the composition of these features. An alternative to these approaches is the use of atom probe tomography (APT), representing the highest spatial resolution analytical technique in existence for the characterization of materials7. The strength of the technique lies in the possibility of combining a 3D reconstruction of nanoscale features with their chemical composition at the atomic scale with a near part-per-million analytical sensitivity7. Previous applications of APT to the analysis of geological samples have provided excellent results8,9,10,11, particularly in the chemical characterization of element diffusion and concentrations9,12,13. Yet, this application has not been used for the study of exsolution lamellae, abundant in some minerals hosted in metamorphic and igneous rocks. Here, we explore the use of APT, and its limitations, for the analysis of the size and composition of exsolution lamellae, and interlamellar spacing in volcanic titanomagnetite crystals.
Access restricted. Please log in or start a trial to view this content.
Protocol
1. Sourcing, selection, and preparation of mineral grains
NOTE: Samples were obtained from the catalogued collection at the Montserrat Volcano Observatory (MVO) and derived from falling deposits originating from a vigorous ash venting episode at Soufrière Hills Volcano that occurred on 5 October, 2009; this was one of 13 similar events over a course of three days14. This ash venting preceded a new phase of lava dome growth (phase 5) that commenced on 9 October. Previous analysis of this sample showed it to be a combination of dense dome rock fragments, glassy particles, and accidental lithics14.
- Pour 1 g of volcanic ash sample into a 10 cm diameter glass Petri dish.
- Wrap a small (3 cm x 3 cm) sheet of weighing paper around a 10 G magnet.
- Use a paper-wrapped magnet to pull magnetite-rich grains between 100 µm and 500 μm in diameter from the ash sample and place in a 32 μm (5 φ), 8 cm diameter stainless-steel sieve.
- Rinse in deionized water for 20–30 s using a squeeze bottle to remove smaller, adhering ash particles (which will pass through the sieve), and air-dry for 24 h.
- Affix clean and dry ash particles to sample mounts suitable for the secondary electron microscope (SEM). Image in secondary electron mode at a 15–20 kV accelerating voltage and at a working distance of 10 mm to select the 5–10 best candidates for further analysis. Selected grains should be predominantly (>50%) magnetite (Figure 1a,b).
- Affix selected ash grains to clear tape, surround with one-inch diameter hollow mold (metal, plastic, or rubber) that has been internally coated with vacuum grease, and pour in epoxy resin to fill the mold (2 cm3). Allow epoxy to cure according to the specific epoxy instructions.
- Once epoxy has cured, remove from mold and peel tape from the bottom. Ash grains should be partially exposed.
- Polish the epoxy-cast ash grains using SiC grinding paper of five different grit sizes (400, 800, 1200, 1500 and 2000 grit).
- Polish the sample with each grit size, from highest (400) to lowest (2000) in a figure eight motion for at least 10 min. In between grit sizes, sonicate the sample in a bath of deionized water for 10 min.
- Check the sample under a microscope to ensure that the polishing grit is not present, and the sample surface is free from scratches. If scratches are present, repeat the polishing procedure with the previous grit size before sonicating and moving to the next grit size.
- Polish the epoxy-cat ash grains with alumina polishing suspensions of 1.0 μm and then 0.3 µm on polishing cloths.
- Polish the sample with each suspension in a figure eight motion for at least 10 min. In between suspension sizes, sonicate the sample in a bath of deionized water for 10 min.
- Check the sample under a microscope to ensure that the suspension is not present and the sample surface is free of scratches. If scratches are present, repeat the polishing procedure with the previous suspension before sonicating and moving to the next suspension size. At the end of the polishing procedure, the epoxy surface should be smooth and the ash grains should be flat and well-exposed.
- Coat the sample surface with a conducting coat of ~10 nm thick carbon using an available sputter coating device.
- Obtain backscattered electron images of the ash grains with the electron microscope at a 15–20 kV accelerating voltage and a working distance of 10 mm to determine the location of exsolution lamellae in the magnetite (Figure 1c), as conducted in previous studies5.
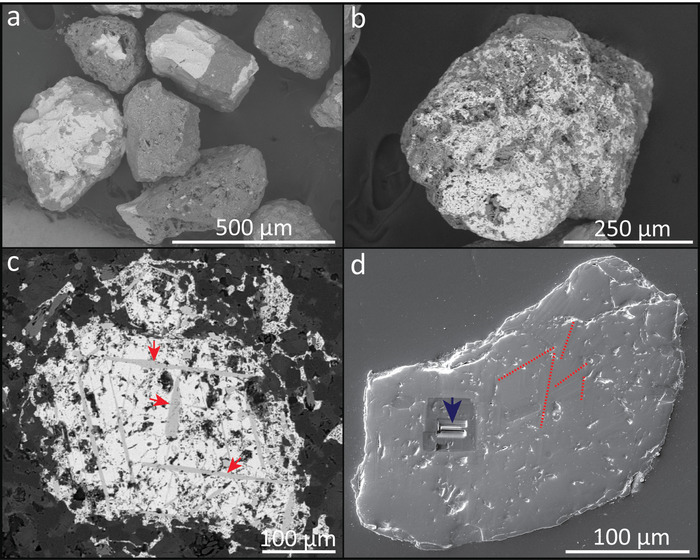
Figure 1: Example of magnetite-rich ash grains from venting episodes at the Soufrière Hills volcano. (a, b): Backscattered electron images (BSE) of both reacted and unreacted textures in magnetite grains. (c) BSE image of a polished magnetite grain showing the presence of exsolution lamellae (light grey laths; red arrows) of potential ilmenite composition. (d) Secondary electron image of a polished magnetite grain prepared for atom probe tomography (APT) analysis, showing the location of some exsolution lamellae (dashed red lines), which are distributed all along the grain surface, and the location of the wedge extraction (blue arrow). Please click here to view a larger version of this figure.
2. Atom probe tomography (APT) sample preparation
- APT samples will be prepared from a wedge of material that reveals the presence of exsolution lamellae (Figure 1d) employing a FIB-based lift-out protocol16 (Figure 2). Prior to FIB work, sputter coat the sample surface with 15 nm layer of Cu to avoid electron charging and sample drifting.
- Using a focused ion beam in a dual beam scanning electron microscope (FIB-SEM), deposit a rectangle of platinum (Pt) (3 μm in thickness) on the polished section of interest containing the lamellae over a 1.5 µm x 20 µm region using a gallium (Ga+) ion beam at 30 kV and 7 pA.
NOTE: This platinum layer is deposited to protect the region of interest (ROI) from ion beam damage. - Mill three wedges of material below three sides of the Pt rectangle using the ion beam (30 kV, 1 nA). See Figure 1d and Figure 2.
- Insert the gas injection system (GIS) and weld the wedge to an in situ nano-manipulator using GIS-deposited Pt before cutting the final edge free (Figure 2a).
- Using the Ga+ ion beam (5 kV and 240 pA), cut ten 1–2 μm wide segments from the wedge and sequentially affix them with Pt to the tops of Si posts of a microtip array coupon (Figure 2b–d).
- Shape and sharpen each specimen tip using annular milling patterns of increasingly smaller inner and outer diameters (Figure 3). Initially, perform the milling at 30 kV to produce the specimen geometry necessary for APT (Figure 3, left panel).
- Perform the final milling at an accelerating voltage of 5 kV in order to reduce Ga+ implantation and obtain a consistent tip-to-tip shape (Figure 3, right panel).
- By applying the measuring tools of the SEM to the figure, ensure that the diameter at the top of the tips ranges 50–65 nm, while the shank angle of the tips ranges from 25° to 38°.
NOTE: Further details have been previously published, describing the conventional lift-out protocol16.

Figure 2: Example of FIB-SEM sample preparation protocol for APT analysis. (a) Wedge (W) lift-out extraction with the nanomanipulator (Nm). (b) Lateral view of the micro-coupon array of silicon posts mounted on a copper clip. (c) Top view of the micro-coupon array of silicon posts showing the nanomanipulator for mounting the wedge sections. (d) Wedge fragment (S), showing a portion of the protective platinum cap (Ptc), mounted on a silicon post after welding with platinum (Ptw). Please click here to view a larger version of this figure.

Figure 3: Example of tips prepared for APT analysis. (Left) Image of tip after the first stage of sharpening. (Right) Image of the same tip after low kV cleaning, indicating the tip radius (67.17 nm) and the shank angle (26°). Please click here to view a larger version of this figure.
3. APT data acquisition
- Perform analysis with a local electrode atom probe (LEAP) equipped with a pico-second 355 nm UV laser. See specific LEAP running parameters in Table 1.
NOTE: Analyses were performed with a LEAP equipped with a pico-second 355 nm UV laser, housed in the Central Analytical Facility (CAF) at The University of Alabama. - Mount the micro-coupon with the sharpened tips, welded to the Si posts, in a specimen puck and load into a carousel for placement inside the LEAP.
- Insert the carousel inside the buffer chamber of the LEAP.
- Turn the laser head on and perform a laser calibration.
- After achieving vacuum in the analysis chamber at or below 6 x 10-11 Torr, insert the puck specimen into the main analysis chamber. For this use a transfer rod; this is operated with a series of automatic steps and manual insertion.
- Before analysis, select the tip by moving the specimen puck to align the micro-coupon with the local electrode and update the database to indicate the tip number.
NOTE: Four out of six tips were analyzed successfully (two fractured during analysis) and resulted in a variable amount of acquired data ranging from 26 to 92 million total detected ions, which corresponded to the removal of a 160–280 nm-thick layer of magnetite (see specific LEAP running parameters in Table 1).
| Specimen | 207 | 217 | 218 | 219 |
| Sample Description | SHV Magnetite | SHV Magnetite | SHV Magnetite | SHV Magnetite |
| Instrument Model | LEAP 5000 XS | LEAP 5000 XS | LEAP 5000 XS | LEAP 5000 XS |
| Instrument Settings | ||||
| Laser Wavelength | 355 nm | 355 nm | 355 nm | 355 nm |
| Laser Pulse Rate | 60 pJ | 30 pJ | 30 pJ | 30 pJ |
| Laser Pulse Energy | 500 kHz | 500 kHz | 500 kHz | 500 kHz |
| Evaporation Control | Detection Rate | Detection Rate | Detection Rate | Detection Rate |
| Target Detection Rate (%) | 0.5 | 0.5 | 0.5 | 0.5 |
| Nominal Flight Path (mm) | 100 | 100 | 100 | 100 |
| Temperature (K) | 50 | 50 | 50 | 50 |
| Pressure (Torr) | 5.7x10⁻¹¹ | 6.0x10⁻¹¹ | 6.1x10⁻¹¹ | 6.1x10⁻¹¹ |
| ToF offset, to (ns) | 279.94 | 279.94 | 279.94 | 279.94 |
| Data Analysis | ||||
| Software | IVAS 3.6.12 | IVAS 3.6.12 | IVAS 3.6.12 | IVAS 3.6.12 |
| Total Ions: | 26,189,967 | 92,045,430 | 40,013,656 | 40,016,543 |
| Single | 15,941,806 | 55,999,564 | 24,312,784 | 23,965,867 |
| Multiple | 9,985,564 | 35,294,528 | 15,331,670 | 15,716,119 |
| Partial | 262,597 | 751,338 | 369,202 | 334,557 |
| Reconstructed Ions: | 25,173,742 | 89,915,256 | 38,415,309 | 39,120,141 |
| Ranged | 16,053,253 | 61,820,803 | 25,859,574 | 26,598,745 |
| Unranged | 9,120,489 | 28,094,453 | 12,555,735 | 12,521,396 |
| Background (ppm/nsec) | 12 | 12 | 12 | 12 |
| Reconstruction | ||||
| Final tip state | Fractured | Fractured | Fractured | Fractured |
| Pre-/Post-analysis Imaging | SEM/n.a. | SEM/n.a. | SEM/n.a. | SEM/n.a. |
| Radius Evolution Model | “voltage” | “voltage” | “voltage” | “voltage” |
| Vinitial; Vfinal | 2205 V; 6413 V | 2361 V; 7083 V | 2198 V; 6154 V | 2356 V; 6902 V |
Table 1. Atom probe tomography data acquisition settings and run summary.
4. APT data processing
- Open the dataset in the processing software (see the Table of Materials) and perform the following steps for data analysis.
- Review the information setup.
- Select ion sequence range based on the voltage history plot. Select the detector region of interest (ROI).
- Perform time-of-flight (TOF) correction. Use peaks corresponding to oxygen and iron for the TOF correction.
- Perform mass calibration with the identification of main peaks.
- Perform the ranging of ions for their assignments to specific masses.
- Perform the reconstruction of the tip profile.
- Show the data into the two main formats: 1) mass-to-charge state ratio (Da) chemical spectra (Figure 4); and 2) 3D reconstructions of tip specimens (Figure 5).
- Define peak ranges as the entire visible peak, or adjust manually when large thermal tails are present, for each mass-to-charge state ratio spectrum (Figure 4). These peaks represent single elements or molecular species, and the decomposition of peaks provides the overall chemical composition for each tip or feature (i.e., clusters and exsolution lamellae) inside each tip (Table 2).
- Perform three-dimensional (3D) tip reconstructions using the “voltage” tip profile method17 to determine the reconstructed radius as a function of analyzed depth (Figure 5 and Movie 1).
- Reconstruct isosurfaces of exsolution lamellae to conduct interlamellar spacing measurements (Figure 5) and establish the host mineral-lamella chemical relationship using proxigrams17,18 (Figure 6).
- Measure interlamellar spacings with image analysis software.
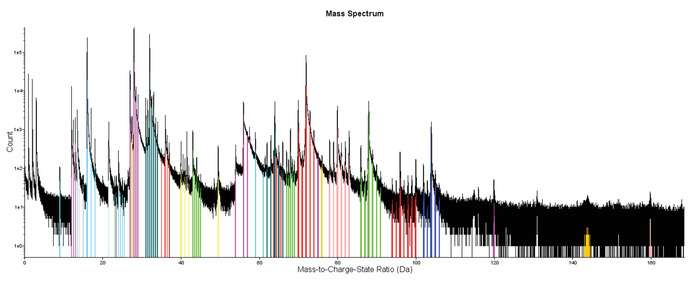
Figure 4: Example of a representative APT mass-to-charge spectrum. Spectrum for the analyzed magnetite crystal with individual ranged peaks showing examples of the identification of peaks corresponding to single elements (e.g., oxygen (O) or iron (Fe)) or molecules (e.g., FeO). Please click here to view a larger version of this figure.
| Specimen | 207 | 217 | 218 | 219 | ||||||||
| Element | Atom count | Atomic % | 1s error | Atom count | Atomic % | 1s error | Atom count | Atomic % | 1s error | Atom count | Atomic % | 1s error |
| O | 9459276 | 40.263 | 0.0155 | 36679256 | 40.724 | 0.0080 | 15396155 | 41.010 | 0.0124 | 16212281 | 41.224 | 0.0122 |
| Fe | 9424298 | 40.114 | 0.0155 | 35948593 | 39.913 | 0.0079 | 14829905 | 39.502 | 0.0121 | 15006853 | 38.159 | 0.0116 |
| Mn | 15954 | 0.068 | 0.0005 | 72884 | 0.081 | 0.0003 | 28166 | 0.075 | 0.0004 | 31450 | 0.080 | 0.0005 |
| Mg | 123755 | 0.527 | 0.0015 | 486732 | 0.540 | 0.0008 | 203596 | 0.542 | 0.0012 | 234231 | 0.596 | 0.0012 |
| Al | 85598 | 0.364 | 0.0013 | 329602 | 0.366 | 0.0006 | 134637 | 0.359 | 0.0010 | 154779 | 0.394 | 0.0010 |
| Si | 13855 | 0.059 | 0.0005 | 39307 | 0.044 | 0.0002 | 16278 | 0.043 | 0.0003 | 25750 | 0.065 | 0.0004 |
| Na | 166 | 0.001 | 0.0001 | 1254 | 0.001 | 0.0000 | 447 | 0.001 | 0.0001 | 1468 | 0.004 | 0.0001 |
| Ti | 4360052 | 18.558 | 0.0097 | 16478946 | 18.296 | 0.0049 | 6920481 | 18.434 | 0.0076 | 7645849 | 19.442 | 0.0077 |
| H | 10657 | 0.045 | 0.0004 | 30522 | 0.034 | 0.0002 | 12899 | 0.034 | 0.0003 | 14478 | 0.037 | 0.0003 |
| Total | 23493611 | 100.00 | 0.04 | 90067097 | 100.00 | 0.02 | 37542563 | 100.00 | 0.04 | 39327140 | 100.00 | 0.03 |
| Fe+Ti+O | 98.94 | 98.93 | 98.95 | 98.82 | ||||||||
| Fe/Ti | 2.16 | 2.18 | 2.14 | 1.96 | ||||||||
Table 2. Atom probe tomography bulk compositional data for all analyzed specimens.
Access restricted. Please log in or start a trial to view this content.
Results
Like many titanomagnetite crystals from various stages of the Soufrière Hills Volcano (SHV) eruption, the crystal analyzed here contains exsolution lamellae <10 µm in thickness, visible in secondary SEM images (Figure 1d), which separate zones of Ti-rich magnetite, indicating a C2 stage of oxidation18. Based upon the SEM images, spacing between these lamellae ranges from 2 to 6 µm (n = 15). Four titanomagnetite specimen tips, referred as 207, 217, 218, and...
Access restricted. Please log in or start a trial to view this content.
Discussion
3D APT data reconstructions allow a precise measurement of the interlamellar spacing in the analyzed crystal at a resolution three orders of magnitude higher than those measured from conventional SEM images. This indicates that atomic variations in chemistry occur over a spatial extent three orders of magnitude smaller than optically observable mineralogical changes. Also, the measured interlamellar distances (29 nm and 14 nm), are consistent with the length scale for oxyexsolution as opposed to that for nucleation and g...
Access restricted. Please log in or start a trial to view this content.
Disclosures
The authors have nothing to disclose.
Acknowledgements
This work was supported by funding from the National Science Foundation (NSF) through grants EAR-1560779 and EAR-1647012, the Office of the VP for Research and Economic Development, the College of Arts and Sciences, and the Department of Geological Sciences. Authors also acknowledge Chiara Cappelli, Rich Martens and Johnny Goodwin for technical assistance and the Montserrat Volcano Observatory for providing the ash samples.
Access restricted. Please log in or start a trial to view this content.
Materials
| Name | Company | Catalog Number | Comments |
|---|---|---|---|
| InTouchScope Secondary Electron Microscope (SEM) | JEOL | JSM-6010PLUS/LA | |
| Focus Ion Beam (FIB) Secondary Electron Microscope (SEM) | TESCAN | LYRA XMU | |
| Local Electrode Atom Probe (LEAP) | CAMECA | 5000 XS | |
| Integrated Visualization and Analysis Software (IVAS, version 3.6.12). | processing software |
References
- Kasama, T., Golla-Schindler, U., Putnis, A. High-resolution and energy-filtered TEM of the interface between hematite and ilmenite exsolution lamellae: Relevance to the origin of lamellar magnetism. American Mineralogist. 88, 1190-1196 (2003).
- Hofer, F., Wabichler, P., Grogger, W. Imaging of nanometer-sized precipitates in solids by electron spectroscopic imaging. Ultramicroscopy. 59, 15(1995).
- Golla, U., Putnis, A. Valence state mapping and quantitative electron spectroscopic imaging of exsolution in titanohematite by energy-filtered TEM. Physics and Chemistry of Minerals. 28, 119-129 (2001).
- Wang, R. C., et al. Cassiterite exsolution with ilmenite lamellae in magnetite from the Huashan metaluminous tin granite in southern China. Mineralogy and Petrology. , 71-84 (2012).
- Robinson, P., Gordon, L., Nord, M. R., Smyth, J. R., Jaffe, H. W. Exsolution lamellae in augite and pigeonite: fossil indicators of lattice parameters at high temperature and pressure. American Mineralogist. 62, 857-873 (1977).
- Austrheim, H., et al. Fragmentation of wall rock garnets during deep crustal earthquakes. Science Advances. 3, (2017).
- Kelly, T. F., Larson, D. J. Atom probe tomography 2012. Annual Review of Materials Research. 42, 1-31 (2012).
- Gordon, L. M., Joester, D. Nanoscale chemical tomography of buried organic-inorganic interfaces in the chiton tooth. Nature. 469, 194-197 (2011).
- Valley, J. W., et al. Hadean age for a post-magma-ocean zircon confirmed by atom-probe tomography. Nature Geoscience. 7, 219-223 (2014).
- Pérez-Huerta, A., Laiginhas, F., Reinhard, D. A., Prosa, T. J., Martens, R. L. Atom probe tomography (APT) of carbonate minerals. Micron. 80, 83-89 (2016).
- Weber, J., et al. Nano-structural features of barite crystals observed by electron microscopy and atom probe tomography. Chemical Geology. , 51-59 (2016).
- Fougerouse, D., et al. Nanoscale gold clusters in arsenopyrite controlled by growth rate not concentration: Evidence from atom probe microscopy. American Mineralogist. 101, 1916-1919 (2016).
- Peterman, E. M., et al. Nanogeochronology of discordant zircon measured by atom probe microscopy of Pb-enriched dislocation loops. Science Advances. 2, (2016).
- Cole, P. D., et al. Ash venting occurring both prior to and during lava extrusion at Soufriere Hills Volcano, Montserrat, from 2005 to 2010. Geological Society, London, Memoirs. 39, 71-92 (2014).
- Thompson, G. B., et al. In situ site-specific specimen preparation for atom probe tomography. Ultramicroscopy. 107, 131-139 (2007).
- Haggerty, S. E. Oxide textures; a mini-atlas. Reviews in Mineralogy and Geochemistry. 25, 129-219 (1991).
- Gault, B., Moody, M. M., Cairney, J. M., Ringer, S. P. Atom Probe Microscopy. Springer Series in Material Sciences. 160, (2012).
- Larson, D. J., Prosa, T. J., Ulfig, R. M., Geiser, B. P., Kelly, T. F. Local Electrode Atom Probe Tomography: A User’s Guide. , Springer. New York. 318(2013).
- Devine, J. D., Rutherford, M. J., Norton, G. E., Young, S. R. Magma storage region processes inferred from geochemistry of Fe–Ti oxides in andesitic magma, Soufriere Hills Volcano. Journal of Petrology. 44, Montserrat, WI. 1375-1400 (2003).
- Jackson, M., Bowles, J. A. Curie temperatures of titanomagnetite in ignimbrites: Effects of emplacement temperatures, cooling rates, exsolution, and cation ordering. Geochemistry, Geophysics, Geosystems. 15, 4343-4368 (2014).
- Harrison, R. J., Putnis, A. The magnetic properties and crystal chemistry of oxide spinel solid solutions. Surveys in Geophysics. 19, 461-520 (1998).
- Price, G. D. Microstructures in titanomagnetites as guides to cooling rates of a Swedish intrusion. Geological Magazine. 116, 313-318 (1979).
- Price, G. D. Exsolution in titanomagnetites as an indicator of cooling rates. Mineralogical Magazine. 46, 19-25 (1982).
- Kuhlman, K. R., Martens, R. L., Kelly, T. F., Evans, N. D., Miller, M. K. Fabrication of specimens of metamorphic magnetite crystals for field ion microscopy and atom probe microanalysis. Ultramicroscopy. 89, 169-176 (2001).
- Dégi, J., Abart, R., Török, K., Rhede, D., Petrishcheva, E. Evidence for xenolith–host basalt interaction from chemical patterns in Fe–Ti-oxides from mafic granulite xenoliths of the Bakony–Balaton Volcanic field (W-Hungary). Mineralogy and Petrology. 95, 219-234 (2009).
- Saxey, D. W., Moser, D. E., Piazolo, S., Reddy, S. M., Valley, J. W. Atomic worlds: Current state and future of atom probe tomography in geoscience. Scripta Materialia. 148, 115-121 (2018).
Access restricted. Please log in or start a trial to view this content.
Reprints and Permissions
