Here, we present an immunophenotyping strategy for the characterization of megakaryocyte differentiation, and show how that strategy allows the sorting of megakaryocytes at different stages with a fluorescence-activated cell sorter. The methodology can be applied to human primary tissues, but also to megakaryocytes generated in culture in vitro.
A subscription to JoVE is required to view this content. Sign in or start your free trial.
Method Article
Immunophenotyping and Cell Sorting of Human MKs from Human Primary Sources or Differentiated In Vitro from Hematopoietic Progenitors
In This Article
Summary
Abstract
Megakaryocyte (MK) differentiation encompasses a number of endomitotic cycles that result in a highly polyploid (reaching even >64N) and extremely large cell (40-60 µm). As opposed to the fast-increasing knowledge in megakaryopoiesis at the cell biology and molecular level, the characterization of megakaryopoiesis by flow cytometry is limited to the identification of mature MKs using lineage-specific surface markers, while earlier MK differentiation stages remain unexplored. Here, we present an immunophenotyping strategy that allows the identification of successive MK differentiation stages, with increasing ploidy status, in human primary sources or in vitro cultures with a panel integrating MK specific and non-specific surface markers. Despite its size and fragility, MKs can be immunophenotyped using the above-mentioned panel and enriched by fluorescence-activated cell sorting under specific conditions of pressure and nozzle diameter. This approach facilitates multi-Omics studies, with the aim to better understand the complexity of megakaryopoiesis and platelet production in humans. A better characterization of megakaryopoiesis may pose fundamental in the diagnosis or prognosis of lineage-related pathologies and malignancy.
Introduction
Megakaryocytes (MKs) develop from hematopoietic stem cells (HSCs) following a complex process called megakaryopoiesis, which is orchestrated mainly by the hormone thrombopoietin (TPO). The classical view of megakaryopoiesis describes the cellular journey from HSCs through a succession of hierarchical stages of committed progenitors and precursor cells, leading ultimately to a mature MK. During maturation, MKs experience multiple rounds of endomitosis, develop an intricate intracellular demarcation membrane system (DMS), which provides enough membrane surface for platelet production, and efficiently produce and pack the plethora of factors that are contained in the different granules inherited by mature platelets1,2,3. As a result, mature MKs are large cells (40-60 µm) characterized by a highly polyploid nucleus (reaching even >64N). Recent studies suggest alternative routes by which HSCs differentiate into MKs bypassing traditional lineage commitment checkpoints in response to certain physio-pathological conditions4,5,6,7,8,9,10,11. These findings highlight that hematopoietic differentiation towards the mature MK is a continuum and adaptive process that responds to biological needs.
With the increasing knowledge on the cell biology and the molecular aspects characterizing megakaryopoiesis12, most of the research dedicated to the study of the process by flow cytometry are limited to the identification of mature MKs using lineage-specific surface markers (i.e., CD42A/B, CD41/CD61), while earlier MK differentiation stages remain unexplored. We previously documented a strategy to stage megakaryopoiesis in mouse bone marrow and bone marrow-derived MK cultures13,14, which we have adapted and applied to humans15. In the present article we show an immunophenotyping strategy that allows the characterization of megakaryopoiesis, from HSCs to mature MKs, in human primary sources (bone marrow -BM- and peripheral blood -PB-) or in vitro cultures using a panel integrating MK specific and non-specific surface markers (CD61, CD42B, CD49B, CD31, KIT and CD71, amongst others). Despite its large size and fragility, MKs can be immunophenotyped using the above-mentioned cell surface markers and enriched by fluorescence-activated cell sorting under specific conditions of pressure and nozzle diameter to minimize cell rupture and/or damage. This technique facilitates multi-Omics approaches, with the aim to better understand the complexity of megakaryopoiesis and platelet production in human health and disease. Noteworthy, it will pose as a useful tool to aid diagnosis and prognosis in a clinical context of growing demand.
In this manuscript we document a strategy to stage human megakaryopoiesis with a panel integrating MK-specific and non-specific surface markers from primary sources or generated in vitro. Additionally, we provide a protocol to sort, with a fluorescence-activated cell sorter, the preferred fractions and mature MKs (Figure 1). This step is not popular, as it is technically difficult due to the large size and fragility of MKs. However, it has been employed both in mouse and human bone marrow samples previously, and due to technological advancement, with a better result each time16,17,18. Human primary sources where MKs or MK precursors can be studied include bone marrow, cord blood and peripheral blood, amongst other. The proper sample processing to isolate the relevant cell fraction for analysis on each sample is of importance. Standard procedures are incorporated, with some considerations to take into account when aiming at the study of megakaryopoiesis.
Access restricted. Please log in or start a trial to view this content.
Protocol
Whole blood and bone marrow samples were obtained and processed in accordance with the 1964 Declaration of Helsinki. Whole blood samples were obtained from healthy donors after giving informed consent (ISPA), within a study approved by our institutional medical ethical committee (Hospital Universitario Central de Asturias -HUCA-). Bone marrow samples were obtained from bone marrow aspirate discard material of patients managed at the Dept. of Hematology of the Hospital Clínico San Carlos (HCSC).
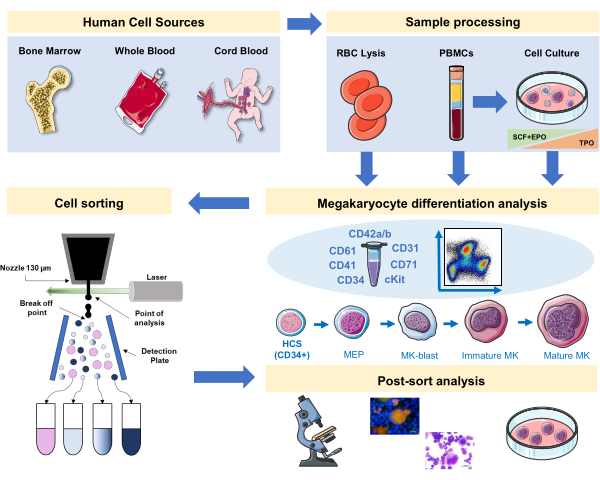
Figure 1: Schematic representation of the protocol documented in this manuscript. The primary human sources or primary cultures where MK differentiation can be staged by using immunophenotyping are indicated. This immunophenotyping strategy can be applied to the study of the process in different lineage-related pathologies or malignancy in primary sources. In addition, it makes possible the cell sorting of MKs and precursors with a fluorescence-activated cell sorter, which allows further analysis of enriched fractions. Images used are part of Servier Medical Art (SMART) by Servier and are licensed under CC BY 3.0. Please click here to view a larger version of this figure.
1. Whole blood and bone marrow processing prior to immunophenotyping
- When using whole blood (WB) from donations as a primary source, optionally isolate the peripheral blood mononuclear cell (PBMC) component. This can be achieved by using standard differential centrifugation combined with density gradient cell separation, as previously described15.
- In brief, centrifuge blood at 193 x g for 15 min (brake 3) at room temperature. Discard the upper plasma fraction and collect the buffy ring. Dilute 1:1 with phosphate buffer saline (PBS)/Trisodium Citrate Dihydrate (38 g/L, pH 7) buffer and pipette carefully a volume of 25 mL on top of 15 mL of a density gradient solution (1.076 g/mL) in 50 mL tubes.
- Centrifuge for 20 min at 1114 x g (accelerator 3, brake 3, room temperature). Discard the plasma fraction and collect the buffy ring containing PBMCs. Wash by adding the same volume of PBS, centrifuge at 435 x g for 5 min, and resuspend in PBS for further use.
- Alternatively, use a WB sample (around 100 μL) for immunophenotyping after lysing the red blood cells (RBCs) and thorough washing.
- In brief, dilute 1:1 in ice cold RBC lysing buffer (4.15 g of NH4Cl, 0.5 g of KHCO3 and 18.5 mg of EDTA (triplex III) to 500 mL of H2O, pH 7.1-7.4). Wait until the cell suspension becomes translucid red (3-5 min).
- Centrifuge at 435 x g for 5 min, at 4 °C, and resuspend the cells in PBS. Repeat the procedure as many times as necessary to obtain a white cell pellet.
- Similarly, directly process the samples obtained from bone marrow (aspiration) with RBC lysing buffer (see point 1.2) and thorough washing, as to begin with a clear single-cell suspension (Figure 1).
- Avoid the use of vortexing to mix samples during processing, as it may damage the fragile MKs. Mix by flicking or inverting the tube.
NOTE: Density gradient to obtain PBMCs may result in a richer and cleaner cell fraction as compared to RBC-lysed WB. However, we should bear in mind that high-density, mature MKs might be lost in the "neutrophil" fraction. This will be discussed in the representative results.
- Avoid the use of vortexing to mix samples during processing, as it may damage the fragile MKs. Mix by flicking or inverting the tube.
2. In vitro MK differentiation from PBMCs
NOTE: MKs can be differentiated in vitro from earlier precursors, such as CD34+ cells, present in different primary sources (i.e., WB/PBMCs, cord blood, bone marrow) and from iPSCs. There are different protocols that have been applied to this end. Here, we use a culture method developed by us that allows MK differentiation from PBMCs, without the need of enriching for CD34+ precursors15,19,20,21,22.
- This protocol consists of three culture phases, where the concentration of thrombopoietin (TPO) gradually increases at the expense of growth factors favoring the proliferation of earlier precursors (i.e., SCF, EPO), which gradually decrease (Figure 2)15.
- For the basis medium, use StemSpan SFEM supplemented with 0.4% of cholesterol rich lipid mix and 1% Penicillin/Streptomycin.
- For the Phase I medium, use the basis medium supplemented with SCF (100 ng/mL), Erythropoietin (EPO, 0.5 U/mL) and Thrombopoietin (TPO, 30 ng/mL). The Phase II medium is the basis medium supplemented with SCF (50 ng/mL), EPO (0.25 U/mL) and TPO (50 ng/mL). For the Phase III medium, use the basis medium supplemented with TPO (100 ng/mL).
- Culture PBMCs in Phase I medium. At day 6-8, place the PBMCs in Phase II medium, and at day 9-12 place the PBMCs in Phase III medium.
- Replace medium by centrifuging cells at 435 x g for 5 min at room temperature from Phase I to Phase II, and at 95 x g for 5 min at room temperature from Phase II to Phase III, and resuspending them in fresh medium.
- Culture cells in an incubator at 37 °C, 5% CO2. In these primary cultures, MK differentiation lasts 10-14 days, and samples can be drawn at different time points throughout the culture period, as to follow MK differentiation.
- For the basis medium, use StemSpan SFEM supplemented with 0.4% of cholesterol rich lipid mix and 1% Penicillin/Streptomycin.
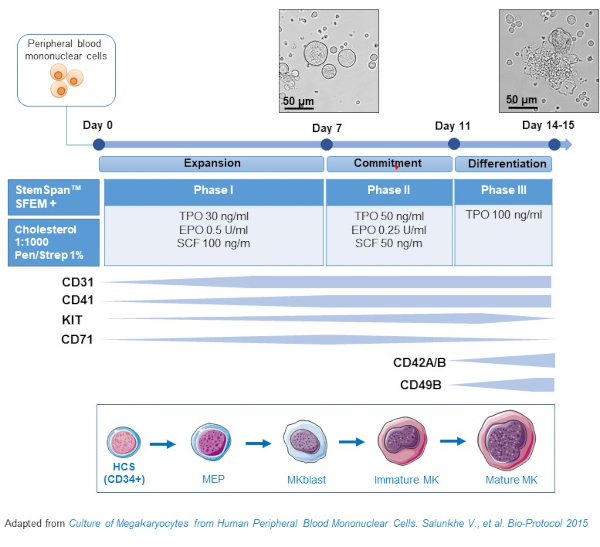
Figure 2: Schematic representation of the PBMC-derived MK culture method. PBMCs from healthy donors were cultured according to the three-phase protocol developed by us to generate MK in vitro (scheme adapted from Salunkhe et al).15 Pictures taken at day 10 and day 13 of culture are shown. Pictures are taken with a 20X objective. Please click here to view a larger version of this figure.
- Sample collection: Wash cells by applying low-speed centrifugation for 5 min (95 x g) and resuspend them in PBS or PBS containing 1% of bovine serum albumin (BSA). For immunophenotyping, the ideal density is 105-106 cells/100 μL (see point 3.1). Depending on the status of the cultures (i.e., presence of dead cells, debris, etc.), 1 or 2 washes may be needed. Collect your cells at the time-points of interest during culture.
3. Immunophenotyping of MK differentiation - incubation with a panel of tagged-antibodies
- Incubate the cell samples with a panel of tagged-antibodies following standard procedures, paying attention to centrifuge at low speed (95 x g) when processing megakaryocytes. We normally incubate the samples with 1% BSA in PBS in volumes of 100 μL at 4 °C, 20 min, with a range of 105-106 cells.
- Scale up when necessary.
- After incubation, add 5 mL of 1% BSA in PBS, centrifuge at low speed (95 x g), aspirate the supernatant and resuspend the sample in 2% BSA in PBS to preserve MK viability (2 mL). Add 1-5 mM EDTA to disrupt cell-cell aggregates (which are naturally seen in MK cultures).
- Transfer samples into a 12 x 75 mm round bottom tube (FACS tube) or plate, keeping them in the dark until flow cytometry analysis or cell sorting.
- Preparation of the single antibodies and antibody panel mixes; setting up the flow cytometer:
- Titrate the antibodies prior to their use to determine the optimal concentration in the antibody panels. The optimal concentration of antibodies is the lowest concentration that separates clearly positive from negative cells (and allows distinction of intermediate levels of expression). As an example, most of the antibodies are used in a 1:200 dilution (stock 100 μg/mL) unless otherwise titrated or indicated by the manufacturer.
- Once the antibody titration is determined, prepare a 10x dilution of each antibody. These dilutions are used for the single-color controls and for preparing the panel mixes. The dilutions and panel mixes are fine for use even a month after preparation (stored at 4 °C, unless manufacturer´s indications preclude these storage conditions). This allows the staining of samples with the same panel through a time period.
- Use 10 μL per 100 μL of the 10x dilution both for the single-color controls and for the panel mix.
- For the single-color controls, use antibody affinity beads, which can be directly measured after adding the antibody. The single-color controls should be measured with every experiment, to allow proper compensation adjustment (and fine-tuning post-measurement with the analysis software).
- Alternatively, perform the single-color controls with cell-samples. However, the beads allow the fast measurement of a given number of events, which, depending on the antibody/surface marker, might not be possible to obtain on complex primary or cultured cell sources. We also advise to run cell samples stained with "Fluorescence Minus One" (FMO) panel mixes to set up the appropriate compensation settings (before running experiments). This is relevant as to carefully identify compensation problems, and especially, in cultured MKs, to identify autofluorescence interference (which will be present if using culture medium containing phenol red).
- Prepare enough volume of the panel mix, depending on the number of samples, containing the antibodies of the designed panel. Most of our panels include six antibodies (6-color panels, see Tables 1-2).
- For these panels, use 488-nm and 633-nm lasers of the flow cytometer, however, panels can be adapted to other technical scenarios. Furthermore, the compensation considerations can be obviated when using mass-spectrometry-based flow cytometry or cytometers with acoustic focusing technology.
- Dyes for measuring viability may give false information regarding MKs, especially when they mature. MKs are very active uptaking cells, and positivity with Hoechst, 7-AAD or PE, might not always reflect actual cell death. An alternative (if cell death measurement is required) might be the use of mitochondria stains (CMX Ros) or amine reactive dyes (Zombie or Ghost dyes).
Table 1: Notes on cell surface markers of the megakaryocytic lineage Please click here to download this Table.
Table 2: Antibody panels Please click here to download this Table.
4. Ploidy analysis combined with 6-color panels
- For ploidy analysis, in combination with a 6-color antibody panel, proceed with fixation and permeabilization of cells after incubation with the antibody panel. This strategy will allow the preservation of the surface marker staining, while allowing the staining of the DNA of cells. We use Hoechst 33342 to stain DNA, as it can be visualized with the available violet 405-nm laser.
- For 105-106 cells, after incubation with the antibody panel, centrifuge cells (95 x g for 5 min), resuspend in 200 μL of fixation buffer and incubate 10 min at room temperature (RT).
- Centrifuge cells as indicated above, resuspended for a second time in 200 μL fixation buffer, and incubate another 10 min at RT.
- Prepare permeabilization buffer, containing 0.1% Triton X-100, 200 mg/mL RNase and 20 mg/mL Hoechst 33342 (permeabilization Hoechst MIX).
- Centrifuge cells as above, resuspend them in 300 μL of the permeabilization Hoechst MIX and incubate 30 min at 37 °C. This step is very important, since, in order to obtain a clean ploidy measurement, RNA has to be degraded.
- After the incubation time, measure samples directly with a flow cytometer. Otherwise, keep the samples at 4 °C, in the dark. Measure them promptly. However, since these samples are fixed, measurement can be delayed even 24-48 hours. Be sure the sample is flicked thoroughly prior to measuring, or passed through a cell strainer, to assure a single cell suspension.
- Morphometric parameters such as Forward and Side Scatter are not maintained after cell fixation. The Forward/Side Scatter plot will show a shrinkage of the cell distribution after fixation. However, the surface marker staining is mostly preserved, and the gating strategy is barely altered, allowing the analysis of the ploidy status at the different stages of differentiation defined by surface marker combinations.
5. MK differentiation analysis
NOTE: We have seen that the combination of CD31/CD71 allows to set a number of gates which correspond to different stages of MK differentiation. Further back-gating with MK-specific markers allows the separation of mature and immature MKs. Furthermore, in fresh samples, back-gating to verify the presence of other markers used, or to place the populations in the Forward/Side Scatter axes, refines the assessment of MK differentiation stages and allows to discard other cell types that could be present on the same populations.
- Use a panel of antibodies that includes early precursor markers (KIT, CD34), common precursor markers (CD31, CD71), and lineage markers, some of them specific (CD42A/CD42B, CD49B, CD41/CD61, CLEC2, GPVI, etc) (see Tables 1-2). The use of Lineage (Lin) cocktail (CD3, CD14, CD16, CD19, CD20, and CD56), also allows to "filter out" mature hematopoietic cells that might add noise to the analysis (when selecting the Lin- population). As an example, we will go through the analysis of MKs in PBMCs, bone marrow and through PBMC-derived cell cultures in the representative results.
6. MK and MK precursor cell sorting
NOTE: The stained cells were analyzed and sorted on a fluorescence-activated cell sorter FACS Aria IIu equipped with 488-nm and 633-nm standard solid-state lasers using FACSDiva software; data were additionally analyzed and presented using FlowJo software and Cytobank (viSNE analysis). Purity of sorted fractions was confirmed by flow cytometry analysis of each of the sorted fractions (purity above 85%).
- Perform cell sorting as soon as possible or within 1 hour after antibody incubation in order to avoid cell deterioration.
- Filter the sample with a 100 µm cell strainer to assure single cell suspension and the integrity of large MK.
- Use a 130-µm ceramic nozzle, a sheath pressure set to 11 pounds per square inch (PSI) and the drop-drive frequency set to 12 kHz to break the stream into drops.
- Prior to sorting, sterilize the nozzle, sheath, and sample lines by performing a 30 min acquisition with Penicillin/Streptomycin diluted 1:5 in sterile water, followed by a 10 min acquisition with sterile water to remove remaining decontaminant.
- Once the stream has stabilized, adjust the drop-delay with recommended beads in order to sort in fine tune mode more than 97.5% of the reflected drops at a flow rate of 400-1200 events per second.
- Prepare collection FACS tubes with 500 µL of 2% BSA in PBS. The percentage of BSA can be increased up to 5-10%.
- Generate the experiment template with the proper compensation matrix parameters.
- Load FACS tube into cytometer.
- Perform a measurement of the sample to set the desired gates and purity of the target cell populations. Maintain the record activated to show up to 200,000 events in the selected population gates during the cell-sorting.
- FACS Aria IIu allows the separation of up to 4 different cell populations at the same time. Create a new sort layout and select the collection device (4 tubes) and appropriate precision mode (intermediate mask of purity and recovery is recommended). Finally, add the population(s) of interest to each sort location field (Figure 3).
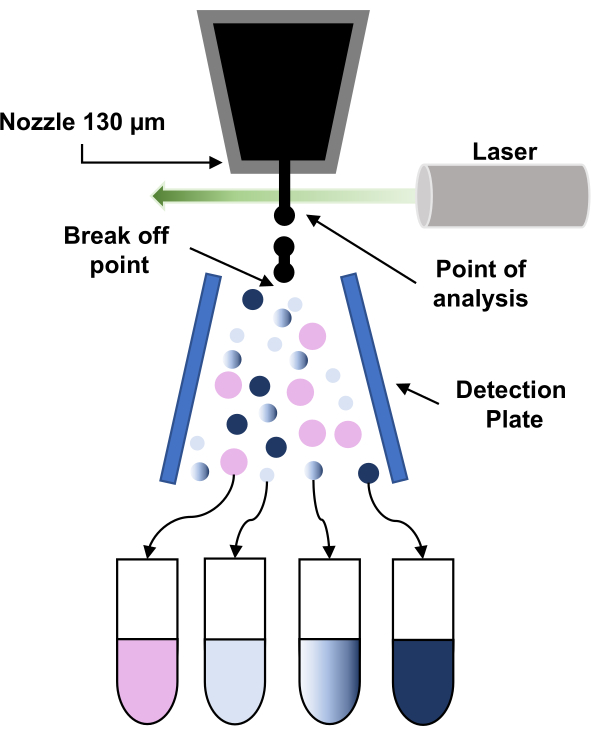
Figure 3: Schematic representation of the principle of fluorescence-activated cell sorting (FACS). The particles go through the 130 µm-nozzle and are forced to break up into a stream of regular droplets due to the application of vibration to the nozzle. Next, the droplets are interrogated by the laser (point of analysis) and the signals are processed to give the ''sort decision" by applying a charge to those droplets. When a charge droplet passes through a high voltage electrostatic field (detection plate), it is deflected and collected into the corresponding collection tube. Please click here to view a larger version of this figure.
- Load the collection tubes and start to sort the target populations.
- Centrifuge the collection tubes for 5 minutes at 95 x g and resuspend the cell pellet in the appropriate volume of 2% BSA in PBS.
- Measure again a fraction of each sorted sample, to calculate the purity.
- Store cells appropriately for further use. Sorted cells can be used for cytological and molecular analyses, or may be re-cultured with the aim of studying the differentiation process of a selected cell population.
7. Post-sort sample preparation
- Preparing cytospins for cytological analysis with a cytocentrifuge
- Bring sorted cells to an easy-to-handle working volume of 100-200 µL. Take into consideration that cell density will depend on the sorted population yield in each case.
- Place a clean slide on the metal holder and place a filter top. Remember to label the slide and the filter to avoid mixing samples.
- Add 100 µL PBS on the filter hole against the slide, so the filter gets humidified on the hole-rim.
- Place the funnel, close the metal holder and place it on its spot in the centrifuge.
- Add the sample (100-200 µL) inside the funnel.
- Centrifuge at 36 x g for 5 minutes. The cytospin slides can be allowed to air dry at RT (properly covered to prevent dust) and can be kept at RT for 1 week prior to the immunostaining or histochemistry.
- For immunostaining
- Fix slides in 2% paraformaldehyde (PFA) diluted in PBS and incubate during 5min.
- A range of 0.5-4% PFA in PBS may be used. In our hands, we use 4% to obtain proper fixation of tissues or some cell types, and 0.5% PFA in PBS is sufficient for platelets. When setting this technique up, the right percentage of PFA requires optimization per cell type/source.
- Incubate 5 min in PBS.
- Incubate 5 min in 50% ethanol (EtOH).
- Incubate 5 min in 70% EtOH.
- Store in 70% EtOH at -20ºC.
- When performing the immunostaining, rehydrate, and follow standard procedures (permeabilization, washing, blocking, primary and secondary antibody incubations, preserving, etc).
- Fix slides in 2% paraformaldehyde (PFA) diluted in PBS and incubate during 5min.
- For cytochemistry:
NOTE: The slides can be stained with May-Grünwald Giemsa staining or the convenient staining for each purpose. - For immediate morphology examination
- Add one drop of mounting medium on the cell-containing spot of the cytospin and place a coverslip.
- Keep slides at 4 °C not longer than a week, unless sealed, which allows long-term storage even at RT. Mounting medium fixation allows long-term storage at RT.
Access restricted. Please log in or start a trial to view this content.
Results
Bone Marrow and Ploidy
In Figure 4, we show a representative immunophenotyping analysis of megakaryopoiesis in BM samples (aspiration) from patients. When plotting the cellular fraction against CD71 and CD31, we have gated six main populations: CD31- CD71- (red), CD31- CD71+ (blue), CD31+ CD71- (orange), CD31+ CD71mid (light green), CD31+ CD71+ (...
Access restricted. Please log in or start a trial to view this content.
Discussion
Most of the research focusing on the study of megakaryopoiesis by flow cytometry is to date limited to the identification of MK subsets using only lineage-specific surface markers (i.e., CD42A/CD42B, CD41/CD61), while earlier MK differentiation stages have been poorly examined. In the present article we show an immunophenotyping strategy to address a comprehensive flow cytometry characterization of human megakaryopoiesis. Overall, we would like to highlight the utility of combining MK specific and non-specific s...
Access restricted. Please log in or start a trial to view this content.
Disclosures
Audiovisual material production was supported by BD Biosciences.
Acknowledgements
We thank Marcos Pérez Basterrechea, Lorena Rodríguez Lorenzo and Begoña García Méndez (HUCA) and Paloma Cerezo, Almudena Payero and María de la Poveda-Colomo (HCSC) for technical support. This work was partially supported by Medical Grants (Roche SP200221001) to A.B., an RYC fellowship (RYC-2013-12587; Ministerio de Economía y Competitividad, Spain) and an I+D 2017 grant (SAF2017-85489-P; Ministerio de Ciencia, Innovación y Universidades, Spain and Fondos FEDER) to L.G., a Severo Ochoa Grant (PA-20-PF-BP19-014; Consejería de Ciencia, Innovación y Universidades del Principado de Asturias, Spain) to P.M.-B. and an intramural postdoctoral grant 2018 (Fundación para la Investigación y la Innovación Biosanitaria de Asturias - FINBA, Oviedo, Spain) to A.A.-H. We thank Reinier van der Linden for sharing his knowledge (and time), especially his wise advice on multi-color tagged-antibody panel mix and single-color bead control preparation.
Access restricted. Please log in or start a trial to view this content.
Materials
| Name | Company | Catalog Number | Comments |
|---|---|---|---|
| 130 micron Nozzle | BD | 643943 | required for MK sorting |
| 5810R Centrifuge | Eppendorf | Cell isolation and washes | |
| A-4-62 Swing Bucket Rotor | Eppendorf | Cell isolation and washes | |
| Aerospray Pro Hematology Slide Stainer / Cytocentrifuge | ELITech Group | Automatized cytology devise, where slides are stained with Mat-Grünwald Giemsa | |
| CO2 Incubator Galaxy 170 S | Eppendorf | Cell Incubation | |
| Cytospin 4 Cytocentrifuge | Thermo Scientific | To prepare cytospins | |
| FACSAria IIu sorter | BD | Lasers 488-nm and 633-nm | |
| FACSCanto II flow cytometer | BD | Lasers 488-nm , 633-nm and 405-nm | |
| Olympus Microscope BX 41 | Olympus | Microphotographs | |
| Olympus Microscope BX 61 | Olympus | Microphotographs | |
| Zoe Fluorescent Cell Imager | BioRad | Microphotographs | |
| To obtain PBMCs | |||
| Lipids Cholesterol Rich from adult bovine serum | Sigma-Aldrich | L4646 | or similar |
| Lymphoprep | Stem Cell Technologies | #07801 | or similar |
| Penicillin-Streptomycin | Sigma-Aldrich | P4333 | or similar |
| Recombinant human Erythropoietin (EPO) | R&D Systems | 287-TC-500 | or similar |
| Recombinant human stem cell factor (SCF) | Thermo Fisher Scientific, Gibco™ | PHC2115 | or similar |
| Recombinant human thrombopoietin (TPO) | Thermo Fisher Scientific, Gibco™ | PHC9514 | or TPO receptor agonists |
| StemSpan SFEM | Stem Cell Technologies | #09650 | |
| Flow Cytometry Analyses | |||
| Bovine Serum Albumin | Merck | A7906-100G | or similar |
| BD CompBead Anti-Mouse Ig, κ/Negative Control Compensation Particles Set | BD | 552843 | Antibodies for human cells are generally from mouse. |
| BD Cytofix/Cytoperm | BD | 554714 | or similar |
| BD FACS Accudrop Beads | BD | 345249 | |
| CD31 AF-647 | BD | 561654 | Mouse anti-human |
| CD31 FITC | Immunostep | 31F-100T | |
| CD34 FITC | BD | 555821 | Mouse anti-human |
| CD41 PE | BD | 555467 | Mouse anti-human |
| CD41 PerCP-Cy5.5 | BD | 333148 | Mouse anti-human |
| CD42A APC | Immunostep | 42AA-100T | We observed unspecific binding... that needs to be assessed |
| CD42A PE | BD | 558819 | Mouse anti-human |
| CD42B PerCP | Biolegend | 303910 | Mouse anti-human |
| CD49B PE | BD | 555669 | Mouse anti-human |
| CD61 FITC | BD | 555753 | Mouse anti-human |
| CD71 APC-Cy7 | Biolegend | 334109 | Mouse anti-human |
| Hoechst 33342 | Thermo Fisher Scientific | H3570 | |
| Human BD Fc Block | BD | 564219 | Fc blocking - control |
| KIT PE-Cy7 | Biolegend | 313212 | Mouse anti-human |
| Lineage Cocktail 2 FITC | BD | 643397 | Mouse anti-human |
| RNAse | Merck | R6513 | or similar |
| Triton X-500 | Merck | 93443-500ML | or similar |
| Cell strainers for sorting | |||
| CellTrics Filters 100 micrometers | Sysmex | 04-004-2328 | Cell strainers |
| Note: we do not specify general reagents/chemicals (PBS, EDTA, etc) or disposables (tubes, etc), or reagents specified in previous published and standard protocols - unless otherwise specified. |
References
- Italiano, J. E. Unraveling Mechanisms That Control Platelet Production. Semin Thrombosis And Haemostasis. 39 (1), 15-24 (2013).
- Machlus, K. R., Italiano, J. E. The Incredible Journey: From Megakaryocyte Development To Platelet Formation. Journal Of Cell Biology. 201 (6), 785-796 (2013).
- Eckly, A., et al. Biogenesis Of The Demarcation Membrane System (DMS) In Megakaryocytes. Blood. 123 (6), 921-930 (2014).
- Couldwell, G., Machlus, K. R. Modulation Of Megakaryopoiesis And Platelet Production During Inflammation. Thrombosis Research. 179, 114-120 (2019).
- Kosaki, G. In Vivo Platelet Production From Mature Megakaryocytes: Does Platelet Release Occur Via Proplatelets. International Journal Of Hematology. 81 (3), 208-219 (2005).
- Lefrancais, E., Looney, M. R. Platelet Biogenesis In The Lung Circulation. Physiology (Bethesda). 34 (6), 392-401 (2019).
- Nieswandt, B., Stritt, S. Megakaryocyte Rupture For Acute Platelet Needs. Journal Of Cell Biology. 209 (3), 327-328 (2015).
- Nishimura, S., et al. IL-1alpha Induces Thrombopoiesis Through Megakaryocyte Rupture In Response To Acute Platelet Needs. Journal Of Cell Biology. 209 (3), 453-466 (2015).
- Sanjuan-Pla, A., et al. Platelet-Biased Stem Cells Reside At The Apex Of The Haematopoietic Stem-Cell Hierarchy. Nature. 502 (7470), 232-236 (2013).
- Notta, F., et al. Distinct Routes Of Lineage Development Reshape The Human Blood Hierarchy Across Ontogeny. Science. 351 (6269), 2116(2016).
- Yamamoto, R., et al. Clonal Analysis Unveils Self-Renewing Lineage-Restricted Progenitors Generated Directly From Hematopoietic Stem Cells. Cell. 154 (5), 1112-1126 (2013).
- Wang, H., et al. Decoding Human Megakaryocyte Development. Cell Stem Cell. , (2020).
- Meinders, M., et al. Repercussion Of Megakaryocyte-Specific Gata1 Loss On Megakaryopoiesis And The Hematopoietic Precursor Compartment. Plos One. 11 (5), 0154342(2016).
- Meinders, M., et al. Sp1/Sp3 Transcription Factors Regulate Hallmarks Of Megakaryocyte Maturation And Platelet Formation And Function. Blood. 125 (12), 1957-1967 (2015).
- Salunkhe, V. P., Gutiérrez, L. Culture Of Megakaryocytes From Human Peripheral Blood Mononuclear Cells. Bio-Protocol. 5 (21), 1639(2015).
- Choudry, F. A., et al. Transcriptional Characterization Of Human Megakaryocyte Polyploidization And Lineage Commitment. Journal Of Thrombosis And Haemostasis. , 15271(2021).
- Heazlewood, S. Y., Williams, B., Storan, M. J., Nilsson, S. K. The Prospective Isolation Of Viable, High Ploidy Megakaryocytes From Adult Murine Bone Marrow By Fluorescence Activated Cell Sorting. Methods In Molecular Biology. 1035, 121-133 (2013).
- Tomer, A., Harker, L. A., Burstein, S. A. Purification Of Human Megakaryocytes By Fluorescence-Activated Cell Sorting. Blood. 70 (6), 1735-1742 (1987).
- Martinez-Botia, P., Acebes-Huerta, A., Seghatchian, J., Gutierrez, L. On The Quest For In Vitro Platelet Production By Re-Tailoring The Concepts Of Megakaryocyte Differentiation. Medicina. 56 (12), Kaunas. (2020).
- Martinez-Botia, P., Acebes-Huerta, A., Seghatchian, J., Gutierrez, L. In Vitro Platelet Production For Transfusion Purposes: Where Are We Now. Transfusion And Apheresis Science. 59 (4), 102864(2020).
- Butov, K. R., et al. In Vitro Megakaryocyte Culture From Human Bone Marrow Aspirates As A Research And Diagnostic Tool. Platelets. , 1-8 (2020).
- Di Buduo, C. A., et al. A Gold Standard Protocol For Human Megakaryocyte Culture Based On The Analysis Of 1,500 Umbilical Cord Blood Samples. Thrombosis And Haemostasis. , (2020).
Access restricted. Please log in or start a trial to view this content.
Reprints and Permissions
