The protocol describes a large-animal (porcine) model of donation after circulatory death, followed by thoracoabdominal normothermic regional perfusion that closely simulates the clinical scenario in heart transplantation, and has the potential to facilitate therapeutic studies and strategies.
Method Article
Large-Animal Model of Donation after Circulatory Death and Normothermic Regional Perfusion for Cardiac Assessment
Khalil Khalil*1,2 , Roberto V. P. Ribeiro*3 , Julgans S. Alvarez4,5 , Mitesh V. Badiwala4,5 , Shant Der Sarkissian1,2 , Nicolas Noiseux1,2
1Centre de Recherche du Centre Hospitalier de l'Université de Montréal (CRCHUM), 2Department of Surgery, Faculty of Medicine, Université de Montréal, 3Division of Cardiac Surgery, Dalhousie University, 4Division of Cardiovascular Surgery, Peter Munk Cardiac Centre, Toronto General Hospital, 5Department of Surgery, University of Toronto
* These authors contributed equally
Opens in a new tab
In This Article
Summary
Loading...
$$\rightleftharpoonup{xx}$$
$$\longleftharp{xx}$$,
$$\longrightharp{xx}$$,
Abstract
Loading...
$$\rightleftharpoonup{xx}$$
$$\longleftharp{xx}$$,
$$\longrightharp{xx}$$,
The increase in demand for cardiac transplantation throughout the years has fueled interest in donation after circulatory death (DCD) to expand the organ donor pool. However, the DCD process is associated with the risk of cardiac tissue injury due to the inevitable period of warm ischemia. Normothermic regional perfusion (NRP) allows for an in situ organ assessment, allowing the procurement of hearts determined to be viable. Here, we describe a clinically relevant large-animal model of DCD followed by NRP. Circulatory death is established in anesthetized pigs by stopping mechanical ventilation. After a preset warm ischemia period, an extracorporeal membrane oxygenator (ECMO) is used for a NRP period lasting at least 30 min. During this reperfusion period, the model allows the collection of various myocardial biopsies and blood samples for initial cardiac evaluation. Once NRP is weaned, biochemical, hemodynamic, and echocardiographic assessments of cardiac function and metabolism can be performed before organ procurement. This protocol closely simulates the clinical scenario previously described for DCD and NRP in heart transplantation and has the potential to facilitate studies aimed at decreasing ischemia-reperfusion injury and enhance cardiac functional preservation and recovery.
Introduction
Loading...
$$\rightleftharpoonup{xx}$$
$$\longleftharp{xx}$$,
$$\longrightharp{xx}$$,
Over 300,000 individuals die in North America each year of heart failure (HF); cardiac transplantation remains the only treatment option for some of these patients with end stage disease1. Historically, the exclusive source for heart transplantation was donor hearts obtained after neurological determination of death (NDD), but even then, only around 40% were adequate for transplantation2. Between 15% to 20% of patients die while waiting for a heart donation, with shortage of donor hearts being one of the reasons that creates a discrepancy between the hearts available and the hearts needed2. In order to increase the organ donor pool, one important consideration is the use of hearts donated after circulatory death (DCD)3. There is reluctance to use DCD hearts because these organs are invariably submitted to a period of unprotected (warm) ischemia after cessation of blood circulation and may sustain irreversible damage. Although reports for successful DCD heart transplantation with excellent early outcomes do exist4,5, there is a need to develop a validated assessment method to determine if these hearts are usable and to potentially predict their post-transplant performance6,7. To limit ischemic periods of DCD hearts and to continuously monitor them during storage and transportation, ex situ heart perfusion systems were developed8. However, this technology relies on complex machines with perfusion equipment, and has a high upfront cost without any guarantee that the procured organ will be suitable for transplantation. A novel protocol for DCD heart transplantation based on normothermic regional perfusion (NRP) was proposed by Messer et al3. This technique involves restoring myocardial perfusion while the heart is still in the donor and excluding cerebral circulation. It allows a functional assessment in situ before procurement3.
When using large-animal models, the porcine heart is one of the preferred platforms to perform cardiac surgical research considering its anatomical similarity to the human heart. However, some important factors in porcine hearts should be considered when using this model. For example, porcine cardiac tissue is very fragile and friable and is prone to tears, especially in the pulmonary artery and the right atrium9. Another important factor to consider is that the porcine heart is very sensitive to ischemia and prone to arrhythmias, which is why antiarrhythmics should be administered routinely to every animal before the experiment; nevertheless, it is still considered an appropriate model for the study of acute ischemia in heart transplantation9.
This manuscript describes a large-animal (porcine) model of donation after circulatory death followed by thoracoabdominal normothermic regional perfusion that closely simulates the clinical scenario in heart transplantation and has the potential to facilitate novel therapeutic studies and strategies for translational research.
Access restricted. Please log in or start a trial to view this content.
Protocol
Loading...
$$\rightleftharpoonup{xx}$$
$$\longleftharp{xx}$$,
$$\longrightharp{xx}$$,
The institutional animal care and use committee of the Centre de Recherche du Centre Hospitalier de l'Université de Montréal (CRCHUM) approved all experimental protocols, and animals were treated in compliance with the Guide for the Care and Use of Laboratory Animals. For this protocol, 3-4-month-old Large White male or female pigs weighing 50-60 kg was used. Animal size can vary according to the investigators' experimental goals.
1. Animal preparation and anesthetic induction
- Premedicate the animal using an intramuscular injection of atropine (0.04 mg/kg), midazolam (0.3 mg/kg), and ketamine (20 mg/kg). Administer isoflurane at an end tidal concentration of 1%-3% in 3 L/min O2, using a face mask for anesthesia induction and maintenance.
- Confirm adequate anesthesia by testing for a relaxed jaw tone, and absence of pain using toe pinch response. Ensure that the animal is placed in dorsal decubitus position and maintained in normothermia using a warming blanket.
- After confirming anesthetic adequacy, perform an orotracheal intubation using a 6.5-8 mm endotracheal tube as described in 10.
- Place the oxygen saturation monitor on the ear or bottom lip of the animal for continuous monitoring. Adjust ventilation to a positive end-expiratory pressure (PEEP) of 5 cm H2O, a peak inspiratory pressure (PIP) of 15 cm H2O, a fraction of inspired oxygen (FIO2) of 0.5, and a respiratory rate (RR) of 15 respirations/min reaching a tidal volume (TV) of 6-8 mL/kg, and normal partial pressure of O2 and CO2. Adjust the RR to maintain an end-tidal CO2 level of 35-45 mmHg.
- Gain a peripheral intravenous access via the ear vein using a 20 G catheter. Start a maintenance infusion of normal saline solution (0.9% NaCl) and administer 2 g of magnesium sulfate (MgSO4) as an intravenous bolus to prevent arrhythmias.
- Prepare the surgical sites by adequately shaving and scrubbing the thorax and groins. Disinfect groins and neck using chlorhexidine and drape appropriately while providing venous and arterial access.
- Place the cautery electrode pad on the animal's back. Place the animal in Trendelenburg position to facilitate central venous access.
- Locate the right jugular vein using an ultrasound. Once located, using a needle, enter the skin at a 45° angle until blood is seen and the needle is seen in the vein on the ultrasound.
- Place the guidewire in the needle and then insert a 7 Fr percutaneous central venous sheath introducer over the guidewire.
- Remove the guidewire while keeping the sheath introducer in place, then insert a Swans-Ganz catheter to ensure cardiac output measurements and right-heart catheterization.
NOTE: The left jugular vein can be used instead of the right one. If access is not possible, insert the sheath directly in the internal jugular vein (left or right) after midline sternotomy. In that case, make sure to dissect the vein. - Using the same technique, insert a central venous catheter (e.g., double lumen) into the left jugular vein.
- Insert another 7 Fr percutaneous central venous sheath introducer into the right femoral vein using the Seldinger technique as described in steps 1.7. to 1.10., for the introduction of a conductance catheter into the right ventricle (RV). This can be done percutaneously with echo-guidance, or after midline sternotomy.
- Allow a period of stability for 10 min post-intubation and manipulation, then measure baseline hemodynamic and cardiac function parameters including pulmonary and systemic pressures, cardiac output, RV and LV pressure-volume loops, and transthoracic echocardiography.
2. Establishing surgical access
- Using a cautery pen, perform a midline incision from the mid-cervical region to the xiphoid. After that, divide the subcutaneous fat, layer by layer, along the midline using the electrocautery to reach the peri-sternum.
- Cut around the sternal notch and use a finger to retract and sweep soft tissues from under the sternum. Open the sternum with a bone saw and ensure the sternum is completely divided while being careful with the vein beneath the upper part of the sternal bone. Cauterize the sternum and/or apply bone wax to ensure adequate hemostasis.
- Using the electrocautery, dissect and remove the thymus by lifting it from the pericardium. Cauterize the vessels that supply the thymus from the aorta and the superior vena cava (SVC) to prevent bleeding.
- Carefully cut the pericardium open with the cautery. Insert fingers under the pericardium while cutting to avoid injury to the heart.
- Administer 300 units/kg of heparin IV to achieve systemic anticoagulation. If the test is available, ensure activated clotting time (ACT) ˃ 300 s.
3. Withdrawal of life-sustaining therapies and declaration of death
- Administer a bolus of 3 mg/kg propofol IV, and then stop mechanical ventilation and disconnect the endotracheal tube.
NOTE: This step corresponds to "Withdrawal of Life Support" to launch the Normothermic Regional Perfusion. For euthanasia conditions, refer to section 8. - Monitor arterial pressure and peripheral O2 saturation. Start functional warm ischemia time when systolic pressure < 50 mmHg.
- Establish circulatory arrest when there is asystole (or ventricular fibrillation) and an absence of arterial pulsatility. Initiate a minimum observation phase of 5 min after circulatory arrest is established (stand-off period) and subsequently declare animal death.
4. Placement of thoracoabdominal normothermic regional perfusion
- Using the cautery, carefully dissect the aortopulmonary space. Retract the RV outflow tract inferiorly, the pulmonary artery to the left, and the aorta to the right to avoid direct lesions to the latter. Take an assistants help if needed during this step.
- Dissect and ligate the supra-aortic vessels to avoid and exclude cerebral perfusion. Alternatively, apply a large cross-clamp over the vessels.
- Insert two 18 G catheters in the carotids bilaterally distally to the occlusion to evaluate potential blood flow to the brain. Collect and measure blood throughout the experiment and reinfuse via the NRP circuit.
- Using the metzenbaum and right-angle forceps, dissect delicately between the SVC and the innominate artery, and between the IVC and pericardium. Encircle the SVC and IVC using an umbilical tape or a simple 0-silk suture and secure them with a tourniquet.
- Using a 3-0 suture, place two concentric purse-string sutures on the distal ascending aorta adventitia; avoid full thickness sutures. Place a purse-string suture on the right atrium (RA). Secure all sutures with a tourniquet.
- Setup and prime the NRP system according to the investigators' and experimental needs. For this protocol, use an ECMO circuit with a centrifugal pump, primed with 2 L of crystalloid solution containing 500 mg of Solumedrol, 200 mL of 8.4% sodium bicarbonate (NaOH), 300 units/kg of heparin, and 2 g of MgSO4.
NOTE: The setup used here is similar to the one used by the institution's perfusionists at the division of cardiac surgery. - Using a 17 to 21 F arterial cannula, cannulate the aorta, then tighten the tourniquet holding the purse-string suture to secure the cannula in place.
NOTE: Alternatively, insert an extracorporeal membrane oxygenator (ECMO) cannula using the Seldinger technique to minimize blood loss. Another method consists of using a standard bypass arterial cannula. The aortic cannula is then connected to the arterial line of the NRP circuit using a 3/8-3/8 connector; ensure complete deairing to avoid air embolism. - Create a 5 mm incision at the center of the purse-string on the RA, and then dilate it using a small-angled instrument like a right-angle or snap. Cover the incision with a finger to avoid excessive bleeding.
- Use a double-stage venous cannula to cannulate the RA then tighten the purse-string sutures using a tourniquet to secure the cannula in place.
- Connect the cannulas to the venous line of the NRP circuit using a 1/2-3/8 connector and ensure complete deairing to avoid an airlock in the system.
- Ensure that a minimum of 15 min has passed between the declaration of death and the initiation of NRP to encompass for the time needed in clinical practice preparation, draping, and having access to the heart.
- Initiate NRP 15 min after the start of functional warm ischemia time. Maintain normothermia throughout the procedure. Adjust flowrates progressively to reach a perfusion index of 2.5 L/min/m2. Restart mechanical ventilation with an FIO2 of 50% and a TV of 6 mL/kg.
NOTE: Modify these settings according to the experimental design. - Continuously infuse 10 µg/kg/min of dopamine and 4 units/min of vasopressin IV. Use epinephrine and norepinephrine during initial perfusion and then titrate them as needed to aid in pressure regulation while maintaining arterial pressure above 50 mmHg.
5. Maintenance of reperfusion and targets for weaning off
- Reperfuse the heart for 30 min before attempting to wean for NRP. If weaning is unsuccessful, perform an additional 15 min of reperfusion to support with NRP before attempting to wean again for a total maximum reperfusion time of 180 min.
- Proceed to cardiac assessment after successful weaning. If weaning is not achieved after this time, stop the experiment, and report the issue.
NOTE: This should be adapted to each investigator's objectives. - Evaluate NRP weaning off criteria and ensure that all criteria are met as detailed in Table 1.
6. Cardiac recovery assessment
- Generate pressure-volume (PV) loop analyses to measure cardiac contractility. The conductance catheter allows for continuous measurements of LV-PV relations.
- Obtain steady-state recordings to generate volume-dependent parameters, stroke work, and developed pressure, and occlude the IVC with an umbilical tape to generate volume-independent parameters through occlusion, namely preload recruitable stroke work.
- Measure central venous pressure, pulmonary artery pressure, cardiac output, RV pressure, and pulmonary capillary wedge pressure using the Swans-Ganz catheter introduced in the beginning of the experiment.
- Analyze cardiac function through echocardiography using a standard transesophageal probe and a transthoracic probe placed directly on the heart.
- Perform metabolic assessments by collecting arterial and venous blood samples for analyses. Draw blood directly from the coronary sinus to assess heart metabolic function specifically. Analyze blood gases and lactate levels.
- Additionally, collect myocardial biopsies from the RV and LV if needed. Obtain samples from other transplantable organs of interest (e.g., lungs, liver, kidneys), depending on the investigator's objectives.
7. NRP removal and cardiac evaluation
- When weaning off criteria are met, stop NRP. Remove the cannula from the RA and quickly tighten the purse-string suture to minimize blood loss. Secure the suture with knots and follow the same procedure to remove the aortic cannula.
- Evaluate cardiac function every 30 min for 2 h after NRP has stopped as described in steps 6.1. to 6.4.
8. Experiment termination
- After 2 h, place a 16 G or 18 G cardioplegia catheter in the ascending aorta. Connect the cannula to the NRP circuit.
- After that, decompress the right cardiac cavities by incising the IVC and the left cavities by incising the left atrium using the cautery.
- Clamp the ascending aorta after the insertion of the cannula and administer 1.5 L of Del Nido cardioplegia solution at 4 °C to the heart. Ensure that the perfusion pressure is 50 mmHg.
- Stop the mechanical ventilation and place ice slush (0.9% NaCl) in the thoracic cavity after the initiation of cardioplegia for cooling. Proceed with cardiectomy in a traditional manner once the cardioplegia infusion is complete.
- Use the collected heart to obtain extensive myocardial biopsies for assessment and evaluation. Perform other biopsies from other organs (e.g., lungs, liver, kidneys) depending on the experimental design and objective of the investigators
NOTE: Figure 1 provides a summary of the protocol steps shown and Table 1 provides definition of the parameters and criteria used in this study.
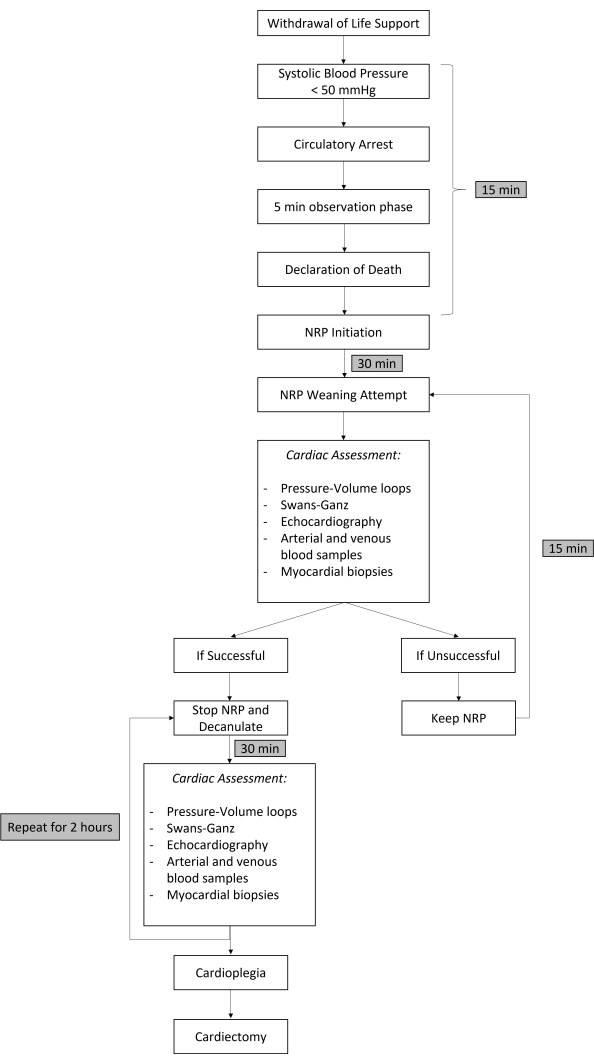
Figure 1: Schematic summary of the experimental protocol. Abbreviations: NRP = Normothermic Regional Perfusion. Please click here to view a larger version of this figure.
| Definition/Criteria | |
| Functional Warm Ischemia Period | Period that starts when systolic pressure < 50 mmHg and ends when NRP is initiated. In this protocol, this period is 15 min |
| Circulatory Arrest | It is established when the heart is in asystole or in ventricular fibrillation |
| Stand-Off Period | Period that starts with the circulatory arrest and ends with the declaration of death. In this protocol, this period is 5 min |
| Successful NRP weaning off | Minimal use of inotropes and vasopressors |
| CI > 2.2 L/min/m2 | |
| MAP > 55 mmHg | |
| RAP < 15 mmHg | |
| PCWP < 15 mmHg | |
| Normal LV and RV function |
Table 1: Representative definition of parameters and criteria used in this protocol. Abbreviations: CI = Cardiac Index; MAP = Mean Arterial Pressure; NRP = Normothermic Regional Perfusion; PCWP = Pulmonary Capillary Wedge Pressure; RAP = Right Atrial Pressure.
Access restricted. Please log in or start a trial to view this content.
Results
Loading...
$$\rightleftharpoonup{xx}$$
$$\longleftharp{xx}$$,
$$\longrightharp{xx}$$,
This preclinical model has been successfully used in our institution for multiple experiments. First, we demonstrated that DCD hearts, initially reperfused with NRP, demonstrated similar functional recovery following transplantation when compared to conventional beating heart donation preserved with cold storage. Further, we have used this protocol to show that cardiac functional assessment following NRP was predictive of post-transplantation recovery. Finally, we have also studied the effects of NRP on cerebral perfusio...
Access restricted. Please log in or start a trial to view this content.
Discussion
Loading...
$$\rightleftharpoonup{xx}$$
$$\longleftharp{xx}$$,
$$\longrightharp{xx}$$,
This manuscript describes a large-animal model donation after circulatory death (DCD) followed by thoracoabdominal normothermic regional perfusion. In this experiment, the heart is reperfused for a minimum of 30 min and a maximum of 3 h before it is weaned off from the ECMO circuit. The heart is then functioning on its own for 2 h which allows for valuable cardiac assessment on the short term. Therefore, the major limitation of this protocol is the short-term follow-up; however, a long-term assessment would be resource-i...
Access restricted. Please log in or start a trial to view this content.
Disclosures
Loading...
$$\rightleftharpoonup{xx}$$
$$\longleftharp{xx}$$,
$$\longrightharp{xx}$$,
The authors have nothing to disclose.
Acknowledgements
Loading...
$$\rightleftharpoonup{xx}$$
$$\longleftharp{xx}$$,
$$\longrightharp{xx}$$,
We would like to thank Melanie Borie, Caroline Landry, Henry Aceros and Ahmed Menaouar for their precious help and support.
Access restricted. Please log in or start a trial to view this content.
Materials
| Name | Company | Catalog Number | Comments |
|---|---|---|---|
| Amiodarone | As available in the institution | ||
| Angiocath 20G | BD | 381704 | |
| Atropine 0.4 mg/mL | As available in the institution | ||
| Biomedicus Centrifugal Pump | Medtronic | ||
| Cardioplegia Solution (Del Nido) | in-house made | Another solution can be used at the discretion of the researcher | |
| Cautery Pencil | Covidien | E2515H | |
| Central Venous Catheter double-lumen | Cook Medical | C-UDLM-501J-LSC | |
| Central Venous Sheath Introducer 7 Fr | |||
| Conductance Catheter | |||
| CPB pack | Medtronic | ||
| DLP Aortic Root Cannula | Medtronic | 12218 | |
| DLP double-stage venous cannula (29 or 37 F) | Medtronic | ||
| Dobutamine | As available in the institution | ||
| Dopamine | As available in the institution | ||
| Electrode Polyhesive | Covidien | E7507 | |
| EOPA Arterial Cannula (17 or 21 F) | |||
| Epinephrine | As available in the institution | ||
| O2 Face Mask | As available in the institution | ||
| Gloves, Nitrile, Medium | Fischer | 27-058-52 | |
| Heparin 1000 IU/mL | As available in the institution | ||
| Inhaled Isofurane | Provided by the institution's animal facility | ||
| Jelco 16 or 18 G catheter | |||
| Ketamine inj. 50 mL vial (100 mg/mL) | Health Canada | Health Canada approval is required | |
| Lidocaine/Xylocaine 1% | As available in the institution | ||
| Magnesium Sulfate 5 g/10 mL | As available in the institution | ||
| Midazolam inj. 10 mL vial (5 mg/mL) | Health Canada | Health Canada approval is required | |
| MPS Quest delivery disposable pack | Quest Medical | 5001102-AS | |
| Norepinephrine | As available in the institution | ||
| Normal Saline (NaCl 0.9%) 1L bag | Baxter | JB1324 | |
| Pipette Tips 1 mL | Fisherbrand | 02-707-405 | |
| Propofol 1 mg/mL | As available in the institution | ||
| Rocuronium | As available in the institution | ||
| Set Admin Prim NF PB W/ Checkvalve | Smith Medical | 21-0442-25 | |
| Sodium Bicarbonate (NaOH) 8.4% | As available in the institution | ||
| Sofsil 0 wax coated | Covidien | S316 | |
| Solumedrol 500 mg/5 mL | As available in the institution | ||
| Suction Tip | Covidien | 8888501023 | |
| Suction Tubing 1/4'' x 120'' | Med-Rx | 70-8120 | |
| Suture 3.0 Prolene Blu M SH | Ethicon | 8523H | |
| Suture 5.0 Prolene BB | Ethicon | 8580H | |
| Suture Prolene Blum 4-0 SH 36 | Ethicon | 8521H | |
| Suture BB 4.0 Prolene | Ethicon | 8881H | |
| Tracheal Tube, 6.5 mm | Mallinckrodt | 86449 | |
| Vasopressin | As available in the institution |
References
Loading...
$$\rightleftharpoonup{xx}$$
$$\longleftharp{xx}$$,
$$\longrightharp{xx}$$,
- Yusen, R. D., et al. The Registry of the International Society for Heart and Lung Transplantation: thirty-third adult heart transplantation report-2016; focus theme: primary diagnostic indications for transplant. The Journal of Heart and Lung Transplantation: the Official Publication of the International Society for Heart Transplantation. 35 (10), 1170-1184 (2016).
- Hornby, K., Ross, H., Keshavjee, S., Rao, V., Shemie, S. D. Non-utilization of hearts and lungs after consent for donation: a Canadian multicentre study. Canadian Journal of Anaesthesia. 53 (8), 831-837 (2006).
- Messer, S. J., et al. Functional assessment and transplantation of the donor heart after circulatory death. The Journal of Heart and Lung Transplantation: the Official Publication of the International Society for Heart Transplantation. 35 (12), 1443-1452 (2016).
- Messer, S., et al. Outcome after heart transplantation from donation after circulatory-determined death donors. The Journal of Heart and Lung Transplantation: the Official Publication of the International Society for Heart Transplantation. 36 (12), 1311-1318 (2017).
- Dhital, K. K., Chew, H. C., Macdonald, P. S. Donation after circulatory death heart transplantation. Current Opinion in Organ Transplantation. 22 (3), 189-197 (2017).
- Ardehali, A., et al. Ex-vivo perfusion of donor hearts for human heart transplantation (PROCEED II): a prospective, open-label, multicentre, randomised non-inferiority trial. The Lancet. 385 (9987), 2577-2584 (2015).
- White, C. W., et al. Assessment of donor heart viability during ex vivo heart perfusion. Canadian Journal of Physiology and Pharmacology. 93 (10), 893-901 (2015).
- Xin, L., et al. A new multi-mode perfusion system for ex vivo heart perfusion study. Journal of Medical Systems. 42 (2), 25(2017).
- Robinson, N., et al. Handbook of Cardiac Anatomy, Physiology, and Devices. Iaizzo, P. A., et al. , Springer International Publishing. 469-491 (2015).
- Swindle, M. M. Swine in the Laboratory: Surgery, Anesthesia, Imaging, and Experimental Techniques. , CRC press. (2007).
- Nasir, B. S., et al. HSP90 inhibitor improves lung protection in porcine model of donation after circulatory arrest. The Annals of Thoracic Surgery. 110 (6), 1861-1868 (2020).
- Aceros, H., et al. Novel heat shock protein 90 inhibitor improves cardiac recovery in a rodent model of donation after circulatory death. The Journal of Thoracic and Cardiovascular Surgery. 163 (2), 187-197 (2022).
- Der Sarkissian, S., et al. Heat shock protein 90 inhibition and multi-target approach to maximize cardioprotection in ischaemic injury. British Journal of Pharmacology. 177 (15), 3378-3388 (2020).
- Aceros, H., et al. Celastrol-type HSP90 modulators allow for potent cardioprotective effects. Life Sciences. 227, 8-19 (2019).
- Aceros, H., et al. Pre-clinical model of cardiac donation after circulatory death. Journal of Visualized Experiments. (150), e59789(2019).
- Der Sarkissian, S., et al. Celastrol protects ischaemic myocardium through a heat shock response with up-regulation of haeme oxygenase-1. British Journal of Pharmacology. 171 (23), 5265-5279 (2014).
Access restricted. Please log in or start a trial to view this content.
Reprints and Permissions
Request permission to reuse the text or figures of this JoVE article
Request Permission