Our detailed protocol outlines the creation and use of the advanced intestine-on-chip model, which simulates human intestinal mucosa with 3D structures and various cell types, enabling in-depth analysis of immune responses and cellular functions in response to microbial colonization.
A subscription to JoVE is required to view this content. Sign in or start your free trial.
Method Article
Immunocompetent Intestine-on-Chip Model for Analyzing Gut Mucosal Immune Responses
* These authors contributed equally
In This Article
Summary
Abstract
An advanced intestine-on-chip model recreating epithelial 3D organotypic villus-like and crypt-like structures has been developed. The immunocompetent model includes Human Umbilical Vein Endothelial Cells (HUVEC), Caco-2 intestinal epithelial cells, tissue-resident macrophages, and dendritic cells, which self-organize within the tissue, mirroring characteristics of the human intestinal mucosa. A unique aspect of this platform is its capacity to integrate circulating human primary immune cells, enhancing physiological relevance. The model is designed to investigate the intestinal immune system's response to bacterial and fungal colonization and infection. Due to its enlarged cavity size, the model offers diverse functional readouts such as permeation assays, cytokine release, and immune cell infiltration, and is compatible with immunofluorescence measurement of 3D structures formed by the epithelial cell layer. It hereby provides comprehensive insights into cell differentiation and function. The intestine-on-chip platform has demonstrated its potential in elucidating complex interactions between surrogates of a living microbiota and human host tissue within a microphysiological perfused biochip platform.
Introduction
Organ-on-Chip (OoC) systems represent an emerging technique of 3D cell culture that is capable of bridging the gap between conventional 2D cell culture and animal models. OoC platforms typically consist of one or more compartments containing tissue-specific cells grown on a wide range of scaffolds such as membranes or hydrogels1. The models are capable of mimicking one or more defined organotypic functions. Pumps enable continuous microfluidic perfusion of cell culture medium for removal of cellular waste products, supply with nutrition and growth factors for improved cellular differentiation, and recreating essential in vivo conditions. With the integration of immune cells, OoC systems can mimic human immune response in vitro2. To date, a wide range of organs and functional units have been presented1. These systems include models of the vasculature3, lung4, liver2,5, and intestine6 that can be facilitated for drug testing5,7 and infection studies6,8.
We here present a human intestine-on-chip model integrating human epithelial cells forming an organotypic 3D topography of villus-like and crypt-like structures combined with an endothelial lining and tissue-resident macrophages. The model is cultured in a microfluidically perfused biochip in the format of a microscopic slide. Each biochip consists of two separate microfluidic cavities. Each cavity is divided by a porous polyethylene terephthalate (PET) membrane into an upper and lower chamber. The membrane itself also serves as the scaffold for the cells to grow on each side. The pores of the membrane enable cellular crosstalk and cell migration between cell layers. Each chamber can be accessed by two female luer lock-sized ports. Optionally, an additional mini-luer lock-sized port can provide access to the upper or lower chamber (Figure 1).
The OoC platform offers a number of readouts that can be obtained from a single experiment. The intestine-on-chip is tailored towards combining perfused 3D cell culture, effluent analysis, and fluorescence microscopy to assess cell marker expression, metabolization rates, immune response, microbial colonization and infection, and barrier function3,6,8. The model includes tissue-resident immune cells and direct contact of living microorganisms with the host tissue, which is a benefit compared to other published models9. Further, epithelial cells self-organize into three-dimensional structures that provide a physiologically relevant interface for the colonization with a living microbiota6.
Access restricted. Please log in or start a trial to view this content.
Protocol
This protocol requires access to ~20 mL of fresh blood per biochip from healthy donors to isolate primary human monocytes. All donors gave written, informed consent to participate in this study, which was approved by the ethics committee of the University Hospital Jena (permission number 2018-1052-BO). For details about the materials, refer to the Table of Materials. For details about the composition of all solutions and media, refer to Table 1.
1. General biochip handling remarks
- Carefully separate a strip of reservoirs and detach the lids by using a heated knife to obtain single reservoirs and lids. Widen the hole of the lid so the silicon tubing fits snugly.
- The silicone tubing has an inner diameter of 0.5 mm, is asymmetrical, and is separated into longer (20 cm) and shorter (12 cm) sides by two peristaltic pump stoppers. Assemble two tubes of each symmetry per biochip by attachment of a tube to a male luer lock-connecter and the lid on the opposing side of the tube. Also assemble four reservoirs per biochip.
NOTE: Prepare tubing and reservoirs in advance and sterilize by autoclaving before use. As the silicone tubing has a limited lifetime, exchange the tubing after 3-5 experiments. For certain research interests, such as drug testing, it is advised to prepare new tubing for each experiment. Many steps of this protocol run in parallel; refer to the overview figure, which highlights the different steps performed on one day as shown in Figure 2.

Figure 1: Schematic representation of intestine-on-chip model. (A) The biochip is presented in a cross-sectional view. (B) The dimension of the whole biochip as well as of the flat, removable PET membrane is visible. The total volume of the upper chamber including the female luer lock-sized ports is 290 µL and 270 µL for the lower chamber respectively. (C) A schematic composition of the intestinal-biochip, the three-dimensional outgrowth epithelium resembling villus-like and crypt-like structures including differentiated immune cells and a mucus layer can be seen. The other side of the PET membrane is covered by an endothelial monolayer. Please click here to view a larger version of this figure.
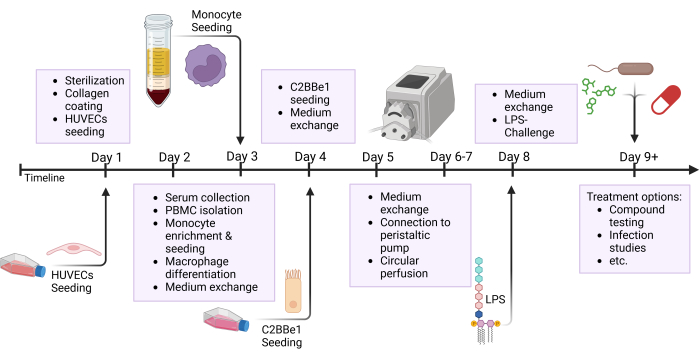
Figure 2: Schematic overview of model buildup timeline and experimental setup. This figure shows the schematic overview of the presented protocol. Important procedures, such as the seeding of cells and the epithelial challenge with LPS are indicated by arrows. Abbreviations: HUVECs = human umbilical venous endothelial cells; LPS = lipopolysaccharide. Please click here to view a larger version of this figure.
2. Biochip sterilization
- Fill a sterile glass Petri dish, possessing a diameter of 15 cm, with 70% undenatured ethanol. Place the biochip inside so that all ports of the biochip are completely covered by the ethanol solution.
- Two times per port, pull 1 mL of 70% ethanol through all chambers of the chip. Incubate for 45-60 min at room temperature (RT).
NOTE: Ensure no air is trapped inside the biochip. From this point forward, no air should enter the biochip system, and the cavities should remain filled with liquid. - Remove the ethanol in the Petri dish and replace it with sterile double-distilled water (ddH2O) until all ports are fully covered. Again, two times per port, draw 1 mL of ddH2O through the biochip cavity. Refresh the ddH2O in the Petri dish and repeat the procedure.
- Remove all liquid from the Petri dish. Hereafter, keep the fully sterilized biochips inside the closed Petri dish whenever they are outside a sterile environment. Add a small reservoir (e.g., the lid of a 50 mL tube) of 2-5 mL ddH2O to the Petri dish to reduce evaporation of liquid inside the biochip.
NOTE: Biochips can be sterilized up to 3 days in advance if they are kept in a sterile environment until use. This allows for flexibility in the workload in a single day.
3. HUVECs harvest and seeding
NOTE: The human umbilical venous endothelial cells (HUVECs) were isolated from umbilical cords as published before10.
- Before seeding the HUVECs, coat the membrane with human collagen IV. For this, prepare a 1:100 dilution of a collagen stock solution (Table 1) in Dulbecco's phosphate-buffered saline containing magnesium and calcium (PBS +/+). Add 350 µL of the diluted stock solution to the respective chamber. Incubate for 5 min at RT.
NOTE: If handling the biochip in the sterile hood, we recommend placing a sterile tissue underneath it to collect excessive medium. - Flush all chambers twice with 350 µL of PBS +/+ to wash out the remaining collagen and acetic acid. Then, add 350 µL of endothelial cell growth (EC)-medium to each chamber.
NOTE: From here, biochips are ready for cell seeding and can be stored at 37 °C until use. - Use HUVECs at passages 1-3 at 80-90% cell confluency. Cultivate HUVECs in EC-medium containing a defined supplement mix provided by the manufacturer. A representative brightfield image of a HUVEC cell culture is presented in Figure 3A.
NOTE: Depending on the donor, HUVECs of higher passages can start to dedifferentiate and cannot reliably form a dense and confluent monolayer inside the biochip. Use of antibiotics, i.e.,100 U/mL penicillin and 100 µg/mL streptomycin, is optional but recommended as a supplement to the EC-medium to prevent microbial contamination. - Remove the cell culture medium from a T25 cell culture flask and wash the cells gently with 3-5 mL of Dulbecco's phosphate-buffered saline without magnesium and calcium (PBS -/-). Remove the PBS -/- and add 1 mL of trypsin dissociation reagent (Table 1). Incubate for 5 min at 37 °C until the cells detach from the cell culture flask.
- Transfer the detached cells into a tube using 9 mL of 5% fetal bovine serum (FBS) in PBS -/-. Centrifuge at 350 × g for 5 min at RT. Remove the supernatant, resuspend in 1 mL of EC-medium, and determine the number of cells. Adjust the cell concentration to 0.4 × 10⁶ cells per 150 µL (seeding in lower chamber) or per 250 µL (seeding in upper chamber).
- Add the respective volume of cells to the chamber. If seeding in the lower chamber, close all ports and immediately position the biochip upside-down so the cells fall onto the PET membrane. Incubate the biochips in a humidified incubator at 37 °C and 5% CO2.
- Perform a medium exchange of the HUVEC-containing chamber with 350 µL of EC-medium after 24 h. The medium in the opposing chamber does not need to be replaced.
4. Human serum collection and peripheral blood mononuclear cell (PBMC)-derived monocyte isolation
NOTE: The PBMCs were isolated as described in Mosig et al.11.
- Withdraw human venous blood from healthy donors. Per biochip, procure a minimum of 10 mL of whole blood in silicate-containing blood collection tubes for serum collection. After full coagulation, centrifuge the blood collection tubes at 2,500 × g for 10 min at RT. Collect the serum, aliquot, and store at -20 °C until further use.
- Procure a minimum of 10 mL of whole blood from the same donor in EDTA-containing blood collection tubes for PBMC isolation. Gently mix the non-coagulated blood 1:1 with iso-buffer (Table 1) by inversion and slowly layer 35 mL of this mixture atop 15 mL of a density gradient medium with a density of 1.077 g/mL in a 50 mL tube.
- Centrifuge at 800 × g for 20 min without brake at RT. Carefully withdraw the resulting immune cell layer, appearing on top of the density gradient medium, and transfer it into a new 50 mL tube. Fill up to 50 mL with cold iso-buffer and wash the cells by gentle inversion.
- Centrifuge at 200 × g for 8 min without brake at 4 °C. Discard the supernatant and resuspend in 10 mL of iso-buffer per density-gradient. Optional: Pool PBMCs of one donor if several gradients are run in parallel.
- Centrifuge at 150 × g for 8 min at 4 °C. Discard the supernatant and resuspend the pellet in 10 mL of iso-buffer per density gradient. Repeat centrifugation step 4.4. Finally, discard the supernatant and resuspend the cells in 2 mL of monocyte differentiation medium (Table 1).
NOTE: The addition of M-CSF and GM-CSF enforces the differentiation of the isolated monocytes towards monocyte-derived macrophages and monocyte-derived dendritic cells (in combination with lipopolysaccharide [LPS], which is added at a later point of this protocol). Use of antibiotics, i.e., 100 U/mL penicillin and 100 µg/mL streptomycin, is optional but recommended as a supplement of the medium to prevent microbial contamination. - Determine the cell number and seed ~10 × 106 cells per well of a 6-well plate in 2 mL of monocyte differentiation medium (Table 1). Incubate in a humidified incubator at 37 °C for 1 h to allow attachment of monocytes to the plastic of the 6-well plate.
- Carefully discard the supernatant and wash 2x with prewarmed 2 mL of hematopoietic cell medium to remove the unbound cells. Incubate at 37 °C for another 24 h in monocyte differentiation medium.
- To harvest the monocytes, carefully discard the supernatant and wash once with 2 mL of prewarmed PBS -/-. See Figure 3B for an example of a brightfield image of the monocyte culture at this point. Then, incubate the cells for 7 min in 1 mL of prewarmed monocyte detachment reagent (Table 1) at 37 °C to enforce detachment of the monocytes from the plastic of the 6-well plate.
- Transfer the detached monocytes to a low-binding tube. Optional: to achieve a higher cell yield, carefully wash the 6-well plate several times with PBS -/-.
- Centrifuge at 300 × g for 8 min at RT. Discard the supernatant and resuspend in EC-conditioned medium (Table 1). Determine the cell number and adjust the cell concentration to 0.1 × 10⁶ cells per 150 µL (seeding in the lower cavity) or per 250 µL (seeding in the upper cavity).
NOTE: Be gentle at all steps of the immune cell isolation and reduce shear forces to prevent immune cell activation. When establishing this isolation, check for the purity of the PBMC-derived monocytes (e.g., via flow cytometry). More than 95% of all cells should be positive for typical monocyte markers such as CD14.
5. Monocyte seeding
- Perform a medium exchange in the HUVEC-containing chamber with 350 µL of prewarmed EC-conditioned medium.
- Add 150 µL (lower chamber) or 250 µL (upper chamber) of the prepared monocyte suspension (see step 4.10) to the same chamber. If seeding into the lower chamber, close all ports and immediately position the biochip upside-down for the cells to fall onto the HUVEC layer. Incubate the biochip in a humidified incubator at 37 °C and 5% CO2.
- Perform a medium exchange in the HUVEC + monocyte-containing chamber with 350 µL of EC-conditioned medium every 24 h.
6. C2BBe1 harvest and seeding
NOTE: Caco-2 brush border expressing cells 1 (C2BBe1)12 are used up to passage 35 and are taken from flasks of 80-90% confluency. A representative brightfield image of a C2BBe1 culture is presented in Figure 3C.
- Cultivate C2BBe1 cells in C2-medium (Table 1).
NOTE: Use of antibiotics, i.e., 20 µg/mL gentamicin, is optional but recommended as a supplement of the C2-medium to prevent microbial contamination. - Remove the cell culture medium of a T25 cell culture flask and wash the cells gently with 3-5 mL of PBS -/-. Remove the PBS -/- and add 1 mL of trypsin dissociation reagent (Table 1). Incubate for 5 min at 37 °C until the cells detach from the cell culture flask.
- Transfer the detached cells to a tube by using 9 mL of 5% fetal bovine serum (FBS) in PBS -/-. Centrifuge at 350 × g for 5 min at RT. Remove the supernatant, resuspend in 1 mL of C2-medium, and determine the number of cells. Adjust the cell concentration to 0.5 × 10⁶ cells per 150 µL (seeding in lower chamber) or per 250 µL (seeding in upper chamber).
- Before seeding of the C2BBe1, gently wash the respective chamber with 350 µL of C2-medium.
- Add 150 µL (lower chamber) or 250 µL (upper chamber) of the prepared C2BBe1-suspension (see step 6.3) to the respective chamber. If seeding into the lower chamber, close all ports and immediately position the biochip upside-down for the cells to fall onto the PET membrane. Incubate the biochips in a humidified incubator at 37 °C and 5% CO2.
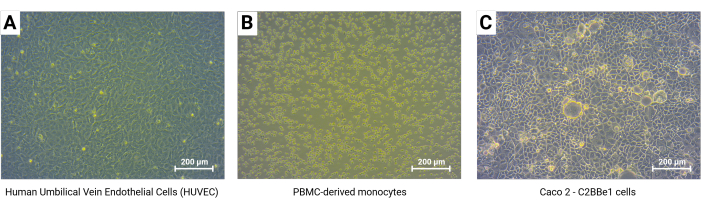
Figure 3: Cell morphology of HUVECs, monocytes, and C2BBe1 before seeding in the biochip. This figure shows representative brightfield images of the different cell sources used throughout the protocol. Images were taken with a reverse brightfield microscope using 10x magnification. All cell types, (A) HUVECs, (B) monocytes, and (C) C2BBe1 were cultivated in 2D mono-layer cell culture as described in their specific protocol sections. Scale bars = 200 µm. Abbreviations: HUVECs = human umbilical venous endothelial cells; PBMCs = peripheral blood mononuclear cells. Please click here to view a larger version of this figure.
7. Connection to peristaltic pump and circular perfusion
- Prepare an empty incubator with the addition of a peristaltic pump. Thoroughly clean all areas of the incubator and pump with disinfectant to provide a quasi-sterile environment.
NOTE: Peristaltic pumps can produce a lot of heat while working. In well-insulated incubators or poorly air-conditioned laboratories, the number of usable pumps per incubator might be limited as incubators tend to overheat. Two peristaltic pumps per incubator should be adequate. - Before attaching the sterilized tubes to the biochip, flush each tubing with 700 µL of PBS +/+ followed by 500 µL of C2-medium or EC-conditioned medium. Prepare one tubing of each symmetry per medium (see step 1.2). Use the tubing with the short distance from the luer lock to the peristaltic pump stopper for the left cavity and the tubing with the other symmetry for the right cavity.
- Retrieve the biochip from the incubator and perform a medium exchange with 350 µL for each chamber. Remove all plugs and fill all ports to the very top.
- Starting at the left cavity, connect the first tubing to the right port of the upper chamber by inserting the luer lock adaptor into the port of the biochip. Then, connect the second tubing to the left port of the lower chamber. Repeat this procedure for the right microfluidic cavity.
- Take a reservoir and add a small drop of cell culture medium to the bottom of the reservoir. Then, insert the reservoir to the opposite side of the first tubing and repeat for the other chamber. Once all ports are connected to a tubing or reservoir, fill the reservoirs with 3.5 mL of cell culture medium.
- Place the loose side of the tubing, which has the lid attached to it, on top of the reservoir to close the microfluidic system of each chamber. In this state, transport the biochip to the peristaltic pump.
NOTE: Depending on the distance to the incubator and the laboratory surroundings, a previously cleaned and autoclaved box can be used to transfer the chips to the incubator. - Use the peristaltic pump stoppers to connect the tubing to the pump. Connect each tubing to the peristaltic pump in such a way that the medium will flow from the reservoir into the cavity, into the tubing, and via the pump back into the reservoir (Figure 4). The reservoir serves as a bubble trap in the circular perfusion and prevents air from getting trapped in the system. Perfuse each chamber with a flow rate of 50 µL/min resulting in a shear stress of 0.013 dyn/cm2 in the upper chamber and 0.006 dyn/cm2 in the lower chamber8.
NOTE: If the medium of the lower and upper cavities is moved in opposing directions, a higher three-dimensional outgrowth of the intestinal tissue can be achieved13. Hence, the reservoirs of the upper and lower cavities are placed on opposing sides (Figure 4). The circular perfusion reduces the amount of cell culture medium needed but could potentially result in the enrichment of cytokines and metabolites. If desired, a linear perfusion of the biochip is also possible. - Perfuse the biochip for 72 h at 37 °C and 5% CO2.
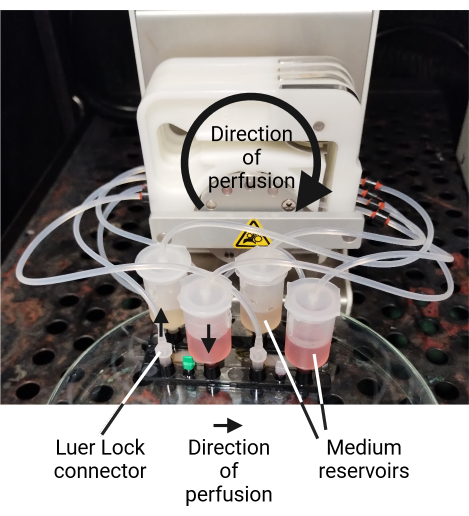
Figure 4: Biochip connected to peristaltic pump. An example of a biochip connected to a peristaltic pump is presented. Epithelial C2BBe1 cells are cultivated in the lower chamber (red C2-medium is in the reservoirs at the front) whilst the HUVECs are cultivated in the upper chamber (yellowish EC-conditioned-medium is in the reservoirs at the back). The different cell culture media are not mixing due to the barrier function of the grown tissue. The biochip is connected to the peristaltic pump in such a way that the medium flows from the reservoir into the cavity. From here, the medium flows back into the reservoir through the tubing via the pump. Please click here to view a larger version of this figure.
8. LPS-conditioning of the epithelial barrier
- After 72 h of preperfusion, stop the peristaltic pump and remove the lid connected to the tube of each reservoir. Place it on a sterile tissue next to the pump.
- Remove all medium and fill the reservoirs with 2 mL of freshly prepared medium. For the epithelial side containing the C2BBe1-cells, add 100 ng/mL LPS to the medium.
NOTE: The LPS increases the barrier function of the tissue, stimulates the monocyte-derived macrophages to migrate into the epithelial tissue, and allows monocyte-derived dendritic cell differentiation. - Reconnect the tubing and lids to the reservoir and continue the circular perfusion at a flow rate of 50 µL/min for an additional 24 h.
NOTE: From this point forward, the chip model can be used in experiments-compound testing or infection studies. We recommend a medium exchange of 2 mL per reservoir every 24 h.
9. Access to the tissue for different readout methods
- Collect cell-culture medium supernatants from the reservoirs at all times of the perfusion. Open the reservoir and collect the desired volume (see steps 8.1-8.3). Use these supernatants for the detection of metabolites, cytokines, or other molecules.
- To access the tissue, use a scalpel to make a precise cut along the outside of the upper chamber and remove the bonding foil to open the microfluidic cavity. The tissue of the intestinal-biochip model is now accessible. Carefully cut along the outside of the microfluidic chamber to detach the membrane from the biochip. Collect the tissue-containing membrane using tweezers.
CAUTION: Be aware of finger placement during this step and work carefully to prevent accidents. Cut-resistant gloves are recommended. - Alternatively, harvest the cells from separate layers inside the biochip using enzyme solutions, i.e., trypsin or cells lysed using Triton X-100-containing buffers.
10. Permeability assessment via FITC-dextran diffusion
NOTE: The barrier function of the tissue can be analyzed via a FITC-dextran permeability assay after disconnection of the peristaltic pump. The FITC-dextran permeability assessment was adapted from Deinhardt-Emmer et al.4.
- Prepare a stock solution of fluorescein isothiocyanate (FITC)-dextran (molecular weight of 3-5 kDa, Table 1).
- Empty the reservoirs and disconnect the chip from the perfusion.
- Perform a medium exchange in the upper and lower chamber with phenol red-free medium.
NOTE: This step is not necessary if phenol red-free medium was already used during the experiment. - Add 350 µL of 1 mg/mL FITC-dextran solution to the chamber containing the C2BBe1 cells.
- Close the ports and incubate the chip for 60 min at 37 °C with the epithelial side facing upwards.
- After the incubation time, collect the culture medium from both chambers of the chip separately and store at 4 °C, protected from light until the measurement.
- For the measurement, prepare a standard curve in C2-medium and the EC-conditioned medium without phenol red in the range of 1,000 µg/mL to 0 µg/mL FITC-dextran with 11 consecutive 1:2 serial dilutions.
- Transfer 200 µL of each sample into a black 96-well plate with a clear bottom. Measure the fluorescence with a microplate reader at an excitation wavelength of 495 nm and an emission wavelength of 517 nm.
- Use the standard curve to calculate the FITC-dextran concentration of the samples and thereby, the permeability coefficient.
11. Immunofluorescence staining
NOTE: The living tissue can be investigated microscopically. For easier handling, we recommend the detachment of the biochip from the peristaltic pump and the use of long-distance objectives on an inverted microscope. As an endpoint analysis, the tissue can be fixated inside the biochip for procedures like immunofluorescence staining.
- Stop the peristaltic pump and open the reservoirs of all cavities. Empty the reservoirs and disconnect the tubing, as well as the reservoirs from the biochip.
- Twice per chamber, wash the microfluidic cavities with 500 µL of cold PBS +/+. Add 500 µL of ice-cold methanol to all cavities and incubate for 15 min at -20 °C. Then, twice per cavity, wash the microfluidic chamber with 500 µL of PBS +/+.
NOTE: Other fixation methods, such as fixation with 4% paraformaldehyde or Carnoy's fixative, are also suitable. After fixation, the chips can be stored at 4 °C or proceed directly to immune fluorescence staining. CAUTION: Fixating chemicals such as methanol or paraformaldehyde are toxic. Perform the respective tasks under a fume hood and collect the waste accordingly. - Open the chip as described in step 9.2 to access the tissue. Cut the tissue-containing PET membrane into up to three pieces to stain in parallel with different immunopanels.
- Transfer each of the membrane pieces to a separate 24-well plate containing a blocking and permeabilizing solution (Table 1) using precision tweezers. Ensure that the cell layer of interest always faces upwards during the whole staining process. Incubate the membrane pieces for 30 min at RT.
NOTE: The best staining results are obtained when matching the serum to the secondary antibody. For example, if secondary antibodies are obtained from goat species, we recommend the use of normal goat serum. - Transfer the membrane pieces onto a clean glass slide inside a humid chamber. Prepare the primary antibody panel in the staining solution (Table 1) and add 50 µL to each membrane piece. Incubate overnight at 4 °C.
NOTE: The optimal antibody concentration and staining efficacy can differ between manufacturers and clones. We recommend testing the staining panels beforehand in a 2D cell culture. - After incubation, transfer the samples to a 24-well plate and gently wash the membranes for 3 x 5 min with wash solution (Table 1).
- Again, transfer the membrane pieces onto a clean glass slide inside a humid chamber. Prepare the secondary antibody panel in staining solution (Table 1) and add 50 µL to each membrane piece. If required, add a nuclear counterstain such as 4',6-diamidino-2-phenylindole (DAPI) or Hoechst. Incubate for 30 min at RT.
NOTE: While working with fluorophores, keep samples protected from light to prevent photobleaching to increase the image quality. - After incubation, transfer the samples to a 24-well plate and gently wash the membranes 2 x 5 min with wash solution (Table 1). Then, wash once with PBS +/+ for 5 min.
- Mount the membrane pieces on a clean glass slide using a fluorescence mounting medium and a cover glass. Store at 4 °C until microscopic imaging.
Access restricted. Please log in or start a trial to view this content.
Results
These representative results show the distinct tissue layers of the intestine-on-chip model. They are immunofluorescent stained as described in protocol section 11. The images were taken with an epifluorescence or confocal fluorescence microscope as z-stacks and processed to an orthogonal projection. See the Table of Materials for details about the microscopical setup and software. Figure 5 shows the vascular layer, a barrier-forming endothelial monolayer, consisting of HUVE...
Access restricted. Please log in or start a trial to view this content.
Discussion
The presented protocol details the necessary steps for generating an immunocompetent intestine-on-chip model. We described specific techniques and possible readout methods such as immunofluorescence microscopy, cytokine and metabolite analysis, flow cytometry, protein and genetic analysis, and permeability measurement.
The described model consists of primary HUVECs, monocyte-derived macrophages, and monocyte-derived dendritic cells co-cultured with a 3D layer of intestinal epithelial cells rep...
Access restricted. Please log in or start a trial to view this content.
Disclosures
M.R. is CEO of Dynamic42 GmbH and holds equity in the company. A.S.M. is a scientific advisor to Dynamic 42 GmbH and holds equity in the company.
Acknowledgements
The work was financially supported by the Collaborative Research Center PolyTarget 1278 (project number 316213987) to V.D.W. and A.S.M. A.F. and A.S.M. further acknowledge financial support by the Cluster of Excellence "Balance of the Microverse" under Germany's Excellence Strategy - EXC 2051 - Project-ID 690 390713860. We want to acknowledge Astrid Tannert and the Jena Biophotonic and Imaging Laboratory (JBIL) for providing us access to their confocal laser scanning microscope ZEISS LSM980. Figure 1C and Figure 2 were created with Biorender.com.
Access restricted. Please log in or start a trial to view this content.
Materials
| Name | Company | Catalog Number | Comments |
|---|---|---|---|
| 96-well plate black, clear bottom | Thermo Fisher | 10000631 | Consumables |
| Acetic acid | Roth | 3738.4 | Chemicals |
| Alexa Fluor 488 AffiniPure, donkey, anti-mouse IgG (H+L) | Jackson Immuno Research | 715-545-150 | Secondary Antibody Vascular Staining and Epithelial Staining |
| Alexa Fluor 647 AffiniPure, donkey, anti-rabbit IgG (H+L) | Jackson Immuno Research | 711-605-152 | Secondary Antibody Epithelial Staining |
| Alexa Fluor 647, donkey, anti-rabbit IgG (H+L) | Thermo Fisher Scientific, Invitrogen | A31573 | Secondary Antibody Vascular Staining |
| Axiocam ERc5s camera | Zeiss | 426540-9901-000 | Technical equipment |
| Basal Medium MV, phenol red-free | Promocell | C-22225 | Cell culture consumables |
| Biochip | Dynamic 42 | BC002 | Microfluidic consumables |
| BSA fraction V | Gibco | 15260-037 | Cell culture consumables |
| C2BBe1 (clone of Caco-2) | ATCC | CRL-2102 | Epithelial Cell Source |
| Chloroform | Sigma | C2432 | Chemicals |
| CO2 Incubator | Heracell | 150i | Technical equipment |
| Collagen IV from human placenta | Sigma-Aldrich | C5533 | Cell culture consumables |
| Coverslips (24 x 40 mm; #1.5) | Menzel-Gläser | 15747592 | Consumables |
| Cy3 AffiniPure, donkey, anti-goat IgG (H+L) | Jackson Immuno Research | 705-165-147 | Secondary Antibody Vascular Staining |
| Cy3 AffiniPure, donkey, anti-rat IgG (H+L) | Jackson Immuno Research | 712-165-150 | Secondary Antibody Epithelial Staining |
| Descosept PUR | Dr.Schuhmacher | 00-323-100 | Cell culture consumables |
| DMEM high glucose | Gibco | 41965-062 | Cell culture consumables |
| DMEM high glucose w/o phenol red | Gibco | 31053028 | Cell culture consumables |
| DPBS (-/-) | Gibco | 14190-169 | Cell culture consumables |
| DPBS (+/+) | Gibco | 14040-133 | Cell culture consumables |
| EDTA solution | Invitrogen | 15575-038 | Cell culture consumables |
| Endothelial Cell Growth Medium | Promocell | C-22020 | Cell culture consumables |
| Endothelial Cell Growth Medium supplement mix | Promocell | C-39225 | Cell culture consumables |
| Ethanol 96%, undenatured | Nordbrand-Nordhausen | 410 | Chemicals |
| Fetal bovine Serum | invitrogen | 10270106 | Cell culture consumables |
| Fluorescein isothiocyanate (FITC)-dextran (3-5 kDa) | Sigma Aldrich | FD4-100MG | Chemicals |
| Fluorescent Mounting Medium | Dako | S3023 | Chemicals |
| Gentamycin (10mg/mL) | Sigma Aldrich | G1272 | Cell culture consumables |
| GlutaMAX Supplement (100x) | Gibco | 35050061 | Cell culture consumables |
| Histopaque | Sigma-Aldrich | 10771 | Cell culture consumables |
| Hoechst (bisBenzimid) H33342 | Sigma-Aldrich | 14533 | Epithelial Staining |
| Holotransferrin (5mg/mL) Transferrin, Holo, Human Plasma | Millipore | 616397 | Cell culture consumables |
| Human recombinant GM-CSF | Peprotech | 300-30 | Cell culture consumables |
| Human recombinant M-CSF | Peprotech | 300-25 | Cell culture consumables |
| Illumination device | Zeiss | HXP 120 C | Fluorescence Microscope Setup |
| Laser Scanning Microscope | Zeiss | CLSM980 | Fluorescence Microscope Setup |
| Lidocain hydrochloride | Sigma-Aldrich | L5647 | Cell culture consumables |
| Lipopolysaccharide (LPS) | Sigma | L2630 | Cell culture consumables |
| Loftex Wipes | Loftex | 1250115 | Consumables |
| Low attachment tubes (PS, 5 mL) | Falcon | 352052 | Consumables |
| Luer adapter for the top cap (M) | Mo Bi Tec | M3003 | Microfluidic consumables |
| Male mini luer plugs, row of four,PP, opaque | Microfluidic chipshop | 09-0556-0336-09 | Microfluidic consumables |
| MEM Non-Essential Amino Acids Solution | Gibco | 11140 | Cell culture consumables |
| Methanol | Roth | 8388.2 | Chemicals |
| Microscope | Zeiss | Axio Observer 5 | Fluorescence Microscope Setup |
| Microscope slides | Menzel | MZ-0002 | Consumables |
| Monoclonal, mouse, anti-human CD68 Antibody (KP1) | Thermo Fisher Scientific, Invitrogen | 14-0688-82 | Primary Antibody Vascular Staining |
| Monoclonal, rat, anti-human E-Cadherin antibody (DECMA-1) | Sigma-Aldrich, Millipore | MABT26 | Primary Antibody Epithelial Staining |
| Multiskan Go plate reader | Thermo Fisher | 51119300 | Technical equipment |
| Normal donkey serum | Biozol | LIN-END9010-10 | Chemicals |
| Optical Sectioning | Zeiss | ApoTome | Fluorescence Microscope Setup |
| Penicillin-Streptomycin (10,000 U/mL) | Gibco | 15140-122 | Cell culture consumables |
| Plugs | Cole Parmer | GZ-45555-56 | Microfluidic consumables |
| Polyclonal, goat, anti-human VE-Cadherin Antibody | R&D Systems | AF938 | Primary Antibody Vascular Staining |
| Polyclonal, rabbit, anti-human Von Willebrand Factor Antibody | Dako | A0082 | Primary Antibody Vascular Staining |
| Polyclonal, rabbit, anti-human ZO-1 antibody | Thermo Fisher Scientific, Invitrogen | 61-7300 | Primary Antibody Epithelial Staining |
| Power Supply Microscope | Zeiss | Eplax Vp232 | Fluorescence Microscope Setup |
| Primovert microscope | Zeiss | 415510-1101-000 | Technical equipment |
| Reglo ICC peristaltic pump | Ismatec | ISM4412 | Technical equipment |
| SAHA (Vorinostat) | Sigma Aldrich | SML0061-25MG | Chemicals |
| Saponin | Fluka | 47036 | Chemicals |
| S-Monovette, 7.5 mL Z-Gel | Sarstedt | 01.1602 | Consumables |
| S-Monovette, 9.0 mL K3E | Sarstedt | 02.1066.001 | Consumables |
| Sodium Pyruvate | Gibco | 11360-088 | Cell culture consumables |
| Tank 4.5 mL | ChipShop | 10000079 | Microfluidic consumables |
| Trypane blue stain 0.4% | Invitrogen | T10282 | Cell culture consumables |
| Trypsin | Gibco | 11538876 | Cell culture consumables |
| Tubing | Dynamic 42 | ST001 | Microfluidic consumables |
| Tweezers (Präzisionspinzette DUMONT abgewinkelt Inox08, 5/45, 0,06 mm) | Roth | K343.1 | Consumables |
| Wheat Germ Agglutinin (WGA) | Thermo Fisher Scientific, Invitrogen | W32464 | Epithelial Staining |
| X-VIVO 15 | Lonza | BE02-060F | Cell culture consumables, Hematopoietic cell medium |
| Zellkultur Multiwell Platten, 24 Well, sterile | Greiner Bio-One | 662 160 | Consumables |
| Zellkultur Multiwell Platten, 6 Well, sterile | Greiner Bio-One | 657 160 | Consumables |
| Zen Blue Software | Zeiss | Version 3.7 | Microscopy Software |
References
- Alonso-Roman, R., et al. Organ-on-chip models for infectious disease research. Nat Microbiol. 9 (4), 891-904 (2024).
- Fahrner, R., Groger, M., Settmacher, U., Mosig, A. S. Functional integration of natural killer cells in a microfluidically perfused liver on-a-chip model. BMC Res Notes. 16 (1), 285(2023).
- Raasch, M., et al. Microfluidically supported biochip design for culture of endothelial cell layers with improved perfusion conditions. Biofabrication. 7 (1), 015013(2015).
- Deinhardt-Emmer, S., et al. Co-infection with Staphylococcus aureus after primary influenza virus infection leads to damage of the endothelium in a human alveolus-on-a-chip model. Biofabrication. 12 (2), 025012(2020).
- Kaden, T., et al. Generation & characterization of expandable human liver sinusoidal endothelial cells and their application to assess hepatotoxicity in an advanced in vitro liver model. Toxicology. 483, 153374(2023).
- Maurer, M., et al. A three-dimensional immunocompetent intestine-on-chip model as in vitro platform for functional and microbial interaction studies. Biomaterials. 220, 119396(2019).
- Hoang, T. N. M., et al. Invasive aspergillosis-on-chip: A quantitative treatment study of human aspergillus fumigatus infection. Biomaterials. 283, 121420(2022).
- Kaden, T., et al. Modeling of intravenous caspofungin administration using an intestine-on-chip reveals altered Candida albicans microcolonies and pathogenicity. Biomaterials. 307, 122525(2024).
- Shah, P., et al. A microfluidics-based in vitro model of the gastrointestinal human-microbe interface. Nat Commun. 7, 11535(2016).
- Jaffe, E. A., Nachman, R. L., Becker, C. G., Minick, C. R. Culture of human endothelial cells derived from umbilical veins. Identification by morphologic and immunologic criteria. J Clin Invest. 52 (11), 2745-2756 (1973).
- Mosig, S., et al. Different functions of monocyte subsets in familial hypercholesterolemia: Potential function of cd14+ cd16+ monocytes in detoxification of oxidized ldl. FASEB J. 23 (3), 866-874 (2009).
- Peterson, M., Mooseker, M. Characterization of the enterocyte-like brush border cytoskeieton of the c2bbe clones of the human intestinal cell line, caco-2. J Cell Sci. 102, Pt 3 581-600 (1992).
- Shin, W., Hinojosa, C. D., Ingber, D. E., Kim, H. J. Human intestinal morphogenesis controlled by transepithelial morphogen gradient and flow-dependent physical cues in a microengineered gut-on-a-chip. iScience. 15, 391-406 (2019).
- Kim, H. J., Ingber, D. E. Gut-on-a-chip microenvironment induces human intestinal cells to undergo villus differentiation. Integr Biol (Camb). 5 (9), 1130-1140 (2013).
- Kim, H. J., Huh, D., Hamilton, G., Ingber, D. E. Human gut-on-a-chip inhabited by microbial flora that experiences intestinal peristalsis-like motions and flow. Lab Chip. 12 (12), 2165-2174 (2012).
- Karra, N., Fernandes, J., James, J., Swindle, E. J., Morgan, H. The effect of membrane properties on cell growth in an 'airway barrier on a chip'. Organs-on-a-Chip. 5, 10025(2023).
Access restricted. Please log in or start a trial to view this content.
Reprints and Permissions
