We describe a novel neuromuscular training intervention based on mobility, stability, anterior chain strength, lumbopelvic control, posterior chain strength, and change of direction exercises. After the intervention, adult female soccer players improved their performance in speed variables, changes of direction, and jumping ability.
A subscription to JoVE is required to view this content. Sign in or start your free trial.
Research Article
Effects of a Novel Neuromuscular Training Intervention on Jump, Sprint, and Change of Direction in Adult Female Soccer Players
In This Article
Summary
Abstract
Neuromuscular training is a methodology used in sports to improve the physical performance of athletes. Soccer has physical demands of power and speed, so players need to develop sprinting, changing direction, and jumping skills. According to these objectives, a novel neuromuscular training protocol has been developed to improve physical performance in terms of jumping, speed, and direction changes in adult female soccer players. The protocol is based on mobility exercises, stability, anterior and posterior chain strength, lumbopelvic control, and change of direction ability. For this, 34 female soccer players were randomly divided into a control group (CG, n = 17) and an experimental group (EG, n = 17) during 10 weeks of intervention. Hedges'g was used for the effect size. The control group did not show significant improvements in any variable (p > 0.05). The experimental group showed significant time-group improvements with a large effect size on the countermovement jump right (CMJR; p = 0.05, ES = 1.13), countermovement jump (CMJ; p = 0.05, ES = 1.35), and countermovement jump left (CMJL; p = 0.05, ES = 0.83), peak speed (p < 0.05; ES = 0.96) and 180 change of direction (180 COD) in the intergroup analysis (p < 0.05; ES = -1.29 to -1.39). Novel variables such as bilateral deficit and change of direction deficit showed significant improvements in the experimental group (change of direction deficit left (CODDL): p = 0.05, ES = -1.24; change of direction deficit right (CODDR): p = 0.05, ES = -1.15 and bilateral limb deficit (BLD): p= 0.05, ES = -0.49). In conclusion, the novel neuromuscular training intervention, which included weekly progressions and unilateral and bilateral exercises, showed significant improvements in the physical performance of adult female soccer players.
Introduction
Women's soccer has grown exponentially in recent years1 and requires technical, tactical, physical, and psychological skills for its development2. Soccer is also characterized by high-intensity intermittent efforts3,4, where players must be able to perform repeated sprints, accelerations and decelerations, changes of direction (COD), jumps, and ball kicking throughout extended matches5,6.
Performance tests are used in team sports to assess jumping, sprinting, and COD ability in scientific literature7,8. Francini et al. compared field tests and match activities, suggesting that field tests can be used to monitor the effect of training over time9. Likewise, Pardos-Mainer et al. point out in their season-long study that jumps, linear sprint, and COD tests can monitor performance in women's soccer10. The Countermovement Jump (CMJ) is one of the most commonly used tests in soccer teams11 as it is a good predictor of muscle power12. A Premier League player performs approximately 700 turns in a soccer match13, so it is necessary to quantify the athletes' COD ability. The 505 test is a test that is commonly used to measure 180° COD ability in team sports14 because of its demand from the point of view of strength and postural control15. Studies in recent years have incorporated new variables such as bilateral deficit (BLD)16 and change of direction deficit (CODD)17, which are novel variables that provide information about the performance of players.
Kim et al. conducted a study of soccer research trends over the last 30 years, with performance being one of the most frequent searches18. In current soccer, there has been a considerable increase in distance covered at high speed (between 19.8 km/h and 25.1 km/h) and in sprints (over 25.1 km/h)19. Professional female soccer players cover more than 8000 m per match on average20,21, with more than 1000 m at high intensity22. For these reasons, they need to be in great physical condition to cover the demands of a season. Neuromuscular training has been shown in different studies to be beneficial in improving performance in female soccer players23,24, with multicomponent injury prevention programs having the most evidence of reducing injury risk25. Therefore, it is necessary to develop new neuromuscular training programs in women's soccer. This protocol includes specific exercises for lumbopelvic control, anterior and posterior chain strengthening, and COD skills, all of which are progressively adapted and focused on improving the performance of women's football players. This novel approach provides significant value beyond traditional strength and conditioning programs, as it is designed to specifically address the physical demands of modern women's football5. The implementation of neuromuscular training interventions in women's soccer arises from the need to not only enhance the physical performance of players but also reduce the risk of injuries, which is considerably high in this sport25. These techniques are designed to strengthen muscular structures and improve motor control, which is crucial for the demands of the modern game, characterized by quick changes of direction and high-intensity intermittent efforts25. Previous studies have shown that programs incorporating neuromuscular control exercises, posterior chain strengthening, and lumbopelvic control are more effective in improving stability, agility, and jumping ability compared to conventional training intervention7,15,25. In the context of women's soccer, where physical demands are increasing, the adoption of specific techniques such as neuromuscular training is not only innovative but is also supported by evidence suggesting significant improvements in jumping ability, sprint speed, and COD capabilities, all critical components in soccer performance2,5,7.
The aim of this study was to observe the effects of a novel neuromuscular training intervention on physical performance (jump, sprint, and COD) in adult female soccer players. This study hypothesized that the developed neuromuscular training intervention would have a positive and significant effect on the physical performance of adult female soccer players, improving their jumping ability, sprint, and COD ability compared to a control group following a conventional training intervention.
Access restricted. Please log in or start a trial to view this content.
Protocol
The Clinical Research Ethics Committee of the Government of Aragón approved this protocol (PI21/011, CEICA, Spain). All players and/or their legal guardians signed informed consent forms before data collection and filming of the protocol.
1. Recruiting participants
- Use the following inclusion and exclusion criteria for participant selection.
- Inclusion criteria: 6 years of competitive soccer experience, being injury-free, consistent training for the past 6 months, not participating in any other training programs outside of this study. Exclusion criteria: missing 3 or more neuromuscular training sessions, missing 1 of the testing days (pretest or posttest).
- Recruit 40 female soccer players from teams in the Spanish 2nd Division. Assign them randomly (ABBA distribution) to a control group (CG = 20) or an experimental group (EG = 20). However, due to attendance at the neuromuscular training intervention and test days, the final sample consisted of 17 players in the CG and 17 in the EG (Figure 1). The training for the experimental group consists of 5 sessions per week (90 min per session) and 1 match per week.
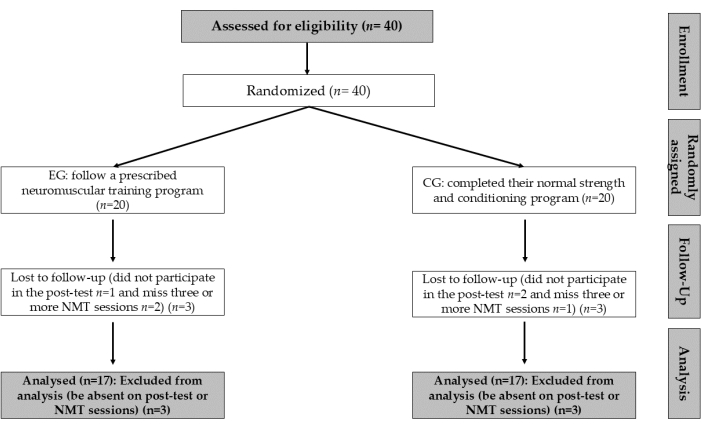
Figure 1. Flowchart of the studies. Enrollment, randomly assigned, follow-up, and analysis can be seen in the CONSORT diagram. Abbreviations: EG = experimental group; CG = control group; NMT = neuromuscular training. Please click here to view a larger version of this figure.
2. Familiarization with measurements, training, and testing
- At 1 week before the start of the tests (3 weeks before the start of the intervention), subject all players (CG and EG) to a simulation of the various tests to be conducted (see step 3). During this simulation, explain all tests in detail, highlight potential errors, emphasize the objective of each test, and address any questions from the players (Figure 2).
- Take measurements at 2 weeks before starting the intervention (pre-test) and 1 week after the intervention (post-test).
- At 2 weeks before the start of the intervention (neuromuscular training intervention), ensure the players in the EG complete four familiarization sessions to learn the exercises included in the program.
- In session 1, explain the exercises in detail, allow players to practice, and correct any potential errors (see step 4.3.).
- In session 2, explain the organization of the players (in pairs) and the transition from one exercise to another within the neuromuscular training intervention (see step 4.3.).
- In session 3, conduct a real simulation and explain the work time for each exercise on the soccer field.
- In session 4, repeat the simulation, with emphasis on the intensity of work for each exercise. Additionally, correct any execution errors.
- Instruct the participants not to change any habits that could affect the study results.
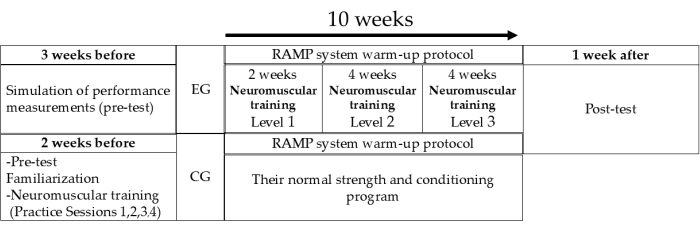
Figure 2: Project design timeline. The figure shows the activities of the experimental group (EG), which followed a three-level neuromuscular training program for 10 weeks, and the control group (CG), which continued their regular training. Both groups used the RAMP (rise, activate, mobilize, and potentiate) warm-up protocol and completed the pre- and post-program tests. Please click here to view a larger version of this figure.
3. Pre-test and Post-test
- Perform measurements in the 7th month of the competitive season, during the first days of the week before and after the intervention (on Monday). Both groups performed the tests in the afternoon (between 17:00 h-19:00 h) under similar environmental conditions of temperature and humidity.
- Instruct the technical teams and players to refrain from vigorous exercise prior to the tests (48 h before). Carry out the measurements on a regulation soccer field with soccer boots.
- Conduct a 24 h dietary recall with a qualified Dietitian-Nutritionist (D-N) and calculate the average intake of macronutrients and energy. Use a food composition database for the subsequent analysis of the information (e.g., Spanish Food Composition Database: BEDCA)26.
- Have all players complete the RAMP warm-up protocol (raise, activate, mobilize, and potentiate) just before starting the measurements27.
- Use the CMJ to assess vertical jumping ability in bilateral and unilateral conditions. Measure jump height using a commercial device as described in Pardos-Mainer et al.28.
- Instruct the players to start in an upright position, with their feet shoulder-width apart (bilateral jump) or with their feet in the most comfortable position (unilateral jump) and their hands on their waist to avoid using arm momentum. Then, have the player begin the lowering phase and push off to perform a maximal-intensity vertical jump (countermovement; Figure 1).
- Conduct the test three times, with a minimum of 45 s of passive recovery between each attempt and record the highest jump for further analysis. The ICC was 0.89 in bilateral and 0.90 in unilateral vertical power. Compute the Bilateral Deficit CMJ according to the following formula29:
BLD CMJ (%) = [100 × (CMJ bilateral/CMJR + CMJL)] −100
- Measure the sprint speed with a 40 m sprint, recording split times at 10 m, 20 m, and 30 m. Conduct timing with dual-beam photoelectric cells.
- Position participants with their lead foot 0.5 m behind the first timing gate, using a two-point staggered stance. Space the timing gates 1.5 m apart and set them at a height of 0.75 m (Figure 3).
- Have each participant perform the 40 m sprint 2x, with at least 3 min of passive recovery between attempts.
- Calculate the times from 10 m to 20 m (time 10 - time 20) and from 30 m to 40 m (time 30 - time 40). Calculate peak speed using the following formula:
[(10/time 30-40m) x 3600] / 1000
- Assess agility using the 505 COD test with dual-beam photocell systems placed 1 m above ground level and perform the test as described by Spiteri et al.30.
- Have players build up speed for 10 m, and as they pass through the electronic timing system, instruct them to sprint 5 m, make a 180° turn, and sprint 5 m again (Figure 1). Have each leg (right and left) complete the test 2x, with at least 3 min of passive recovery in between, and record the best time for analysis. The ICC value was 0.82.
- Calculate the COD deficit (CODD) by finding the difference between the times of the first part of the linear sprint (i.e., the time recorded in 10 m) and the COD test (i.e., 505 test)31.

Figure 3: Jump, sprint, and change of direction test protocols. The figure illustrates the measurement procedures used in the study. Abbreviations: CMJ = countermovement jump; COD = change of direction. Please click here to view a larger version of this figure.
4. Neuromuscular training intervention
- During the 10 week intervention, have all players (CG and EG) begin by performing the standardized RAMP warm-up protocol27.
- Have players assigned to the EG perform 3 sessions per week of neuromuscular training, each lasting 24 min. Additionally, have players in the CG perform 3 sessions per week of their regular physical conditioning routine. In both groups, monitor the intensity of the sessions using the modified Borg scale (rating from 0 to 10)32.
- Perform the neuromuscular training intervention as described below26.
- Mobility (Level 1 = lunge to hamstring strength, Level 2 = standing hip out, and Level 3 = 90-90 hip stretch; Figure 4).
- At level 1, perform the lunge to hamstring stretch. This exercise combines a forward lunge with a hamstring stretch. Start with a lunge, then shift hips back to stretch the front leg. Repeat, alternating between the lunge and the stretch.
- At level 2, perform the standing hip out. This mobility exercise helps open the hips and improve the range of motion. Stand with feet hip-width apart, lift one knee towards the chest, then rotate it outward to open the hip. Lower the leg and repeat on the other side.
- At level 3, perform the 90-90 hip stretch. This static stretch improves hip flexibility and mobility. Sit with the front leg bent at 90° in front and the back leg bent at 90° behind. Keep the torso upright, lean forward to deepen the hip stretch, hold, and then switch sides.
- Stability (Level 1 = star excursion, Level 2 = lateral hops + balance, and Level 3 = forward hop + balance; Figure 5).
- At level 1, perform the star excursion. This exercise improves balance and stability. Stand on one leg and reach the other leg in various directions, like the points of a star, without touching the ground. After each reach, return the leg to the center and repeat on the other side.
- At level 2, perform the lateral hops + balance. This exercise enhances stability by hopping side-to-side and holding a balance on one leg. Hop laterally onto one leg, land softly, and hold the balance for a few seconds before hopping to the other side. Focus on control during both the hop and balance.
- At level 3, perform the forward Hop + balance. This exercise targets forward movement and balance. Hop forward on one leg, land softly, and hold the balance for a few seconds to stabilize. Repeat the movement, alternating legs while maintaining control throughout.
- Anterior chain strength (Level 1 = squat, Level 2 = squat jump, and Level 3 = walking lunge; Figure 6).
- At level 1, perform the squat. The squat is a basic lower-body exercise that targets the quadriceps and other anterior chain muscles. Stand with feet shoulder-width apart, lower the hips as if sitting in a chair, and keep chest upright. Push through the heels to return to standing and repeat for the desired reps.
- At level 2, perform the squat jump. The squat jump is a dynamic variation of the squat, adding a jump to build explosive power and strength. Begin in a squat position, lower down, then jump off the ground. Land softly back into a squat, maintaining control and balance. Repeat for the desired number of jumps.
- At level 3, perform the walking lunge. The walking lunge is an advanced exercise that builds lower-body strength and balance, focusing on the quadriceps and anterior chain muscles. Step forward into a lunge, lowering both knees to 90°, then push off the back foot to step into the next lunge. Continue alternating legs in a controlled forward motion for the desired distance or repetitions.
- Lumbo-pelvic control (Level 1 = front plank, Level 2 = side plank, and Level 3 = add plank; Figure 7).
- At level 1, perform the front plank. The front plank is a core stability exercise that strengthens the abdominals, lower back, and hips. Begin face down, lift the body onto the forearms and toes, and hold a straight line from head to toe. Engage the core, avoid sagging or lifting the hips, and maintain the position for the desired time.
- At level 2, perform the side plank. The side plank targets the obliques and enhances lumbo-pelvic stability. Lie on the side with legs extended, lift the body onto one forearm and the edge of the foot, maintaining a straight line from head to toe. Engage the core and hold for the desired time, then switch sides.
- At level 3, perform the add plank. This is an advanced plank variation that includes movements or added resistance to increase difficulty. Begin in a front or side plank, then incorporate movements like leg lifts, arm reaches, or weights to further challenge core stability. Maintain strong core control throughout, holding for the desired time or reps.
- Posterior chain strength (Level 1 = single-leg glute bridge, Level 2 = single-leg touch and hop, and Level 3 = scissors lunge; Figure 8).
- At level 1, perform the single-leg glute bridge. This exercise strengthens the glutes, hamstrings, and lower back. Lie on the back with one knee bent and the other leg extended. Push through the heel of the bent leg to lift the hips, forming a straight line from shoulders to knee. Lower down and repeat, then switch legs.
- At level 2, perform the single-leg touch and hop. This exercise targets balance, coordination, and posterior chain strength, focusing on the glutes and hamstrings. Stand on one leg, hinge at the hips to touch the ground, then push off to hop while maintaining balance. Land softly and repeat, then switch legs.
- At level 3, perform the scissors lunge. The scissors lunge is an explosive exercise targeting the entire posterior chain, including the glutes, hamstrings, and calves. Begin in a lunge position, then push off the ground to switch legs mid-air and land in a lunge with the opposite leg forward. Keep the chest upright and core engaged, alternating legs in a dynamic, controlled motion.
- Agility (Level 1 = lateral shuffle, Level 2 = T-test, Level 3 = 505 test; Figure 9).
- At level 1, perform the lateral shuffle. The lateral shuffle enhances lateral movement, speed, and agility. Start in an athletic stance with knees bent and feet shoulder-width apart. Shuffle sideways by pushing off one foot, maintaining a low, balanced posture. Repeat for the desired distance or time, then shuffle in the opposite direction.
- At level 2, perform the T-Test. The T-test is an agility drill that tests speed and quick direction changes. Set up 4 cones in a T shape. Start at the base, sprint to the middle cone, shuffle laterally to the left and right cones, return to the middle, then backpedal to the start. Focus on fast, controlled movements throughout the drill.
- At level 3, perform the 505 test. The 505 test is an advanced agility drill that measures speed and quick direction changes. Set up two cones 5 m apart and a starting cone 10 m away. Sprint from the starting cone to the second, make a quick turn and accelerate back past the first cone. This test is typically timed to assess the athlete's speed and agility.
- Mobility (Level 1 = lunge to hamstring strength, Level 2 = standing hip out, and Level 3 = 90-90 hip stretch; Figure 4).
- Progress the difficulty and intensity levels, with Level 1 exercises performed during the first 2 weeks, Level 2 during weeks 3-6, and Level 3 during weeks 7-10.
- Ask the players to perform four rounds of the previously described circuit, consisting of six exercises per round (40 s of work and 20 s of rest). For exercises performed unilaterally, alternate the working leg in each round.
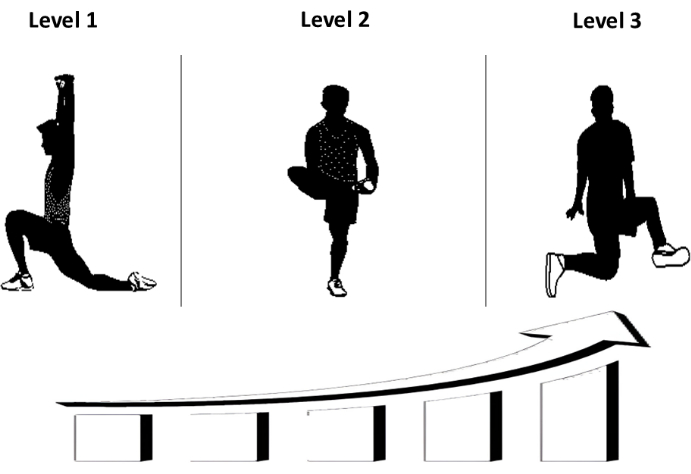
Figure 4: Levels 1, 2, and 3 mobility exercises from the neuromuscular training intervention. Level 1: lunge to hamstring strength; Level 2: standing hip out; Level 3: 90-90 hip stretch. Please click here to view a larger version of this figure.
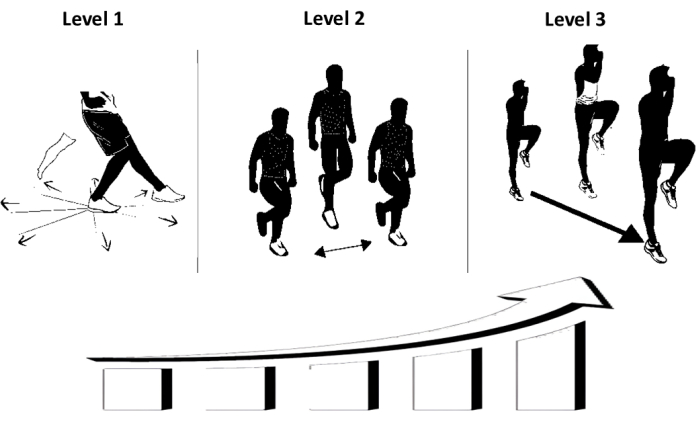
Figure 5: Levels 1, 2, and 3 dynamic stability exercises from the neuromuscular training intervention. Level 1: star excursion; Level 2: lateral hops + balance; Level 3: forward hop + balance. Please click here to view a larger version of this figure.
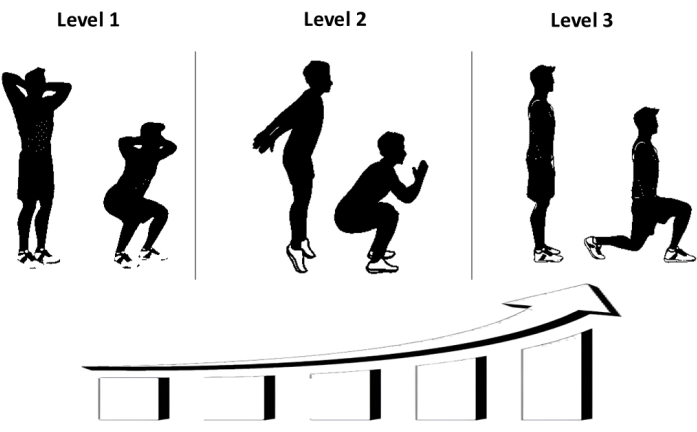
Figure 6: Levels 1, 2, and 3 anterior chain strength exercises from the neuromuscular training intervention. Level 1: squat; Level 2: squat jump; Level 3: walking lunge. Please click here to view a larger version of this figure.
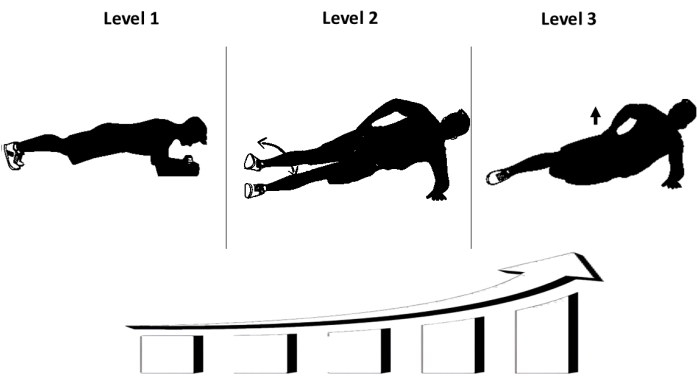
Figure 7: Levels 1, 2, and 3 lumbo-pelvic control exercises from the neuromuscular training intervention. Level 1: front plank; Level 2: side plank; Level 3: add plank. Please click here to view a larger version of this figure.
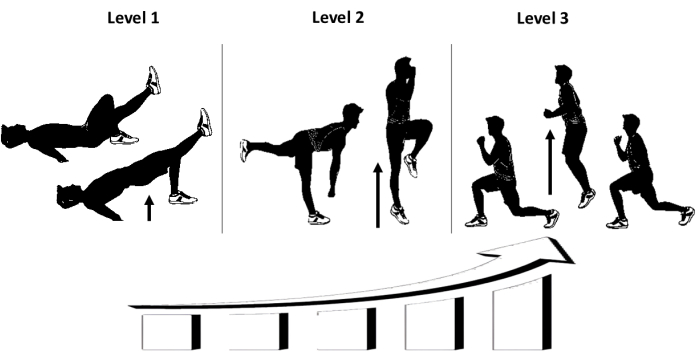
Figure 8: Levels 1, 2, and 3 posterior chain strength exercises from the neuromuscular training intervention. Level 1: single-leg glute bridge; Level 2: single-leg touch and hop; Level 3: scissors lunge. Please click here to view a larger version of this figure.
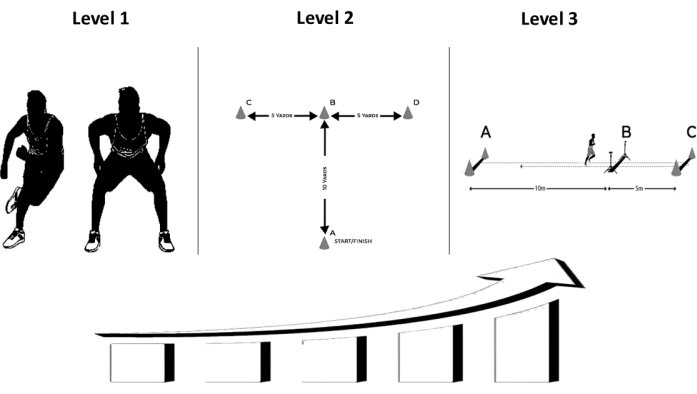
Figure 9: Levels 1, 2, and 3 change of direction ability exercises from the neuromuscular training intervention. Level 1: lateral shuffle; Level 2: T-test; Level 3: 505 test. Please click here to view a larger version of this figure.
5. Statistical analysis
- To assess the normality of all variables, use the Shapiro-Wilk test. Evaluate the homogeneity of variances using Levene's test.
- Conduct within-group comparisons using the students' paired t-test to identify significant differences between pre-test and post-test measurements in both groups.
- Employ repeated measures ANOVA with a 2 (group) x 2 (time) design, followed by a Bonferroni post hoc analysis for each parameter.
- Calculate the effect size, Hedges' g, along with a 95% confidence interval, to evaluate the magnitude of changes between pre-and post-test results, categorized as trivial (<0.2), small (>0.2), moderate (>0.5), or large (>0.8).
- Set statistical significance at p < 0.05. Perform all analyses using commercial analysis software.
Access restricted. Please log in or start a trial to view this content.
Results
A total of 40 female soccer players from teams in the Spanish 2nd Division were recruited (Table 1). A post hoc power analysis was performed using G*Power software for repeated measures ANOVA with two groups. For this, a mean effect size (f = 0.25), a significance level α of 0.05, and a total sample size of 40 participants (20 per group) were assumed. With these parameters, the analysis indicated a statistical power (1-β err prob) = 0.87. However, due to attendance at the neuromuscular training intervent...
Access restricted. Please log in or start a trial to view this content.
Discussion
The main findings in this study were the improvement observed in CMJR, CMJL, and CMJ in the intervention group that performed the novel neuromuscular training intervention. In contrast, no improvement was found in the 10 m-20 m and 30 m-40 m sprint tests in this cohort of adult female soccer players. In addition, a significant improvement in maximal speed and BLD was observed in the experimental group, while there was no improvement in the control group. The COD tests (180° CODL and 180° CODR) also showed signi...
Access restricted. Please log in or start a trial to view this content.
Disclosures
The authors have nothing to disclose.
AUTHOR CONTRIBUTION:
Alberto Roso-Moliner: Writing - original draft, Validation, Software, Resources, Methodology, Investigation, Formal analysis, Conceptualization. Demetrio Lozano: Writing - original draft, Validation, Project administration, Investigation, Conceptualization. Oscar Villanueva-Guerrero: Review and editing, Methodology, Investigation, Data curation. Hadi Nobari: Software, Investigation, Formal Analysis, Conceptualization. Elena Mainer-Pardos: Review and editing, Validation, Supervision, Investigation, Conceptualization.
Acknowledgements
The authors thank all the female players who participated in this study. There is no funding source for the study.
Access restricted. Please log in or start a trial to view this content.
Materials
| Name | Company | Catalog Number | Comments |
|---|---|---|---|
| Spanish Food Composition Database | BEDCA | https://www.bedca.net/bdpub/index_en.php | |
| SPSS software | IBM SPSS Inc., Chicago, IL, USA | Version 28.0 |
References
- López-Valenciano, A., et al. Injury profile in women's football: A systematic review and meta-analysis. Sports Med. 51 (3), 423-442 (2021).
- Pettersen, S. D., Adolfsen, F., Martinussen, M. Psychological factors and performance in women's football: A systematic review. Scandinavian J Med Sci Sports. 32 (Suppl 1), 161-175 (2022).
- Wang, S., Choi, H., Jiang, X. Impact of cardiovascular-respiratory parameters on high-intensity football training. Revista Psicol Deporte. 32 (1), 169-178 (2023).
- Aguinaga-Ontoso, I., Guillen-Aguinaga, S., Guillen-Aguinaga, L., Alas-Brun, R., Guillen-Grima, F. Effects of nutrition interventions on athletic performance in soccer players: a systematic review. Life. 13 (6), 1271(2023).
- Datson, N., et al. Match physical performance of elite female soccer players during international competition. J Strength Condition Res. 31 (9), 2379-2387 (2017).
- Altmann, S., et al. Match-related physical performance in professional soccer: Position or player specific. PloS One. 16 (9), e0256695(2021).
- Pardos-Mainer, E., Lozano, D., Torrontegui-Duarte, M., Cartón-Llorente, A., Roso-Moliner, A. Effects of strength vs. plyometric training programs on vertical jumping, linear sprint and change of direction speed performance in female soccer players: A systematic review and meta-analysis. Int J Environ Res Public Health. 18 (2), 401(2021).
- Sonesson, S., Lindblom, H., Hägglund, M. Performance on sprint, agility and jump tests have moderate to strong correlations in youth football players but performance tests are weakly correlated to neuromuscular control tests. Knee Surg Sports Traumatol Arthrosc. 29 (5), 1659-1669 (2021).
- Francini, L., et al. Association between match physical activity and neuromuscular characteristics in youth football. J Sports Med Phys Fitness. 63 (1), 202-211 (2023).
- Pardos-Mainer, E., Casajús, J. A., Gonzalo-Skok, O. Reliability and sensitivity of jumping, linear sprinting and change of direction ability tests in adolescent female football players. Sci Med Football. 3 (3), 183-190 (2019).
- Paul, D. J., Nassis, G. P. Testing strength and power in soccer players: the application of conventional and traditional methods of assessment. J Strength Condition Res. 29 (6), 1748-1758 (2015).
- Jiménez Reyes, P., Cuadrado Peñafiel, V., González Badillo, J. Analysis of variables measured in vertical jump related to athletic performance and its application to training. Cultura Ciencia Deporte. 6 (17), 105-112 (2011).
- Bangsbo, J. Physiological demands of football. Sports Sci Exchange. 27 (125), 1-6 (2014).
- Chaalali, A., et al. Agility training in young elite soccer players: promising results compared to change of direction drills. Biology Sport. 33 (4), 345-351 (2016).
- Nygaard Falch, H., Guldteig Rædergård, H., van den Tillaar, R. Effect of different physical training forms on change of direction ability: A systematic review and meta-analysis. Sports Med. 5 (1), 53(2019).
- Ascenzi, G., et al. Bilateral deficit and bilateral performance: Relationship with sprinting and change of direction in elite youth soccer players. Sports. 8 (6), 82(2020).
- Sammoud, S., Bouguezzi, R., Negra, Y., Chaabene, H. The reliability and sensitivity of change of direction deficit and its association with linear sprint speed in prepubertal male soccer players. J Func Morphol Kinesiol. 6 (2), 41(2021).
- Kim, J. Analysis of football research trends using text network analysis. PLoS One. 19 (4), e0299782(2024).
- Gualtieri, A., Rampinini, E., Dello Iacono, A., Beato, M. High-speed running and sprinting in professional adult soccer: current thresholds definition, match demands and training strategies. A systematic review. Front Sports Active Living. 5 (13), 1116293(2023).
- Kirkendall, D. T., Sayers, A. Soccer anatomy. , Human Kinetics Publishers. (2020).
- Winther, A. K., et al. Position specific physical performance and running intensity fluctuations in elite women's football. Scand J Med Sci Sports. 32 (Suppl 1), 105-114 (2022).
- Diaz-Seradilla, E., et al. Inter-and intra-microcycle external load analysis in female professional soccer players: A playing position approach. Plos one. 17 (3), e0264908(2022).
- Lindblom, H., Waldén, M., Carlfjord, S., Hägglund, M. Implementation of a neuromuscular training programme in female adolescent football: 3-year follow-up study after a randomised controlled trial. British J Sports Med. 48 (19), 1425-1430 (2014).
- Pardos-Mainer, E., Casajús, J. A., Gonzalo-Skok, O. Adolescent female soccer players' soccer-specific warm-up effects on performance and inter-limb asymmetries. Biol Sport. 36 (3), 199-207 (2019).
- Crossley, K. M., et al. Making football safer for women: a systematic review and meta-analysis of injury prevention programmes in 11 773 female football (soccer) players. British J Sports Med. 54 (18), 1089-1098 (2020).
- Roso-Moliner, A., et al. Evaluation of 10-week neuromuscular training program on body composition of elite female soccer players. Biology. 11 (7), 1062(2022).
- Jeffreys, I. Warm up revisited-the 'ramp'method of optimising performance preparation. J Strength Condition Res. 6, 15-19 (2006).
- Mainer Pardos, E., Ustero-Pérez, O., Gonzalo-Skok, O. Effects of upper and lower body plyometric training on physical performance in young tennis players. Revista int ciencias deporte. 13 (49), 225-243 (2017).
- Howard, J., Enoka, R. Maximum bilateral contractions are modified by neurally mediated interlimb effects. J Appl Physiol. 70 (1), 306-316 (1991).
- Spiteri, T., et al. Mechanical determinants of faster change of direction and agility performance in female basketball athletes. J Strength Condition Res. 29 (8), 2205-2214 (2015).
- Nimphius, S., Callaghan, S. J., Spiteri, T., Lockie, R. Change of direction deficit: A more isolated measure of change of direction performance than total 505 time. J Strength Condition Res. 30 (11), 3024-3032 (2016).
- Zamunér, A. R., et al. Assessment of subjective perceived exertion at the anaerobic threshold with the Borg CR-10 scale. J Sports Sci Med. 10 (1), 130(2011).
- Roso-Moliner, A., et al. Effects of a neuromuscular training program on physical performance and asymmetries in female soccer. Front Physiol. 14 (2), 1171636(2023).
- Amundsen, R., Heimland, J. S., Thorarinsdottir, S., Møller, M., Bahr, R. Effects of high and low training volume with the Nordic hamstring exercise on hamstring strength, jump height, and sprint performance in female football players: A randomised trial. Transl Sports Med. 31, 7133928(2022).
- Rejc, E., Zaccaron, S., D'Alleva, M., Botter, A., Lazzer, S. Effects of bilateral or unilateral plyometric training of lower limbs on the bilateral deficit during explosive efforts. J Musculoskel Neuron Interact. 24 (2), 200-208 (2024).
- Bračič, M., Supej, M., Peharec, S., Bačič, P., Čoh, M. An investigation of the influence of bilateral deficit on the counter-movement jump performance in elite sprinters. Kinesiology. 42 (1), 73-81 (2010).
- Bishop, C., et al. Bilateral deficit during jumping tasks: Relationship with speed and change of direction speed performance. J Strength Condition Res. 35 (7), 1833-1840 (2021).
- Clark, K. P., Rieger, R. H., Bruno, R. F., Stearne, D. J. The national football league combine 40-yd dash: How important is maximum velocity. J Strength Condition Res. 33 (6), 1542-1550 (2019).
- Lee, Y. S., Lee, D., Ahn, N. Y. SAQ training on sprint, change-of-direction speed, and agility in U-20 female football players. PLoS One. 19 (3), e0299204(2024).
- Westheim, F., Gløersen, Ø, Harper, D., Laugsand, H., Eriksrud, O. Reliability of phase-specific outcome measurements in change-of-direction tests using a motorized resistance device. Front Sports Active Living. 5 (23), 1212414(2023).
- Roso-Moliner, A., Gonzalo-Skok, O., Villavicencio Álvarez, V. E., Calero-Morales, S., Mainer-Pardos, E. Analysing the Influence of Speed and Jumping Performance Metrics on the Percentage Change of Direction Deficit in Adolescent Female Soccer Players. Life. 14 (4), 466(2024).
- Villanueva-Guerrero, O., et al. Effects of different strength and velocity training programs on physical performance in youth futsal players. Heliyon. 10 (10), e30747(2024).
- Okholm Kryger, K., et al. Research on women's football: a scoping review. Sci Med Football. 1 (5), 549-558 (2022).
- Okholm Kryger, K., et al. Can we evidence-base injury prevention and management in women's football? A scoping review. Res Sports Med. 31 (5), 687-702 (2023).
Access restricted. Please log in or start a trial to view this content.
Reprints and Permissions
