Here, we present a detailed protocol combining cryo-fixation and expansion microscopy methods (Cryo-ExM), allowing for high-resolution imaging with structural preservation adapted to various biological samples. Biological samples are frozen, embedded in a swellable polymer, denatured, expanded, and immunolabeled, enabling super-resolution imaging with standard light microscopes.
Method Article
Expansion Microscopy: High-Resolution Fluorescent Imaging with a Conventional Microscope
* These authors contributed equally
In This Article
Summary
Abstract
Expansion microscopy (ExM) is an innovative super-resolution fluorescence microscopy technique that physically enlarges biological specimens, enabling imaging beyond the diffraction limit using conventional systems such as confocal microscopes. By embedding samples in a swellable hydrogel matrix, ExM allows isotropic expansion of the sample, enhancing spatial resolution without requiring specialized nanoscopy equipment. Advanced variants, such as Ultrastructure Expansion Microscopy (U-ExM), preserve fine cellular details, including organelles and macromolecular assemblies.
The observation of specific cellular structures or organelles depends significantly on the method of fixation applied to the sample, notably through the use of aldehyde-based chemical crosslinkers and protein precipitation with cold methanol. Recently, integrating cryo-fixation -- a gold-standard fixation technique -- with the U-ExM method has enabled nanoscale observations of a wide range of biological samples, from cultured mammalian cells to whole organisms, in their near-native state. Expansion microscopy is a powerful tool for studying biological structures across scales, from isolated organelles to entire tissues. When combined with cryo-fixation, it provides unprecedented insights into cellular architecture and dynamic processes while minimizing artifacts associated with traditional fixation methods. These developments position ExM as a versatile framework for high-resolution, near-native biological imaging.
The present study outlines a detailed protocol for cryo-fixation coupled with expansion microscopy of samples from various origins. This protocol highlights critical steps, including sample fixation, polymer formation, expansion, immunostaining, and imaging, providing the necessary guidance to implement this method in any laboratory.
Introduction
Microscopy plays a critical role in biological research, enabling us to visualize the ultrastructure and organization across living systems at unprecedented scales, from whole organisms to individual molecules. The microscopy field encompasses two distinct systems: electron microscopy (EM), highly resolutive but with limited capacity for specific labeling, and light microscopy, allowing for precise and specific visualization of subcellular structure but with limited resolution due to the diffraction limit of light. Although super-resolution fluorescence microscopy (SRM) has evolved as a powerful method for sub-diffraction resolution fluorescence imaging of cells, visualizing the ultrastructural details of macromolecular assemblies, such as entire organisms, remains challenging1. Moreover, SRM techniques, achieving resolutions ranging from 10 to 120 nm, depend on advanced microscopes and image reconstruction algorithms and require expertise and specialized microscopes, limiting their accessibility to many biology laboratories. An emerging super-resolution method, Expansion microscopy (ExM), has overcome these limitations. Developed in the laboratory of Edward S. Boyden a decade ago, ExM is an innovative photonic microscopy technique now considered as super-resolution microscopy that allows imaging without the need for specialized microscopes2. Rather than relying on sophisticated imaging technologies, ExM involves the embedding of biological samples in a swellable polymer that expands isotropically. This physical expansion increases the sample size by a factor of four or more, enhancing resolution and enabling observation using conventional light microscopes. Originally developed in brain slices, ExM protocols have evolved to improve resolution and simplify procedures. This technique has been successfully adapted for various biological samples, including eukaryotic cells, unicellular organisms, parasites, tissues, and whole organisms, demonstrating its versatility3,4,5,6,7,8,9,10,11,12,13,14,15.
Currently, two main classes of protocols exist: pre-expansion2,16 and post-expansion17,18, which refer to the moment of the biological sample staining, either prior to or after the expansion procedure. This article will focus specifically on the post-expansion protocol, in which immunolabeling is performed after sample denaturation and expansion.
In this protocol, biological samples are cryo- or chemically-fixed and incubated with chemical agents, allowing protein anchoring to the future polymer. The samples are then embedded in a swellable polymer composed of acrylamide/bis-acrylamide (commonly used in electrophoresis gels) and sodium acrylate (enabling expansion). Adding water triggers gel expansion, increasing the distance between proteins in proportion to the gel's expansion. Proteins of interest are then labeled directly within the gel using specific antibodies (Figure 1).
All aforementioned imaging techniques, including electron microscopy, photonic microscopy, super-resolution microscopy, and ExM require biological sample fixation. Aldehyde-based fixation creates cross-linking between proteins, maintaining cellular organization during the treatments required for photonic or electron microscopy. However, fixation can also lead to artifacts and morphological changes in the cell, which may be subtle in classical light microscopy but have become increasingly evident with the advancement and development of SRM, making scientists reconsider the consequences of fixation methods19. One way to circumvent fixation-related artifacts is to use live microscopy, which enables the dynamic visualization of cellular structures in their near-native state. However, live microscopy has several disadvantages, notably the need for transgene expression, which can potentially impact cell physiology and alter protein behavior compared to endogenous counterparts. Additionally, live microscopy typically offers lower resolution than fixed microscopy and has limited labeling options, as fluorescent tags must be non-toxic and stable in live conditions, restricting the available markers. The field of electron microscopy, due to its high resolution, has considerably contributed to the development of optimal methods to fix subcellular or macromolecular structures while preserving their native state. Decades ago, cryo-fixation was developed by Dubochet, Frank, and Henderson laboratories, involving the rapid fixation of the cell in vitreous state water and demonstrating that it was the sole approach for preserving the native ultrastructure20,21. While purified molecules can be observed directly in vitreous ice using cryo-electron microscopy, cells need to be embedded in resin and sectioned prior to observation. To further stabilize the samples in the most native state possible, samples are subjected to freeze substitution. In this process, as ice molecules return to a liquid state, they are instantly replaced by acetone, which has a higher diffusion coefficient than water. During the removal of water, molecules of interest may aggregate and collapse, similar to what occurs in chemical cross-linking fixation. To limit this aggregation, freeze substitution is carried out at low temperatures, reducing aggregation by increasing intracellular viscosity22. This controlled approach limits the formation of large aggregates and preserves cellular ultrastructure closer to its native state.
In 2022, growing evidence that chemical fixation introduces artifacts, combined with advancements in expansion microscopy, led Guichard/Hamel laboratory to develop a method that integrates cryo-fixation with expansion microscopy, known as 'Cryo-ExM'23. This approach leverages the strengths of both techniques by preserving biological structures with minimal distortion. Samples are cryo-frozen using either high-pressure freezing or manual plunging, both of which require specialized equipment commonly found in electron microscopy laboratories or core facilities.
This paper outlines a step-by-step protocol to perform cryo-fixation followed by expansion microscopy and presents representative results from two experimental models: human cultured cells and the unicellular parasite Trypanosoma brucei, the causative agent of sleeping sickness. We will emphasize the improvements offered by cryo-fixation over conventional fixation methods and highlight the most common pitfalls and fixation artifacts associated with the technique.
Protocol
NOTE: Reagents used in this protocol are listed in the Table of Materials. This protocol is adapted, with minor modifications, for observation of various cellular processes in different biological samples (including yeast24,25, Toxoplasma gondii26, close relative animal species27, green algae28,29, microbial eukaryotes30, as well as mouse23 and human samples23,31,32,33). Modifications to adapt the protocol to these different samples are not mentioned in this paper, as they can be retrieved from the original publications. Here, RPE1 cells and Trypanosoma brucei are used as proxies for mammalian cells and parasites. This protocol emphasizes the fixation and expansion steps of the biological samples; therefore, information regarding the sample culture is not presented in this article.
1. Stock solution preparation
- Poly-lysine solution
- Resuspend poly-L or poly-D-lysine hydrobromide (Table of Materials) in water to obtain a stock solution of poly-lysine at 1 mg/mL. Store this stock solution at -20 °C and further dilute it in water at 0.2 mg/mL for coating the coverslips (Table 1, Table of Materials).
- Anchoring solution
- Prepare fresh acrylamide/formaldehyde solution (under the chemical hood) by mixing 38 µL of formaldehyde (36.5%-38%; Table of Materials) and 50 µL of acrylamide (40%, Table of Materials) in 912 µL of PBS to obtain 1 mL of solution.
- Gelation solution without APS (initiator)
- Prepare a mix solution by adding 500 μL of 38% sodium acrylate (19% final), 250 μL of 40% Acrylamide (10% final), 50 μL of 2% bis-acrylamide (0.1% final), 50 μL TEMED (0.5% final), and 100 μL of 10x PBS (1x final). Aliquot in volume suitable for 2 gels maximum (80-90 μL) and store at -20 °C for at least 12 h before use (see Table 1 for long-term conservation).
NOTE: Please note that the volume indicated to prepare the mix of gelation solution is calculated to obtain a final volume of 1 mL, but the actual volume of the solution is 950 μL, as APS, which represents 1/20 of the total volume each, is added extemporaneously. The original storage time of the gelation solution17 was extended after we observed that it could be preserved for up to 1 month at -20 °C without compromising gel solidity or expansion efficiency.
- Prepare a mix solution by adding 500 μL of 38% sodium acrylate (19% final), 250 μL of 40% Acrylamide (10% final), 50 μL of 2% bis-acrylamide (0.1% final), 50 μL TEMED (0.5% final), and 100 μL of 10x PBS (1x final). Aliquot in volume suitable for 2 gels maximum (80-90 μL) and store at -20 °C for at least 12 h before use (see Table 1 for long-term conservation).
- TEMED and APS
- APS 10% w/v: Dilute APS powder in water, aliquot and store at -20 °C.
- TEMED 10% v/v: Dilute TEMED in water, aliquot and store at -20 °C.
- Sodium acrylate (SA) 38%
- Prepare 38% SA from purified SA (AK scientific or Sigma; Table of Materials)
- Resuspend 38 g of sodium acrylate in 100 mL of water under constant stirring (important). Incorporate SA progressively to avoid aggregates and stir overnight at 4 °C to ensure complete resuspension. Ensure that the solution is translucent and colorless or slightly yellow. Aliquot and store at 4 °C for up to 1 year.
- Prepare 38% SA from acrylic acid (Sigma; Table of Materials)
- Prepare 90 mL of 38% sodium acrylate by neutralizing acrylic acid with NaOH under a chemical hood.
- Mix 29 mL of water with 25 mL of acrylic acid while stirring.
NOTE: From this step, the reaction must be performed on ice with constant control of pH and temperature as the reaction is exothermic. - Add 10 N NaOH drop by drop using a Pasteur pipet.
NOTE: Ensure that the temperature does not exceed 25 °C (if it does, stop adding NaOH and wait for the temperature to cool down). - Continue neutralization until the pH reaches 7-8 and agitate for 1 h on ice.
NOTE: If the pH suddenly jumps to over 10, add acrylic acid until the pH drops to 7-8. - Store the solution in a closed container overnight. If the solution has precipitated, centrifuge at 1,000 × g for 10 min. Collect the supernatant, aliquot, and store them at -20 °C.
- Prepare 38% SA from purified SA (AK scientific or Sigma; Table of Materials)
- Denaturation solution
- TrisBase 1 M: Dilute 121.14 g of TrisBase in 1 L of water, adjust pH with HCl to 9, and store at RT.
- Denaturation buffer: Mix 200 mM Sodium Dodecyl Sulfate (SDS), 200 mM NaCl, 50 mM TrisBase in water. For a 200 mL solution, add 10 mL of Tris-BASE 1 M (pH 9) in 124.9 mL of ddH2O, add 57.1 mL of SDS (20%/700 mM stock) and 8 mL of NaCl (5 M stock) while stirring. Store at RT (Table 1).
2. Cryo-fixation and expansion procedure
- Sample preparation and cryo-fixation
NOTE: This protocol is optimized for samples grown/loaded on 12 mm coverslips. Please revise the volume of the solution for other support.- Sample preparation
- Grow the sample in a condition adapted to the biological sample, either directly on 12 mm coverslips (mammalian adherent cells) or in suspension (T. brucei).
- Load sample on the coverslip (T. brucei) pre-coated with poly-lysine as follows: briefly, incubate 12 mm coverslips in poly-lysine (0.2 mg/mL) for 1 h at 37 °C, quickly wash and air-dry.
- Centrifuge the parasites at 300 g for 10 min at room temperature (RT). Resuspend in PBS supplemented with 10% of culture medium and load on coverslips 5-10 min prior to cryo-fixation.
- Plunging setup (Figure 2A-C)
CAUTION: Work under a chemical hood with gloves and a lab coat when manipulating acetone. Use lab coat and goggles whenever manipulating liquid nitrogen and liquid ethane.- Under a chemical hood, fill 5 mL tubes (1 coverslip/tube) with 1 mL of extra-dry acetone using a syringe and a needle to avoid air contamination.
NOTE: For better biological membrane preservation, the addition of paraformaldehyde (PFA)/Glutaraldehyde (GA) (0.1/0.02 %) is necessary. Adapt the tube according to the coverslip's diameter (coverslips > 12 mm will not fit into 5 mL tubes). - Freeze the tubes in liquid nitrogen using a plastic or metal rack resistant to cold temperatures to keep them upright.
- Fill half of a polystyrene box (30 cm x 30 cm / thick walls) with dry ice.
- Fill the Vitrobot-type dewar with liquid nitrogen until it stops evaporating, and wait 10-15 min for the stabilization of the temperature. The use of the spider is needed to facilitate the cooling down of the system (Figure 2B, asterisk). Refill if necessary.
- Remove the spider and fill the metallic plunging chamber with liquid ethane.
- Wait 10 min for the ethane to be equilibrated.
NOTE: Refill the plunging system with liquid ethane during the experiment if needed (do not use the spider anymore at this point). The transition from gaseous to liquid ethane is difficult. Using appropriate pressure is critical for the formation of liquid ethane. High pressure will prevent liquid formation by constant gas overflow within the metallic chamber, while low pressure will form solid ethane within the metallic chamber and the filling tube. Avoiding ice formation is essential for the experiment. Maintaining the filling tip at the liquid/air interface helps prevent solid ethane formation.
- Under a chemical hood, fill 5 mL tubes (1 coverslip/tube) with 1 mL of extra-dry acetone using a syringe and a needle to avoid air contamination.
- Plunging (Figure 2A-C)
CAUTION: Use lab coat and goggles whenever manipulating liquid nitrogen and liquid ethane.- Grab a 12 mm coverslip with thin tweezers.
- Soak up any excess of medium with tissue paper.
- Hold the coverslip half-way with the tweezers with a clamping ring adapted to the cryo-plunger.
- Place the tweezers holding the coverslip in the holder of the cryo-plunger. Blot any remaining excess of medium with Whatman paper.
- Activate the cryo-plunger to plunge the coverslip into the ethane solution in the metal chamber.
- Quickly transfer the coverslip into the tube containing frozen acetone (1 coverslip/tube).
NOTE: Do not use the same tweezers for collecting the samples and for plunging to avoid contamination with the culture medium. Be extra careful if using coverslips > 12 mm (15- or 18-mm diameter coverslips fit with the carrier but might be more difficult to plunge). During this step, it is possible to immerse the coverslip in liquid nitrogen after plunging to facilitate the transfer into the Eppendorf while keeping the sample frozen. As the acetone freezes at -96 °C, placing the coverslips on frozen acetone is necessary for the freeze substitution.
- Freeze substitution and rehydration
CAUTION: Work under the hood when manipulating samples during freeze substitution. Rising up temperature creates pressure inside the tube, which may trigger a tube explosion.- Incubate the tubes in dry ice with a tilt angle (approximately 45°).
- Agitate overnight on an orbital shaker. Place the closed box on a shaker at 4 °C or RT to let the temperature rise from -180 °C to -80 °C.
- Remove the majority of the dry ice from the box (just keep a few at the bottom of the box), release the pressure into the tubes by quickly opening and closing them, and continue to agitate for 45 min on the orbital shaker to further continue the temperature rising from -80 °C to -20 °C.
- Transfer coverslips to a 12-well plate (or any convenient container) containing pre-chilled pure ethanol (100%) solution. Incubate for 5 min and proceed with gradual rehydration as follows: EtOH 100% (5 min) - EtOH 95% (3 min) - EtOH 95% (3 min) - EtOH 70% (3 min) - EtOH 50% (3 min) - EtOH 25% (3 min) - H2O 100%.
- Transfer the coverslips in PBS and orient them under a microscope (scratching the surface with a tip) to have them all facing up.
NOTE: EtOH 100% and 95% are stored at -20 °C, EtOH 70% and EtOH 50% at 4 °C and EtOH 25% and ddH2O at RT to continue rising up the temperature until RT. For membrane labeling, the addition of PFA/GA (0.1%/0.02%) is necessary in acetone and rehydration solutions except for ddH2O.
- Sample preparation
- Expansion
- Protein anchoring
- Prepare fresh 1.4% formaldehyde/ 2% acrylamide (FA/AA) solution in PBS 1x.
- Place coverslips into a 4/12 well-plate filled with 0.5/1 mL of AA/FA.
- Incubate for 3-5 h at 37 °C without agitation.
NOTE: The formaldehyde links free amine groups of proteins to acrylamide. The excess acrylamide helps limit the protein cross-linking normally induced by formaldehyde and anchors the proteins to the future expansion polymer. Protein anchoring step elongation to overnight might be needed depending on the biological sample. In any case, longer incubation will not impact any of the following steps. Fill free wells with water or place them in a humid chamber to avoid evaporation.
- Gelation
- Thaw, APS (10%), and gelation solution (Sodium acrylate 19%, Acrylamide 10%, bis-acrylamide 0.1%, TEMED 0.5% diluted in 10x PBS) on ice 10 min before gelation.
- Prepare a humid chamber with a thin layer of wet tissue and parafilm, then store it at 4 °C for 10 min.
- Place the humid chamber on ice.
- Take the coverslips out of the protein anchoring solution and remove the excess solution with a tissue paper (2 in a row).
- Add APS (final concentration 0.5%) into the gelation solution, vortex for 2-3 seconds, and load 2 drops of 35 μL on the parafilm of the humid chamber.
- Cover each drop with the coverslip, cells facing the gelation solution.
- Incubate on ice for 5 min to allow gel penetration.
- Incubate at 37 °C for 30-60 min.
- Denaturation
- Punch the gel with a biopsy punch tool (0.4 cm in diameter, Figure 2D) and agitate for 10/15 min into a 6 well plate filled with 1 mL of denaturation buffer until the gels detach from the coverslips.
- Transfer the gel into a 1.5 mL microcentrifuge tube filled with fresh denaturation buffer.
- Incubate for 1 h 30 at 95 °C.
- Transfer the gel to ddH2O for 10 min, and repeat 3 times to wash the denaturation buffer properly.
- Measure the gel with millimeter paper or caliper to evaluate gel expansion factor.
- Transfer the gel to PBS for immunostaining.
- Alternatively, store the gels in PBS-azide 0.02% at 4 °C for a short period (Table 1) or at -20°C for longer storage (Table 1). For long storage, gels must be incubated in several baths of water: glycerol 50% solution for 2-3 h under agitation and placed at -20 °C in a sufficient volume of solution, which must be adapted to the gel size.
NOTE: Gel can be kept entire if preferred (Figure 2D, E) (step 2.2.3.1). Up to 5 punches (equivalent to an entire gel) can be gathered in 1 tube (step 2.2.3.2). Denaturation temperature and time must be respected (step 2.2.3.3). High heat may trigger tube opening, leading to denaturation buffer evaporation and/or expulsion of the gel. Make sure to use safe-lock tubes or to cover them. Washing the gel after denaturation must be done in distilled water as PBS will trigger SDS precipitation, affecting the efficiency of the washes. This step will trigger a slight expansion of the gel which has no consequences on the following steps of the protocol (step 2.2.3.4). The glycerol can be diluted in PBS to save space in case of big gels. For 0.4 mm punch, gels are ideally stored in a 12-well plate filled with 3 mL of water: glycerol.
- Protein anchoring
3. Immunostaining and final expansion
- Change the PBS bath for another 15 min incubation.
- Cut the entire gel into 4 equal pieces.
- Transfer the gel pieces/punches into an adapted carrier (Figure 2D, E) and incubate with primary antibodies diluted in PBS-BSA 2% for 3 h to overnight with agitation (see Table 2, and Table 3 for detailed conditions).
- Wash gels 3x with PBS+Tween 0.1% for 10 min RT with agitation.
- Incubate the gel into secondary antibodies and Hoechst in PBS-BSA 2% for 3 h to overnight with agitation (see Table 2 and Table 3 for detailed conditions).
- Wash gel 3x with PBS+Tween 0.1% for 10 min RT with agitation.
- Optional: Perform pan-labeling of the whole proteome by incubating gel with NHS-ester (see Table 2 for details) in PBS for 1h30 at RT under agitation, then wash 3x in PBS+Tween 0.1% for 10 min.
- Transfer the gel to an adapted carrier and proceed with gel expansion by incubation in distilled water (ddH2O).
NOTE: The concentration and type of detergent (Tween, Triton-X100, Saponin) used for antibody washes can be adapted to biological samples. Replacing the water several times is crucial to eliminate traces of salts, which prevent full expansion.
4. Mounting and imaging
- Coat coverslips with poly-lysine (see section 1.1) by covering coverslips with approximately 200 μL of poly-lysine, incubate 1 h at RT, and wash 3x in ddH2O to remove the excess poly-lysine. Let the coverslips dry and store them at 4°C until use.
- Place expanded gels on non-coated coverslips in the imaging chamber to check the orientation of the samples using a fluorescence microscope.
- Once oriented, dry gels on a lint-free paper to remove the excess water and mount on poly-lysine coated coverslips (see step 1.1 for protocol).
- Observe samples with an inverted microscope.
Results
This paper highlights the results of combining cryo-fixation with expansion microscopy on two different types of samples: cultured mammalian cells and T. brucei parasites. Both samples were either cryo-fixed or chemically fixed in 4% PFA prior to expansion and immunostaining. Note that other chemical fixations might be more suitable to specific organelles (such as methanol or glutaraldehyde) and that only PFA, a common chemical fixation, has been chosen to compare with cryo-fixation for simplicity.
Human RPE1 (retinal pigment epithelial cells) were stained for αβ-tubulin, ATP5a, and Hoechst to visualize microtubules, mitochondria, and nuclei, respectively. Additionally, gels were incubated with fluorescent NHS-ester before expansion, a dye reacting with the free amine groups and therefore staining the whole cellular proteome. We could observe several advantages of cryo-fixation compared to chemical fixation, as already demonstrated23. The most striking feature was that cryo-fixation perfectly preserved the mitochondrial network, both visible using NHS-ester and specific antibodies against ATP synthase subunit alpha (ATP5a) (Figure 3A,B). Moreover, as ATP5a is localized in the inner mitochondrial membrane, we could resolve mitochondrial cristae using cryo-fixation (Figure 3B"). On the contrary, the PFA fixation did not allow to preserve the mitochondrial network and therefore, mitochondrial cristae were not visible in this condition (Figure 3C"). We also stained microtubules in both conditions and demonstrated that cryo-fixation preserved better dynamic microtubules such as cytoplasmic or astral microtubules (Figure 3B-E). However, stable microtubules such as in centriole and cilia, non-membranous organelles composed of 9-fold microtubules triplets/doublets, were equally preserved, if not better in PFA-fixed cells compared to cryo-fixed cells (Figure 3B',C'). It is important to note that cryo-fixation, as preserving the integrality of cellular proteins, might be less applicable to very dense structures such as centrioles/cilia. This observation has also been made on rigid structures such as nuclear pores where chemical fixation triggers a washout of cytoplasmic proteins, allowing for a better observation of nuclear pore structures23,32. Finally, we could demonstrate that cryo-fixation also circumvents the cross-linking effect of chemical fixation, which negatively impacts expansion capacity as shown on mitotic spindles, which were almost 2-fold more expanded in cryo-fixed condition compared to PFA (Figure 3D,E).
Trypanosoma brucei cells were stained for TDH34 (Figure 4A-D) to visualize the unique mitochondrion and for BiP35 (Figure 4E,F) to highlight the endoplasmic reticulum. Additionally, gels were stained with fluorescent NHS-ester. As observed in human cells, cryo-fixation combined with expansion better preserves the overall cellular architecture (Figure 4B,E), particularly these two membranous structures, compared to PFA fixation (Figure 4C,D,F). The microtubule cytoskeleton of T. brucei is more rigid and stable than that of human cells; consequently, no significant difference was observed between PFA and cryo-fixation. Furthermore, the resolution limit of the U-ExM technique prevents us from distinguishing individual microtubules (not shown).
Overall, cryo-fixation addresses limitations of classical chemical fixation, such as the preservation of membranous organelles (mitochondria, endoplasmic reticulum) and dynamic cytoskeleton elements (cytoplasmic or astral microtubules). Additionally, because cryo-fixation does not create any cross-link between proteins, it fully preserves expansion capacity, notably on rigid and dense structures.
Controlling the quality of cryo-fixation and expansion is essential to preserve the cellular ultrastructure of biological samples. Several mistakes can result in poor fixation and create artifacts within the biological samples. Here, we highlight the most common cryo-fixation drawbacks and results of poor fixation. The most obvious artifact created by cryo-fixation is the appearance of cracks inside the biological sample (Figure 5A), also common in cryo-electron microscopy. While these cracks do not alter the intrinsic ultra-structure of organelles, as shown in Figure 5A (inset) for mitochondria and microtubules, it could lead to mis-interpretation of the biological relevance of these cracks and need to be considered cautiously. There is no specific correlation between manipulation issues and the appearance/abundance of these cracks.
One specific feature indicative of poor fixation is the appearance of "bubble-like structures" within the cell cytoplasm, indicating the presence of ice crystals. These structures are particularly visible with NHS-ester staining (Figure 5B). They are usually accompanied by limited preservation of cytoskeleton elements, such as wavy-shaped microtubules (Figure 5B), and a very poor preservation of membranous organelles (mitochondria in Figure 5B). These features witness important issues with fixation, which can be caused by (i) inappropriate ethane volume and/or temperature (steps 2.2.4-2.2.6 from protocol), (ii) non-gradual warming up of the biological sample (steps 2.3 and 2.4 from protocol), and (iii) presence of impurities in the freeze substitution solution (step 2.2.1 from protocol). Representative images of sodium acrylate solutions highlighting the expected aspect of 38% sodium acrylate usable (colorless and translucent [1]) or slightly yellow and translucent [2]), or not usable for expansion (Yellow/orange and cloudy [3]) are shown in Figure 5C.
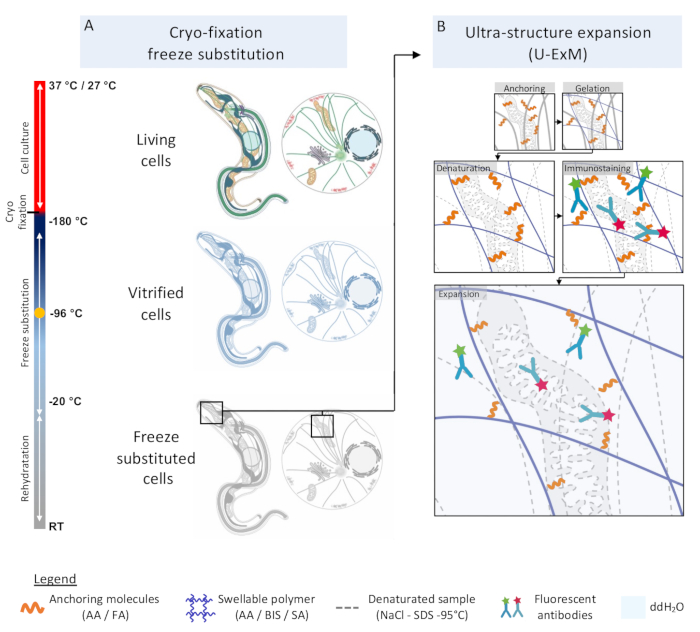
Figure 1 Cryo-ExM workflow. (A) Living cells (human cells or T. brucei) are cryo-fixed by plunging in liquid ethane at -180 °C and incubated in frozen acetone on dry ice. Freeze substitution is performed by constant and slow rising of temperature from -180 °C to -80 °C by incubation on dry ice, which triggers acetone liquefaction (-96 °C), and then from -80 °C to -20 °C by incubation without dry ice. Rehydration is performed by successive baths of ethanol mixed with a crescent concentration of distilled water together with a constant increase in temperature from -20 °C to room temperature. (B) Rehydrated samples are then proceeded for expansion as follows: Samples are incubated in a mixture of acrylamide: formaldehyde (AA/FA) at 37 °C allowing the anchoring of the proteins to the swellable polymer made of acrylamide, bis-acrylamide, and sodium acrylate (AA/BIS/SA), the later conferring the expansion property to the gel. Samples are incubated in NaCl/SDS at 95 °C to perform protein-protein interaction destabilization and gentle denaturation. This step is essential for isotropic expansion. Samples are then immunostained using regular primary and secondary antibodies and finally expanded in distilled water. Please click here to view a larger version of this figure.
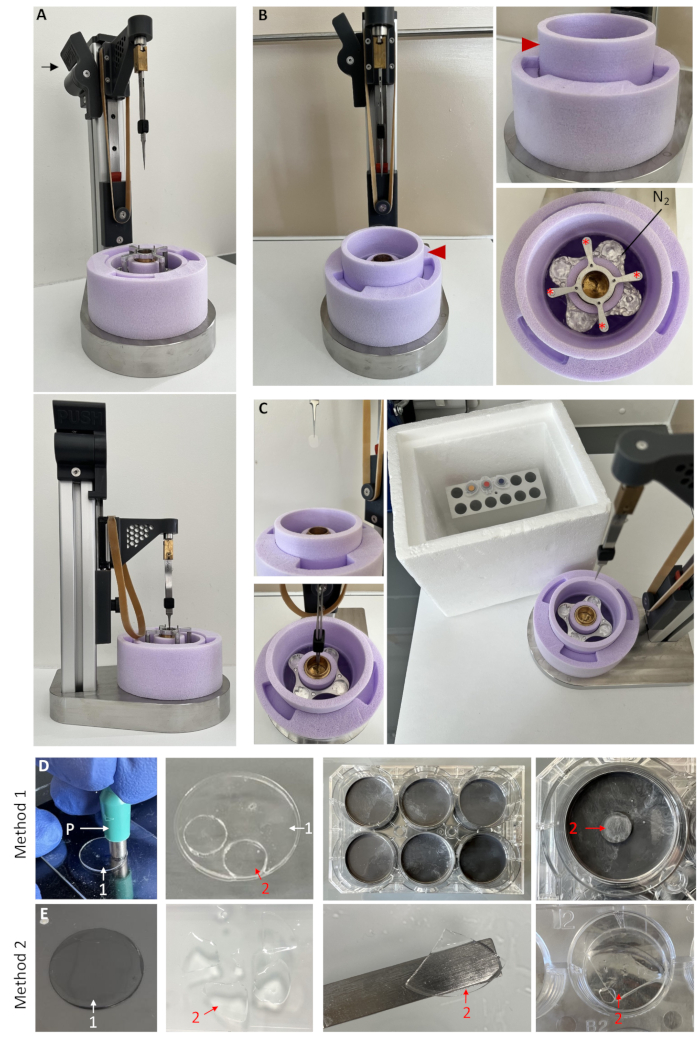
Figure 2. Cryo-plunging and expansion setup. (A) Cryo-plunger in armed position (upper panel) and down position (lower panel). Arrow indicates the PUSH button to activate the plunging. (B) Cryo-plunging setup ready for plunging showing the level of liquid nitrogen (N2) suitable for cryo-fixation indicated by the height of the foam surrounding the dewar (red arrowhead). The removable spider is indicated by asterisks. (C) Illustration of the key steps of cryo-plunging from holding the coverslip (upper left), the position of the coverslips in liquid ethane dewar (lower left), and of the collection tube for freeze substitution (right). (D) Illustration of the 'gel punching' method for immunostaining in human samples. Polymerized gel on coverslips (1) is cut using a specific biopsy punch (P), forming a gel punch of 0.4 cm diameter (2), which can be stained in a siliconed-plate (right panels) to reduce the amount of antibody. (E) Illustration of the 'gel cutting' method for immunostaining in human and T. brucei samples. Polymerized and denatured gels (1) are cut into 4 equal pieces (2), allowing for their incubation in a 12-well plate with antibodies. Please click here to view a larger version of this figure.
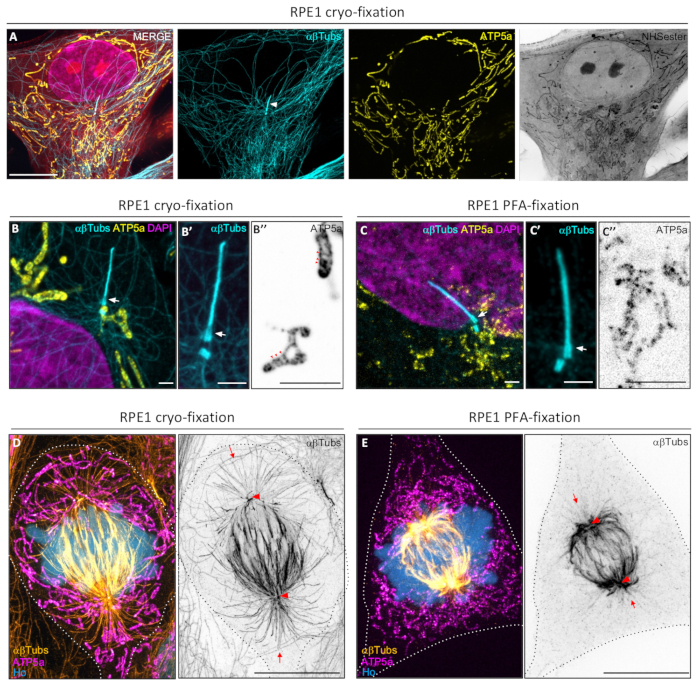
Figure 3. Comparison of cryo-fixation and PFA-fixation in human cells. (A) Spinning disk image of cryo-fixed and expanded RPE1 cells stained for αβ-tubulins (cyan), mitochondrial ATP synthase subunit 5a (ATP5a, yellow), and NHS-ester (red/grey) showing the excellent preservation of both membrane-based organelles and cytoskeleton elements, including centrioles and cilia (arrowhead). Scale bar: 10 µm. (B, C) Spinning disk image of cryo-fixed (B) and PFA-fixed (C) RPE1 cell stained for αβ-tubulins (cyan), mitochondrial ATP5a (yellow), and Hoechst (magenta) emphasizing on primary cilium (arrows, B', C') and mitochondria (B", C"). If cryo- and PFA-fixation equally preserve centrioles and primary cilia, cryo-fixation largely surpasses PFA regarding mitochondrial structure preservation (B", C"- red arrowheads indicate mitochondrial cristae only visible in cryo-fixed conditions) Scale bars: 1, 1, and 2.5 µm respectively. (D,E) Spinning disk image of cryo-fixed (D) and PFA-fixed (E) mitotic RPE1 cell stained for αβ-tubulins yellow/grey), mitochondrial ATP5a (magenta), and Hoechst (BOP blue) showing that cryo-fixation allows for better expansion of the mitotic spindle (red arrowheads) and preserve better mitotic spindle microtubules (red arrows). Measurements of the mitotic spindle length: 12 µm and 7 µm for cryo-fixation and PFA-fixation, respectively. Scale bars: 10 µm. Please click here to view a larger version of this figure.
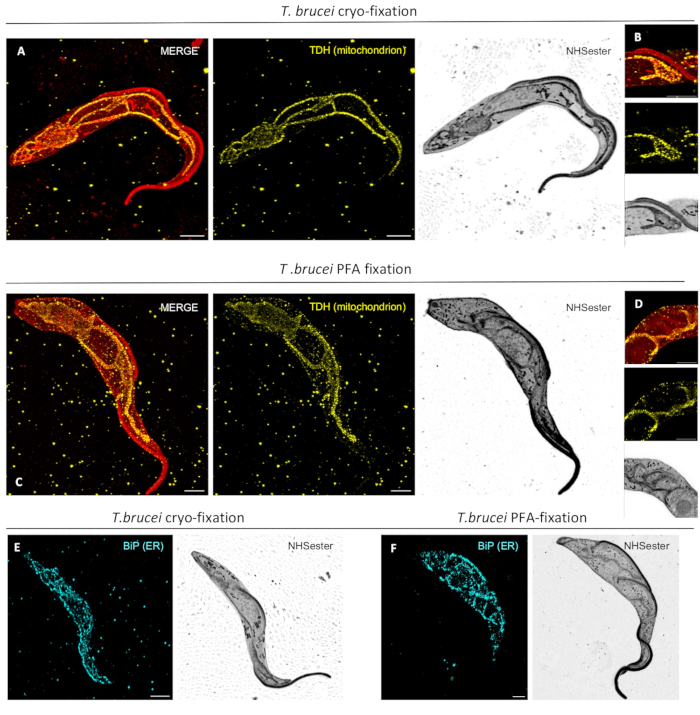
Figure 4. Comparison of Cryo-fixation and PFA fixation in Trypanosoma brucei. (A, B) Confocal images of cryo-fixed and expanded T. brucei procyclic cells stained for mitochondrial threonine dehydrogenase (TDH, yellow) and NHS-ester (red/grey), showing the excellent preservation of the unique mitochondrion and the general architecture of the cell. Scale bars: 5 µm. (C, D) Confocal image of PFA-fixed and expanded T. brucei procyclic cells stained for TDH (yellow) and NHS-ester (red/grey). Comparing mitochondrial structure preservation and network, cryo-fixation outperforms PFA-fixation. Scale bars: 5 µm. (E, F) Confocal images of cryo-fixed (E) and PFA-fixed (F) and expanded T. brucei procyclic cells stained for endoplasmic reticulum marker BiP and NHS-ester (grey) showing that cryo-fixation allows for better expansion and conservation of the endoplasmic reticulum. Scale bars: 5 µm. Please click here to view a larger version of this figure.
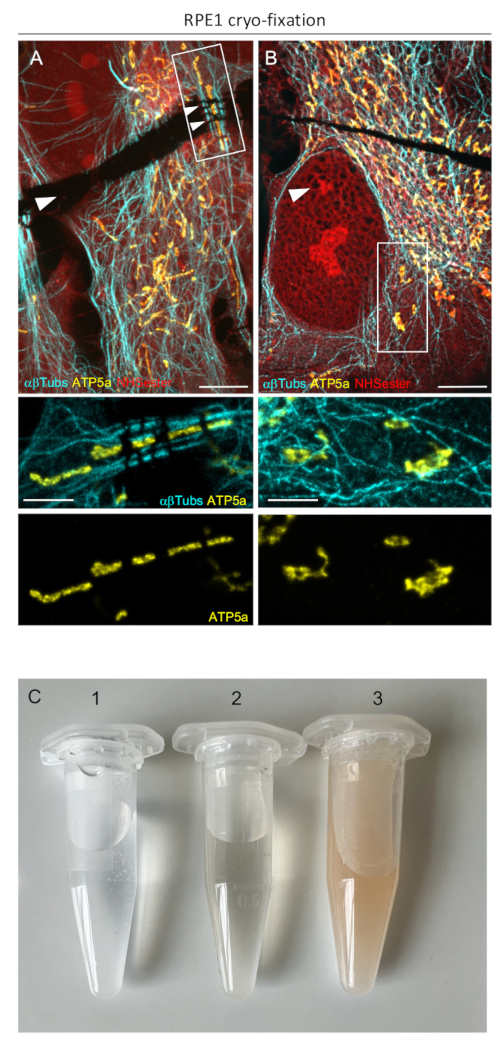
Figure 5. Cryo-fixation issues. (A,B) Spinning disk images of cryo-fixed and expanded RPE1 stained for αβ-tubulins (cyan), mitochondrial ATP synthase subunit 5a (ATP5a, yellow), and NHS-ester (red) showing classical effects of cryo-fixation: cracks (A, arrows) and bubbles (B, arrow). While cracks do not affect organelles ultrastructures (A), the presence of bubbles in the cytoplasm (B) is indicative of bad fixation and significantly alters the preservation of subcellular organelles (mitochondria and microtubules, insets). Scale bars: 5 µm and 2 µm (insets). (C) Picture showing different sodium acrylate solutions highlighting the expected aspect of 38% sodium acrylate usable (colorless and translucent (1) or slightly yellow and translucent (2), or not usable for expansion (Yellow/orange and cloudy (3)). Please click here to view a larger version of this figure.
Table 1: Solution storage conditions Please click here to download this Table.
Table 2: List of antibodies Please click here to download this Table.
Table 3: Immunostaining conditions Please click here to download this Table.
Discussion
In this paper, we present a detailed protocol that integrates cryo-fixation with expansion microscopy (Cryo-ExM), offering a robust approach for visualizing subcellular compartments while avoiding artifacts commonly associated with chemical fixation, such as structural distortion and antigen loss. By preserving cellular architecture in a near-native state, Cryo-ExM eliminates the need for extensive fixation optimization, allowing for more accurate protein localization.
Although the protocol is generally straightforward, several critical steps require particular attention to ensure successful outcomes. The cryo-plunging step is especially sensitive, as it demands both specific materials (see Table of Materials) and a level of dexterity, particularly when handling the liquid ethane filling, which represents a potential pitfall. Prior knowledge of cryo-fixation techniques is advantageous; we recommend consulting with a cryo-EM specialist or an electron microscopy facility manager when first adopting this method. During the expansion phase, it is essential to strictly adhere to the denaturation conditions, as deviations can compromise both sample preservation and expansion efficiency. Finally, maintaining proper storage conditions for all reagents (see Table 1) is crucial for ensuring reproducibility and consistent imaging quality over time.
This paper highlights several key advantages of the Cryo-ExM protocol. Notably, cryo-fixation minimizes the loss of soluble proteins, a common limitation of conventional fixation methods, and better preserves membrane integrity, thereby enhancing the fidelity of cellular imaging. A major strength of this technique lies in its compatibility with standard widefield and confocal microscopes. Unlike many other super-resolution methods that require specialized and often expensive equipment, ExM can be implemented using conventional fluorescence microscopes. Another significant advantage of ExM is its versatility. The technique has been successfully applied to a wide range of biological samples – from individual cells to complex tissues – demonstrating its broad applicability across diverse research domains. This paper specifically emphasizes the compatibility of this protocol with 2 very different model systems: T. brucei and human cells, but note that a bigger or more complex sample would require high-pressure freezing fixation as manual plunging is not sufficient to preserve the entire sample24,25,30. Expansion microscopy has revolutionized the ability to visualize nanoscale cellular structures that were previously difficult or impossible to resolve, enabling breakthroughs in fields such as cell biology, developmental biology, and neuroscience36. In particular, the method has been transformative in parasitology, a field where conventional light microscopy often falls short. For many parasites, ultrastructure expansion microscopy (U-ExM) has proven to be a game changer, enabling high-resolution imaging of intricate organelles such as the apicoplast, conoid, and cytoskeletal elements with unprecedented clarity6,37,38. These advances demonstrate the power of U-ExM to uncover previously inaccessible structural details, opening new avenues for discovery in cell biology, neuroscience, and parasite biology, and aiding the search for potential therapeutic targets. Moreover, ExM remains compatible with commonly used immunofluorescence antibodies, which facilitates its integration into existing workflows. In most cases, antibodies routinely used for fluorescence microscopy or western blotting perform effectively on expanded samples, eliminating the need for specialized reagents. This accessibility makes Cryo-ExM an appealing option for many biological research laboratories, offering high-resolution imaging without the cost or complexity typically associated with advanced imaging systems.
Despite its advantages, ExM has certain limitations. A major drawback is the substantial consumption of antibodies, which can be costly or problematic, especially for homemade antibodies available in limited quantities. Here is why we propose this protocol strategy to reduce the volume of antibodies used for immunostaining (Figure 2D,E). The expansion process also increases the thickness of the sample, which can affect the ability to visualize deeper structures due to the working distance limitations of standard microscope objectives. This limitation may be particularly challenging when studying larger, thicker samples, where deeper regions may not be effectively imaged using conventional microscopes. Additionally, tissue expansion can sometimes introduce mechanical distortions, necessitating careful validation and correction steps to ensure accurate spatial representations. Finally, classical ExM is strictly dependent on sample fixation, which may vary from biological samples or subcellular structure to observe. While centrioles and cilia are stable enough to be expanded without pre-fixation, cellular organelles necessitate different types of chemical fixation (PFA, methanol, glutaraldehyde), which may create artifacts and prevent the observation of several cellular structures together. Finally, since ExM is compatible with various super-resolution imaging modalities such as Structured Illumination Microscopy (SIM)39, Stimulated Emission Depletion Microscopy (STED)40, direct Stochastic Optical Reconstruction Microscopy (dSTORM)41 and more recently, light-sheet microscopy42, the approach described in this study provides a versatile tool to investigate cellular structures with high precision. A recent study combined cryo-fixation with iterative expansion microscopy32, further pushing the limits of resolution while preserving the cell's natural state as much as possible thanks to cryo-fixation.
By enabling these advanced imaging techniques to capture cells in their native state, Cryo-ExM paves the way for future studies of intricate cellular processes with unprecedented clarity. This approach also opens new possibilities for correlative light and electron microscopy (CLEM), further enhancing its potential for multimodal imaging.
In conclusion, ExM represents a powerful tool for super-resolution imaging with broad applicability across various biological samples. Its compatibility with standard microscopes, versatility in sample types, and relatively straightforward implementation make it an appealing choice for many laboratories. With continued advancements in the technique, we expect further improvements in resolution, antibody use, and sample handling that will enhance its capabilities and make it even more accessible for a wide range of biological applications. Cryo-ExM, in particular, stands as a promising advancement, providing a means to study cellular structures with exceptional detail while preserving their native integrity, ultimately pushing the boundaries of modern microscopy.
Disclosures
The authors declare no conflict of interest
Acknowledgements
We thank Jennifer Vieillard for critical advice and reading of the manuscript. We acknowledge the contribution of SFR Santé Lyon-Est (UAR3453 CNRS, US7 Inserm, UCBL) facility: CIQLE (a LyMIC member) for the acquisition of the images of RPE1 cells. We thank Mónica Fernández Monreal from the BIC for giving us access to the plunger and ethane and the Bordeaux Imaging Centre, a service unit of the CNRS-INSERM and Bordeaux University, a member of the national infrastructure France BioImaging, for the acquisition of T. brucei images This work was supported by the CNRS (T.brucei) and INSERM (human cells) and funded by the following institutions: Agence National de la Recherche (ANR-20-CE91-0003, ANR-19-CE17-0014 to M.B), the LabEx ParaFrap (ANR-11-LABX-0024) and Fondation pour la Recherche sur le Cerveau (FRC-AP2024, M.L). P.H was supported by ANR-OIL funding (ANR24-CE15-2171-01 to L.R), L.K was supported by ANR-BBDIV (ANR-22-CE13-0014 to B.D)
Materials
| Name | Company | Catalog Number | Comments |
|---|---|---|---|
| 5ml tube metallic holder | Dominique Dutscher | QB-E5 | Freeze substitution step |
| 620 Manual Cryo-plunger | RHOST | https://rhost-em.com/ | Cryo-fixation step |
| Acetone 99.8% AcroSeal | Acros Organics | cat. no. 67-64-1 | Freeze substitution step |
| Acrylamyde 40% (AA) | Sigma-Aldrich | A4058 | Expansion procedure (anchoring) |
| Acrylic acid | Sigma-Aldrich | 8.00181 | Expansion procedure (polymer) |
| Ammonium persulfate (APS) | Thermo Fisher | 17874 | Expansion procedure (polymer) |
| Biopsy punch | Dominique Dutscher | PUK-40 | Needed for cutting the gel prior to denaturation |
| BSA | Sigma-Aldrich | P1379 | Immunostaining |
| Cell chamber Attofluor | Invitrogen | A7816 | Imaging chamber adapted to 24mm coverslips for imaging |
| Cell chamber | Life Imagning Service | 10900 | Imaging chamber adapted to 18mm coverslips for imaging |
| Coverslips 12 mm | Dominique Dutscher | 100040 | Growing cells / attaching T.brucei |
| Coverslips 24 mm | Dominique Dutscher | 900547 | Imaging |
| Coverslips 18mm | VWR | 631-0153 | Imaging |
| Ethane gaz | Linde Gaz | 88888DE | Needed for cryo-fixation |
| Formaldehyde 36.5–38% (FA) | Sigma-Aldrich | F8775 | Expansion procedure (anchoring) |
| Glutaraldhehyde 25% (GA) | Sigma-Aldrich | G5882 | Freeze substitution step |
| Glycerol | Euromedex | EU3550 | Long-term gel storage |
| Liquid nitrogen | Linde Gaz | 2200975 | Needed for cryo-fixation (cooling down the system) |
| Microtube clear-lock 5 ml | Dominique Dutscher | 390932A | Needed for freeze substitution |
| Needle 18G | Dominique Dutscher | 050123B | Needed to collect Acetone |
| N,N-methylbisacrylamide 2% (BIS) | Sigma-Aldrich | M1533, SIGMA | Expansion procedure (polymer) |
| Paraformaldehyde 16% (PFA) | EMS | cat. no. 15710 | Freeze substitution step |
| Poly-D-Lysine | Sigma-Aldrich | P1024 | Coating coverslips for sample / imaging |
| Poly-L-Lysine | Sigma-Aldrich | P1274 | Coating coverslips for sample / imaging |
| Pressure reduicer | Linde Gaz | CPLH0SJ-LIN224 | Pressure reduicer allowing ethane distrubtion (cryo-fixation) |
| Seringe Terumo 10 ml | Dominique Dutscher | 50132 | Needed to collect Acetone |
| Silicone Elastomer kit | Dow | 4001834 | Kit for the preparation of silioned-well plates (immunostaining) |
| Sodium Acrylate 97-99% (SA) | Sigma-Aldrich | 408220 | Expansion procedure (polymer) |
| AK Scientific | R624 | Expansion procedure (polymer) | |
| Sodium dodecyl sulfate | Euromedex | EU0660 | Expansion procedure (denaturation) |
| Tetramethylethylendiamine (TEMED) | Thermo Fisher | 17919 | Expansion procedure (polymer) |
| Tubings | Thermo Scientific | 8060-0060 | Tubings for ethane distrubtion (cryo-fixation) |
| Tween-20 | Euromedex | 1005-7 | Immunostaining |
| Tweezers Dumont n°5 | FineScienceTools | 11255-20 | Manipulation of the coverslips |
References
- Jacquemet, G., et al. The cell biologist's guide to super-resolution microscopy. J Cell Sci. 133 (11), jcs240713(2020).
- Chen, F., Tillberg, P. W., Boyden, E. S. Optical imaging: expansion microscopy. Science. 347 (6221), 543-548 (2015).
- Laporte, M. H., et al. Time-series reconstruction of the molecular architecture of human centriole assembly. Cell. 187 (9), 2158-2174 (2024).
- Steib, E., et al. WDR90 is a centriolar microtubule wall protein important for centriole architecture integrity. Elife. 9, e57205(2020).
- Le Borgne, P., et al. The evolutionary conserved proteins CEP90, FOPNL, and OFD1 recruit centriolar distal appendage proteins to initiate their assembly. PLoS Biol. 20 (9), e3001782(2022).
- Bertiaux, E., et al. Expansion microscopy provides new insights into the cytoskeleton of malaria parasites including the conservation of a conoid. PLoS Biol. 19 (3), e3001020(2021).
- Liffner, B., et al. Atlas of Plasmodium falciparum intraerythrocytic development using expansion microscopy. Elife. 12, RP88088(2023).
- Amodeo, S., et al. Characterization of the novel mitochondrial genome segregation factor TAP110 in Trypanosoma brucei. J Cell Sci. 134 (5), jcs254300(2021).
- Corrales, R. M., et al. Tubulin detyrosination shapes Leishmania cytoskeletal architecture and virulence. Proc Natl Acad Sci U S A. 122 (3), e2415296122(2025).
- Brunet, M., et al. Drosophila Alms1 proteins regulate centriolar cartwheel assembly by enabling Plk4-Ana2 amplification loop. EMBO J. 44 (8), 2396(2025).
- Langner, E., et al. Ultrastructure expansion microscopy (U-ExM) of mouse and human kidneys for analysis of subcellular structures. Cytoskeleton (Hoboken). 81 (11), 618-638 (2024).
- Mercey, O., et al. The connecting cilium inner scaffold provides a structural foundation that protects against retinal degeneration. PLoS Biol. 20 (6), e3001649(2022).
- Steib, E., et al. TissUExM enables quantitative ultrastructural analysis in whole vertebrate embryos by expansion microscopy. Cell Rep Methods. 2 (10), 100311(2022).
- Freifeld, L., et al. Expansion microscopy of zebrafish for neuroscience and developmental biology studies. Proc Natl Acad Sci U S A. 114 (50), E10799-E10808 (2017).
- Yu, C. J., Orozco Cosio, D. M., Boyden, E. S. ExCel: super-resolution imaging of C. elegans with expansion microscopy. Methods Mol Biol. 2468, 141-203 (2022).
- Tillberg, P. W., et al. Protein-retention expansion microscopy of cells and tissues labeled using standard fluorescent proteins and antibodies. Nat Biotechnol. 34 (9), 987-992 (2016).
- Gambarotto, D., et al. Imaging cellular ultrastructures using expansion microscopy (U-ExM). Nat Methods. 16 (1), 71-74 (2019).
- Ku, T., et al. Multiplexed and scalable super-resolution imaging of three-dimensional protein localization in size-adjustable tissues. Nat Biotechnol. 34 (9), 973-981 (2016).
- Schnell, U., et al. Immunolabeling artifacts and the need for live-cell imaging. Nat Methods. 9 (2), 152-158 (2012).
- Dubochet, J. Cryo-EM-the first thirty years. J Microsc. 245 (3), 221-224 (2012).
- Neuhaus, E. M., et al. Ethane-freezing/methanol-fixation of cell monolayers: a procedure for improved preservation of structure and antigenicity for light and electron microscopies. J Struct Biol. 121 (3), 326-342 (1998).
- Kellenberger, E. The potential of cryofixation and freeze substitution: observations and theoretical considerations. J Microsc. 161 (Pt 2), 183-203 (1991).
- Laporte, M. H., et al. Visualizing the native cellular organization by coupling cryofixation with expansion microscopy (Cryo-ExM). Nat Methods. 19 (2), 216-222 (2022).
- Hinterndorfer, K., et al. Ultrastructure expansion microscopy reveals the cellular architecture of budding and fission yeast. J Cell Sci. 135 (24), jcs260240(2022).
- Mikus, F., Dey, G. Ultrastructure expansion microscopy (U-ExM) of the fission yeast Schizosaccharomyces pombe. Methods Mol Biol. 2862, 47-59 (2025).
- Ben Chaabene, R., et al. Toxoplasma gondii rhoptry discharge factor 3 is essential for invasion and microtubule-associated vesicle biogenesis. PLoS Biol. 22 (8), e3002745(2024).
- Shah, H., et al. Life-cycle-coupled evolution of mitosis in close relatives of animals. Nature. 630 (8015), 116-122 (2024).
- Klena, N., et al. An in-depth guide to the ultrastructural expansion microscopy (U-ExM) of Chlamydomonas reinhardtii. Bio Protoc. 13 (17), e4792(2023).
- van den Hoek, H., et al. In situ architecture of the ciliary base reveals the stepwise assembly of intraflagellar transport trains. Science. 377 (6605), 543-548 (2022).
- Mikus, F., et al. Charting the landscape of cytoskeletal diversity in microbial eukaryotes. bioRxiv. , (2024).
- Petrich, A., et al. Expanding insights: harnessing expansion microscopy for super-resolution analysis of HIV-1-cell interactions. Viruses. 16 (10), 1610(2024).
- Louvel, V., et al. iU-ExM: nanoscopy of organelles and tissues with iterative ultrastructure expansion microscopy. Nat Commun. 14 (1), 7893(2023).
- Lemaître, F., et al. Unveiling the molecular architecture of T cells and immune synapses with cryo-expansion microscopy. bioRxiv. , (2025).
- Millierioux, Y., et al. De novo biosynthesis of sterols and fatty acids in the Trypanosoma brucei procyclic form: carbon source preferences and metabolic flux redistributions. PLoS Pathog. 14 (5), e1007116(2018).
- Bangs, J. D., et al. Molecular cloning and cellular localization of a BiP homologue in Trypanosoma brucei: divergent ER retention signals in a lower eukaryote. J Cell Sci. 105 (Pt 4), 1101-1113 (1993).
- Dolgin, E. 'Expansion microscopy' turns ten: how a tissue-swelling method brought super-resolution imaging to the masses. Nature. 637 (8046), 752-754 (2025).
- Tosetti, N., et al. Essential function of the alveolin network in the subpellicular microtubules and conoid assembly in Toxoplasma gondii. Elife. 9, e56635(2020).
- Gorilak, P., et al. Expansion microscopy facilitates quantitative super-resolution studies of cytoskeletal structures in kinetoplastid parasites. Open Biol. 11 (9), 210131(2021).
- Halpern, A. R., et al. Hybrid structured illumination expansion microscopy reveals microbial cytoskeleton organization. ACS Nano. 11 (12), 12677-12686 (2017).
- Gao, M., et al. Expansion stimulated emission depletion microscopy (ExSTED). ACS Nano. 12 (5), 4178-4185 (2018).
- Zwettler, F. U., et al. Molecular resolution imaging by post-labeling expansion single-molecule localization microscopy (Ex-SMLM). Nat Commun. 11 (1), 3388(2020).
- Daetwyler, S., Fiolka, R. P. Light-sheets and smart microscopy, an exciting future is dawning. Commun Biol. 6 (1), 502(2023).
Reprints and Permissions
