The present 2,3,5-Triphenyltetrazolium Chloride (TTC) assay introduces a refined TTC staining protocol that enables the analysis of myocardial injury at microscopic resolution, producing high-quality images that allow for accurate and reliable assessment of infarct size and cardiomyocyte viability at the cellular level.
Method Article
A Microscopic 2,3,5-Triphenyltetrazolium Chloride Assay for Accurate and Reliable Analysis of Myocardial Injury
* These authors contributed equally
In This Article
Summary
Abstract
In this protocol, we present a refined 2,3,5-Triphenyltetrazolium Chloride (TTC)-based method for the accurate and reliable analysis of myocardial infarction (MI) at cellular resolution. This protocol involves a two-step TTC staining procedure performed on infarcted hearts 24 hpost-MI: perfusion, in which a 1% TTC solution is retrogradely perfused through the coronary vasculature via an aortic cannula, and immersion, where the heart is subsequently incubated in TTC solution at 4 °C overnight. After staining, the heart is embedded in OCT compound and cryosectioned transversely into 50-µm thick slices at 100-µm intervals. Following a 24 h fixation process with Zamboni's fixative, a sharp and distinct boundary between viable myocardium (deep red) and necrotic tissue (yellow) becomes discernible under microscopic examination. Notably, this microscopic TTC assay enables MI-detection not only in the acute phase (24 h post-MI) but also across an extended time window beyond 7 days. Because the microscopic TTC assay generates multiple-layer images (80 slices per heart), we developed a robust, color-based semi-automated algorithm that enables rapid and efficient analysis of large image datasets and quantifies the global infarct size within minutes. With these enhancements, the current approach substantially refines the TTC staining process and provides a broadly applicable and valuable tool for laboratories investigating cardiac ischemic injury.
Introduction
Over the past two decades, cardioprotection has continued to be pursued as a key strategy for preserving cardiomyocytes following severe ischemic insults to the heart1. In both experimental and clinical settings, the final extent of myocardial injury is a critical metric for evaluating the efficiency of cardioprotective interventions2. Thus, a reliable and accurate assessment of infarct size is highly desirable and fundamentally important.
In rodent models, the standard protocol for assessing postmortem infarct size primarily relied on the activity of mitochondrial dehydrogenase, which enzymatically converts the colorless compound 2,3,5-triphenyltetrazolium chloride (TTC) into a red precipitate in viable cells, while it remains light grey in necrotic tissue3. Although TTC-based staining is simple and cost-effective, it presents several methodological challenges and intrinsic limitations. These include cardiac slices undergoing contracture in TTC solution, which badly distorts the tissue and prevents the slices from lying flat for planimetry; uneven slice thickness during sample processing; and poor image quality that hampers the accurate delineation of the infarct boundary. In recent years, several technical modifications have been introduced to the sample preparation process, such as the use of acrylic heart matrices4 or semi-freezing the heart to facilitate slicing3. Although these modifications substantially enhanced the practicality of tissue slicing, the conventional approach continues to rely on gross imaging of thick heart sections, often producing variable and suboptimal image quality5, with insufficient color contrast that can introduce substantial subjectivity to infarct measurement6. Moreover, the conventional method requires the use of whole-heart tissue, which prevents multipurpose analyses on the same tissue samples, such as immune co-staining of regulatory proteins to identify key signaling cascades involved in cardiac survival. As a result, substantial numbers of animals are often required to adequately address various research questions.
To overcome these limitations5, we developed a protocol suitable for microscopic imaging of the TTC staining. This method combines "perfusion + immersion" staining steps with cryosectioning of the heart tissue into thin slices optimized for imaging by a light microscope. Although this method was recently reported7, we believe that providing detailed experimental procedures enhances its practicality and accessibility. Moreover, because the microscopic TTC method generates high-resolution images comprising multiple heart-section layers, we developed a robust, color-based semi-automatic algorithm to address the time-intensive nature of analyzing large image datasets. The present method enables rapid detection of infarct regions and quantification of global infarct size within minutes.
Overall, the protocol presented here serves as a valuable tool, enabling researchers to efficiently implement this method with ease and accuracy.
Protocol
All experiments were approved by the LANUV of Nordrhein-Westfalen, Germany, and conducted in accordance with the ARRIVE guidelines and the NIH Guide for the Care and Use of Laboratory Animals. All necessary equipment and chemicals are listed in the Table of Materials.
1. Setting up a Langendorff retro-perfusion system
NOTE: The system consists of a two-gang, three-way stopcock connected to an aortic cannula made from a 20-gauge blunted needle and two infusion ports, one for the washing solution (phosphate-buffered saline (PBS) port) and the other for the TTC infusion (TTC port). By alternating the direction of the three-way stopcock, the perfusate can be delivered to the heart interchangeably.
- Secure the apparatus horizontally on a 150-mm Petri dish using a piece of adhesive tape to prevent unwanted movement during later steps.
- Adjust the tip of the cannula to be 1 mm above the bottom, aligning it with the level of the aortic root when the heart is placed flat.
- Prefill the system with ice-cold PBS using a 10-mL syringe through the PBS port.
- Prepare fresh staining solution (1% TTC dissolved in PBS); a minimal volume of 6 mL is required for each heart.
CAUTION: TTC is generally considered hazardous and requires careful handling as it may cause mild skin irritation, serious eye irritation, and is harmful if inhaled. Dispose of waste and residues in accordance with local authority requirements. - Use a 3-mL syringe to prefill the TTC port with the staining solution.
- Ensure there are no unintentional air bubbles in the system, as they could cause potential air emboli that would interfere with subsequent staining. In most cases, air bubbles are visible in the system; when present, remove them by withdrawing and refilling PBS while gently tapping the three-way stopcock in the upright cannula position.
- Form a loose half-square knot using a 6-0 silk suture and place it on the distal end of the cannula for later fixation of the aortic root.
2. Heart sample preparation
NOTE: C57BL/6J mice (20-25 g) were used in this study. Experimental myocardial infarction (MI) was induced by surgically ligating the left anterior descending artery (LAD) for 30-60 min, as described below. The MI induction methodology has been previously reported8 and is not detailed in this manuscript. Unless otherwise stated, heart samples were collected 24 h post-MI.
- Take the MI mouse out of the cage and euthanize it by cervical dislocation under deep isoflurane anesthesia (3 %, v/v).
NOTE: All euthanasia procedures must be properly documented and reported, including the reason for euthanasia and the method used, in accordance with local regulations . - Transfer the euthanized animal to the operating table and secure all four extremities with adhesive tape.
- Remove pelt from the mid-abdomen to mid-forepaw region using micro-dissecting forceps and scissors.
- Make a 2-cm transverse incision into the abdominal muscle wall, just below the diaphragm, to allow subsequent thoracotomy.
- Spread the diaphragm with fine scissors to expose the heart, then make bilateral incisions through the skin, muscle, and ribs to open the thoracic cavity.
- Cut the diaphragm back bilaterally and fully expose the heart by lifting the sternum.
- Immediately pour 20 mL of ice-cold PBS onto the heart surface to arrest the heartbeat.
- Excise the heart along with the surrounding tissues (lungs and esophagus) and transfer the tissue mass into a 50-mL beaker containing ice-cold PBS for about 1 min to allow the heartbeat to subside.
- Transfer the heart onto a 150-mm Petri dish and trim the aortic root free of connective tissue under a binocular microscope using fine forceps and scissors.
- Gently remove the thymus and expose the ascending aorta.
- Trim the aortic root by dissecting the connective tissue.
- Pick up the aortic stump with fine tweezers and mount it over the cannula that is already connected to a perfusion apparatus prefilled with PBS and TTC staining solution. Use fine tweezers to stabilize the aortic root wall during insertion.
- Secure the aorta using the pre-formed loose knot on the cannula. Carefully inspect the cannula and the heart while it is being retro-perfused with PBS. Filling of the heart can be visually confirmed by the bulging of the ventricle as the volume of PBS entering the heart increases.
- Leave the extra-cardiac tissues (lungs and esophagus) in situ to support the heart in a natural and appropriate position.
3. TTC staining
- Cover the heart with moist tissue paper once the cannulation is secured.
- Begin rinsing the heart with a pre-connected 10-mL syringe filled with ice-cold PBS at a rate of 2-3 mL/min for 3 min, until the cardiac eluate drains clear. This ensures that only a minimal amount of blood remains in the heart and coronaries. During this step, avoid excessive pressure during perfusion as it can lead to rupture of the infarcted ventricle.
- Inspect the heart under a binocular microscope to ensure there is no leakage at the aortic root and that it inflates properly under perfusion pressure.
- Turn the three-way stopcock toward the TTC solution and slowly infuse 1 mL of staining solution through the TTC port over 30 s.
- Re-infuse 1 mL of TTC solution 5 min later and repeat this step once more after another 5 min (10 min after the first TTC infusion). A total of 3 mL of TTC solution is required for 3x infusion over 15 min.
- Inspect the heart surface under a binocular microscope. At this point, a clear distinction between the viable myocardium (deep red) and necrotic tissue (light gray) should already be visible.
- Remove all non-cardiac tissues using fine scissors and transfer the stained heart into a 15-mL conical tube containing 3 mL of TTC solution.
- Place the conical tube at 4 °C overnight for a second round of staining by immersion.
4. Tissue block preparation
- Take the heart out of the conical tube and carefully dry it with tissue paper. At this point, staining in the viable myocardium becomes more pronounced, and non-perfused myocardium (epicardial and potentially endocardial regions) also shows light red staining.
- Fill a blunted, curved 20-gauge cannula with optimal cutting temperature (OCT) compound using a 1-mL syringe.
- Excise the tricuspid valve with fine scissors and insert the cannula into the right ventricle.
- Fill the cavity with OCT compound (approximately 50-80 µL) and stop the infusion when backflow is observed.
- Expose the mitral valve and insert the cannula through the left atrium and the mitral valve into the left ventricle.
- Gently infuse the cavity with OCT compound (approximately 80 µL) and stop the infusion when outflow from the aorta is observed.
- Prepare a small cylindrical capsule (1 cm in diameter) made from aluminum foil and fill it with 300 µL of OCT compound.
- Carefully place the heart into the capsule in an apex-down position and adjust it to a vertical orientation. From the top-down view, the apex should not excessively protrude toward either side.
- Immerse the capsule in a 2-methylbutane solution pre-chilled to -30 °C to -40 °C.
- Allow the sample to remain in the solution for 5-10 min to solidify before forming a tissue block.
- Label the tissue block and store it at -80 °C for further histological analysis.
5. Cryosectioning and fixation
- Mount the tissue block onto a cryostat chuck using OCT compound.
- Place the chuck into the cryostat and set the temperature at approximately -24 °C.
- Slice the tissue block until the apex is visible.
- Set the section thickness to 50 µm and collect every second slice, resulting in 100-µm intervals between slices.
NOTE: Avoid tissue folding during cryosectioning. This is largely minimized by filling the empty ventricular cavities with OCT compound (see steps 4.4-4.6). - Align the slices sequentially on glass microscope slides, placing eight pieces per slide. In total, 80 sections, i.e., 10 slides, are expected per heart.
- Dry the slides with a hairdryer on the lowest setting using room-temperature airflow (no heating is needed) for approximately 10 min.
- Submerge the slides in a staining chamber filled with Zamboni's solution (a fixative containing 2% paraformaldehyde and 0.4 % picric acid, w/v).
CAUTION: Zamboni's fixative may cause an allergic skin reaction and is suspected of causing genetic defects and carcinogenesis. Dispose of waste and residues in accordance with local authority regulations. - Fix the heart tissue at 4 °C overnight. This long-term fixation ensures the heart tissue surface remains free of air bubbles formed during the fixation process.
- After fixation, take the slides out of the fixative and rinse them three times with PBS.
- Mount the slides with mounting medium and cover the sections with coverslips. After this step, the heart slides are ready for image acquisition.
- Store the samples in a slide box at room temperature.
NOTE: As formazan precipitates are water-insoluble, staining can be preserved for years without any loss of intensity.
6. Imaging and processing
- Set up a light microscope using a 1.25x objective and run CellSens software for imaging.
- Position the heart section in the center of the field of view.
- Adjust the camera's exposure time, focus, and white balance as needed.
- Capture images of each section and save all images from the same heart in a dedicated folder.
- Copy the R script (Supplementary File 1) onto the RStudio platform and run an R-based automated algorithm to assess MI. The algorithm computes planimetric infarct sizes for each slice and calculates the total infarct volume for the entire heart.
- Export the dataset to an Excel file and analyze the data as needed.
- Import all images of each heart into the ImageJ platform for subsequent 3D reconstruction.
- Stack all images in a coherent, sequential order using the pop-up menu of the ImageJ platform.
- Create a 3D construction using the surface plot function.
- Open the Volume Viewer window and adjust all parameters for 3D projection.
NOTE: The methodology for immunohistochemistry9 and videos for conventional TTC staining4,5 have been previously reported and are not included in this manuscript.
Results
The key steps involved in performing microscopic TTC staining are illustrated in Figure 1. After two rounds of TTC staining, a distinct punched pattern became visible on the surface of the heart. Serial slicing of the entire heart at 100-µm intervals yielded approximately 80 tissue sections, with the ligation site located around the 60th slice. In each section, the deep red staining of viable cardiomyocytes (viaCM) was clearly distinguishable from the yellow necrotic tissue (necCM), labeled by picric acid, yielding a sharply defined border (Figure 2A). The 3D reconstruction of all sections further visualized the spatial distribution and volume of viaCM and necCM within the heart (Figure 2B). A direct comparison of image quality to the conventional staining protocols shows that the microscopic protocol provides clearer and sharper boundaries and an improved viable-to-infarct signal ratio (Figure 2C). Filling the ventricular cavities with OCT during sample processing prevented cardiac contracture and maintained the heart in a physiological shape, without altering the quantification of infarct size or inducing structural damage, as evidenced by the intact endocardial layer (Figure 2D).
At microscopic resolution, the deep red formazan precipitates were primarily found within the cytoplasm of viable cardiomyocytes, as shown by the precise overlapping with cardiac troponin I (cTnI) staining (Figure 3). This result confirms that the current method reliably detects the viability of cardiomyocytes and precisely delineates the infarct area at the cellular level.
For the automated analysis of the large image dataset, we developed a color-based R program that outlines the infarct zone and the viable myocardium. Infarct size was computed at a single sectional level using planimetry and global volume-based measurement (Figure 4). The semi-automated algorithm rapidly calculates key image parameters of approximately 80 sections per heart, within 2 min. In our mouse MI model with 50 min of ischemia, the average infarct size (global) was 32.14% ± 8.3% (n = 5, mean ± SD), which roughly corresponds to the planimetric infarct size slightly above the mid-ventricular level. Notably, infarct size varied across different levels of the heart, reaching a maximum of 71.21% ± 6.8% (n = 5, mean ± SD) at the apical level and gradually decreasing to zero near the ligation site (Figure 4).
Conventional TTC staining is typically applied within the first 24 h following acute MI. Given its ability to reveal subtle differences in formazan intensity between myocytes and non-myocytes, we successfully extended the microscopic TTC assay beyond 24 h post-MI (Figure 5). In heart sections at 3 days post-MI ( = 3), yellow TTC staining was confined to the necrotic infarct core, while the peripheral region exhibited a pinkish-grey appearance consistent with immune cell infiltration and fibroblast activation7. Notably, in these regions, TTC signal intensity remained clearly distinguishable between myocytes and non-myocytes. Even at 7 days post-MI ( = 2), when fibrotic scar tissue had formed, a distinct contrast between myocytes and non-myocytes was still clearly detectable. To our knowledge, this is the first demonstration that TTC-based staining can be used to assess infarct size beyond the acute phase.
We also addressed the issue of the minimum ischemia duration required to induce a reproducible transmural MI in an experimental mouse model. Our results show that 30 min of cardiac ischemia (30-min MI, n = 3) resulted in a characteristic "wavefront" pattern of myocardial injury10, beginning in the endocardium and gradually progressing toward the epicardium (Figure 6). In contrast, when ischemia duration was extended beyond 40 min (n = 4, n = 5 for 50 min, and n = 2 for 60 min), a stable transmural infarct was consistently achieved. The microscopic imaging revealed that only a thin layer of endocardium and a portion of the epicardium remain positive. These results suggest that a minimum ischemia duration of 40 min is required to reliably induce a transmural infarct in a mouse model.
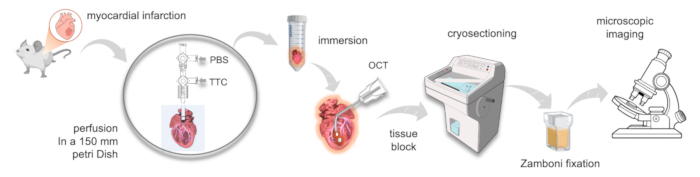
Figure 1: Workflow of the microscopic TTC staining protocol. The schematic diagram illustrates the detailed steps of perfusion and immersion staining, followed by cryosectioning and microscopic analysis. Please click here to view a larger version of this figure.
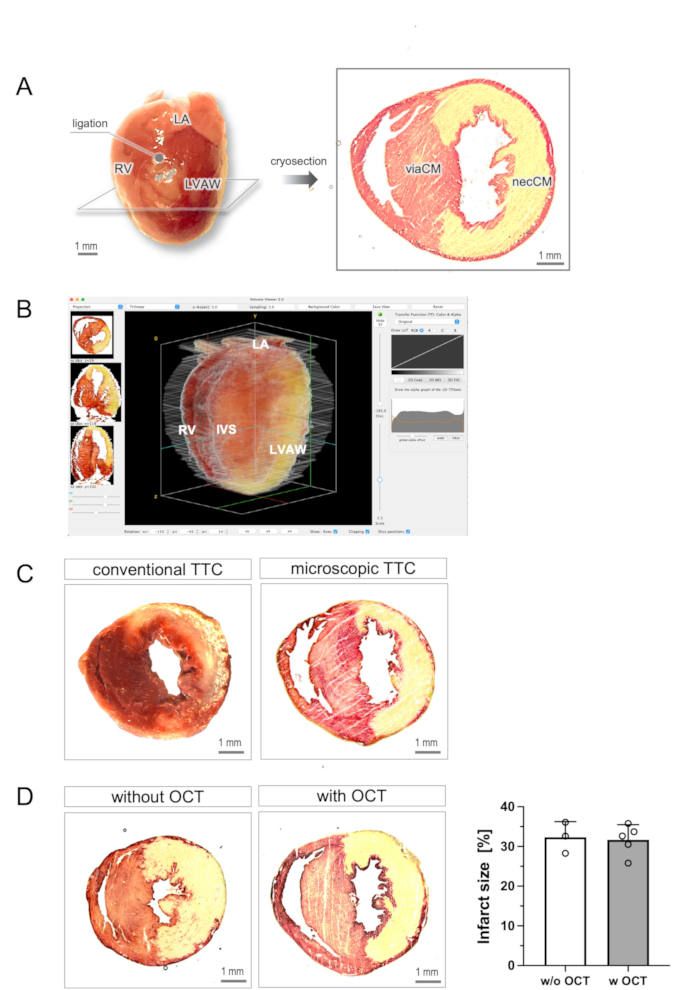
Figure 2: Microscopic TTC imaging of the infarcted heart. (A) Following two-step staining with 1% TTC solution (perfusion followed by immersion), the heart exhibited a distinct punched surface, with the viable myocardium appearing deep red and the necrotic regions light grey. Cryosectioning followed by fixation with Zamboni's fixative yielded high-quality images that demonstrated a sharply defined boundary between viable cardiomyocytes (viaCM, red) and necrotic cardiomyocytes (necCM, yellow). (B) Screenshot of the Volume Viewer interface in ImageJ software used for generating a 3D reconstruction of TTC-stained heart sections. The interactive surface plot function enables spatial visualization of infarcted and viable myocardial regions based on color intensity gradients. (C) A direct comparison of image quality between the two staining protocols shows that the microscopic protocol provides clearer and sharper boundaries, as well as an improved viable-to-infarct signal ratio compared to the conventional method. (D) Representative images of heart sections with and without filling OCT into ventricular cavities. The values of infarct size derived by both methods are identical (n = 3 and 5). Abbreviations: LA, left atrium; RV, right ventricle; LVAW, left ventricular anterior wall; IVS, interventricular septum. Please click here to view a larger version of this figure.
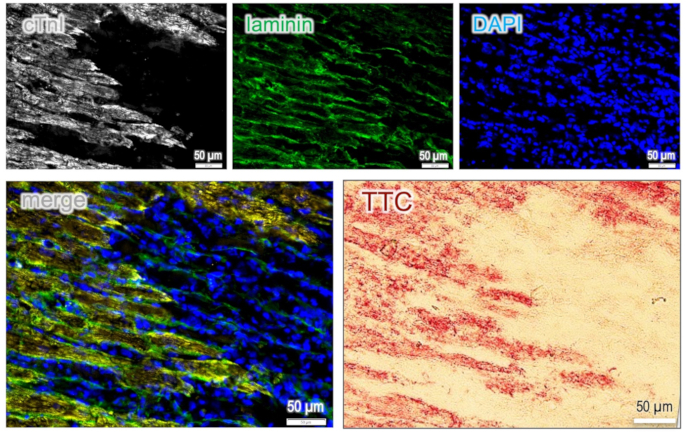
Figure 3: TTC positivity in cardiomyocytes. Photomicrographs of the TTC-stained heart section co-stained with cardiac troponin I (cTnI) and laminin revealed that TTC precipitates were localized intracellularly and precisely overlapped with cTnI-positive viable cardiomyocytes, confirming the specificity of TTC staining for viable myocardium. Please click here to view a larger version of this figure.
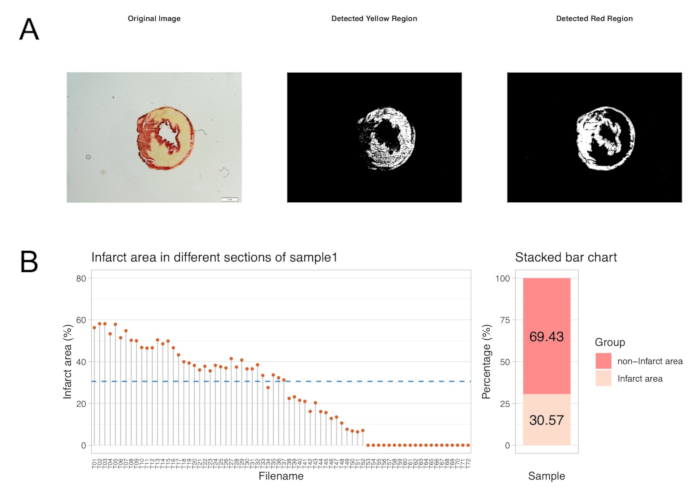
Figure 4: Asemi-automated algorithm for infarct size calculation. (A) A color-based R program automatically contours and quantifies the areas of the infarct zone and the viable myocardium. (B) The planimetric infarct size was determined on a per-section basis, revealing substantial variation across slices from the apex to the base of the heart. Global infarct size was calculated by dividing the total infarct (yellow) by the left ventricular volume (yellow + red), as indicated by the blue dotted line. Please click here to view a larger version of this figure.
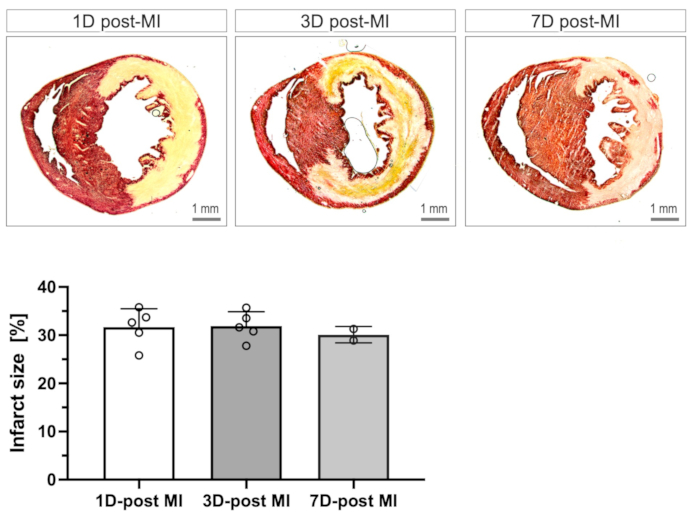
Figure 5: Microscopic TTC staining across multiple time points. Microscopic TTC staining was performed on the hearts harvested at three time points following myocardial infarction (post-MI). High-quality images showing clear delineation between viable cardiomyocytes (deep red) and necrotic tissue (yellow) were obtained from hearts in the acute phase (1 day post-MI) as well as in the subacute phase (3-7 days post-MI), demonstrating the applicability of this protocol across an extended post-infarction time window. The global infarct size values obtained from the R script-based algorithm were within a similar range across all time points. Please click here to view a larger version of this figure.
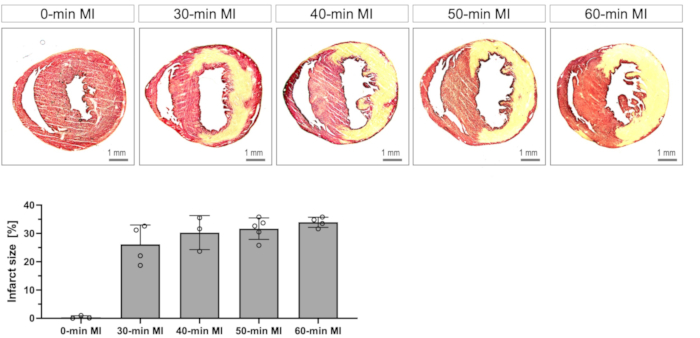
Figure 6: Minimal ischemia duration required to induce transmural myocardial infarction (MI). When ischemia durations ranging from 0 to 60 minutes were compared, microscopic TTC images revealed a characteristic "wavefront" pattern of myocardial injury in hearts subjected to less than 30 min of ischemia. This pattern originated in the endocardium and progressed toward the epicardium, ultimately forming a transmural MI (as seen in the 30-min MI group). These findings suggest that a minimum of 40 min of cardiac ischemia is preferable to consistently induce a reproducible transmural MI. Please click here to view a larger version of this figure.
Supplementary File 1: R script for semi-automated algorithm for infarct detection. Image files in the dedicated folder were sequentially imported into the R platform, and pixels corresponding to infarcted areas and viable myocardium were detected colorimetrically. Segmental infarct size was computed at the single-section level, and global infarct size was calculated for the entire heart. Please click here to download this file.
Discussion
Myocardial infarction (MI), resulting from prolonged myocardial ischemia, remains a major global health concern, as ischemic injury often impairs the heart's contractile function required for effective blood circulation. Over the past several decades, significant efforts have been devoted to identifying interventions or compounds that enhance cardiac resistance to ischemic stress1. Although alternative surrogate endpoints, such as enzyme release11, post-ischemic functional recovery, or cellular viability indices in cultured cells12 have been explored13, only direct quantification of tissue necrosis can definitively confirm the efficacy of an anti-infarct intervention6. Therefore, a reliable and early method for detecting cardiomyocyte viability and MI in the intact heart is essential for advancing research in this field14.
In this context, tetrazolium staining has emerged as the most widely used method for detecting MI. This technique relies on an enzymatic reaction involving dehydrogenase enzymes and cofactors present in viable tissue, which reduce the colorless tetrazolium salt (TTC) to a deep-red formazan pigment15. In infarcted hearts, viable myocardium stains deep red due to the abundance of cardiac lactate dehydrogenase, whereas infarcted regions appear pale because these enzymes are denatured or degraded in dying cells. This colorimetric switch, based on the enzymatic reduction of TTC, enables the clear distinction between metabolically active and inactive tissues, thereby facilitating the post-mortem identification of MI16.
Conventional TTC staining, typically performed on thick sections of cardiac tissue5, is often hindered by suboptimal image quality, poor color contrast, and indistinct boundaries17. These limitations can lead to ambiguous infarct delineation during analysis and may potentially compromise the accuracy of infarct size measurement (Figure 2C)3. In the present protocol, taking advantage of the membrane-permeable nature of TTC, we introduce a refined protocol involving TTC perfusion via the aortic cannula to ensure uniform distribution of tetrazolium salts throughout the entire heart, followed by a sequential immersion staining step. The stained heart is then processed by cryosectioning to produce a thin slice (50 µm) suitable for microscopic imaging. This methodological modification significantly improves image quality at the cellular resolution and facilitates accurate and reliable assessment of MI7.
In practice, several technical precautions should be carefully observed. First, TTC should be freshly prepared shortly before use to ensure optimal staining efficacy. Additionally, when dissolved in normal saline, TTC solution may be strongly acidic (pH = 3.0 at a concentration of 1%), potentially causing severe cardiac contractions and obstructing perfusion. To avoid this, PBS must be used to prepare the TTC solution at a physiological pH of 7.4. Second, a subsequent immersion step is necessary to enhance color development and achieve adequate staining of the non-perfused myocardial regions, primarily the endocardial and parts of the epicardial layers. Finally, long-term fixation is necessary, as numerous tiny air bubbles form within the tissue during the initial hours and often persist even after washing steps.
With these technical considerations in mind, the present TTC staining method presents a simple and easy-to-perform technique that consistently yields high-quality images with sharp and clear contrast (Figure 1). Due to the high resolution of microscopic imaging, it adequately discriminates subtle differences in staining intensity between viable myocytes and living non-myocytes, as observed in subacute hearts where fibrotic scarring has developed (Figure 5). To the best of our knowledge, it is the first demonstration of the application of the TTC staining protocol at extended time points beyond 24 h post-MI. Moreover, using this microscopic TTC staining protocol, we systematically investigated the minimum duration of ischemia required to induce a reproducible transmural MI in an experimental mouse model16. Our results convincingly demonstrate that at least 40 min of cardiac ischemia are necessary to produce a stable and consistent MI in mice (Figure 6).
One major drawback of microscopic TTC imaging is its time-intensive nature. Unlike conventional TTC staining, which takes only 1-2 hours18, this method necessitates approximately three days for a single round of preparation and generates a large dataset suitable for detailed analysis. To address this limitation, we developed a robust, color-based semi-automated algorithm that rapidly detects infarct regions and quantifies global infarct size within minutes (Supplementary File 1). Built on the R programming language, this platform is user-friendly and cost-effective, enabling quick and efficient analysis of heart samples.
Although this method has been previously reported7, a detailed description of the staining steps is of great interest to researchers aiming to incorporate the microscopic TTC staining technique into routine practice. The streamlined protocol presented here enables users to complete all necessary steps for acquiring high-quality images with ease. As a result, this reliable and standardized method helps minimize experimental errors in infarct size detection and reduces the number of animals required, particularly valuable for cross-laboratory comparisons of putative cardioprotective interventions. Notably, TTC labeling in tissue sections persists after multiple washing steps, allowing for successful combination with immunostaining (e.g., cTnI staining in Figure 2) and making the tissue samples suitable for multipurpose studies. Thus, the current approach offers several practical advantages in infarct size detection and should be of considerable value to researchers investigating myocardial ischemia/reperfusion injury.
Disclosures
The authors declare that they have no competing financial interests.
Acknowledgements
This study was funded by FoKo 23/2013 and by the Cardiovascular Research Institute Düsseldorf (CARID).
Materials
| Name | Company | Catalog Number | Comments |
|---|---|---|---|
| 1.25x objective | Olympus | PlanApo 1.25X/0.04 | Imaging |
| 10 mL Syringers | B.Braum | 4617100V | Retro-perfusion |
| 2,3,5-triphenyltetrazolium chloride | Milipore | 1.08380.0100 | Chemicals |
| 20 G cannula | BD | 305895 | Retro-perfusion |
| 3 mL Syringers | B.Braum | 4617022V | Retro-perfusion |
| 3-way stopcock | B.Braum | 16494C | Retro-perfusion |
| Aquamount | BDH | 362262H | Cyrosection |
| Balance | Ohaus | N/A | Weighing chemicals |
| Binocular miccroscope | Leica | MZ6 | Canulation |
| C57BL/6J | Janvier | N/A | Animals |
| Camera | Olympus | UC30 | Imaging |
| Cover slips | Epredia | BB02400500A113MN20 | Cyrosection |
| Cryostat | Leica | M850 | Cyrosection |
| Double Distilled Water | MIlipore | N/A | Disolving chemicals |
| Fine dissecting scissors | AESCULAP | BC702R | Surgical Instruments |
| Fine micro-dissecting forceps | AESCULAP | FM001R | Surgical Instruments |
| Glass microscope slides | Engelbrecht | 11102 | Cyrosection |
| ImageJ | NIH | 1.54g | Imaging processing |
| Isoflurane | Piramal | 14150097146754 | Chemicals |
| Isopropanol | Roth | 0733.1 | Chemicals |
| Light microscope | Olympus | BX61 | Imaging |
| Micro-dissecting forceps | F.S.T | 11152-10 | Surgical Instruments |
| OCT compound | Sakura | 4583 | Chemicals |
| Petri dish | Therno Scientific | 172931 | Retro-perfusion |
| Phosphate Buffered Saline | Roth | 9143.1 | Chemicals |
| Rstudio | Posit Software | 2024.09.0 | Imaging processing |
| Silk suture | F.S.T | 18020-60 | Retro-perfusion |
| Software | Olympus | CellSens V3.2 | Imaging |
| Stainless dissecting scissors | AESCULAP | BC257R | Surgical Instruments |
| Zamboni solution | Morphisto | 12773.0050 | Chemicals |
References
- Bolli, R., Becker, L., Gross, G., Mentzer, R., Balshaw, D., et al. Myocardial protection at a crossroads: the need for translation into clinical therapy. Circ Res. 95 (2), 125-134 (2004).
- Murphy, E., Steenbergen, C. Mechanisms underlying acute protection from cardiac ischemia-reperfusion injury. Physiol Rev. 88 (2), 581-609 (2008).
- Bohl, S., Medway, D. J., Schulz-Menger, J., Schneider, J. E., Neubauer, S., et al. Refined approach for quantification of in vivo ischemia-reperfusion injury in the mouse heart. Am J Physiol Heart Circ Physiol. 297 (6), H2054-H2058 (2009).
- Liepinsh, E., Kuka, J., Zvejniece, L., Vilskersts, R., Dambrova, M. Rodent heart and brain tissue preparation for digital macro photography after ischemia-reperfusion. J Vis Exp. (180), e62942(2022).
- Kim, S. -C., Boehm, O., Meyer, R., Hoeft, A., Knüfermann, P., et al. A murine closed-chest model of myocardial ischemia and reperfusion. J Vis Exp. (65), e3896(2012).
- Lindsey, M. L., et al. Guidelines for experimental models of myocardial ischemia and infarction. Am J Physiol Heart Circ Physiol. 314 (4), H812-H838 (2018).
- Ding, Z., et al. A refined TTC assay precisely detects cardiac injury and cellular viability in the infarcted mouse heart. Sci Rep. 14 (1), 25214(2024).
- Zhu, H., et al. IL-6 coaxes cellular dedifferentiation as a pro-regenerative intermediate that contributes to pericardial ADSC-induced cardiac repair. Stem Cell Res Ther. 13 (1), 44(2022).
- Zhu, H., et al. Sfrp1 as a pivotal paracrine factor in the trained pericardial stem cells that foster reparative activity. Stem Cells Transl Med. 13 (2), 137-150 (2023).
- Yellon, D. M., Hausenloy, D. J. Myocardial reperfusion injury. N Engl J Med. 357, 1121-1135 (2007).
- Li, C., Chen, M., Zhang, D., Xu, T., Wang, Z. Cardiac injury induced by obstructive jaundice: a comprehensive review. Perioper Precis Med. 28 (1), 28-38 (2025).
- Chang, X., et al. ß-tubulin contributes to Tongyang Huoxue decoction-induced protection against hypoxia/reoxygenation-induced injury of sinoatrial node cells through SIRT1-mediated regulation of mitochondrial quality surveillance. Phytomedicine. 108, 154502(2023).
- Li, Z., Hu, B., Zou, X. Research advances in understanding the role and mechanism of pyroptosis in myocardial ischemia-reperfusion injury. Perioper Precis Med. 2 (2), 52-63 (2024).
- Ouyang, W., et al. An immunostaining-based approach for assessing myocardial viability in the infarcted mouse hearts. Front Cardiovasc Med. 12, 1598314(2025).
- Benedek, A., et al. Use of TTC staining for the evaluation of tissue injury in the early phases of reperfusion after focal cerebral ischemia in rats. Brain Res. 1116 (1), 159-165 (2006).
- Lindsey, M. L., et al. Guidelines for in vivo mouse models of myocardial infarction. Am J Physiol Heart Circ Physiol. 321 (6), H1056-H1073 (2021).
- Lujan, H. L., Janbaih, H., Feng, H. -Z., Jin, J. -P., DiCarlo, S. E. Myocardial ischemia, reperfusion, and infarction in chronically instrumented, intact, conscious, and unrestrained mice. Am J Physiol Regul Integr Comp Physiol. 302 (12), R1384-R1400 (2012).
- Redfors, B., Shao, Y., Omerovic, E. Myocardial infarct size and area at risk assessment in mice. Exp Clin Cardiol. 17 (4), 268-272 (2012).
Reprints and Permissions
