We present a reproducible mouse model of heterotopic hindlimb-to-neck vascularized composite allotransplantation. This supermicrosurgical protocol, involving 0.3-0.5 mm vessel anastomoses, integrates nylon filament guidance and venous cuffing. It provides a reliable platform for translational studies on tolerance, ischemia-reperfusion injury, and immunological mechanisms in vascularized composite allotransplantation.
A subscription to JoVE is required to view this content. Sign in or start your free trial.
Method Article
Heterotopic Hindlimb-to-Neck Transplantation in the Mouse: A Supermicrosurgical Model of Vascularized Composite Allotransplantation
In This Article
Summary
Abstract
Vascularized composite allotransplantation (VCA) is increasingly recognized as a reconstructive option that offers substantial benefits for patients with severe tissue loss, including injuries affecting the face and hand. Despite its clinical promise, VCA remains limited by surgical complexity, the need for long-term immunosuppression, and associated morbidity. Preclinical models are therefore essential for refining surgical techniques, testing novel immunomodulatory approaches, and investigating ischemia/reperfusion injury.
Compared with large-animal models, rodent models offer advantages in accessibility and cost while adhering more closely to the 3Rs principles of Replacement, Reduction, and Refinement. Among them, the mouse offers unique advantages, including the availability of humanized strains, a broad panel of well-characterized antibodies, and compatibility with advanced immunological assays. These features make the mouse particularly valuable for translational VCA research.
Murine VCA, however, requires demanding supermicrosurgical skills, as vascular anastomoses are performed on vessels measuring approximately 0.3-0.5 mm in diameter. To enhance reproducibility, we provide technical tips that have proven critical to the success of these procedures. These include the insertion of a nylon filament into the vessel lumen to stabilize the anastomosis, careful separation of the artery and vein over a sufficient distance along the pedicle, precise anesthetic dosing, and specific maneuvers to prevent pedicle twisting. We also highlight common pitfalls and errors, offering practical guidance to improve outcomes.
Here, we describe a comprehensive, stepwise protocol for mouse heterotopic hindlimb-to-neck transplantation, accompanied by instructional video material. This non-functional model minimizes postoperative morbidity compared with orthotopic transplantation while providing robust and reproducible results. It is ideally suited for training in supermicrosurgery and for addressing key experimental questions in VCA, including immune tolerance, graft preservation, and ischemia/reperfusion mechanisms. This methodology provides investigators with a reliable murine platform to advance translational VCA research and to develop innovative strategies aimed at improving outcomes in reconstructive transplantation.
Introduction
Over the past two decades, vascularized composite allotransplantation (VCA) has emerged as a groundbreaking reconstructive approach for patients with severe tissue loss, including injuries to the hand, face, and other complex composite tissues1. Beyond its clinical promise, VCA remains technically demanding and limited by lifelong immunosuppression, necessitating ongoing translational research2.
Adequate training is crucial to mastering the surgical aspects of VCA3. Rehearsals on cadavers have proven useful for teaching the dissection of complex anatomical units4,5,6,7,8, but experimental models are indispensable for addressing fundamental biological questions9. In this regard, rodents offer significant advantages over large-animal models: they are less costly, more accessible, and in line with the 3Rs principles (Replacement, Reduction, Refinement)10.
The mouse offers several advantages for transplantation research, including the availability of genetically modified and humanized strains, the broad spectrum of well-characterized antibodies and immunological assays, and the possibility of combining VCA with other preclinical platforms in regenerative medicine11,12. These specific advantages make the mouse an ideal species for exploring immune tolerance, ischemia / reperfusion injury, and innovative therapeutic strategies in VCA.
Using the neck as the recipient site offers several advantages that enhance the reproducibility and reliability of this model. The cervical vessels are long, of sufficient caliber, and possess thicker vascular walls, facilitating secure vascular anastomosis. In addition, the high-flow common carotid artery promotes anastomotic patency, while cardiac diastolic suction reduces the risk of venous congestion and thrombosis. Importantly, the anatomical location of the graft prevents self-mutilation, a common complication in hindlimb transplantation models. Furthermore, compared with orthotopic hindlimb transplantation, this heterotopic approach causes less tissue disruption and is associated with lower postoperative morbidity and mortality, particularly in fragile experimental settings13.
However, this nonfunctional model is not intended to assess sensorimotor recovery or functional integration; instead, it prioritizes the investigation of immunological mechanisms, including rejection, tolerance, and ischemia-reperfusion injury.
Technically, murine VCA requires performing vascular anastomoses on vessels with diameters of approximately 0.3-0.5 mm14. This level of precision falls within the field of supermicrosurgery, which demands considerable training and expertise15. While rat VCA models have been extensively described16,17, reports of step-by-step murine protocols remain scarce.
In this article, we present a detailed video-guided protocol of heterotopic hindlimb-to-neck transplantation in the mouse. This non-functional model reduces postoperative morbidity while providing a robust and reproducible platform for VCA research.
Access restricted. Please log in or start a trial to view this content.
Protocol
All animals received humane care in accordance with the Guide for the Care and Use of Laboratory Animals18. All animal procedures were reviewed and approved by the Institutional Animal Care and Use Committee (protocol number: 202300058) as well as the Animal Care and Use Review Office.
Female BALB/c mice were used as donors, whereas female C57BL/6J mice functioned as recipients of VCA allografts. At the time of transplantation, mice were 8-30 weeks old, weighed approximately 20-30 g, and were maintained under standard housing conditions. All data presented in this study were generated by a single surgeon.
1. General surgical considerations
NOTE: Use sterile, autoclaved instruments and consumables (autoclaved), and maintain an aseptic operating field. Refer to the Table of Materials for required instruments.
- Anesthetize the mice using an isoflurane inhalation chamber and maintain anesthesia through a breathing cone. For details, see sections 2 and 3, respectively.
NOTE: Although donor and recipient mice were comparable in body weight, different isoflurane concentrations were used because of differences in surgical invasiveness and nociceptive burden between the procedures. Donor surgery involves a more extensive and invasive operative process, including wide tissue dissection and graft procurement, which generate stronger surgical and nociceptive stimuli and therefore require higher isoflurane concentrations for both induction and maintenance to maintain a stable depth of anesthesia. In contrast, recipient surgery is relatively less invasive, primarily consisting of cervical vessel exposure and vascular anastomosis; accordingly, lower isoflurane concentrations were sufficient to achieve adequate surgical anesthesia while minimizing the risk of excessive cardiovascular or respiratory depression. - Treat the surgical field with depilatory cream before skin preparation.
- Throughout the procedure, carefully monitor heart rate and respiratory rate (heart rate approximately 350-450 beats/min and respiratory rate approximately 60-100 breaths/min).
- Perform all surgical steps under a microscope with magnification adapted to the requirements of supermicrosurgery.
NOTE: All surgical procedures were performed under an operating microscope equipped with a 0.5× objective lens and 10× eyepieces, providing a total magnification range of approximately 4× to 31.5×. Lower magnification (approximately 4×) was used for skin incision and gross dissection, whereas higher magnification (up to approximately 31.5×) was used for vascular dissection, cuff placement, and microvascular anastomosis. - Select bipolar cautery (6 W), monopolar cautery (Bovie; highest power setting), or suture ligation for hemostasis according to the operative stage and anatomical context, as described in the following sections.
2. Donor left partial hindlimb procurement
NOTE: This is a non-survival procedure.
- Ensure that the heating pad (100 °F) is operating properly.
- Induce anesthesia using 3.5% isoflurane delivered in an induction chamber with an oxygen flow rate of 1 L/min, then maintain anesthesia at 3% via a breathing cone with oxygen flow set at 0.8-1 L/min.
NOTE: Pre-operative analgesia was not administered in this protocol because all procedures were performed under a deep, stable plane of anesthesia in a non-survival setting. - Remove the hair from the abdomen to the ankle of the donor mouse using a depilatory cream.
- Mark a quadrangular skin incision from just proximal to the nipples to just proximal to the knee joint (Figure 1).
NOTE: Prefer the left hindlimb when possible, as it is easier to dissect. - Elevate the cutaneous flap, beginning from its perforator (superficial inferior epigastric artery and vein), and skeletonize as needed.
- Transect the inguinal ligament cranially and proceed with dissection caudally. At this stage, ensure that branches that are exposed are coagulated with bipolar cautery.
- Coagulate and dissect the surrounding adipose tissue using a larger monopolar cautery to achieve full exposure of the external iliac vessels extending to the level of the common iliac vessels. Dissect the surrounding tissues of the external and common iliac arteries using smaller monopolar cautery.
- Flex the knee joint to identify its location, and open it using bipolar cautery.
- Extend the knee joint again and transect the biceps femoris, quadriceps femoris, and other associated muscles with bipolar cautery while coagulating.
NOTE: At this step, the amount of muscle included in the graft should be minimized within the range that does not compromise the femoral artery. This precaution is taken to prevent deviation of the recipient mouse's trachea or impairment of forelimb movement due to swelling of the grafted muscle mass in the cervical region. - Use bipolar cautery to release the femoral head.
- Carefully coagulate any remaining branches arising from the external and common iliac vessels, as well as the surrounding muscular tissue, and dissect with bipolar cautery while maintaining hemostasis.
NOTE: At this point, the graft remains connected to the donor mouse solely at the junction where the common iliac vessels branch from the abdominal aorta and inferior vena cava. - Perforate the membrane between the artery and vein at a point distant from the graft, then hook an ophthalmic retractor onto the artery.
NOTE: Always place the artery in the retractor, never the vein, as the vein is too fragile. - Carefully separate the vein and artery as distally as possible using curved Potts scissors.
NOTE: This step requires particular care and precision. Although time-consuming, meticulous separation prevents complications later. - Ligate collateral branches with 10-0 Prolene.
NOTE: Avoid cautery at this stage. Dissect both sides of the branch before ligation to prevent injury. - Ligate the artery with 8-0 Prolene. Place a stay suture on the artery as a marker to prevent twisting during vascular anastomosis.
NOTE: Loosen the stay suture to avoid damaging the pedicle. - Ligate the vein with 8-0 Prolene. Place stay sutures at two sites on the vein to facilitate its passage through the cuff. As the vein is very thin and the vessel wall can occasionally be difficult to distinguish, insert a 4-0 nylon into the lumen to facilitate placement of the stay sutures.
- Pass the vein through the cuff using stay sutures and clamp the cuff with a vascular clip.
- Evert the vessel wall and secure it to the cuff with 9-0 nylon.
- Restore the cuff to its original shape by releasing the deformation with the vascular clip after fixation (Figure 2).
- Flush the graft with 2 mL of heparinized saline prepared at a final concentration of 50 IU/mL through the artery (Figure 3).
- After graft procurement, euthanize the donor animal under deep anesthesia prior to recovery using cervical dislocation.
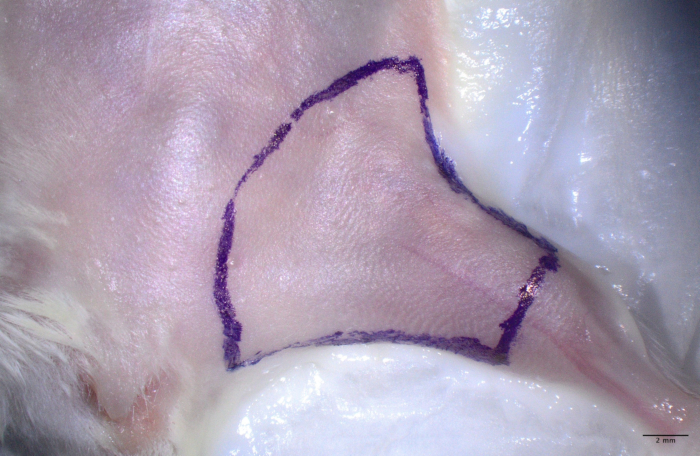
Figure 1: Donor mouse with preoperative skin markings outlining the planned incisions on the left hindlimb. Cranial direction is indicated at the top of the image. The incision is oriented from just proximal to the nipples to just proximal to the knee joint (Step 2.4). This marking ensures adequate exposure of the superficial inferior epigastric perforator. Printed with permission; copyrights retained by Eduardo D. Rodriguez, MD, DDS. Please click here to view a larger version of this figure.
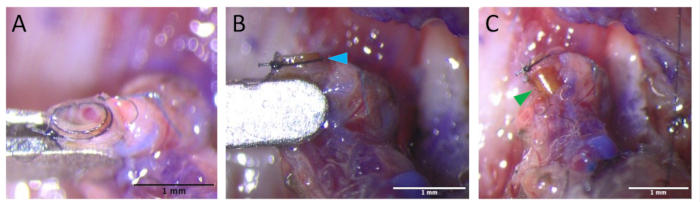
Figure 2: Placement of the venous cuff on the graft vein. The external iliac vein is everted over a polyethylene cuff and secured with 9-0 nylon (Step 2.18). This step ensures lumen patency and provides a rapid, reliable interface for subsequent end-to-cuff anastomosis with the recipient jugular vein.(A) Use a vascular clip to elevate the vein, allowing clear visualization of both the venous lumen and the inner lumen of the cuff. (B) After securing the vein to the cuff with interrupted 9-0 nylon sutures, confirm circumferential fixation of the venous wall to the cuff (blue arrowhead). (C) After fixation, restore the cuff to its original shape by releasing the deformation with the vascular clip (green arrowhead). Printed with permission; copyrights retained by Eduardo D. Rodriguez, MD, DDS. Please click here to view a larger version of this figure.
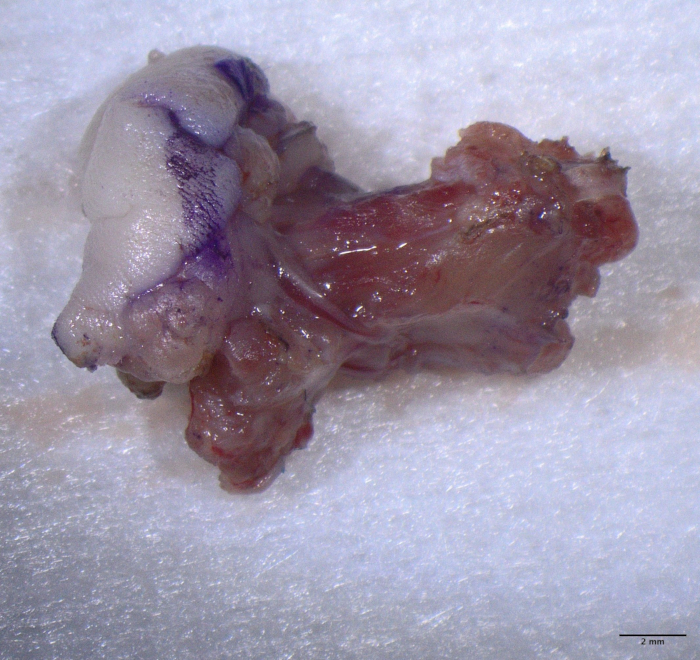
Figure 3: Harvested graft showing the partial hindlimb allograft and vascular pedicle. The left side of the image corresponds to the proximal side of the graft, and the right side corresponds to the distal side. The external and common iliac vessels are preserved in continuity with the muscle cuff and femoral bone. The artery and vein remain separated over several millimeters to prevent twisting and allow optimal orientation during inset. Printed with permission; copyrights retained by Eduardo D. Rodriguez, MD, DDS. Please click here to view a larger version of this figure.
3. Recipient surgery
- Ensure that the heating pad (100 °F) is operating properly.
- Induce anesthesia with 2.5% isoflurane and maintain with 2%.
NOTE: Pre-operative analgesia was not administered in this protocol, as a stable, sufficient depth of anesthesia was maintained throughout the procedure. Analgesia is administered intraoperatively and continued postoperatively to ensure effective perioperative pain control while minimizing potential effects on hemodynamic stability during critical microsurgical steps. - Position the right upper limb downward rather than horizontally to facilitate exposure of the surgical field.
- Administer 0.5 mL of saline subcutaneously for hydration.
- Apply ophthalmic lubricant before surgery, as this is a survival procedure.
- Remove the hair of the cervical region using a depilatory cream, at least 1 cm around the intended incision site.
- Make a small circular skin incision (approximately 10 mm). Insert the scissors caudally through the incision and gently open them to dissect the subcutaneous tissue of the chest, thereby creating a pocket for graft placement.
- Expose the external jugular vein by cauterizing and dividing its branches with a larger monopolar cautery.
- Cauterize the sternocleidomastoid muscle using bipolar cautery, and then divide it.
- Identify and carefully dissect the common carotid artery.
- Perform vascular anastomoses:
- Arterial anastomosis: Clamp the common carotid artery as proximally as possible with a vascular clip, then ligate and divide it with 8-0 Prolene at a site just proximal to the bifurcation of the external and internal carotid arteries.
- Arterial anastomosis: Perform an end-to-end anastomosis with 11-0 or 12-0 nylon using six interrupted sutures (four anterior stitches initially, flip the artery, then complete the posterior wall). Insert 5-0 nylon into both vessels and use it as a stent (Figure 4).
NOTE: During the final steps of the anastomosis, the last two sutures should be passed but left untied. The 5-0 nylon is then removed before tying these sutures to complete the closure. - Venous anastomosis: Clamp the external jugular vein as proximally as possible with a vascular clip, ligate it as distally as possible using 8-0 Prolene, and then divide it.
- Venous anastomosis: Insert the cuff into the external jugular vein and secure it with 9-0 nylon, taking care to avoid twisting of the pedicle.
NOTE: Complete the venous anastomosis before arterial declamping, as early reperfusion may predispose to thrombosis.
- Administer 0.5 mL of saline subcutaneously for hydration and place alginate around the arterial anastomosis to minimize bleeding from the site.
- Declamp the vein first, then the artery (Figure 5).
- Position the graft carefully in the subcutaneous chest pocket, avoiding displacement of the trachea or restriction of forelimb movement. Ensure the perforator is untwisted.
- Administer analgesia at this time (Meloxicam 5 mg/mL, 100 µL subcutaneous injection; Buprenorphine 0.3 mg/mL, 80 µL subcutaneous injection).
- Close the skin with 6-0 Ethilon sutures, placed tightly to prevent loosening during postoperative movements (Figure 6).
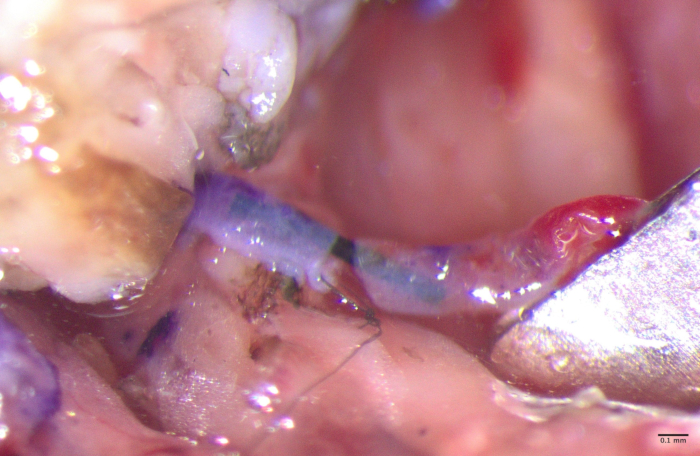
Figure 4: Arterial anastomosis. Cranial direction is indicated at the top of the image. Nylon monofilaments are inserted into the vessel lumen. The arterial stay suture placed during graft harvest serves as an orientation marker during anastomosis to avoid arterial torsion. The anastomosis is performed using 11-0 nylon and No. 5 forceps (Step 3.11.2). Printed with permission; copyrights retained by Eduardo D. Rodriguez, MD, DDS. Please click here to view a larger version of this figure.
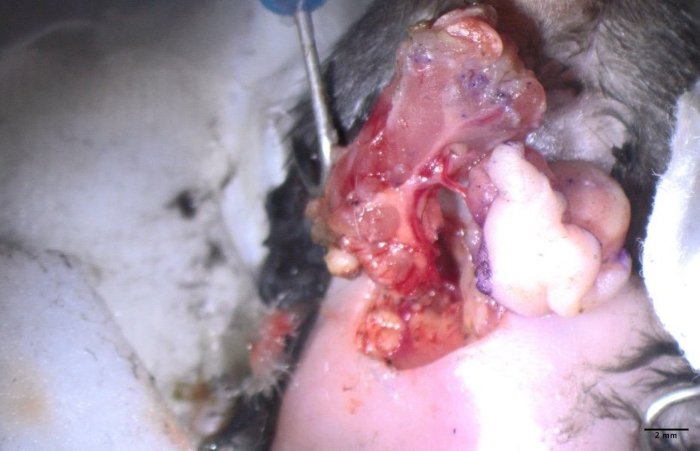
Figure 5: Reperfusion of the graft following arterial and venous declamping. Cranial direction is indicated at the top of the image. Once the arterial and venous anastomoses have been completed (artery: end-to-end; vein: cuff-based), confirm correct arterial and venous orientation without torsion, and the clamps are released-first on the vein, then on the artery-to re-establish blood flow. Immediate color change of the skin paddle confirms successful perfusion (Step 3.13). Printed with permission; copyrights retained by Eduardo D. Rodriguez, MD, DDS. Please click here to view a larger version of this figure.
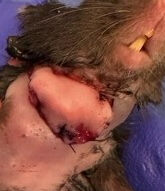
Figure 6: Final immediate postoperative appearance. The graft is positioned heterotopically in the cervical region without tension or tracheal deviation (Step 3.14). The skin incision is closed with interrupted 6-0 Ethilon sutures, after confirming adequate arterial pulsation and venous backflow immediately (Step 3.16). This configuration minimizes self-mutilation and facilitates daily graft inspection. Printed with permission; copyrights retained by Eduardo D. Rodriguez, MD, DDS. Please click here to view a larger version of this figure.
4. Postoperative care
- Monitor the mouse once daily.
NOTE: Adjust monitoring to the animal and graft condition in consultation with the veterinarian. House recipient mice singly to prevent graft injury. - Administer analgesia (Meloxicam 5 mg/mL, 100 µL subcutaneous injection; Buprenorphine 0.3 mg/mL, 80 µL subcutaneous injection). Additionally, if signs of dehydration are observed, administer normal saline subcutaneously for fluid supplementation.
- Assess the graft and conduct daily physical examinations, documenting findings with photographs captured using the same device (Figure 7).
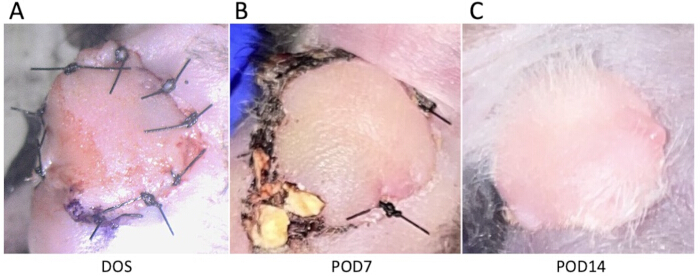
Figure 7: Clinical course of the graft skin paddle over time. Serial frontal photographs illustrate the postoperative evolution. (A) Day of surgery, showing good graft perfusion. (B) POD 7, showing resolution of erythema and stabilization of skin color. (C) POD14, the skin paddle remains viable, with visible hair regrowth by postoperative day 14. This study focuses on the surgical technique, and immunosuppressive regimens differed among cases. In the case shown in Figure 7, CTLA-4-Ig (500 µg) was administered intraperitoneally on DOS and POD 2, 4, 7, and 9, followed by intraperitoneal Lag3 BiTS on POD 11, 13, 16, 18, and 21 (50 µg on POD 11; 100 µg thereafter). Printed with permission; copyrights retained by Eduardo D. Rodriguez, MD, DDS. Abbreviations: DOS = day of surgery; POD = postoperative day; BiTS = Bi-functional Tissue-restricted Suppressors. Please click here to view a larger version of this figure.
Access restricted. Please log in or start a trial to view this content.
Results
The main results are summarized in Table 1.
| Value | Comments/Description | |
| Total animals completed the study | 13 | |
| Complications | ||
| Graft infection | 1 (7.7%)<... |
Access restricted. Please log in or start a trial to view this content.
Discussion
The use of nylon tips for vessel manipulation was first reported by Narushima et al. in 2008 in the context of supermicrosurgery21. In this setting, working with vessels of extremely small caliber (≤0.5 mm) presents specific technical challenges, such as the difficulty of introducing forceps into the vessel lumen and the potential risk of unintentionally incorporating the posterior wall during anastomosis. The introduction of nylon monofilaments into the vessel lumen was shown to effectively...
Access restricted. Please log in or start a trial to view this content.
Disclosures
The authors have no conflicts of interest to declare.
Acknowledgements
The authors acknowledge the use of animals in this study and express their respect for their role in advancing scientific and medical knowledge, in accordance with ethical guidelines and the 3Rs principle (Replacement, Reduction, Refinement). The authors also acknowledge the animal laboratory at NYU Langone Health (New York, USA) for providing the animals and facilities used for this study.
Access restricted. Please log in or start a trial to view this content.
Materials
| Name | Company | Catalog Number | Comments |
|---|---|---|---|
| 0.9% NaCl Injection, USP (Pre-filled Syringe, 10 mL) | Becton, Dickinson and Company | E0103-01 | |
| 30 G x 1/2 in. BD PrecisionGlide Needle | Becton, Dickinson and Company | 305106 | |
| 3M Durapore Surgical Tape | 3M Healthcare | 1538-2 | Used to secure the limbs of a mouse |
| 4-0 ETHILON Black 18" (45 cm) FS-2 Needle, Nylon Monofilament Suture | Ethicon | 662G | Used as a stent by inserting it into the common iliac vein to facilitate the placement of stay sutures for passing the graft vein through the cuff |
| 5-0 ETHILON Black 18" (45 cm) PS-3 Needle, Nylon Monofilament Suture | Ethicon | 1668G | Used as a stent during arterial anastomosis |
| 6-0 ETHILON Black 18" (45 cm) P-1 Needle, Nylon Monofilament Suture | Ethicon | 697G | Used for skin closure |
| 8-0 PROLENE Blue 24" (60 cm) BV130-5 Needle, Polypropylene Monofilament Suture | Ethicon | EPM8739 | Used for ligation of the common carotid artery, external jugular vein, and common iliac vessels |
| 9-0 ETHILON Black 12" (30 cm) CS140-6 Needle, Nylon Monofilament Suture | Ethicon | 9013G | Used to secure the cuff to the vessel |
| 10-0 PROLENE Blue 12" (30 cm) CS160-6 Needle, Polypropylene Monofilament Suture | Ethicon | 7761G | Used for ligation of collateral branches between the artery and vein in the graft pedicle |
| Alginate Wound Dressing (4 in × 4 in) | Dimora | DM201417 | Used to achieve hemostasis for arterial anastomotic leakage after declamping |
| Cautery High Temp Adjust-A-Temp Fine Tip | World Precision Instrument | AA11 | |
| Cautery Low Adjust-A-Temp Fine Tip | World Precision Instrument | AA02 | |
| Classic forceps 18cm long, round handle 8mm dia.; curved jaw, 0.3mm tip dia., with tying platform | Accurate Surgical & Scientific Instruments Corporation | ASSI231 | |
| Dealmed Non-Woven Sponges, 2"x2", 4-ply, Non-Sterile, 200 Count | Dealmed | 783222 | |
| Dumont #5/45 Forceps | Fine Science Tools | 11251-35 | |
| General Purpose Drape dynarex® Poly Lined Towel Drape 18 W X 26 L Inch Sterile | Dynarex Corporation | 4410 | |
| Grieshaber Flexible Iris Retractors | Alcon | 611.74 | Used on the artery during separation of the artery and vein of the pedicle |
| Halsey Needle Holder, Standard | World Precision Instrument | 14110 | |
| Heparin sodium salt from porcine intestinal mucosa | Sigma-Aldrich | H3393-100KU | |
| Isoflurane, USP Inhalation Anesthetic | Pivetal | 46066-115-04 | |
| Kimtech Science Kimwipes Delicate Task Wipers | Kimberly-Clark Professional | 34155 | |
| KL 1600 LED Fiber Optic Microscope Illuminator | Schott | 150.600 | |
| McPherson-Vannas Scissors, 7cm, Straight, 3mm Blades | World Precision Instruments | 14177 | |
| Micro Jewelers Forceps No. 3LX (15.5 cm) | KLS-Martin L.P. | 12-418-04-07 | |
| Microsurgical Needles with Suture Thread Attached | Fine Science Tools | 12052-11 | Used as sutures for arterial anastomosis and as stay sutures for the vascular stumps of the pedicle |
| Nair Body Cream Hair Remover | Nair (by Church & Dwight Co., Inc.) | UPC 022600255232 | |
| Polyimide Tubing | Professional Plastics | 302761 | Used as a cuff |
| Sterile 0.9% Normal Saline, USP (500 mL) | Medline Industries, Inc. | DYND500MLS | |
| Sterile Cotton Tipped Applicators | Puritan Medical Products | 25-806 10WC | |
| Student Dumont #5 Forceps | Fine Science Tools | 91150-20 | |
| Swiss Scissors, 9cm, curved, fine blade | World Precision Instruments | 504520 | |
| SZX10 Stereo Microscope | Evident (formerly Olympus) | SZX10 | |
| Ultra Vannas Scissors, 8cm, Angled On Edge, 4mm Blade | Accurate Surgical & Scientific Instruments Corporation | ASIM163 |
References
- Lupon, E., et al. Vascularized composite allografts in France: an update. Ann Chir Plast Esthet. 70 (2), 140-147 (2025).
- Rifkin, W. J., et al. A comparison of immunosuppression regimens in hand, face, and kidney transplantation. J Surg Res. 258, 17-22 (2021).
- Sosin, M., et al. Total face, eyelids, ears, scalp, and skeletal subunit transplant research procurement: a translational simulation model. Plast Reconstr Surg. 137 (5), 845e-854e (2016).
- Brydges, H. T., et al. Combined face and whole eye transplantation: cadaveric rehearsals and feasibility assessment. Plast Reconstr Surg Glob Open. 11 (11), e5409(2023).
- Perraudin, T., et al. Vascularized composite upper limb allograft harvesting for proximal arm allotransplantation. J Vis Exp. (220), e68170(2025).
- Perraudin, T., et al. Vascularized composite hand allograft procurement and preparation for distal and proximal forearm allotransplantation: a stepwise approach. J Vis Exp. (219), e67767(2025).
- Barbat, P., et al. Procurement for a vascularized and reinnervated abdominal wall allotransplantation. J Vis Exp. (221), e68418(2025).
- Lupon, E., et al. Surgical Approach to Full Soft Tissue Face Allograft Procurement for Vascularized Composite Allotransplantation. J Vis Exp. (226), e69607(2025).
- Barré-Sinoussi, F., Montagutelli, X. Animal models are essential to biological research: issues and perspectives. Future Sci OA. 1 (4), FSO63(2015).
- Lewis, D. I. Animal experimentation: implementation and application of the 3Rs. Emerg Top Life Sci. 3 (6), 675-679 (2019).
- Shultz, L. D., Ishikawa, F., Greiner, D. L. Humanized mice in translational biomedical research. Nat Rev Immunol. 7 (2), 118-130 (2007).
- Kenney, L. L., Shultz, L. D., Greiner, D. L., Brehm, M. A. Humanized mouse models for transplant immunology. Am J Transplant. 16 (2), 389-397 (2016).
- Lin, C. H., et al. The neck as a preferred recipient site for vascularized composite allotransplantation in the mouse. Plast Reconstr Surg. 133 (2), 133e-141e (2014).
- Bas, S., Sızmaz, M., Aydın, A. C., Karsıdag, S. A novel basic training laboratory model on live subjects for supermicrosurgery: mouse femoral artery, vein and nerve. World J Plast Surg. 11 (1), 44-50 (2022).
- Pafitanis, G., et al. Evolution of an evidence-based supermicrosurgery simulation training curriculum: a systematic review. J Plast Reconstr Aesthet Surg. 71 (7), 976-988 (2018).
- Tran, D. L., et al. Novel osteomyocutaneous flap model for vascularized composite allotransplantation. JPRAS Open. 41, 244-251 (2024).
- Goutard, M., et al. Partial heterotopic hindlimb transplantation model in rats. J Vis Exp. (172), e62586(2021).
- National Research Council (US) Committee for the Update of the Guide for the Care and Use of Laboratory Animals. Guide for the care and use of laboratory animals. 8th ed, National Research Council. (2011).
- Li, Z., Le Moine, A. Mouse models of experimental vascularized composite allotransplantation. Curr Transplant Rep. 1 (3), 183-189 (2014).
- Zhang, F., et al. Development of a mouse limb transplantation model. Microsurgery. 19 (5), 209-213 (1999).
- Narushima, M., Koshima, I., Mihara, M., Uchida, G., Gonda, K. Intravascular stenting (IVaS) for safe and precise supermicrosurgery. Ann Plast Surg. 60 (1), 41-44 (2008).
- Sucher, R., et al. Mouse hind limb transplantation: a new composite tissue allotransplantation model using nonsuture supermicrosurgery. Transplantation. 90 (12), 1374-1380 (2010).
- Berkane, Y., et al. Advances and perspectives in vascularized composite allotransplantation preservation. Bull Acad Natl Med. 208 (9), 1299-1308 (2024).
- Njessi, P., et al. Preservation strategies for vascularized composite allotransplantation: an updated systematic review of a rapidly expanding field. bioRxiv. , (2025).
- Lupon, E., et al. Engineering vascularized composite allografts using natural scaffolds: a systematic review. Tissue Eng Part B Rev. 28 (3), 677-693 (2022).
- Baker, C. E., et al. Pretreatments of ex vivo vascularized composite allografts: a scoping review. Ann Plast Surg. 95 (3), 318-326 (2025).
- Tu, W., Zheng, J. Application of humanized mice in immunological research. Methods Mol Biol. 1371, 157-176 (2016).
Access restricted. Please log in or start a trial to view this content.
Reprints and Permissions
