A CRISPR/Cas9 microinjection workflow for endogenous fluorescent tagging in the Caenorhabditis elegans germline to obtain homozygous knock-in lines for in vivo protein localization analysis.
A subscription to JoVE is required to view this content. Sign in or start your free trial.
Method Article
CRISPR/Cas9-mediated Endogenous Fluorescent Tagging of Germline-specific Genes in Caenorhabditis elegans
* These authors contributed equally
In This Article
Summary
Abstract
Protein localization in the Caenorhabditis elegans (C. elegans) germline is central to interpreting gene function during gametogenesis, yet conventional transgene approaches often yield variable expression and can be silenced in germ cells. Here, a practical CRISPR/Cas9 workflow inserting a fluorescent tag into an endogenous locus is described, enabling the generation of stable knock-in alleles that report protein distribution under native regulation. The protocol covers key stages of the procedure: selecting a tagging strategy appropriate for the target protein, delivering CRISPR reagents by gonadal microinjection into young adult hermaphrodites, and recovering injected animals for screening. Knock-in candidates are identified through PCR-based genotyping across two generations to isolate homozygous worms and verify the edited allele. Finally, confocal microscopy is used to verify germline fluorescence and assess subcellular localization in vivo. The workflow is designed to be reproducible and broadly applicable to germline-enriched genes, providing a straightforward route to establish homozygous tagged strains for developmental and cell-biological analyses.
Introduction
Caenorhabditis elegans (C. elegans) is a well-established model for studying reproductive development and gametogenesis, owing to its short life cycle, transparent body, and high genetic tractability1. C. elegans exists primarily as self-fertilizing hermaphrodites, whose gonad first undergoes spermatogenesis, and then switches to oogenesis. This reproductive mode simplifies strain maintenance and makes it straightforward to obtain homozygous lines2. Recent spatial transcriptomics has substantially expanded the list of genes enriched in the gonad and has revealed pronounced sex-specific expression patterns across the reproductive system in C. elegans3. More recently, single-cell RNA sequencing has enabled reconstruction of germ-cell developmental trajectories and inference of gene regulatory networks governing spermatogenesis4. Together, these datasets generate rich candidate lists, but functional interpretation often requires observing protein behavior in vivo—specifically, defining when and where the corresponding proteins localize and how their patterns change throughout germline development.
Conventional transgenesis in C. elegans often relies on gonadal microinjection of plasmid DNA, which readily generates multi-copy extrachromosomal arrays5. However, in the germline, these arrays are often robustly silenced, a mechanism that is thought to help maintain germline integrity by restricting expression from repetitive DNA, thereby preserving germline function and the stability of genetic information across generations6,7. As a result, transgene expression constructs that are readily expressed in somatic tissues can be weak or inconsistent in the germline. Even when expression is detectable, copy-number effects and engineered regulatory elements can shift protein dosage and timing, potentially confounding conclusions about native localization and dynamics. To address these limitations, microparticle bombardment and Mos1-mediated Single Copy Insertion (MosSCI) are widely used to generate low/single copy integrated transgenic lines8,9,10. These approaches can improve expression in the germline, yet they differ in cost, throughput, and how well they reproduce endogenous regulation. CRISPR/Cas9 genome editing offers a more direct route by inserting a fluorescent tag at the endogenous locus via homology-directed repair, generating stable knock-in alleles that report protein localization and dynamics under native regulatory control11,12,13,14.
Here, a practical workflow for CRISPR/Cas9-mediated endogenous fluorescent tagging in C. elegans is described, applied to genes selected based on reported germline-enriched expression patterns. The protocol outlines target selection, donor template and guide RNA design, gonadal microinjection, and downstream screening to isolate homozygous knock-in lines, followed by validation using genotyping. This approach is broadly applicable to germline-expressed genes across developmental stages and enables quantitative analyses of protein localization and dynamics in vivo. This workflow provides a practical strategy for tagging genes expressed in the germ line and for analyzing protein localization and dynamics in vivo under native regulatory control.
Access restricted. Please log in or start a trial to view this content.
Protocol
All experiments involving Caenorhabditis elegans were conducted in accordance with the institutional guidelines for the care and use of laboratory organisms at Beijing Normal University.
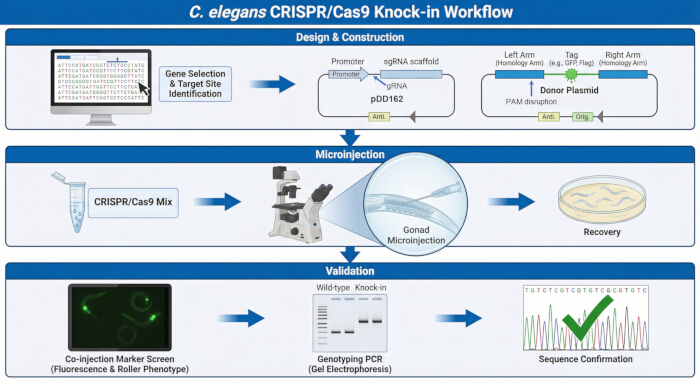
Figure 1: Overview of CRISPR/Cas9-mediated endogenous fluorescent tagging in C. elegans. Schematic workflow illustrating the major stages of endogenous fluorescent knock-in generation and validation. In the design and construction stage, a germline-enriched target gene and insertion site are selected, pDD162 is used as the CRISPR/Cas9 plasmid for Cas9 and guide RNA expression, and pPD95.75 is used as the donor backbone into which the fluorescent tag (e.g., GFP) and the left and right homology arms are subcloned. In the microinjection stage, the CRISPR/Cas9 injection mixture (including the gRNA/Cas9 plasmid, donor template, and co-injection markers) is delivered into the gonad of young adult hermaphrodites, followed by recovery on seeded plates. In the validation stage, marker-positive progeny are selected for downstream genotyping, including PCR-based identification of knock-in events and confirmation by DNA sequencing, and successful knock-in lines are subsequently examined by fluorescence microscopy to assess germline expression and subcellular localization of the tagged protein. Please click here to view a larger version of this figure.
1. Select a germline-enriched target gene
- Identify candidate genes with predominant expression in the gonad or germ cells using public databases and published literature.
- Select an appropriate tagging site based on protein features. Record the selected isoform and the tag insertion position for downstream guide RNA and donor template design (Figure 1).
2. Design the guide RNA and donor template
- Identify a 20 nt guide RNA (gRNA) sequence upstream of a protospacer adjacent motif (PAM; NGG), the sequence required for Cas9 recognition, and position it as close as possible to the intended tag insertion site.
- Evaluate candidate gRNAs using an online design tool (e.g., the IDT CRISPR design tool) with the C. elegans genome selected. Select a guide with strong predicted on-target cutting efficiency and no high-risk predicted off-target sites.
- Clone the gRNA sequence into the region between the U6 promoter and the gRNA scaffold within the CRISPR expression plasmid backbone.
NOTE: Design primers incorporating the gRNA sequence as overhangs. Perform PCR amplification followed by homologous recombination-based assembly, a ligation-independent cloning method that eliminates restriction enzyme digestion and enables one-step cloning directly into the expression vector15. - Confirm correct insertion by Sanger sequencing.
- Construct the donor plasmid using a fluorescent tag flanked by approximately 1,000 bp left and 1,000 bp right homology arms derived from the target locus.
NOTE: Amplify homology arms from N2 genomic DNA prepared as worm lysate using proteinase K digestion. Design primers with 15–20 bp overlaps to the linearized vector and fluorescent tag. Assemble the homology arms and tag into the backbone via homologous recombination in a single reaction. Insert the fluorescent tag immediately after the ATG start codon for N-terminal tagging or before the stop codon for C-terminal tagging. Include a linker sequence between the target gene and the fluorescent tag to maintain proper protein folding and function. Use the linker to reduce steric interference between the fusion partners, and ensure that both the linker and tag are inserted in frame with the coding sequence. Select the insertion site carefully to avoid disrupting known or predicted functional domains, signal peptides, or transmembrane regions (Supplementary File 1). - Introduce silent substitutions into the donor homologous template sequence to disrupt the PAM or guide-binding sequence without altering the protein sequence and prevent Cas9 re-cutting after integration.
NOTE: Incorporate synonymous point mutations into primers used for homology-arm amplification, targeting codons within the PAM region. - Confirm donor sequence integrity across both homology arms and tag junctions by Sanger sequencing.
NOTE: Store verified plasmids at −20 °C for short-term storage or −80 °C for long-term storage.
3. Prepare the injection mix
- Assemble the injection mix by combining the CRISPR expression plasmid, the donor plasmid (constructed based on pPD95.75), and co-injection markers in sterile ddH₂O to a final volume of 10 µL at the concentrations listed in Table 1.
NOTE: Optimize concentrations empirically to balance marker readability, candidate recovery, and post-injection survival. - Centrifuge the injection mix at 10,000 × g. for 10–20 min to pellet particulate material and prevent clogging of the microinjection capillary.
| Component | Function | Working concentration (ng/μL) |
| pDD162 | CRISPR/Cas9 plasmid (Cas9 and gRNA expression) | 50-100 |
| Donor plasmid (pPD95.75 backbone) | HDR donor template carrying fluorescent tag flanked by ~1 kb homology arms | 50-100 |
| pRF4 | Co-injection marker (Roller phenotype) | 50-100 |
| pPD122.11 | Co-injection marker (GFP expression) | 5-10 |
| Sterile ddH2O | Bring to final volume | – |
Table 1: Injection mix composition and plasmid functions. The injection mix contains CRISPR expression plasmid, donor plasmid, pRF4, and pPD122.11 at the indicated concentrations, for a total volume of 10 µL.
4. Load and prepare the injection needle
- Pull glass capillaries into microinjection needles using a needle puller configured to produce a long taper with a sharp tip suitable for gonadal injection.
NOTE: Optimize puller parameters empirically. Example starting parameters: heat = 540, pull = 20, velocity = 100.
CAUTION: Handle pulled needles carefully to avoid puncture injuries. Use forceps when handling needles and dispose of used needles in a sharps container. - Heat a microcapillary pipette and snap it into two pieces to create a loading tool.
NOTE: Commercial loading tips may be used as an alternative. - Attach a rubber aspirator bulb to the wide end of the shortened microcapillary pipette.
- Aspirate approximately 1 µL of clarified injection mix supernatant into the loader.
NOTE: Exact volume is not critical. Ensure the solution fills the needle tip. - Insert the loader into the back end of the injection needle and gently dispense the injection mix.
- Place the loaded needle horizontally for 10 min to allow the solution to settle toward the tip and confirm a continuous column.
- Mount the needle on the injection microscope and bring the tip into focus using brightfield optics.
- Open the needle tip by gently contacting it with the edge of a coverslip in halocarbon oil and test flow.
NOTE: Adjust injection pressure (30–80 psi) to generate a bubble approximately equal to the gonad diameter within 1 s16.
5. Prepare worms for injection
NOTE: Prepare Nematode Growth Medium (NGM) plates and M9 buffer as described previously17. Maintain worms on plates seeded with Escherichia coli OP50 (hereafter OP50) and perform injections in the N2 background.
- Select L4 hermaphrodites from a healthy plate and incubate at 20 °C for 10 h to obtain young adults with well-developed germlines.
- Transfer worms to an unseeded plate to reduce bacterial carryover.
- Prepare a dry 2% agarose pad on a glass slide and apply a drop of halocarbon oil.
- Transfer a worm onto the agarose pad using an eyelash picker.
- Immobilize the worm and orient the gonad for injection.
CAUTION: Complete injections within 20–30 min to prevent desiccation.
6. Perform gonadal microinjection

Figure 2: Localization of the distal gonad syncytium for microinjection in young adult C. elegans hermaphrodites. (A) Low-magnification brightfield image of a mounted young adult hermaphrodite. Both gonad arms are visible; the injection site is indicated for one arm (arrow) as a representative example. The boxed region marks the area shown at higher magnification in panel B. (B) Higher-magnification DIC view of the distal gonad corresponding to the boxed region in panel A. The arrow indicates the injection position within the distal gonadal syncytium, where the injection mix is delivered. Scale bars: 100 µm (A) and 20 µm (B). Please click here to view a larger version of this figure.
- Locate an immobilized worm and identify the gonad using a low-magnification objective.
- Position the needle using micromanipulator controls.
- Orient the worm at a 20–40° angle relative to the needle.
- Focus on the distal germline using higher magnification.
- Advance the worm toward the needle and position the tip within the gonadal syncytium (Figure 2).
- Inject the solution and confirm delivery by visible gonad swelling.
NOTE: Optimize injection pressure (30–80 psi), compensation pressure (0.1–0.5 psi), and injection duration (0.1–0.3 s).
CAUTION: Excessive pressure or volume can cause worm rupture. - Withdraw the needle and reposition for subsequent injections.
NOTE: Perform a unilateral injection to maximize survival, or a bilateral injection to increase editing efficiency. - Add M9 buffer to release worms and transfer each worm to an individual recovery plate.
- Repeat injections for 20–25 worms.
NOTE: Replace the needle if it clogs or becomes damaged. - Incubate injected worms at 20 °C for 2–3 days to allow recovery.
7. Screen F1 candidates to identify knock-in-positive lines
- Screen F1 progeny for co-injection markers and select marker-positive animals.
NOTE: Examples of alternative fluorescent co-injection markers with different tissue specificity and spectral properties are provided in Supplementary Table 1.
NOTE: Select animals expressing both markers for higher reliability. Prioritize broods with high marker frequency (“jackpot broods”). - Transfer each F1 worm to an individual plate and allow egg laying for 1–2 days.
- Lyse each F1 worm in proteinase K buffer to prepare PCR templates.
NOTE: Store lysates at −80 °C if not processed immediately. - Perform junction PCR using one genomic primer outside the homology arm and one internal tag primer.
NOTE: Retain corresponding plates from PCR-positive F1 animals.
8. Screen F2 progeny to isolate homozygous knock-in lines and confirm integration
- Isolate F2 progeny from PCR-positive F1 lines onto individual plates.
- Allow F2 worms to produce progeny and lyse adults for genotyping.
NOTE: Store lysates at −20 °C if needed. - Perform PCR using primers flanking the homology arms to distinguish wild-type and knock-in alleles by product size.
- Confirm correct integration by Sanger sequencing across both insertion junctions.
- Verify germline fluorescence expression and localization using fluorescence microscopy.
- Expand confirmed homozygous lines and maintain stocks.
NOTE: Cryopreserve validated lines for long-term storage.
Access restricted. Please log in or start a trial to view this content.
Results
Following the protocol, young adult hermaphrodites were gonadally microinjected with a CRISPR/Cas9 plasmid (pDD162), a plasmid donor encoding a GFP knock-in tag flanked by about 1 kb homology arms (pPD95.75), and co-injection markers (pRF4 and pPD122.11). A germline-enriched target gene was used as a representative example to generate a stable, homozygous knock-in allele that reports protein localization under native regulatory control.
Across two injection sessions, 30 P0 hermaphrodites were ...
Access restricted. Please log in or start a trial to view this content.
Discussion
This workflow is designed to generate stable, homozygous knock-in lines in which a fluorescent tag is inserted at the endogenous locus to report protein localization under native regulatory control5,6,7,8,9,10. In practice, success is best judged by a sequential validation chain rather than any single readout: identification ...
Access restricted. Please log in or start a trial to view this content.
Disclosures
The authors have nothing to disclose.
Acknowledgements
This work was supported by grants from the National Key Research and Development Program of China (2023YFA1801100 to L.M.), the Natural Science Foundation of China (32400698 to P.W., 32270774 to L.M.).
Access restricted. Please log in or start a trial to view this content.
Materials
| Name | Company | Catalog Number | Comments |
|---|---|---|---|
| Agar | Beijing Lablead Biotech Co., Ltd. | QZ02 | Component for preparing NGM agar plates |
| Agarose | NOVON | ZZ14011 | Prepare 2% agarose pads |
| Caenorhabditis elegans strain N2 | Caenorhabditis Genetics Center (CGC) | Injection background strain | |
| Centrifuge | Eppendorf | 5425 | Clarify injection mix |
| Cholesterol | Beijing Chemical Reagents Company | 57-88-5 | Component for preparing NGM agar plates |
| Co-injection marker plasmid rol-6 (su1006) (pRF4) | Guangshuo Ou Lab | Roller marker to enrich candidates | |
| Confocal microscope | ZEISS | LSM880 + Airyscan | Validate GFP expression/localization |
| Di-Potassium hydrogen phosphate (K2HPO4) | Sinapharm | CAS: 7758-11-4 | Component for preparing NGM agar plates |
| Di-Sodium hydrogen phosphate (Na2HPO4) | Sinapharm | CAS: 7558-79-4 | Component for preparing M9 buffer |
| DNA ladder | Mei5 Biotechnology, Co., Ltd. | MF288-01 | Size reference for agarose gels |
| Donor plasmid backbone (pPD95.75) | Addgene | 1494 | Backbone for HDR donor construction |
| Electrophoresis System | Beijing Liuyi Biotechnology Co., Ltd. | 112-0630 | Separate PCR amplicons on agarose gels for junction screening and zygosity genotyping |
| Escherichia coli OP50 strain | Caenorhabditis Genetics Center (CGC) | Food source for worms | |
| Fluorescent co-injection marker plasmid (pPD122.11) | Fire Lab | GFP co-marker to enrich candidates | |
| Fluorescent stereomicroscope | SOPTOP | SZX12-HT | Screen live worms for fluorescent co-injection markers |
| GelRed Nucleic Acid Gel Stain | Mei5 Biotechnology, Co., Ltd. | MF079-plus-01 | Visualization of DNA bands |
| Glass capillaries | World Precision Instruments | 1B100F-4 | Used with needle puller to make injection needles |
| Halocarbon oil 700 | Sigma-Aldrich | H8898-50ML | Prevent desiccation during injection |
| Incubator | Wuhan Ruihua Instrument & Equipment Co., Ltd. | HP400S | Maintain worms at standard temperature |
| Magnesium sulfate (MgSO4) | Sinapharm | CAS: 7487-88-9 | Component for preparing NGM agar plates and M9 buffer |
| Microcapillary pipettes | KIMBLE | 71900-50 | Heated and snapped to create loading tool |
| Microinjector unit | Eppendorf | FemtoJet 4i | Deliver controlled pressure pulses of injection mix into the distal gonad via a microinjection needle (foot-pedal triggered) |
| Microscope cover glasses | Fisherbrand | 12545A 22×30-1 | Prepare 2% agarose pads for mounting and immobilizing worms during microinjection; Open injection needle tips against the coverslip edge |
| Microscope for microinjection | ZEISS | Axio Observer.A1 | Injection microscope |
| Needle puller | Sutter Instrument Company | Model P97 | Pull glass capillaries into injection needles |
| PCR thermocycler | Bio-Rad | C1000 Touch Thermal Cycler | PCR amplification |
| pDD162 (Peft-3::Cas9 + Empty sgRNA) | Addgene | 47549 | Cas9 + sgRNA expression |
| Peptone | Gibco | 308723 | Component for preparing NGM agar plates |
| Potassium dihydrogen phosphate (KH2PO4) | Sinapharm | CAS: 7778-77-0 | Component for preparing NGM agar plates and M9 buffer |
| Sodium chloride (NaCl) | Sinapharm | CAS: 7647-14-5 | Component for preparing NGM agar plates and M9 buffer |
| Stereomicroscope | Motic | K400L | Pick and mount worms on agarose pads and perform post-injection recovery steps |
References
- Corsi, A. K., Wightman, B., Chalfie, M. A transparent window into biology: a primer on Caenorhabditis elegans. Genetics. 200 (2), 387-407 (2015).
- Pazdernik, N., Schedl, T. Introduction to germ cell development in Caenorhabditis elegans. Adv Exp Med Biol. 757, 1-16 (2013).
- Ebbing, A., et al. Spatial transcriptomics of C. elegans males and hermaphrodites identifies sex-specific differences in gene expression patterns. Dev Cell. 47 (6), 801-813.e6 (2018).
- Li, L., et al. Spatiotemporal single-cell architecture of gene expression in Caenorhabditis elegans germ cells. Cell Discov. 11 (1), 26 (2025).
- Mello, C. C., Kramer, J. M., Stinchcomb, D., Ambros, V. Efficient gene transfer in C. elegans: extrachromosomal maintenance and integration of transforming sequences. EMBO J. 10 (12), 3959-3970 (1991).
- Kelly, W. G., Fire, A. Chromatin silencing and the maintenance of a functional germline in Caenorhabditis elegans. Development. 125 (13), 2451-2456 (1998).
- Robert, V. J., Sijen, T., van Wolfswinkel, J., Plasterk, R. H. A. Chromatin and RNAi factors protect the C. elegans germline against repetitive sequences. Genes Dev. 19 (7), 782-787 (2005).
- Merritt, C., Seydoux, G. Transgenic solutions for the germline. WormBook. , 1-21 (2010).
- Frøkjær-Jensen, C., et al. Single-copy insertion of transgenes in Caenorhabditis elegans. Nat Genet. 40 (11), 1375-1383 (2008).
- Vallin, E., et al. A genome-wide collection of Mos1 transposon insertion mutants for the C. elegans research community. PLoS One. 7 (2), e30482 (2012).
- Dickinson, D. J., Ward, J. D., Reiner, D. J., Goldstein, B. Engineering the Caenorhabditis elegans genome using Cas9-triggered homologous recombination. Nat Methods. 10 (10), 1028-1034 (2013).
- Friedland, A. E., et al. Heritable genome editing in C. elegans via a CRISPR-Cas9 system. Nat Methods. 10 (8), 741-743 (2013).
- Nance, J., Frøkjær-Jensen, C. The Caenorhabditis elegans transgenic toolbox. Genetics. 212 (4), 959-990 (2019).
- Wang, P., et al. Protocol for CRISPR-Cas9-mediated genome editing to study spermatogenesis in Caenorhabditis elegans. STAR Protoc. 4 (4), 102720 (2023).
- Khan, A. A., et al. A highly efficient ligation-independent cloning system for CRISPR/Cas9-based genome editing in plants. Plant Methods. 13, 86 (2017).
- Ghanta, K. S., Ishidate, T., Mello, C. C. Microinjection for precision genome editing in Caenorhabditis elegans. STAR Protoc. 2 (3), 100748 (2021).
- Rieckher, M., Tavernarakis, N. Caenorhabditis elegans microinjection. Bio Protoc. 7 (19), e2584 (2017).
- Medley, J. C., Hebbar, S., Sydzyik, J. T., Zinovyeva, A. Y. Single nucleotide substitutions effectively block Cas9 and allow for scarless genome editing in Caenorhabditis elegans. Genetics. 220 (1), iyab199 (2022).
- Berkowitz, L. A., Knight, A. L., Caldwell, G. A., Caldwell, K. A. Generation of stable transgenic C. elegans using microinjection. J Vis Exp. (18), e833 (2008).
- Shaner, N. C., et al. A bright monomeric green fluorescent protein derived from Branchiostoma lanceolatum. Nat Methods. 10 (5), 407-409 (2013).
- Bajar, B. T., et al. Improving brightness and photostability of green and red fluorescent proteins for live cell imaging and FRET reporting. Sci Rep. 6, 20889 (2016).
- Bindels, D. S., et al. mScarlet: a bright monomeric red fluorescent protein for cellular imaging. Nat Methods. 14 (1), 53-56 (2017).
- He, S., Cuentas-Condori, A., Miller, D. M. NATF (native and tissue-specific fluorescence): a strategy for bright, tissue-specific GFP labeling of native proteins in Caenorhabditis elegans. Genetics. 212 (2), 387-395 (2019).
- Paix, A., Folkmann, A., Seydoux, G. Precision genome editing using CRISPR-Cas9 and linear repair templates in C. elegans. Methods. 121-122, 86-93 (2017).
Access restricted. Please log in or start a trial to view this content.
Reprints and Permissions
