This manuscript presents a therapist-guided facial proprioceptive training protocol informed by principles of proprioceptive and sensory facilitation. It is designed to support motor initiation and movement control during recovery in patients with early-stage peripheral facial palsy.
A subscription to JoVE is required to view this content. Sign in or start your free trial.
Method Article
Therapist-Guided Facial Proprioceptive Training for Early-Stage Peripheral Facial Palsy: A Protocol With Retrospective Observations
* These authors contributed equally
In This Article
Summary
Abstract
This article describes a therapist-guided facial proprioceptive training protocol for early-stage peripheral facial palsy. The method uses therapist-applied tactile tapping, a brief facilitative quick stretch, and assisted voluntary contraction to train seven representative facial expressions involving the upper, middle, and lower face. These cues are intended to enhance the patient’s perception of movement direction and to support selective activation of the affected-side facial muscles when voluntary output is weak. To illustrate routine clinical use of the method, we reviewed a retrospective cohort of 40 patients treated in the Department of Rehabilitation Medicine at The First Affiliated Hospital of Soochow University from January 2023 to June 2024. According to the rehabilitation approach documented in the medical records, 20 patients received the proprioceptive training protocol and 20 received conventional facial exercise training. Facial function was evaluated at baseline (T0) and at 4, 8, and 12 weeks (T1–T3) using the Sunnybrook Facial Grading System and the House-Brackmann (HB) scale. Both groups improved over time. In unadjusted exploratory comparisons, both groups showed improvement in Sunnybrook scores and a shift toward less severe HB grades over the 12-week follow-up period. Because group allocation was not randomized and the cohort was retrospective, these observations should be interpreted as descriptive rather than confirmatory. The protocol is presented with emphasis on cueing sequence, pacing, and task-specific assistance to facilitate standardized implementation and video-based demonstration.
Introduction
Peripheral facial palsy is caused by dysfunction of the facial nerve and results in weakness or paralysis of the facial muscles on the affected side. Common manifestations include facial asymmetry, incomplete eye closure, and deviation of the oral commissure1,2. Although spontaneous recovery can occur within weeks to months, a substantial proportion of patients have persistent deficits in motor control, reduced facial symmetry, or synkinesis, which may lead to long-term functional limitations and impaired quality of life1,3,4. Physical therapy is widely used as part of clinical management for peripheral facial palsy3,5. In the early hypotonic stage, however, repeated voluntary facial exercises alone may be difficult for some patients because affected-side movement is weak, movement direction is poorly perceived, and compensatory activation of non-target muscles may occur3,5,6. The goal of this method is to establish a therapist-guided facial proprioceptive training protocol that uses perceptible tactile and directional cues to support movement initiation and motor control during the early recovery phase of peripheral facial palsy.
The design of this protocol is based on principles of proprioceptive and sensory facilitation within neuromuscular re-education6,7. Although peripheral facial palsy mainly disrupts facial nerve-mediated motor output, facial movement control also depends on sensory input7,8. Facial expression muscles differ from limb skeletal muscles in their sensorimotor organization; input from facial skin, soft tissues, and trigeminal nerve-related pathways may contribute to movement regulation and perception of movement direction7,8,9. Anatomical and neurophysiological studies have described connections between the trigeminal and facial nerves, and afferent input from skin and muscles may influence facial motor cortex excitability and sensorimotor integration7,9. On this basis, tactile tapping, directional manual guidance, and brief facilitative quick stretch are used as low-intensity sensory cues to provide the patient with external information about the intended movement direction and target muscle recruitment7,9,10. The protocol is not intended to reproduce a single established rehabilitation technique. Rather, it combines selected elements of PNF-style directional facilitation and Rood-style tactile sensory facilitation into a therapist-guided facial proprioceptive training protocol for facial motor retraining7,10,11,12,13,14,15.
When voluntary motor output is weak, conventional facial exercises may provide limited guidance on movement direction and target-muscle recruitment. The present method adds tactile, kinesthetic, and directional cues to help patients perceive the intended movement and activate target facial muscles more selectively3,5. In contrast to EMG biofeedback training, this method does not require specialized equipment or detectable baseline muscle activity. Electrical stimulation during the early hypotonic phase remains controversial, particularly because of concerns regarding aberrant reinnervation and synkinesis16. For this reason, the approach is described here as facial proprioceptive training, with tactile tapping, facilitative quick stretch, and assisted voluntary contraction as its core components. It is primarily intended for patients within 12 weeks of onset, particularly those with House-Brackmann grades II–VI who show reduced facial muscle tone or difficulty initiating voluntary facial movements13. This manuscript describes the procedural sequence, stimulation parameters, and implementation details needed for clinical replication, video demonstration, and future prospective evaluation. The method can be delivered in outpatient rehabilitation settings by therapists trained in facial rehabilitation, with sessions of 20–30 min conducted five times per week for at least four weeks17. Task selection and stimulation intensity should be individualized based on the patient's tolerance, fatigue level, and the presence of compensatory activation or synkinesis.
Access restricted. Please log in or start a trial to view this content.
Protocol
The training described in this manuscript was delivered as part of routine outpatient rehabilitation care, and informed consent was obtained from all participants. The retrospective analysis was approved by the Ethics Committee of The First Affiliated Hospital of Soochow University (Approval No. 1179), which waived the requirement for informed consent for the use of retrospective data.
NOTE: Instrument details are available in the Table of Materials. Initiate this protocol during the early to mid-recovery phase (1–12 weeks post-onset) when clinical evaluation reveals reduced facial muscle tone or impaired movement initiation.
1. Patient preparation and positioning
- Confirmation of patient status
- Confirm a diagnosis of peripheral facial palsy and that the patient can understand and follow verbal instructions.
- Inspect facial skin integrity and avoid stimulation over areas with skin breakdown, infection, or marked pain.
- Patient positioning
- Position the patient in a comfortable supine (Figure 1A) or seated (Figure 1B) position, depending on the treatment setting and patient tolerance.
- Provide mirror feedback during facial movement training.
- Before starting the intervention, expose the full face and keep the head and neck neutral.
- Establish visual feedback
- Set the mirror at eye level, approximately 50–80 cm in front of the patient, so that both sides of the face are clearly visible.
- For a patient in the supine position, use a handheld or adjustable mirror within the patient’s line of sight.
- Ask the patient to observe facial symmetry while focusing on the movement of the affected side during training.
NOTE: If mirror feedback increases anxiety or excessive self-monitoring, shorten mirror use or provide it intermittently.
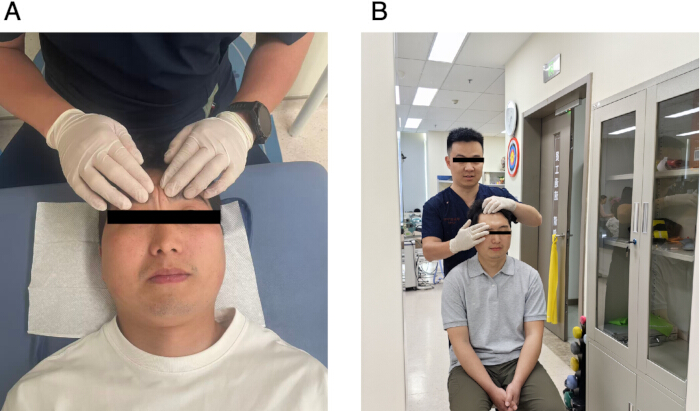
Figure 1: Patient Positioning. Patients may be positioned seated or supine, depending on the treatment setting and patient comfort. (A) In supine, support the head and neck with a pillow to keep the head neutral. Ensure that the face is fully exposed before training. The therapist provides standardized verbal instruction, tactile facilitation, and assisted movement as needed. (B) In sitting, keep the trunk upright, both feet supported, and a mirror placed in front of the patient for visual feedback. Please click here to view a larger version of this figure.
2. General principles of facial proprioceptive training
- Training sequence
- Train from superior to inferior facial regions and from midline toward lateral areas to reduce compensation by non-target muscles.
- Stimulation sequence
- Each facial expression task follows the same sequence: tactile tapping over the target muscle region, brief facilitative, brief reverse facilitative, quick stretch away from the intended contraction direction, and assisted active contraction of the target muscle.
- Intensity control
- Use mild to moderate intensity stimulation to avoid pain or significant discomfort.
NOTE: If synkinesis or obvious compensation from the unaffected side occurs, reduce intensity immediately or pause the task.
- Use mild to moderate intensity stimulation to avoid pain or significant discomfort.
- Task selection
- Complete the seven facial expression tasks described in section 3 during a standard session. When weakness is mainly limited to one facial region, such as the lower face, emphasize the relevant tasks and reduce sets for the less affected regions.
- If fatigue appears before all tasks are completed, stop the session and resume the remaining tasks at the next visit (see Section 4.4).
- Rest intervals
- Allow approximately 10–15 s of rest between sets within each facial expression task.
- Between tasks, provide a 30–60 s rest interval to prevent muscular fatigue.
- Extend rest periods at the therapist’s discretion if the patient reports discomfort or shows signs of fatigue.
NOTE: If the patient exhibits signs of fatigue, discomfort, compensatory activation, or worsening synkinesis, immediately reduce the intensity or terminate the session11,18.
- Laterality of stimulation
- Apply tactile tapping, facilitative stretch, and assisted voluntary contraction only to the affected side. Do not actively stimulate the unaffected side.
- During bilateral expressions, such as smiling or eyebrow raising, ask the patient to focus on the movement of the affected side. Gently stabilize the unaffected side if compensatory over-activation occurs.
3. Step-by-step procedures for each facial expression task
- Frowning training for the corrugator supercilii and procerus muscles
- Place the pads of the index and middle fingers of the working hand over the affected medial eyebrow and glabellar region.
- Deliver light tactile tapping over the medial third of the affected eyebrow and the glabellar region. Apply each tap perpendicular to the skin with the fingertip pads and avoid sliding or rubbing the skin.
- Perform tactile tapping at 2–3 taps/s for 15–20 taps/set. Complete 3 sets, taking approximately 6–10 s per set.
- Place the fingertip pads over the affected medial eyebrow and glabellar soft tissue. Apply brief, low amplitude reverse facilitative quick stretches by moving the medial eyebrow and glabellar soft tissue laterally and slightly superiorly, away from the intended frowning direction.
- Perform reverse facilitative quick stretches at 1–2 stretches/s for 10–15 stretches/set. Complete 3 sets, taking approximately 5–15 s per set.
- Immediately after the final reverse stretch cue, ask the patient to frown gently. Assist the affected medial eyebrow medially and slightly inferiorly toward the glabella with the fingertip pads.
- Perform 10 assisted frowning repetitions/set for 3 sets. Release the manual assistance after each repetition.
- Allow the facial muscles to relax before the next repetition. Maintain a slow and controlled movement throughout the set.
- Observe the face during each repetition for excessive forehead wrinkling, unwanted eye closure, nasal scrunching, or overactivity of the unaffected brow.
- Reduce the movement amplitude, lighten the manual cue, and slow the repetition speed when compensatory movement occurs.
- Eyebrow-raising training for the frontalis muscle
- Place the fingertip pads over the affected forehead immediately above the eyebrow.
- Deliver light tactile tapping over the affected frontalis region immediately above the eyebrow. Apply each tap perpendicular to the skin with the fingertip pads.
- Perform tactile tapping at 2–3 taps/s for 15–20 taps/set. Complete 3 sets, taking approximately 6–10 s per set.
- Place the fingertip pads over the affected forehead just above the eyebrow. Apply brief, low-amplitude reverse facilitative quick stretches by moving the affected supra-brow soft tissue inferiorly, away from the intended eyebrow-raising direction.
- Perform reverse facilitative quick stretches at 1–2 stretches/s for 10–15 stretches/set. Complete 3 sets, taking approximately 5–15 s per set.
- Immediately after the final reverse stretch cue, ask the patient to raise the eyebrows gently. Assist the affected eyebrow superiorly with the fingertip pads placed just above the brow.
- Perform 10 assisted eyebrow-raising repetitions/set for 3 sets. Release the manual assistance after each repetition.
- Allow the forehead muscles to relax before the next repetition. Maintain a small and symmetrical eyebrow movement throughout the set.
- Observe for excessive scalp recruitment, head extension, or large forehead skin traction during each repetition.
- Reduce the movement amplitude, lighten the manual cue, and slow the repetition speed when the patient lifts the whole forehead or uses the unaffected side disproportionately.
- Eye-closure training for the orbicularis oculi muscle
- Rest the supporting hand lightly on the bony orbital margin. Place one fingertip pad on the upper eyelid skin just above the lash line and another fingertip pad on the lower eyelid skin just below the lash line.
- Contact only the eyelid tissues during manual stimulation. Do not apply posterior pressure to the globe.
- Deliver very light tactile tapping around the affected upper and lower eyelids. Apply the taps with minimal pressure and avoid pressing the eyeball.
- Perform tactile tapping at 2–3 taps/s for 15–20 taps/set. Complete 3 sets, taking approximately 6–10 s per set.
- Place the fingertip pads on the affected upper and lower eyelid skin. Apply brief, small-amplitude reverse facilitative quick stretches by moving the upper eyelid skin slightly superiorly and the lower eyelid skin slightly inferiorly, away from the intended eyelid-closure direction.
- Perform reverse facilitative quick stretches at 1–2 stretches/s for 10–15 stretches/set. Complete 3 sets, taking approximately 5–15 s per set.
- Immediately after the final reverse stretch cue, ask the patient to close the eye gently. Assist eye closure by guiding the upper eyelid downward and the lower eyelid slightly upward until the eyelids meet.
- Hold the assisted eye closure for 1–2 s, then allow the eyelids to relax. Perform 10 repetitions/set for 3 sets.
- Monitor for mouth tightening, cheek lifting, chin contraction, or excessive squeezing of the unaffected eye during each repetition.
- Reduce the effort, lighten the manual cue, and ask for a soft eye closure when the patient forces the movement.
- Smiling training for the zygomaticus major and zygomaticus minor muscles
- Place one or two fingertip pads over the affected lateral oral commissure and adjacent zygomatic region.
- Deliver light tactile tapping over the affected lateral oral commissure and zygomatic region. Apply each tap perpendicular to the skin with the fingertip pads.
- Perform tactile tapping at 2–3 taps/s for 15–20 taps/set. Complete 3 sets, taking approximately 6–10 s per set.
- Place the fingertip pads over the affected lateral oral commissure. Apply brief, low-amplitude reverse facilitative quick stretches by moving the affected oral commissure inferomedially, away from the intended smiling direction.
- Perform reverse facilitative quick stretches at 1–2 stretches/s for 10–15 stretches/set. Complete 3 sets, taking approximately 5–15 s per set.
- Immediately after the final reverse stretch cue, ask the patient to smile gently. Assist the affected oral commissure superolaterally toward the zygomatic region with the fingertip pads.
- Perform 10 assisted smiling repetitions/set for 3 sets. Release the manual assistance after each repetition.
- Allow the mouth and cheek muscles to relax before the next repetition. Maintain facial symmetry and avoid strong traction on the oral commissure.
- Observe for eye narrowing, platysma activation, jaw deviation, or excessive pulling by the unaffected side. Reduce the movement amplitude, lighten the manual cue, and repeat the movement slowly with visual feedback when asymmetry increases.
- Cheek-inflation training for the buccinator muscle and lip-seal control
- Cup the affected cheek lightly with the working hand.
- Place the fingertip pads over the affected mid-cheek buccinator region and the affected lateral oral commissure.
- Deliver light tactile tapping over the affected cheek and lateral oral commissure. Apply each tap with the fingertip pads at a comfortable intensity.
- Perform tactile tapping at 2–3 taps/s for 15–20 taps/set. Complete 3 sets, taking approximately 6–10 s per set.
- Place the fingertip pads over the affected mid-cheek and lateral oral commissure. Apply brief, low-amplitude reverse facilitative quick stretches by moving the affected cheek soft tissue slightly laterally and outward, away from the dental arch and lip-seal direction.
- Perform reverse facilitative quick stretches at 1–2 stretches/s for 10–15 stretches/set. Complete 3 sets, using approximately 5–15 s for each set, and avoid instructing the patient to practice large lateral traction of the cheek soft tissue.
- Immediately after the final reverse stretch cue, ask the patient to inflate both cheeks and maintain intraoral air pressure. Provide gentle external support over the affected cheek and lateral oral commissure to reduce air leakage.
- Hold the assisted cheek inflation for 1–2 s, then allow the patient to relax. Perform 10 repetitions/set for 3 sets.
- Monitor for air leakage, jaw clenching, lip over-pursing, or head and neck effort during each repetition.
- Lip-pursing training for the orbicularis oris muscle
- Place the fingertip pads around the affected upper and lower lips, especially near the affected oral commissure and the paramedian upper- and lower-lip regions.
- Deliver light tactile tapping around the affected upper and lower lips. Apply each tap with the fingertip pads, avoiding excessive pressure on the teeth or gingiva.
- Perform tactile tapping at 2–3 taps/s for 15–20 taps/set. Complete 3 sets, taking approximately 6–10 s per set.
- Place the fingertip pads over the affected upper and lower lips. Apply brief, low-amplitude reverse facilitative quick stretches by moving the affected lip tissues laterally and slightly posteriorly, away from the intended lip-rounding and protrusion direction.
- Perform reverse facilitative quick stretches at 1–2 stretches/s for 10–15 stretches/set. Complete 3 sets, keeping the mandible relaxed during each stretch.
- Immediately after the final reverse stretch cue, ask the patient to purse the lips gently as if preparing to whistle. Assist the affected upper and lower lips toward a rounded midline position and slightly forward with the fingertip pads.
- Perform 10 assisted lip-pursing repetitions/set for 3 sets. Release the manual assistance after each repetition.
- Allow the lips and jaw to relax before the next repetition. Maintain light mandibular stabilization when the jaw tends to move forward.
- Observe for chin overactivity, tooth clenching, neck activation, or mandibular thrust.
- Reduce the movement size, lighten the manual cue, and maintain mandibular stabilization when the patient compensates with the jaw rather than the lips.
- Lower-lip depression training for the depressor labii inferioris muscle
- Place one fingertip pad on the affected lower lip and another fingertip pad on the skin over the anterior mandible just inferior to the affected lower lip. Support the mandible with the other hand when the mouth opens.
- Deliver light tactile tapping over the affected lower lip and anterior mandibular region. Apply each tap with the fingertip pads at a comfortable intensity.
- Perform tactile tapping at 2–3 taps/s for 15–20 taps/set. Complete 3 sets, taking approximately 6–10 s per set.
- Place the fingertip pad over the affected lower lip. Apply brief, low-amplitude reverse facilitative quick stretches by moving the affected lower lip superiorly and slightly medially, away from the intended lower-lip depression direction.
- Perform reverse facilitative quick stretches at 1–2 stretches/s for 10–15 stretches/set. Complete 3 sets, keeping the mandible relaxed and stable during each stretch.
- Immediately after the final reverse stretch cue, ask the patient to depress the lower lip gently. Assist the affected lower lip inferiorly with slight eversion while maintaining mandibular stability.
- Perform 10 assisted lower-lip depression repetitions/set for 3 sets. Release the manual assistance after each repetition.
- Allow the lower lip and jaw to relax before the next repetition. Maintain a small and controlled lower-lip movement throughout the set.
- Observe for jaw opening, platysma activation, chin dimpling, or cervical muscle contraction. Decrease the movement range, lighten the manual cue, and increase mandibular stabilization when compensation occurs.
4. Training frequency, duration, and stopping criteria
- Session duration: Total training time per session: 20–30 min.
- Frequency: Five sessions per week.
- Training period: Continue training for at least 4 weeks.
- Stopping criteria (PAUSE POINT)
If fatigue, pain, or worsening synkinesis is noted, pause after completing the current task and continue with the remaining tasks in the next session.
5. Post-training steps and documentation
- Cool-down
- Instruct the patient to relax facial muscles and avoid immediately performing high-intensity facial activities.
- Documentation
- Record tolerance to stimulation, activation of target muscles, and whether synkinesis occurred using the documentation form shown in Supplementary File 1.
NOTE: Documentation facilitates adjustment of stimulation parameters in subsequent sessions.
- Record tolerance to stimulation, activation of target muscles, and whether synkinesis occurred using the documentation form shown in Supplementary File 1.
6. Safety considerations
- Same as step 4.4
- Maintain stimulation intensity within the patient’s tolerance throughout.
7. Outcome assessments
Assess facial function19 at baseline (T0) and at 4 weeks (T1), 8 weeks (T2), and 12 weeks (T3) using the Sunnybrook Facial Grading System20 and the House-Brackmann grading scale21.
8. Conventional training protocol (comparator group)
- Training instructions
- Instruct the patient in the comparator group to perform routine active voluntary facial exercises.
- Direct the patient to execute the seven facial expression tasks described in Section 3: frowning, eyebrow raising, eye closure, smiling, cheek inflation, lip pursing, and lower-lip depression.
- Implementation details
- Provide verbal cueing and mirror feedback throughout the training session.
- Perform each task for 10–15 repetitions per set, with 3 sets per task. Each contraction was held for approximately 3–5 s, followed by a rest interval of 30–60 s between sets.
- Each session lasted approximately 20–30 min, and training was conducted five sessions per week for a minimum of 4 weeks.
- Instruct the patient to practice the seven movements repeatedly within their physical tolerance during outpatient sessions and home-based practice, following the same dose parameters described above.
- Exclusion of specific components
- Omit all tactile tapping, facilitative quick stretch, and therapist-assisted voluntary contraction during these sessions.
Access restricted. Please log in or start a trial to view this content.
Results
Study cohort and design
This retrospective cohort study included 40 patients with unilateral peripheral facial palsy treated at the Department of Rehabilitation Medicine, The First Affiliated Hospital of Soochow University (January 2023–June 2024). Patients were grouped according to the rehabilitation approach documented in their medical records rather than by random allocation: the facial proprioceptive training group (n = 20) and the conventional training group (n = 20). As this assignment reflecte...
Access restricted. Please log in or start a trial to view this content.
Discussion
The representative results showed progressive improvement over time in both groups. In these exploratory observations, the proprioceptive training group tended to show higher Sunnybrook scores and a greater shift toward lower HB grades at later follow-up points. Given the retrospective, non-randomized design, these findings should be viewed as hypothesis-generating observations rather than evidence of comparative efficacy. One possible explanation is that patients may require several weeks of repeated therapist-guided cu...
Access restricted. Please log in or start a trial to view this content.
Disclosures
The authors declare no conflicts of interest.
Acknowledgements
The authors thank the Department of Rehabilitation Medicine at The First Affiliated Hospital of Soochow University for its clinical and administrative support. This study was supported by a Special Research Grant from Suzhou Science and Technology Project (Grant No. SKYD2022086).
Access restricted. Please log in or start a trial to view this content.
Materials
| Name | Company | Catalog Number | Comments |
|---|---|---|---|
| Latex Examination Gloves | PT.UNIVERSAL GLOVES | TLFVMD44100 | Used for hygiene during facial tactile tapping and stretching URL: https://universal-gloves.com/products |
| GraphPad Prism v10.0 | GraphPad Software | N/A | Software used for data visualization and generating figures. URL: https://www.graphpad.com/features |
| Mirror | Changzhou Kangda Medical Rehabilitation Equipment Co., Ltd. | N/A | Height 170 cm, width 60 cm; used for visual feedback during training URL: http://www.kdkfyl.com/ |
| SPSS Statistics v26.0 | IBM Corp. | N/A | Software used for statistical management and exploratory analysis of clinical scores. URL: https://www.ibm.com/products/spss-statistics |
| Timer | Shenzhen ENO Musical Instruments Co., Ltd. | EM988S | Used to monitor total session duration and pace the 2–3 Hz tactile tapping rhythm. URL: http://www.eno-music.com/cpxl |
References
- Dalrymple SN, Row JH, Gazewood J. Bell's palsy. Prim Care. 2025;52(1):111-21.
- Baugh RF, et al. Clinical practice guideline: Bell's palsy. Otolaryngol Head Neck Surg. 2013;149(3 Suppl).
- Khan AJ, et al. Physical therapy for facial nerve paralysis (Bell's palsy): an updated and extended systematic review of the evidence for facial exercise therapy. Clin Rehabil. 2022;36(11):1424-49.
- Piercy J. Bell's palsy. BMJ. 2005;330(7504):1374.
- Nakano H, et al. Physical therapy for peripheral facial palsy: a systematic review and meta-analysis. Auris Nasus Larynx. 2024;51(1):154-60.
- Teixeira LJ, Valbuza JS, Prado GF. Physical therapy for Bell's palsy (idiopathic facial paralysis). Cochrane Database Syst Rev. 2011;(12).
- Pilurzi G, et al. Role of cutaneous and proprioceptive inputs in sensorimotor integration and plasticity occurring in the facial primary motor cortex. J Physiol. 2020;598(4):839-51.
- Bress KS, Cascio CJ. Sensorimotor regulation of facial expression: an untouched frontier. Neurosci Biobehav Rev. 2024;162:105684.
- Mohanty AJ, et al. Anatomy and histology of sensorimotor connections between the facial and trigeminal nerve in the buccinator muscle. Head Neck. 2025;47(3):928-35.
- Vanswearingen J. Facial rehabilitation: a neuromuscular reeducation, patient-centered approach. Facial Plast Surg. 2008;24(2):250-9.
- Manikandan N. Effect of facial neuromuscular re-education on facial symmetry in patients with Bell's palsy: a randomized controlled trial. Clin Rehabil. 2007;21(4):338-43.
- Silva MC, Oliveira MT, Azevedo-Santos IF, DeSantana JM. Effect of proprioceptive neuromuscular facilitation in the treatment of dysfunctions in facial paralysis: a systematic literature review. Braz J Phys Ther. 2022;26(6):100454.
- Chen Y, et al. Facial nerve function training in patients with peripheral facial paralysis: an expert consensus. Hua Xi Kou Qiang Yi Xue Za Zhi. 2023;41(6):613-21.
- Vaughan A, et al. A systematic review of physical rehabilitation of facial palsy. Front Neurol. 2020;11:222.
- Burke DG, Culligan CJ, Holt LE. The theoretical basis of proprioceptive neuromuscular facilitation. J Strength Cond Res. 2000;14(4):496-500.
- Cronin GW, Steenerson RL. The effectiveness of neuromuscular facial retraining combined with electromyography in facial paralysis rehabilitation. Otolaryngol Head Neck Surg. 2003;128(4):534-8.
- Zhang L, et al. A retrospective study on the application of guided rehabilitation training in the rehabilitation of children with peripheral facial paralysis. J Phys Med Rehabil Disabil. 2023;9:80.
- Santiago S, et al. Effectiveness of novel facial stretching with structured exercise versus conventional exercise for Bell's palsy: a single-blinded randomized clinical trial. Sci Rep. 2024;14(1):13266.
- Tedeschi R, Donati D, Giorgi F. Beyond the smile: a systematic review of diagnostic tools for peripheral facial paralysis. Acta Neurol Belg. 2024;124(6):1805-22.
- Ross BG, Fradet G, Nedzelski JM. Development of a sensitive clinical facial grading system. Otolaryngol Head Neck Surg. 1996;114(3):380-6.
- House JW, Brackmann DE. Facial nerve grading system. Otolaryngol Head Neck Surg. 1985;93(2):146-7.
- Zhu C, Li M. Clinical observation of staging kinesiotherapy on the treatment of idiopathic facial palsy. China J Tradit Chin Med Pharm. 2019;34(9):4445-8.
- Kim DR, et al. Neuromuscular retraining therapy for early-stage severe Bell's palsy patients minimizes facial synkinesis. Clin Rehabil. 2023;37(11):1510-20.
- Saal HP, Bensmaia SJ. Touch is a team effort: interplay of submodalities in cutaneous sensibility. Trends Neurosci. 2014;37(12):689-97.
- Rail B, et al. Clinical perspectives on the pathophysiology of facial synkinesis: a narrative review. JAMA Otolaryngol Head Neck Surg. 2025;151(3):268-75.
- 26. Unell A, et al. Influence of visual feedback persistence on visuo-motor skill improvement. Sci Rep. 2021;11(1):17347.
Access restricted. Please log in or start a trial to view this content.