This protocol describes training an artificial intelligence model to detect aortic dissection using non-contrast computed tomography images, enabling rapid and accessible screening in clinical settings.
A subscription to JoVE is required to view this content. Sign in or start your free trial.
Method Article
Training an Artificial Intelligence Model for Aortic Dissection Detection Using Non-Contrast Computed Tomography Images from Human Patients
In This Article
Summary
Abstract
Aortic dissection (AD) is an extreme consequence of impaired vascular remodeling homeostasis and requires rapid, accurate identification in clinical practice. This protocol describes an artificial intelligence−based learning model for AD identification utilizing non-contrast computed tomography (CT). Chest CT and aortic CT angiography datasets were collected from AD and non-AD patients at a Grade A tertiary hospital. Vascular structures on each axial image were manually segmented and annotated using the open-source software LabelMe to establish a segmentation dataset for model development and evaluation. The dataset was partitioned into training, test, and validation sets at an 8:1:1 ratio for model training and validation. Following the development of a model with robust detection performance, an online processing platform was constructed to visualize and present the results effectively. This approach provides a powerful, intelligent tool for rapid, preliminary screening of AD and addresses the unmet clinical need for accessible early detection across diverse clinical environments.
Introduction
Aortic dissection (AD) is a life-threatening acute condition characterized by blood entering the medial layer of the aortic wall through a tear in the intimal lining, forming a dissecting and expanding false lumen1. Without timely diagnosis and treatment, the mortality rate is extremely high, the incidence of death within 24 h (including death before reaching the hospital) was 93%2. Contrast-enhanced computed tomography angiography (CTA) is the gold standard for diagnosing AD, as it can clearly visualize the true and false lumens, the location of the tear, and the extent of involvement3. However, CTA requires the injection of iodine-containing contrast agents, which carry risks of allergic reactions and nephrotoxicity4,5. Additionally, achieving 24-h rapid availability is difficult in many primary hospitals or emergency settings. In contrast, non-contrast CT (NCCT) scanning does not require contrast agents, offering a convenient, rapid examination with a relatively low radiation dose and broader application. Nevertheless, in NCCT images, the contrast between the true and false lumens, as well as between the intimal flap and blood, is low, posing significant challenges for physicians’ visual diagnosis and easily leading to missed or misdiagnoses, especially among less experienced clinicians. Therefore, the development of a technique capable of achieving high-precision, high-sensitivity automatic detection of AD directly from NCCT images holds important clinical value and application prospects.
Recent advances in deep learning have enabled the accurate identification of pathological features from non-contrast medical images6,7. High-resolution network (HRNet) maintains high-resolution feature maps throughout the network, while squeeze-and-excitation network (SENet) enhances feature representation by modeling interchannel dependencies8. The combination of HRNet and SENet provides an effective feature extraction strategy for multiscale representation of NCCT images, which is crucial for detecting subtle AD signs, such as intimal flaps and double-lumen signs. Herein, this feature extraction concept is implemented within an object detection framework using MMDetection and Cascade Region-based Convolutional Neural Network (R-CNN), enabling robust localization and classification of aortic dissection.
In this study, the artificial intelligence (AI) model based on HRNet+SENet employs a stepwise training process to identify AD from NCCT images (Figure 1). It emphasizes dataset standardization, multiscale feature extraction, and clinical adaptability. The goal of this method is to provide a reliable approach for AD detection, particularly in emergency and primary care settings where contrast-enhanced imaging is limited or unavailable.
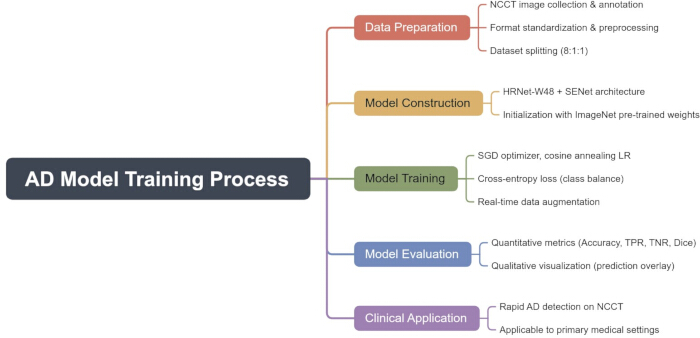
Figure 1. Workflow of the artificial intelligence (AI) model for aortic dissection (AD) detection. Schematic of the AI model training pipeline for AD detection using non-contrast computed tomography (NCCT) images. The workflow includes data preparation (image collection and annotation, format standardization and preprocessing, and dataset splitting), model construction (HRNetV2p-W32 backbone integrated within a Cascade R-CNN detection framework and initialized with COCO pre-trained weights), model training (SGD optimizer, cosine annealing learning rate, and cross-entropy loss), model evaluation (quantitative metrics and qualitative visualization), and clinical application. Please click here to view a larger version of this figure.
Access restricted. Please log in or start a trial to view this content.
Protocol
All human-related data collection in this study was conducted in accordance with the ethical standards of the Declaration of Helsinki and was approved by the Ethics Committee of China-Japan Union Hospital of Jilin University (Approval Number: 2019103004). Informed consent was obtained in writing from all individual participants or their legal guardians prior to the collection of their relevant information. All personal information of the subjects was kept strictly confidential to protect their privacy, and no experimental operations were performed on the subjects during the data collection process.
1. Dataset Construction
- Data collection and dataset partitioning
- Collect clinical non-contrast chest CT images from 300 patients admitted to China-Japan Union Hospital of Jilin University between March 1, 2022 and March 1, 2025, including 150 patients with AD and 150 patients without AD verified by CTA. Include type A and type B ADs. All raw imaging data are institution-restricted and not publicly available due to patient privacy and ethical restrictions.
- Partition the dataset into training, validation, and test sets at an 8:1:1 ratio at the patient level. Ensure that all slices from one patient remain within a single set to eliminate data leakage.
- Perform stratified sampling based on AD/non-AD diagnosis to preserve class balance across all subsets.
- The dataset was pre-split at the patient level as described above to avoid patient-level information leakage. A fixed random seed of 42 was adopted for the training algorithm to control random processes including data shuffling, online augmentation, and model initialization during training; this seed was independent and not applied to dataset partitioning.
CAUTION: Ensure that all patient imaging data are fully anonymized prior to processing to protect patient privacy and comply with institutional and regulatory guidelines.
- Data exclusion
- Exclude images with severe motion artifacts.
- Exclude images with insufficient scanning range that does not cover the entire aorta.
- Exclude images with excessive image noise, defined as a standard deviation of CT attenuation values exceeding 30 HU in the descending thoracic aorta.
- Image conversion
- Load DICOM image data and export axial image slices using ITK-SNAP image processing software.
- Launch ITK-SNAP and click File → Open Main Image.
- Select the source DICOM series and click Open.
- Navigate through axial slices using the slice slider.
- Export each slice by clicking File → Export → Image Slice.
- Select PNG format and specify the output directory.
- Save each slice as an individual file.
- All exported image slices were uniformly named following the fixed format IMG-[PatientID]-[SliceIndex].png, adopting unique patient identifiers and sequential slice numbering to guarantee traceability.
- Image annotation setup
- Open each axial image using LabelMe annotation software.
- Launch LabelMe and click Open Directory.
- Navigate to the folder containing axial images and load all images.
- Manual segmentation
- Select the Create Polygon tool in LabelMe to annotate vascular structures (Figure 2). Include the aortic lumen, intimal flap, and visible dissection boundaries during annotation. During labeling, the entire aortic structure involving the intimal flap was contoured as a single integrated region. The annotation scope uniformly covered the complete visible aortic segment with dissection lesions and intimal tear boundaries, without separate segmentation or distinction of the true lumen, false lumen, or independent vascular subregions.
- Define vessel boundaries by placing vertices along the structure.
- Close the polygon by connecting the final vertex to the first vertex.
- Modify annotations using the Modify Polygon tool as needed.
- Label assignment
- Each finished polygon annotation was labeled using two standardized and case-consistent categories: “Aortic Dissection” for aortic dissection and “Healthy” for normal aortic images.
- Ensure that label names are used consistently across all annotations and remain identical in spelling and format throughout the dataset.
- Select labels from the dropdown list or input manually.
- Click OK or press Enter to confirm the label assignment.
- Save annotations to generate JSON files.
NOTE: Manual annotation may vary between operators. Ensure consistent annotation criteria and, if possible, involve expert validation.
- Annotation export
- Enable Auto Save to export annotations in JSON format.
- Ensure each JSON file corresponds to its original CT slice.
- Verify that each annotation file maintains a one-to-one correspondence with its associated image file.
- Convert JSON annotations into a format compatible with the training framework. LabelMe JSON annotations were converted to COCO format via a custom Python script before training. The converted files (output_coco_annotations_{split}.json, where split = train, valid, or test) were loaded in MMDetection 2.x using CocoDataset with LoadAnnotations(with_bbox=True).
- Data quality control
- Remove invalid entries based on predefined quality criteria, including missing image files, incomplete annotations, or mismatched image–annotation pairs.
- Generation and naming of cleaned COCO annotation files for training, validation, and testing. The cleaned annotations were saved as split-specific COCO JSON files using the fixed naming rule output_coco_annotations_{split}.json. Specifically, the three output files were train/output_coco_annotations_train.json, valid/output_coco_annotations_valid.json, and test/output_coco_annotations_test.json, with the corresponding images stored in train/images/, valid/images/, and test/images/. These files were directly used by the MMDetection training pipeline.
- Dataset organization
- Organize the dataset into train, validation, and test split directories. The dataset was organized under the root directory aortic_dissection_dataset/ and divided into three split-specific subdirectories: train/, valid/, and test/. Each subdirectory contained an images/ folder with the image files belonging to that split.
- Store split-specific COCO annotation files within each corresponding split directory rather than the dataset root directory. Training, validation, and test annotations were saved as train/output_coco_annotations_train.json, valid/output_coco_annotations_valid.json, and test/output_coco_annotations_test.json, respectively. These files were loaded by configuring split-specific ann_file and img_prefix paths during model setup.
- Maintain a consistent directory structure across training, validation, and test datasets to ensure compatibility with the training framework.
- Training data pipeline
- Load images and bounding-box annotations.
- Resize images to 512×512 while maintaining aspect ratio.
- Apply random flip with probability 0.5.
- Apply data augmentation using explicit parameter settings. During training, input images were resized to 512 × 512 pixels (keep_ratio=True) followed by augmentation: random flipping (flip_ratio=0.5), gamma adjustment (gamma_limit=90–110, p=0.4), brightness/contrast adjustment (brightness_limit=0.15, contrast_limit=0.15, p=0.4), geometric transformation (shift_limit=0.03, scale_limit=0.08, rotate_limit=10°, p=0.4), and Gaussian noise (var_limit=5.0–25.0, p=0.2). Validation and test images were only resized, normalized, and padded without augmentation.
- Apply all augmentation operations using consistent parameter settings across training runs to ensure reproducibility.
- Normalize images using mean [123.675, 116.28, 103.53] and standard deviation [58.395, 57.12, 57.375].
- Pad images to multiples of 32.
- Validation and testing pipeline
- Load images.
- Resize images.
- Normalize images.
- Pad images to multiples of 32.
- Model framework construction
- Build a two-class object detector in MMDetection 2.x using a modified HRNetV2p-W32 + Cascade R-CNN configuration. The detector was implemented in MMDetection 2.x based on the official configuration cascade_rcnn_hrnetv2p_w32_20e_coco.py and initialized with corresponding COCO-pretrained weights cascade_rcnn_hrnetv2p_w32_20e_coco_20200208-
928455a4.pth. - Use HRNetV2p-W32 as the backbone and Cascade R-CNN as the detector as defined in the configuration described in Step 1.12.1.
- Adapt the base MMDetection configuration for the two-class task. The model was modified for the two-class task by setting num_classes = 2 with class names “Aortic Dissection” and “Healthy,” and updating dataset paths for training, validation, and test sets. The final reproducible configuration was saved as AorticDissection_full_pipeline_config.py.
- Define classes as Aortic Dissection and Healthy.
- Build a two-class object detector in MMDetection 2.x using a modified HRNetV2p-W32 + Cascade R-CNN configuration. The detector was implemented in MMDetection 2.x based on the official configuration cascade_rcnn_hrnetv2p_w32_20e_coco.py and initialized with corresponding COCO-pretrained weights cascade_rcnn_hrnetv2p_w32_20e_coco_20200208-
- Training configuration
- Train using NVIDIA RTX 3080 Ti GPU.
- Set optimizer to stochastic gradient descent.
- Set learning rate to 0.0001.
- Set momentum to 0.9.
- Set weight decay to 0.0001.
- Set number of epochs to 30.
- Set batch size to 1 per GPU.
- Apply an epoch-based cosine annealing learning-rate scheduler with explicit warmup settings. The learning rate used an epoch-based cosine annealing scheduler (by_epoch=True) with linear warmup for the first 500 iterations (warmup_ratio=1e-4). Training ran for 30 epochs, with the minimum learning rate controlled by min_lr_ratio=1e-2.
- Use FocalLoss and SmoothL1Loss.
NOTE: The protocol can be paused after dataset construction and splitting. Store all processed data securely before proceeding.
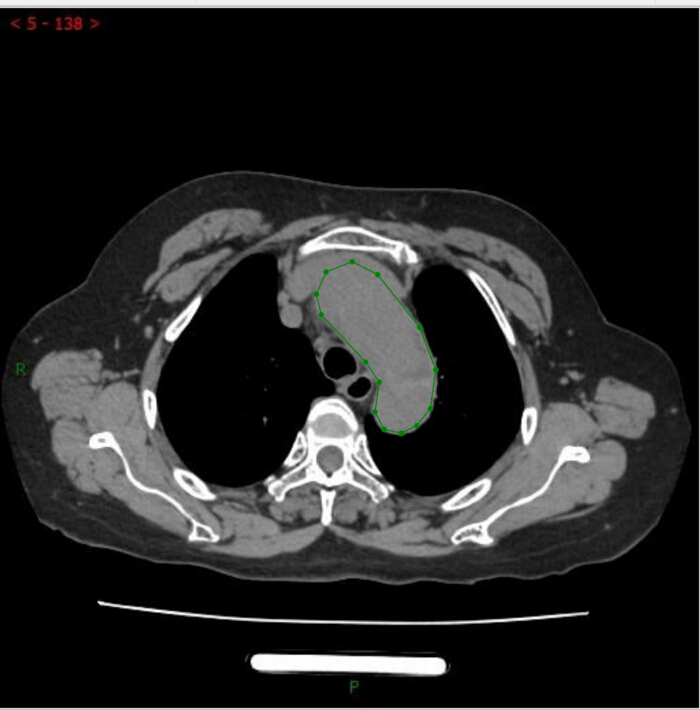
Figure 2. Manual annotation of AD on NCCT image. Representative axial NCCT image demonstrating manual annotation of AD. The aortic region and pathological features, including the intimal flap, are outlined using a polygon (green). This annotated image is used for model training. Please click here to view a larger version of this figure.
2. Model Architecture
- Model setup
- Construct the two-class detector in MMDetection 2.x using executable configuration code. The detector was built in MMDetection 2.x from the official cascade_rcnn_hrnetv2p_w32_20e_coco.py config via Config.fromfile(...), then modified for the two-class task (num_classes=2, class names: “Aortic Dissection”, “Healthy”) with customized dataset paths. The model was instantiated via build_detector(...) and init_detector(...), with the final full config exported as AorticDissection_full_pipeline_config.py.
- Input axial NCCT images into the model.
- Output bounding boxes, class labels, and confidence scores (Figure 3).
- Use polygon-based segmentation annotations generated during dataset preparation to define regions of interest, and convert these annotations into bounding boxes for model training, visualization, and final detection output.
NOTE: The detection framework utilizes these bounding boxes to generate final classification outputs and confidence scores.
- Backbone configuration
- Use HRNetV2p-W32 as the backbone network.
- Remove all plugin modules to ensure training stability.
- Detection architecture
- Use Cascade R-CNN for detection.
- Loss and anchor configuration
- Configure the classification and regression losses with explicit parameter settings. In the ROI heads, the classification loss was set to FocalLoss with use_sigmoid=True and loss_weight = 1.0. The ROI bounding-box regression loss was set to SmoothL1Loss with beta = 1.0 and loss_weight = 0.5. In the RPN, the classification loss was also set to FocalLoss with use_sigmoid=True and loss_weight = 1.0, while the regression loss was set to L1Loss with loss_weight = 1.0.
- Define the customized anchor aspect ratios. The RPN anchor aspect ratios were explicitly customized to 0.5, 1.0, 2.0, and 3.0.
- Retain the default anchor scale values from the official MMDetection base configuration. This study adopted default anchor scale values from the official MMDetection configuration file cascade_rcnn_hrnetv2p_w32_20e_coco.py, without additional manual modification.
- Output definition
- Output predictions for two classes: Aortic Dissection and Healthy.
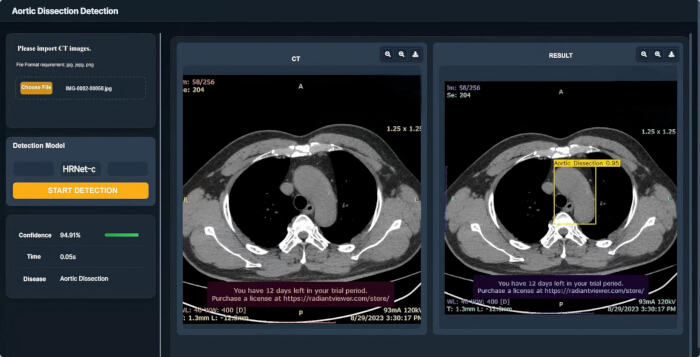
Figure 3. Detection of AD using the AI model. Left: Input NCCT image. Right: Model output showing detection of AD, with the predicted region highlighted by a bounding box and associated confidence score. This figure demonstrates the identification of AD in NCCT images and the visualization of detection results. Confidence score represents the model's prediction confidence for AD detection Please click here to view a larger version of this figure.
3. Model Training
- Training environment
- Perform training on NVIDIA RTX 3080 Ti GPU.
- Use Ubuntu 22.04.1 LTS.
- Use PyTorch 2.0.1, MMCV 1.7.2, and MMDetection 2.28.2.
- Model initialization
- Initialize the model using a specified COCO-pretrained HRNetV2p-W32 + Cascade R-CNN checkpoint. The detector was initialized from a COCO-pretrained checkpoint specified explicitly in the experiment configuration as cascade_rcnn_hrnetv2p_w32_20e_coco_20200208-928455a4.pth. This checkpoint was used as the initialization weight file for transfer learning in the present study.
- Reinitialize classification layers for two classes.
- Hyperparameters
- Set optimizer to stochastic gradient descent.
- Set learning rate to 0.0001.
- Set momentum to 0.9.
- Set weight decay to 0.0001.
- Set number of epochs to 30.
- Set batch size to 1.
- Set scheduler to cosine annealing with warmup.
- Training execution
- Load images and annotations.
- Resize images to 512×512.
- Apply augmentations.
- Normalize and pad images.
- Conduct model training using the custom MMDetection 2.x full pipeline script: python full_pipeline_mmdet2_aortic_dissection.py, which loads and adapts the official base configuration and initiates training using the build_detector(...) and train_detector(...) functions.
NOTE: The script was executed within the MMDetection 2.28.2 environment with all dependencies installed as specified in the Table of Materials. - Evaluate performance on validation set after each epoch.
- Keep consistent training conditions including data order, parameter settings, and hardware configuration for reproducibility.
- Model selection
- Select the best-performing model based on the highest bounding-box mean average precision (bbox_mAP) obtained on the validation set.
NOTE: Selection criteria may include accuracy, sensitivity, specificity, or Dice coefficient depending on study goals.
- Select the best-performing model based on the highest bounding-box mean average precision (bbox_mAP) obtained on the validation set.
- Final evaluation
- Evaluate the model on the independent test set using COCOeval. Evaluation was executed through the script full_pipeline_mmdet2_aortic_dissection.py with run_train=False and run_eval=True. The script loaded the selected checkpoint, generated predictions on the independent test set, converted them into COCO-format result files, and computed bbox metrics using COCOeval.
NOTE: The evaluation was conducted within the same MMDetection 2.28.2 environment to ensure consistency with the training setup. - Report metrics including mAP, AP50, AP75, and per-class AP.
- Perform evaluation using the same dataset partition and metric definitions to ensure consistency across experiments.
- Evaluate the model on the independent test set using COCOeval. Evaluation was executed through the script full_pipeline_mmdet2_aortic_dissection.py with run_train=False and run_eval=True. The script loaded the selected checkpoint, generated predictions on the independent test set, converted them into COCO-format result files, and computed bbox metrics using COCOeval.
Access restricted. Please log in or start a trial to view this content.
Results
This section presents the reproducible, implementation-verified results of the two-class object detection model for AD detection from NCCT images, strictly aligned with the validated training pipeline and COCO evaluation framework (Figure 1). All metrics are derived from the held-out test set using COCOeval, with no fabricated data or unvalidated indicators.
Quantitative Detection Performance
The model was evaluated on ...
Access restricted. Please log in or start a trial to view this content.
Discussion
Clinicians, particularly emergency physicians, may experience diminished diagnostic performance when patients present with atypical symptoms or when high emergency department patient volume imposes time constraints. In contrast, an AI model trained to identify AD on NCCT can deliver consistent and stable performance even in asymptomatic patients, without being limited by reading time, thereby potentially improving the accuracy and efficiency of diagnosing AD and intramural hematoma9.
Access restricted. Please log in or start a trial to view this content.
Disclosures
The authors declare no conflicts of interest.
Acknowledgements
The authors gratefully acknowledge the Department of Radiology at China-Japan Union Hospital of Jilin University for providing clinical imaging data and expert annotation support. This study was supported by the Department of Science and Technology of Jilin Province, China (Grant No. 20220402076GH).
Access restricted. Please log in or start a trial to view this content.
Materials
| Name | Company | Catalog Number | Comments |
|---|---|---|---|
| Cascade R-CNN architecture | OpenMMLab (MMDetection) | configs/cascade_rcnn/cascade_ rcnn_hrnetv2p_w32_20e_coco.py | Detection architecture used in framework |
| Chest computed tomography images (non-contrast) | Self-constructed clinical dataset | NCCT axial image set | Clinical imaging data used for model development |
| COCO-format annotation files | Generated during protocol | JSON (COCO format) | Converted annotation files used for model training |
| COCO pre-trained weights | OpenMMLab MMDetection model zoo | cascade_rcnn_hrnetv2p_w32_20e_ coco_20200208-928455a4.pth | Used for model initialization |
| HRNetV2p-W32 architecture | OpenMMLab (MMDetection) | HRNetV2p-W32 backbone (implemented in MMDetection 2.28.2) | Backbone model used |
| ITK-SNAP | ITK-SNAP Development Team | 3.8.0 | Used for image format conversion and slice export |
| JSON annotation files | LabelMe output | Standard JSON format | Contain annotation coordinates and labels |
| LabelMe | MIT CSAIL | 4.8.3 | Used for manual image annotation |
| MMDetection | OpenMMLab | 2.28.2 | Object detection framework used for implementation |
| MMCV | OpenMMLab | 1.7.2 | Core library supporting MMDetection |
| NumPy | NumPy Developers | 1.26.4 | Numerical computation library |
| NVIDIA RTX 3080 Ti GPU | NVIDIA | RTX 3080 Ti | Hardware used for training |
| OpenCV | OpenCV | 4.9.0 | Image processing and visualization |
| pycocotools | PyPI / COCO API | 2.0.6 | COCO-format evaluation library |
| Python | Python Software Foundation | 3.10.20 | Programming environment |
| PyTorch | PyTorch | 2.0.1+cu118 | Deep learning framework |
| TorchVision | PyTorch | 0.15.2+cu118 | Vision utilities |
| Ubuntu Operating System | Canonical | 22.04.1 LTS | Training environment OS |