This protocol visualizes the deposition of lignin and pectin cell wall components in cross sections of alfalfa (Medicago sativa L.) stems. The objective is to identify specific tissues of the stem that could be targeted to develop new alfalfa lines with desirable stem digestibility characteristics.
Method Article
In vitro Incubation with Rumen Fluid and Histological Staining of Select Cell Wall Components in Alfalfa (Medicago sativa L.) Stems
In This Article
Summary
Abstract
The accumulation of cell wall components as plants grow limits forage nutrition for ruminants. In particular, lignin deposition in plant tissues impedes the breakdown of the cell wall carbohydrates cellulose and hemicellulose, thereby reducing the amount of energy available from forage. The highly digestible pectin component of the cell wall, however, is readily available for degradation. Information about lignin and pectin deposition in different stem cell types may provide mechanistic insights into the factors underlying variation in stem digestibility among alfalfa lines. In vitro incubation of stem cross sections in rumen fluid simulates the processes that stem tissues undergo in the rumen. Coupled with histological staining and microscopy, this method enables visualization of changes in tissue degradation over time and the location of lignin and pectin in the stem. Wiesner stain reacts with guaiacyl (G) aldehyde units of lignin, staining them fuchsia. Similarly, ruthenium red interacts with the carboxylic groups of pectin, staining pectin in the stem in shades ranging from pink to orange and brown. This protocol describes the digestion of alfalfa stem cross-sections after exposure to rumen microbes, followed by staining to visualize lignin and pectin patterns in the cell walls. The method can be used to identify stem tissues in which lignin and pectin are present or absent, facilitating comparisons among alfalfa lines.
Introduction
A cell wall encloses every plant cell. Cellulose, hemicellulose, lignin, and pectin are components of the cell wall and contribute to plant fiber, a necessary part of the ruminant diet. While pectins are highly digestible (soluble) polysaccharides1, lignin is an indigestible polymer that limits fiber degradation2. Lignin therefore reduces plant digestibility and ultimately decreases the energy available to the ruminant from forage. However, lignin supports important plant physiological functions, such as conducting water throughout the plant by reinforcing tracheid elements3. Previous work has shown that changes to stem fiber that reduce lignin or increase pectin could enhance stem digestibility and forage nutritive value4. Thus, this protocol focuses on these two cell wall components. Total stem cell wall concentrations of lignin and pectin provide insufficient information to explain the mechanisms underlying stem fiber digestibility5. In vitro incubation with rumen fluid and histological staining can provide insights at the cellular level by visualizing differences in cell wall components among plants with varying stem fiber digestibility4,6. In the present protocol, alfalfa (Medicago sativa L.), a common perennial forage legume, serves as a model species to illustrate patterns of lignin and pectin in stem tissues, which contain more lignin but less pectin than leaves.
In vitro incubation with rumen fluid simulates forage digestion in the ruminant stomach, allowing observation of the effects of forage anatomy on digestibility. By creating conditions in a test tube similar to those found in the rumen, stem cross sections adhered to glass slides can be removed at various time points to assess the degree of tissue degradation following exposure to rumen fluid6. This method provides a relatively simple, rapid, and inexpensive approach for visualizing the anatomical structures of alfalfa stems7 and examining how cell types containing different cell wall components change as the stem is digested.
Histological staining of stem cross sections allows visualization of cell wall components. Phloroglucinol and hydrochloric acid (HCl) combine to form Wiesner stain, which highlights stem tissues containing guaiacyl-rich lignin units8 by reacting with G C6C3 aldehyde (coniferaldehyde) monomers9. Lignin consists of multiple monomer subunits; however, throughout this article, the term “lignin” refers solely to the G-unit monomer, as it is the monomer that reacts with Wiesner stain10 and is therefore visualized using this protocol. Some tissues, such as xylem vessels, are always lignified6. Otherwise, lignin deposition in alfalfa stem tissues begins once secondary (cambial) growth initiates and coincides with the cessation of stem internode elongation6. Ruthenium red binds to pectic substances, which contain carboxyl groups that are sometimes esterified and share some side chains11. The carboxylic groups of pectins present in the middle lamella and primary cell walls interact with ruthenium red11. Pectin is involved in cell elongation and is therefore present in cells during primary growth. Throughout the manuscript, the term “pectin” refers generally to the suite of pectins that may be present. Pairing histological staining with rumen in vitro incubation facilitates observation of the location of cell wall components in the stem and highlights how different cell types change during ruminal digestion. Ultimately, this protocol can be used to identify lignin- and pectin-containing stem cells and to characterize patterns across alfalfa lines and incubation times.
Protocol
This research was conducted in compliance with institutional guidelines for animal subjects (IACUC 2301-40689B).
1. Labeling of sample tubes
- Preparation and labeling of sample tubes for incubation, storage, and staining
- Pre-label five separate sets of disposable, screw-cap, 50 mL conical centrifuge tubes for each sample. Add the sample identifier and incubation time to each tube for the uses described below.
- Label the pre-incubation holding tubes and add 35 mL of ultrapure water.
- Label the incubation tubes for use in Sections 3 and 4. Organize the tubes into separate racks by incubation time (0, 4, 8, 24, 48, or 96 h).
NOTE: Use an industrial-grade permanent marker to prevent the labels from washing off in the water bath. - Label the post-incubation storage tubes and add 35 mL of a 50:50 mixture of 100% glycerol and ultrapure water. Use these tubes to store digested cross sections on slides until staining.
- Label the pre-staining tubes and add 35 mL of a 50:50 mixture of 200-proof ethanol and ultrapure water. Use these tubes to extract glycerol from the cross sections before staining.
- Label the hydrating tubes and add 35 mL of ultrapure water.
2. Stem cross-sectioning and mounting on slides
- Using forceps, select one stem segment at a time from the sample stems and excise the center of the segment.
NOTE: Use four stems per sample as technical replicates for each biological replicate. Randomly select the four stems from all possible stems per sample. Use an additional set of standard stems as a control across all incubation runs. - Cut two rectangles of extruded polystyrene rigid foam insulation, each approximately 2.5 cm long and 0.6 cm thick. Cut a small wedge along the length of each piece so that a stem internode fits snugly between the two pieces of foam.
- Mount the stem “sandwich” on the stage of a sliding microtome capable of producing 100 μm-thick sections. Using a fine-pointed paintbrush, place a drop of water on the stem and microtome blade to facilitate clean sectioning.
- Cut the stem cross sections to a thickness of 100 μm. Use the paintbrush to transfer each cross-section to a pre-labeled Petri dish containing ultrapure water for temporary storage, and remove any foam from the dish.
NOTE: Replace the microtome blade if the foam tears, as tearing may indicate a dull blade. - Hand-label two standard 25 mm × 75 mm glass slides for each sample at each incubation time (2 stains × 6 time points = 12 slides per sample for each of the biological replicates). Include the sample identifier, incubation time, and stain on each label.
- Cut a 2.5 cm-long piece of 2 mm-wide double-sided tape. Position the short side of the tape 0.5 cm from the bottom of the slide, with the adhesive side facing down, and firmly press the wax-paper side of the tape while wearing gloves to ensure adhesion.
NOTE: Perform this step on a flat surface to avoid breaking the glass slides. - Use a dissecting microscope to orient all cross sections in the same direction. Remove the wax paper from the double-sided tape and, while maintaining the orientation of the cross sections, transfer them to the tape on the pre-labeled glass slide using a wetted, fine-tipped paintbrush. Keep the cross sections slightly moist.
- Place the wax paper over the cross sections and lightly roll the paintbrush over it to secure the cross sections firmly to the double-sided tape. Remove the wax paper and place the mounted slide containing four cross sections into the pre-labeled holding tube described in step 1.1.2, ensuring that the ultrapure water covers the mounted cross sections.
- For staining with both ruthenium red and Wiesner stain, place two slides back-to-back in each holding tube with the double-sided tape facing outward.
NOTE: After mounting all slides and placing them in tubes containing ultrapure water, store the slides overnight at room temperature if necessary.
3. Preparation for in vitro incubation of stem cross sections
- Use the disposable, screw-cap, 50 mL centrifuge tubes prepared for incubation (see 1.1.3). Group all sample tubes for each incubation interval on a single plastic rack.
- Use a four-decimal-place analytical balance to weigh 0.2 g of a 1 mm-ground corn stalk standard onto weighing paper, and carefully transfer the material into each incubation tube except for the 0 h tubes, which serve as the unincubated control. Cap the tubes and set them aside until use.
NOTE: The corn stalk standard provides energy to sustain rumen microbes during incubation because the biomass of the stem cross-sections is insufficient to maintain microbial activity. - Fill a circulating water bath with sufficient water and equilibrate it to 39 °C before beginning the incubation. Adjust the water depth to cover the 35 mL mark on the 50 mL tubes, and use an aerator if necessary to maintain uniform water circulation and temperature.
- Preparation of McDougall’s buffer for the inoculation solution
- Prepare McDougall’s buffer no more than 2 days before initiating the incubations.
NOTE: Mix McDougall’s buffer with rumen fluid at a 4:1 ratio to prepare the inoculation solution. Adjust the buffer volume to match the number of samples, and prepare enough inoculation solution to provide 30 mL per tube. - Measure 1,600 mL of ultrapure water. Transfer 1 L into a 3 L flat Erlenmeyer flask and reserve 600 mL for transferring and rinsing reagents.
- Place a magnetic stir bar in the Erlenmeyer flask and position the flask on a stirring plate.
- Place a plastic funnel in the Erlenmeyer flask. Add 15.7 g sodium bicarbonate (NaHCO₃), 5.9 g sodium phosphate dibasic anhydrous (Na₂HPO₄), 0.91 g potassium chloride (KCl), 0.75 g sodium chloride (NaCl), 0.19 g magnesium sulfate heptahydrate (MgSO₄·7H₂O), and 0.06 g calcium chloride dihydrate (CaCl₂), adding one reagent at a time and allowing each reagent to dissolve before adding the next. Use portions of the reserved 600 mL of ultrapure water to rinse the funnel after each addition.
- After adding calcium chloride dihydrate, insert a CO₂ diffuser to facilitate dissolution and sparge the solution. Once the solution becomes clear, continue sparging for an additional 10–15 min.
- Stopper the flask tightly and secure the stopper with masking tape because warming the buffer may pressurize the container.
- Store the solution at 20 °C for up to 2 days. Place the solution in a 39 °C water bath the day before use, or place it directly in the 39 °C water bath if it will be used the following day.
- Prepare McDougall’s buffer no more than 2 days before initiating the incubations.
4. In vitro incubation of stem cross sections
- On the day of incubation, place 47 mL of water and 4 mL of 1 N NaOH in a 100 mL beaker in a fume hood, and add 0.625 g of cysteine-HCl. In a second 100 mL beaker, add 0.625 g of sodium sulfide to 47 mL of water, and keep the two solutions separate until the inoculation solution is prepared.
- Fill an insulated thermos with hot water to establish a warm environment for transporting rumen microorganisms from the cow to the laboratory. Bring a five-gallon bucket for transferring the hot water from the thermos.
- Travel to the barn to collect rumen fluid from the cannulated cow assigned to the experiment by the barn management.
NOTE: Collect rumen fluid at approximately the same time of day and from the same cow throughout an experiment to minimize variation. Coordinate with the barn management to provide advanced notice of when you will be at the barn to collect rumen fluid. - Identify the experimental cow and wear appropriate personal protective equipment, including a laboratory coat, eye protection, boot covers, and shoulder-length gloves.
NOTE: Restrict the procedures in steps 4.4–4.8 to personnel authorized under the applicable IACUC protocol. - Transfer the warm water from the thermos into the five-gallon bucket. Prepare two layers of grade 50 gauze (cheesecloth) for filtering the rumen material.
- Collection of rumen fluid from the cannulated cow
- Carefully open the cannula and place the stopper in the five-gallon bucket with warm water to avoid contaminating the stopper. Using a gloved hand, remove sufficient material from the rumen to access the solid-liquid interface of the rumen.
- Once at the solid-liquid interface, collect several handfuls of material and squeeze it through two layers of grade 50 gauze, approximately 45 cm square each, into a pre-warmed screw-cap thermos. Discard the spent material after squeezing rumen fluid through the gauze.
- Repeat step 4.6.2 until there is 1 L of rumen fluid in the thermos for each set of 60 inoculation tubes, adjusting the volume as needed based on the number of samples to be incubated.
NOTE: Cannulated cows have specific limits on how much rumen fluid can be extracted for a given week. Communicate with the barn manager to ensure that the amount of rumen fluid withdrawn does not exceed the limit for the cow.
- Upon collecting sufficient rumen fluid, tightly close the thermos to maintain its temperature. Replace the cannula and use the warm water in the five-gallon bucket for cleanup.
- Discard soiled boot covers, gloves, and gauze in the proper disposal receptacle upon leaving the barn. Return to the laboratory as soon as possible to maintain the rumen fluid's temperature and anoxic conditions.
- Upon returning to the laboratory, combine the two reducing-agent solutions (see 4.1) in the fume hood and mix them to prepare the reduction solution.
- Place a glass beaker of at least 2 L capacity containing a large stir bar on a heated stirring plate set to <30 °C, and position a CO₂ diffuser above the liquid. Add 1,600 mL of McDougall’s buffer and stir slowly without allowing the CO₂ diffuser to contact the liquid.
NOTE: Use a polypropylene beaker if desired at this low temperature. Use CO₂ to displace O₂ and help maintain anoxic conditions. - Line a large funnel with two layers of grade 50 cheesecloth and place it over a 2 L graduated cylinder. Filter 400 mL of rumen fluid and add it to the McDougall's buffer (see 3.4.7) to prepare the inoculation solution.
- Add 80 mL of the reduction solution (see 4.9) to the inoculation solution and mix slowly. Keep the CO₂ diffuser from coming into contact with the liquid.
- In the fume hood, remove the caps from the incubation tubes and organize them into separate racks by incubation time. Uncap the pre-incubation holding tubes in preparation for transferring the slides (see 1.1.2).
- Randomly select one pre-incubation holding tube at a time and use forceps to transfer the mounted glass slides to the corresponding incubation tube (see 1.1.3). Place each incubation tube containing the mounted slides into a small sample rack and set the pre-incubation holding tube aside.
NOTE: Use two people to perform steps 4.14–4.15. When possible, minimize the cooling of the rumen fluid-buffer mixture. - Draw 30 mL of inoculation solution into a 60 mL syringe fitted with a blunt, large-bore needle. Slowly dispense the solution down the side of the incubation tube, purge the tube with CO₂ for approximately 20 s, cap the tube, and return it to the rack.
- Place the racks containing the inoculated tubes in a 39 °C water bath. Gently swirl the tubes at least once daily and shift the rack positions daily to minimize uneven heating.
NOTE: Formation of gas bubbles in the tubes indicates active fermentation. - At the end of each incubation period, remove the corresponding rack from the water bath. Open one tube at a time, remove each slide, and gently rinse away solids and residual inoculation solution with ultrapure water.
- Place the rinsed slides into the post-incubation storage tubes containing the glycerol-water mixture described in step 1.1.4.
5. Cross-section staining for lignin
- If the slides have been stored in a 50:50 glycerol-water mixture, transfer both slides containing the mounted cross sections into pre-staining rinse tubes containing the ethanol-ultrapure water solution (see 1.1.5). Store the tubes overnight in a refrigerator to remove glycerol before staining.
- Prepare a 3% phloroglucinol (PG) solution by dissolving 0.3 g of PG in 10 mL of absolute ethanol in a 25 mL Erlenmeyer flask wrapped in aluminum foil to protect the photosensitive reagent from light. Stopper and label the flask with the solution name, preparation date, and preparer’s name, and store it at 20 °C.
- Remove the slides from the refrigerated tubes and temporarily transfer them to the hydrating tubes described in step 1.1.6, containing 100% ultrapure water.
NOTE: Keep the cross sections hydrated during handling to minimize oxidation, which can damage the sections and affect subsequent imaging. - Prepare the Wiesner stain in the fume hood using a pipetter by mixing 50 μL of 3% PG in ethanol (see 5.2) with 25 μL of hydrochloric acid (HCl) in a 50 mL beaker.
NOTE: Adjust the quantities to match the number of slides while maintaining a 2:1 PG-to-HCl ratio.
CAUTION: Handle hydrochloric acid in a fume hood because it is corrosive to metals, causes severe skin burns and eye damage, and may cause respiratory irritation. Avoid inhaling fumes or aerosols, wear appropriate protective gloves, clothing, eye protection, and face protection, and wash exposed skin thoroughly after handling. - Remove one slide from the tube and gently blot the glass around the double-sided tape with a low-lint tissue to prevent the stain from flowing off the tape. Place the slide on a small plastic tray and use a pipette to apply several drops of Wiesner stain over the cross sections.
- Set a timer for 12 min and cover the slides with aluminum foil to protect it from light. Check the cross sections during staining and reapply the stain as necessary to prevent drying.
NOTE: Prevent the cross sections from drying because oxidation can damage the tissue and affect subsequent imaging. - After 12 min, gently remove excess Wiesner stain with a low-lint tissue. Wash the tissue before mounting to minimize exposure of the microscope objective lens to corrosive HCl fumes.
- Apply 1–2 drops of 50% glycerol-ultrapure water over each cross section and cover with a 24 mm × 30 mm coverslip (No. 1.5 thickness). Proceed immediately to microscopic analysis and imaging.
NOTE: Acquire images within 6–8 h because Wiesner staining is time-sensitive and may turn yellow and diffuse from the cross-section over time.
6. Cross-section staining for pectin
- Follow step 5.1 to remove the glycerol-ultrapure water mixture from stored slides before staining.
- Prepare a 0.02% ruthenium red solution by dissolving 0.02 g of ruthenium red in 100 mL of ultrapure water in a 125 mL Erlenmeyer flask wrapped in aluminum foil to protect the photosensitive reagent from light. Stopper and label the flask with the solution name, preparation date, and preparer’s name, and store it at 20 °C.
- Remove the slides from the refrigerated ethanol-ultrapure water tubes and transfer the correctly labeled slides containing mounted sections to tubes containing 100% ultrapure water (see 1.1.6) for temporary holding.
NOTE: Follow the hydration precautions described in step 5.3. - Remove one slide from the ultrapure water using forceps and blot the water around the tape with a low-lint tissue to prevent the stain from flowing onto the glass. Place the slide on a small plastic tray.
- Apply several drops of ruthenium red solution (see 6.2) to evenly cover the cross sections. Cover the slides with aluminum foil for 10 min to protect them from light, then gently rinse the stain from the slide with ultrapure water for 2 min.
- Blot excess water from the slide and apply 1–2 drops of 50% glycerol-ultrapure water over each cross section. Cover the cross sections with a 24 mm × 30 mm coverslip (No. 1.5 thickness) and proceed to microscopic analysis and imaging.
NOTE: Conduct microscopic analysis on the same day for optimal results.
7. Brightfield imaging
- Observe the cross sections under brightfield illumination using a microscope at 10×, 20×, and 40× magnification. See Table 1 for image acquisition parameters and settings.
Results
The use of centrifuge tubes to simulate rumen conditions enabled relatively rapid, inexpensive in vitro digestion of Medicago sativa stem cross sections. Using a sliding microtome, 100 μm-thick cross sections of M. sativa stems were prepared (Figure 1A). The stem cross sections were adhered to glass slides with double-sided tape (Figure 1B) and immersed in rumen fluid inoculation solution for incubation periods ranging from 4 h to 96 h (Figure 1C). For the in vitro incubation, capped disposable 50 mL centrifuge tubes were used as incubation vessels and supplemented with 0.2 g of 1-mm-ground corn stalk substrate to sustain rumen microorganisms throughout the incubation. The tubes were incubated in a water bath maintained at 39 °C (Figure 1D). Active fermentation by rumen microorganisms was visually confirmed by gas bubbles forming in the inoculation solution. The materials required for this protocol are commonly available in wet chemistry laboratories. Double-sided tape did not prevent tissue degradation during exposure to rumen fluid but retained the portions of the stem that remained after digestion, allowing subsequent staining and microscopic visualization.
Stem cross sections that were not subjected to in vitro incubation (0 h) enabled visualization of initial cell wall components across different stem tissues. Cross sections stained with Wiesner stain identified tissues exhibiting lignin-associated staining (Figure 2A–E), whereas cross sections stained with ruthenium red highlighted tissues exhibiting pectin-associated staining (Figure 3A–E). In Wiesner-stained sections, mature primary phloem fibers exhibited fuchsia staining (Figure 2B–E). Xylem vessels and interfascicular xylem also exhibited fuchsia staining (Figure 2B–D). Ruthenium red staining was observed in the epidermis, collenchyma, chlorenchyma, secondary phloem (Figure 3B–E), and pith (Figure 3B–D). Some interfascicular xylem and primary phloem fibers also stained with ruthenium red (Figure 3B–E). Whole-stem cross sections were visualized by stitching together a 5 × 5 grid of images acquired at 10× magnification (Figure 2A and Figure 3A). Additional images of one region of the stem cross-section were acquired at 10× (Figure 2B and Figure 3B), 20× (Figure 2C and Figure 3C), and 40× magnification above (Figure 2D and Figure 3D) and below (Figure 2E and Figure 3E) the vascular cambium.
Wiesner-stained tissues of M. sativa stem cross sections were evident across all in vitro incubations from 0 h to 96 h (Figure 4A–F). At 0 h, all cells have clear edges (Figure 4A). After 8 h, evidence of tissue degradation was apparent from the blurring of the edges of cells with thin, unlignified (i.e., unstained) cell walls (e.g., collenchyma) and the disappearance of cells (e.g., secondary phloem). After 24 h, the spiral three-dimensional structure of the xylem vessels became more apparent as the surrounding tissues degraded (Figure 4D). Beyond 24 h, unstained cells progressively degraded and disappeared (Figure 4D–F). As these tissues degraded, loss of anatomical support caused the unstained epidermis to collapse laterally, producing the appearance of a ribbon of thin, transparent cells at 24, 48, and 96 h (Figure 4D–F).
In vitro incubation of M. sativa stem cross sections followed by ruthenium red staining enabled visualization of pectin-associated staining in stem tissues after 0–96 h of exposure to rumen fluid (Figure 5A–F). At 0 to 4 h, clear edges around all cells indicate that they were intact (Figure 5A,B). As incubation time progressed to 8 h, tissues with thin, unlignified cell walls in the cortex, including the collenchyma, chlorenchyma, and secondary phloem, progressively lost structural integrity, resulting in the blurring of cell edges (Figure 5C). At 24, 48, and 96 h, much of the surrounding cortical tissue was absent, whereas portions of the epidermis, interfascicular xylem, pith, and vascular tissues remained visible (Figure 5D–F). Loss of the surrounding anatomical structure was accompanied by lateral collapse of the epidermal region. By 96 h, substantially less ruthenium red-stained tissue remained than at the earlier incubation times (Figure 5F). Overall, the progressive loss of stem tissue during incubation was accompanied by a reduction in cells staining positive for ruthenium red. The degradation and disappearance of thin, non-lignified, and pectin-associated cells were expected because pectin readily degrades over time.
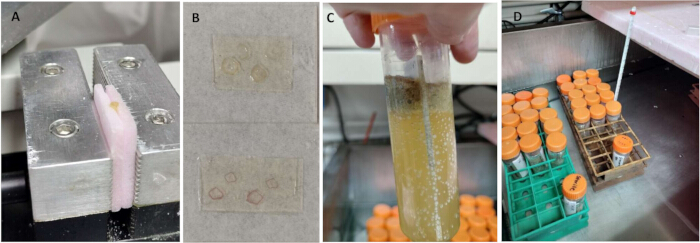
Figure 1: In vitro incubation of alfalfa stem cross sections. (A) Alfalfa stem segments were wedged between two pieces of extruded polystyrene rigid foam insulation and mounted on a sliding microtome stage for cross-sectioning. (B) Four cross sections, each 100 μm thick, were secured to a glass slide with double-sided tape for in vitro incubation and histological staining. (C) Two glass slides were placed back-to-back, with the double-sided tape facing outward, in a 50 mL tube containing 30 mL of rumen fluid-buffer inoculation solution and 0.2 g of 1-mm-ground corn stalk. The tube was purged with CO₂ and capped for incubation. Gas bubbles along the side of the tube indicated active fermentation by rumen microorganisms during incubation. (D) Racks containing the 50 mL tubes were maintained in a 39 °C water bath throughout the incubation. The water level covered the inoculation solution but remained below the tube openings, preventing water from entering the tubes. Please click here to view a larger version of this figure.
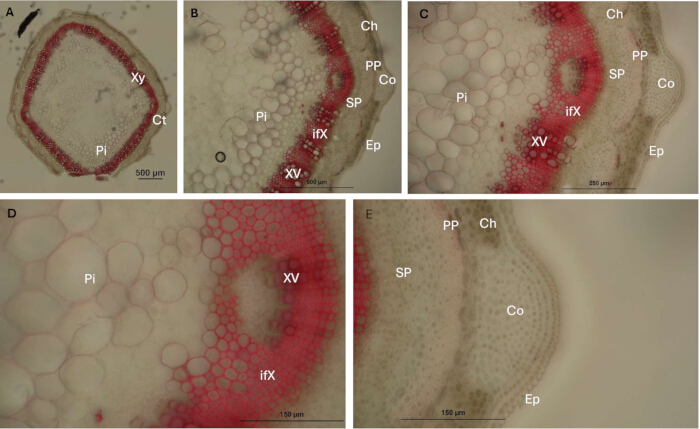
Figure 2: Wiesner staining of alfalfa stem tissues indicates the distribution of lignified cell wall components. (A–E) Undigested alfalfa stem cross sections (incubation time = 0 h) served as an initial reference for identifying stem tissues exhibiting Wiesner staining. Xylem vessels (XV), interfascicular xylem (ifX), and mature primary phloem fibers (PP) stained fuchsia. Magnifications and scale bars: (A) 5 × 5 grid of stitched images acquired at 10× magnification, scale bar = 500 μm; (B) 10×, scale bar = 500 μm; (C) 20×, scale bar = 250 μm; (D, E) 40×, scale bars = 150 μm. Abbreviations: Xy = xylem; Ct = cortex; Pi = pith; Ep = epidermis; Co = collenchyma; Ch = chlorenchyma; SP = secondary phloem; XV = xylem vessels; ifX = interfascicular xylem; PP = mature primary phloem fibers. Please click here to view a larger version of this figure.
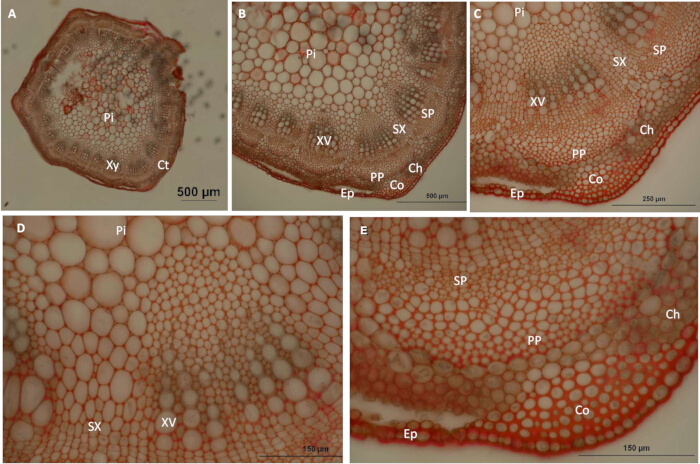
Figure 3: Ruthenium red staining of alfalfa stem tissues indicates the distribution of pectic polysaccharides in cell walls. (A–E) Undigested alfalfa stem cross sections (incubation time = 0 h) served as an initial reference for identifying stem tissues exhibiting ruthenium red staining. Epidermis (Ep), collenchyma (Co), chlorenchyma (Ch), secondary phloem (SP), and pith (Pi) exhibited red staining. Secondary xylem (SX) and mature primary phloem (PP) also exhibited staining, whereas xylem vessels (XV) remained comparatively unstained. Magnifications and scale bars: (A) 5 × 5 grid of stitched images acquired at 10× magnification, scale bar = 500 μm; (B) 10×, scale bar = 500 μm; (C) 20×, scale bar = 250 μm; (D, E) 40×, scale bars = 150 μm. Abbreviations: Xy = xylem; Ct = cortex; Pi = pith; Ep = epidermis; Co = collenchyma; Ch = chlorenchyma; SP = secondary phloem; XV = xylem vessels; SX = secondary xylem; PP = mature primary phloem. Please click here to view a larger version of this figure.
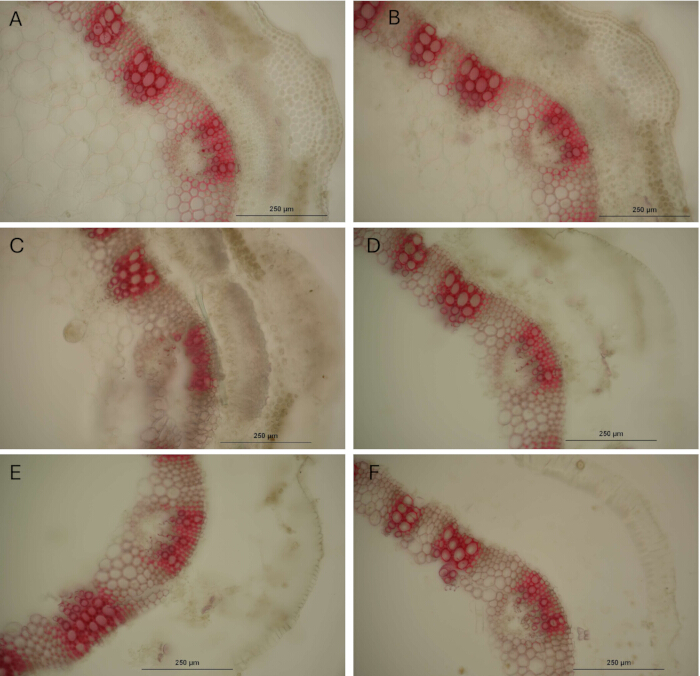
Figure 4: Changes in alfalfa stem tissues following in vitro incubation and Wiesner staining. Alfalfa stem cross sections from the same internodes were subjected to in vitro incubation with rumen fluid for (A) 0 h, (B) 4 h, (C) 8 h, (D) 24 h, (E) 48 h, and (F) 96 h. Xylem vessels (XV), interfascicular xylem (ifX), and mature primary phloem fibers (PP) retained Wiesner staining across the incubation periods. Faint staining of the ifX was observed in immature stem tissue. As incubation time increased, the surrounding tissues progressively lost structural integrity, making the remaining stained vascular structures increasingly apparent. Scale bars = 250 μm. Please click here to view a larger version of this figure.
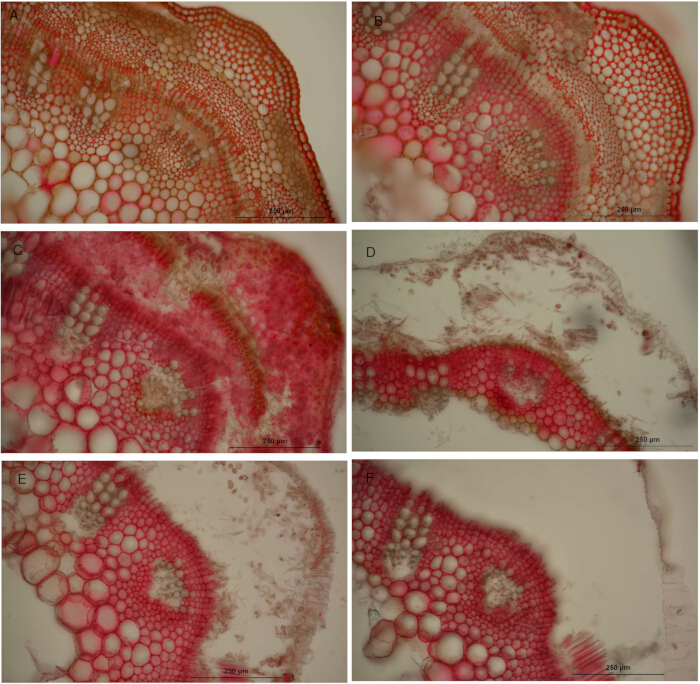
Figure 5: Changes in alfalfa stem tissues following in vitro incubation and ruthenium red staining. Alfalfa stem cross sections from the same internodes were subjected to in vitro incubation with rumen fluid for (A) 0 h, (B) 4 h, (C) 8 h, (D) 24 h, (E) 48 h, and (F) 96 h. Ruthenium red staining was observed in multiple stem tissues, whereas xylem vessels (XV) remained comparatively unstained. As incubation time increased, progressive loss of tissue structure and ruthenium red staining were observed. Portions of the xylem vessels, interfascicular xylem (ifX), and epidermal region (Ep) remained visible at later incubation times. Scale bars = 250 μm. Please click here to view a larger version of this figure.
| Parameter | Setting |
| Fast (Focus) | 2000 × 1328 |
| Quality (Capture) | 2000 × 1328 |
| Color Mode | RGB Color |
| Bit Depth | 8-bit per channel |
| Effective Color Depth | 24-bit RGB (8-bit R + 8-bit G + 8-bit B) |
| Gain | 2 |
| 10x magnification exposure time (ms) | 30 |
| 20x magnification exposure time (ms) | 50 |
| 150x magnification exposure time (ms) | 150 |
Table 1: Microscope and camera settings for imaging. Microscope, camera, and image-acquisition settings used for brightfield imaging with an upright microscope equipped with a digital color camera and imaging software.
Discussion
The alfalfa material used in the present study consisted of clones from five alfalfa lines. Two experimental lines were selected after two cycles of divergent selection for in vitro neutral detergent fiber digestibility (IVNDFD) from mother plants with either low 16 h IVNDFD and low 96 h IVNDFD or high 16 h IVNDFD and high 96 h IVNDFD12. Three commercial lines with unknown genetic backgrounds were also included in the study, and mother plants were selected based on near-infrared spectroscopy analysis to identify individuals with (a) the highest lignin, (b) the lowest lignin, and (c) the lowest neutral detergent fiber and acid detergent fiber. The five alfalfa lines were transplanted from a greenhouse in May 2021 to replicated field trials at two locations in Minnesota, USA. For both the first- and second-cut harvests of each growing season, 10 stems from each alfalfa line were harvested at the vegetative, early bud, early flowering, flowering, and green pod stages of plant maturity. The seventh internode from the base of each stem was excised and placed in a 50 mL tube containing a 50:50 mixture of 200-proof ethanol and ultrapure water for storage until cross-section incubation. This method was developed based on work previously performed by the laboratory group in the 1990s, in which the seventh internode was selected as the unit of study4,6.
In vitro incubation with rumen fluid and histological staining of alfalfa stems were used to gain insight into patterns of cell wall component deposition across degraded stem tissues. The in vitro incubations simulated the extent of degradation that an alfalfa stem undergoes in the rumen, and subsequent histological staining highlighted lignin and pectin in cells where these cell wall components remained detectable after timed microbial digestion. The use of a sliding microtome ensured a standardized cross-section thickness to minimize sectioning artifacts that could interfere with the results13. Although only lignin and pectin were examined in the present protocol, alternative stains such as toluidine blue, Astra blue, and Direct Red 23 can also be used for histological staining of these and other cell wall components14,15,16. Additionally, polarized light can be used to detect cellulose in cell walls, and fluorescent reagents such as safranin O can visualize lignin17 and cell wall polysaccharides. Furthermore, antibodies can be used to label specific pectins18. Beyond alfalfa, this protocol could be applied to other species. However, staining responses may vary among species, genotypes, developmental stages, and environmental conditions19.
The use of low-cost double-sided tape to adhere stem cross sections to glass slides has been previously described6,20. Before initiating this in vitro incubation protocol, it was necessary to identify a double-sided tape that could withstand submersion in liquid for several days and was readily obtainable. Several tape types differing in intended industrial use and thickness were evaluated. Briefly, 1-inch-long pieces of double-sided tape and stem cross sections were affixed to glass slides and immersed in water for varying durations over the course of 1 week to determine whether they remained adhered to the slides. Some double-sided tapes detached from the glass slides, whereas others became opaque after prolonged exposure to liquid. Loss of tape transparency interfered with microscopy and prevented the acquisition of high-quality images of the stem cross sections. A vinyl double-sided tape performed best among the adhesives tested. The tape used in the original experiments had been purchased in the 1990s and remained effective; however, the same product could not be obtained for subsequent experiments. Therefore, the selected tape should be tested before use to ensure that both the tape and cross sections remain adhered throughout the incubation period. The tape should also remain transparent to permit acquisition of high-quality images.
The in vitro incubation portion of the protocol involved multiple time-sensitive steps that required careful planning and coordination. The total time required for the in vitro incubation procedure may vary depending on the size of the experiment. For example, to generate a robust dataset of stem cross sections, four unique alfalfa stems were mounted on each slide for each sample × in vitro incubation interval × stain combination. With 16 samples, six incubation intervals, and two stains, a total of 768 stem cross sections were required for each in vitro incubation run. Approximately 8 h were required to prepare the 768 cross sections, which could then be stored overnight in Petri dishes containing ultrapure water and mounted the following day. Before mounting, 192 glass slides and 96 centrifuge tubes (50 mL) required labeling. Mounting the cross sections required an additional 8 h because the sections were oriented consistently across incubation intervals and stains to facilitate comparisons among stem tissues. This approach required more time than the random mounting of the cross sections. The mounted slides were stored overnight in ultrapure water before initiation of the in vitro incubation the following day. While the alfalfa stem cross sections were being prepared and mounted, McDougall’s buffer also required preparation. The buffer could be prepared no more than 2 days before initiating the in vitro incubation and required warming to 39 °C before inoculation of the mounted cross sections. Thus, careful planning and preparation were necessary for the successful completion of the protocol.
The Wiesner stain is commonly used to visualize lignin-associated structures in plant tissues. Although this staining method is relatively simple21 and reasonably specific22, it stains cinnamaldehyde end groups associated with guaiacyl (G) lignin units13. In dicotyledonous angiosperms such as alfalfa, G and syringyl (S) units are the primary constituents of the lignin polymer, although H-ringed subunits are also present. Wiesner staining may therefore underestimate total lignin in the stem because it does not react with S lignin. Both G and S units may be present in interfascicular xylem and primary phloem fibers (i.e., sclerenchyma tissues); therefore, although S units may not react with Wiesner stain, staining of G units can indicate the presence of lignin-associated structures in these tissues. Mäule stain could be used to visualize S units and provide a more complete representation of lignin units in the stem13. Variation in the intensity of ruthenium red staining of pectin may also occur depending on the esterification or de-esterification state of pectic acid23. Staining can range from a yellow-orange tone to a bright red hue. Because ruthenium red can interact with several carbohydrates, the use of this stain may result in overestimation of pectin in tissues11. Because the proportion of lignin increases as the alfalfa stem matures, lignin may also interfere with pectin staining in older stems. Differences among shades of a given stain can be difficult to distinguish visually; however, image analysis technologies may help overcome this limitation.
Following in vitro incubation with rumen fluid and histological staining, stem cross sections can be visualized under a microscope, and images can be acquired for subsequent analysis. Because Wiesner stain fades within 24 h9, brightfield microscopic analysis of stems stained for lignin should be completed on the same day as staining, ideally within 6–8 h, to ensure consistent coloration across images. Ruthenium red staining maintains its intensity over time; therefore, same-day imaging is less critical. Nevertheless, images stained with ruthenium red were also acquired within 6–8 h for consistency. Images were acquired using a high-definition, high-resolution digital color microscope camera equipped with a large-format CMOS image sensor. The same exposure, analog gain, bit depth, image quality, and focus settings were used to ensure comparability among images and minimize variation introduced by differences in acquisition settings. Exposure time was adjusted for magnification (10×, 20×, and 40×) to prevent over- or underexposure and produce high-quality images. Therefore, comparisons should be made among images acquired at the same magnification to minimize variation associated with different exposure settings. Imaging settings may require adjustment depending on the microscope and camera used (Table 1). Other microscopy techniques, including scanning electron microscopy 6,20 and fluorescence microscopy14,15,17, have also been used to visualize cell wall components, although brightfield microscopy was used in the present protocol.
This protocol generated a large dataset of stem cross-section images (>15,000), which could be leveraged to extend the qualitative information generated in this protocol with histological staining toward quantitative analysis using machine-learning technologies. Efficient image-analysis pipelines can automate and accelerate the extraction of quantitative data from images. Collaboration with computer scientists can facilitate the development of tools to preprocess images, remove extraneous noise, and extract features of interest to address multiple hypotheses. Machine-learning approaches require appropriate training and test datasets of sufficient size to ensure robust model performance. Smaller datasets can be analyzed using simpler image-analysis approaches, such as manual measurement of traits of interest with image-analysis software such as ImageJ24 or with image-analysis software associated with the microscope25. Therefore, consideration of the intended downstream use of the images can improve efficiency in determining the type and number of images to acquire, as well as the subsequent analytical approach.
Disclosures
The authors declare that the research was conducted without any commercial or financial relationships that could be construed as a potential conflict of interest. Mention of trade names or commercial products in this publication is solely for the purpose of providing specific information and does not imply recommendation or endorsement by the U.S. Department of Agriculture. The USDA is an equal opportunity provider and employer. All experiments complied with the current laws of the United States, the country in which they were performed.
Acknowledgements
The authors acknowledge R. Ted Jeo for his insights into prior related work. Thank you to the University Imaging Center at the University of Minnesota - Twin Cities for providing access to microscope image-acquisition and analysis software to prepare the images for publication. This work was supported by the United States Department of Agriculture – Agricultural Research Service [062-21500-001-000D] and the non-assistance cooperative agreement (No. 58-5062-2-016).
Materials
| Name | Company | Catalog Number | Comments |
|---|---|---|---|
| Aluminum foil | Boardwalk | 7106BW | 18 in × 1,000 ft; used to protect photosensitive staining solutions from light |
| Calcium chloride dihydrate, min. 99% | Sigma Life Science | C7902-500G | CAS No. 10035-04-8; reagent for McDougall’s buffer |
| Camera software | Nikon | NIS-Elements AR 5.42.04 | 64-bit imaging software used for image acquisition and analysis |
| Carbon dioxide gas | Matheson | UN1013 | Utility grade; used to maintain anoxic conditions during preparation and incubation |
| Circulating water bath | Precision | — | Temperature-controlled circulating water bath used to maintain samples at 39 °C |
| Corn stalk standard | University of Minnesota | NA | Harvested in fall 2023 in St. Paul, Minnesota, USA; ground to 1 mm and used as microbial substrate |
| Cover glass | Thermo Scientific | 3419 | 24 mm × 30 mm, No. 1.5 thickness, 1 oz |
| Digital Sight 10 color microscope camera with FX large-format CMOS image sensor | Nikon | MQA20000 | Digital color camera used to acquire brightfield microscopic images |
| Dissecting microscope | Nikon | SMZ18 | Stereo microscope used to orient and position stem cross sections |
| Double-stick tape | SelloTape Office Vinyl Double Sided Tape | 4270 | 2 mm × 53 m; used to secure stem cross sections to glass slides |
| Electric scale | AND | GH-202 | Analytical balance with four-decimal-place readability |
| Erlenmeyer flask (125 mL) | Kimax | 25600 | 125 mL flask; compatible with stopper No. 5 |
| Erlenmeyer flask (25 mL) | Pyrex | 4980 | 25 mL flask; compatible with stopper No. 0 |
| Ethanol (200 proof) | Fisher Scientific | 04-355-720 | Absolute ethanol used for preparation of staining solutions and pre-staining rinses |
| Extruded polystyrene rigid foam insulation | Owens Corning | 1407788 | 1 in × 2 ft × 2 ft, R-5, 15 PSI foam board; used to support stem internodes during sectioning |
| Forceps | Fisher Scientific | 10-316A | Laboratory forceps used for handling stem segments, slides, and mounted sections |
| Glass slides | FisherBrand | 125503 | 25 mm × 75 mm × 1 mm; used for mounting stem cross sections |
| Globe flask (6 L) | Pyrex | CLS43205L-4EA | 6 L glass flask used for preparation or handling of larger solution volumes |
| Glycerin, lab-grade liquid | Fisher Science Education | 525342C | CAS No. 56-81-5; glycerol used in mounting and storage solutions |
| Grade 50 double-ply cheesecloth | JINIOHEE Shop | B0FL27KXRN | 100% cotton, bleached white; used to filter rumen material and rumen fluid |
| Graduated cylinder (10 mL) | Pyrex | 700024 | 10 mL graduated cylinder used for measuring liquid volumes |
| Hydrochloric acid | Fisher | A1445-500 | CAS No. 7647-01-0; used with phloroglucinol to prepare Wiesner stain |
| Industrial super permanent marker | Sharpie | 13601 | Fine tip; used to label incubation tubes with water-resistant markings |
| L-cysteine hydrochloride hydrate | Sigma-Aldrich | C121800-10G | CAS No. 345909-32-2; reducing agent used in preparation of the incubation solution |
| Low-lint tissue | Kimberly-Clark | 34155 | 4.5 in × 8.5 in; used to blot excess liquid from slides without leaving fibers |
| Low-profile microtome blade | Leica 819 | 63065-LP | Replacement low-profile blade used for preparation of uniform stem cross sections |
| Magnesium sulfate heptahydrate | Fisher Chemical | M80-500 | CAS No. 10034-99-8; reagent for McDougall’s buffer |
| Magnetic stirring bar | Fisher Scientific | 03-411-783 | 76 mm × 12 mm; used for mixing buffer and inoculation solutions |
| Mailing address labels | Avery | 5167 | 1/2 in × 1 3/4 in; used for sample and slide identification |
| Paint brush | Loew-Cornell | — | Series 7000, No. 3 round; fine brush used to transfer and manipulate stem cross sections |
| Petri dishes with covers | Becton Dickinson Labware | 81731119 | 60 mm × 15 mm; used for temporary storage of stem cross sections in ultrapure water |
| Phloroglucinol, 1,3,5-trihydroxybenzene | Sigma-Aldrich | P3502-25G | CAS No. 108-73-6; reagent used to prepare Wiesner stain |
| Pipette (100 μL) | Gilson | P 1000; 767547M | Adjustable-volume pipette used to dispense staining solutions |
| Plastic utility funnel | Nalgene | 10-437-23E | 150 mm; used for reagent transfer and filtration |
| Polypropylene beaker (4 L) | Nalgene | 1201-4000 | 4 L chemical-resistant beaker used for preparation and mixing of inoculation solutions |
| Potassium chloride | Fisher Chemical | P217-500 | CAS No. 7447-40-7; reagent for McDougall’s buffer |
| Razors | Personna | 66-0089 | 0.009 in thick; used for manual trimming of stem material |
| Ruthenium red, ammoniated ruthenium oxychloride | Sigma | R-2751 | CAS No. 11103-72-3; histological stain used to visualize pectic substances |
| Scissors | Fiskars | 1063071 | General-purpose scissors used for cutting tape, foam, and other consumables |
| Screw-cap conical centrifuge tubes (50 mL) | Corning | 430828 | Polypropylene, nonpyrogenic; used for sample holding, incubation, rinsing, and storage |
| Sledge microtome | Leica | 2000R | Sliding/sledge microtome used to prepare 100 μm-thick stem cross sections |
| Sodium bicarbonate, ACS grade | Fisher Chemical | S233-3 | CAS No. 144-55-8; reagent for McDougall’s buffer |
| Sodium chloride | Fisher Chemical | — | CAS No. 7647-14-5; reagent for McDougall’s buffer |
| Sodium hydroxide | Fisher Chemical | S318-500 | CAS No. 1310-73-2; used in preparation of the reducing solution |
| sodium phosphate dibasic anhydrous (Na2HPO4) | Sigma Aldrich | S-9763 | CAS 7558-79-4 |
| Sodium sulfide anhydrate, ACS, min. 98.0% | Oakwood Chemicals | 245960 | CAS No. 1313-84-4; reducing agent used in preparation of the incubation solution |
| Spoonula laboratory spoon | Fisher Scientific | 14-375-10 | Laboratory spatula used for transferring powdered reagents |
| Stirring plate | Thermolyne by Sybron | 7200 | Magnetic stirring plate used to mix buffer and inoculation solutions |
| Syringe (60 mL) with wide needle | Monoject | 935401028 | 60 mL syringe with large-bore needle used to dispense inoculation solution |
| Test tube racks | Thermo Scientific | 14-809-44 | Racks used to organize and support 50 mL incubation tubes |
| Thermometer | FisherBrand | 13201663 | Laboratory thermometer used to verify solution and water-bath temperature |
| Upright microscope | Nikon | Eclipse Ni | Upright brightfield microscope used for visualization and imaging of stained stem cross sections |
| Utility pump | Little Giant Pump Co. | 502203 | Model 2E-38N; 115 VAC, 60 Hz, 1.7 A; used to circulate water and maintain uniform bath temperature |
| Weigh paper | VWR Scientific Products | 12578-165 | Disposable weighing paper used for weighing and transferring solid reagents and corn stalk substrate |
References
- Cosgrove DJ. Growth of the plant cell wall. Nature Reviews Molecular Cell Biology. 2005;6(11):850-861.
- Moore KJ, Jung H-JG. Lignin and fiber digestion. Journal of Range Management. 2001;54(4):420-430.
- Barros J, Serk H, Granlund I, Pesquet E. The cell biology of lignification in higher plants. Annals of Botany. 2015;115(7):1053-1074.
- Jung HG, Engels FM. Alfalfa stem tissues: cell wall deposition, composition, and degradability. Crop Science. 2002;42(2):524-534.
- Jung HG, Lamb JFS. Stem morphological and cell wall traits associated with divergent in vitro neutral detergent fiber digestibility in alfalfa clones. Crop Science. 2006;46(5):2054-2061.
- Engels FM, Jung HG. Alfalfa stem tissues: cell-wall development and lignification. Annals of Botany. 1998;82(5):561-568.
- Akin DE. Section to slide technique for study of forage anatomy and digestion. Crop Science. 1982;22(2):444-446.
- Jung HG, Deetz DA. Cell wall lignification and degradability. In: Jung HG, Buxton DR, Hatfield RD, Ralph J, eds. Forage Cell Wall Structure and Digestibility. American Society of Agronomy, Crop Science Society of America, Soil Science Society of America; Madison, WI; 1993:315-346.
- Blaschek L, et al. Cellular and genetic regulation of coniferaldehyde incorporation in lignin of herbaceous and woody plants by quantitative Wiesner staining. Frontiers in Plant Science. 2020;11:109.
- Blaschek L, et al. Different combinations of laccase paralogs nonredundantly control the amount and composition of lignin in specific cell types and cell wall layers in Arabidopsis. The Plant Cell. 2023;35(2):889-909.
- Nevins DJ. Analysis of forage cell wall polysaccharides. In: Jung HG, Buxton DR, Hatfield RD, Ralph J, eds. Forage Cell Wall Structure and Digestibility. American Society of Agronomy, Crop Science Society of America, Soil Science Society of America; Madison, WI; 1993:105-132.
- Xu Z, Heuschele DJ, Lamb JFS, Jung H-JG, Samac DA. Improved forage quality in alfalfa (Medicago sativa L.) via selection for increased stem fiber digestibility. Agronomy. 2023;13(3):770.
- Pradhan Mitra P, Loqué D. Histochemical staining of Arabidopsis thaliana secondary cell wall elements. Journal of Visualized Experiments. 2014;(87):51381.
- De Micco V, Aronne G. Combined histochemistry and autofluorescence for identifying lignin distribution in cell walls. Biotechnic & Histochemistry. 2007;82(4–5):209-216.
- Kraus JE, et al. Astra Blue and Basic Fuchsin double staining of plant materials. Biotechnic & Histochemistry. 1998;73(5):235-243.
- Ursache R, Andersen TG, Marhavý P, Geldner N. A protocol for combining fluorescent proteins with histological stains for diverse cell wall components. The Plant Journal. 2018;93(2):399-412.
- Baldacci-Cresp F, et al. A rapid and quantitative safranin-based fluorescent microscopy method to evaluate cell wall lignification. The Plant Journal. 2020;102(5):1074-1089.
- Casero PJ, Knox JP. The monoclonal antibody JIM5 indicates patterns of pectin deposition in relation to pit fields at the plasma-membrane-face of tomato pericarp cell walls. Protoplasma. 1995;188(1-2):133-137.
- Pesquet E, Cesarino I, Kajita S, Pawlowski K. Physiological roles of lignins – tuning cell wall hygroscopy and biomechanics. New Phytologist. 2025;248(6):2674-2706.
- Jung HG, Engels FM. Alfalfa stem tissues: rate and extent of cell-wall thinning during ruminal degradation. NJAS: Wageningen Journal of Life Sciences. 2001;49(1):3-13.
- Yeung EC. A beginner’s guide to the study of plant structure. Tested Studies for Laboratory Teaching. 1998;19:125-142.
- Jensen, W.A. Botanical Histochemistry: Principles and Practice. Freeman W.H. & Co. San Francisco, CA. (1962).
- Ruzin, SE. Plant Microtechnique and Microscopy. Oxford University Press; New York, NY; 1999.
- Gronwald JW, Bucciarelli B. Comparison of stem morphology and anatomy of two alfalfa clonal lines exhibiting divergent cell wall composition. Journal of the Science of Food and Agriculture. 2013;93(11):2858-2863.
- Dai R, et al. Overexpression MsJAR1 gene increased lateral branches and plant height in alfalfa (Medicago sativa L.). Scientific Reports. 2025;15(1):16956.
Reprints and Permissions
This article has been published
Video Coming Soon