The goal of this protocol is to standardize human fecal sample collection and automated deoxyribonucleic acid extraction using a magnetic particle processor.
Method Article
Standardized Workflow for Human Fecal Sample Collection and Automated Deoxyribonucleic Acid Extraction Using a Magnetic Particle Processor
213 views
⸱
September 11th, 2026
In This Article
Summary
Abstract
Gut microbiome sequencing has become an important approach for investigating microbial community dynamics in healthy and diseased states. Alterations in microbial composition have been associated with several lifestyle- and age-related disorders, including diabetes, leukemia, and neurodegenerative diseases. Because different microorganisms exhibit distinct physiological characteristics and environmental requirements, standardized fecal sample collection, transport, and processing are essential to preserve sample integrity and minimize technical variability. Variations introduced during pre-analytical handling and deoxyribonucleic acid (DNA) extraction can influence downstream microbiome analyses and affect data interpretation. The goal of this protocol is to provide a standardized workflow for human fecal sample collection and automated DNA extraction using the MagMAX Microbiome Ultra Nucleic Acid Isolation Kit (nucleic acid extraction kit) and the KingFisher Flex System (automated magnetic particle processor). The workflow integrates controlled sample handling with automated nucleic acid extraction to reduce manual variability and improve procedural consistency. The protocol includes standardized fecal sample collection, storage, preparation, automated extraction, and nucleic acid recovery from complex fecal matrices. Representative results demonstrate successful recovery of DNA suitable for downstream applications, including 16S ribosomal ribonucleic acid (rRNA) gene sequencing and shotgun metagenomic sequencing. The standardized workflow supports reproducible sample processing, facilitates scalability for microbiome studies, and promotes greater consistency across experiments. The visual demonstration provides practical guidance for implementing standardized fecal sample processing and automated nucleic acid extraction for gut microbiome research.
Introduction
The gut microbiome is a complex microbial ecosystem that influences host metabolism, immunity, and neurological function and is increasingly implicated in diverse diseases, including metabolic disorders, Parkinson’s disease, cancer, and neurodegeneration1,2. It plays an important role in maintaining host physiology by influencing metabolism, immune function, nutrient absorption, and resistance to pathogenic microorganisms3,4. Robust and reproducible microbiome measurements are essential for translating these associations into mechanistic insights and clinical applications. Advances in next-generation sequencing (NGS) technologies have revolutionized our understanding of the complex microbial communities residing in the gastrointestinal tract. However, pre-analytical variables, such as fecal sample collection procedures, storage conditions, handling, transportation, and deoxyribonucleic acid (DNA) extraction methods, can selectively alter microbial community structure, DNA yield, and sequencing outcomes5,6. Such methodological inconsistencies often complicate comparisons across studies.
Among the critical pre-analytical steps, DNA extraction represents one of the most influential determinants of microbiome data quality7,8. An ideal extraction protocol should consistently produce high-quality, high-molecular-weight DNA with minimal contamination across large numbers of samples. Automated nucleic acid extraction platforms can improve reproducibility, reduce manual handling errors, reduce the risk of contamination, and increase throughput. The performance of these automated extraction platforms depends substantially on protocol parameters, including sample homogenization, bead-beating conditions, lysis chemistry, incubation conditions, and magnetic bead handling9,10. Therefore, establishing a standardized workflow that integrates uniform fecal sample collection with automated DNA extraction is essential for generating reliable and reproducible microbiome datasets.
Here, we present a standardized workflow for human fecal sample collection, handling, and automated DNA extraction using the nucleic acid extraction kit and automated magnetic particle processor described above. The protocol emphasizes controlled sample handling, effective mechanical and chemical lysis, inhibitor removal, and quality control measures appropriate for downstream applications, including 16S ribosomal ribonucleic acid (rRNA) gene amplicon sequencing, whole-genome sequencing, quantitative polymerase chain reaction (PCR), and shotgun metagenomic sequencing. The visual demonstration provides practical guidance for standardized fecal sample processing and automated nucleic acid extraction to support reproducible and scalable gut microbiome research.
Protocol
The study was conducted in accordance with the guidelines of the SKAN Research Trust Institutional Ethics Committee and was approved by the committee (Approval No. SKAN/IEC/2025/04). Written informed consent was obtained from all participants before sample collection.
NOTE: All reagents, consumables, and equipment are listed in the Table of Materials.
1. Assemble the fecal sample collection kit
- Assemble a fecal sample collection kit containing a sterile fecal catcher, a sterile screw-cap collection tube (30–50 mL capacity) with an attached spatula, a collection tube pre-filled with stabilization buffer, disposable gloves, absorbent material, a biohazard-labeled sealable transport bag, and an instruction sheet (Figure 1).
- Label each collection tube with a unique sample identifier, the date, and the time of collection using a permanent marker or a preprinted label.
- Include an instruction sheet describing the sample collection procedure, handling precautions, storage conditions, and transport requirements.
NOTE: The stabilization buffer is supplied prefilled in the fecal collection tube as part of the fecal collection kit. The manufacturer does not disclose the composition or volume of the stabilization buffer. Collect approximately 2–5 g of fecal material directly into the prefilled collection tube according to the manufacturer’s instructions.
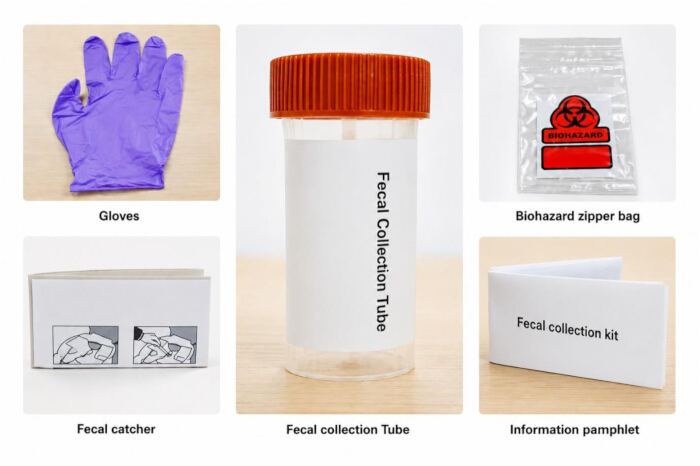
Figure 1. Components of the fecal sample collection kit.
The fecal sample collection kit includes disposable gloves, a sterile fecal catcher, a sterile screw-cap fecal collection tube with an attached spatula, a biohazard-labeled sealable transport bag, and an instruction pamphlet provided to participants for fecal sample collection, handling, storage, and transport. Please click here to view a larger version of this figure.
2. Prepare the participant for sample collection
- Instruct the participant to wash their hands before sample collection.
- Instruct the participant to empty their bladder before bowel movement to avoid urine contamination of the fecal sample.
3. Collect the fecal sample using a fecal catcher
- Place a sterile fecal catcher on the toilet seat to prevent contact between the fecal sample and toilet water.
- For adhesive fecal catchers, unfold the device carefully along the indicated edges without tearing it. Follow the manufacturer’s instructions provided with the fecal catcher, and attach the device securely to the rear portion of the toilet seat to create a stable collection surface.
- For non-adhesive fecal catchers, position the device across the toilet bowl according to the manufacturer’s instructions to provide stable support.
- Ensure that the fecal catcher does not contact toilet water during sample collection.
- Instruct the participant to complete the bowel movement directly onto the fecal catcher.
- Put on the disposable gloves provided in the collection kit before handling the sample.
- Open the sterile collection tube and use the attached spatula to collect fecal material from at least four to five distinct regions of the stool, including the outer surface and inner core. This approach typically yields approximately 2–5 g of fecal material, which is sufficient for DNA extraction.
- Avoid collecting fecal material that has contacted the edges of the fecal catcher or any external surfaces.
- Close the collection tube securely immediately after sample collection.
- Mix the fecal sample thoroughly with the stabilization buffer by manually shaking the closed collection tube vigorously until the sample is uniformly suspended and no large clumps remain.
- Place the sealed collection tube into the leak-proof biohazard-labeled transport bag containing absorbent material.
- Carefully release the fecal catcher into the toilet along with the stool, ensuring that the contents do not spill. Flush the toilet to dispose of the fecal catcher and stool together.
4. Store and transport fecal samples
- Store the samples according to the specifications of the stabilization buffer used.
- Store the samples at room temperature if the stabilization buffer supports ambient preservation. Alternatively, store the samples at 4°C for short-term storage (≤24–48 h) or at −20°C to −80°C for long-term storage.
- Store samples in accordance with the manufacturer’s recommendations. Samples collected using the stabilization buffer employed in this study are stable for up to 2 years at room temperature.
- Transport the samples in leak-proof biohazard bags containing absorbent material to prevent leakage and contamination.
- Maintain the samples under the recommended temperature conditions during transport. Use insulated containers and cooling elements when required.
- Ensure compliance with institutional biosafety guidelines and applicable local regulations for transporting biological specimens.
5. Receive and log samples
- Inspect each sample upon receipt in the laboratory for proper labeling, tube integrity, and evidence of leakage.
- Assign a laboratory-specific identifier, if required, and record the collection date and time, storage conditions, and transport duration.
- Exclude samples showing leakage, improper labeling, or compromised integrity.
6. Prepare the plates
NOTE: Prepare all plates before initiating the extraction workflow. Perform all steps involving reagents and biological samples in a clean environment while wearing appropriate personal protective equipment, including a laboratory coat, gloves, and eye protection. Figure 2 shows the automated magnetic particle processor (Figure 2A), plate-loading positions (Figure 2B), deep-well plate adapter (Figure 2C), plate-compatible centrifuge (Figure 2D), bead-beating instrument (Figure 2E), cushioning support (Figure 2F), plate holder (Figure 2G), 96-well bead plate (Figure 2H), deep-well plate (Figure 2I), and Elution Plate (Figure 2J).
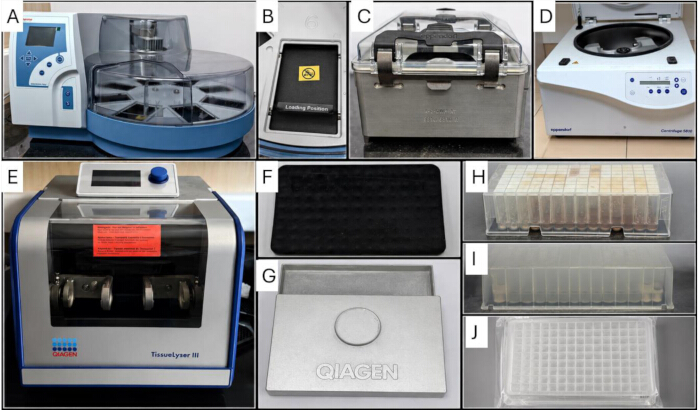
Figure 2. Equipment and consumables used for automated fecal deoxyribonucleic acid (DNA) extraction.
(A) Automated magnetic particle processor. (B) Plate-loading position within the automated magnetic particle processor. (C) Deep-well plate adapter for centrifugation. (D) Plate-compatible centrifuge. (E) Bead mill homogenizer. (F) Cushioning support used during bead beating. (G) Deep-well plate holder (adapter) for bead beating. (H) Ninety-six-well bead plate supplied with the nucleic acid extraction kit. (I) Ninety-six-well deep-well plate. (J) Ninety-six-well Elution Plate. Please click here to view a larger version of this figure.
- Remove the tip comb plate from its packaging and keep it ready for instrument loading.
- Prepare the Elution Plate (Figure 2J) by adding 200 µL of elution buffer supplied with the nucleic acid extraction kit to each well of a 96-well plate. Seal the plate with clear adhesive film to prevent contamination. Keep the plate sealed until loading it into the automated magnetic particle processor. Label the plate as Elution Plate.
- Prepare Wash Plate 4 by adding 1 mL of 80% ethanol to each well of a deep-well plate. Seal the plate with adhesive film to prevent evaporation and contamination.
- Prepare Wash Plate 3 by adding 1 mL of freshly prepared 80% ethanol to each well of a separate deep-well plate. Seal the plate with adhesive film.
- Prepare Wash Plate 2 by adding 1 mL of wash buffer to each well of a deep-well plate. Seal the plate with adhesive film.
- Prepare Wash Plate 1 by adding 1 mL of wash buffer to each well of a deep-well plate. Seal the plate with adhesive film.
7. Set up the automated magnetic particle processor
- Turn on the automated magnetic particle processor. Verify that the correct 96-deep-well magnetic head and the 96-well deep-well heating block are installed.
- Run the appropriate instrument check protocol (for example, the Check_96dw_tip protocol) using a clean tip comb and an empty compatible well plate before processing samples.
- Confirm that the required extraction program is available on the automated magnetic particle processor.
NOTE: Use of an incorrect magnetic head or heating block can reduce nucleic acid yield and damage the instrument.
8. Perform sample lysis
- Prepare a plate map to record the position of each sample in the 96-well plate.
- Centrifuge the 96-well bead plate (Figure 2H) at 2,750 × g for 10 s using a plate-compatible centrifuge (Figure 2D) and adapter (Figure 2C) to collect the beads at the bottom of each well.
NOTE: This step prevents bead loss during removal of the plate seal. - Remove the plate seal carefully without disturbing the beads.
- Add 800 µL of lysis buffer to each well of the bead plate.
- Avoid aspirating the beads during pipetting.
- Thaw frozen fecal samples at room temperature until completely thawed. Mix the samples gently to homogenize them, and proceed immediately to DNA extraction. Avoid repeated freeze-thaw cycles because they can reduce DNA quality and yield.
NOTE: For fresh samples, vortex each fecal sample tube containing the stabilization solution for 5–10 s to ensure sample homogenization. - Transfer 200 µL of each homogenized sample into the corresponding well of the bead plate.
- Use a single-channel pipette fitted with sterile filtered wide-bore (cut) pipette tips to transfer the samples. Avoid repeated pipetting to minimize bead loss and subsequent reduction in DNA yield.
- Seal the plate securely with adhesive film, ensuring that all wells and plate edges are completely sealed.
9. Perform mechanical lysis (bead beating)
- Secure the sealed plate in the bead-beating instrument (Figure 2E) using the appropriate plate holder (Figure 2G) and cushioning support (Figure 2F).
- Balance the instrument by placing a plate of equal weight opposite the sample plate.
- Set the instrument to 30 Hz for 2 min and start the run.
- Allow the run to proceed without interruption.
- Remove the plate carefully after completion of the run without disturbing the seal.
NOTE: Use the cushioning support to prevent damage to the plate during bead beating.
10. Perform post-lysis processing
- Centrifuge the plate at 2,750 × g for 5 min at room temperature using a balanced configuration.
- Carefully transfer 400 µL of the supernatant from each well to a new deep-well plate designated as the Sample Plate.
- Avoid transferring any beads during this step.
NOTE: The Sample Plate does not contain beads and does not require pre-centrifugation. - Seal the Sample Plate if not proceeding immediately.
NOTE: Store the sealed lysate plate at 4°C overnight, if necessary. Alternatively, store the sealed Sample Plate at −20°C for up to 3 months. Thaw the samples to room temperature before further processing.
11. Prepare the binding bead mixture
- Prepare the binding bead mixture immediately before use by combining 500 µL of nucleic acid binding buffer with 20 µL of magnetic beads per sample. Mix thoroughly to obtain a homogeneous suspension.
- Calculate the total volume of binding bead mixture required based on the number of samples.
- For a full 96-well plate, prepare the binding bead mixture by adding 48.00 mL of nucleic acid binding buffer and 1.92 mL of magnetic beads to a sterile conical tube. Mix thoroughly to obtain a final volume of 49.92 mL (520 µL per well).
NOTE: Prepare sufficient volume for one or two additional wells to compensate for pipetting variability. - Mix the binding bead suspension gently by inversion until homogeneous.
- Transfer the binding bead mixture to a clean reagent reservoir.
- Immediately before dispensing, resuspend the magnetic beads by pipetting the suspension up and down three to four times to prevent bead settling.
- Dispense 520 µL of the binding bead mixture into each well of the prepared Sample Plate using a multichannel pipette.
- Pipette slowly because of the viscosity of the solution, and avoid bubble formation. Gently resuspend the binding bead mixture in the reagent reservoir before each dispensing step to maintain uniform bead distribution across all wells.
12. Modify the MagMAX_Microbiome_Stool_Flex instrument program (modified extraction program)
- Download and install BindIt software (protocol-editing software) according to the manufacturer’s instructions.
- Download the instrument program from the manufacturer’s website.
- Launch the protocol-editing software and allow it to initialize.
- Click Open and select the downloaded instrument program.
- Modify the protocol parameters as described in Table 1.
- Save the modified protocol and close the software.
- Connect the computer to the automated magnetic particle processor using a USB or RS-232C serial cable.
NOTE: Ensure that the automated magnetic particle processor is turned off before connecting the computer. - Turn on the automated magnetic particle processor and allow it to complete initialization.
- Launch the protocol-editing software and confirm that it detects the automated magnetic particle processor.
- Transfer the modified extraction program to the automated magnetic particle processor.
- Confirm successful transfer of the modified extraction program, then turn off the automated magnetic particle processor.
| Step | Action | Parameters |
| 1 | Binding | Mix; 5 collection cycles; 37°C |
| 2 | Collect beads | 5 magnetic collection cycles |
| 3 | Wash 1 | Mix for 20 s × 3 cycles; 37°C |
| 4 | Wash 2 | Mix for 20 s × 3 cycles; 37°C |
| 5 | Wash 3 | Mix for 20 s × 2 cycles; 37°C |
| 6 | Wash 4 | Mix; 1 cycle; 37°C |
| 7 | Dry | Air dry for 2 min |
| 8 | Elution | 75°C; 6 mixing cycles; preheating enabled |
| 9 | Collect beads | 3 magnetic collection cycles |
| 10 | Transfer eluate | Transfer purified nucleic acid to the Elution Plate |
Table 1: Automated extraction program for the magnetic particle processor.
Summary of the automated extraction program executed by the automated magnetic particle processor during deoxyribonucleic acid (DNA) extraction. The program includes nucleic acid binding, magnetic bead collection, sequential wash steps, air drying, elution, and transfer of purified DNA to the Elution Plate. The operating parameters for each automated step are listed.
13. Perform automated nucleic acid extraction
- Turn on the automated magnetic particle processor (Figure 2A) by switching on the main power supply followed by the instrument power button. Allow the system to complete initialization.
- Using the instrument control panel, select the modified extraction program and initiate the run.
- When prompted, load the tip comb plate into position 7 and press Start to proceed. Refer to Table 2 for the plate loading positions (Figure 2B).
- Remove the sealing film from the Elution Plate and load it into position 6, ensuring the correct orientation (well A1 aligned with the designated position). Press Start to proceed.
- Remove the sealing film from Wash Plate 4 containing 80% ethanol, load the plate into position 5 with the correct orientation, and press Start.
- Remove the sealing film from Wash Plate 3 containing 80% ethanol, load the plate into position 4, and press Start.
- Remove the sealing film from Wash Plate 2, load the plate into position 3, and press Start.
- Remove the sealing film from Wash Plate 1, load the plate into position 2, and press Start.
- When prompted, load the Sample Plate into position 1, ensuring the correct orientation.
- Close the instrument lid and press Start to initiate the automated extraction run.
- Allow the program to run uninterrupted until completion (approximately 35–40 min).
NOTE: Table 1 summarizes the automated extraction program executed by the instrument.
| Plate | Position | Plate type | Reagent | Volume per well |
| Sample Plate | 1 | 96-deep-well plate | Sample lysate + binding bead mixture | 920 µL |
| Wash Plate 1 | 2 | 96-deep-well plate | Wash buffer | 1,000 µL |
| Wash Plate 2 | 3 | 96-deep-well plate | Wash buffer | 1,000 µL |
| Wash Plate 3 | 4 | 96-deep-well plate | 80% ethanol | 1,000 µL |
| Wash Plate 4 | 5 | 96-deep-well plate | 80% ethanol | 1,000 µL |
| Elution Plate | 6 | 96-well plate | Elution buffer | 200 µL |
| Tip Comb Plate | 7 | Standard deep-well plate | 96-deep-well tip comb | N/A |
Table 2: Plate loading configuration for automated nucleic acid extraction.
Plate loading positions, plate types, reagents, and reagent volumes used for automated DNA extraction with the magnetic particle processor. The Sample Plate contains the sample lysate and binding bead mixture. N/A indicates that no liquid reagent was added to the Tip Comb Plate.
14. Elute and store nucleic acids
- Open the instrument after completion of the run and remove the Elution Plate carefully to avoid spilling the eluates.
NOTE: If visible magnetic bead carryover is present in the Elution Plate, transfer the eluates to a standard 96-well plate and place the plate on a magnetic stand for 5–10 min. Transfer the clarified supernatant to a fresh 96-well plate or appropriately labeled tubes using a multichannel pipette. - Transfer the eluted DNA to appropriately labeled tubes or storage plates.
- Store the eluted DNA at 4°C for short-term use, at −20°C for storage of up to 6 months, or at −80°C for long-term storage.
15. Perform post-run cleanup
- Remove all used plates and tip combs from the automated magnetic particle processor.
- Dispose of all consumables in accordance with institutional biosafety and chemical waste disposal guidelines.
- Clean any spills using an appropriate laboratory disinfectant.
- Turn off the automated magnetic particle processor, followed by the main power supply.
Results
Fecal samples from seven participants were successfully collected using the described collection workflow, yielding specimens with sufficient mass and appropriate consistency for downstream processing. Samples were stored at room temperature following collection. The majority of samples exhibited a uniform texture and coloration, consistent with appropriate collection and storage conditions, whereas a small subset showed minor variability in consistency, which may reflect biological variation among participants. No visible contamination or leakage was observed during transport, and all samples were processed within the validated stability window of the collection kit (up to 2 years at room temperature), supporting the robustness and reliability of the collection workflow (Figure 1).
The automated DNA extraction workflow was performed using the automated magnetic particle processor (Figure 2A), plate-loading configuration (Figure 2B), deep-well plate adapter (Figure 2C), plate-compatible centrifuge (Figure 2D), bead-beating instrument (Figure 2E), cushioning support (Figure 2F), plate holder (Figure 2G), bead plate (Figure 2H), deep-well plate (Figure 2I), and Elution Plate (Figure 2J), following the automated extraction program summarized in Table 1 and the plate-loading configuration presented in Table 2. DNA concentration and purity were assessed for representative fecal samples, and the results are summarized in Table 3. DNA concentration was measured using the Qubit double-stranded DNA High Sensitivity assay (fluorometric DNA quantification assay) on a Qubit fluorometer (fluorometric DNA quantification instrument) according to the manufacturer’s instructions. Samples were mixed with the working solution, incubated for 2 min at room temperature, and measured together with the two assay standards. The A260/A280 and A260/A230 absorbance ratios were determined using a NanoDrop spectrophotometer (microvolume spectrophotometer). DNA concentrations ranged from 36 to 87 ng/µL, with all samples eluted in a consistent volume of 200 µL, allowing direct comparison of total DNA recovery across preparations (Table 3).
| Sample | DNA concentration (ng/µL) | A260/A280 | A260/A230 | Elution volume (µL) | Total DNA yield (ng) |
| Sample A | 62 | 1.83 | 1.71 | 200 | 12,400 |
| Sample B | 36 | 1.89 | 1.51 | 200 | 7,200 |
| Sample C | 87 | 1.92 | 1.85 | 200 | 17,400 |
| Sample D | 50 | 2.03 | 1.87 | 200 | 10,000 |
| Sample E | 55 | 1.97 | 1.81 | 200 | 11,000 |
| Sample F | 85 | 1.99 | 1.88 | 200 | 17,000 |
| Sample G | 44 | 2.01 | 1.51 | 200 | 8,800 |
| Extraction blank | 0 | — | — | 200 | 0 |
Table 3: Representative DNA recovery and purity following automated extraction from human fecal samples.
Representative DNA concentration, purity (A260/A280 and A260/A230 absorbance ratios), elution volume, and total DNA yield measured following automated DNA extraction from human fecal samples. DNA concentration was determined using a fluorometric assay. The extraction blank served as a negative control and yielded no detectable DNA.
Representative results demonstrated variability in DNA recovery among samples. Higher DNA concentrations were obtained for Sample A (62 ng/µL), Sample F (85 ng/µL), and Sample C (87 ng/µL), whereas intermediate concentrations were observed for Sample D (50 ng/µL) and Sample E (55 ng/µL). Sample B and Sample G yielded the lowest DNA concentrations (36 ng/µL and 44 ng/µL, respectively). The A260/A280 absorbance ratios ranged from 1.83 to 2.03, whereas the A260/A230 absorbance ratios ranged from 1.51 to 1.88 (Table 3). This variation is expected for fecal specimens and may reflect differences in sample composition and biological variability, in addition to technical variation associated with specimen processing. The extraction blank yielded no detectable DNA, indicating the absence of detectable contamination during the extraction procedure. Representative amplification of the nearly full-length bacterial 16S rRNA gene generated the expected approximately 1.5 kb PCR amplicon in fecal DNA samples, whereas the no-template control showed no amplification (Figure 3).
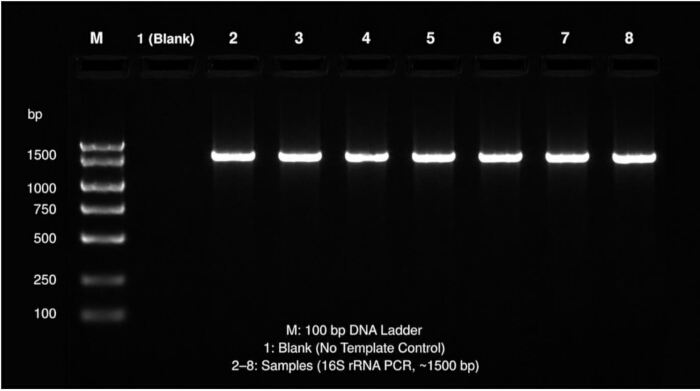
Figure 3. Agarose gel electrophoresis of bacterial 16S ribosomal ribonucleic acid (rRNA) gene polymerase chain reaction (PCR) amplicons.
Representative agarose gel showing amplification of the nearly full-length (~1.5 kb) bacterial 16S rRNA gene using the universal primers 27F and 1525R following DNA extraction from human fecal samples. Lane M: 100 base pair (bp) DNA ladder; Lane 1: no-template control (blank); Lanes 2–8: representative fecal DNA samples showing the expected ~1.5 kb PCR amplicon. Please click here to view a larger version of this figure.
Successful implementation of this protocol is demonstrated by the recovery of measurable DNA suitable for downstream molecular applications, including PCR-based assays, 16S rRNA gene sequencing, shotgun metagenomic sequencing, and library preparation. Collectively, these representative results demonstrate that the protocol consistently recovers DNA from human fecal samples while illustrating the range of variation that may be encountered among biological specimens.
Discussion
The protocol described here provides a standardized workflow for human fecal sample collection and automated DNA extraction for microbiome studies. Critical steps include representative fecal sampling from multiple regions of the stool, thorough homogenization with the stabilization buffer, proper storage and transport under recommended conditions, efficient mechanical lysis, and careful handling during automated extraction. Consistent adherence to these steps minimizes technical variability and supports reproducible DNA recovery. Previous studies have similarly identified sample collection, storage conditions, homogenization, and DNA extraction as major sources of variability in microbiome analyses and emphasized the importance of standardized workflows for reproducible results5,6,7,8. The representative results demonstrate successful sample collection without visible contamination or leakage and measurable DNA recovery across all tested samples.
Several procedural factors can influence DNA recovery and should be considered during implementation. Inadequate mechanical or chemical lysis, incomplete homogenization, inefficient nucleic acid binding, or sample loss during transfer and wash steps may reduce DNA yield. Variation in fecal composition, microbial biomass, and sample consistency may also contribute to differences in DNA recovery among specimens. Therefore, careful execution of the protocol, particularly during sample homogenization, bead beating, and automated extraction, is important for achieving consistent results. Troubleshooting should focus on verifying reagent preparation, instrument setup, plate loading, and execution of the automated extraction program before processing samples. Similar recommendations have been reported in studies evaluating microbiome analytical workflows and DNA extraction methodologies5,6,7,8,11.
The principal limitation of this method is the observed variability in DNA yield among biological specimens. As demonstrated by the representative results, differences in DNA concentration may reflect inherent biological variation among fecal samples as well as technical variation introduced during specimen processing. Consequently, DNA concentration alone should not be considered the sole indicator of extraction performance. Additional measures of DNA quality and suitability may be required depending on the intended downstream application. To further evaluate DNA quality and suitability for downstream molecular analyses, the bacterial 16S rRNA gene was amplified by PCR using the universal primers 27F and 1525R. Successful amplification of the expected approximately 1.5 kb 16S rRNA gene fragment was confirmed by agarose gel electrophoresis (Figure 3), demonstrating that the extracted DNA was of sufficient quality for downstream applications, including sequencing and other molecular assays. Previous benchmarking studies have likewise shown that DNA yield does not necessarily correlate with downstream sequencing performance or microbiome profiling accuracy8,11.
Compared with manual extraction workflows, automated magnetic particle processors reduce hands-on processing, standardize extraction conditions, and support high-throughput sample processing while minimizing operator-dependent variability9,10. However, variations in stool consistency and microbial biomass may influence lysis efficiency and DNA yield. In addition, microorganisms with robust cell walls may not be lysed completely, potentially affecting the representation of certain taxa. Despite these limitations, automated extraction provides a robust and efficient approach for large-scale gut microbiome studies5,6,7,8,9,10. The present protocol combines standardized fecal sample collection with an automated DNA extraction workflow, providing a practical and reproducible approach for microbiome studies requiring consistent processing of large numbers of samples. Standardized methodologies such as this facilitate reproducibility across studies and are well suited for downstream molecular applications, including microbiome profiling, metagenomic sequencing, and other sequencing-based analyses5,6,7,8,9,10.
Disclosures
The authors declare no competing financial or non-financial interests.
Acknowledgements
We gratefully acknowledge SKAN Research Trust (India) for providing the resources and collaborative environment that made this work possible. We also thank Dr. Anushree Kogje for her assistance with fact-checking and editorial support.
Materials
| Name | Company | Catalog Number | Comments |
|---|---|---|---|
| 80% Ethanol (prepared from absolute ethanol) | Merck | ET00161000 | Prepare fresh from absolute ethanol as described in the protocol. |
| Absorbent material | Kimtech | 34256 | Included in the transport bag. |
| Adhesive plate sealing film | Applied Biosystems | 4306311 | MicroAmp Clear Adhesive Film. |
| Automated magnetic particle processor (KingFisher Flex Purification System with 96 deep-well head) | Thermo Fisher Scientific | 5400630 | Automated nucleic acid extraction system. |
| Biohazard-labeled sealable transport bag | Zymo Research | R1180 | Leak-proof transport bag for specimen transport. |
| BindIt software | Thermo Fisher Scientific | 5189009 | Software used to modify and transfer the automated extraction protocol. |
| Collection tube with attached spatula (30–50 mL) | Zymo Research | R1180 | Sterile screw-cap collection tube. |
| Cushioning support | QIAGEN | 69984 | TissueLyser Adapter Set (used as cushioning support during bead beating). |
| Deep-well plate (96-well) | Thermo Fisher Scientific | 95040460 | KingFisher Deepwell 96 Plate. |
| Disposable gloves | Zymo Research | R1180 | Powder-free recommended. |
| Elution buffer | Applied Biosystems | A42357 | Supplied with the MagMAX Microbiome Ultra Nucleic Acid Isolation Kit. |
| Fecal catcher | Zymo Research | R1180 | Sterile collection device. |
| Heating block (96-well deep-well) | Thermo Fisher Scientific | Supplied with instrument | Component of the KingFisher Flex Purification System. |
| Laboratory coat | Local supplier | N/A | Personal protective equipment. |
| Lysis buffer | Applied Biosystems | A42357 | Supplied with the MagMAX Microbiome Ultra Nucleic Acid Isolation Kit. |
| Magnetic beads | Applied Biosystems | A42357 | Supplied with the MagMAX Microbiome Ultra Nucleic Acid Isolation Kit. |
| Magnetic head (96-deep-well) | Thermo Fisher Scientific | Included with 5400630 | Ninety-six-deep-well magnetic head supplied with the KingFisher Flex system. |
| Magnetic stand (96-well) | Thermo Fisher Scientific | 12332D | Required only if magnetic bead carryover is observed. |
| Multichannel pipette | Eppendorf | 3125000052 | Compatible with 96-well plates. |
| NanoDrop spectrophotometer | Thermo Fisher Scientific | ND-ONE-W | Used to determine A260/280 and A260/230 ratios. |
| Nucleic acid binding buffer | Applied Biosystems | A42357 | Supplied with the MagMAX Microbiome Ultra Nucleic Acid Isolation Kit. |
| Permanent marker | Sharpie | 3002 | Alternatively, use preprinted labels. |
| Pipette tips, sterile filtered (10 µL) | Tarsons | 528100 | Sterile graduated filter tips. |
| Pipette tips, sterile filtered (200 µL) | Tarsons | 528104 | Sterile graduated filter tips. |
| Pipette tips, sterile filtered (1,000 µL) | Tarsons | 529106 | Sterile filter tips; cut to prepare wide-bore tips where indicated in the protocol. |
| Plate adapter for centrifuge | Eppendorf | 5820710004 | Rotor A-2-DWP-AT deep-well plate adapter. |
| Plate-compatible centrifuge | Eppendorf | 5810 | Compatible with the Rotor A-2-DWP-AT adapter. |
| Plate holder for bead beating | QIAGEN | 69984 | TissueLyser Adapter Set 2 × 96. |
| Preprinted labels (optional) | Brady | BBP12 | Alternative to permanent marker. |
| Qubit dsDNA HS Assay | Thermo Fisher Scientific | Q33231 | Fluorometric assay used for DNA quantification. |
| Qubit fluorometer | Thermo Fisher Scientific | Q33327 | Instrument used for fluorometric DNA quantification. |
| Reagent reservoir | Thermo Fisher Scientific | 8093 | Matrix Reagent Reservoir. |
| Sample stabilization buffer | Zymo Research | R1180 | DNA/RNA Shield Fecal Collection Kit. |
| Sterile conical tube | HiMedia | TCP106H | Used for preparation of the binding bead mixture. |
| TissueLyser III bead mill homogenizer | QIAGEN | 9003240 | Mechanical lysis instrument. |
| Tip comb plate | Thermo Fisher Scientific | 97002534 | KingFisher 96 Tip Comb for deep-well magnets. |
| Wash buffer | Applied Biosystems | A42357 | Supplied with the MagMAX Microbiome Ultra Nucleic Acid Isolation Kit. |
References
- Joshi D, et al. Roles of human gut microbiota in metabolic, neurodegenerative, cardiovascular and gastrointestinal diseases. Discov Biotechnol. 2026;3(1):8. doi:10.1007/s44340-026-00053-2.
- Jin X, et al. Gut microbiota and Parkinson’s disease: exploring pathogenesis and potential therapeutic strategies from a gut-brain axis perspective. iScience. 2026;29(2):114185. doi:10.1016/j.isci.2025.114185.
- Hou K, et al. Microbiota in health and diseases. Signal Transduct Target Ther. 2022;7(1):135. doi:10.1038/s41392-022-00974-4.
- Valencia S, et al. Human gut microbiome: a connecting organ between nutrition, metabolism, and health. Int J Mol Sci. 2025;26(9):4112. doi:10.3390/ijms26094112.
- Panek M, et al. Methodology challenges in studying human gut microbiota: effects of collection, storage, DNA extraction and next-generation sequencing technologies. Sci Rep. 2018;8(1):5143. doi:10.1038/s41598-018-23296-4.
- Ece G, et al. Basic microbiome analysis: analytical steps from sampling to sequencing. Microorganisms. 2026;14(2):387. doi:10.3390/microorganisms14020387.
- Bharti R, Grimm DG. Current challenges and best-practice protocols for microbiome analysis. Brief Bioinform. 2021;22(1):178-193. doi:10.1093/bib/bbz155.
- Zoruk P, et al. Impact of DNA extraction techniques and sequencing approaches on microbial community profiling accuracy. Front Microbiomes. 2025;4:1688681. doi:10.3389/frmbi.2025.1688681.
- Wallinger C, et al. Evaluation of an automated protocol for efficient and reliable DNA extraction of dietary samples. Ecol Evol. 2017;7(16):6382-6389. doi:10.1002/ece3.3197.
- Kwa WT, Sim CK, Low A, Lee JWJ. A comparison of three automated nucleic acid extraction systems for human stool samples. Microorganisms. 2024;12(12):2417. doi:10.3390/microorganisms12122417.
- Demkina A, et al. Benchmarking DNA isolation methods for marine metagenomics. Sci Rep. 2023;13(1):22138. doi:10.1038/s41598-023-48804-z.
Reprints and Permissions
This article has been published
Video Coming Soon