Islet-like cells derived from ductal cells demonstrate potential for the treatment of diabetes by lowering blood glucose levels and enhancing insulin production in diabetic rats. Nevertheless, challenges remain in ensuring sufficient cell function, immunological defense, and safety. Additional investigation is required to enhance the therapeutic capacity of these substances.
Method Article
Islet-like Cells Derived from Ductal Cell Transplantation into Rats
Opens in a new tab
In This Article
Summary
Loading...
$$\rightleftharpoonup{xx}$$
$$\longleftharp{xx}$$,
$$\longrightharp{xx}$$,
Abstract
Loading...
$$\rightleftharpoonup{xx}$$
$$\longleftharp{xx}$$,
$$\longrightharp{xx}$$,
The use of islet-like cells derived from ductal cells has emerged as a potential approach for treating type 1 diabetes. Diabetic patients have insufficient insulin synthesis in their bodies due to the autoimmune destruction of pancreatic beta cells responsible for making insulin. Within this framework, the objective of islet cell transplantation is to reinstate the ability of patients to produce insulin. However, obstacles such as the insufficient acquisition of islet cells from donor pancreases and immune reactions hinder the broad application of this therapy method. Under specific circumstances, pancreatic ductal cells possess the capability to transform into cells that produce insulin. These cells could be cultivated in a controlled environment and converted into islet-like cells that have the capability to release insulin, making them suitable for transplantation. This innovative strategy offers the potential to halt the progression of type 1 diabetes and reduce dependence on insulin injections. In this study, islet-like cells derived from ductal cells were transplanted into the liver through the portal vein of the liver in streptozotocin-induced diabetic rats. Following transplantation, we noted substantial reductions in the rats' blood glucose levels starting on day 5, which continued for 15 days. In addition, an intraperitoneal glucose tolerance test (IPGTT) demonstrated that diabetic rats receiving the islet-like cell transplants produced significantly more insulin than the control group. These results suggest that islet-like cells derived from ductal cells may be a promising therapeutic approach for diabetes. The primary obstacles in this field of study include achieving sufficient functional capability for the cells, shielding them from the immune system, and ensuring their safety for therapeutic application. Future studies endeavors have the potential to yield crucial insights for optimizing the use of these cells in therapeutic settings, with a focus on enhancing both efficacy and safety.
Introduction
Loading...
$$\rightleftharpoonup{xx}$$
$$\longleftharp{xx}$$,
$$\longrightharp{xx}$$,
Type 1 diabetes is a persistent autoimmune disorder marked by the destruction of beta cells in the pancreas that produce insulin. The current treatments mostly include long-term insulin therapy, which, although successful in controlling blood glucose levels, does not provide a cure for the condition or halt its advancement1. The investigation of alternative therapies for Type 1 diabetes is motivated by the necessity for more efficacious alternatives than the existing emphasis on insulin treatment. Ongoing research has been prompted by this, focusing on alternate treatments such as islet cell transplantation, which seeks to reinstate the body's inherent capacity to make insulin. Still, the fact that donor islet cells are hard to come by and there is a chance of immunological rejection has made it hard for this treatment to be widely used. As a result, the scientific community has become increasingly interested in finding alternate sources of cells that produce insulin1,2,3.
This method seeks to leverage the regeneration potential of these cells to establish a sustainable supply of insulin-secreting cells4. In vitro investigations have demonstrated the capacity of these ductal cells to be transformed into functional beta-like cells capable of insulin secretion in response to glucose stimulation5. This line of inquiry is especially vital, considering the unfavorable results linked to conventional islet transplantation due to the intricate immune responses involved. Numerous studies indicate that ductal-derived cells not only have the intrinsic capability to generate insulin but may also demonstrate characteristics that could promote immune tolerance, thereby mitigating some challenges associated with traditional transplantation techniques5,6,7,8. These cells can be cultivated outside of the body, converted into cells resembling islets that can release insulin, and subsequently implanted into individuals with diabetes. Preclinical investigations, which encompassed experiments with streptozotocin-induced diabetic rats, have demonstrated that the transplantation of these cells can effectively reduce blood glucose levels and enhance insulin secretion9.
Our approach focused on accelerating the differentiation process and improving the functionality of insulin-producing cells by augmenting the standard cell culture medium with Insulin-Transferrin-Selenium (ITS)10,11,12, Isoxazole 9 (ISX-9)13,14, and GLP-115. These factors are reported to be essential in facilitating pancreatic differentiation and enhancing insulin secretion. The integration of these components aimed to achieve functional islet-like cells more efficiently, ensuring their ability to produce and release insulin in response to glucose stimulation9,10,11,12,13,14.
In islet transplantation, immune rejection constitutes a significant obstacle to achieving successful outcomes. Allogeneic transplanted islets are vulnerable to immune attack, requiring immunosuppressive therapies to avert rejection16,17. The involvement of pancreatic ductal cells in immune rejection during islet transplantation represents a developing field of study. It is thought that ductal cells may have properties that could reduce immune rejection, which would make transplanted islets more likely to survive and work properly. Ilieva et al. demonstrated that islets co-cultured with ductal cells exhibited reduced central necrosis and apoptosis, indicating a protective effect against immune-mediated damage. This effect may be mediated by factors such as insulin-like growth factor 2 (IGF-2) secreted by ductal cells, as noted by Marín-Cañas et al. (2019)18. The protective effect is essential, as immune rejection poses a considerable challenge to the success of islet transplantation, especially in Type 1 diabetes. Ductal cells in islet grafts have been associated with enhanced graft function and survival, likely attributable to their capacity to secrete immunomodulatory factors that mitigate the immune response19.
Notwithstanding the promising advancements, some hurdles must be resolved to guarantee the operational efficacy and safety of these cell-based therapies for clinical use. It is essential to verify that the induced cells exhibit functional properties comparable to native beta cells and to establish effective techniques to protect these cells from immune system assaults to ensure their prolonged survival and functionality20,21. As this research domain progresses, comprehensive knowledge and resolution of these obstacles will be essential for leveraging the promise of ductal cell-derived insulin-producing cells in the treatment of Type 1 diabetes22,23,24.
This study aims to assess the in vivo efficiency of ductal cell-derived islet-like cells, developed under optimal conditions, for the restoration of glycemic control in a streptozotocin-induced diabetic rat model.
Access restricted. Please log in or start a trial to view this content.
Protocol
Loading...
$$\rightleftharpoonup{xx}$$
$$\longleftharp{xx}$$,
$$\longrightharp{xx}$$,
This study adhered to the ARRIVE recommendations, ensuring that the design, execution, and reporting of the research met high standards for animal welfare and experimental integrity (https://arriveguidelines.org). Ankara Medipol University secured approval from the ethics committee (AMUHADYEK-12- 09.05.2025) and institutional authorization. All methods were performed in compliance with applicable guidelines and regulations. All measures were enacted to minimize animal suffering and to employ the minimum number of animals necessary to achieve scientific objectives.
1. Preparation of solutions
- Enzyme solution: Prepare a collagenase solution with 50 mg of powdered Clostridium histolyticum collagenase type V. Prepare a 50 mL solution by combining collagenase with HBSS (containing Ca-Mg) to achieve a concentration of 1 mg/mL. Use 7 mL of the solution per sample and put the remainder in the freezer at -20 °C.
NOTE: The recommended concentration of collagenase is 1 mg/1 mL. Before being drawn into the syringes, the collagenase must be mixed with the pre-prepared HBSS solution to a concentration of 1 mg/mL. - Washing solution 1: Withdraw 62.5 mL from 500 mL of phenol red-free HBSS. Add 50 mL of FBS to the remaining HBSS very carefully. Add 5 mL of penicillin/streptomycin (P/S), 5 mL of L-glutamine (L-Gln), and 2.5 mL of 1 M HEPES. Bring the volume to 500 mL.
NOTE: With the addition of phenol red, the final volume consists of 88% HBSS, 10% FBS, 1% P/S, and 1% l-Gln. To prevent foaming and assure accuracy, carefully incorporate the fetal bovine serum step by step. - Culture medium for cells and washing solution 2: Withdraw 62.5 mL from 500 mL of Roswell Park Memorial Institute Medium (RPMI w/L-Gln). Exercise caution to prevent the FBS from frothing during the gradual addition of 50 mL to the remaining RPMI. Add 2.5 mL of 1 M HEPES, 5 mL of P/S, and 5 mL of L-Gln. Ensure the total volume is 500 mL. Store at 4 °C.
- Density gradient solutions: Prepare the final density solutions by diluting the 1100 mg/mL density solution with HBSS solution to obtain an intermediate density range of 1062-1096 mg/mL. To ensure accuracy, verify with a densitometer the density of each prepared solution. Use the 1077 concentration solution as a reference. Once the desired concentrations (1062-1096 mg/mL) are obtained, transfer the solutions to airtight containers and store in a dark place at 4 °C to maintain their stability.
- Prepare a 0.4% trypan blue solution. Cell development is promoted by phosphate-buffered saline solution (PBS), which has a pH of 7.4.
- Cell culture growth Medium: Combine 43.4 mL each of Roswell Park Memorial Institute Medium (RPMI) and Dulbecco's Modified Eagle's Medium (DMEM-low glucose). Add 10% fetal calf serum (FCS), 1% insulin-transferrin-selenium (ITS), 1% L-glutamine (L-Gln), 1% penicillin-streptomycin (P/S), and 0.2 mL of 1 M HEPES. Make up the final volume to 100 mL. Store at 4 °C.
- Cell culture differentiation medium: Add 43.4 mL of RPMI with 43.4 mL of DMEM-low glucose. Add 10% FCS, 1% insulin-transferrin-selenium (ITS), 1% L-Gln, 1% P/S, and 0.2 mL of 1 M HEPES into the mixture. Furthermore, add 1 µL of Isoxazole 9 (ISX-9) diluted in 4 mL of ethanol to the differentiation media. Finally, add 24 µL of a glucagon-like peptide 1 (GLP-1) solution at a concentration of 50 nM into the cell culture medium.
NOTE: ISX-9 and GLP-1 are only added fresh during culture changes; they are pre-prepared. Fresh preparation is required for any cultural material. - Dithizone (DTZ) solution: Dissolve 100 mg of Dithizone in 20 mL of Dimethyl Sulfoxide (DMSO) and mix well. Add 30 mL of HBSS to the resulting solution and stir until a homogeneous mixture is obtained. Filter the solution 0.2 or 0.4 µm filters. Add 50 mL of HBSS to the filtered solution. Label the solution with the date of preparation. Once the solids are completely broken down, run the solution through a 0.4 µm filter device. Put the filtered solution into 2 mL tubes and use them right away, after they have thawed. Keep the solution that has been made at -20 °C.
- Krebs solution: In a 250 mL container, add 1.68 g of sodium chloride (for 115 mM), 0.50 g of sodium bicarbonate (for 24 mM), 0.09 g of potassium chloride (to make it 5 mM), 0.05 g of magnesium chloride (for 1 mM), 0.09 g of calcium chloride (for 2.5 mM), and 0.25 g of bovine serum albumin (for 0.1%). Add 6.25 mL of 1 M HEPES. Adjust the volume to 250 mL by adding deionized water and stir until everything is combined. Adjust the pH to a range of 7.3 to 7.5, using either 1 M NaOH or 1 M HCl. Filter through a 0.22 µm filter. Store the solutions at room temperature. In a water bath at 37 °C, add the solutions when they are ready to be used.
- High glucose concentration solution: Measure and add 149.1 mg of D-(+)-glucose to a tube. Add 50 mL of Krebs solution to the tube and mix thoroughly by shaking. Filter through a 0.22 µm filter.
- Low glucose concentration solution: Combine 1 mL of 16.7 mM high glucose concentration solution with 9 mL of Krebs solution.
2. Isolation of the pancreas from rats
- Start with a cohort of three Wistar Albino laboratory rats (3 months old/male) weighing between 220 g and 280 g. Anesthetize the animals using a combination of ketamine (35-50 mg/kg) and xylazine (5-10 mg/kg). Check the depth of anesthesia by the lack of the pedal withdrawal response. Apply veterinary ointment on the eyes to keep them from drying.
- Start the surgical process with a 3-4 cm midline abdominal incision along the linea alba with scissors. (Figure 1A). Perform delicate manipulation of the liver by exerting gentle physical pressure with fingers to the rib cage to elevate the diaphragm. Exteriorize the liver and position it on sterile gauze for stability.
- Prepare a standardized collagenase solution at a dosage of 28 mg/g of body weight and draw 7 mL (about 7 g) into the syringe for rats weighing between 250 and 300 g. Modify the solution volume based on each animal's body weight.
- Incise the pancreatic duct. Using fine vascular scissors, cut the duct near the liver. Use anatomical positions relative to the pancreas and surrounding vasculature to identify the duct. Use location cues like nearby blood vessels and tissue features to assure accuracy. Make one perfect cut at this spot for occlusion.
NOTE: The incision was minimal-too small to be precisely measured-but sufficiently wide to allow catheter insertion. The incision allows for a smooth and efficient placement of the catheter, ensuring minimal trauma to the surrounding tissue. - Insert a catheter with an integrated intracket within the generated ductal opening (Figure 1B). Upon correct placement, fasten the catheter using a surgical clamp (e.g., micro forceps) to avoid dislodgement.
- Administer the collagenase enzymatic solution by controlled infusion through gradual, intentional plunger depression.
- Following inflation, use fine surgical instruments to carefully separate the pancreatic tissue from the surrounding structures. Perform the excision quickly and with precise and gentle maneuvers to minimize tissue damage. Immediately after removal, place the pancreas in a 50 mL tube on ice that to stop any enzyme activity.
- The whole process should take around 60 s for one pancreas25. In addition, until all of the pancreases have engorged, keep the collagenase and the removed pancreases on ice.
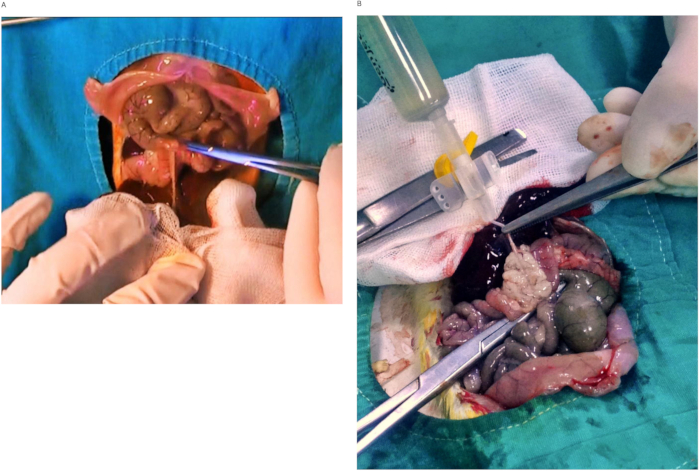
Figure 1: Pancreatic processing. (A) Clamping of the pancreatic duct opening into the duodenum and (B) Collagenase type 5 inflation results in an image of the pancreas. Please click here to view a larger version of this figure.
3 Isolation of ductal cells from pancreatic tissue
- Following surgical extraction, incubate the pancreas in a 37 °C water bath for 12 min.
- Add 25 mL of wash solution 1 to the tube to neutralize collagenase activity. Manually shake the tube to promote the breakdown of pancreatic tissue. Perform all subsequent procedures under a sterile field with laminar flow.
- Keep all media on ice. Centrifuge samples at 4 °C, at 100 x g for 1 min, and set the brake to the maximum setting. Discard the supernatant. To the cell pellet, add 25 mL of wash solution 1 and resuspend the mixture.
- Perform centrifugation again and discard the supernatant. To the pellet, add 25 mL of wash solution 1 and resuspend. Strain the processed pancreatic tissue through a 425 µm steel mesh to eliminate any residual vascular or undigested tissue fragments.
- After filtration, make the volume to 25 mL with washing solution 1. Perform centrifugation 1x at 100 x g for 1 min at 4 °C. Remove the supernatant.
- Transfer the pellet to a new tube using a sterile plastic pipette after adding 50 mL of RPMI medium. Centrifuge the sample again at 100 x g for 1 min at 4 °C. Discard the supernatant and store the pellet for further analysis.
NOTE: All remaining steps were performed inside laminar flow cabinets under sterile conditions suitable for cell culture experiments. - Add 10 mL of density solution 1.077 to the pellet acquired after the last, followed by gentle disruption and homogenization of the pellet by tapping the tube's edge with a finger.
NOTE: The density range for isolating islet cells from the surrounding pancreatic tissue is approximately 1.077, in contrast to the medium's density, which is approximately 1.00126. Consequently, we employed density solution 1.077 solution for this objective. - Add 10 mL of RPMI and centrifuge at 600 x g for 12 min at 4 °C with brakes off. This procedure established a density-based division inside the tubes, resulting in the accumulation of islet cells in a layer right below the RPMI layer, positioned directly underneath the RPMI layer.
- Remove both the islet cells and RPMI were eliminated. The goal of this step was to purify islet cells to enhance their removal from pancreatic tissues, resulting in a purer ductal cell isolation process.
- Remove any extra pancreatic tissue into a new 50 mL tube using a pipette. Add 10 mL of 1.096 density solution to the tissue pellet.
- Next, slowly add 10 mL of 1.062 density solution gradient with a syringe. Pay attention to maintaining a homogeneous distribution of components. Make a gradient by stacking solutions in order from densest to least dense.
- Add 10 mL of RPMI on top. Centrifuge tubes at 600 x g for 12 min at 4 °C without the brakes. After spinning, different layers of density are seen. The ductal cells are in the middle layer, below the RPMI layer.
- Carefully remove the ductal cells using a throwaway Pasteur pipette and put them into a separate 50 mL tube. Add 25 mL of washing solution 2 and mix the suspension gently by tapping the tube with a finger.
- Spin the tube at 100 x g for 1 min and discard the supernatant. Perform two more rounds of centrifugation with the pellet. After the last wash, add 2 mL of washing solution 2 to the pellet27.
4. Isolation and culture of ductal cells
- Inoculate the harvested cells into a T25 flask and add 5 mL of prewarmed cell culture fluids. Maintain the incubator at 5% CO2and 37 °C.
NOTE: Keeping physiological temperatures stable is important for cell culture to work, so all the solutions were heated to about 37 °C before they were used. - After 24 hours, aspirate the medium carefully. Rinse the cells twice with washing solution 2. Add fresh cell culture medium and return the flask to the incubator. Those cells that adhered to the flask surface were called ductal cells.
- Replace the growth medium every 3 days. If the color of the medium changes very quickly, it means that it is losing nutrients and becoming more acidic, which indicates the medium should be changed more frequently.
- Passage cells once the cells in the flasks attain 80% confluency. Wash with 1-2 mL of PBS 2x and get rid of any extra media.
- Add 2 mL of enzymatic dissociation solution (without phenol red) to start the enzymatic breakdown process and separate the cells from the flask surface.
- Incubate for 2-3 min and assess cell detachment under a 10x microscope. If the cells remain partially attached, re-incubate at 37 °C for an additional 2 min.
- After the cells were completely detached from the flask surface, stop the enzyme digestion by adding about 8 mL of cell growth medium, which is 4x the volume of the enzymatic dissociation solution. Gently tap the flask walls.
NOTE: Tapping, which can help the cells separate, cuts down on the overall incubation time and stops the enzymes from damaging the cell membrane, ensuring that this happens after long-term contact with the enzymatic dissociation solution. - After adding cell culture media, transfer the cell suspension to 15 mL tubes and centrifuge at 150 x g for 10 min at 25 °C with a mild deceleration setting (speed 9 break) to pellet the cells.
- Discard the supernatant. Resuspend the cell pellet in 6-8 mL washing solution 2. Repeat centrifugation as above. Discard the supernatant. The procedure was repeated to guarantee the thorough elimination of the enzymatic dissociation solution.
- Using gentle pipetting, resuspend the pellet in 5 mL fresh cell culture medium to make a uniform cell suspension. At this stage, perform cell counting.
- Mix 10 µL of the cell suspension with 10 µL trypan blue and count cells using a hemocytometer.
- Seed 1 × 10⁶ cells per T25 flask using the counted suspension.
NOTE: By this time, most of the cells had been identified as ductal cells. A good number of cells were seeded into each dish based on the cell count that was done. Based on what we saw in the experiments, cells were spread out into two different T25 flasks once they reached the best level of confluence in one flask. This was done to keep the proliferation efficiency high. We were able to successfully separate ductal cells from rat pancreas tissue using this method. After being successfully separated, the cells were made ready for further experiments according to the study plan. - Continue culturing until passage 4. Passage cells when needed to maintain optimal growth conditions.
NOTE: From passage 4 on, there was a noticeable rise in the number of cells between days 3 and 9. Since cells tend to be less able to divide after more cycles, this method made sure that there were enough viable cells. Once the ductal cells had grown enough, they started to change into islet-like cells. Based on what we found, cells between stages 3 and 6 have the fastest rates of proliferation. Passage 4 shows a particularly noticeable rise in the number of ductal cells. However, after passage 6, there was a decline in proliferative ability. The protocol was tweaked based on these results to get the right number of cells while keeping their viability and usefulness28.
5. Differentiation of ductal cells into islet-like clusters
- Harvest passage 4 ductal cells using the standard passaging procedure. Wash twice with 1-2 mL PBS to remove residual medium and unattached cells.
- Add 2 mL enzymatic dissociation solution (without phenol red) to the flask. Incubate at 37 °C for 2-3 minutes and monitor under a 10x microscope.
- If cells remain attached, incubate for another 2 minutes. Stop the enzymatic reaction by adding 8 mL cell growth medium.
- Transfer the suspension to a 15 mL tube and centrifuge at 150 × g for 10 minutes at 25 °C, setting 9 for speeding up and slowing down.
- Discard the supernatant. Resuspend the pellet in 6-8 mL washing solution 2. Centrifuge and discard the supernatant.
- Resuspend the final pellet in 5 mL fresh medium. Count the cells as described earlier.
- Seed 1 × 10⁵ cells per well in a six-well plate, adding 3 mL medium per well. Incubate at 37 °C, 5% CO2.
- Replace the medium every 3 days during the first 7 days. Adjust the frequency if the medium color changes rapidly.
- Gradually switch to differentiation medium after 7 days. Continue culturing for 15 days total (7 days growth + 8 days differentiation). Change medium every 2 days during differentiation.
- On day 8, begin the differentiation phase. After 4 days, wash cells twice with PBS and add 500 µL enzymatic dissociation solution.
- Incubate 2-3 min, stopping the reaction by adding 2 mL of growth medium. Centrifuge at 150 x g for 10 min at 25 °C. Resuspend and re-seed 1 x 10⁵ cells per well in six-well plates.
- On the 15th day, perform a full microscopic analysis to clearly characterize and confirm the formation of islet-like cellular aggregates24.
6. Quantification of zinc concentration in differentiated ductal cells by Dithizone
- Thaw and equilibrate the DTZ solution from −20 °C storage. Add 3-4 drops DTZ solution to each well of the 15-day differentiated cells. Observe under a microscope. Identify insulin-producing cells by red staining28(Figure 2).
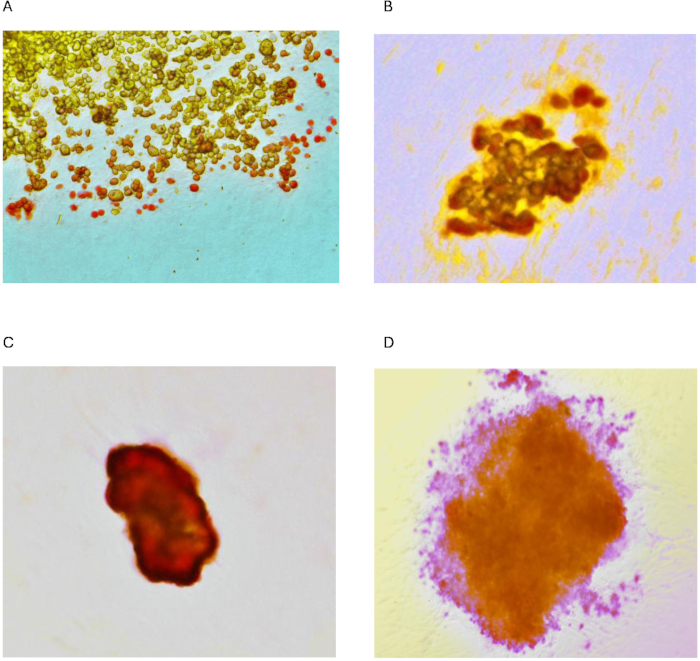
Figure 2: Microscope images of islet-like ductal cells. Images at (A) day 11 of culture (20x), (B) day 13 of culture (20x), (C, D) day 15 of culture (20x). Cells were visualized after staining with Dithizone. Please click here to view a larger version of this figure.
7. Test for glucose stimulation
- Seed 1 x 10⁴ islet-like clusters per well in a 24-well plate with 1 mL of differentiation medium per well.
- On day 15, stimulate cells with glucose. Remove existing medium and add 1 mL of low-glucose solution (1.67 mM). Incubate 1 h at 37 °C.
- Collect medium and transfer to 2 mL tubes. Add 1 mL of high-glucose solution (16.7 mM). Incubate 1 h. Collect medium for analysis. Collect the cell culture medium at every 1 h interval between the addition of different glucose solutions.
- Perform insulin ELISA following the manufacturer's instructions. Once removed from the foil pouch, allow the microplate to equilibrate to room temperature prior to beginning the ELISA procedure.
- Add 10 µL of reagent to the sample, control, and standard wells.Add 75 µL of working conjugate solution. Sela the plate and incubate for 2 h at room temperature with shaking (700-900 rpm).
- Wash wells 6x with 350 µL of wash buffer. Add 100 µL of 3,3′,5,5,5,5-Tetramethylbenzidine (TMB) substrate per well. Seal the plates and incubate 15 min in the dark with shaking (700-900 rpm) at room temperature.
- Add 100 µL of stop solution per well and mix by gently agitating the plate to halt the process. Remove bubbles and read absorbance at 450 nm. Measure for 30 min following the addition of the stop solution27.
8. Islets and islet-like ductal cell transplantation
- Anesthetize rats using ketamine (100 mg/kg) and xylazine (10 mg/kg). Sanitize and drape the surgical site. Make a 2-3 cm midline incision.
- Displace the intestines and expose the portal vein using retractors. Perform venotomy and insert a catheter pre-filled with saline (Figure 3A).
- Infuse 100-500 µL of cell suspension into the portal vein. Remove the catheter and close the venotomy with sutures or adhesive. Close abdomen and monitor recovery, providing analgesia as needed (Figure 3B).
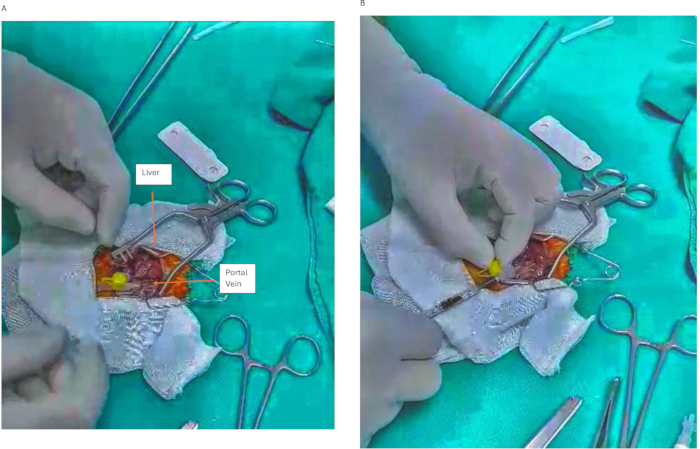
Figure 3: Transplantation of islets and islet-like cells. (A) Sterile intravenous intracath used to transplant islets and islet-like cells. (B) Transplantation of islets and islet-like cells into a sterile syringe. Please click here to view a larger version of this figure.
9. Streptozotocin (STZ) induced diabetic rats
- Fast rats 12 h. Administer 45 mg/kg STZ intraperitoneally, dissolved in cold citrate buffer (pH 4.5).
NOTE:Fasting for 12 h prior to STZ injection enhances GLUT2 expression, which facilitates glucose transport in pancreatic beta cells. This process increases STZ uptake into the cells, resulting in greater beta cell damage. This mechanism facilitates the progression of more significant hyperglycemia and enhances the effectiveness of the diabetes model. - Confirm diabetes 48-72 h post-injection with blood glucose >250 mg/dL. Classify rats that usually reached blood glucose values over 250 mg/dL as diabetic and incorporate them into the experiment29.
10. Preparation of islets and islet-like cells for transplantation
- Harvest cells after treating with the enzymatic dissociation solution for 1 min. Scrape cells that adhere to the surface. Replace with fresh medium and collect cells.
- Centrifuge at 300 x g for 5 min. Resuspend the pellet in 100-150 µL of saline. Perform cell counting and adjust the cell count to 1000 IEQ or 800 islets per rat or 1 x 10⁵ islet-like cells per rat.
11. Portal vein transplantation
- Anesthetize animals by intraperitoneal injection of ketamine (100 mg/kg) and xylazine (10 mg/kg).
- Sanitize the animal's abdomen region with a sterile solution (betadine or 70% ethanol). Envelope the surgical area with a sterile drape.
- Make a midline incision, approximately 2-3 cm in length, to gain access to the abdominal cavity.
- Displace the intestines to reveal the liver. Secure the left and right lobes of the liver with sterile retractors. Expose the ventral surface of the liver to locate the portal vein.
- Pre-rinse the polyethylene catheter (PE-10 or PE-50) with saline solution and fill it entirely. Use microsurgical forceps to hold a branch of the portal vein-typically the left or right lateral branch.
- Perform a minor venotomy (about 1-2 mm).Carefully insert the catheter into the venotomy site. To prevent displacement, use suture material or forceps to anchor the catheter, typically using a 6-0 suture thread.
- Verify the accurate positioning of the catheter by gradually administering sterile saline solutions. The catheter gradually delivered the prepared islet cell and islet-like cell suspension into the portal vein. Total volume is 100-500 µL.
- Upon completion of the infusion, remove the catheter and use sterile tissue adhesive or absorbable sutures to seal the venotomy site.
- Carry out hemorrhage management. Reposition all tissues surrounding the liver and suture the abdominal muscles using absorbable thread. Secure the skin with sutures or clips.
- Keep the animal under surveillance in a warm environment. Provide suitable analgesics for pain management during emergence from anesthesia (e.g., buprenorphine 0.1 mg/kg). Observe animals for 48 h. Examine for indications of infection, edema at the surgical site, or hemorrhage30.
12. Blood glucose monitoring
- Assess the initial blood glucose levels. Carefully hold the rat and use a lancet to create a small cut at the tip of the tail. Gently remove the initial drop of blood using a sterile cotton swab.
- Apply the second drop of blood onto the glucose test strip and document the baseline glucose level31.
13. Intraperitoneal glucose tolerance test
NOTE: Rats undergo the Intraperitoneal Glucose Tolerance Test (IPGTT) to evaluate their bloodstream's glucose clearance efficiency. This test offers insights into glucose metabolism, insulin sensitivity, and possible diabetic conditions. The intraperitoneal glucose tolerance test was performed on day 15 on day 15 post-transplantation. The primary rationale for implementing a designated fasting duration before the IPGTT is to stabilize basal glucose levels and ensure a consistent metabolic state. The fasting period facilitates the depletion of liver glycogen stores, enabling a more reliable evaluation of the glucose tolerance response. Fasting for 6 h reduces postprandial effects, while overnight fasting (approximately 12-16 h) may have distinct implications, potentially influencing insulin sensitivity and glucose metabolism.
- Subject rats to a 6 h fasting period, with only water access allowed overnight, ensuring the fasting duration does not exceed 12 h. Ensure a uniform fasting period for all subjects to reduce variability in glucose measurements.
- Before glucose is administered, weigh the rats. To prepare a sterile solution, dissolve 20 g of glucose in 100 mL of sterile saline.
NOTE: The standard dosage is generally 2 g of glucose/kg of body weight (2 g/kg). The total volume given is determined by the body weight of the animal. - Assess the baseline blood glucose levels. Hold the rat and use a lancet to make a small incision at the tip of the tail. Gently remove the first drop of blood using a sterile cotton swab.
- Apply the second drop of blood to the glucose test strip and record the baseline glucose level.
- Based on the rat's body weight, administer the appropriate amount of glucose solution at a rate of 2 g/kg.
- Before intraperitoneal (IP) administration of the glucose solution, gently handle the rat. Inject glucose into the peritoneal cavity, not into subcutaneous tissue or any organ, and ensure it is correct administration.
- After the glucose injection, collect blood samples at specified intervals to monitor glucose levels. Typical time intervals are 15, 30, 60, 90 and 120 min after injection.
- At each point, collect blood by cutting the tail vein. Before each blood collection, ensure that the tail is wiped with an alcohol swab.
- At each designated time point, measure glucose levels and document using a glucose meter.
- During the test, monitor the rats for any signs of discomfort or adverse reactions. To minimize stress for the animals between measurements, maintain a warm and quiet environment.
- After the last blood glucose measurement, clean tail wounds, and comfort the animals29.
14. Analysis of insulin through ELISA following blood collection
NOTE: The steps in this protocol are for taking blood from a rat's abdominal aorta and then using the enzyme-linked immunosorbent assay (ELISA) method to test for insulin.
- Anesthetize the rat before blood collection as described earlier. Place the anesthetized rat in a supine position on a sterile surgical platform.
- Shave the abdominal area and disinfect the area using 70% ethanol or iodine solution to ensure sterility.
- Make a midline incision with a scalpel to penetrate the skin and muscle layers and expose the abdominal cavity.
- Retract the intestines to access the abdominal aorta located adjacent to the spine. Use a heparinized syringe to insert the needle into the abdominal aorta at a slight angle.
- Collect blood (usually 1-3 mL, depending on the size of the rat) into the syringe. Apply gradual and consistent suction to avoid vascular collapse or hemolysis of the blood.
- Place the collected blood in a centrifuge tube and keep it on ice.
- If the animal is to be euthanized after the procedure, perform euthanasia in accordance with institutional ethical guidelines.
- Centrifuge the collected blood at 300 x g for 10-15 min at 4 °C to ensure separation of plasma or serum. Transfer the supernatant to a new tube and store at -80 °C for subsequent insulin analysis.
NOTE: It is important to avoid hemolysis during blood collection as this can affect the accuracy of ELISA results (Figure 4)29.
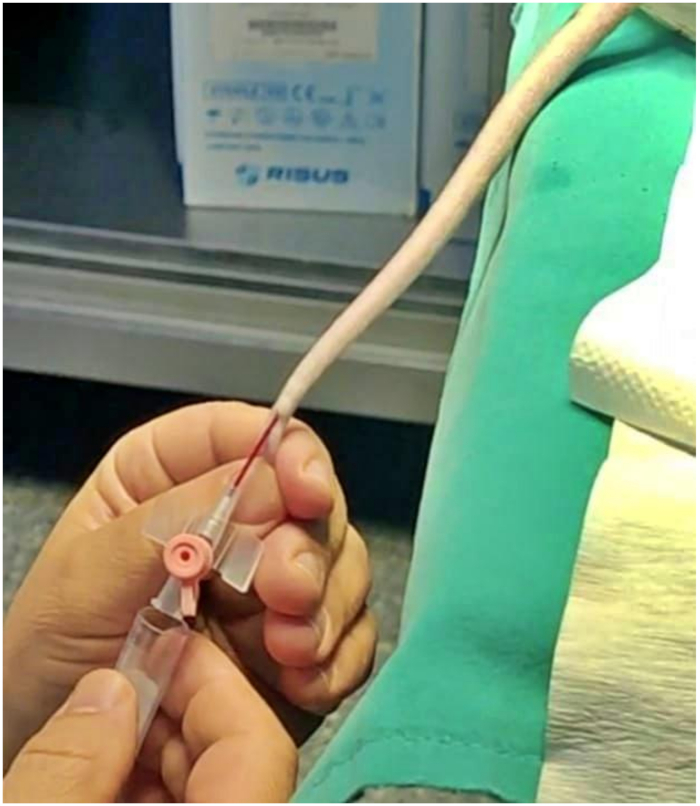
Figure 4: Blood samples were obtained from the tail vein of rats into blood tubes for insulin analysis at the conclusion of the experiment on day 15 post-transplantation. Please click here to view a larger version of this figure.
15. Insulin measurement by ELISA
- Prepare the insulin ELISA kit according to the manufacturer's instructions. Allow all reagents, standards, and samples to reach room temperature before starting the assay.
- Determine the required number of wells on the ELISA plate for standards, controls, and rat serum samples.
- Prepare the rat serum samples for analysis by diluting them as indicated in the ELISA kit protocol, e.g., 1:10 dilution in PBS.
- Prepare insulin standards by serial dilution to generate a standard curve, e.g., ranging from 0 to 10 ng/mL.
- Dispense standards, controls, and diluted rat serum samples (usually 50-100 µL per well) into the indicated wells of the ELISA plate. Dispense the detection antibody solution provided with the kit into each well to ensure even distribution.
- Incubate the plate for the specified time (typically 1-2 h) at room temperature or according to the instructions provided.
- Following incubation, ensure that the wells are washed with the designated wash buffer, typically PBS containing 0.05% Tween-20, to remove unbound substances. Perform the washing step 3x to 5x according to the kit instructions, making sure that any remaining liquid is completely removed after each wash.
- Place the substrate solution in each well. The substrate will interact with the antibody bound to the enzyme, causing a color change; the intensity of the color is related to the amount of insulin present in the sample. Incubate the plate in darkness for the duration indicated by the kit, typically ranging from 15 to 30 min.
- Add the stop solution to each well to terminate the colorimetric reaction. The color change will stabilize following the addition of the stop solution, which is typically yellow.
- Immediately measure the optical density (OD) of each well using a plate reader set to 450 nm (or as specified by the kit).
- Generate a standard curve by plotting the known concentrations of insulin standards against the corresponding optical density (OD) values.
- Calculate the insulin concentration in rat serum samples using the standard curve and corresponding OD values. Insulin levels should be reported in ng/mL or other appropriate units29.
Access restricted. Please log in or start a trial to view this content.
Results
Loading...
$$\rightleftharpoonup{xx}$$
$$\longleftharp{xx}$$,
$$\longrightharp{xx}$$,
Light microscopy analysis
During the 14th day examinations of ductal cells, light microscopy analysis revealed that the cells clustered and formed an islet-like structure. This structural change indicates that after a certain period, ductal cells change their morphological characteristics by entering an organizational order and gaining an islet-like appearance. The tendency of the cells to cluster is probably due to the effects of intercellular communication and the...
Access restricted. Please log in or start a trial to view this content.
Discussion
Loading...
$$\rightleftharpoonup{xx}$$
$$\longleftharp{xx}$$,
$$\longrightharp{xx}$$,
The study of the functional capacity of islet-like cells from different sources has attracted considerable interest in diabetes research. Initial research shows that these cells can release insulin when glucose levels are raised, which suggests that they might be able to mimic the functions of natural pancreatic islets. Researchers have utilized dithizone staining to verify the phenotypic resemblance of islet-like cells to pancreatic islets, as evidenced by the characteristic red staining present in these cells
Access restricted. Please log in or start a trial to view this content.
Disclosures
Loading...
$$\rightleftharpoonup{xx}$$
$$\longleftharp{xx}$$,
$$\longrightharp{xx}$$,
No potential conflict of interest was reported by the author(s).
Acknowledgements
Loading...
$$\rightleftharpoonup{xx}$$
$$\longleftharp{xx}$$,
$$\longrightharp{xx}$$,
The authors would like to thank the laboratory team for their contributions to the study.
Access restricted. Please log in or start a trial to view this content.
Materials
| Name | Company | Catalog Number | Comments |
|---|---|---|---|
| 0.9% Sodium Chloride | Sahar Pharma | For removal of pancreas and cell transplantation | |
| 10 mL serological pipette - sterile | Corning | 4488 | For isolation |
| 24 well plate | Corning | 353047 | For GSIS |
| 25 mL serological pipette - sterile | Corning | 4489 | For isolation |
| 70% ethanol | ISOLAB | 64-17-5 | For desinfection of rats |
| betadine | Baticonol | 1186 | For desinfection of rats |
| Biocholl 1077 | Sigma | L6715-BC | For pancreas purification |
| Biocoll, Density 1.10 g/mL | Sigma | L6155-BC | For pancreas purification |
| Blood glucose meters and glucose test strips | On Call Plus | For measuring blood glucose | |
| BSA | Sigma | A9418 | For preperation of krebs |
| CaCl2 | Sigma | 57647902 | For preperation of krebs |
| Catheter composition: Polyethylene catheter (intravenous intracath) | Bicakcilar | 24G and 14G | For pancreas and liver |
| Centrifuge | Thermo | ST1R Plus | For isolation |
| Collagenase Type V, ≥ 1 FALGPA units/mg solid, >125 CDU/mg solid | Sigma | C9263- 1G | For pancreas digestion |
| D-(+)-glucose | Sigma | 50-99-7 | For GSIS and IPGTT |
| Dithizone (DTZ) | Sigma | D5130 | For islet determination |
| DMSO | Sigma | D8779 | For solve to DTZ |
| Dulbecco’s Modified Eagle’s Medium (DMEM—low glucose) | Gibco | 11885084 | For cell culture |
| Eppendorf tube | ISOLAB | For cell washing | |
| Falcon tube (50 mL) | ISOLAB | LB.IS.078.02.009 | For isolation |
| fetal bovine serum (FBS) | Sigma | N4637 | For pancreas isolation and culture |
| Fine needle and suture material (size 6-0 or 7-0) | PROLENE Blue 18" | P-1 Needle | 8697G | For removal of pancreas and cell transplantation |
| glucagon-like peptide 1 (GLP-1) | Aladdin | rp174144 | For Cell Culture |
| Hank's balanced salt solution (HBSS with Ca-Mg) | Capricorn | HBSS-1A | For enzyme preperation |
| HBSS no calcium, no magnesium, no phenol red | BIOCHROM | L2015 | For pancreas isolation |
| HEPES | Lonza | For cell culture | |
| Insulin Elisa | Alpco | 80-INSRT-E01 | For insulin elisa |
| insulin-transferrin-selenium (ITS) | Gibco | ITS -G | For cell culture |
| Isoxazole 9 (ISX-9) | Aladdin | I304735-10mg | For cell culture |
| KCl | Sigma | 329820207 | For preperation of krebs |
| Ketamine HCl 200 mg/mL | NexGen | For rats anestesia | |
| Laminar Flow Cabinets | Labor Ildam | BSC-1100IIA2-X | For isolation and Culture period |
| Lancets | Ayset | 28 G | For measuring blood glucose |
| L-glutamine | Sigma | 59202c | For pancreas isolation and culture |
| MgCl2 | Sigma | 329759772 | For preperation of krebs |
| microplate reader | BioTek Synergy | H1 Multimode Reader | For insulin elisa |
| microplate shaker | VWR | 444-0270 | For insulin elisa |
| Microsurgical microscope | EMZ- | 200TR 3.9X | For removal of pancreas and cell transplantation |
| Microsurgical scissors and forceps | Aesculap | For removal of pancreas and cell transplantation | |
| Millicell Hanging Cell Culture Insert, polyethylene terephthalate 8.0µm | MILLIPORE | PIEP30R48 | For GSIS |
| NaCl | Sigma | 7647-14-5 | For preperation of krebs |
| NaHCO3 | Sigma | 144-55-8 | For preperation of krebs |
| Pasteur Pipette 3 Ml | BIOSIGMA | For isolation | |
| penicillin/streptomycin | Sigma | For pancreas isolation and culture | |
| Phosphate buffered saline solution (PBS) | BIOCHROM | L1815 | For cell passaging |
| Retractor (for the stabilization of the liver and connective tissues) | Aesculap | For removal of pancreas and cell transplantation | |
| Roswell Park Memorial Institute Medium (RPMI w/L-Gln) | Capricorn | RPMI-A | For pancreas isolation and culture |
| Steril Cotton Tipped | Dynarex | For removal of pancreas and cell transplantation | |
| Sterile syringe (10 mL) | Ayset | 32MM 22G | For Collegenase reaction |
| Stopwatch | Kenko | KK613D | For IPGTT |
| Streptozotocin (STZ) | Sigma | 18883-66-4 | For occur diabetic rats |
| Syringe Driver Filter Unit (GP-0.22 µm-3 mm) | Millex | SLGP033RS | For sterilisation of cell culture media |
| T25 flask | Thermo | 130189 | For culture |
| TrypLE Express reagents | Gibco | For cell passaging | |
| water bath | Labor Ildam | ALB128 | For collegenase reaction |
| Xylazine 2% w/v Solution for Injection | Rompun | For rats anesthesia |
References
Loading...
$$\rightleftharpoonup{xx}$$
$$\longleftharp{xx}$$,
$$\longrightharp{xx}$$,
- Nichols, G. A., Kimes, T. M., Harp, J. B., Kou, T. D., Brodovicz, K. G. Glycemic Response and Attainment of A1C Goals Following Newly Initiated Insulin Therapy for Type 2 Diabetes. Diabetes Care. 35 (3), 495-497 (2012).
- Shapiro, A. M. J., et al. Islet transplantation in seven patients with type 1 diabetes mellitus using a glucocorticoid-free immunosuppressive regimen. New Engl J Med. 343 (4), 230-238 (2000).
- Barton, F. B., et al. Improvement in Outcomes of Clinical Islet Transplantation: 1999-2010. Diabetes Care. 35 (7), 1436-1445 (2012).
- Jacobson, A., et al. Biomedical Risk Factors for Decreased Cognitive Functioning in Type 1 Diabetes: An 18-year Follow-Up of the Diabetes Control and Complications Trial (DCCT) Cohort. Diabetologia. 54 (2), 245-255 (2010).
- Rovner, A. J., et al. Development and Validation of the Type 1 Diabetes Nutrition Knowledge Survey. Diabetes Care. 35 (8), 1643-1647 (2012).
- Knopp, B., Perumareddi, P. An Atypical Presentation of Type 1 Diabetes. Arch Clin Cases. 8 (3), 46-49 (2021).
- Low, J. C., et al. Do Obese Children With Diabetic Ketoacidosis Have Type 1 or Type 2 Diabetes. Primary Care Diabetes. 6 (1), 61-65 (2012).
- Xu, X., et al. β cells can be generated from endogenous progenitors in injured adult mouse pancreas. Cell. 132 (2), 197-207 (2008).
- Dorrell, C., et al. Transcriptomes of the major human pancreatic cell types. Diabetologia. 54 (11), 2832(2011).
- Kim, B., et al. Differentiation of human labia minora dermis-derived fibroblasts into insulin-producing cells. Exp Mol Med. 44 (1), 26(2012).
- Campbell, S. C., et al. Selenium stimulates pancreatic beta-cell gene expression and enhances islet function. FEBS Lett. 582 (15), 2333-2337 (2008).
- Shaer, A., Azarpira, N., Vahdati, A., Karimi, M. H., Shariati, S. Differentiation of Human-Induced Pluripotent Stem Cells Into Insulin-Producing Clusters. Exp Clin Transplantat. 13 (1), 68-75 (2015).
- Koh, S. H., et al. Differential Effects of Isoxazole-9 on Neural Stem/Progenitor Cells, Oligodendrocyte Precursor Cells, and Endothelial Progenitor Cells . PLoS One. 10 (9), e0138724(2015).
- Tsakmaki, A., Fonseca Pedro, P., Pavlidis, P., Hayee, B., Bewick, G. A. ISX-9 manipulates endocrine progenitor fate revealing conserved intestinal lineages in mouse and human organoids. Mol Metabol. 34, 157-173 (2020).
- Khan, S., Sur, S., Newcomb, C. J., Appelt, E. A., Stupp, S. I. Self-assembling glucagon-like peptide 1-mimetic peptide amphiphiles for enhanced activity and proliferation of insulin-secreting cells. Acta Biomaterialia. 8 (5), 1685-1692 (2012).
- White, A. M., et al. Engineering Strategies to Improve Islet Transplantation for Type 1 Diabetes Therapy. ACS Biomater Sci Eng. 6 (5), 2543-2562 (2020).
- Li, X., Meng, Q., Zhang, L. The Fate of Allogeneic Pancreatic Islets following Intraportal Transplantation: Challenges and Solutions. J Immunol Res. 2018, 1-13 (2018).
- Marín-Cañas, S., et al. Pancreatic ductal cells may have a negative effect on human islet transplantation. PLoS One. 14 (7), e0220064(2019).
- Webb, M. A., et al. The Impact of Potential Islet Precursor Cells on Islet Autotransplantation Outcomes. Cell Transplant. 22 (6), 1041-1051 (2013).
- Vendrame, F., et al. Recurrence of Type 1 Diabetes After Simultaneous Pancreas-Kidney Transplantation, Despite Immunosuppression, Is Associated With Autoantibodies and Pathogenic Autoreactive CD4 T-Cells. Diabetes. 59 (4), 947-957 (2010).
- Barron, E., et al. Associations of Type 1 and Type 2 Diabetes With COVID-19-related Mortality in England: A Whole-Population Study. Lancet Diabetes Endocrinol. 8 (10), 813-822 (2020).
- Rezania, A., et al. Maturation of human embryonic stem cell-derived pancreatic progenitors into functional islets capable of treating pre-existing diabetes in mice. Diabetes. 61 (8), 2016-2029 (2012).
- Blum, B., et al. Functional β-cells maturation is marked by an increase in the glucose threshold for insulin secretion and by expression of urocortin3. Nat Biotechnol. 30 (3), 261-264 (2012).
- Karimi, N., Ozcan, G. B. Rat Ductal Cell-Derived Differentiation into Islet-Like Cells. Methods Mol Biol. , 1-15 (2024).
- Dagli Gul, A. S., Fadillioglu, E., Karabulut, I., Yesilyurt, A., Delibasi, T. The effects of oral carvacrol treatment against H2O2-induced injury on isolated pancreas islet cells of rats. Islets. 5 (4), 149-155 (2013).
- Noguchi, H., et al. Evaluation of Osmolality of Density Gradient for Human Islet Purification. Cell Transplant. 21 (2-3), 493-500 (2012).
- Boyuk, G., Yigit, A. A., Aydogan, I. Co-culture of rat luteal cells with islet cells enhances islet viability and revascularization. In Vitro Cell Dev Biol Animal. 54, 640-647 (2018).
- Karimi, N., Boyuk Ozcan, G. Isolation Procedure for Rat Pancreatic Ductal Cells. Methods Mol Biol. , (2024).
- Karakose, M., et al. Comparison of the Ovary and Kidney as Sites for Islet Transplantation in Diabetic Rats. Transplant Proc. 48, 2216-2220 (2016).
- Gou, W., Cui, W., Cui, Y., Wang, H. Minimizing post-infusion portal vein bleeding during intrahepatic islet transplantation in mice. J Vis Exp. (171), e62530(2021).
- Geiger, M. C., et al. Evaluation of Metabolic Control Using a Continuous Subcutaneous Glucose Monitoring System in Patients with Type 1 Diabetes Mellitus who Achieved Insulin Independence after Islet Cell Transplantation. Cell Transplant. 14 (2-3), 77-84 (2005).
- Farina, M., et al. 3D Printed Vascularized Device for Subcutaneous Transplantation of Human Islets. Biotechnol J. 12 (9), 1700169(2017).
- Biancone, L., et al. Platelet-Activating Factor Synthesis and Response on Pancreatic Islet Endothelial Cells: Relevance for Islet Transplantation. Transplantation. 81 (4), 511-518 (2006).
- Lee, Y. S., Lee, C., Choung, J. S., Jung, H. S. Glucagon-Like Peptide 1 Increases Β-Cell Regeneration by Promoting Α- To Β-Cell Transdifferentiation. Diabetes. 67 (12), 2601-2614 (2018).
- Akinci, E., Banga, A., Greder, L. V., Dutton, J. R., Slack, J. M. W. Reprogramming of pancreatic exocrine cells towards a beta (β) cell character using Pdx1, Ngn3 and MafA. Biochem J. 442 (3), 539-550 (2012).
- Kalwat, M. A., et al. Isoxazole Alters Metabolites and Gene Expression, Decreasing Proliferation and Promoting a Neuroendocrine Phenotype in Β-Cells. Acs Chem Biol. 11 (4), 1128-1136 (2016).
- Kroon, E., et al. Pancreatic endoderm derived from human embryonic stem cells generates glucose-responsive insulin-secreting cells in vivo. Nat Biotechnol. 26 (4), 443-452 (2008).
- García-Ocaña, A., et al. Transgenic Overexpression of Hepatocyte Growth Factor in the β-Cell Markedly Improves Islet Function and Islet Transplant Outcomes in Mice. Diabetes. 50 (12), 2752-2762 (2001).
- Vegas, A. J., et al. Long-term glycemic control using polymer-encapsulated human stem cell-derived beta cells in immune-competent mice. Nat Med. 22 (3), 306-311 (2016).
- Zhang, W. J., et al. Evaluation of islets derived from human fetal pancreatic progenitor cells in diabetes treatment. Stem Cell Res Ther. 4 (6), 141(2013).
- El-Kersh, A. O. F. O., El-Akabawy, G., Al-Serwi, R. H. Transplantation of human dental pulp stem cells in streptozotocin-induced diabetic rats. Anat Sci Int. 95 (4), 523-539 (2020).
- Lee, D. Y., Park, S. J., Nam, J. H., Byun, Y. Optimal aggregation of dissociated islet cells for functional islet-like cluster. J Biomater Sci Pol Ed. 19 (4), 441-452 (2008).
- Brissova, M., et al. Intraislet Endothelial Cells Contribute to Revascularization of Transplanted Pancreatic Islets. Diabetes. 53 (5), 1318-1325 (2004).
- Maxwell, K. G., Kim, M. H., Gale, S. E., Millman, J. R. Differential function and maturation of human stem cell-derived islets after transplantation. Stem Cells Transl Med. 11 (3), 322-331 (2022).
- Brissova, M., et al. Pancreatic Islet Production of Vascular Endothelial Growth Factor-A Is Essential for Islet Vascularization, Revascularization, and Function. Diabetes. 55 (11), 2974-2985 (2006).
- Chow, L. W., Wang, L., Kaufman, D. B., Stupp, S. I. Self-assembling Nanostructures to Deliver Angiogenic Factors to Pancreatic Islets. Biomaterials. 31 (24), 6154-6161 (2010).
- Assady, S., et al. Insulin Production by Human Embryonic Stem Cells. Diabetes. 50 (8), 1691-1697 (2001).
- Homma, J., Sekine, H., Shimizu, T. Tricultured Cell Sheets Develop into Functional Pancreatic Islet Tissue with a Vascular Network. Tissue Engineering Part A. 29 (7-8), 211-224 (2023).
- Loganathan, G., et al. Culture of Impure Human Islet Fractions in the Presence of Alpha-1 Antitrypsin Prevents Insulin Cleavage and Improves Islet Recovery. Transplaxt Proc. 42 (6), 2055-2057 (2010).
- Hilderink, J., et al. Controlled aggregation of primary human pancreatic islet cells leads to glucose-responsive pseudoislets comparable to native islets. J Cell Mol Med. 19 (8), 1836-1846 (2015).
- Choi, H., Shinohara, M., Ibuki, M., Nishikawa, M., Sakai, Y. Differentiation of Human-Induced Pluripotent Stem Cell-Derived Endocrine Progenitors to Islet-like Cells Using a Dialysis Suspension Culture System. Cells. 10 (8), 2017(2021).
- Ding, Y., Xia, S., Zhang, H., Chen, Q., Niu, B. Loureirin B Activates GLP-1R and Promotes Insulin Secretion in Ins-1 Cells. J Cell Mol Med. 25 (2), 855-866 (2020).
- O'Mara, B. A., Liehuaa, L., Ahrén, B. Stromal Derived Factor 1 Alpha (SDF-1a) in a Dual Therapy With the DPP-4 Inhibitor 1 Vildagliptin Does Not Enhance Beta Cell Function but Improves Glucose Clearance After Oral Glucose in Streptozotocin Diabetic Mice. J Chem Biol Ther. 1, 110(2016).
- Caporarello, N., Parrino, C., Trischitta, V., Frittitta, L. Insulin Receptor Signaling and Glucagon-Like Peptide 1 Effects on Pancreatic Beta Cells. Plos One. 12 (8), e0181190(2017).
- Schwenk, R. W., et al. GLP-1-oestrogen Attenuates Hyperphagia and Protects From Beta Cell Failure in Diabetes-Prone New Zealand Obese (NZO) Mice. Diabetologia. 58 (3), 604-614 (2014).
- He, Y., et al. Reversal of Early Diabetic Nephropathy by Islet Transplantation under the Kidney Capsule in a Rat Model. J Diabetes Res. 2016, 1-12 (2016).
- Yun, F., Zhaorigen, B., Han, X., Li, X., Yun, S. Islet-Like Cells Induced from Umbilical Cord Mesenchymal Stem Cells with Neonatal Bovine Pancreatic Mesenchymal Exosomes for Treatment of Diabetes Mellitus. Hormone Metabolic Res. 56 (06), 463-470 (2024).
Access restricted. Please log in or start a trial to view this content.
Reprints and Permissions
Request permission to reuse the text or figures of this JoVE article
Request Permission