This protocol describes the generation of mutant murine neural stem cells (NSCs) for glioma research using sequential lentiviral transductions. Oncogenic mutations are first introduced into NSCs, followed by a bicistronic lentivirus containing reporter genes. After dual antibiotic selection, mutant NSCs enable real-time imaging of tumor growth and treatment response.
Method Article
Dual Lentiviral Transduction To Generate Mutant Neural Stem Cells For Glioma Research
In This Article
Summary
Abstract
Gliomas are the most prevalent primary brain tumors in adults, and murine modeling suggests that they may arise from oncogenic mutations in NSCs or early differentiating progenitors. Orthotopic transplantation models derived from mutant NSCs thus have the potential to yield valuable preclinical information about glioma pathogenesis, outcomes, and treatment response. These models require the introduction of an oncogenic mutation into NSCs, preferentially coupled with reporters to aid in the determination of transfection/transduction efficiency and to monitor tumor growth in vivo. This protocol outlines a dual transduction-based methodology for generating mutant NSCs suitable for in vivo tumor monitoring. In this technique, isolated NSCs are first transduced with lentiviruses that contain a gene of interest (oncogenic mutation or green fluorescent protein [GFP] control) in addition to a blasticidin-resistance element. Following blasticidin selection, cells are secondarily transduced with a bicistronic lentiviral vector expressing luciferase and red fluorescent protein (RFP), as well as a puromycin-resistance element. After puromycin selection, cells can be expanded for proliferation assays, orthotopic transplantation, or other downstream applications. This dual transduction approach allows for estimation of transduction efficiency at both infection stages as well as monitoring in vivo tumor establishment, growth, and response to therapy using noninvasive bioluminescent imaging (BLI). This system represents a useful tool for glioma research, merging the biological relevance of adult neural stem cell-derived tumor modeling with the practical benefit of real-time imaging capability, ultimately enhancing the understanding of glioma biology and the advancement of new therapeutic approaches.
Introduction
Gliomas are the most prevalent form of primary brain tumors affecting adults, constituting approximately 80% of all malignant brain neoplasms in this population1. The majority of these are high-grade gliomas2, which are typically very invasive and carry a poor prognosis3,4 despite significant advances in neurosurgical techniques, radiation therapy, and chemotherapeutic approaches5. The high mortality rate in patients afflicted by these tumors highlights the need for ongoing research into glioma formation and progression.
Gliomagenesis in the central nervous system can be triggered by introducing oncogenic mutations into NSCs6,7,8,9 or their early differentiating progeny10,11,12 in murine modeling studies. Notably, these studies have shown that the same oncogenic mutations often fail to produce tumors when introduced into more differentiated cells13, establishing a cell-of-origin hierarchy where increased lineage restriction correlates with reduced susceptibility to transformation14. Genetically modified NSCs are thus commonly used to generate biologically relevant and versatile glioma models, using either transgenic techniques or orthotopic transplantation methods15. Both approaches allow for the study of de novo tumor formation in the native brain environment from an untransformed cell. Genetically engineered models allow for this study in animals with an intact immune system, often better mimicking the histology and cellular heterogeneity observed in human tumors16. However, generating these models is labor- and cost-intensive, and they frequently exhibit long latency times and low tumor formation frequencies16. In contrast, orthotopic NSC models are more readily manipulable and cost-effective. Mutant NSCs can be generated from primary or immortalized cells from either mice or humans, based on experimental needs, and are also suitable for in vitro. experimentation16,17. Additionally, these models offer the ability to precisely adjust the developmental stage of both NSCs and recipient mice, as well as the spatial localization from which NSCs are derived and to which they are introduced. This enables researchers to investigate how age and specific brain regions influence tumorigenesis driven by particular mutations17.
This protocol outlines the methodology for generating mutant murine NSCs from primary culture, which are suitable for both in vitro and in vivo experimental applications (Figure 1). The protocol consists of two distinct transduction phases that occur in a specific temporal sequence. In the initial transduction phase, isolated murine NSCs are infected with recombinant lentiviruses carrying the target genetic construct, either an oncogenic mutation or a green fluorescent protein (GFP) control, alongside a blasticidin resistance cassette. Following this, antibiotic selection pressure is applied using blasticidin, allowing only the surviving transduced cells to proceed to a secondary transduction event. This secondary event employs a bicistronic lentiviral construct that encodes both firefly luciferase and red fluorescent protein (RFP) reporter genes, coupled with puromycin resistance elements for subsequent selection. After the selection with puromycin, the resulting dually transduced NSC populations are expanded in vitro. before subsequent experimentation. This sequential transduction approach offers several methodological advantages: (1) it facilitates a quantitative assessment of transduction efficiency at each step18, (2) it establishes stable reporter cell lines suitable for longitudinal tracking, and (3) it enables noninvasive monitoring of tumor initiation, progression kinetics, and therapeutic responses through BLI methodologies18,19,20. It can also be used with primary or immortalized NSCs21,22,23.
The protocol presented here addresses the pressing need for a standardized, efficient, and biologically relevant approach to generating NSC-derived glioma models from adult animals with integrated imaging capabilities. The resulting models are anticipated to yield insights that are clinically relevant regarding glioma pathogenesis, facilitate the identification of novel therapeutic targets, and present solid platforms for the preclinical evaluation of emerging treatment strategies.
Protocol
This study was conducted in accordance with the ethical standards and regulatory guidelines established by Washington University in St. Louis. For this protocol, the cortex of adult mice was micro-dissected as per the Brossier laboratory’s previously described technique24 and used to isolate primary murine NSCs for subsequent expansion in non-adherent culture according to established protocol24,25,26. All reagents used in culture are either supplied in sterile format or passed through a 0.2 µM membrane filter to ensure sterility. The reagents and the equipment used are listed in the Table of Materials.
1. Neural stem cell isolation from micro-dissected tissue
- Prepare Dissociation Media (DM) and Trypsin Digest Medium (TDM), as per recipes shown in Figure 2.
- Add 200 µL of Trypsin Digest Medium into 1.5 mL microcentrifuge tubes and keep on ice for at least 20 min prior to use. DM can be left at room temperature for later steps in the protocol.
- While tubes are pre-chilling, prepare base Neural Stem Cell Medium (NSC; recipe shown in Figure 2) and place NSC and Fetal Bovine Serum (FBS) at 37 °C in a water or bead bath to pre-warm. Place aliquots of supplements (B27, N2) and growth factors (EGF, FGF) in an ice bucket to thaw slowly.
NOTE: TDM must be prepared fresh each time before use, although NSC and DM can be stored at 4 °C between uses; recipes are shown in Figure 2. Stocks of N2, B27, EGF, and FGF should be aliquoted and stored at -20 °C until use; avoid repeated freeze-thaws of reconstituted stocks (see Table of Materials for further details in preparing stocks of EGF and FGF).
- After TDM-containing microcentrifuge tubes are sufficiently chilled, micro-dissect tissue as previously described24. After each micro-dissection, place the tissue into a microcentrifuge tube. Return the tube to ice until all dissections have been completed, as any warming of tissue may begin the enzymatic digestion process early and result in over-digestion.
- Incubate the microcentrifuge tube(s) at 37 °C in a water or bead bath for 15 min to initiate enzymatic digestion. During incubation, prepare 10% FBS in NSC by adding 0.5 mL FBS to 4.5 mL NSC.
- After incubation, pipette sample(s) gently 5–10 times with a 1 mL micropipette to further dissociate cells, then neutralize trypsin by adding 200 µL of 10% FBS in NSC to each sample. Pipette up and down gently to mix.
NOTE: It is crucial to follow the recommended time of incubation at 37 °C. Over-trypsinization may lead to cell death, while under-trypsinization can make the sample difficult to dissociate (see Table 1, Points 1–2 for this and other troubleshooting tips).
NOTE: Either a water bath or a bead bath may be used to incubate samples; the latter may reduce the risk of contamination27, but this may come with a risk of less efficient heat transfer28.
- After incubation, pipette sample(s) gently 5–10 times with a 1 mL micropipette to further dissociate cells, then neutralize trypsin by adding 200 µL of 10% FBS in NSC to each sample. Pipette up and down gently to mix.
- Spin down the isolated primary cells at 630 × g for 5 min at 4 °C. Aspirate the supernatant, being careful not to disturb the cells at the bottom of the well. Wash the cells by adding 2.5 mL DM to the cell pellet and resuspending by gently pipetting up and down 3–4 times. Spin down again at 630 × g for 5 min at 4 °C, and carefully aspirate the supernatant.
- Repeat Step 1.3 to perform a second wash. During final wash, add B27, N2, FGF, and EGF to pre-warmed base NSC medium to create complete NSC medium (recipe shown in Figure 2).
- Aspirate the supernatant. Add 2 mL of warm complete NSC medium to each cell pellet, then resuspend by gently pipetting up and down 3–4 times. Place resuspended cells in one well of a 6-well low-attachment plate and incubate at 37 °C.
NOTE: Although base NSC medium can be stored at 4 °C between uses, supplements and growth factors may undergo degradation at this temperature. Thus, B27, N2, FGF, and EGF should be added to NSC medium to create a complete NSC medium immediately before use.
2. Neurosphere culture establishment and expansion
- Administer 0.5–1 mL of fresh NSC feeding medium (recipe shown in Figure 2) to each well of the NSC cultures every 3 days.
- Monitor for neurosphere formation. When fully formed small spheres are visible, the culture is ready for passage (typically 5–10 days from initial plating).
NOTE: Cells grow best when passaged frequently and when still in the logarithmic growth phase. Larger neurospheres are harder to dissociate and more prone to cell death during this process. Thus, earlier and more frequent passaging is recommended to promote cell health. When ready for passage, isolated neurospheres will be ~100–200 µm in diameter with tightly packed cells and smooth, well-defined borders under brightfield microscopy. Neurospheres will not display irregular projections or extensions. The center of the neurospheres will be slightly darker than the outer edges, but not excessively so; excessively dark cores often result from necrosis of central cells due to nutrient deprivation when neurospheres have been overgrown. Passaging overgrown neurospheres often results in high amounts of cell death, which can affect downstream applications. See Table 1, Points 3–4 for this and other troubleshooting tips. - Pre-warm the NSC medium, DM, 0.05% Trypsin-EDTA, and phosphate-buffered saline (PBS) at 37 °C using a water or bead bath. Place stocks of B27, N2, FGF, EGF, and FBS on ice until needed.
- To passage, transfer well-grown neurospheres to a 15 mL sterile conical tube using a serologic pipette. Centrifuge at 630 × g for 1 min at 4 °C to settle down neurospheres. Aspirate supernatant, being careful to avoid disturbing the pelleted neurospheres. Wash the cells by resuspending in sterile 1x PBS, then centrifuging again at 630 × g for 5 min at 4 °C and aspirating the supernatant.
- Add 1 mL of 0.05% Trypsin/EDTA to the cell pellet. Pipette up and down 3–5 times with a 1 mL micropipette to mix, then incubate at 37 °C in a water or bead bath for 5–6 min.
- After incubation, gently pipette up and down 5–10 times with a 1 mL micropipette to break up neurospheres. Neutralize trypsin by adding 1 mL 10% FBS in NSC medium; pipette gently to mix.
NOTE: Avoid over-trypsinization and/or overly vigorous pipetting of the neurospheres, as it may damage the NSCs and affect cell viability.
- After incubation, gently pipette up and down 5–10 times with a 1 mL micropipette to break up neurospheres. Neutralize trypsin by adding 1 mL 10% FBS in NSC medium; pipette gently to mix.
- Add 2.5 mL DM and centrifuge at 630 × g for 5 min at 4 °C. Aspirate the supernatant. Repeat the wash step with another 2.5 mL DM, followed by centrifugation and aspiration of supernatant, to remove traces of FBS in the medium.
- Resuspend cells in 1 mL fresh complete NSC medium. Filter cell suspension by placing a 40 µm sterile filter in a 50 mL microcentrifuge tube, then adding the cell solution to the top of the filter and allowing gravity to drain the solution into the tube. Any remaining undissociated cells will be captured by the filter, while single cells will pass through to the solution below.
- From the resuspended, filtered cells, take 10 µL for cell counting and mix with 10 µL trypan blue. Using a manual hemocytometer, load 10 µL of the sample and count viable cells (i.e., cells that are not blue) according to standard practice29. Alternatively, an automated cell counter may be used, although it may be less accurate in the presence of cell debris or aggregates30,31.
NOTE: Generally, less than 10%–15% of the total cells should exhibit signs of cell death (e.g., unable to exclude trypan blue). Higher rates of cell death may result from over-trypsinization, excessive mechanical force in separating cells, or poor overall health of the culture prior to trypsinization (see Table 1, Points 1–3). As this can negatively affect downstream applications, it is recommended that cells be replated (Step 2.9) and expanded again (e.g., repeat Steps 2.1–2.9) if high cell death rates are observed rather than proceeding to transduction. - Dilute 5 x 10⁵ cells into 2 mL fresh complete NSC medium and plate into one well of an ultra-low attachment 6-well plate. Administer 0.5–1 mL of fresh NSC feeding to each well every three days to ensure optimal culture health. When fully formed, healthy spheres are visible (see Table 1, Point number 4), the culture is ready for use in Step 3 or 4.
NOTE: Extra NSCs can be stored at this point by resuspending one million NSCs in 1 mL of serum-free cell freezing medium in a 1.5 mL cryovial and storing at -80 °C. NSCs can also be further expanded if needed by plating additional cells in extra wells of the 6-well plate or plating into T-25 flasks.
3. Blasticidin kill curve in parent cells
NOTE: Once the passaged NSCs form healthy neurospheres, cells are ready for subsequent experimentation. Prior to transduction, it is critical to determine the optimal concentration of the selection antibiotic (blasticidin, in this case). This must be performed empirically, as different populations of NSCs may have different susceptibility to the antibiotic. If this has already been determined for the given cell type, skip to Step 4.
- Pre-warm the base NSC medium, DM, 0.05% Trypsin-EDTA, and PBS at 37 °C. Thaw stocks of B27, N2, FGF, EGF, FBS, and blasticidin. Prior to starting, or during incubation steps below, make fresh complete NSC medium and 10% FBS in NSC medium as described above.
- Using freshly expanded neurospheres (after culture from Step 2.9 above), trypsinize and subsequently split as per steps 2.5–2.6, then resuspend in 1 mL fresh NSC for counting. Filter cells through a 40 µm sterile filter as described above to remove undissociated cells, then count cells as described in Step 2.8.
- Resuspend 25,000 viable cells into 2.5 mL aliquots of fresh complete NSC in 15 mL conicals, with 1 aliquot prepared per antibiotic concentration to be tested. Plan to test at least 4–6 different concentrations, although more can be tested if desired.
- Add the appropriate amount of blasticidin to each 2.5 mL aliquot to achieve the desired end concentration (see sample calculations in Table 2). Plate 500 µL of suspended cells (5,000 cells) per well in a 24-well ultra-low attachment plate, with each concentration plated in quadruplicate.
NOTE: To achieve the correct final concentration, blasticidin stock may need to be diluted before adding to the media. Blasticidin can be diluted in NSC medium or PBS; for a 1:1000 diluted stock (10 mg/mL), add 1 mL of undiluted (10 mg/mL) blasticidin stock to 999 mL NSC or PBS. It is recommended that investigators perform all needed calculations to achieve the desired concentrations while materials are warming in Step 3.1; sample calculations shown in Table 2. - Incubate the cells at 37 °C. Check cells carefully using brightfield microscopy every 24 h for changes in morphology and cell/neurosphere death. Feed cells every 3 days by adding 0.5–1 mL of fresh NSC feeding medium supplemented with the correct concentration of blasticidin.
- Determine the appropriate concentration for subsequent blasticidin selection by identifying the lowest blasticidin concentration that kills non-transduced cells between 72–120 h post-plating.
NOTE: For adult murine NSCs, 1000 ng/mL (1 mg/mL) blasticidin was identified as the best concentration for antibiotic selection (Figure 3). Subsequent steps are performed using blasticidin at this concentration. It should be noted that the optimal blasticidin concentration can vary considerably across cell preparations, typically ranging from 0.5–10 µg/mL depending on the type of sample, passage number, and culture conditions32,33; empirical kill curves are therefore essential rather than optional for each new cell type. See Table 1, Point number 5 for additional troubleshooting tips.
4. First lentiviral transduction
NOTE: Before proceeding with the transduction, it is essential to know the optimal multiplicity of infection (MOI) at which to transduce the lentiviral particles (LVPs). This must be determined empirically for different cell types; the methods for doing so have been previously well-described34,35. In the depicted illustrative results, an MOI of 20 was used based on prior experience in transducing primary murine NSCs.
- Start with expanded, untransduced NSCs forming healthy neurospheres (generated after expansion of cells in Step 2.9 above). Split, resuspend, filter, and count cells as per Steps 2.3–2.8 above, then plate cells at a density of 1.5 x 10⁶ cells per well into two wells (one for oncogenic virus, one for control) of a 6-well ultra low-adhesion plate. Incubate the plates overnight at 37 °C.
- The following day, examine the cells. NSCs will be ready for infection if they are forming small clumps.
- Before infecting the cells, carefully thaw the lentiviral aliquot on ice, allowing for a gradual thaw. It is critical not to rush this process.
NOTE: For illustrative purposes, this protocol describes lentiviral transduction using two representative constructs: (1) a control vector expressing GFP under the EF1-α promoter with blasticidin resistance, and (2) an experimental vector expressing an N-terminal HA-tagged BRAF V600E oncogenic mutant under the EF1-α promoter, also with blasticidin resistance. The generation of lentiviruses is beyond the scope of this protocol but has been previously well-described36,37. - After thawing, briefly warm the virus to 37 °C immediately prior to the infection. Determine the volume of LVP to add to each well, using the formula MOI x cell number/virus titer. Using a micropipette set to the calculated volume, slowly add LVPs drop-wise to the cultured cells. Swirl the plate gently to distribute, being careful not to slosh media into adjacent wells. Incubate the cells at 37 °C for 24 h.
NOTE: Once the viral aliquot has been thawed to room temperature, it cannot be refrozen and must be utilized within 24 h. Once the aliquot has been warmed to 37 °C, it needs to be employed within a 30 min timeframe. - Following this incubation period, centrifuge the neurospheres at 630 × g for 5 min at 4 °C, then aspirate supernatant. Resuspend in 2 mL fresh complete NSC, without any virus or antibiotic, and plate in a fresh well of a low-attachment 6-well plate.
- On the following day, evaluate the transduction efficiency in the GFP control cells by determining the proportion of fluorescently-tagged cells/clumps to total cells/clumps by fluorescence microscopy in multiple fields. The expected reporter expression (GFP) should be more than 80% for successful transduction.
NOTE: If suboptimal transduction efficiency is noted, a second round of infection (repeating Steps 4.4–4.6) can be performed. If efficiency fails to improve, consider re-optimization of MOI or trialing a different preparation of lentivirus. See Table 1, Point number 6 for these and other troubleshooting tips. - Upon observing that the developing neurospheres appear healthy and that evidence of infection is present (GFP positive; ~80%), proceed with splitting cells per Steps 2.3–2.6 above. Resuspend the cells in fresh 5 mL of complete NSC medium containing the appropriate concentration of blasticidin (1000 ng/mL), then filter through 40 µm sterile filters to eliminate cell clumps. Count cells, then plate at approximately 5 x 10⁴ cells/mL in ultra-low-attachment T-25 flasks.
NOTE: After initial addition of antibiotic, there may be a high rate of cell death as non-transduced cells die; this is expected, and should improve with ongoing selection. - Expand cells by feeding every 3 days with a feeding supplement containing blasticidin. When fully formed, healthy spheres are visible, usually 5–10 days after splitting, the culture is ready for use in Step 5 or 6.
NOTE: After further expansion of the resistant clones, cells can be collected for Western blotting (described in Step 7) to validate that the non-fluorescently labeled, HA-tagged oncogenic construct is being appropriately expressed. If Western blotting is performed at this step, it is still recommended that expression is checked after the 2nd transduction (in Step 7), to ensure appropriate ongoing expression.
5. Puromycin kill curve in blasticidin-resistant NSCs
NOTE: The optimal selection concentration for the second transduction must also be empirically determined. Transduced NSCs resistant to blasticidin are used at this step, and cells are maintained under blasticidin selection (1000 ng/mL) throughout, as transduction and concurrent blasticidin selection may alter sensitivity to puromycin.
- Pre-warm the base NSC medium, DM, 0.05% Trypsin-EDTA, and PBS at 37 °C. Thaw stocks of B27, N2, FGF, EGF, FBS, blasticidin, and puromycin. Prior to starting, or during incubation steps below, make fresh complete NSC medium and 10% FBS in NSC medium as described above.
- Using blasticidin-resistant neurospheres, trypsinize and subsequently split as per Steps 2.5–2.7, resuspending in 1 mL fresh NSC for counting and filtering to remove clumps. Count the cells as described in Step 2.8, then resuspend 25,000 viable cells into 2.5 mL aliquots of fresh complete NSC in 15 mL conicals, with 1 aliquot prepared per antibiotic concentration to be tested. Plan to test at least 4–6 different concentrations, although more can be tested if desired.
- Add blasticidin to achieve the previously optimized concentration (1000 ng/mL = 0.25 mL of undiluted stock / 2.5 mL aliquot). Then add the appropriate amount of puromycin to each tube to achieve the desired end concentration (see sample calculations in Table 2).
- Plate 500 µL of suspended cells (5,000 cells) per well in a 24-well ultra-low attachment plate, with each concentration plated in quadruplicate.
- Incubate the cells at 37 °C. Check cells carefully using brightfield microscopy every 24 h for changes in morphology and cell/neurosphere death. Feed cells every 3 days by adding 0.25 mL of fresh NSC feeding medium supplemented with blasticidin and the correct concentration of puromycin.
- Determine the appropriate concentration for subsequent puromycin selection by identifying the lowest puromycin concentration that kills cells between 72–120 h post-plating.
NOTE: For adult murine NSCs transduced with illustrative GFP and/or BRAF-V600E lentiviruses, 100 ng/mL puromycin was empirically determined as the best concentration for antibiotic selection (Figure 4). For the example transductions, subsequent steps were performed using 1000 ng/mL blasticidin (from Step 3 above) and 100 ng/mL puromycin (from Step 5 above). See Table 1, Point number 5 for troubleshooting tips.
6. Second lentiviral transduction
NOTE: Cells remain in blasticidin-containing media during the second transduction phase to ensure that the oncogenic construct or GFP control introduced in the first transduction phase is maintained in the cells.
- Initiate the procedure by utilizing actively proliferating, stably-transduced blasticidin-resistant NSCs (generated in Step 4). Begin by dissociating the NSCs into a single-cell suspension (Steps 2.3–2.7) to ensure uniformity during plating.
- Plate cells at a density of 1.5 x 10⁶ cells per well in complete NSC medium with blasticidin (1000 ng/mL, as determined in Step 3) into a 6-well ultra low-adhesion plate. Incubate the plates overnight at 37 °C.
- The following day, cells will be ready for transduction if they form small clumps. Thaw the bicistronic lentivirus (containing luciferase and RFP) on ice, then briefly warm to 37 °C immediately prior to infection. Determine the volume of LVP to add to each well, using the formula MOI x cell number/virus titer; an MOI of 20 is used here.
- Using a micropipette set to the calculated volume, slowly add LVPs drop-wise to the cultured cells. Swirl the plate gently to distribute, being careful not to slosh media into adjacent wells. Incubate the cells at 37 °C for 24 h.
- The following day, centrifuge the neurospheres at 630 × g for 5 min at 4 °C and replate them in fresh complete NSC containing blasticidin (1000 ng/mL, as per Step 3).
- The following day, evaluate the efficiency of the second transduction step by determining the proportion of RFP-positive cells/clumps to total cells/clumps by fluorescence microscopy in multiple fields, with an optimal efficiency of ~60%.
- Upon observing that neurospheres appear healthy and that the second transduction step was effective (e.g., the majority of cell clumps are RFP+), cells are ready for dual selection. Begin by dissociating the NSCs into a single-cell suspension (Steps 2.3–2.7), then replate at approximately 5 x 10⁴ cells/mL in ultra-low-attachment T-25 flasks in complete NSC containing blasticidin (1000 ng/mL) and puromycin (100 ng/mL).
NOTE: As in Step 4.6 above, if suboptimal transduction efficiency is noted, a second round of infection (repeating Steps 6.3–6.6) may be performed. See Table 1 for further troubleshooting tips. - Feed cells every 3 days with a feeding supplement containing blasticidin and puromycin.
NOTE: Vigilant monitoring of the cultures is essential to identify dual-resistant clones, which will be characterized by their survival under both selective pressures. When fully formed, healthy spheres are visible, usually 5–10 days after splitting, the culture is ready for further validation (Step 7).
7. Validation and characterization of dually transduced NSCs
NOTE: Prior to performing further in vitro or in vivo. experimentation, further validation is recommended to ensure that HA-tagged constructs and luciferase are appropriately expressed.
- Western blotting to validate expression of the HA-tagged construct
- Culture NSCs (GFP control and HA-tagged BRAF. V600E, in the provided example) in T-25 ultra-low adherence flasks until ready to split (as per Step 2.2).
NOTE: Before proceeding to the next step, it is recommended that cultures be double-checked for ongoing GFP expression (in GFP control cells) and RFP expression (in all cells). - Remove half the culture and split as per Steps 2.2–2.7, then replate in fresh complete NSC medium with blasticidin (1000 ng/mL) and puromycin (100 ng/mL) for ongoing culture expansion. Spin the remainder of the neurospheres down at 630 × g at 4 °C, then aspirate off supernatant.
- Subsequently, wash pelleted NSCs two times with ice-cold PBS, spinning down at 630 × g at 4 °C and aspirating off supernatant after each wash. Add approximately 200 µL of ice-cold RIPA lysis buffer supplemented with protease and phosphatase inhibitors to each sample.
- Allow the lysates to incubate on ice for 30 min, ensuring intermittent vortexing every 10 min. Centrifuge the samples at 14,000 × g for 15 min at 4 °C. Carefully transfer the supernatant, designated as the cleared lysate, into a fresh pre-chilled tube. Store the lysates at -80 °C in a deep freezer.
- Lysate can then be used for Western blotting (to validate expression of constructs) according to previously established protocols38.
NOTE: If not using immediately, store lysates at -80 °C until use. Avoid repeated freeze-thaw cycles to maintain the integrity of the sample (see Table 1, Point No. 7).
- Culture NSCs (GFP control and HA-tagged BRAF. V600E, in the provided example) in T-25 ultra-low adherence flasks until ready to split (as per Step 2.2).
- Bioluminescence intensity (BLI) to validate the appropriate expression of firefly luciferase
NOTE: This protocol validates luciferase expression using BLI monitoring of live cells using specific hardware and software (see Table of Materials for further details). If using a different system for BLI detection and quantification, the methodology may vary.- Split NSCs and quantify as per Steps 2.2–2.8 above, then dilute cells in complete NSC medium and plate at varying concentrations (e.g., 2.5 x 10⁴ cells, 1 x 10⁵ cells/well) in a 24-well ultra-low adherence plate (500 mL/well), with each cell concentration plated in quadruplicate. Cells are maintained in complete NSC medium containing blasticidin (1000 ng/mL) and puromycin (100 ng/mL).
NOTE: To prevent the luciferase-secreted luminescence intensity of one well from bleeding over into adjacent wells during measurement, avoid plating NSCs in adjacent wells. - Power on the imaging system at least 30 min in advance to allow the charge-coupled device camera to cool to its optimal operating temperature (approximately -90 °C). Initiate the quantification software, and sanitize the imaging chamber using 70 % ethanol, allowing it to dry completely before use.
NOTE: Maintain the temperature of the imaging chamber at 37 °C to ensure cell viability during prolonged imaging sessions. - Thaw the stock aliquots of D-luciferin, ensuring that they are shielded from light exposure. Add a volume of 5 µL of 15 mg/mL D-luciferin working solution gently to each well containing cells to achieve a final concentration of 150 mg/mL. Swirl the plate lightly to ensure even distribution of the solution.
- Incubate the plate at 37 °C for 10 min to facilitate the diffusion of the substrate into the cells, thereby promoting maximal light production.
- Position the plate within the sensitive bioluminescence imaging system. Place a grid over the plate. Select the luminescence imaging mode, commencing with auto-exposure for the exposure time. Set binning to medium, and adjust the f-stop to 1 to optimize light collection.
- Set the field of view to 'D' for 24-well plates, and fix the subject height at 1.5 cm. Acquire images using the imaging software. If the signal seems low, the exposure time can be manually adjusted (see Troubleshooting Table Point No. 8).
- Perform background correction against the control wells and quantify the relative light units as necessary for subsequent analysis using the imaging software.
NOTE: Following validation of BLI, the cells can be orthotopically transplanted into the brains of syngeneic or immunocompromised mice, in accordance with previously established protocols19.
- Split NSCs and quantify as per Steps 2.2–2.8 above, then dilute cells in complete NSC medium and plate at varying concentrations (e.g., 2.5 x 10⁴ cells, 1 x 10⁵ cells/well) in a 24-well ultra-low adherence plate (500 mL/well), with each cell concentration plated in quadruplicate. Cells are maintained in complete NSC medium containing blasticidin (1000 ng/mL) and puromycin (100 ng/mL).
Results
Adult NSCs were isolated from the cortex of adult C57BL/6 mice and grown in non-adherent culture39, resulting in the formation of primary neurospheres (20 – 250 µm) within 7 to 10 days (Figure 1). Cells were then expanded in vitro. Optimization of blasticidin selection was then performed in untransduced NSCs (Step 3). After 24 h of selection, concentrations at or above 1000 ng/mL (1 µg/mL) blasticidin resulted in reduced neurosphere size (Figure 3A). Manual cell quantification and viability assessments were then performed using trypan blue exclusion; approximately 50% cell death was noted in the 1000 ng/mL (1 µg/mL) blasticidin by 24 h post-selection (Figure 3B). At 72 h, this concentration resulted in universal cell death in non-transduced cells. Thus, 1000 ng/mL (1 µg/mL) blasticidin was selected as the optimal concentration for antibiotic selection going forward.
For illustrative purposes, cells were then transduced with lentiviral vectors containing either GFP control or an HA-tagged BRAF V600E oncogenic construct at an MOI of 20, per the laboratory’s standard technique. Successful transduction was verified by checking GFP fluorescence in control samples under a fluorescent microscope (Figure 3C). Cells then underwent selection in blasticidin-containing media (1000 ng/mL), and were subsequently used to perform puromycin selection optimization (Steps 5.1–5.2). At 24 h post-selection, concentrations at or above 50 ng/mL puromycin resulted in reduced neurosphere size (Figure 4A). Fluorescence microscopy also demonstrated preserved GFP expression in GFP-transduced cells (Figure 4A). Manual cell quantification and viability assessments were then performed using trypan blue exclusion; approximately 50% cell death was noted in the 100 ng/mL puromycin condition by 24 h post-selection (Figure 4B), which resulted in uniform cell death by 72 h. Thus, 100 ng/mL puromycin was selected as the optimal concentration for antibiotic selection going forward.
Next, secondary transduction was performed using the bicistronic RFP-Luciferase lentivirus at an MOI of 20, following the laboratory’s standard approach. Successful transduction was verified by checking RFP fluorescence under a fluorescent microscope. Dual-transduced cells were then selected further with the combination of blasticidin (1000 ng/mL) and puromycin (100 ng/mL) and expanded for subsequent validation. After expansion, continued expression of RFP via fluorescent microscopy was validated in both sets of transduced cells, as well as preserved GFP expression in GFP-transduced cells (Figure 5A). To verify expression of the BRAF V600E oncogenic protein in dually transduced cells, Western blotting was performed; the HA tag was detected at 95 kDa in the BRAF V600E transduced but not GFP transduced cells (Figure 5B). Dually transduced cells maintained expression of the neural stem cell markers Nestin (220kDa) and Sox2 (35kDa) by Western blot (Figure 5B). Luciferase activity was then determined via bioluminescent imaging (Figure 5C); as expected, a higher quantity of luciferase activity was detected in wells plated with a higher concentration of cells. Finally, BLI was used to assess proliferation in the dually transduced cells; both GFP and BRAF V600E cells showed significant increases of BLI over time, as expected, and BRAF V600E cells displayed a trend towards increased proliferation by 5 days in culture (Figure 5D).
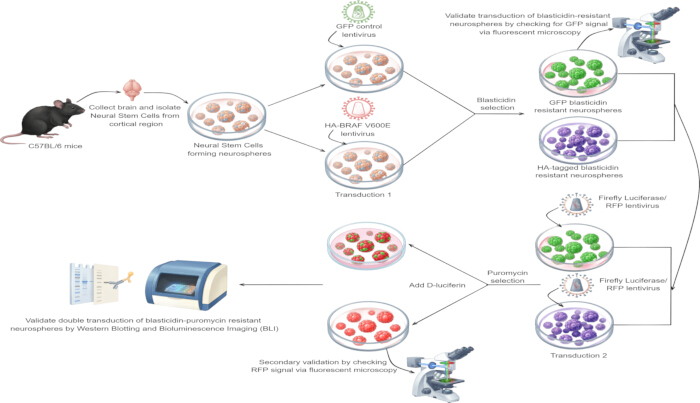
Figure 1: Graphical abstract of workflow. NSCs are first isolated from C57/BL6 mice, then transduced with lentiviral particles (GFP control or BRAF V600E, in this case). Effective transduction is verified by examining GFP fluorescence under fluorescence microscopy in GFP-transduced cells. Cells are then selected using blasticidin-containing selection medium. Transduced cells are then re-transduced with a bicistronic lentivirus containing firefly luciferase and RFP. Effective transduction at this step is then verified by examining RFP fluorescence under fluorescence microscopy, after which cells are dually selected using blasticidin and puromycin. Transduced cells then undergo secondary validation by ensuring that (1) the HA-tag can be detected in the appropriate cells (HA-BRAF-V600E, in this example), and (2) that luciferase can be detected via in vitro live-cell bioluminescent imaging. Please click here to view a larger version of this figure.
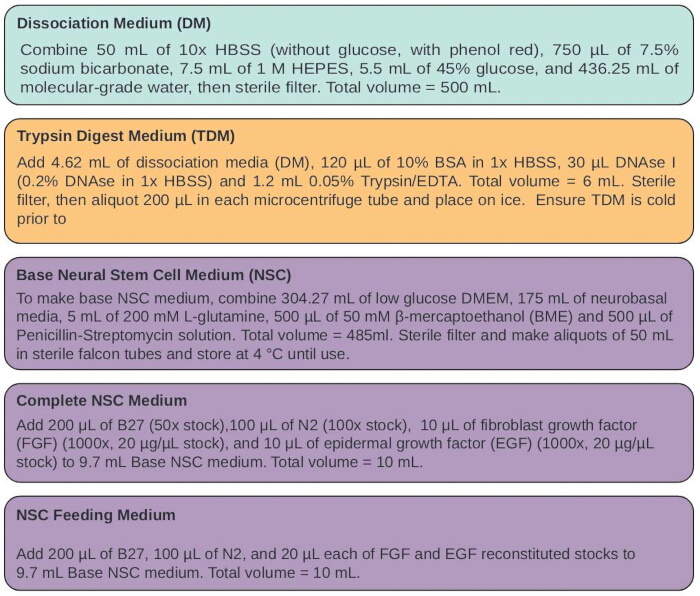
Figure 2: Reagent recipes. Recipes for dissociation media (DM), trypsin digest media (TDM), base neural stem cell medium (NSC), complete NSC medium, and NSC feeding medium are shown. Please click here to view a larger version of this figure.
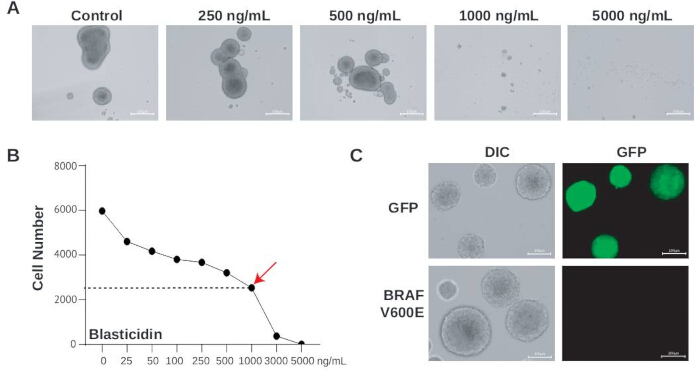
Figure 3: Illustrative results, blasticidin toxicity, and first transduction. (A) Differential Interference Contrast (DIC) images were obtained of non-transduced NSCs treated with various concentrations of blasticidin ranging from 250 ng/mL to 5000 ng/mL; decreased neurosphere size was observed at the 1000 ng/mL concentration at 24 h post-selection. (B) Cell viability was measured using trypan blue exclusion at 24 h post-blasticidin treatment; 50% cell death was noted at the 1000 ng/mL concentration at 24 h post-selection. (C) DIC and GFP images of transduced cells (GFP and BRAF V600E) were acquired at 20x magnification using fluorescent microscopy; as expected, green fluorescence can be detected in GFP- but not BRAF V600E-transduced cells. Scale bars: 100 mm. Please click here to view a larger version of this figure.
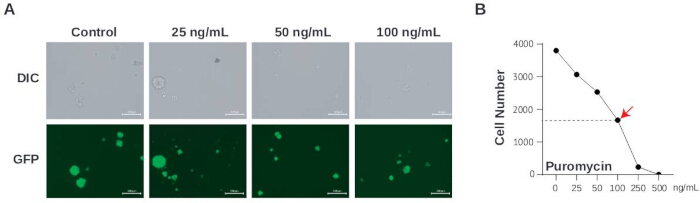
Figure 4: Illustrative results, puromycin toxicity in singly transduced cells. (A) DIC and GFP images of singly transduced cells (GFP control for this experiment) treated with different concentrations of puromycin ranging from 25 ng/mL to 100 ng/mL; decreased neurosphere size was observed at the 50 ng/mL concentration at 24 h post-selection. (B) Puromycin toxicity was measured using trypan blue exclusion; 50% cell death was noted at the 100 ng/mL concentration at 24 h post-selection. Scale bars: 100 µm. Please click here to view a larger version of this figure.
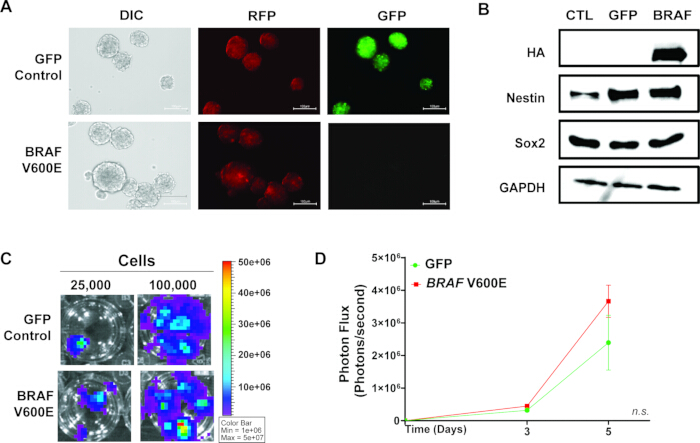
Figure 5: Validation and characterization of dual-transduced NSCs. (A) DIC, RFP, and GFP images of GFP control and BRAF V600E dually transduced NSCs demonstrate RFP fluorescence detected in both samples, but GFP fluorescence is only detected in GFP control cells. (B) Western blotting was performed after the second transduction step to validate expression of the HA-tag (95 kDa) in BRAF V600E transduced cells. Nestin (220 kDa) and Sox2 (35 kDa) were also analyzed to demonstrate continued expression of NSC markers after dual transduction; protein from untransduced cells (CTL) from an earlier passage was used as a positive control for stemness. GAPDH (36 kDa) is shown as a loading control. (C) BLI of dually transduced cells (GFP control and BRAF V600E) was performed to validate luciferase expression. Representative bioluminescence is shown from cells seeded at 2.5 x 10⁴ versus 1 x 10⁵ NSCs per well in a 24-well ultra-low adherence plate; as expected, cells seeded at higher densities demonstrate higher BLI signal, consistent with a higher cell count. (D) BLI imaging was used to assess in vitro proliferation over time in dually transduced cells expressing GFP control versus BRAF V600E. BRAF V600E-tranduced cells showed a trend towards increased proliferation by 5 days post-plating, although this was not significant by two-way ANOVA. Scale bars: 100 mm. Please click here to view a larger version of this figure.
| Point No. | Problem | Possible Cause | Step No. | Solution | ||||||||
| 1 | Poor separation of microdissected tissue into single cells | TDM not prepared fresh, leading to suboptimal enzymatic digestion | 1.1 | Prepare TDM fresh before each use | ||||||||
| Inadequate mechanical disruption (pipetting) of tissue | 1.2 | Pipette up and down at least 5-10 times to mix cells prior to neutralizing trypsin with FBS | ||||||||||
| 2 | Low cell yield or viability after initial dissociation | TDM not kept cold on ice, leading to excessive enzymatic degradation | 1.1 | Pre-chill TDM and keep on ice during dissections | ||||||||
| Over-trypsinization (incubation >15 min, delayed FBS neutralization) | 1.2 | Strictly time the 15 min 37 °C incubation to avoid over-trypsinization. After removal from the water bath, immediately pipette samples to mix, add 10% FBS and mix again to ensure appropriate neutralization. If large numbers of dissections are performed, this may need to occur in batches. | ||||||||||
| Aspiration of cell pellet | 1.3-1.4 | When aspirating supernatant, avoid aspirating the cell pellet by placing aspirator close to the open end of the tube and tilting tube towards the aspirator | ||||||||||
| 3 | High cell death after dissociation when passaging NSCs | Deterioration of media or other reagents | 1.5, 2.2 | Prepare base NSC medium, aliquot and keep at 4 °C to avoid excessive warming/cooling cycles; add B27, N2, EGF and FGF immediately prior to use | ||||||||
| Failure to replace growth factors and nutrients | 2.1 | Feed cultures with NSC feeding medium every 3 days to ensure optimal culture health. Ensure supplements and growth factors are added to medium immediately before use. | ||||||||||
| Neurospheres are overgrown | 2.2 | Monitor cultures every 3 days; passage at 100–200 µm diameter with smooth, well-defined borders and slightly darker (non-necrotic) cores; passage early and frequently while still in logarithmic growth phase | ||||||||||
| Overlong trypsinization or inadequate trypsin neutralization | 2.5 | Do not exceed recommended time of trypsin incubation (6 min). Ensure trypsin is neutralized by adding 10% FBS in NSC medium to trypsinized cells. | ||||||||||
| Excessively vigorous pipetting | 2.5 | Limit number of times the cell solution is pipetted to dissociate cells; pipet gently and slowly to avoid turbulence or creating air bubbles | ||||||||||
| Incomplete removal of trypsin and/or FBS | 2.6-2.7 | Perform both DM washes as described, with proper centrifugation and supernatant removal to eliminate residual enzymes and serum | ||||||||||
| 4 | Neurospheres appear unhealthy / irregular morphology | Deterioration of media or other reagents | 1.5, 2.2 | Prepare base NSC medium, aliquot and keep at 4 °C to avoid excessive warming/cooling cycles; add B27, N2, EGF and FGF immediately prior to use | ||||||||
| Over-grown neurospheres (necrotic cores) | 2.2 | Monitor cultures every 3 days; passage at 100–200 µm diameter with smooth, well-defined borders and slightly darker (non-necrotic) cores; passage early and frequently while still in logarithmic growth phase | ||||||||||
| Contamination of culture medium | 2.2 | Use sterile-filtered reagents (0.2 µm membrane); ensure all reagents are either supplied in sterile format or sterile-filtered before use; sanitize work surfaces and equipment with 70% ethanol; use appropriate sterile technique | ||||||||||
| Incomplete FBS neutralization of trypsin | 2.2 | Perform both DM washes as described, with proper centrifugation and supernatant removal to eliminate residual enzymes and serum | ||||||||||
| 5 | Blasticidin or puromycin kill curve shows no cell death at any concentration | Antibiotic stock degraded or inactive | 3.1-3.5, 5.1-5.2 | Use freshly aliquoted antibiotic stocks stored at -20 °C; verify stock concentration and ensure correct dilution calculations; prepare a 1:1000 dilution from 10 mg/mL stock for low-concentration testing (e.g., 25 ng/mL range). Consider purchasing new antibiotic lot if problem is persistent | ||||||||
| Cells already resistant to antibiotic (contamination with resistant cells) | 3.1-3.5, 5.1-5.2 | Use confirmed untransduced parent NSCs for blasticidin kill curve; use confirmed blasticidin-resistant (first-transduction) NSCs for puromycin kill curve; ensure cultures are not cross-contaminated | ||||||||||
| 6 | Low or no GFP/RFP reporter expression after transduction | Unsuccessful first round of transduction | 4.1-4.7, 6.1-6.6 | Evaluate transduction efficiency 24 h post-infection by fluorescence microscopy; expected GFP expression after first transduction should be >80%; expected RFP efficiency after second transduction is ~60%; if suboptimal, perform a second round of infection (repeat Steps 4.4–4.6 or 6.3–6.6) | ||||||||
| Problem with virus | 4.1-4.7, 6.1-6.6 | If poor efficency remains after repeating viral transduction step, ensure MOI calculations have been performed correctly. Check that virus has been aliquoted appropriately and has not been previously frozen and thawed. Recheck viral titer using fresh aliquot, or generate a fresh lentivirus preparation. | ||||||||||
| Antibiotic selection not adequately removing non-transduced cells | 4.1-4.7, 6.1-6.6 | Re-optimize kill curves for the given application. At 2nd transduction step, flow-assisted cell sorting (FACS) for RFP can also be used to isolate transduced NSCs if sub-optimal selection is still occurring | ||||||||||
| Loss of transgene expression over serial passages | 4.1-4.7, 6.1-6.6 | Mammalian cells can epigenetically silence stable transgenes. If this occurs, and is not improved by repeating the transduction in a different cell line, the viral vector may have to be redesigned. Using different promoters or enhancers, adding chromatin insulators, and limiting CpG sites may improve expression | ||||||||||
| 7 | Western blot fails to detect tagged oncogenic construct | Inadequate ongoing selection | 7.1 | Ensure GFP / RFP reporters are still being expressed appropriately. If they are not, optimize antibiotic selection as described above | ||||||||
| Insufficient protein yield | 7.1 | Ensure neurosphere density in culture is high enough to generate sufficient protein yield. Ensure RIPA buffer is cold and added at the correct volume. | ||||||||||
| Protein degradation in lysate | 7.1 | Ensure NSCs are washed with ice-cold PBS and that RIPA buffer is appropriately supplemented with protease and phosphatase inhibitors. Lysate incubation should occur on ice to prevent degradation. Cleared lysate should be stored at -80 °C and repeated freeze-thaw cycles should be avoided | ||||||||||
| Issue with viral vector | 7.1 | If the oncogenic transgene is too large for the viral vector, or if the coding sequences of the vector are damaged, poor expression can result. Double-check vector size; if not an issue, consider vector sequencing to verify appropriate coding sequence of transgene and promoters | ||||||||||
| Silencing of transgene expression over time | 7.1 | Mammalian cells can epigenetically silence stable transgenes. If this occurs, and is not improved by repeating the transduction in a different cell line, the viral vector may have to be redesigned. Using different promoters or enhancers, adding chromatin insulators, and limiting CpG sites may improve expression. | ||||||||||
| 8 | Poor or no bioluminescence signal (BLI validation) | Camera not at optimal operating temperature | 7.2 | Power on imaging system at least 30 min before imaging to allow camera to cool to approximately -90 °C; maintain imaging chamber at 37 °C for cell viability during imaging | ||||||||
| D-luciferin improperly stored or degraded | 7.2 | Shield D-luciferin aliquots from light at all times; prepare working solution of 15 mg/mL in molecular-grade water filtered through 0.22 µm; add 5 µL per well to achieve a 150 mg/mL final dilution and swirl plate gently for even distribution | ||||||||||
| Insufficient substrate incubation time | 7.2 | Incubate plate at 37 °C for 10 min after D-luciferin addition to facilitate substrate diffusion and maximize light production; if signal still low, manually adjust exposure time in software | ||||||||||
| 9 | NSCs fail to form neurospheres after thawing from cryopreservation | Improper cryopreservation protocol | 2.9 | Ensure that the correct ratio of cells to cryopreservation medium is used. Make sure serum has not been added to medium. Ensure they are stored correctly (at -80 °C, if using the medium described in this protocol; other protocols may require storage at -120 °C) without freeze-thaw cycles. | ||||||||
| Delayed or improper freezing causing viability loss | 2.9 | Ensure cryopreservation is performed promptly; delays or improper freezing protocols can result in substantial viability loss and diminished reporter expression | ||||||||||
Table 1: Troubleshooting tips. Please click here to download this Table.
| Blasticidin | |||
| Desired Concentration | Volume of undiluted (10 mg/mL = 10 mg/mL) stock | Volume of 1:1000 diluted (10 mg/mL = 10 ng/mL) stock | Add complete NSC to achieve total volume of 2.5 mL |
| 25 ng/mL | ---- | 6.25 mL | |
| 50 ng/mL | ---- | 12.5 mL | |
| 100 ng/mL | ---- | 25 mL | |
| 250 ng/mL | ---- | 62.5 mL | |
| 500 ng/mL | ---- | 125 mL | |
| 1000 ng/mL | 0.25 mL | ---- | |
| 3000 ng/mL | 0.75 mL | ---- | |
| 5000 ng/mL | 1.25 mL | ---- | |
| Puromycin | |||
| Desired Concentration | Volume of undiluted (10 mg/mL = 10 mg/mL) stock | Volume of 1:1000 diluted (10 mg/mL = 10 ng/mL) stock | Add complete NSC to achieve total volume of 2.5 mL |
| 25 ng/mL | ---- | 6.25 mL | |
| 50 ng/mL | ---- | 12.5 mL | |
| 100 ng/mL | ---- | 25 mL | |
| 250 ng/mL | ---- | 62.5 mL | |
| 500 ng/mL | ---- | 125 mL | |
Table 2: Kill curve calculations. Please click here to download this Table.
Discussion
This two-step lentiviral transduction method successfully generated genetically modified NSCs suitable for oncology research. Here, effective integration of the BRAF V600E oncogenic mutation (found in a subset of adult high-grade gliomas and used here as a proof of concept) or GFP control with dual reporter systems for bioluminescence imaging (luciferase) and fluorescence microscopy detection (RFP) was illustrated. Successive transduction at a constant MOI of 20, together with a double antibiotic selection scheme using blasticidin followed by puromycin, resulted in high transduction efficiency, elimination of non-transduced cells, and the generation of stable transduced cell lines, as determined by serial monitoring of fluorescence. High transduction efficiency, while technically not required for stable cell line generation, allows for faster generation of stable cell lines; more cells survive the selection process40,41, thus reducing the need for serial cell expansion to generate sufficient material for experimentation.
Compared with alternative approaches, this sequential transduction technique offers several advantages: it is cost-effective and rapid, and enables stepwise quantification of transduction efficiency, supports the generation of stable reporter cell lines for longitudinal tracking of transgene expression, and permits in vitro experimentation as well as noninvasive monitoring of tumor initiation, progression, and therapeutic response in vivo after orthotopic transplantation18,19,20. Here, BLI demonstrated a strong correlation between luminescent signal and cell number, and was used to quantify proliferation over time in vitro (Figure 5); BLI approaches may also be used for in vitro viability assays42,43 or in vivo tumor monitoring in live animals following orthotopic transplantation44,45, although those approaches are not demonstrated in the current article. Additionally, the use of murine NSCs allows precise control over the developmental stage of both donor cells and recipient animals, as well as the anatomical origin and site of orthotopic transplantation17, providing a powerful system to investigate the spatial and temporal factors that affect gliomagenesis.
Despite the lentiviral approach's robust transduction efficiency and versatility, however, inherent limitations must also be considered. First, prolonged antibiotic culture may impose selective pressure that alters cellular properties, possibly affecting downstream metrics like tumor formation kinetics or therapeutic responses46. Second, if using transduced cells for downstream orthotopic transplantation, the growth conditions in vitro can affect the success of tumor formation47,48. Furthermore, orthotopic transplantation typically requires an immunocompromised host model system, and may not be suitable for studies of how the host immune system affects gliomagenesis. Third, if using primary NSCs without an immortalizing oncogenic mutation, the cells may undergo senescence prior to in vivo tumor formation49, which may necessitate adjustments to the experimental design. Fourth, some oncogenic mutations, like the BRAF V600E mutation featured here, may require additional secondary mutations, such as CDKN2A/B loss to generate high-grade gliomas50, which would have to be introduced through an alternative method. In comparison, transgenic models have a working immune system but can be costly and may have a long latency period prior to tumor development51, while direct transduction in vivo using retroviruses or adeno-associated viruses avoids cell culture but lacks pre-selection for oncogene expression, affecting reproducibility52. CRISPR-Cas9 knock-in methods allow for precise editing but add complexity and require checking for off-target effects53.
While this protocol achieved acceptable transduction efficiency with the specified parameters, several critical optimizations are necessary when adapting this approach to different experimental contexts. For example, an MOI of 20 is used in this protocol for transducing adult murine NSCs, but if using NSCs from a different species, this may need re-optimization, as cellular receptors and transduction susceptibility can vary across different developmental stages and species54. Additionally, the determination of the optimal antibiotic concentration for selection must be independently conducted for each cell type, for similar reasons. Furthermore, primary versus immortalized cell lines exhibit vastly different transduction kinetics and antibiotic sensitivities, with TERT-immortalized NSCs generally showing enhanced proliferation and higher tolerance to viral titers55, suggesting that immortalized NSCs may also need re-optimization of MOI and optimal selection concentration of antibiotics.
The timing of antibiotic selection initiation is also crucial; starting blasticidin selection 48 h post-first transduction and puromycin selection 48 h post-second transduction maximizes survival in transgene-expressing cells; earlier selection may not allow for adequate time for expression of the resistance gene. However, these intervals may need adjustment for different growth rates in primary cultures or immortalized lines. Proper antibiotic handling is also essential; aliquoting blasticidin and puromycin into single-use volumes and storing at -20 °C will prevent reduced potency from repeated freeze-thaw cycles. Finally, selection efficiency can be negatively impacted by poor NSC culture health; maintaining healthy primary NSCs demands gentle handling, as over-trypsinization or vigorous pipetting can lead to significant cell death and compromised proliferative capacity. Post-transduction cryopreservation is also recommended within 2–3 passages after final antibiotic selection if long-term storage is desired. Delays or improper freezing protocols can result in substantial viability loss and diminished reporter expression.
In summary, this protocol describes a dual-transduction approach to generate primary NSCs carrying an oncogenic mutation or a GFP control, combined with a bicistronic RFP/luciferase reporter. This allows robust quality control during cell generation and later validation of continued transgene expression, and is suitable for downstream in vivo and in vitro applications.
Disclosures
The authors do not have any conflicts of interest.
Acknowledgements
This work was supported by the St. Louis Children’s Hospital Foundation (FDN-2023-1203 to NMB) and Hyundai Hope on Wheels (1470169 to NMB). Lentivirus generation and additional support were provided by the Hope Center Viral Vectors Core at Washington University School of Medicine, which assisted in the generation of lentiviral particles for primary transduction (GFP and BRAF V600E). Thanks to the Washington University Molecular Imaging Center and Siteman Cancer Center Small Animal Cancer Imaging shared resource (NCI P30 CA091842, NIH-S10OD027042, and NIH-S10OD025264) for their assistance with the imaging study.
Materials
| Name | Company | Catalog Number | Comments |
|---|---|---|---|
| β-mercaptoethanol (BME) | Sigma | M3148-25ML | Use inside biological safety cabinet. Make 50 mM stocks by adding 35 mL BME to 10 mL low-glucose DMEM, sterile filter and aliquot into 500 mL aliquots for use in media preparation. |
| Anti-mouse IgG, HRP-linked Antibody | Cell Signal Technology | 7076 | Used at 1:2000 dilution in 1 % Non-fat milk |
| B-27 Supplement (50X), | Gibco | 17504-044 | At first use, thaw and make 1ml aliquots for future use; store aliquots at -20 °C. Keep supplements on ice after thawing until ready to add to media |
| Blasticidin S HCl (10 mg/mL) | Gibco | A1113903 | Make aliquots of the 10 mg/mL stock; place in 200 mL small tubes and store at -20 °C until use. |
| Bovine Serum Albumin (BSA) | Millipore-Sigma | A1470-10G | Used as 10% BSA weight/volume in 1x PBS. BSA is sticky; make sure to take care to weigh it properly and add an appropriate volume of diluent to make the exact solution. |
| Cell Strainer (40 µm) | Midsci | 40ICS | Pre-sterilized and individually wrapped. Must be opened inside the biological safety cabinet. Do not touch with bare hands |
| D-Luciferin, Potassium Salt | Gold Biotechnology | eLUCK-100 | Make 15 mg/mL working solution (diluted in molecular grade water) and sterile filter before use. Prepare fresh stock each time and add directly to the media to achieve final working concentration of 150 mg/mL (e.g. 5 mL working solution per 500 mL culture) |
| DMEM, Low-Glucose | Gibco | 11885-084 | Used to make base NSC medium |
| Epidermal Growth Factor (EGF) | Corning | 354001 | Supplied as a sterile lyophilized powder; to reconstitute 1000X stock, add 4.95 mL PBS and 50 µL 10% BSA (in 1x PBS) to 100 µg lyophilized EGF powder, and pipette to combine. Make 500 µL or smaller aliquots in small tubes and store at -20° C until use for complete NSC media and NSC feeding supplement. Avoid repeat freeze-thaws. |
| Fibroblast Growth Factor, Basic (FGF) | R&D systems | 233-FB | Supplied as a sterile lyophilized powder; to reconstitute 1000X stock, add 1.24 mL PBS and 12.5 µL 10% BSA (in 1x PBS) to 25 µg lyophilized FGF powder, and pipette to combine. Make 500 µL or smaller aliquots in small tubes and store at -20° C until use for complete NSC media and NSC feeding supplement. Avoid repeat freeze-thaws. |
| Glucose, 45% | Corning | 25-037-CI | Supplied as sterile solution. Do not open outside of the biological safety cabinet |
| HA-Tag (C29F4) Rabbit mAb | Cell Signal Technology | 3724 | Used at 1: 1000 dilution in 3 % Bovine serum albumin (Western blotting, to verify HA-tag expression) |
| HBSS, 10x | Gibco | 14185-052 | Supplied as sterile solution. Do not open outside of the biological safety cabinet |
| HEPES, 1 M | Corning | 25-060-CI | Supplied as sterile solution. Do not open outside of the biological safety cabinet |
| IVIS 50 | PerkinElmer | The instrument should be powered on 30 min before use to allow the camera to cool to optimal temperature. Living Image software (version 4.3.1) is used for quantification. | |
| Lentivirus-Luciferase (Firefly)-2A-RFP | AMSBio | LVP324-PBS | LVP must be aliquoted and stored at -80 °C refrigerator |
| L-Glutamine, 200 mM | Corning | 25-005-CI | Supplied as sterile solution. Do not open outside of the biological safety cabinet |
| Molecular-Grade Water | Corning | 46-000-CM | Supplied as sterile solution. Do not open outside of the biological safety cabinet |
| N-2 Supplement (100x) | Gibco | 17502-048 | At first use, thaw and make 1ml aliquots for future use; store aliquots at -20 °C. Keep supplements on ice after thawing until ready to add to media |
| Nestin (E5C7I) Rabbit mAb | Cell Signal Technology | 89529 | Used at 1: 1000 dilution in 3 % Bovine serum albumin (Western blotting, to verify NSC marker expression) |
| Neurobasal Media | Gibco | 21103-049 | Used to make base NSC medium |
| Penicillin-Streptomycin (10,000 U/mL) | Gibco | 15140-122 | Supplied as sterile solution; aliquot and store at -20°C until use. |
| Phosphate Buffered Saline, 1x (PBS) | Corning | MT21040CV | Supplied as sterile solution. Do not open outside of the biological safety cabinet |
| Protease/Phosphatase inhibitor | Cell Signal Technology | 5872S | Must be stored at -20 °C |
| Puromycin Dihydrochloride | Gibco | A1113803 | Make aliquots of the 10mg/ml stock; place in 200 mL small tubes and store at -20 °C until use. |
| RIPA Lysis Buffer, 10x | Millipore-Sigma | 20-188 | Store at -80 °C and make aliquots of 1x in sterile double distilled water |
| Serum-Free Cell Freezing Medium | Bambanker (Nippon Genetics) | CS-04-001/BB02 | Dilute cells in 1ml freezing medium per cryovial to store NSCs. After addition of freezing medium to cells, cells can be placed at -80 °C for long-term storage; there is no need for slow cooling or storage in liquid N2. |
| Sodium Bicarbonate (7.5%) | Corning | 25-035-CI | Supplied as sterile solution. Do not open outside of the biological safety cabinet |
| Sox2 (D9B8N) Rabbit mAb | Cell Signal Technology | 23064 | Used at 1: 1000 dilution in 3 % Bovine serum albumin (Western blotting, to verify NSC marker expression) |
| Trypan Blue | Sigma Life Science | T8154-100ML | Add 10 mL trypan blue with with 10 mL cell solution for trypan blue exclusion |
| Trypsin-EDTA (0.05%) | Gibco | 25300-054 | Aliquot and keep frozen at -20 °C until use. When thawed, it should be warmed to room temperature for 1h rather than placing in bead bath. Residual trypsin can be stored at 4 °C for one week. |
| Ultra-low attachment multiple well plate (6-well) | Corning | CLS3471 | Supplied sterile; open inside hood only. |
| Ultra-low attachment multiple well plate (24-well) | Corning | CLS3473 | Supplied sterile; open inside hood only. |
| Ultra-low attachment T25 flasks | Corning | CL4616 | Supplied sterile; open inside hood only. |
Reprints and Permissions
This article has been published
Video Coming Soon