Here, we present a protocol for assessment-based dentin and pulp removal during vital pulp therapy. The method uses stepwise procedures to remove only diseased tissue while preserving viable pulp. Compared to conventional pulpotomy, it aims to conserve more pulp tissue and support maintenance of pulp vitality.
A subscription to JoVE is required to view this content. Sign in or start your free trial.
Method Article
Assessment-Based Pulp And Dentin Removal Protocols For Vital Pulp Therapy
In This Article
Summary
Abstract
Pulpal pathology is a progressive process that may be reversible in early stages if vital tissue remains and pulpal irritants are eliminated. Therefore, vital pulp therapy should aim to preserve pulp vitality by minimizing unnecessary tissue removal. In conventional pulpotomy, the extent of pulp resection is predetermined (e.g., partial or full), and stepwise pulpal evaluation is not performed, which may lead to removal of viable tissue.
Here, we present a protocol for assessment-based removal of dentin and pulp using Minimized Dentin Removal (MDR) and Minimized Pulp Resection (MPR). The MPR technique selectively removes the pathologically altered superficial layer of exposed pulp while preserving deeper viable tissue. MDR removes caries indicator-stained dentin while maintaining dentin adjacent to the pulp to support underlying tissue preservation.
The protocol is applied iteratively, with continuous assessment guiding the extent of tissue removal until a clinically acceptable pulpal surface and dentin free of indicator staining are achieved. In contrast to conventional approaches that rely on predetermined resection levels, this method incorporates real-time evaluation to guide intervention. Overall, the MDR–MPR protocol provides a structured, minimally invasive approach to dentin and pulp management and may support preservation of pulp vitality.
Introduction
Vital pulp therapy (VPT) relies on the presence of pulp vitality1˒2. Therefore, treatment strategies should prioritize the conservation of viable tissue3. Conventional VPT approaches are classified according to the extent of pulp removal: direct pulp capping, partial pulpotomy, and full pulpotomy. Partial pulpotomy typically removes 2–3 mm of coronal pulp tissue, whereas full pulpotomy removes the entire coronal pulp to the canal orifices4˒5. However, in conventional pulpotomy, stepwise evaluation of the pulpal condition prior to pulp resection is omitted, and resection is performed to a predetermined depth, which may lead to unnecessary removal of viable tissue.
To address this limitation, assessment-based stepwise tissue-removal strategies have been proposed, including Minimized Pulp Resection (MPR) and Minimized Dentin Removal (MDR). MDR and MPR preserve viable tissue and pulp vitality and are selective tissue removal techniques for dentin and pulp, respectively. MPR selectively removes pathologically altered superficial pulp tissue while preserving the underlying viable pulp. The extent of MPR is determined by the surface condition of the exposed pulp, and tissue removal is minimized; therefore, MPR is performed iteratively until a normal-appearing pulpal surface is achieved.
Similarly, MDR removes caries-indicator-stained dentin while preserving sound dentin, and is particularly relevant in cases of pulpal exposure. MPR and MDR frequently overlap and are often performed concurrently, forming an integrated process rather than distinct procedural steps. MDR is indicated for deep carious lesions, particularly when there is pulp exposure, and is performed using the complete caries removal method in accordance with AAE guidelines. MPR is indicated for exposed pulp in conjunction with MDR. Here, we present a protocol for assessment-based, stepwise removal of dentin and pulp tissue to preserve pulp vitality.
Access restricted. Please log in or start a trial to view this content.
Protocol
All procedures involving human participants were conducted in accordance with the ethical standards of the institution and the Declaration of Helsinki. The study was approved by the Institutional Review Board (IRB) of Gangdong Kyung Hee University Dental Hospital (Approval No.: KHNMC 2022-12-019-002). All subjects provided their informed consent for publication of their data. The overall workflow of the protocol is illustrated in Figure 1. VPT was attempted in teeth with symptomatic or asymptomatic deep-to-extremely deep caries. The final decision to perform VPT was made based on the assessment of pulp status.
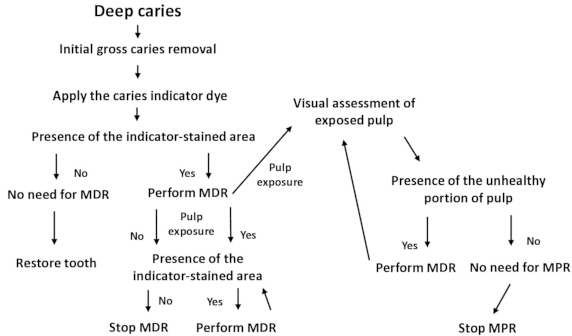
Figure 1: Schematic workflow of MDR/MPR protocol for vital pulp therapy. The workflow illustrates stepwise, assessment-based removal of dentin and pulp tissue. Following initial caries removal, a caries indicator is applied to guide MDR. If pulp exposure occurs, MPR is performed in conjunction with MDR. Both MDR and MPR are applied iteratively, guided by real-time visual assessment, until stained dentin is removed and a healthy pulpal surface is achieved. The protocol emphasizes controlled, minimally invasive tissue removal to preserve pulp vitality. Abbreviations: MDR = minimized dentin removal; MPR = minimally invasive pulp resection. Please click here to view a larger version of this figure.
1. Perform pretreatment procedures.
- Administer local anesthesia using 2% lidocaine with epinephrine (1:100,000).
- Place a rubber dam to isolate the affected tooth.
- Rinse the tooth surface with 20 mL of 2.5% sodium hypochlorite solution.
2. Perform complete caries removal using the MDR technique.
- Penetrate the enamel and dentine of a carious lesion and extend the cavity outlines using a #330 tungsten carbide bur in a high-speed handpiece (Figure 2A).
- Remove gross caries using a long-shank round bur in a low-speed handpiece at approximately 20,000–40,000 rpm under light pressure. Stop gross caries removal when the preparation approaches the pulp (Figure 2B and Figure 3A).
NOTE: Go to section 3 if pulp exposure occurs. - Apply caries indicator dye to the cavity with a microbrush for 10–20 s (Figure 3B,C).
- Rinse the indicator dye with water from a three-way syringe. Identify the stained area (Figure 2C and Figure 3D).
- Perform iterative MDR until the stained area is no longer present.
- Select a bur size appropriate for the cavity. Remove the stained dentin using a long-shanked round bur in a low-speed handpiece at approximately 20,000–40,000 rpm (Figure 3E,F). Use a gentle peeling, brushing, or scraping motion with gentle pressure for MDR.
NOTE: Ensure that the MDR is confined to indicator-stained areas.
- Select a bur size appropriate for the cavity. Remove the stained dentin using a long-shanked round bur in a low-speed handpiece at approximately 20,000–40,000 rpm (Figure 3E,F). Use a gentle peeling, brushing, or scraping motion with gentle pressure for MDR.
- Examine the removal of the stained area (Figure 3G).
NOTE: Go to section 3 if pulp exposure occurs (Figure 2D). - Perform MPR in conjunction with MDR if pulp exposure occurs (section 3).
- Apply caries indicator dye to the cavity for 10–20 s (Figure 3H,I).
- Rinse the indicator dye. Identify the stained area. Stop MDR if the stained area is absent without pulp exposure; this is not an MPR case. Restore the tooth.
- Proceed to section 3 to perform MPR in conjunction with MDR if pulp exposure occurs.
NOTE: Ensure pulp exposure if there is no bleeding at the exposure site (Figure 4A). - Proceed with MDR if the stained area is present without pulp exposure. Repeat steps 2.5–2.7.2, including iterative MDR, dye application, and identification of the stained area until the stained area is no longer present.
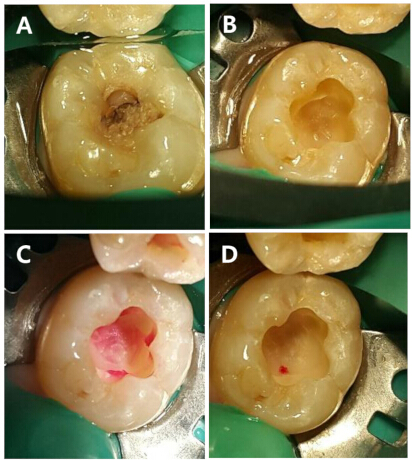
Figure 2: Caries removal and pulp exposure during the MDR protocol. (A) A carious lesion is present on the occlusal surface. Initial penetration of enamel and dentin was performed, and cavity outline formation was initiated. (B) Initial gross caries removal resulted in a deep cavity without pulp exposure. (C) Application and rinsing of caries indicator dye revealed stained dentin. (D) Pulp exposure occurred following the removal of stained dentin using MDR. The exposure site is pinpoint-sized. The exposed pulp appeared bright red with limited bleeding, indicating a favorable pulpal condition; therefore, MPR was not performed. Abbreviations: MDR = minimized dentin removal; MPR = minimally invasive pulp resection. Please click here to view a larger version of this figure.
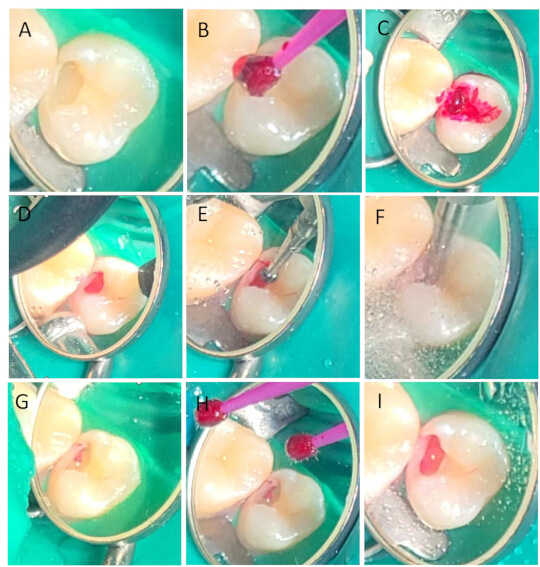
Figure 3: Stepwise application of caries indicator–guided MDR. (A) A deep cavity following initial caries removal without visible residual caries. (B,C) Caries indicator dye is applied to the cavity using a microbrush. (D) After rinsing, stained dentin is visualized. (E) A long-shanked round bur is used to perform MDR at the exposure site. (F) MDR is performed using a long-shanked round bur under water coolant during continued dentin removal. (G) Indicator-stained areas were removed; however, residual stained dentin remained after MDR. (H) Caries indicator dye is reapplied to assess completion of caries removal. (I) An indicator-stained area remains. Further MDR is required for complete caries removal. Abbreviation: MDR = minimized dentin removal. Please click here to view a larger version of this figure.
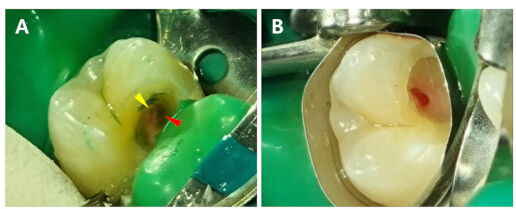
Figure 4: MPR in conjunction with MDR at the pulp exposure site. (A) Pulp exposure occurred without bleeding (yellow arrow). Indicator-stained dentin near the pulp exposure site (red arrow) is present. (B) Iterative MDR and MPR revealed vascularized pulp beneath the exposure site without bleeding. MDR and MPR preserved more viable pulp than conventional partial or full pulpotomy. Abbreviations: MDR = minimized dentin removal; MPR = minimally invasive pulp resection. Please click here to view a larger version of this figure.
3. Perform iterative MPR in conjunction with MDR after pulp exposure.
- Apply the caries indicator dye to the cavity and exposed pulpal surface for 10–20 s.
- Rinse the indicator dye and identify the area of stained dentin and the unhealthy-appearing portion on exposed pulp.
- Perform iterative MPR until the unhealthy portion is no longer present.
- Select a bur size appropriate for the pulp exposure. Remove the unhealthy-appearing portion on exposed pulp using a long-shanked round bur in a low-speed handpiece at approximately 20,000–40,000 rpm. Use a gentle peeling, brushing, or scraping motion with gentle pressure for MPR.
NOTE: Ensure that the MPR is confined to the unhealthy portion.
- Select a bur size appropriate for the pulp exposure. Remove the unhealthy-appearing portion on exposed pulp using a long-shanked round bur in a low-speed handpiece at approximately 20,000–40,000 rpm. Use a gentle peeling, brushing, or scraping motion with gentle pressure for MPR.
- Perform iterative MDR until the stained area is no longer present.
- Repeat protocol 2.5–2.7.2, including iterative MDR, dye application, and identification of the stained area until the stained area is no longer present.
NOTE: Remember that MDR and MPR are performed concurrently rather than as strictly sequential steps.
- Repeat protocol 2.5–2.7.2, including iterative MDR, dye application, and identification of the stained area until the stained area is no longer present.
4. Achieve hemostasis.
- Apply sterile cotton pellets soaked in 2.5% sodium hypochlorite solution. Maintain gentle pressure for up to 10 min.
NOTE: If hemostasis is not achieved within 10 min, consider additional tissue removal or alternative treatment.
5. Perform pulp capping and temporary filling.
- Prepare a calcium silicate-based material according to the manufacturer’s instructions.
- Place the calcium silicate-based material directly on the exposed pulp. Fill the cavity with a calcium silicate-based material. Ensure complete coverage and marginal adaptation.
- Adjust the occlusion to eliminate premature contacts once the material has set.
NOTE: In this protocol, a calcium silicate cement (e.g., Biodentine) was used to both cover the exposed pulp and fill the entire cavity in a single step, according to the manufacturer’s instructions.
Access restricted. Please log in or start a trial to view this content.
Results
Outcome of MDR: minimized initial pulp exposure size
Prior to pulp exposure, MDR was performed to remove stained dentin while preserving the surrounding dentin structure. Application of MDR to caries indicator-stained dentin reduced the size of the initial pulp exposure site (Figure 2D).
Outcome of MPR in conjunction with MDR: preservation of viable pulp
After pulp exposure, dentin removal and pulp management were performe...
Access restricted. Please log in or start a trial to view this content.
Discussion
Approaches to caries removal: AAE and ESE guidelines
Significant differences exist between the American Association of Endodontists (AAE) and the European Society of Endodontology (ESE) on caries removal protocols. The AAE advocates complete removal to eliminate infected tissue and visualize the exposed pulp, while the ESE recommends selective removal to firm/leathery dentin1,2. These reflect varying views on pulpal ex...
Access restricted. Please log in or start a trial to view this content.
Disclosures
The author has no conflicts of interest to declare. AI-assisted tools were used for language editing.
Acknowledgements
This study was supported by grants from the National Research Foundation of Korea (NRF) funded by the Korean government (NRF-2021R1F1A1064350).
Access restricted. Please log in or start a trial to view this content.
Materials
| Name | Company | Catalog Number | Comments |
|---|---|---|---|
| Calcium silicate-based material (Biodentine) | Septodont | REF 01-003 | For pulp capping and restoration |
| Caries indicator dye (Seek) | Ultradent | 209 | For detection of stained dentin |
| Cotton pellets (sterile) | Various | For disinfection and hemostasis | |
| Dental examination instruments (mirror, explorer, tweezers) | Various | For clinical examination | |
| Local anesthetic (2% lidocaine with epinephrine 1:100,000) | Huons | For local anesthesia | |
| Long-shank round burs | Komet | For MDR and MPR procedures | |
| Low-speed handpiece | Siemens | For dentin removal and pulp resection | |
| Microbrush applicators | Various | For dye application | |
| Rubber dam kit | Various | Includes rubber dam sheet, clamp, frame, punch, and forceps | |
| Sodium hypochlorite solution (2.5%) | Various | For disinfection and hemostasis | |
| Sterile saline solution | Various | For irrigation |
References
- AAE Position Statement on vital pulp therapy. J Endod. 47 (9), 1340-1344 (2021).
- Duncan, H. F., et al. European Society of Endodontology position statement: management of deep caries and the exposed pulp. Int Endod J. 52 (7), 923-934 (2019).
- Yi, J. K., Seo, A. R. Preserving pulp vitality for teeth with post-vital pulp therapy symptoms by retrying pulp-preserving procedures: a retrospective clinical study. J Dent Sci. 20 (1), 229-237 (2025).
- American Association of Endodontists. Guide to clinical endodontics. , 6th ed, American Association of Endodontists. (2019).
- American Association of Endodontists. Glossary of endodontic terms. , 10th ed, American Association of Endodontists. (2020).
- Yi, J. K., Kim, A. N., Kwon, K. H. Evaluation of the reasons for preferring root canal treatment in mature permanent teeth potentially indicated for pulp preservation: a clinical case/photo-based questionnaire study. BMC Oral Health. 23 (1), 1003(2023).
- Ricucci, D., et al. Pulp and dentine responses to selective caries excavation: a histological and histobacteriological human study. J Dent. 100, 103430(2020).
- Jensen, O. E., Handelman, S. L. Effect of an autopolymerizing sealant on viability of microflora in occlusal dental caries. Scand J Dent Res. 88 (5), 382-388 (1980).
- Lim, Z. E., Duncan, H. F., Moorthy, A., McReynolds, D. Minimally invasive selective caries removal: a clinical guide. Br Dent J. 234 (4), 233-240 (2023).
- Bitello-Firmino, L., Soares, V. K., Dame-Teixeira, N., Parolo, C. C. F., Maltz, M. Microbial load after selective and complete caries removal in permanent molars: a randomized clinical trial. Braz Dent J. 29 (3), 290-295 (2018).
- Martin, F. E., Nadkarni, M. A., Jacques, N. A., Hunter, N. Quantitative microbiological study of human carious dentine by culture and real-time PCR: association of anaerobes with histopathological changes in chronic pulpitis. J Clin Microbiol. 40 (5), 1698-1704 (2002).
- Abba, H. M., Idon, P. I., Udoye, C. I., Ikusika, O. F. Evaluation of residual carious dentin detection methods after cavity preparation: a randomized clinical trial. BMC Oral Health. 24 (1), 1452(2024).
Access restricted. Please log in or start a trial to view this content.
Reprints and Permissions
This article has been published
Video Coming Soon