This protocol describes bench preparation of Ni-NTA lipid monolayer affinity grids for cryogenic electron microscopy (cryo-EM). This transmission electron microscopy (TEM) grid surface modification selectively captures soluble polyhistidine‑tagged protein complexes, thereby improving structural determination by concentrating dilute samples and tethering particles away from the air–water interface.
Method Article
Detailed Preparation of Ni-NTA Lipid Monolayer Affinity Grids for Cryo-EM Structural Analysis of Soluble Polyhistidine-Tagged Protein Complexes
In This Article
Summary
Abstract
Cryo‑specimen preparation remains a major technical challenge for high‑resolution structural determination of protein complexes. Interactions at the air‑water interface can induce protein denaturation or preferred orientation, thereby limiting achievable resolution. In addition, dilute samples or low‑abundance targets often exhibit insufficient particle density, which hinders efficient data collection. Lipid‑based affinity grids provide an effective strategy to address these limitations. This article presents a step‑by‑step protocol for preparing Ni‑NTA lipid monolayer affinity grids for the structural analysis of soluble polyhistidine‑tagged protein complexes. The major stages of the protocol include preparing a lipid mixture, casting the lipid mixture onto the surface of a reservoir buffer, transferring the resulting lipid monolayer onto TEM grids, optionally drying and storing the lipid grids for up to 1 week, and cryo‑plunging the lipid grids with the sample. Successful implementation of this protocol yields cryo‑grids containing a single layer of well‑dispersed particles with improved particle density relative to grids prepared without a lipid monolayer. The procedure can be completed within a few hours in a laboratory equipped with a cryo‑plunger, a chemical fume hood, and standard tools commonly used for cryo‑specimen preparation. By combining detailed written instructions with video demonstrations, this work aims to improve the accessibility, reproducibility, and broader adoption of Ni‑NTA lipid monolayer affinity grids within the cryo‑EM community.
Introduction
Experimental techniques for protein structure determination, including X‑ray crystallography, nuclear magnetic resonance (NMR), and cryogenic electron microscopy (cryo‑EM), all rely on careful sample preparation. In single‑particle analysis (SPA) cryo‑EM, specimen quality is often the primary factor limiting the resolution of the final reconstruction. As technological advances in cryo‑transmission electron microscopes (cryo‑TEMs) and direct electron detectors continue to improve data collection efficiency and attainable resolution, the principal challenge in high‑resolution cryo‑EM increasingly shifts from image acquisition to specimen preparation and quality1,2,3,4,5,6,7.
Traditional cryo-grid preparation generally involves applying a few microliters of sample to the surface of a transmission electron microscopy (TEM) grid, blotting the grid with filter paper, and rapidly plunging it into a cryogen, typically liquid ethane or a propane–ethane mixture. Ideally, the resulting cryo‑grid contains thin vitreous ice with monodispersed particles. In practice, achieving this outcome is often difficult and may require multiple rounds of optimization to generate grids suitable for high‑resolution structural determination. Common issues include protein denaturation at the air-water interface (AWI)8,9, preferred orientation10 and low particle density within the ice layer11,12. The latter challenge is particularly significant for protein complexes that are highly dynamic, short‑lived, or difficult to isolate at micromolar concentrations. Several strategies have been developed to address these limitations, including graphene oxide13 continuous ultrathin carbon14 and streptavidin‑coated nanobeads for capturing biotinylated targets15.
An alternative approach involves modifying TEM grids with affinity surfaces designed to selectively bind target molecules. These affinity grids can concentrate particles at the grid surface while reducing exposure to the AWI, thereby improving particle distribution and preserving structural integrity. In addition, the concentration effect can enrich low‑abundance macromolecular complexes from dilute or heterogeneous samples.
Over the past decade, several affinity grid strategies have been developed for SPA cryo‑EM. These approaches can be categorized by TEM grid surface modification and the corresponding functionalization strategy. Commonly used surfaces include ultrathin amorphous carbon14 graphene or graphene oxide13,16 lipid monolayers or lipid nanotubes17,18 and two‑dimensional streptavidin crystals grown on lipid monolayers19,20. Among these approaches, two‑dimensional streptavidin affinity grids have been particularly successful in enabling high‑resolution protein structure determination21,22,23,24,25,26,27,28,29. Related methodologies include the use of monodispersed single‑particle streptavidin bound to lipid monolayers, which was recently applied to determine the structure of the mini‑chromosome maintenance complex bound to double‑stranded DNA (dsDNA)30.
Despite these advances, accessible and reproducible methods for affinity grid preparation remain limited. Each technique has unique sample requirements for selective target binding, and none are commercially available, necessitating specialized fabrication protocols and chemical modifications. These additional steps can substantially increase the technical complexity of SPA cryo‑EM workflows. Accordingly, this article presents a detailed, step‑by‑step protocol intended to facilitate preparation of the affinity grid technology described herein. The Ni‑NTA lipid monolayer affinity grid protocol has been routinely implemented previously17 and can be readily adopted for cryo‑EM structural studies of soluble polyhistidine‑tagged protein complexes spanning a broad molecular weight range (97–470 kDa) (Figure 1). The method is compatible with protein concentrations ranging from 0.05 to 0.2 mg/mL in detergent‑free buffers.
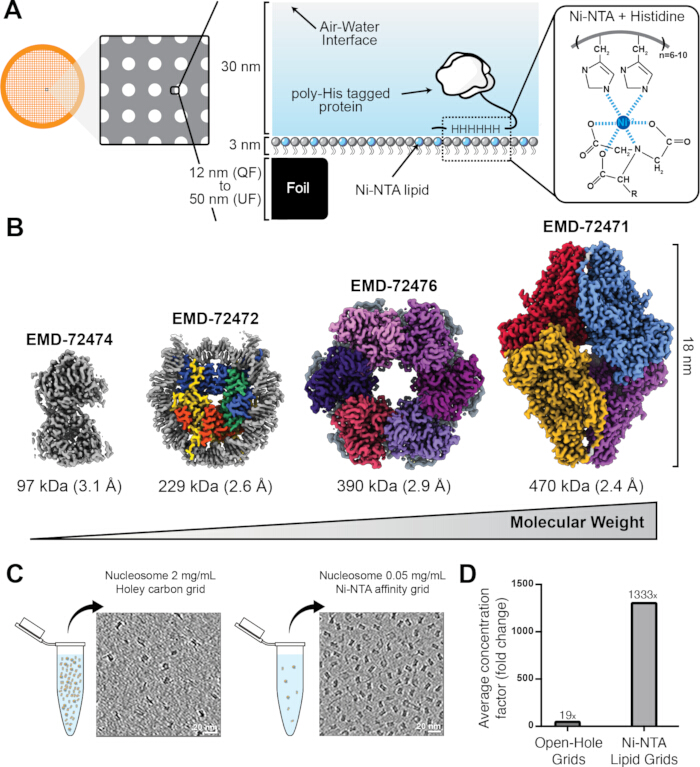
Figure 1: Overview of the Ni-NTA lipid affinity grid design. (A) Schematic of a 20% Ni-NTA lipid cryo-grid. The cryo-grid is shown at left, with a cross-sectional view of the lipid monolayer illustrating the dimensions of the carbon film, lipid monolayer, vitreous ice, and attached particles (center). The interaction between histidine side chains and Ni-NTA lipid is depicted at right. (B) Examples of polyhistidine-tagged proteins solved using lipid affinity grids. Maps are drawn to scale relative to one another, with molecular weight, size, resolution, and EMDB accession number indicated. (C) Representative tomographic slices of polyhistidine-tagged nucleosomes prepared using non-lipid cryo-grids at 2 mg/mL (right) and Ni-NTA lipid affinity cryo-grids at 0.05 mg/mL (left). (D) Average concentration factor of non-lipid cryo-grids compared with Ni-NTA lipid affinity cryo-grids, demonstrating the ability of the lipid film to concentrate polyhistidine-tagged proteins away from the air-water interface (AWI). Portions of this figure were adapted from Figures 1A,B and 2A,B in Skrajna et al.17 with permission from Elsevier. Please click here to view a larger version of this figure.
Protocol
This study did not involve human participants, clinical data, or live animals. The reagents and the equipment used are listed in the Table of Materials.
NOTE: DOPC refers to 18:1 (Δ9-cis) PC. Ni-NTA lipid refers to 18:1 DGS-NTA(Ni). Low-salt buffer refers to 10 mM HEPES (pH 7.4) with 50 mM NaCl. Dilution buffer refers to 20 mM HEPES (pH 7.4) with 150 mM NaCl.
1. Washing reusable glassware (~30 min)
- Gather two small petri dishes, two small petri dish covers, one 25 mL volumetric flask with a stopper, and one 1 mL volumetric flask with a stopper. Place the items near the sink.
- Dissolve an anionic surfactant powder in warm tap water in an 11.4 L plastic tub.
- Gently submerge the glassware in the surfactant solution.
- While wearing nitrile gloves, scrub all accessible glassware surfaces with a labware brush. Rinse thoroughly with ultrapure water.
- Remove residual water by gently tapping the glassware on paper towels.
- Dry the glassware with a hairdryer until no visible moisture remains.
NOTE: Store washed glassware in a clean, dust-free environment.
2. Equilibrating lipids to room temperature (1–4 h)
NOTE: If lipid stocks were previously prepared, skip this section.
- Place one sealed ampule of 25 mg DOPC powder and one sealed ampule of 1 mg Ni-NTA lipid powder in a chemical fume hood.
- Equilibrate the lipids to room temperature for at least 1 h.
3. Setting up the solvent-cleaning station (~10 min)
CAUTION: Chloroform is a hazardous and volatile liquid that acts as a central nervous system depressant and skin, eye, and respiratory irritant. Perform all steps involving more than 100 µL of chloroform in a chemical fume hood while wearing appropriate personal protective equipment (PPE), including gloves, a lab coat, and eye protection. Remove and discard contaminated nitrile gloves within 1 min of exposure, as chloroform rapidly penetrates nitrile. Do not combine chloroform waste with other chemical waste streams.
- Gather 99.8% chloroform, one lidded chloroform waste bottle, 99.5% ethanol, one lidded ethanol waste bottle, one sharps container, two small petri dishes, two small petri dish covers, one large petri dish containing grade 1 filter paper, three or more 1–2 cm2 pieces of self-sealing film, and paper towels. Arrange all materials in the chemical fume hood (Figure 2).
- Rinse the petri dishes with 20–30 mL of chloroform. Discard the rinse into the appropriate waste bottle. Repeat with ethanol. Air-dry the dishes.
- Fill one small petri dish with chloroform and the other with ethanol. Cover both dishes to minimize evaporation.
- Refill the petri dishes throughout the experiment, especially when the chloroform becomes visibly cloudy with contaminants.
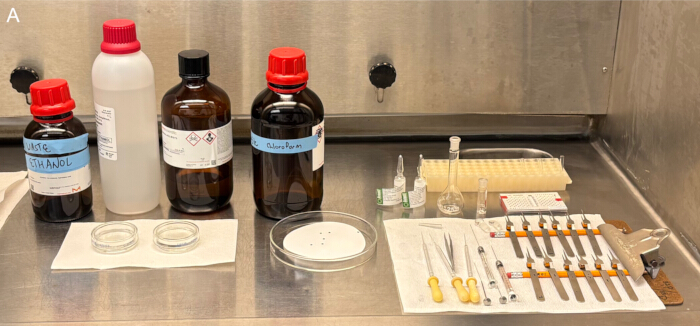
Figure 2: Chemical fume hood containing tools and reagents for lipid mixture preparation. Image of the solvent-cleaning station and cleaned tools, glassware, and TEM grids. Bottles from left to right: ethanol waste, ethanol, chloroform, and chloroform waste. Petri dishes from left to right: ethanol, chloroform, and TEM grids on filter paper. Additional items from left to right and top to bottom include culture tubes in a tube rack, lipid ampules, volumetric flasks with stoppers, stored TEM grids, glass pipets with bulbs, fine-tipped tweezers, glass syringes, and anti-capillary tweezers with spacers (pencil stubs) inserted. Please click here to view a larger version of this figure.
4. Cleaning tools, glassware, and TEM grids with solvents (~20 min)
- Gather one pair of fine-tipped tweezers, twelve pairs of self-closing anti-capillary tweezers, three glass pipettes, one 25 µL glass syringe, one 2.5 µL glass syringe, three glass culture tubes in a tube rack, one 25 mL volumetric flask with stopper, one 1 mL volumetric flask with stopper, twenty to twenty-five 3.7 mL threaded glass vials with phenolic caps, and twelve gold-mesh holey-carbon TEM grids. Place the materials near the solvent-cleaning station in the chemical fume hood.
NOTE: Keep a spacer, such as a pencil stub, inserted into each pair of anti-capillary tweezers when not in use to prevent tip malformation and misalignment. Discard bent tweezers. - Clean the tweezers by immersing the tips in chloroform several times. Repeat with ethanol. Air dry.
- Clean the glass pipettes by aspirating and dispensing chloroform several times. Repeat with ethanol. Air dry.
- Clean the syringes by aspirating and dispensing chloroform until the plunger moves smoothly. Repeat with ethanol. Remove the plunger from the syringe barrel and air dry.
- Clean the culture tubes by adding and removing chloroform several times with a glass pipette. Repeat with ethanol. Remove residual liquid by inverting the tubes and gently tapping them on paper towels. Air dry.
- Clean the volumetric flasks by adding chloroform with a glass pipette, stoppering the flask, and gently agitating to rinse the interior surfaces. Discard the solvent into the waste bottle. Repeat with ethanol. Leave the flasks unstoppered and air dry.
- Clean the vials by adding chloroform with a glass pipette, capping the vial, and gently agitating to rinse the interior surfaces. Discard the solvent. Repeat with ethanol. Leave the vials uncapped and air dry.
- Clean the TEM grids by grasping the reinforced outer edge with fine-tipped tweezers while avoiding damage to the carbon film. Submerge the grids vertically in chloroform three times, then in ethanol three times.
- Place the TEM grids carbon side up on the filter paper and allow them to air dry.
5. Chilling the casting buffer (>20 min)
- Place at least 50 mL of low-salt buffer on ice.
- Chill the buffer for at least 20 min.
6. Preparing separate 1 mg/mL chloroform stock solutions of DOPC and Ni-NTA lipid (~20 min)
NOTE: If lipid stocks were previously prepared, skip to Section 8, “Preparing the 80% DOPC/20% Ni-NTA lipid mixture.”
- Ensure that the DOPC and Ni-NTA lipid powders have equilibrated to room temperature.
CAUTION: Razors and broken glass are sharp hazards. Exercise caution when using a razor and breaking glass ampules. - To improve visibility of the DOPC powder, remove the ampule label by cutting it with a razor and peeling it away. Repeat for the Ni-NTA lipid ampule.
- Using both hands and working over the sharps container, carefully break open the ampule containing 25 mg DOPC. Discard the ampule neck in the sharps container. Place the ampule body near the chloroform dish. Repeat for the 1 mg Ni-NTA lipid ampule.
- Carefully brush glass fragments from gloves and work surfaces into the sharps container. Replace damaged gloves immediately.
- Label one glass pipette for chloroform, one for DOPC, and one for Ni-NTA lipid.
- Fill a small solvent-cleaned petri dish with chloroform.
- Use the DOPC pipette to transfer 2–5 mL of chloroform into the DOPC ampule. Aspirate and dispense the solution until the lipid on the bottom and sides dissolves completely.
- Transfer the DOPC solution into the 25 mL volumetric flask using the DOPC pipette. Bring the flask to a final volume of 25 mL with chloroform using the chloroform pipette.
- Discard the DOPC ampule in the sharps container.
- Transfer less than 1 mL of chloroform into the 1 mL volumetric flask using the chloroform pipette.
- Use the Ni-NTA lipid pipette to transfer the chloroform from the 1 mL volumetric flask into the Ni-NTA lipid ampule. Aspirate and dispense the solution until the lipid on the bottom and sides dissolves completely.
- Transfer the Ni-NTA lipid solution into the 1 mL volumetric flask using the Ni-NTA lipid pipette. Bring the flask to a final volume of 1 mL with chloroform using the chloroform pipette.
- Discard the Ni-NTA lipid ampule in the sharps container.
7. Preparing small aliquots of lipid for long-term storage (~15 min)
- Use the DOPC pipette to aliquot 1–2 mL of DOPC stock into several glass vials. Cap and label the vials.
- Use the Ni-NTA lipid pipette to aliquot 0.2–0.5 mL of Ni-NTA lipid stock into several glass vials. Cap and label the vials.
CAUTION: Liquid nitrogen (LN2) is a cryogen that may initially produce a brief Leidenfrost effect before causing intense pain, numbness, blistering, and frostbite. Injury severity increases with exposure duration and can progress from first- through fourth-degree burns in less than 1 min. Objects cooled by LN2 can cause similar injuries. Be mindful of thermal conduction through cryo-specimen tools while handling them in LN2. Wear a face shield to protect against splashes. Do not immerse hands in LN2, even while wearing cryo-protective gloves, because trapped LN2 may remain in contact with the skin. Do not mistake condensed atmospheric water vapor for LN2 vapor. LN2 expands approximately 700× in volume when transitioned into an invisible, odorless gaseous asphyxiant. Ensure that all LN2 tanks and dewars are properly vented to prevent pressure buildup. Use LN2 only in well-ventilated areas and evaporate unused LN2 in a chemical fume hood. - Fill a small cryogen dewar with LN2.
- Remove the cap from one aliquot vial, pour nitrogen vapor into the vial, recap the vial, and seal it with self-sealing film. Repeat for all aliquot vials.
NOTE: Store lipid aliquot stocks at −20 °C for up to 3 months.
8. Preparing the 80% DOPC/20% Ni-NTA lipid mixture (~15 min)
- Ensure that the DOPC and Ni-NTA lipid stock aliquots have equilibrated to room temperature.
- Label one glass culture tube for DOPC, one for Ni-NTA lipid, and one for the lipid mixture.
- Use the DOPC pipette to transfer 50–100 µL (2–3 drops) of DOPC stock into the DOPC culture tube. Seal the tube with self-sealing film.
- Use the Ni-NTA lipid pipette to transfer 20–50 µL (1–2 drops) of Ni-NTA lipid stock into the Ni-NTA lipid culture tube. Seal the tube with self-sealing film.
- Use the 25 µL syringe to draw 20 µL of DOPC aliquot into the syringe barrel. Confirm that the barrel contains no bubbles and redraw the sample if necessary. Dispense the aliquot into the lipid mixture tube. Repeat once for a total volume of 40 µL.
- Clean the syringe with chloroform followed by ethanol.
- Use the syringe to draw 10 µL of Ni-NTA lipid aliquot. Confirm that the barrel contains no bubbles and redraw the sample if necessary. Dispense the aliquot into the lipid mixture tube, bringing the final total volume to 50 µL.
- Mix the lipids by aspirating and dispensing the solution several times. Seal the tube with self-sealing film.
- Clean the syringe with chloroform followed by ethanol. Air dry.
9. Casting a lipid monolayer and transferring onto the TEM grids (~10 min)
- Ensure that the low-salt buffer is chilled.
- Gather one small LED lamp, the chilled low-salt buffer, one lidded buffer waste bottle, reagent ethanol, one ethanol waste bottle, one bottle of castor oil with a dropper, the lipid mixture, one small petri dish, one 2.5 µL syringe, twelve pairs of anti-capillary tweezers, twelve TEM grids, and low-lint tissues. Arrange the materials on a well-lit black benchtop (Figure 3).
- Orient the flat arm of each pair of anti-capillary tweezers to the carbon side of a TEM grid. Clamp the grid along the reinforced outer edge. Repeat for all grids.
- Fill the small petri dish to the brim with chilled low-salt buffer (Figure 4A). Place one drop of castor oil at the center of the buffer surface (Figure 4B, 4C).
NOTE: Proceed rapidly through the following steps because the lipid monolayer gradually moves away from the center of the castor oil over time, reducing transfer efficiency. Temperature fluctuations and vibrations accelerate this process. - Use the 2.5 µL syringe to draw 1 µL of lipid mixture. Lower the syringe needle tip to the center of the castor oil. Dispense the lipid mixture as a droplet hanging from the needle bevel just above the surface, then gently touch the droplet to the castor oil (Figure 4D).
- Use the LED lamp to confirm formation of a flat 2–3 cm diameter lipid circle surrounded by a ring of castor oil (Figure 4E). If this morphology is not observed, reset the casting dish by discarding the buffer, rinsing the dish with reagent ethanol, drying with low-lint tissues, and reapplying low-salt buffer, castor oil, and lipid mixture.
NOTE: Excess castor oil hinders the formation of the lipid monolayer, whereas insufficient castor oil fails to contain the monolayer. Lipid fluidity is temperature-dependent. If the buffer is too cold, the lipid does not spread into a monolayer. If the buffer is too warm, the lipid and castor oil migrate toward the edge of the dish and collapse. Pour chilled buffer into a room-temperature petri dish to achieve optimal lipid spreading. Reset the casting dish as needed after each grid transfer. Ensure that the casting dish is completely free of oil before adding fresh buffer. - Transfer the lipid monolayer onto a TEM grid by lowering the clamped TEM grid to the center of the lipid cast with the carbon side facing downward. Gently touch the entire carbon surface to the lipid monolayer without submerging or releasing the grid (Figure 4F).
- Inspect the lipid grid to confirm complete liquid coverage and absence of castor oil (Figure 5). Discard oily grids.
- Repeat the transfer procedure for all TEM grids.
NOTE: Clamped lipid grids may dry within 5–10 min. Lipid grids may remain clamped on the benchtop overnight before rehydration. Alternatively, dried lipid grids may be placed in a grid box and stored in a desiccator at room temperature for up to 1 week before reclamping and rehydration.
CRITICAL: Proceed only if plunge-freezing will occur within 2 h. Otherwise, delay the remaining steps.
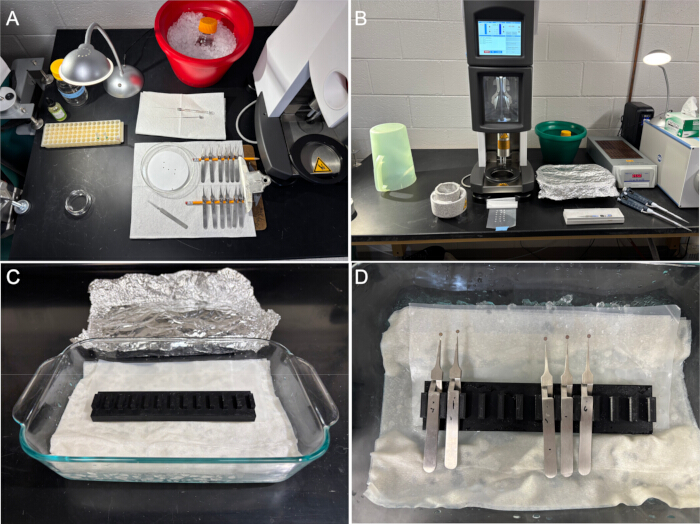
Figure 3: Bench setup for casting lipid monolayers and plunge-freezing. (A) Items shown from left to right and top to bottom include a castor oil dropper bottle, buffer waste bottle, LED lamp, chilled low-salt buffer on ice, tube rack containing lipid aliquots and lipid mixture, 2.5 µL glass syringe, empty petri dish, petri dish containing TEM grids on filter paper, fine-tipped tweezers, and anti-capillary tweezers with spacers inserted. (B) Items shown include a chilled, humidified cryo-plunger, an assembled cryo-plunger pot, an ice bucket containing dilution buffer and sample, a foil-covered benchtop humidity chamber, a sealed, self-sealing film with lines of dilution buffer drops, cryo-plunger tweezers, and micropipettes. (C) Benchtop humidity chamber containing ice, wet paper towels, self-sealing film, and a benchtop version tweezer holder. (D) Lipid grids clamped by anti-capillary tweezers inside the benchtop humidity chamber. Please click here to view a larger version of this figure.
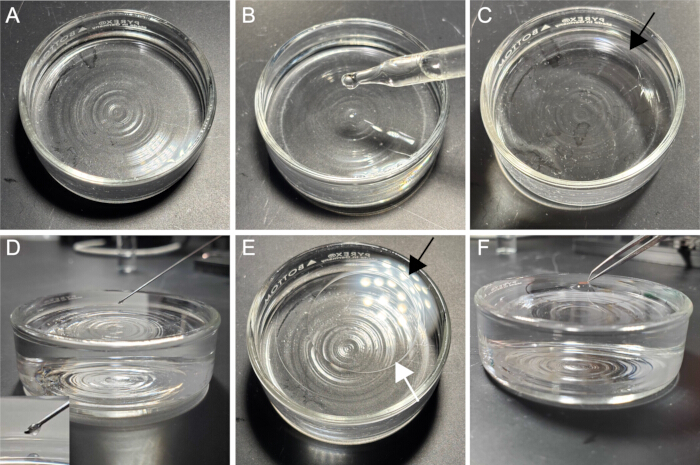
Figure 4: Casting a lipid monolayer and transferring it onto TEM grids. (A) Casting dish filled with low-salt buffer. (B) Dispensation of 1 drop of castor oil to the casting dish. (C) Circle of castor oil floating on the buffer surface; black arrow indicates the castor oil boundary. (D) Syringe needle centered above the castor oil with the bevel facing downward; 1 µL droplet of lipid mixture suspended from the needle tip. (E) Lipid mixture spread within a ring of castor oil; the black arrow indicates the castor oil boundary, and the white arrow indicates the lipid monolayer boundary. (F) Transfer of the lipid monolayer onto the carbon side of a TEM grid. Please click here to view a larger version of this figure.
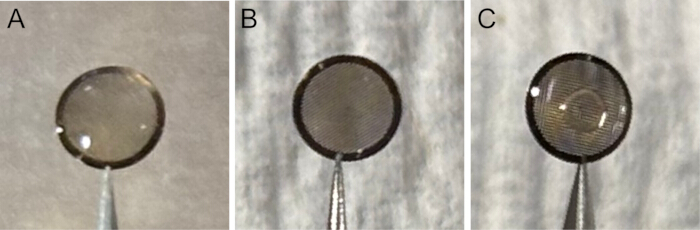
Figure 5: Examples of TEM grids after lipid monolayer transfer. (A) Successful lipid transfer with buffer distributed across the entire grid surface. (B) Successful lipid transfer after air drying for 1 h. (C) Lipid transfer contaminated with castor oil, visible at the center of the grid. Please click here to view a larger version of this figure.
10. Incubating blot paper in a cryo-plunger at 4 °C and 100% humidity (>1 h)
- Set the cryo-plunger humidity chamber to 4 °C and 100% humidity.
- Install blot paper onto the blotting pads. Incubate the blot paper at high humidity for at least 1 h.
11. Chilling the dilution buffer (~20 min)
- Place at least 20 mL of dilution buffer on ice.
- Chill the buffer for at least 20 min.
12. Incubating dilution buffer on the lipid grids (>15 min)
- Gather one baking dish, one version of a 3D-printed tweezer holder (Supplemental Files 1–3), one 25–35 cm strip of 10 cm-wide self-sealing film, one 35–45 cm strip of 30.4 cm-wide aluminum foil, ice, and paper towels. Place the materials near the cryo-plunger (Figure 3).
- Position the baking dish lengthwise adjacent to the cryo-plunger. Fill the dish halfway with ice, then cover it with paper towels. Lightly wet the paper towels with tap water.
- Position the strip of self-sealing film lengthwise on the far half of the baking dish directly over the wet paper towels.
- Position the 3D-printed tweezer holder lengthwise in the center of the baking dish, directly on the wet paper towels and self-sealing film.
- Cover the baking dish with aluminum foil (Figure 3).
- Replace melted ice throughout the experiment.
- Place the clamped lipid grids in the benchtop humidity chamber over the self-sealing film with the lipid side facing upward (Figure 3).
NOTE: Avoid moving the benchtop humidity chamber or touching the lipid grids with a pipette tip because these actions may dislodge the grids. Retrieve any grids that fall onto the self-sealing film if the grids remain undamaged. - Apply 2 µL of sample dilution buffer to each lipid surface. Cover the chamber with foil to minimize evaporation.
- Maintain hydration of each lipid grid by applying an additional 2 µL of dilution buffer whenever less than 1 µL of liquid remains on the grid.
- Equilibrate the hydrated lipid grids in the chilled benchtop humidity chamber for at least 15 min.
13. Incubating the sample on the lipid grids (>15 min)
- Ensure that the lipid grids have been hydrated with dilution buffer continuously for at least 15 min.
- Ensure that the stock dilution buffer is fully chilled.
- Apply 3 µL of polyhistidine-tagged sample to each hydrated lipid grid. Cover the chamber with foil to minimize evaporation.
- Maintain hydration of each lipid grid by applying an additional 2 µL of dilution buffer whenever less than 2 µL of liquid remains on the grid.
- Incubate the grids for at least 15 min.
14. Preparing the cryo-plunger pot (>15 min)
- Assemble the cryo-plunger pot, including the spindle used for indirect cooling of the brass cup.
- Label the cryo-grid boxes and place them inside the cryo-plunger pot.
- Fill the cryo-plunger pot with LN2. Cover the pot to minimize ice contamination.
- Maintain the LN2 level above the cryo-grid boxes by periodically adding additional LN2.
- Cool the metal components and cryo-grid boxes to LN2 temperature for at least 10 min.
CAUTION: Liquid propane and ethane are highly flammable cryogens that cause injuries similar to LN2 but lack a noticeable Leidenfrost effect. As a result, contact may cause immediate and persistent injury. Avoid splashing during handling. If propane-ethane contaminates LN2, handle the contaminated LN2 with the same elevated precautions as liquid propane and ethane. After use, place the cryo-plunger pot in a chemical fume hood to allow the cryogens to evaporate safely. - Fill the brass cup with a 60:40 liquid propane-ethane mixture.
- Equilibrate the propane-ethane mixture to LN2 temperature for at least 5 min.
15. Plunge-freezing the lipid grids (~1 h)
- Ensure that the blot paper has equilibrated at 4 °C and 100% humidity for at least 1 h.
- Ensure that the lipid grids have incubated with polyhistidine-tagged sample for at least 15 min.
- Confirm that the propane-ethane temperature is below −190 °C, then remove the spindle.
- Dispense three 50 µL drops of dilution buffer in a line onto a secured 10 cm2 piece of self-sealing film (Figure 3).
- Wash one clamped lipid grid by sequentially touching the lipid surface to each dilution buffer drop and releasing the grid on the final drop.
- Use the cryo-plunger tweezers to pick up the floating lipid grid. Mount the grid into the cryo-plunger.
- Absorb the used buffer drops with a lint-free tissue and discard.
- Apply the following cryo-plunger settings to the lipid grid before plunge-freezing into the propane-ethane mixture: wait time, 0 s; total blot, 1; blot force, −10; blot time, 4 s; and drain time, 0 s.
- Transfer the cryo-grid from the propane-ethane cup into an available slot in a cryo-grid box.
- Repeat the plunge-freezing procedure for all lipid grids.
Results
To illustrate the expected outcomes of this protocol, a series of experiments was performed. Holey-carbon R1.2/1.3 TEM grids with and without 20% Ni-NTA lipid monolayers were plunge-frozen with sample and imaged using a 200 keV cryo-TEM. For each condition, 3–9 grid squares were imaged. Ice thickness varied across individual grids and grid squares, with optimal regions containing thin vitreous ice and well-embedded particles, as verified by characteristic Thon rings in the fast Fourier transform (FFT)31.
In the first experiment, purified polyhistidine-tagged Staphylococcus aureus glutamate synthase (saGS) was used to demonstrate the optimal preparation and expected performance of 20% Ni-NTA lipid monolayer affinity grids (Figure 6). Lipid monolayers were transferred onto gold-mesh TEM grids. The lipid grids were dried and stored in a desiccator for 1 week before rehydration. After complete rehydration, saGS at 0.1 mg/mL was incubated on the grids for 15–30 min to allow particle binding. The saGS particles, with an average particle count of 274 particles per micrograph (N = 7), appeared evenly distributed across the lipid monolayer with minimal or no overlap.

Figure 6: Representative cryo-TEM images of a 20% Ni-NTA lipid affinity grid. The lipid monolayer was dried for 1 week and rehydrated with low-salt buffer as described in the protocol. Representative images were collected at low (A), intermediate (B), and high (C) magnification, with corresponding FFT shown in (D). Particles, with an average of 274 particles per micrograph (N = 7), are evenly dispersed across the grid surface within a layer of thin vitreous ice. Scale bars: 10 µm, 500 nm, and 50 nm. Please click here to view a larger version of this figure.
In the second experiment, saGS samples exhibiting particle stacking were used to demonstrate the effects of lipid grids on protein aggregation (Figure 7). Four cryo-grid conditions were examined: saGS at 1.0 mg/mL on copper-mesh grids without lipid, saGS at 0.1 mg/mL on copper-mesh grids without lipid, saGS at 0.1 mg/mL on gold-mesh grids with never-dried lipid, and saGS at 0.1 mg/mL on gold-mesh grids with lipid dried for 1 week before rehydration. Lipid grids exhibited higher particle density, with averages of 40 or 46 particles per micrograph (N = 12), relative to non-lipid grids prepared at the same protein concentration, which averaged 2 particles per micrograph (N = 12). These findings demonstrated a clear concentration effect relative to unmodified TEM grids, confirming that the 20% Ni-NTA lipid monolayer remained intact. Although particle stacking was still observed, particles on lipid grids exhibited minimal overlap and remained within a similar focal plane. In contrast, particles on non-lipid grids appeared at substantially different focal depths, with aggregated particles observed at the higher concentration of 1 mg/mL.
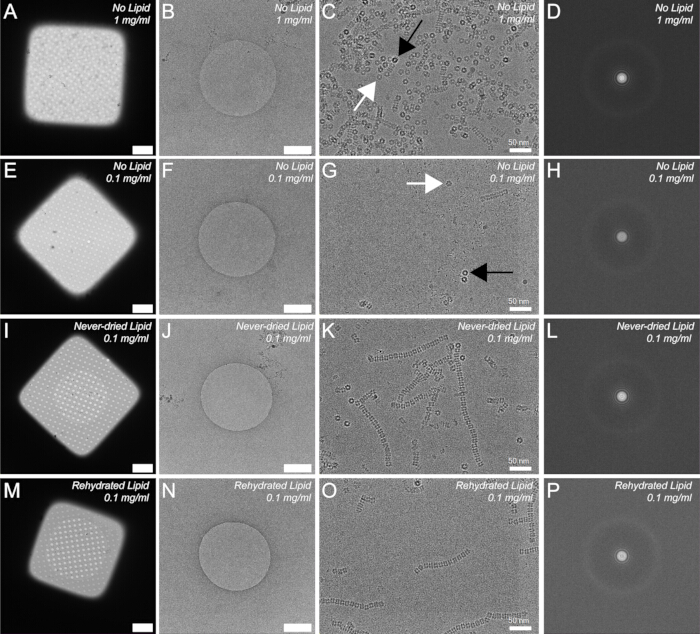
Figure 7: Cryo-TEM images of stacked polyhistidine-tagged saGS on 20% Ni-NTA lipid and non-lipid grids. (A–D) Non-lipid grid prepared with saGS at 1.0 mg/mL, shown at low (A), intermediate (B), and high (C) magnification, with corresponding FFT (D). (E–H) Non-lipid grid prepared with saGS at 0.1 mg/mL. (I–L) Never-dried lipid grid prepared with saGS at 0.1 mg/mL.
(M–P) Rehydrated lipid grid prepared with saGS at 0.1 mg/mL. Particle density on non-lipid grids was lower than that observed on corresponding lipid affinity grids, averaging 2 particles per micrograph compared with 46 and 47 particles per micrograph, respectively (N = 12). Black arrows indicate heavily defocused particles. White arrows indicate particles near focus. Scale bars: 10 µm, 500 nm, and 50 nm. Please click here to view a larger version of this figure.
In the third experiment, lipid grids were exposed to N-dodecyl-β-D-maltoside (DDM). Purified saGS at 0.1 mg/mL was used as the sample. The detergent disrupted the lipid monolayer. Lipid cryo-grids containing 0.05% DDM in the buffer (Figure 8) exhibited gaps in the lipid monolayer, lipid micelles on the grid surface, and reduced particle density relative to the control condition.
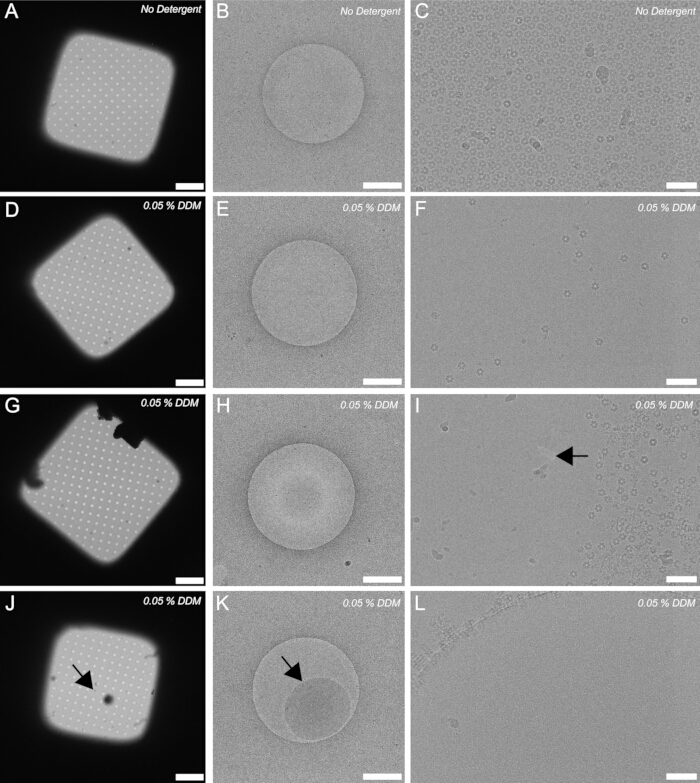
Figure 8: Representative images of 20% Ni-NTA lipid grids exposed to 0.05% N-dodecyl-β-D-maltoside (DDM). Cryo-grids were imaged at low, intermediate, and high magnification. (A–C) Images of a 20% Ni-NTA lipid affinity grid rehydrated with sample dilution buffer. (D–L) Images of a 20% Ni-NTA lipid affinity grid rehydrated with sample dilution buffer containing 0.05% DDM. saGS particle density was lower on detergent-treated TEM grids. The arrow in panel I indicates a hole in the lipid monolayer. Arrows in panels J and K indicate the same lipid micelle. Scale bars: 10 µm, 500 nm, and 50 nm. Please click here to view a larger version of this figure.
Ice thickness varied both between grids and within individual grid squares. In some cases, the ice was too thin or absent from portions of the grid square (Figure 9A), unevenly distributed (Figure 9B), or excessively thick for imaging (Figure 9C). In some regions, the ice thickness was less than the diameter of the protein complex. Dry areas or regions containing very thin ice, defined as thinner than the particle diameter, should be avoided during data collection because proteins in these regions are likely denatured. Based on experience using this protocol, approximately 25%–50% of cryo-grids are expected to contain sufficiently thin ice suitable for SPA data collection across multiple grid squares. Ice thickness can be optimized by adjusting blotting time or modifying the final buffer volume on the grid before plunge-freezing.
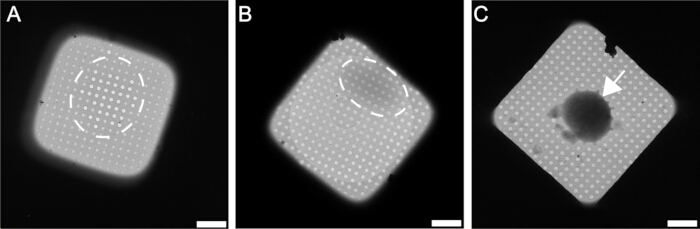
Figure 9: Examples of suboptimal Ni-NTA affinity grids. Representative cryo-TEM micrographs of suboptimal 20% Ni-NTA affinity cryo-grids. (A) Lipid film absent from the center of the grid square, indicated by the white dashed circle surrounding empty holes. (B) Grid square containing uneven ice, with thicker ice near the region indicated by the white dashed circle. (C) Grid square containing ice that is too thick for imaging, indicated by the arrow. Scale bars: 10 µm. Please click here to view a larger version of this figure.
When prepared correctly, affinity grids contain a lipid monolayer with a predominantly single layer of particles adsorbed onto the film. Particle density is expected to exceed that observed on non-lipid grids prepared using similar sample concentrations. Failure to transfer the lipid monolayer onto a TEM grid yields cryo-grids containing either empty holes (Figure 10A) or holes containing vitreous ice lacking lipid film and exhibiting few or no particles (Figure 10B, C).
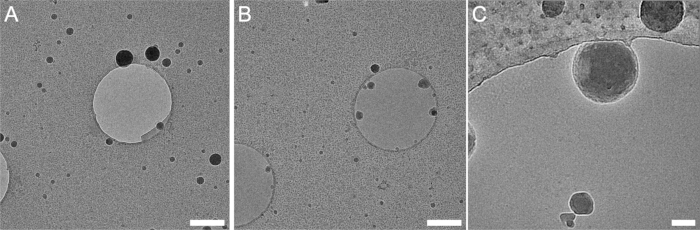
Figure 10: Example of a TEM grid lacking a lipid monolayer. Cryo-TEM images showing failed transfer of the lipid monolayer onto the TEM grid surface. Polyhistidine-tagged human nucleosomes are adsorbed onto the carbon film. (A) Region of the grid square containing empty holes. (B) Different regions of the same grid containing holes filled with vitreous ice but lacking visible particles or lipid film. (C) High-magnification image of a hole lacking lipid film but containing vitreous ice; particles are visible on the thick carbon support film. Scale bars: 1 µm and 50 nm. Please click here to view a larger version of this figure.
Supplementary File 1: Instructions for 3D printing the tweezers holder. This supplementary file contains detailed instructions for 3D printing custom tweezer holders used during lipid grid hydration and sample incubation. Please click here to download this file.
Supplementary File 2: STL file for 3D printing benchtop tweezer holder. This supplementary file contains the stereolithography (STL) file required for 3D printing the tweezer holder version used for incubating hydrated lipid grids in a benchtop humidity chamber (Figure 3C, 3D). Please click here to download this file.
Supplementary File 3: STL file for 3D printing cryo-plunger tweezer holder. This supplementary file contains the stereolithography (STL) file required for 3D printing the tweezer holder version used for incubating hydrated lipid grids in a cryo-plunger humidity chamber. Please click here to download this file.
Discussion
This study presents a detailed step-by-step protocol for preparing Ni-NTA lipid monolayer affinity grids and highlights important practical considerations and advantages of this approach for routine cryo-EM structural determination of soluble polyhistidine-tagged protein complexes. Several steps in the protocol are technically challenging and susceptible to user error, particularly for first-time users.
Lipid monolayer modification can be completed within approximately 2 h, and the resulting lipid grids can be dried and stored for later use. With an additional 2 h and access to a cryo-plunger, cryo-grids can subsequently be prepared. Accordingly, this method is well-suited for multi-user facilities and cryo-EM laboratories. Using this approach, structures of soluble protein complexes ranging from 97 to 470 kDa have been determined at sub-3 Å resolution17. Efficient binding to the Ni-NTA lipid monolayer requires a polyhistidine-tagged component containing a flexible linker. Although some degree of preferred orientation relative to the monolayer has been observed for certain samples, including nucleosomes and glutamate synthase, these orientations did not limit resolution or introduce stretching artifacts into the final reconstructions. Interaction between the Ni-NTA lipid monolayer and polyhistidine-tagged proteins promotes efficient particle capture at the TEM grid surface. Consequently, structural analysis can be performed using relatively dilute samples and standard cryo-EM processing pipelines, such as RELION and cryoSPARC, without additional sample-preparation steps.
Careful handling of TEM grids and preparation of lipid mixtures are essential for reproducible results. Lipid monolayers are highly sensitive to contaminants, including residual detergents, oils, and dust. Thorough cleaning of all glassware is therefore critical. Washing with an anionic surfactant followed by extensive rinsing with ultrapure water and thoroughly air drying is strongly recommended before subsequent rinsing with chloroform and ethanol immediately prior to use.
The protocol uses gold-mesh TEM grids because they are nonreactive across a broad range of sample and buffer conditions. To accommodate different samples, the buffers used during lipid casting, lipid-grid rehydration, sample incubation, and washing prior to plunge-freezing can be modified as needed. Sample buffers containing glycerol or other additives may be removed during the washing step before vitrification. Buffers containing dithiothreitol (DTT) should be avoided because DTT reduces nickel32 and interferes with binding between polyhistidine-tagged proteins and the Ni-NTA lipid monolayer. Detergents are also not recommended because 0.05% N-dodecyl-β-D-maltoside (DDM) disrupted the lipid monolayer, and other detergents commonly used for membrane-protein structural studies are expected to produce similar effects (Figure 8D–L). Whether lower detergent concentrations or low-critical-micelle-concentration detergents similarly disrupt monolayer integrity remains to be determined.
The most technically demanding portion of the protocol is casting and transferring the lipid monolayer onto the TEM grid. This step is highly sensitive to temperature, vibration, and handling technique. Optimal results were obtained by casting lipid films at room temperature (~22 °C) using prechilled buffer. Mechanical disturbances should be minimized because vibrations can destabilize the monolayer. Accordingly, the petri dish should remain stationary after lipid casting. During transfer, the castor oil and lipid monolayer may gradually migrate across the buffer surface, increasing the likelihood of transferring castor oil instead of the lipid monolayer (Figure 5C). Proper filling of the petri dish and careful control of grid orientation are necessary to ensure complete and uniform monolayer transfer. Failure to transfer the lipid film onto the TEM grid surface produces a hydrophobic grid surface, causing the buffer to bead on the carbon surface.
In this study, only a cryo-plunger utilizing two-sided blotting was evaluated. However, other blotting methods, including manual or one-sided blotting, are expected to produce comparable results provided that the lipid film remains undamaged. When adapting this protocol, lipid grids should be handled similarly to standard TEM grids, with several important considerations. Plasma cleaning should be avoided, and the lipid grids should remain continuously hydrated for at least 15 min before sample application. Samples should be incubated on the lipid grid for a minimum of 15 min to allow surface adsorption, and the grid should be contacted with at least one drop of dilution buffer before blotting to normalize the final buffer volume on the grid surface. Maintaining hydration of the Ni-NTA lipid monolayer throughout sample incubation is critical, as evaporation can increase local salt concentrations and potentially alter protein structure or complex assembly. Longer incubation times (>30 min) may increase particle density on the grid, although prolonged incubation should be balanced against potential sample degradation. The 60:40 liquid propane-ethane mixture described in this protocol is recommended but not strictly required. Alternative propane-ethane ratios or pure ethane may also be used in conjunction with a cryo-plunger equipped with an ethane-cup heating system to maintain the cryogen in a liquid state throughout the experiment. Finally, particle distribution is influenced by ice thickness. In some cases, particles may be excluded from regions containing especially thin ice, particularly near the center of grid squares. Blotting conditions may therefore need to be optimized for each vitrification device. Overall, Ni-NTA lipid monolayer affinity grids provide a robust and accessible strategy for structural determination of soluble polyhistidine-tagged protein complexes. With careful implementation of the step-by-step procedure described herein, this method can be readily integrated into standard cryo-EM workflows.
Acknowledgements
The authors thank Caleb Fisher, Rob McGinty, Nicholas Wright, Blake Fordyce, and Bryan Roth of the University of North Carolina at Chapel Hill for providing buffers used in these experiments. The UNC-Chapel Hill CryoEM Core Facility and the UNC Core Facility Advocacy Committee are acknowledged for technical and financial support. The Biomolecular Cryo-Electron Microscopy Facility in the Department of Chemistry and Biochemistry at the University of California, Santa Cruz (RRID: SCR_021755), is acknowledged for technical assistance. This work was supported by the National Cancer Institute of the National Institutes of Health under award number P30CA016086 and by National Institutes of Health grant R35GM150960 awarded to Richard W. Baker.
Materials
| Name | Company | Catalog Number | Comments |
|---|---|---|---|
| 1 mL volumetric flask with stopper | Avantor | 10124-382 | VWR Volumetric Flask, clear glass, Class A, serialized, with penny-head glass stopper, 1 mL |
| 2.5 µL glass syringe | Hamilton | 7632-01 | 2.5 Microliter Syringe, removable needle (RN), no needle included |
| 3.7 mL threaded glass vial with phenolic cap | Fisher Scientific | 03338A | Fisherbrand Class B clear glass threaded vial with attached closure, 3.7 mL |
| 4-slot cryo-grid box | MiTeGen | 71166-10 | Cryo Grid Box Round With Lid |
| 11.4 L plastic tub | Sterilite 12 qt dishpan, multi-purpose plastic wash tub | ||
| 25 µL glass syringe | Hamilton | 80430 | 25 Microliter Syringe, removable needle (RN), includes 22s gauge, 52 mm curved beveled needle |
| 25 mL volumetric flask with stopper | Avantor | 10123-994 | VWR Volumetric Flask, clear glass, Class A, serialized, with penny-head glass stopper, 25 mL |
| 99.5% pure ethanol | Thermo Fisher Scientific | 615090040 | Ethanol, 99.5%, ACS reagent, absolute, 200 proof |
| 99.8% pure chloroform | Fisher Scientific | AA32614K2 | Chloroform, ACS, 99.8+% |
| Aluminum foil | Walmart | Aluminum foil, 30.4 cm width | |
| Anionic surfactant powder | Fisher Scientific | 50-997-492 | Electron Microscopy Sciences Alconox anionic powder detergent, 4 lb |
| Baking dish | Walmart | Pyrex 232-D 3-quart deep glass baking dish | |
| Blot paper | Ted Pella | 47000-100 | Standard Vitrobot filter paper, Ø55/20 mm, Grade 595 |
| Bottle of castor oil with dropper | Walmart | Organic castor oil with dropper, 1 fl oz | |
| Cryo-plunger | Thermo Fisher Scientific | 1151972 | FEI Vitrobot Mark IV |
| DOPC | Avanti Polar Lipids | 850375P-25mg | 18:1 (Δ9-Cis) PC (DOPC), 1,2-dioleoyl-sn-glycero-3-phosphocholine powder, 25 mg |
| Fine-tip tweezers | Ted Pella | 505 | DUMONT Biology Grade Tweezers, style 5, polished stainless steel |
| Glass culture tube | Fisher Scientific | 14958A | Fisherbrand disposable flint glass tube with plain end, 1 mL |
| Glass pipet | Fisher Scientific | 13-678-20A | Fisherbrand disposable borosilicate glass Pasteur pipet, 14.6 cm |
| Gold-mesh holey-carbon TEM grid | Quantifoil | N1-C14nAu30-01 | QUANTIFOIL R 1.2/1.3 Au 300 mesh |
| Grade 1 filter paper | Sigma-Aldrich | WHA1001150 | Whatman qualitative filter paper, Grade 1, 150 mm diameter |
| Large petri dish with cover | Fisher Scientific | 08747E | Corning PYREX reusable petri dish with cover, 150 mm diameter, 15 mm height |
| Low-lint tissues | Fisher Scientific | 06-666 | Kimtech Science Kimwipes delicate task wipers, 1-ply |
| Ni-NTA lipid | Avanti Polar Lipids | 790404P-5mg | 18:1 DGS-NTA(Ni), 1,2-dioleoyl-sn-glycero-3-[(N-(5-amino-1-carboxypentyl)iminodiacetic acid)succinyl] (nickel salt) |
| Pipet bulb | Fisher Scientific | S32325 | Fisherbrand rubber bulb, natural, 2 mL |
| Reagent ethanol | Sigma-Aldrich | 362808-1L | Reagent alcohol ≥89% (GC), contains 5% isopropyl alcohol and 5% methyl alcohol |
| Self-closing anti-capillary tweezers | Ted Pella | 510-5 | DUMONT anti-capillary reverse tweezers, Biology Grade, style 5ACN, stainless steel |
| Self-sealing film | Fisher Scientific | S47529 | Parafilm M wrapping film, 10 cm |
| Small petri dish with cover | Fisher Scientific | 08747A | Corning PYREX reusable petri dish with cover, 60 mm diameter, 15 mm height |
| Syringe needle | Hamilton | 7803-01 | 27 gauge small-hub removable needle (RN), beveled, 75 mm length, 45° angle |
References
- Chan, L. M., et al. High-resolution single-particle imaging at 100–200 keV with the Gatan Alpine direct electron detector. J Struct Biol. 216 (3), 108108(2024).
- Efremov, R. G., Stroobants, A. Coma-corrected rapid single-particle cryo-EM data collection on the CRYO ARM 300. Acta Crystallogr D Struct Biol. 77 (Pt 5), 555-564 (2021).
- Frechin, L., et al. High-resolution cryo-EM performance comparison of two latest-generation cryo electron microscopes on the human ribosome. J Struct Biol. 215 (1), 107905(2023).
- Herzik, M. A. Jr, Wu, M., Lander, G. C. High-resolution structure determination of sub-100 kDa complexes using conventional cryo-EM. Nat Commun. 10 (1), 1032(2019).
- Karia, D., et al. Sub-3 Å resolution protein structure determination by single-particle cryo-EM at 100 keV. Structure. 33 (10), 1717-1727.e4 (2025).
- McMullan, G., et al. Structure determination by cryoEM at 100 keV. Proc Natl Acad Sci U S A. 120 (49), e2312905120(2023).
- Peng, R., et al. Characterizing the resolution and throughput of the Apollo direct electron detector. J Struct Biol X. 7, 100080(2023).
- D’Imprima, E., et al. Protein denaturation at the air-water interface and how to prevent it. eLife. 8, (2019).
- Noble, A. J., et al. Routine single-particle cryoEM sample and grid characterization by tomography. eLife. 7, (2018).
- Tan, Y. Z., et al. Addressing preferred specimen orientation in single-particle cryo-EM through tilting. Nat Methods. 14 (8), 793-796 (2017).
- Snijder, J., et al. Vitrification after multiple rounds of sample application and blotting improves particle density on cryo-electron microscopy grids. J Struct Biol. 198 (1), 38-42 (2017).
- Cianfrocco, M. A., Kellogg, E. H. What could go wrong? A practical guide to single-particle cryo-EM: From biochemistry to atomic models. J Chem Inf Model. 60 (5), 2458-2469 (2020).
- Cheng, H., et al. Dual-affinity graphene sheets for high-resolution cryo-electron microscopy. J Am Chem Soc. 145 (14), 8073-8081 (2023).
- Yu, G., Li, K., Jiang, W. Antibody-based affinity cryo-EM grid. Methods. 100, 16-24 (2016).
- Arimura, Y., Konishi, H. A., Funabiki, H. MagIC-Cryo-EM, structural determination on magnetic beads for scarce macromolecules in heterogeneous samples. eLife. 13, (2025).
- Zhao, Q., et al. An immobilized antibody-based affinity grid strategy for on-grid purification of target proteins enables high-resolution cryo-EM. Commun Biol. 7 (1), 715(2024).
- Skrajna, A., et al. Nickel-NTA lipid-monolayer affinity grids allow for high-resolution structure determination by cryo-EM. J Struct Biol. 217 (4), 108253(2025).
- Esfahani, B. G., et al. SPOT-RASTR—A cryo-EM specimen preparation technique that overcomes problems with preferred orientation and the air/water interface. PNAS Nexus. 3 (8), pgae284(2024).
- Cookis, T., et al. Streptavidin-affinity grid fabrication for cryo-electron microscopy sample preparation. J Vis Exp. (202), e66197(2023).
- Han, B. G., et al. Long shelf-life streptavidin support-films suitable for electron microscopy of biological macromolecules. J Struct Biol. 195 (2), 238-244 (2016).
- Song, J., et al. Structural basis for inactivation of PRC2 by G-quadruplex RNA. Science. 381 (6664), 1331-1337 (2023).
- Cookis, T., et al. Structural basis for the inhibition of PRC2 by active transcription histone posttranslational modifications. Nat Struct Mol Biol. 32 (2), 393-404 (2025).
- Gillies, J. P., et al. Structural basis for cytoplasmic dynein-1 regulation by Lis1. eLife. 11, (2022).
- Sauer, P. V., et al. Structural and quantum chemical basis for OCP-mediated quenching of phycobilisomes. Sci Adv. 10 (14), eadk7535(2024).
- Sauer, P. V., et al. Activation of automethylated PRC2 by dimerization on chromatin. Mol Cell. 84 (20), 3885-3898.e8 (2024).
- Ciapponi, M., et al. Structural basis of the histone ubiquitination read-write mechanism of RYBP-PRC1. Nat Struct Mol Biol. 31 (7), 1023-1027 (2024).
- Dominguez-Martin, M. A., et al. Structures of a phycobilisome in light-harvesting and photoprotected states. Nature. 609 (7928), 835-845 (2022).
- Marechal, N., Serrano, B. P., Zhang, X., Weitz, C. J. Formation of thyroid hormone revealed by a cryo-EM structure of native bovine thyroglobulin. Nat Commun. 13 (1), 2380(2022).
- Kasinath, V., et al. JARID2 and AEBP2 regulate PRC2 in the presence of H2AK119ub1 and other histone modifications. Science. 371 (6527), (2021).
- Ma, J., et al. Open architecture of archaea MCM and dsDNA complexes resolved using monodispersed streptavidin affinity CryoEM. Nat Commun. 15 (1), 10304(2024).
- Kim, L. Y., et al. Benchmarking cryo-EM single-particle analysis workflow. Front Mol Biosci. 5, 50(2018).
- Zhou, Z., Jin, J., Deng, X., Jia, Z. Protein purification via consecutive histidine-polyphosphate interaction. Protein Sci. 33 (6), e5021(2024).
Reprints and Permissions
Explore More Articles
This article has been published
Video Coming Soon