This protocol describes the integration of augmented reality and three-dimensional holographic imaging into the cosmetic rhinoplasty workflow to enhance intraoperative visualization and facilitate surgical decision-making.
Method Article
Protocol for Integrating Augmented Reality Into the Cosmetic Rhinoplasty Workflow
In This Article
Summary
Abstract
Cosmetic rhinoplasty often relies on intraoperative reference images to help achieve the patient’s desired aesthetic outcome. However, these images are typically displayed in a two-dimensional (2D) format, which oversimplifies three-dimensional (3D) nasal anatomy and requires the surgeon to divert attention away from the operative field. Augmented reality (AR) technology may address these limitations by projecting patient-specific 3D holographic images into the surgeon’s field of view, providing real-time spatial visualization. This article describes a protocol for integrating AR into the cosmetic rhinoplasty workflow using a 3D facial imaging system and a head-mounted mixed-reality display. Preoperative 3D facial images are acquired, collaboratively morphed with the patient to represent the desired surgical outcome, exported as holographic models, and displayed intraoperatively for visual comparison with the surgical field. The protocol was successfully incorporated into the surgical workflow, allowing surgeons to manipulate holographic models in real space during preoperative planning and intraoperative assessment. This protocol provides a reproducible workflow for incorporating AR into cosmetic rhinoplasty and may enhance intraoperative visualization, support surgical decision-making, and facilitate comparison between preoperative planning and intraoperative anatomy.
Introduction
Preoperative shared decision-making with patients is a key component of cosmetic rhinoplasty and involves simulating potential cosmetic outcomes while understanding patient goals for the procedure. Photo simulation assists both patients and surgeons in visualizing the desired surgical outcome while communicating what is realistically achievable. Morphed images are often referenced intraoperatively; however, these reference images are typically presented in a two-dimensional (2D) format, either printed on paper or displayed on a computer screen. These 2D formats not only oversimplify the complex three-dimensional (3D) anatomy of the nose but also require the surgeon to divert attention away from the operative field1,2.
Augmented reality (AR) technology may address these limitations by projecting rendered 3D holographic images directly into the surgeon’s field of view, providing real-time spatial visualization. AR combines computer-generated images with the real-world environment and has been applied in facial plastic surgery for facial trauma reconstruction3,4, craniofacial surgery5, and microtia reconstruction6 to improve intraoperative visualization and facilitate surgical workflow. However, the application of AR in cosmetic rhinoplasty remains limited. Recent studies describing emerging applications of AR and mixed-reality technologies in facial surgery and rhinoplasty include case reports and small case series7,8,9,10.
In a previous study, we successfully completed two AR-guided rhinoplasties on cadaver specimens using a mixed-reality head-mounted display (Microsoft HoloLens 2; Microsoft Corporation, Redmond, WA, USA). This was followed by a proof-of-concept AR-guided cosmetic rhinoplasty feasibility study involving six patients9. In the present protocol, we employ a head-mounted mixed-reality display (Apple Vision Pro; Apple Inc., Cupertino, CA, USA) as the visualization platform for intraoperative holographic guidance. Subsequent references to this device are described as the head-mounted display (HMD). We herein present a protocol for integrating AR into the cosmetic rhinoplasty workflow to enhance intraoperative visualization and facilitate comparison between preoperative planning and intraoperative anatomy. This AR system serves as a visual reference rather than an AR guidance system with automatic registration. The technology described in this protocol can be used for both surgical planning and intraoperative visualization. 3D holographic images can be manually repositioned intraoperatively, enabling user-directed customization of the AR experience.
Protocol
This protocol was performed at Vanderbilt University Medical Center in accordance with the guidelines of the Vanderbilt University Medical Center Institutional Review Board (IRB approval #241657). All participants provided written informed consent prior to participation, including consent for the intraoperative use of AR technology to facilitate projection of preoperative and morphed 3D holographic images. All patient data were de-identified. Patients underwent standard preoperative evaluation and photography using a 3D facial imaging system with photorealistic rendering capabilities. Inclusion criteria included patients aged 18 years or older undergoing cosmetic rhinoplasty.
1. 3D Photo Capture
- Set up and calibrate the 3D facial imaging system according to the manufacturer’s instructions.
- Open the image acquisition software on the associated workstation.
- Create a new patient record and enter the required patient identifiers.
- Select the facial capture mode to open a new 3D image acquisition page.
- Position the patient facing the camera while seated upright with the head aligned to the Frankfurt horizontal plane (Figure 1).
- Align the patient’s eyes as closely as possible within the green reference lines displayed in all three camera views (Figure 2).
- Capture the 3D facial image.
- Verify that the acquired image is automatically loaded into the rendering environment (Figure 3).
- Save the image and rename the file to distinguish it from the subsequently created morphed image.
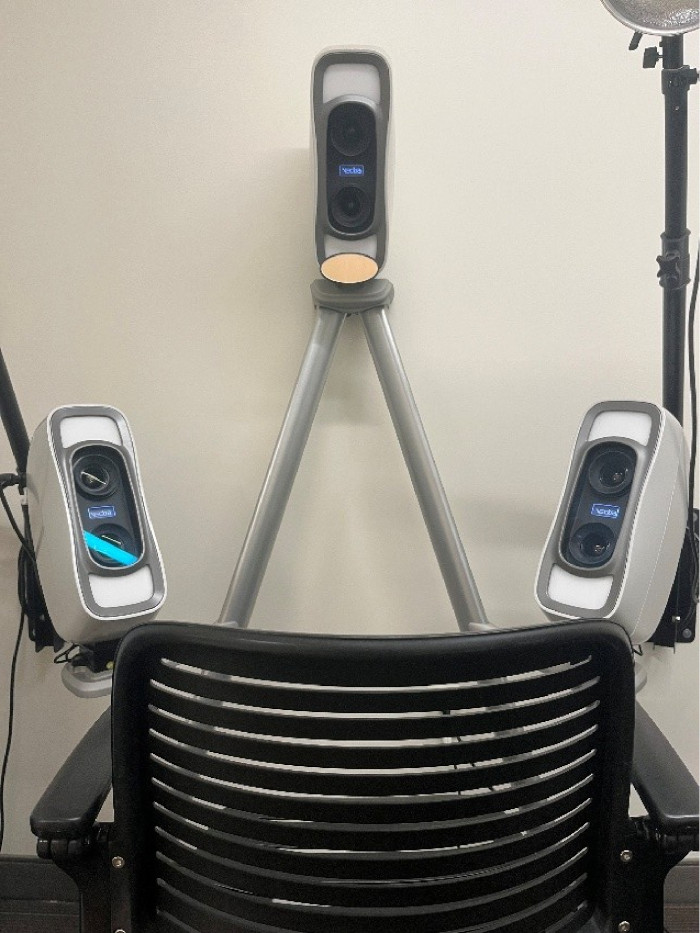
Figure 1: Three-dimensional facial imaging system setup. The three-dimensional facial imaging system used for preoperative image acquisition. The patient should be seated upright and positioned facing the camera system with the head aligned to the Frankfurt horizontal plane before image capture. Please click here to view a larger version of this figure.
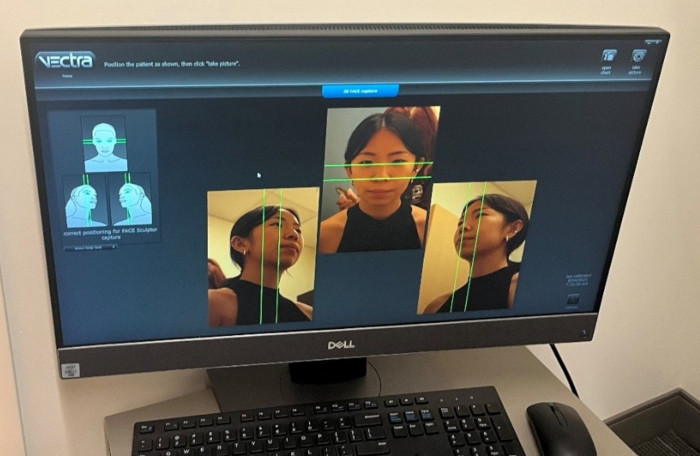
Figure 2: Patient alignment during three-dimensional image acquisition. Representative alignment interface demonstrating correct patient positioning before image capture. The patient’s eyes should be aligned within the reference guides in all camera views to ensure standardized three-dimensional facial image acquisition. Please click here to view a larger version of this figure.
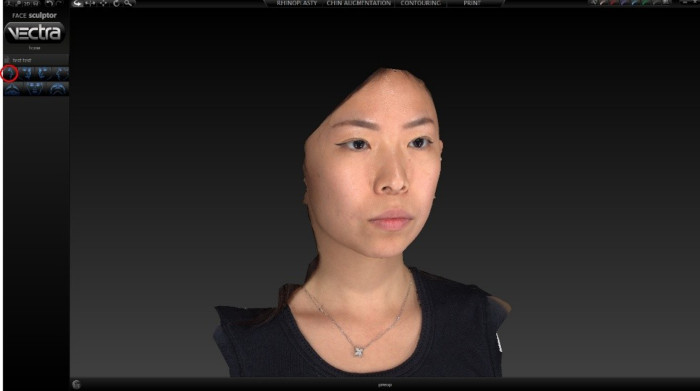
Figure 3: Three-dimensional facial rendering and morphing interface. Representative three-dimensional facial rendering environment used for preoperative image modification. The red circle indicates the rhinoplasty morphing tool used to simulate the desired cosmetic outcome before exporting the three-dimensional model for hologram generation. Please click here to view a larger version of this figure.
2. Morphing the Image
- Select the rhinoplasty morphing tool within the rendering environment (Figure 3).
- Morph the image in consultation with the patient to represent the desired cosmetic outcome.
- Save the modified image as a new file with a unique name.
NOTE: The facial morphing software is intended for surgical planning, and the resulting models can subsequently be used for experimental 3D intraoperative visualization.
3. 3D Image Export and File Conversion
- Image Export
- Select the baseline preoperative image on the patient home page.
- Select the Export icon in the upper left corner to open the image in the 3D analysis environment.
- Select File, followed by Export from the drop-down menu.
- Export the preoperative 3D image as an .obj file.
NOTE: Exporting the image automatically generates one corresponding .mtl file and three .jpg files (one from each camera view), which are saved to the selected export location. - Repeat the export procedure for the morphed cosmetic goal image.
NOTE: Each patient should have a total of 10 exported files: five files for the preoperative model (one .obj, one .mtl, and three .jpg files) and five files for the morphed cosmetic goal model. Save all files in a folder containing the patient’s unique identifiers. - Convert each exported 3D model to .glb format before uploading it to the online hologram management platform.
NOTE: The final .glb file should be between 2 MB and 10 MB. Equivalent file conversion software or newer software versions that produce the same output may also be used.
- Conversion to .glb Format and File Size Reduction
- Import the .obj file into a computer-aided design (CAD) software project.
- Export the model as a new .obj file into the same folder containing the associated .mtl file and three .jpg files.
- Import the exported .obj file into an open-source 3D modeling software project using the legacy .obj import option.
- Select the imported object and export it as a .glb file.
- During export, enable Selected Objects under Include.
- Enable Apply Modifiers and disable Shape Keys and Animation under Mesh before exporting.
- Leave all other export settings at their default values.
NOTE: If the exported file exceeds 11 MB, it may not load properly. - If necessary, apply the Decimate modifier within the 3D modeling software to reduce the file size.
- Adjust the decimation ratio between 0.05 and 0.2 to reduce the file size.
NOTE: In our experience, this range did not noticeably affect model fidelity. A higher ratio may be used if necessary.
CAUTION: Do not enable compression during export, as compressed models may fail to load correctly within the HMD. - After export, verify the final file size by right-clicking the file, selecting Properties, and confirming that the file size is between 2 MB and 10 MB before uploading.
- Uploading Images to the Online Hologram Management Platform
- Log into the online hologram management platform.
- Select the Add icon, followed by New Patient, to create a new scan.
- Enter the patient identification using the date of the scan (for example, YYYY-MM-DD_RHINOPLASTY).
- Select the patient’s sex.
- Create a new case, assign a title to the case, and upload the corresponding hologram files.
- Confirm the upload by selecting the checkbox next to the uploaded files.
NOTE: A randomized patient name is automatically generated and associated with the uploaded scan.
4. Using the Head-Mounted Display (HMD)
NOTE: Become familiar with the HMD before use in the operating room. Test the HMD with both the surgeon and assistant before the procedure to minimize interruptions during surgery.
- Opening Holograms within the HMD
- Open the hologram viewing application after the holographic models have been installed on the HMD.
- Log into the application and open the appropriate patient folder identified by the randomized patient name.
- Select the preoperative hologram file once.
CAUTION: Do not select the file multiple times, as this may prevent the model from loading. - Wait until the loading indicator completes and the file indicator changes to blue.
- Verify that the hologram of the preoperative 3D image appears within the field of view, typically to the right.
NOTE: If the file indicator changes to blue but the hologram is not immediately visible, search the surrounding space until the model is located. - Repeat the procedure to load the hologram of the morphed cosmetic goal image.
- Verify the orientation and scale fidelity of both holograms before intraoperative use.
NOTE: If a model fails to appear despite successful loading, re-upload the model without compression. Repeat the file conversion step using only mesh decimation to achieve the recommended file size. If the hologram viewing application requires re-authentication, complete the login procedure using the authentication code displayed within the HMD. Assistance from another individual may facilitate this process while the HMD is being worn. Re-authentication is generally required only during the initial setup, provided the user remains logged in throughout the procedure.
- Manipulating the Holograms
- Pinch the thumb and index finger together to manually resize, reposition, and rotate the holograms until they are placed in the desired location relative to the operative field.
- Use two-handed manipulation, when necessary, to facilitate repositioning.
- Verify that the holograms remain fixed in orientation, scale, and location within the visual field after positioning.
NOTE: The holograms remain fixed unless manually adjusted, allowing the user to customize the augmented reality environment as desired.
- Case Preparation
- Before surgery, load the holograms into the hologram viewing application.
- Open and position the preoperative and morphed cosmetic goal holograms within the AR)
- environment.
- Verify hologram manipulation, resizing, and overall system functionality before the start of the procedure.
- Leave the holograms open so they are immediately available when the HMD is worn during surgery.
- Calibrate the HMD to the surgeon’s eyes before the procedure.
NOTE: Perform HMD calibration before each procedure. During surgery, an assistant may facilitate donning and doffing of the HMD if the surgeon wishes to remain scrubbed while reviewing the holograms.
- Intraoperative Use of the HMD
- At the beginning of the procedure, wear the HMD to review the preoperative and morphed holograms during surgical planning.
- Use the HMD during cosmetic modification of the nose as needed.
- After closure of all incisions, wear the HMD again to compare the patient’s nose with the morphed cosmetic goal (Figure 4).
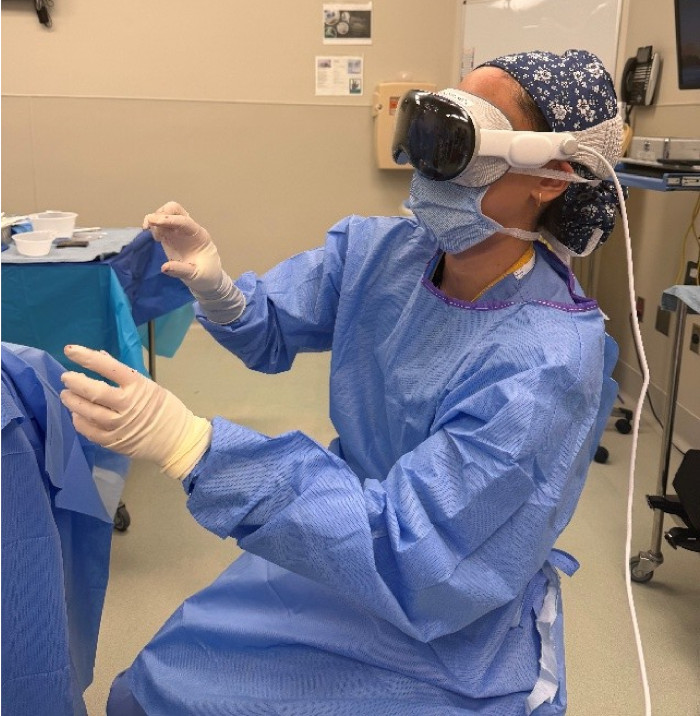
Figure 4: Intraoperative use of the head-mounted display. Representative intraoperative use of the head-mounted display for visualization of patient-specific holographic models during cosmetic rhinoplasty. The surgeon reviews the holographic models for comparison with the operative field during surgical planning and intraoperative assessment. Please click here to view a larger version of this figure.
Results
The AR protocol was successfully integrated into the cosmetic rhinoplasty workflow. Representative stages of the workflow are illustrated in Figure 1, Figure 2, Figure 3, Figure 4. The 3D facial imaging system was used to acquire standardized preoperative facial images (Figure 1), with patient positioning guided by the alignment interface to ensure consistent image acquisition (Figure 2). The acquired images were subsequently imported into the rendering environment, where preoperative facial models were modified to simulate the planned cosmetic outcome before export for hologram generation (Figure 3).
Following image processing, the unmorphed and morphed 3D facial models were displayed using an HMD through a hologram viewing application. During surgery, the holographic models could be manually repositioned, resized, and rotated to facilitate real-time visual comparison with the patient’s nose, either as a direct overlay or as an adjacent visual reference (Figure 4).
The HMD was successfully incorporated into the authors’ surgical workflow with minimal training. Surgeons reported improved display resolution and interface responsiveness compared with the previously used visualization system. Preliminary surgeon survey responses indicated that the system was useful for intraoperative assessment of surgical progress and comparison with the planned cosmetic outcome9.
Overall, this protocol demonstrates a reproducible workflow for integrating AR into cosmetic rhinoplasty to facilitate intraoperative visualization and comparison between preoperative planning and the operative field. These observations support the feasibility of incorporating a HMD-based visualization system into the cosmetic rhinoplasty workflow. The present study describes a technical protocol and feasibility workflow rather than a clinical efficacy evaluation; however, investigation of objective outcome measures associated with this workflow is currently underway.
This manuscript describes a protocol for integrating AR into the cosmetic rhinoplasty workflow. Data supporting the feasibility of the described workflow are available at: https://doi.org/10.1177/26893614261430605.
Discussion
A previous study demonstrated the feasibility of using AR during cosmetic rhinoplasty and found that AR technology was easy to integrate, required minimal additional operative time, and reduced surgeon cognitive load9. AR has also been reported to enhance anatomical understanding11 and reduce operative time12 in surgical applications. In rhinoplasty, AR studies have emphasized the technology’s potential to aid preoperative planning, enhance surgical precision, and improve patient satisfaction7,8,9,10. The present protocol expands on prior research by describing an alternative HMD-based workflow that can be incorporated into cosmetic rhinoplasty to support intraoperative visualization.
This protocol proposes the use of patient-specific 3D preoperative and morphed cosmetic goal images as intraoperative holographic visual references. Current AR technology can supplement traditional 2D reference images by providing additional 3D perspectives that may aid intraoperative surgical decision-making. This approach may be useful in facial plastic and reconstructive surgery, where spatial understanding of patient-specific anatomy is important during cosmetic and reconstructive procedures.
Several limitations should be noted. The main user limitation is that intraoperative HMD use requires additional personnel if the surgeon wishes to remain sterile or scrubbed during the procedure. An assistant must remain in the operating suite or nearby to assist with donning and doffing the HMD. Additionally, this specific HMD is heavier than other devices, and the external corded power supply requires the surgeon to wear scrubs with pockets or have an assistant hold the battery pack during HMD use. The material cost of AR equipment is also high. Pricing for the latest model of the HMD used in this protocol starts at $3699 USD13, while the 3D image capture system costs approximately $25,000.
Additional limitations relate to intraoperative interpretation of the holographic reference images. The holograms are manually resized, repositioned, and rotated by the surgeon, and the current protocol does not describe automated registration, tracking, surface matching, landmark-based alignment, or patient-specific anchoring. However, these features may not be necessary for the aims of cosmetic rhinoplasty. Technically, the current system functions as a wearable 3D reference display rather than an AR system with automated registration. Manual manipulation allows the surgeon to directly overlay or position the holograms adjacent to the patient’s nose as a modifiable visual reference. Tracked or anchored positioning of holograms may be disadvantageous by either obscuring the operative field as a fixed overlay or preventing direct comparison when fixed adjacent to the operative field. Intraoperative edema, soft-tissue deformation, incision, tissue manipulation, traction, surgical exposure, and progressive swelling may also affect comparison between the patient’s intraoperative anatomy and the preoperative or morphed holographic models. While these factors may alter interpretation of the holographic reference images, they are also present when using traditional 2D reference images. Experienced surgeons should be able to recognize and account for these variables regardless of the reference image dimensionality. Other approaches to studying this workflow may include comparison with traditional 2D reference images, use of alternative HMDs, evaluation of registered overlay systems, assessment of patient-specific anchoring methods, or quantitative comparison of planned and postoperative aesthetic outcomes. This manuscript presents a technical feasibility protocol, and quantitative validation is currently ongoing. While 3D holographic images can augment intraoperative visualization of cosmetic goals in rhinoplasty, similar to traditional images, they are intended solely as reference material. Surgical decision-making ultimately remains at the surgeon’s discretion. Users of this protocol should maintain sterility and prioritize patient safety. When used appropriately, the system should pose minimal risk to the surgical field and the patient. Given the experimental nature of this protocol, each patient should be counseled regarding the risks and benefits of the technology, and informed consent should be obtained before intraoperative HMD use.
While further research is needed to validate these findings, AR technology may have potential applications in facial plastic and reconstructive surgery by improving access to patient-specific 3D reference images during cosmetic rhinoplasty. Increased adoption of AR technology may identify additional applications in facial plastic and reconstructive surgery. Future multi-institutional studies evaluating objective outcomes such as operative time, accuracy, aesthetic results, patient safety, and workflow efficiency are necessary to further validate this approach.
Disclosures
The authors declare no disclosures.
Acknowledgements
This work was supported by the National Institutes of Health (NIH), National Institute on Deafness and Other Communication Disorders (R25DC020728), and the National Cancer Institute (NCI) K08 Career Development Award (5K08CA293255-02). The authors would like to acknowledge Shreeya Bahethi for her contributions to video production.
Materials
| Name | Company | Catalog Number | Comments |
|---|---|---|---|
| 3D analysis module | Canfield Scientific Inc. | N/A | VECTRA 3D Analysis Module software used for exporting three-dimensional image files. RRID: N/A |
| 3D capture module | Canfield Scientific Inc. | N/A | VECTRA Capture Module software used for acquisition of three-dimensional facial images. RRID: N/A |
| 3D facial imaging system | Canfield Scientific Inc. | N/A | VECTRA M3 three-dimensional imaging system used for facial image acquisition. RRID: N/A |
| Computer workstation | Dell Inc. | W31C003 | Workstation used with the three-dimensional facial imaging system. Minimum requirements: Windows 11 (64-bit), Intel Core i7 or higher, ≥16 GB RAM, compatible NVIDIA graphics card with ≥4 GB graphics memory, and two USB 2.0 ports. Configured and supplied by Canfield Scientific Inc. |
| Computer-aided design software | Autodesk Inc. | N/A | Meshmixer software used for repair of three-dimensional model files before conversion. RRID: SCR_015736 |
| Computer-aided design software (legacy) | Microsoft Corporation | N/A | Microsoft 3D Builder software used for repair of three-dimensional model files (deprecated; optional alternative). |
| Facial morphing software | Canfield Scientific Inc. | N/A | Face Sculptor software used to generate the desired cosmetic simulation for surgical planning. RRID: N/A |
| Head-mounted display | Apple Inc. | N/A | Apple Vision Pro (M2) mixed-reality headset used for intraoperative visualization. RRID: N/A |
| Hologram management platform | ApoQlar Medical | N/A | HoloMedicine Online Preview application used for uploading and managing holographic models before visualization. RRID: N/A |
| Hologram viewing application | ApoQlar Medical | N/A | VSI HoloMedicine Preview application used to visualize holographic models within the head-mounted display. RRID: N/A |
| Open-source three-dimensional modeling software | Blender Development Team | Version 4.4 | Blender software used for conversion of three-dimensional models to .glb format and mesh decimation. RRID: SCR_008606 |
References
- Kim CH, Most SP. Photography and photodocumentation for the rhinoplasty patient. Clin Plast Surg. 2022;49(1):13-22.
- Weissler JM, et al. The evolution of photography and three-dimensional imaging in plastic surgery. Plast Reconstr Surg. 2017;139(3):761.
- Yao J, et al. Augmented reality technology could be an alternative method to treat craniomaxillofacial foreign bodies: A comparative study between augmented reality technology and navigation technology. J Oral Maxillofac Surg. 2020;78(4):578-587.
- Chen G, et al. The preliminary application of augmented reality in unilateral orbitozygomatic maxillary complex fractures treatment. J Craniofac Surg. 2020;31(2):542-548.
- Liu K, et al. Augmented reality navigation method for recontouring surgery of craniofacial fibrous dysplasia. Sci Rep. 2021;11(1):10043.
- Nuri T, Mitsuno D, Otsuki Y, Ueda K. Augmented reality technology for the positioning of the auricle in the treatment of microtia. Plast Reconstr Surg Glob Open. 2020;8(2):e2626.
- Autelitano M, et al. Augmented reality for rhinoplasty: 3D scanning and projected AR for intraoperative planning validation. Healthc Technol Lett. 2025;12(1):e12116. doi:10.1049/htl2.12116.
- Heydari MS, Kolivand M, Al-Azzawi M, Kolivand H. Intelligent augmented reality application for personalised rhinoplasty using machine learning. Intell Robot. 2025;5(2):355-377. doi:10.20517/ir.2025.18.
- Barna AJ, et al. Use of augmented reality technology in cosmetic rhinoplasty: A feasibility study. Facial Plast Surg Aesthet Med. 2026. doi:10.1177/26893614261430605.
- Huang C, et al. The combined application of augmented reality and guide template technology in the treatment of nasal deformities. J Craniofac Surg. 2021;32(7):2431-2434. doi:10.1097/SCS.0000000000007522.
- Rose AS, Kim H, Fuchs H, Frahm JM. Development of augmented reality applications in otolaryngology-head and neck surgery. Laryngoscope. 2019;129(S3):S1-S11.
- Pérez-Pachón L, et al. Image overlay surgery based on augmented reality: A systematic review. Adv Exp Med Biol. 2020;8:175-195.
- Apple Inc. Buy Apple Vision Pro. Apple. Available at: https://www.apple.com/apple-vision-pro/. Accessed July 18, 2026.
Reprints and Permissions
This article has been published
Video Coming Soon