The goal of this presented protocol is to share optimized surgical experience for establishing a non-arterialized rat liver transplantation model, specifically focusing on technical refinements that ensure long-term animal survival beyond 100 days.
Method Article
Sharing Experience on Long-Term Survival in A Non-Arterialized Rat Liver Transplantation Model
Opens in a new tab
In This Article
Summary
Loading...
$$\rightleftharpoonup{xx}$$
$$\longleftharp{xx}$$,
$$\longrightharp{xx}$$,
Abstract
Loading...
$$\rightleftharpoonup{xx}$$
$$\longleftharp{xx}$$,
$$\longrightharp{xx}$$,
In experimental liver transplantation, the rat model is the gold standard for investigating transplant immunology and metabolic processes; however, reconstructing the exceedingly fine hepatic artery (~0.5 mm) presents a formidable technical challenge. To circumvent this, the simplified non-arterialized rat liver transplantation (NArLT) model is widely utilized. Unfortunately, severe biliary complications—such as bile leakage and ischemic cholangitis—arising from arterial deprivation frequently restrict the long-term survival of recipients. This obstacle significantly limits research on key topics, including long-term host-graft immunocompatibility and chronic rejection. Herein, we present an optimized protocol for the NArLT model that incorporates critical technical refinements to successfully overcome these ischemic biliary injuries. Key improvements include a significantly shortened anhepatic phase, a “no-touch” biliary dissection technique, thorough biliary tract flushing, and an optimized internal biliary stenting method. After implementing this improved procedure, the recipient survival rate exceeded 94% during the 100-day observation period. Ultimately, this optimized protocol provides a highly reproducible and robust platform to investigate the mechanisms underlying long-term transplant tolerance, thereby supporting the development of novel therapeutic strategies in transplantation medicine.
Introduction
Loading...
$$\rightleftharpoonup{xx}$$
$$\longleftharp{xx}$$,
$$\longrightharp{xx}$$,
The rat liver transplantation model serves as the most widely utilized experimental platform for basic transplant research. However, its broader application is frequently hindered by a notoriously steep learning curve, which can significantly impede the progress of downstream experimental studies1,2. Furthermore, conventional rat liver transplantation models often suffer from suboptimal surgical success and low long-term survival rates. By critically streamlining the surgical procedures, meticulously refining operative details, and performing vascular and biliary reconstructions under direct visualization, the learning curve associated with this complex microsurgical model can be substantially abbreviated3,4. Liver transplantation remains the sole curative therapy for end-stage liver disease, making the establishment of rat liver transplantation models profoundly significant for scientific research5,6.
The non-arterialized rat liver transplantation (NArLT) model offers significant advantages in experimental surgery: it circumvents the formidable challenge of microvascular arterial anastomosis, shortens the overall surgical time, and reduces the duration of anesthesia for the rats. Despite the deprivation of arterial blood supply, the resulting biliary response in this model offers a unique perspective for investigating ischemic biliary injuries. However, conventional NArLT models are associated with a high postoperative biliary complication rate of up to 30%7, which severely compromises long-term survival. In the traditional classic rat liver transplant model, the long-term survival rate of the recipient is less than 70%–85%8. To address this, this study introduces an optimized protocol utilizing a heparin-treated soft biliary stent. By employing a “no-touch” biliary dissection technique to maximize the preservation of the peribiliary microvascular network, alongside thorough biliary flushing via cold perfusion, this approach aims to fundamentally mitigate biliary complications through physical support and ischemic protection9, ultimately providing a robust and stable platform for long-term immunological monitoring.
Therefore, maximizing procedural success rates and prolonging recipient survival stand as the primary objectives of any technical innovation in rat liver transplantation. Achieving these goals is a critical prerequisite for ensuring the timely and uninterrupted progression of downstream experimental research10.
Access restricted. Please log in or start a trial to view this content.
Protocol
Loading...
$$\rightleftharpoonup{xx}$$
$$\longleftharp{xx}$$,
$$\longrightharp{xx}$$,
All animal experiments and surgeries in this study were approved by the Experimental Animal Ethics Committee of Qingdao University (No. 20260301SD5020260401065). Make all efforts to minimize animal suffering.
1. Preoperative Preparation
- Experimental animals
- Use adult male Sprague–Dawley (SD) rats, aged 8–10 weeks and weighing 220–250 g, as donors. Ensure that the recipient’s weight is slightly greater than the donor’s, with the difference within 50 g.
- House rats under specific pathogen-free conditions at a controlled temperature of 22°C ± 2°C and relative humidity of 50% ± 10%.
- Maintain a 12-h light/dark cycle with a cage density of 2–3 rats per cage.
- Provide a standard laboratory rodent diet. Allow rats to acclimatize to the laboratory environment for at least 1 week prior to surgical intervention.
- Fast animals for 12 h prior to surgery. Allow ad libitum access to water.
NOTE: Fasting prior to surgery helps minimize the risk of aspiration during anesthesia and prevents gastric dilation that may compromise respiratory function and obstruct the surgical exposure.
- Surgical instruments and materials
- Use the instruments required for transplant surgery as shown in Figure 1. List the details of the consumables used in the surgery in the Table of Materials.
- Select 5F and 6F epidural catheter sheaths by matching the external diameter of the catheters to the physiological internal diameters of the target vessels in male SD rats weighing 220–250 g.
- Use a 5F sheath (approximately 1.67 mm) for the portal vein (PV). Use a 6F sheath (approximately 2.00 mm) for the infrahepatic inferior vena cava (IHIVC).
NOTE: Select catheter size based on a combination of anatomical standards and intraoperative visual estimation under a surgical microscope. Perform real-time comparison between the external diameter of the catheter and the internal lumen of the target vessel. An appropriate match is achieved when the catheter occupies approximately 70%–80% of the vessel lumen, allowing smooth insertion without overstretching the vessel wall or leaving excessive slack. For SD rats within the specified weight range, predefined anatomical vessel diameters can be used for initial size selection, which should be adjusted intraoperatively based on individual variation. Operators should establish this vessel-to-catheter matching through prior microsurgical training. - For SD rats aged 8–10 weeks, select 5F and 6F epidural catheter sheaths as cuffs for the PV and IHIVC, respectively (Figure 2A).
- Prepare cuffs with a total functional length (tubular body) of 2.0–2.5 mm. Maintain an extension length of 3.0–4.0 mm for handling with forceps.
- Clamp the cuff wall with the jaws of mosquito forceps to create a circumferential groove located approximately 0.5–1.0 mm from the proximal edge of the cuff (see Figure 2A for details). Maintain a groove depth of approximately 0.1–0.2 mm to facilitate secure knot tying and subsequent fixation.
- Ensure that the groove prevents the 7-0 securing ligature from slipping off the rigid catheter surface.
- Trim a 22G intravenous catheter to create a biliary stent with inclined or beveled ends. Ensure a length of 5–7 mm.
- Prefer a stent length of 7 mm. Adjust the length based on anatomical variation using the horizontal level of the right gastric vein as a landmark. Estimate the distance from this landmark to the hepatic hilum to guide stent length selection.
- Shorten the stent (to approximately 5–6 mm) if the estimated distance is limited or if resistance is encountered during insertion. Ensure that approximately 2–3 mm of the stent can be inserted into the bile duct without bending, kinking, or protrusion.
- Soak the stent in heparinized saline (100 IU/mL) at room temperature (23°C ± 2°C). Maintain the stent immersed for a minimum of 30 min prior to use to prevent intraluminal bile coagulation upon insertion into the donor’s biliary lumen (Figure 2A).
NOTE: Prepare the cuff before surgery and use mosquito forceps to create grooves in the cuff wall to facilitate knotting and fixation after successful cannulation. Ensure that the ends of the trimmed biliary stent are not excessively sharp to prevent bile duct perforation. Under a surgical microscope (10×–16× magnification), confirm that the cut edge is clean and free of jagged plastic burrs; if the tip appears needle-like, slightly blunt it using micro-scissors. During manipulation, use only fine, non-toothed micro-forceps to handle the stent. Avoid applying excessive external force, as indicated by any flattening, ovalization, or kinking of the stent lumen; discard and replace any deformed stent, as luminal narrowing increases the risk of postoperative biliary complications.
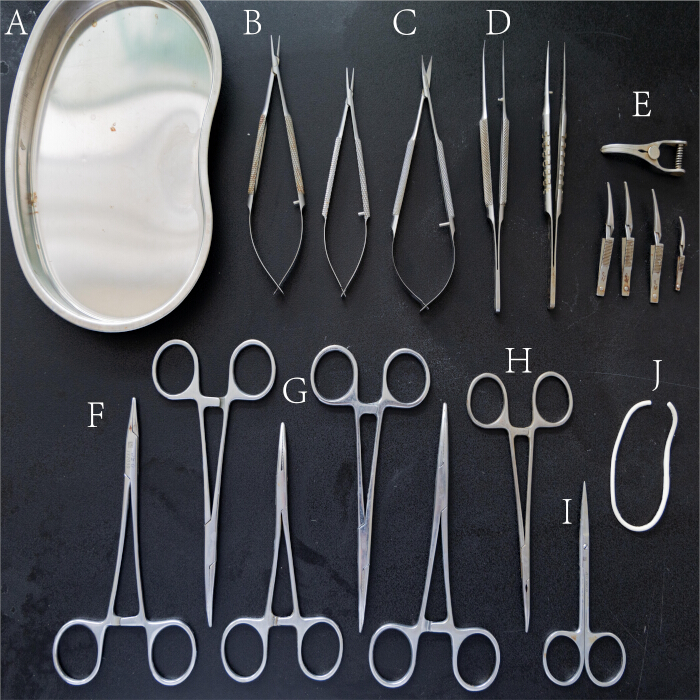
Figure 1. Surgical instruments used in the transplant procedure. (A) Stainless steel kidney basin. (B) Micro-needle holders. (C) Micro-scissors. (D) Micro-forceps (straight and curved). (E) Microvascular clips and small mosquito-style bulldog clamps. (F) Standard needle holder. (G) Straight hemostatic forceps (mosquito forceps). (H) Vascular clamp. (I) Standard surgical scissors. (J) Rubber band (fashioned from the cuff of a sterile surgical glove). Please click here to view a larger version of this figure.
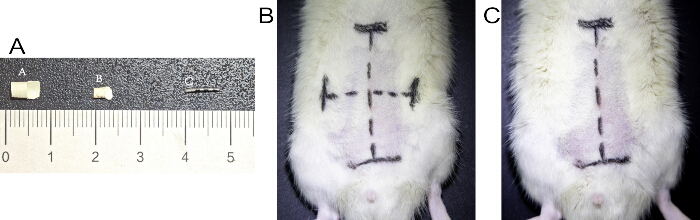
Figure 2. Custom-made surgical cuffs, biliary stent, and planned abdominal incisions. (A) Preparation of vascular cuffs and the biliary stent alongside a millimeter ruler. From left to right: a 6F epidural catheter sheath used for the infrahepatic inferior vena cava (IHIVC) cuff, a 5F sheath used for the portal vein (PV) cuff, and a 5–7 mm biliary stent trimmed from a 22G intravenous catheter. (B) A cruciate incision marked on the donor rat abdomen to maximize surgical exposure. (C) A standard midline laparotomy incision marked on the recipient rat abdomen. Please click here to view a larger version of this figure.
2. Donor Operation
- Initial steps
- Anesthetize the donor rat using 5% isoflurane at an airflow rate of 1 L/min in the induction chamber. Assess anesthesia depth by confirming the absence of spontaneous limb movement and withdrawal reflex.
NOTE: The depth of anesthesia is assessed by observing the absence of spontaneous limb movement, the lack of a withdrawal reflex, and the respiratory rate. To ensure the smooth and safe progress of the surgery, these parameters are strictly reassessed at 20-min intervals throughout the entire procedure. - Administer 1% pentobarbital (40–45 mg/kg) via intraperitoneal injection at the right lower abdomen, approximately 1–2 cm lateral to the midline (linea alba) and 1–2 cm cranial to the right inguinal ligament. Confirm adequate anesthesia by pinching the hind paw and ensuring there is no withdrawal reflex.
- Position the donor rat in the supine position on a 37°C heating pad to maintain body temperature intraoperatively.
- Shave the abdominal surgical area. Disinfect the area with povidone-iodine three times.
- Anesthetize the donor rat using 5% isoflurane at an airflow rate of 1 L/min in the induction chamber. Assess anesthesia depth by confirming the absence of spontaneous limb movement and withdrawal reflex.
- Procedures before liver perfusion
- Make a cruciate incision extending up to the xiphoid process, down to the pubic symphysis, and laterally to the axillary midline to maximize exposure of the surgical field (Figure 2B).
NOTE: Perform the laparotomy in two layers. First incise the skin and subcutaneous tissue. Then tent the linea alba with forceps and make a small initial incision to allow air entry, causing the viscera to fall away. Extend the incision with scissors while keeping the lower blade parallel to the abdominal wall to prevent organ injury. - Wrap the intestines with saline-soaked gauze. Place them on the sterile operation field on the left side of the abdomen to expose the operative area.
NOTE: It is imperative to maintain continuous moisture of the eviscerated intestines throughout the entire procedure to prevent ischemic desiccation and hypothermia. Periodically rehydrate the covering gauze by applying drops of warm (37°C) normal saline approximately every 10–15 min, or immediately whenever the gauze begins to dry under the surgical illumination. - Divide the falciform ligament. Clamp and retract the xiphoid process cranially to expose the suprahepatic IVC (SHIVC) and the left inferior phrenic vein.
- Divide the left triangular ligament. Ligate the left phrenic vein close to the SHIVC using a 7-0 or 8-0 suture (Figure 3A).
NOTE: When ligating the left inferior phrenic vein, position the ligation close to the SHIVC. Be aware that the suture needle can easily puncture the diaphragm and cause pneumothorax; suture close to the blood vessel. - Electrocautery is recommended for vessel division to achieve rapid hemostasis and reduce operative time, thereby improving procedural consistency and reproducibility.
NOTE: Electrocautery standardizes hemostasis, reduces operative time, and improves reproducibility across operators. - Mobilize the caudate and papillary lobes (Figure 3B).
- Use microscopic forceps to remove fat and connective tissue from the surface of the IHIVC.
NOTE: Remove connective tissue until the vessel wall appears smooth and translucent. Adequate exposure is achieved when vascular clamps can be applied without interference and no residual tissue remains that could compromise cuffing or suturing. - Ligate the right adrenal vein flush with the IHIVC. Isolate the right renal vein and ligate it flush with the IHIVC.
- Continue dissecting the IHIVC caudally to a level just above the left renal vein (Figure 3C).
NOTE: Ensure the IHIVC is thoroughly skeletonized (separate blood vessels as completely as possible from fatty connective tissue) during dissection. This facilitates subsequent liver explantation and cuff attachment procedures. - Gently elevate the liver using a cotton swab. Dissect the ligamentous attachments between the right inferior hepatic lobe and the retroperitoneum.
NOTE: Identify the SHIVC as a short, wide, thin-walled bluish vessel at the superior liver pole. Stop dissection once its anterior surface is cleared and the adjacent diaphragmatic fibers become visible. - Halt dissection upon reaching the SHIVC.
NOTE: Handle the liver with extreme care to prevent parenchymal injury. Exercise caution to protect the IVC during cranial retroperitoneal dissection. - Dissect the connective tissue between the PV and the proper HA. Isolate the PV.
- Ligate the right gastric vein (pyloric vein) flush with the PV. Continue dissection to the root of the splenic vein.
- Expose the porta hepatis. Identify the cord-like fatty connective tissue located to the left of the PV, encapsulating the common bile duct (CBD) and the HA.
- Make a “V”-shaped incision on the anterior wall of the CBD, 3–5 mm distal to the hepatic duct bifurcation.
- Use microforceps to hold the biliary stent. Insert the stent approximately 3 mm into the biliary tract while maintaining parallel alignment with the duct.
NOTE: Advance the stent smoothly without resistance. Ensure no lateral bulging, angulation, or duct wall tenting. If resistance or deformation occurs, withdraw and realign before reinsertion. - Secure the stent with a circumferential 7-0 silk tie. Ligate the HA at the level of the incision and transect it proximally (Figure 3D).
NOTE: Strictly avoid excessive “skeletonization” when dissecting the donor CBD. Preserve the peribiliary connective tissue, nerve plexuses, and microvascular networks to promote early collateral circulation and postoperative biliary healing. Because the distal end of the donor duct is the most ischemic region, keep the anastomotic site close to the hepatic hilum to minimize ischemic burden.
- Make a cruciate incision extending up to the xiphoid process, down to the pubic symphysis, and laterally to the axillary midline to maximize exposure of the surgical field (Figure 2B).
- Liver perfusion
- Expose the abdominal aorta. Insert a 23-gauge (23 G) scalp vein needle (approximately 1 cm) connected to a 20 mL syringe filled with cold (4°C) University of Wisconsin (UW) solution.
NOTE: Insert the needle into the abdominal aorta at a shallow angle (15°–20°). Confirm entry by observing arterial blood flashback, then advance slightly and align the needle parallel to the vessel to prevent posterior wall perforation. - Remove air from the syringe before infusion. Clamp and fix the abdominal aorta and needle using a vascular clamp.
NOTE: Remove all air from the syringe by tapping to dislodge bubbles and expelling fluid until a continuous drop is visible at the needle tip. Confirm absence of air in the needle hub before cannulation. - Slowly initiate perfusion by manually depressing the syringe at a steady rate of 3–3.5 mL/min (Figure 3E).
NOTE: Confirm correct intravascular placement by observing blood return in the tubing. - Incise the diaphragm. Fully expose the thoracic IVC and thoracic aorta.
- Clamp the thoracic IVC at its junction with the right atrium, along with the thoracic aorta, using vascular clamps.
- Transect the thoracic IVC immediately below the clamp to allow efflux of perfusate.
NOTE: Apply the clamp as cranially as possible and transect below it to preserve vessel length. Begin perfusion immediately to prevent coagulation and preserve graft quality. - Continue perfusion at a steady rate (3–3.5 mL/min) to a total volume of approximately 40 mL.
- Halt perfusion once the liver parenchyma turns completely pale (yellowish-brown) (Figure 3F).
NOTE: Adequate perfusion is confirmed when the liver becomes uniformly pale (yellowish-brown) and the effluent from the transected IHIVC runs clear, without residual blood. - Transect the IHIVC flush with the left renal vein. Transect the PV at the level of the splenic vein.
NOTE: Avoid rapid or forceful injection of perfusate to prevent endothelial and parenchymal injury. - Enlarge the diaphragmatic incision. Harvest the liver graft en bloc with the attached diaphragm.
- Place the graft in a sterile petri dish containing cold UW preservation solution.
- Maintain the graft in cold UW solution at 4°C. Complete transplantation within 2 h of procurement.
- Expose the abdominal aorta. Insert a 23-gauge (23 G) scalp vein needle (approximately 1 cm) connected to a 20 mL syringe filled with cold (4°C) University of Wisconsin (UW) solution.
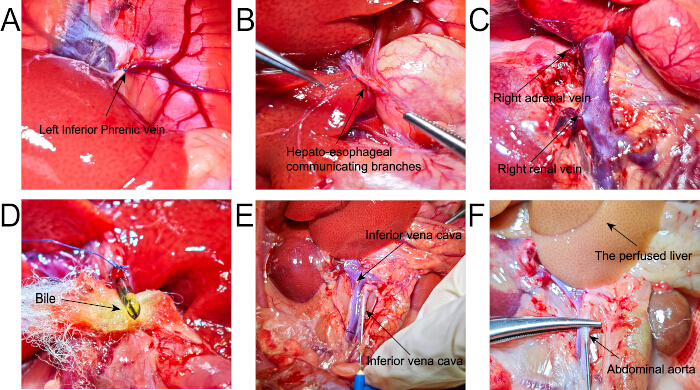
Figure 3. Key surgical steps during donor liver mobilization and in situ perfusion. (A) Exposure and ligation of the left inferior phrenic vein. (B) Isolation and division of the hepato-esophageal communicating branches. (C) Dissection of the IHIVC, demonstrating ligation of the right adrenal and right renal veins. (D) Insertion of the custom biliary stent into the common bile duct (CBD) using the “no-touch” technique to preserve peribiliary connective tissue. (E) Cannulation of the abdominal aorta to initiate cold in situ perfusion. (F) Fully perfused donor liver exhibiting a uniformly pale appearance, indicating successful blood washout. Please click here to view a larger version of this figure.
3. Ex Vivo Graft Preparation
NOTE: Perform all ex vivo graft preparation on ice (Figure 4A). Maintain the graft in UW solution at 4°C ± 2°C and monitor temperature periodically to ensure adequate cold preservation.
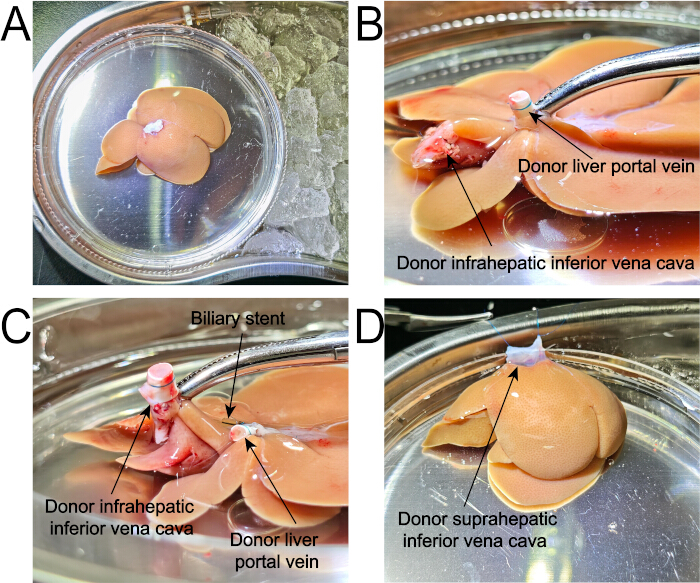
Figure 4. Ex vivo preparation of the donor liver graft. (A) The harvested liver graft placed in a sterile petri dish containing cold UW preservation solution, positioned on crushed ice to maintain hypothermia. (B) Cuffing of the donor PV by eversion over a custom cuff and fixation with a circumferential ligature. (C) Completed cuff preparation for PV and IHIVC, with the biliary stent in place. (D) Preparation of the suprahepatic IVC (SHIVC) with stay sutures placed at both lateral corners to facilitate subsequent anastomosis. Please click here to view a larger version of this figure.
- PV cuff preparation
- Grasp the tail of the PV cuff with mosquito forceps and secure it so that the tail end is directed downward, perpendicular to the bottom of the petri dish.
- Pass microforceps through the lumen of the cuff. Pull the PV through the cuff.
- Adjust the anterior wall of the PV. Evert approximately 3 mm of the vessel wall over the flared end of the cuff tail.
- Secure the everted vessel to the outer wall of the cuff using a circumferential 7-0 silk tie (Figure 4B).
NOTE: Ensure that the vessel and cuff are aligned without torsion or angulation. After fixation, flush the PV cuff with approximately 1 mL of UW solution and confirm patency by observing efflux from the SHIVC.
- IHIVC cuff preparation
- The preparation and cuffing of the IHIVC are performed using the exact identical steps as described for the PV in Step 3.1. Briefly, this includes vessel mobilization, trimming, and cuff fixation following the same standardized protocol to ensure experimental consistency and reproducibility. (Figure 4C).
NOTE: Confirm patency of the IHIVC cuff by observing unobstructed efflux from the SHIVC following flushing.
- The preparation and cuffing of the IHIVC are performed using the exact identical steps as described for the PV in Step 3.1. Briefly, this includes vessel mobilization, trimming, and cuff fixation following the same standardized protocol to ensure experimental consistency and reproducibility. (Figure 4C).
- Biliary tract flushing
- Gently flush the bile duct through the biliary stent using a 1 mL syringe containing 0.5 mL of UW solution.
- Ensure that no fluid leakage occurs during flushing.
NOTE: Absence of fluid leakage confirms integrity of the bile duct.
- SHIVC preparation
- Trim the SHIVC of the liver graft by excising the residual diaphragm.
- Ensure the SHIVC is completely skeletonized, as defined in Step 2.2.7.
- Stay suture placement
- Use 7-0 or 8-0 sutures based on operator preference.
NOTE: In terms of surgical outcomes (including anastomotic patency and recipient survival), both suture sizes are functionally equivalent in this model. The selection between the two can be based entirely on the operator's personal preference or laboratory availability without affecting the reproducibility of the procedure. - Gently flatten the SHIVC stump. Place sutures at the left and right lateral corners by passing the needle from inside to outside, approximately 1 mm from the edge (Figure 4D).
- Use 7-0 or 8-0 sutures based on operator preference.
4. Recipient Operation
- Initial steps
- Anesthetize the recipient rat using the same protocol as described for the donor (Step 2.1.1).
- Place the recipient rat on a thermostatically controlled heating pad maintained at 37°C.
- NOTE: Weigh the recipient rat prior to anesthesia. Ensure its body weight exceeds that of the donor by approximately 50 g.
- Mobilization of the recipient liver
- Perform a midline laparotomy.
- Retract the abdominal wall laterally using four elastic retractors. Position the two superior retractors lateral to the bilateral costal margins and the two inferior retractors lateral to the bilateral inguinal regions to achieve optimal exposure.
NOTE: Apply sufficient retraction to expose the operative field while avoiding excessive tension that may cause tissue blanching or impair respiration. - Ligate the left inferior phrenic vein (LIPV) in the same manner as described for the donor procedure (refer to Step 2.2.1).
- Dissect the ligaments between the left liver lobe and the retroperitoneum. Mobilize the caudate and papillary lobes.
- Divide the ligaments and communicating branches between the esophagus and the left liver lobe using electrocautery.
NOTE: Electrocautery is recommended to ensure rapid hemostasis, reduce operative time, and improve procedural reproducibility. - Bluntly dissect the IHIVC down to the level of the right renal vein.
- Carefully isolate and ligate the left adrenal vein approximately 2 mm from its confluence with the IHIVC.
- Manage the right lower lobe of the liver in the same manner as described for the donor procedure (refer to Step 2.2.4).
- Pass a rubber band (fashioned from the cuff of a sterile surgical glove, approximately 10 cm in length) transversely behind the SHIVC.
NOTE: Apply gentle traction to expose the SHIVC without restricting respiratory movement. - Leave the rubber band in place for use during the subsequent transection of the SHIVC.
- Dissect and isolate the PV from the hepatic hilum to the level of the pyloric vein branch.
NOTE: Limit dissection of the PV to the anastomotic region. Preserve surrounding tributaries to reduce surgical trauma. - Isolate the HA at the hepatic hilum.
- Ligate the HA flush with the hilum and transect it proximally.
- Identify the confluence of the left and right hepatic ducts forming the CBD below the hepatic hilum. Ligate the CBD at this site using a 7-0 Prolene suture and transect it (Figure 5A).
NOTE: Minimize surgical trauma in this region. Preserve the maximum possible length of the HA along with the peribiliary connective tissue, nerve plexuses, and microvascular network to facilitate early establishment of collateral circulation.
- Recipient hepatectomy
- Apply microvascular clamps to occlude the IHIVC immediately cephalad to the right renal vein.
- Apply a microvascular clamp to occlude the PV just above its junction with the pyloric vein.
- Confirm successful vascular occlusion by observing visible darkening of the liver parenchyma.
NOTE: Confirm vascular occlusion by uniform darkening (cyanosis) of the liver, loss of parenchymal turgor, and collapse of the PV. - Insert a 23G scalp vein needle attached to a 5 mL syringe into the PV.
- Infuse 2 mL of 5% glucose solution over approximately 30 s to flush intrahepatic blood into systemic circulation.
NOTE: Inject slowly via the PV near the hepatic hilum to flush intrahepatic blood into the systemic circulation. - Apply downward traction on the rubber band to expose the SHIVC.
- Cross-clamp the SHIVC using a vascular clamp (Figure 5B).
- Transect the IHIVC, PV, and SHIVC flush with the hepatic parenchyma.
- Remove the native liver completely from the abdominal cavity.
NOTE: Maintain the anhepatic phase within 26 min (not exceeding 30 min). Transect vessels flush with the liver to preserve adequate length and ensure smooth vascular stumps.
- Implantation of the liver graft
- SHIVC reconstruction
- Position the liver graft in its orthotopic anatomical orientation.
- Use the pre-placed 7-0 suture at the left corner to begin continuous suturing of the posterior wall toward the right corner.
- Secure the suture to the stay suture at the right corner.
- Continue the running suture along the anterior wall to complete the anastomosis (Figure 6A–6C).
- Maintain a needle entry distance of 0.5–1.0 mm from the vessel edge.
- Maintain a suture pitch of 1.0–1.5 mm.
NOTE: Maintain consistent needle spacing and suture pitch to ensure a secure and tension-free anastomosis. - Tighten the suture after each stitch to eliminate dead space and maintain appropriate tension.
NOTE: Before completing anterior wall suturing, flush the SHIVC with UW solution using an indwelling needle to expel residual air and prevent air embolism.
- PV reconstruction
- Place 7-0 stay sutures at the left and right corners of the recipient PV stump.
- Apply three-point traction to create a triangular opening.
- Insert the cuffed donor PV into the lumen.
- Secure using a 7-0 ligature tied around the circumferential groove (Figure 6D–6F).
- IHIVC reconstruction
- Reconstruct the IHIVC using the same technique as PV reconstruction (refer to Step 4.4.2) (Figure 6G–6I).
- Reperfusion
- Sequentially release vascular clamps on the SHIVC, PV, and IHIVC.
- Confirm successful reperfusion by observing uniform color restoration of the graft without congestion, hemorrhage, or leakage (Figure 7A).
NOTE: Active bile production from the bile duct indicates restoration of hepatic perfusion and early graft function.
- Biliary reconstruction
- Make a small transverse incision (half the duct diameter) on the anterior wall of the recipient CBD stump.
- Insert the donor biliary stent approximately 3 mm into the CBD lumen.
- Secure the stent with a 7-0 circumferential suture (Figure 7B).
NOTE: Observe active bile efflux from the distal tip of the donor stent prior to completing reconstruction. This confirms patency and early graft function.
- SHIVC reconstruction
- Recipient rewarming
- Irrigate the peritoneal cavity with 150 mL of normal saline at 37°C prior to abdominal closure.
NOTE: This step removes residual blood, restores body temperature, and allows inspection of hemostasis at the SHIVC, IHIVC, and PV anastomoses.
- Irrigate the peritoneal cavity with 150 mL of normal saline at 37°C prior to abdominal closure.
- Abdominal closure and postoperative care
- Close the musculofascial layer using a continuous running suture with 4-0 absorbable thread, taking 5 mm bites at 1 cm intervals.
- Close the skin using a continuous running suture with 4-0 silk thread.
- Administer buprenorphine (0.1 mg/kg) subcutaneously every 12 hours for a total of 2 doses.
- Transfer the recipient rat to a clean, temperature-controlled cage.
- Monitor continuously until full recovery from anesthesia and resumption of normal spontaneous movement.
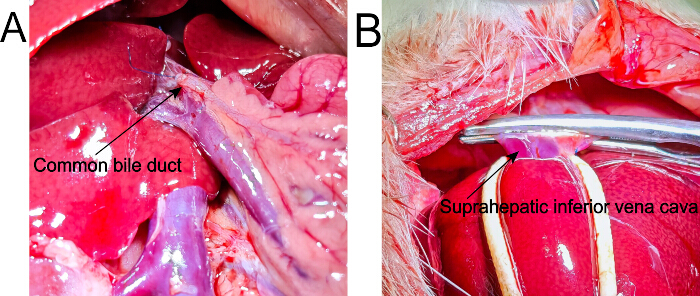
Figure 5. Key surgical steps during recipient liver mobilization and hepatectomy. (A) Identification and ligation of the recipient CBD near the hilar bifurcation. (B) Exposure and cross-clamping of the SHIVC. A rubber band is placed behind the SHIVC to provide traction and improve visualization during clamping. Please click here to view a larger version of this figure.
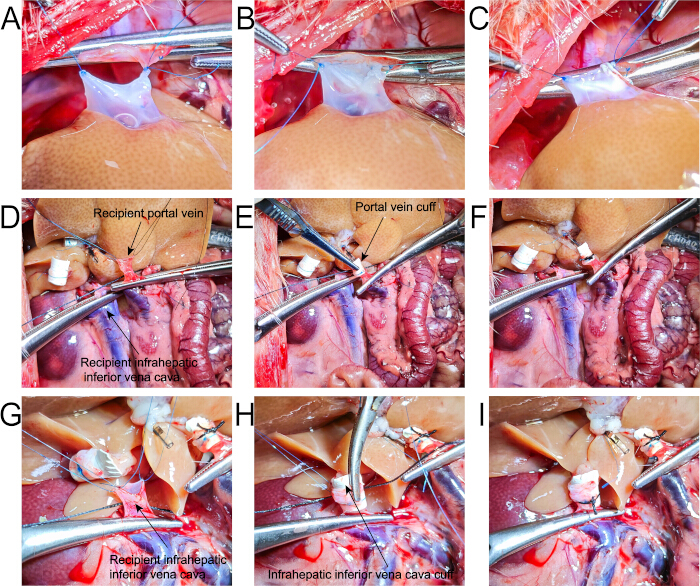
Figure 6. Key surgical steps for vascular reconstruction during liver graft implantation. Reconstruction of the SHIVC: (A) alignment using corner stay sutures, (B) posterior wall continuous suturing, and (C) completion of anterior wall suturing. PV reconstruction using the cuff technique: (D) three-point traction, (E) insertion of cuffed donor PV, and (F) ligation securing the cuff. IHIVC reconstruction using the same cuff technique: (G) exposure, (H) insertion, and (I) ligation. Please click here to view a larger version of this figure.
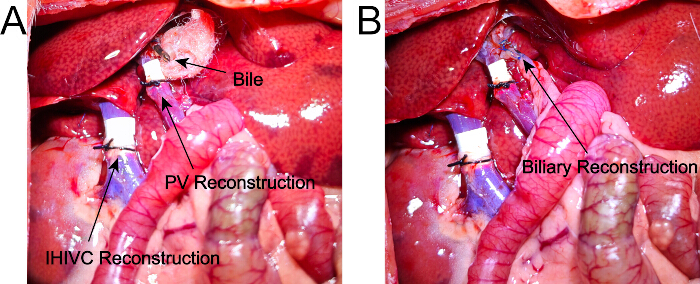
Figure 7. Verification of graft function, biliary reconstruction, and postoperative recovery. (A) Assessment of early graft function following reperfusion, with visible bile efflux from the donor biliary stent. PV and IHIVC reconstructions are visible. (B) Completed biliary reconstruction with insertion and fixation of the donor biliary stent into the recipient CBD. (C) Representative recipient rat demonstrating full postoperative recovery with normal posture and spontaneous activity. Please click here to view a larger version of this figure.
Access restricted. Please log in or start a trial to view this content.
Results
Loading...
$$\rightleftharpoonup{xx}$$
$$\longleftharp{xx}$$,
$$\longrightharp{xx}$$,
To ensure consistent surgical quality and reproducibility across the NArLT models, all procedures were performed by the same experienced microsurgeon. A total of 50 rat liver transplantations were completed during the study period. The mean durations for the surgical procedures were as follows: donor surgery averaged 25.3 ± 2.6 min, ex vivo graft preparation averaged 13.1 ± 2.1 min, recipient surgery averaged 43.0 ± 1.6 min, and the anhepatic phase averaged 15.7 ± 1.2 min.
Recipients undergoin...
Access restricted. Please log in or start a trial to view this content.
Discussion
Loading...
$$\rightleftharpoonup{xx}$$
$$\longleftharp{xx}$$,
$$\longrightharp{xx}$$,
The NArLT model is a cornerstone for experimental transplant research due to its avoidance of complex microvascular arterial anastomosis11. However, conventional NArLT methods are historically plagued by high rates of biliary complications—up to 30%—which severely limit long-term survival and hinder chronic immunological studies2. The significance of the proposed method lies in its ability to circumvent these ischemic biliary injuries. In this study, the 100-day...
Access restricted. Please log in or start a trial to view this content.
Disclosures
Loading...
$$\rightleftharpoonup{xx}$$
$$\longleftharp{xx}$$,
$$\longrightharp{xx}$$,
The authors declare no conflicts of interest.
Acknowledgements
Loading...
$$\rightleftharpoonup{xx}$$
$$\longleftharp{xx}$$,
$$\longrightharp{xx}$$,
This work was supported by the National Natural Science Foundation of China (No.82370666), Key R&D Program of Shandong Province, China (No.2025KJHZ016) and Fujian provincial health technology project (No. 2023CXA014).
Access restricted. Please log in or start a trial to view this content.
Materials
| Name | Company | Catalog Number | Comments |
|---|---|---|---|
| 4-0 Absorbable Suture | Ethicon | W9109H | Used for closure of musculofascial layer (linea alba) |
| 4-0 Silk Suture | Ethicon | VCP304H | Used for skin closure |
| 7-0 or 8-0 Suture / Silk Tie | Ethicon | Z1711E | Used for ligation of vessels (e.g., left phrenic vein) |
| 22G Intravenous Catheter | B. Braun | 4252098B | Trimmed to 5–7 mm with inclined ends to prepare biliary stent |
| 23G Scalp Vein Needle | Shandong Qinkai Medical Industry Co., Ltd. | MDLSSVS | Used for insertion into abdominal aorta for liver perfusion |
| Buprenorphine | Tianjin Institute of Pharmaceutical Research Pharmaceutical Co., Ltd. | H12020275 | Administered as subcutaneous analgesia post-surgery |
| Cotton Swab | Aoocn | 216-236 | Used to gently elevate liver during dissection |
| Crushed Ice | N/A | N/A | Used to maintain graft temperature during ex vivo preparation |
| Elastic Retractors | N/A | N/A | Used to retract abdominal wall during laparotomy |
| Epidural Catheter Sheaths | Jiangsu Maichuang Medical Device Co., Ltd. | 20173084015 | Sizes 5F and 6F; used as cuffs for PV and IHIVC |
| Gauze | Central Medical Technology Co., Ltd. | CH-1001 | Saline-soaked; used to cover and protect intestines |
| Glucose Solution (5%) | Sichuan Kelun Pharmaceutical Co., Ltd. | H20044307 | Used to flush intrahepatic blood during recipient hepatectomy |
| Heparin Saline | Shenzhen Life Biotechnology Co., Ltd. | H2012003 | 100 IU/mL; used to soak biliary stent |
| Indwelling Needle | B. Braun | 4254074B | Used to flush SHIVC to remove air before completing anastomosis |
| Isoflurane | Jinan Guangshengyuan Biotechnology Co., Ltd. | 153107015 | 5% concentration; used for anesthesia induction |
| Microvascular Clamps | Shanghai Medical Devices Co., Ltd. | JCZ200 | Used for vessel occlusion during surgery |
| Mosquito Forceps | Shanghai Medical Devices Co., Ltd. | J31010 | Used for fine manipulation and cuff preparation |
| Normal Saline (0.9%) | Sichuan Kelun Pharmaceutical Co., Ltd. | H20044304 | Used for irrigation and gauze soaking (37°C) |
| Pentobarbital (1%) | Shanghai Yuansi Technology Co., Ltd. | P0500000 | 40–45 mg/kg; used for surgical anesthesia |
| Peripherally Inserted Venous Catheter (PIVC) | Covidien | 8888145015 | Used to flush cuffed PV and confirm patency |
| Povidone-Iodine | Shanxi Trinda Biotechnology Co., Ltd. | 41836054 | Used for surgical site disinfection |
| Rubber Band (from Surgical Glove) | Ansell | N/A | Used for SHIVC traction during recipient surgery |
| Sprague–Dawley Rats | Huafukang (Beijing) Biotechnology Co., Ltd. | 22001A | Adult male rats, 8–10 weeks, 220–250 g |
| Sterile Petri Dish (10 cm) | Shandong Enyou Biotechnology Co., Ltd. | H905001 | Used to hold graft in UW solution during ex vivo preparation |
| Syringe (20 mL) | Shandong Weigao Group Medical Polymer Products Co., Ltd. | 20163141593 | Used for controlled liver perfusion (3–3.5 mL/min) |
| UW Preservation Solution | Bridge to Life | BTL-UW-1L | Maintained at 4°C; used for donor liver perfusion and graft preservation |
References
Loading...
$$\rightleftharpoonup{xx}$$
$$\longleftharp{xx}$$,
$$\longrightharp{xx}$$,
- Hirata, M., et al. Stepwise approach for acquisition of microsurgical skills through rat orthotopic liver transplantation experiments. Eur Surg Res. , (2023).
- Zhao, H., et al. Revisiting orthotopic rat liver transplant. Exp Clin Transplant. , (2021).
- Wu, W., et al. Research progress on anatomy reconstruction of rat orthotopic liver transplantation. Transplant Rev (Orlando). , (2024).
- Shi, J. H., Line, P. D., Zhang, S. J., Guo, W. Z. Experimental liver surgery for liver research: update, choice and translation. J Inflamm Res. , (2025).
- Engel, B., et al. Molecular signatures discriminating different types of rejection in human liver transplants. J Hepatol. , (2025).
- Khatua, C. R., Anirvan, P., Panigrahi, M. K., Singh, S. P. Admission Albumin-Bilirubin Score Is Inferior to MELD, MELD-Na+ and Child-Turcotte-Pugh Score in Predicting Survival in Indian Patients with Alcohol-associated Liver Disease. J Transl Gastroenterol. , (2025).
- Yu, H., et al. Low hepatic artery blood flow mediates NET extravasation through the regulation of PIEZO1/SRC signaling to induce biliary complications after liver transplantation. Theranostics. , (2024).
- Yang, Z., et al. Prognosis analysis of rat liver transplantation under direct vision of single operator. Transplant Proc. , (2024).
- Wang, Z., et al. Liver cold storage and transplantation in the cold-adaptive Daurian ground squirrels. J Vis Exp. , (2025).
- Wang, X., MacParland, S. A., Perciani, C. T. Immunological determinants of liver transplant outcomes uncovered by the rat model. Transplantation. , (2021).
- Kamada, N., Calne, R. Y. Orthotopic liver transplantation in the rat: technique using cuff for portal vein anastomosis and biliary drainage. Transplantation. , (1979).
- Yuan, Z., et al. The effect of microcirculation disturbance of peribiliary vascular plexus on hepatic bile duct epithelial cells in rats undergoing liver transplantation and postoperative rejection reduction by nanocarrier mediation. Cell Mol Biol (Noisy-le-grand). , (2022).
- Zhao, D., et al. Regression of bile duct damage and bile duct proliferation in the non-rearterialized transplanted rat liver is associated with spontaneous graft rearterialization. Hepatology. , (1995).
Access restricted. Please log in or start a trial to view this content.
Reprints and Permissions
Request permission to reuse the text or figures of this JoVE article
Request Permission