We provide a detailed, reproducible protocol for dissecting, immunostaining, and mounting the developing and adult Drosophila visual system for high-resolution imaging. These methods allow visualization of neuroblast patterning, neuronal specification, photoreceptor axon targeting, and adult neuropil organization, offering a versatile framework for studying visual system development.
Method Article
A Protocol for Dissection, Immunostaining and Mounting of the Drosophila Visual System
In This Article
Summary
Abstract
The Drosophila visual system is a powerful model for exploring how neuronal diversity is generated and integrated into functional neural circuits - a central question in developmental neuroscience. It comprises the retina and four distinct neuropils: the lamina, medulla, lobula, and lobula plate, which together form a highly organized structure that processes visual input from the retina and relays it to the higher centers of the brain. During development, the visual system undergoes significant remodeling. During larval development, neuroblasts are progressively generated from the neuroepithelium and divide asymmetrically to produce diverse neuronal subtypes by integrating spatial and temporal patterning programs. These neurons then differentiate and form precise synaptic connections that build the functional circuits of the adult visual system. These dynamic processes can be reliably studied using immunostaining across larval, pupal, and adult stages. Herein, we provide a detailed, reproducible protocol for dissecting and immunostaining the developing and adult Drosophila visual system. We primarily focus on representative imaging of larval neuroblasts to highlight spatiotemporal patterning and neuronal specification, and to visualize adult neuropil morphology. This provides a robust framework for visualizing the developing Drosophila visual system.
Introduction
The Drosophila melanogaster visual system serves as an important developmental model for exploring the cellular and molecular mechanisms underlying nervous system development. Its highly stereotyped structures, extensive genetic toolkit, and conserved developmental processes have advanced our understanding of neural stem cell development, neuronal specification, circuit assembly, and brain organization. The fly visual system consists of the compound eye retina and four optic neuropils - lamina, medulla, lobula, and lobula plate - arranged in a complex hierarchical circuit1. The sensory photoreceptor cells in the retina detect light and convert it into neural signals2,3,4. These signals pass through local interneurons and projection neurons that interconnect the four optic neuropils, where successive processing stages extract visual features such as contrast, motion, and colour4,5. The processed visual information is then transmitted to higher brain centers via visual projection neurons for further integration4,5,6.
The developing optic lobe undergoes a series of precisely timed developmental events that transform a proliferative neuroepithelium (NE) into a complex neural circuit network7,8 . The NE originates from the optic placode during embryogenesis7,8. During larval stages, neuroepithelial cells initially proliferate through symmetric divisions to expand the progenitor pool. Subsequently, they gradually transition to neuroblasts, which divide asymmetrically to generate neurons and glial cells of the adult visual system9,10,11,12,13. Spatio-temporal patterning mechanisms diversify neuronal identities, with newly generated neurons forming concentric layers within the developing medulla and subsequently differentiating into functional circuits during pupal development14,15,16,17,18,19. Integration of spatiotemporal cues activates cell-type-specific neuronal transcription factors, whose sustained expression specifies neuronal cell types14,15,20,21,22. Similar mechanisms exist in the lamina and lobula to specify neuronal identities14,23,24,25,26.
Immunofluorescence imaging of the developing visual system has become the method of choice for visualizing the cellular and molecular events underlying its development. Successful visualization depends not only on the preparation of high-quality tissue samples and reliable immunostaining reagents, but also on careful dissection and accurate sample orientation during mounting27,28. Different developmental structures and cellular processes require samples to be oriented in specific ways to reveal the brain's anatomical features. Several articles and protocols have described in detail the dissection and immunostaining of the Drosophila brain28,29,30,31,32. However, only a few have addressed this in the context of a widely studied developmental process in the visual system27.
Here we present a comprehensive protocol for the dissection, immunostaining, and mounting of larval and adult visual systems. A simple, cost-effective larval brain dissection method uses widely available syringe needles, making the procedure readily accessible for laboratories and teaching settings with limited specialised dissection tools. We demonstrate the protocol through representative examples, including visualisation of the larval neuroepithelium-to-neuroblast (NE to NB) transition, concentric neuronal organisation within the developing medulla, and the adult optic lobe neuropils. We also provide examples illustrating analyses of spatial and temporal patterning and photoreceptor targeting in the developing and adult visual system. Together, these procedures and defined mounting orientations provide a practical framework for obtaining reproducible, high-quality images of the developing and mature Drosophila visual system for neurodevelopmental studies.
Protocol
1. Preparation of reagents and equipment
Successful dissection and immunostaining of the Drosophila visual system requires preparing all reagents and equipment before starting the experiment. Preparing all solutions in advance minimizes tissue handling time and helps preserve tissue morphology throughout the procedure. The following reagents should be prepared and kept at hand:
- Phosphate Buffered Saline (1x PBS): Prepare 1x PBS from 10x stock solution for tissue dissection, washing, and reagent preparation. PBS provides an isotonic environment that maintains tissue integrity during handling. Store 1x PBS at 4 °C.
- Dissection Media: For dissection, use ice-cold Schneider's insect medium. Schneider's medium is formulated to support Drosophila tissues by closely mimicking the ionic composition of insect hemolymph and is recommended for prolonged dissections.
- Fixative Solution (4% formaldehyde in 1x Phosphate Buffered Saline with Triton X-100 (PBST)): Prepare a fresh 4% formaldehyde solution from a 16% formaldehyde stock in 1x PBST to ensure optimal fixation and tissue preservation.
CAUTION: Formaldehyde is highly reactive and toxic if inhaled, ingested, or absorbed through the skin. Handle it in a chemical fume hood using appropriate personal protective equipment (PPE), and dispose of it in the dedicated formaldehyde hazardous waste. - Wash Buffer (1x PBST): Prepare PBST (1x PBS containing 0.3% Triton X-100) for use as the washing and permeabilization.
- Blocking Solution: Use either 5% bovine serum albumin (made from 30% BSA in 1x PBST) or 5% normal goat serum (5% NGS in 1x PBST) as blocking solution. This helps to reduce nonspecific antibody binding. Store at 4 °C for long-term use.
- Sylgard Coated Plates Preparation: Sylgard-coated dissection dishes offer a soft surface that immobilizes tissues and protects fine forceps tips. Mix Sylgard 184 base and curing agent in a 10:1 ratio until fully combined. Pour into Petri dishes for an even coat, then cure at 37 °C for 2–4 days until dry. The pot life of catalyzed Sylgard 184 at room temperature (22–25 °C) is about 2 h, so use the mixture within this time.
- Pre-chill all dissection media and buffers, and keep them on ice during sample preparation, dissection, and immunostaining to preserve tissue morphology and reduce degradation. Before starting the protocol, ensure that all dissection instruments, microscope slides, coverslips, mounting medium, and forceps or dissection needles are prepared and readily accessible. Collect flies or larvae at the appropriate developmental stage and keep them ready for dissection.
No ethical approval or guidance was required to work with Drosophila melanogaster.
2. Dissection, immunostaining and mounting of larval brain
- Dissection:
- Collect the 8–10 wandering third-instar Drosophila larvae from inside the vial with a moist paintbrush, and wash them in a glass spot plate with ice-cold 1X PBS to remove residual food debris.
- Using forceps or a small brush, transfer a single larva from the glass spot plate to the drop of ice-cold 1X PBS or Schneider's medium at the centre of the 150 mm Petri plate (without Sylgard).
- Hold the larva at the mid-body region with a 1 mL syringe needle using the non-dominant hand. With the dominant hand, make a transverse cut with the syringe needle at the same position, cutting the larva into two halves (Figure 1A–B).
CAUTION: Syringe needles are sharp and may cause injury. Dispose of used sharps in a designated sharps container. - Hold the anterior half of the larva (identifiable by black mouth hooks) at the cut edge with the non-dominant hand. With the syringe needle in the dominant hand, gently push the mouth hooks inward through the body cavity, as if pushing a sock inside-out. This action everts the larval cuticle, producing an inside-out preparation. The inside-out dissection method is quicker and helps preserve the brain and eye discs from damage (Figure 1C–D).
- Once the cuticle is everted, the brain can be seen attached to the imaginal discs and mouth hooks. Using a syringe needle, remove unwanted tissues, including the gut, salivary glands, and fat body (Figure 1E).
- Transfer the dissected brain to the glass spot plate containing 300 µL of ice-cold 1X PBS, which is kept on ice (Figure 1F).
- Repeat steps 2.1.2–2.1.6 until sufficient brains have been dissected, or until 20 min have passed.
NOTE: Dissection time should not exceed 20 min to preserve high tissue quality. - Use a 200 μL pipette to aspirate most of the buffer from the brains, leaving just enough to keep them submerged.
- Fixation: Add 200 μL of cold fixative solution (4% formaldehyde) to the brains in the dissection dish and cover with a microscopic glass slide, then place the dish on the benchtop rocker at 28 rocking speed with an 8° rocking angle for 20 min.
NOTE: Avoid high rocking speeds to prevent tissue disintegration.
CAUTION: Formaldehyde is hazardous. Wear appropriate PPE, including gloves, a lab coat, a facemask, and eye protection, when handling solutions containing formaldehyde. - Aspirate the fixative solution, then add 200 μL wash buffer (1X PBS with 0.3% Triton X-100). Perform two quick PBST rinses, followed by two 20 min washes.
NOTE: Triton X-100 is a detergent crucial for permeabilizing tissue samples and facilitating antibody penetration. - Blocking: Aspirate the PBST and add blocking solution (5% Normal Goat Serum or 5% BSA in 1x PBST) to the brains. Incubate for 40 min at room temperature.
NOTE: Incubation in blocking solution saturates nonspecific binding sites in the tissue, thereby reducing background staining and increasing antibody specificity. This step is recommended, although it can be skipped if the antibody staining is specific and shows minimal background.
- Immunostaining
- Prepare the primary antibody cocktail at the recommended dilution in approximately 50 μL wash PBST.
NOTE: Keep antibody aliquots on ice during preparation to maintain antibody stability and activity. - Transfer the brains from the glass well into the 1.5 mL microcentrifuge tubes. Remove the excess blocking solution from the brains, leaving enough to keep them submerged.
- Prepare antibody cocktail solution and add it to the tube with brains. Gently mix by pipetting with a 20 µL pipette tip to ensure even antibody distribution.
NOTE: Incubating brains in a 50 µL primary antibody solution reduces antibody consumption without compromising staining quality. - Incubate the tubes containing brains on a stand at 4 °C for 16 h.
NOTE: Primary antibody incubation can be performed for 48–72 h at 4 °C to enhance staining in some cases. Primary antibodies can be reused at least 3 times without reducing staining quality. - Add 200 μL of PBST. Perform 2 quick washes followed by 2 long washes of 20 min each.
- Prepare the secondary antibody cocktail at the recommended dilutions in approximately 250 μL of wash PBST.
NOTE: Perform all incubations after adding the secondary antibodies in the dark to avoid light exposure, which can cause photobleaching. - Remove excess PBST, then add the secondary antibody cocktail to the brains. Incubate for 2 h at room temperature (22–25 °C) or 16 h at 4°C on a rocker, covered with a cardboard box to keep it dark.
- Repeat the above washing steps (2 quick rinses, followed by 2 long washes of 20 min each) using PBST.
PAUSE POINT: Brains can be stored in PBST at 4 °C for up to 1 week. However, it is recommended to image the samples as soon as possible after mounting to minimize signal loss from tissue degradation or fluorophore decay.
- Prepare the primary antibody cocktail at the recommended dilution in approximately 50 μL wash PBST.
- Mounting of larval optic lobes
- Prepare a microscope slide by cleaning it with 70% ethanol and allow it to dry for 5 min (Figure 2E).
- Apply two parallel strips of double-sided tape in the center of the microscope slide, leaving a 5–10 mm gap between the strips.
- Using a 200 µL pipette with a cut tip, transfer the brains to another clean microscope slide and remove unwanted tissues, such as leg imaginal discs, that may obstruct the region of interest during imaging.
NOTE: Small tissues that do not obstruct our region of interest during imaging can be left as is during mounting. - Transfer the brains to the microscopic slide containing the double-sided tape.
NOTE: Make sure brains don’t dry out and are always submerged in the 1x PBST buffer. - Identify the anterior–posterior orientation of each larval brain under a stereomicroscope using the characteristic bulged morphology of the brain and the position of the ventral nerve cord (VNC) as anatomical landmarks (Figure 2A–D).
- Anterior mounting: Position the brain with the bulged side facing upward, away from the slide, and the VNC facing toward the slide (Figure 2A, Figure 3A).
- Posterior mounting: Position the brain with the bulged side facing the slide and the VNC facing away from the slide (Figure 2B, Figure 3F).
- Lateral mounting: Bisect the anteriorly mounted brain and VNC along the midline using a 1 mL syringe needle or fine tungsten needle to generate two hemisected brain halves (Figure 2C). Rotate each hemisphere by 90° and position it with the lateral, lobula-plug side facing the coverslip and the medial cut surface facing away from the imaging plane (Figure 2D, Figure 3K).
NOTE: Adjust the brain position under the stereomicroscope as needed to obtain the desired orientation. Keep the brain submerged during positioning. - Aspirate most of the buffer, leaving enough to keep the brains submerged.
- Add 20–40 μL of mounting medium (SlowFade Gold Antifade) to the area containing the brains and spread it evenly with a 20 μL pipette.
- Carefully place a coverslip so that it rests on both tape strips and seal the edges with nail polish.
NOTE: If large bubbles form after placing the coverslip, add more mounting medium into the gap between the coverslip and slide until the bubbles disappear.
3. Dissection, immunostaining and mounting of adult brain
- Dissection: Adult brain dissection is more technically demanding and requires careful handling. It is strongly recommended to use a sharp pair of stainless-steel forceps for adult brain dissection.
- Anesthetize a sufficient number of adult flies of the required age on a CO2 fly pad, then transfer them to the moist tissue wipe placed on the ice bucket to maintain anesthesia during dissection.
NOTE: After anesthesia, flies can be kept moist with a tissue wipe on ice during dissection, eliminating the need to keep the CO2 pad on and making handling easier. - Using fine forceps, gently pick up the adult fly by the legs and place it in the Sylgard-coated Petri dish.
- Secure the fly to the Sylgard-coated plate by inserting a pin from above through the middle of the thorax, away from the brain region. Submerge the fly in a drop of ice-cold 1X PBS buffer/Schneider's Media and position the fly’s head for the dissection by rotating the fly towards yourself or moving the plate.
CAUTION: Dissection pins are sharp and may cause injury. Dispose of them in a designated sharps container. - Using forceps in the dominant hand, carefully remove the proboscis and the frontal cuticle between the eyes to partially expose the brain. This creates an opening beneath the retinal cuticle for the forceps to facilitate subsequent brain dissection.
- Using fine forceps, gently grasp the retina at its outermost edges and pull it apart from both sides. Be careful not to prick the optic lobes while peeling off the retina.
- Carefully clean residual tissues, such as the trachea or foregut, attached to the brain.
- Transfer the clean brain to a glass spot plate containing 200 µL of 1X PBS, kept on ice.
- Repeat dissection steps 3.1.2 to 3.1.7 until enough brains are collected or 30 min have elapsed.
- Use a 200 µL pipette to aspirate the PBS from the brains, leaving just enough to keep them submerged.
- Fixation: Add 200 μL of cold fixative solution (4% formaldehyde in 1X PBS) to the glass spot plate containing dissected adult brains, then place the plate, covered with a microscopic glass slide, on the benchtop rocker at 28 rocking speed for 30 min.
CAUTION: Formaldehyde is hazardous. Wear appropriate gloves, a lab coat, and eye protection when handling solutions containing formaldehyde. - Aspirate the fixation solution, leaving enough to submerge the brains, and add 200 µL PBST. Repeat 3 quick washes and 2 long washes, each for 20 min.
- Blocking: Remove the PBST and incubate the brains in a blocking solution (5% NGS or 5% BSA) for 45 min.
- Transfer the brains to a 1.5 mL tube and remove most of the blocking solution, leaving just enough to keep the brains submerged.
- Anesthetize a sufficient number of adult flies of the required age on a CO2 fly pad, then transfer them to the moist tissue wipe placed on the ice bucket to maintain anesthesia during dissection.
- Immunostaining
- Prepare the primary antibody cocktail at the appropriate dilution in 50 µL of PBST.
- Add the primary antibody cocktail to the tube with brains and incubate 12–16 h at 4 °C.
- Aspirate the antibody solution, then add PBST for 2 quick rinses and 2 long washes of 20 min each.
- Prepare the secondary antibody cocktail at the recommended dilutions in 250 µL of PBST.
- Remove the PBST and then add the secondary antibody cocktail. Incubate on a benchtop rocker at room temperature (22–25 °C) for 2 h or leave 12–16 h at 4 °C in the dark.
- Repeat the washes (3 quick and 2 long, each for 20 min).
PAUSE POINT: Pause at this step and keep the brains in PBST at 4 °C for a week.
- Mounting of adult optic lobes
- Prepare a microscopic slide by cleaning it with 70% ethanol.
- Prepare a coverslip bridge by placing two 18 x 18 mm coverslips on a small drop of all-purpose adhesive glue to create a space (less than 1 mm) between them for brains (Figure 2F).
- Using a 200 µL cut tip, transfer cleaned brains onto a slide and remove tissues, such as trachea or head cuticle, that can obstruct the view during imaging.
- Transfer the cleaned brains to the mounting side prepared at step 3.3.2.
NOTE: Keep the brains submerged in 1x PBST throughout the mounting procedure and do not allow them to dry. - Under a stereomicroscope, identify the anterior–posterior orientation of each adult brain using its overall morphology. The convex surface corresponds to the anterior side, whereas the concave surface corresponds to the posterior side.
- Anterior mounting: Position the brain with the anterior surface and antennal lobes facing the coverslip (Figure 4A).
- Posterior mounting: Position the brain with the posterior surface facing the coverslip and the antennal lobes facing away from the coverslip (Figure 4D).
- Lateral mounting: Position the brain so that the visual neuropils are oriented parallel to the imaging plane. Place the brain in the anterior position, rotate it 90°, and support it against the edge of the spacer coverslip (Figure 4G).
- Aspirate most of the 1x PBST buffer, leaving sufficient to keep the brains submerged.
- Add 40 μL of mounting medium (preferably VECTASHIELD Antifade Mounting Media) onto the area containing the brains, then spread it evenly with a 20 μL pipette. Add more mounting medium if needed.
NOTE: VECTASHIELD Antifade Mounting Media works well with a coverslip bridge slide because its higher viscosity helps it remain in the space between the coverslips. - Carefully place a 22 x 22 mm coverslip so that it rests on two coverslips. Remove any bubbles by adding more mounting medium from the gap.
- Seal the edges with nail polish (Figure 2F).
4. Image acquisition and image processing
- Acquire images using a Leica STELLARIS 8 confocal microscope with 40x (NA = 1.3) and 63x oil-immersion (NA = 1.4) objectives, at a resolution of 1024 × 1024 pixels.
- Collect Z-stacks with a 1 µm z-step at a scan speed of 200 Hz.
- Image using bidirectional scanning with a zoom range of 0.75–1.0x, depending on the sample.
- Perform the detection at a gain setting of 100 using the appropriate detector for each fluorophore.
NOTE: Use excitation wavelengths of 405, 488, 555, and 647 nm, and adjusted laser power according to the antibody and fluorophore being imaged. - Acquire images using Leica acquisition software and process using Fiji/ImageJ2 version 2.16.0/1.54p.
Results
Successful dissection, immunostaining, and correct mounting orientations are essential to preserve the overall structure of the developing optic lobe and accurately capture its anatomical features, developmental transitions, and cell types. Different mounting orientations provide complementary views of the larval and adult Drosophila visual systems and allow different anatomical regions and neuronal features to be visualized.
Larval Mounting Orientations:
This section illustrates representative mounting orientations that facilitate imaging of the developing larval optic lobe (Figure 3). The schematic of the larval brain highlights the major optic lobe structures, including the OPC, medulla, and lamina (Figure 3A). An anterior mount shows the OPC, the neuroepithelium-to-neuroblast (NE-to-NB) transition, the band of medulla neuroblasts, and the developing lamina. An anteriorly mounted brain stained with Deadpan (Dpn), E-Cadherin (ECad), and Dachshund (Dac) highlights these structures (Figure 3B). This orientation also resolves the temporal transcription factor cascade in medulla neuroblasts, as shown by the sequential expression of Hth, Opa, Erm, and Ey (Figure 3C). Photoreceptor axons, labelled with anti-Chp antibodies, interspersed with lamina neurons, can also be visualized in the anterior orientation (Figure 3D, E). Posterior mounting exposes the inner proliferation center (IPC) and the tips of the OPC, providing complementary views of the developing optic lobe (Figure 3F, G-H). Photoreceptor axons (Chp-positive) interspersed with lamina neurons can also be visualized in the posterior orientation (Figure 3I, J). Together with anterior mounting, this orientation provides complementary access to different regions of the developing larval visual system. Lateral mounting reveals the spatial patterning of the OPC along with concentric organization of the neurons (Figure 3K). Lateral mounting simultaneously provides a view of the concentric organization of medulla neurons (Figure 3L). Representative neuronal populations include spatial domain-agnostic Bsh-positive medulla intrinsic neurons (Mi1) and TfAP-2-positive transmedullary neurons (Tm1, Tm2, Tm4, and Tm6), as well as region-specific neuronal subtypes such as Dm8, DRA-Dm8, and Dm11 (Figure 3L). Vsx and Optix (Optix-GAL4>GFP) are present in the neuroepithelium (NE) but not in neuroblasts (NB), while Rx is found in both the NE and NBs19. Additionally, Vsx and Rx are expressed in specific post-mitotic neurons corresponding to their spatial domains19 (Figure 3M). Photoreceptor axons targeting the lamina and medulla can be visualized in the lateral orientation (Figure 3N, O). These mounting orientations enable analysis of how the spatial and temporal patterning of medulla neuroblasts gives rise to distinct neuronal identities14,22.
Adult Mounting Orientations: This section presents a schematic and representative example of mounting orientations for imaging the adult Drosophila optic lobe. Anterior mounting provides a frontal view of the optic lobe, revealing the lamina, medulla, and anterior aspects of the lobula and lobula plate (Figure 4A). Anti-Bruchpilot (Brp) labels the optic neuropils, while Bsh marks Mi1 neurons in the medulla cortex (Figure 4B). In the same orientation, anti-Chaoptin (Chp) labels photoreceptor axons projecting to the lamina and medulla (Figure 4C). Posterior mounting orientation exposes deeper regions of the optic lobe, allowing visualization of the medulla neuropil in depth (Figure 4D, E). In this orientation, Chp staining resolves photoreceptor terminals within the medulla (Figure 4F). Lateral mounting provides a side view of the optic lobe, enabling simultaneous visualization of the lamina, medulla, lobula, and lobula plate (Figure 4G, H). Bsh labels lamina neurons (L4 and L5) together with medulla intrinsic neurons (Mi1), while Brp defines the neuropil boundaries. Photoreceptor projections target within the lamina and medulla (Figure 4I), providing an overview of the organization of the adult visual system.
Together, the anterior, posterior, and lateral mounting orientations offer complementary views of the developing and mature visual systems, enabling researchers to examine different anatomical regions, developmental features, and neuronal populations based on their experimental objectives.
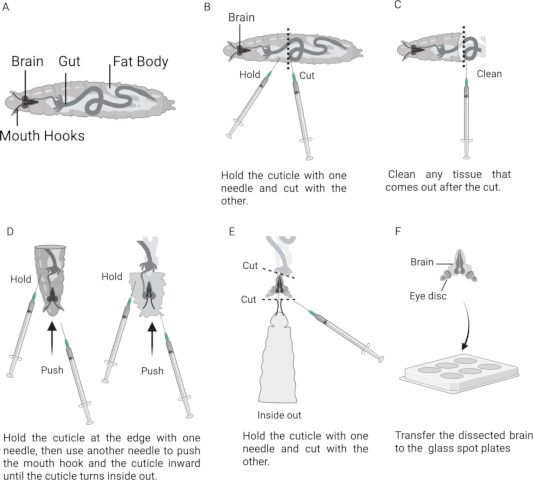
Figure 1: Dissection of the Drosophila larval brain using the syringe needle method. (A) Schematic of a late third-instar larva showing the location of the brain and associated anatomical structures. (B) Shows the larva positioned between two syringe needles, with the dotted line indicating the approximate site of transverse separation. (C) Anterior larval half after removal of surrounding tissues. (D) Sequential steps showing inversion of the larval cuticle with syringe needles. (E) Everted preparation showing the brain, imaginal discs, and mouth hooks. (F) Isolated larval brain in a glass spot plate. Please click here to view a larger version of this figure.
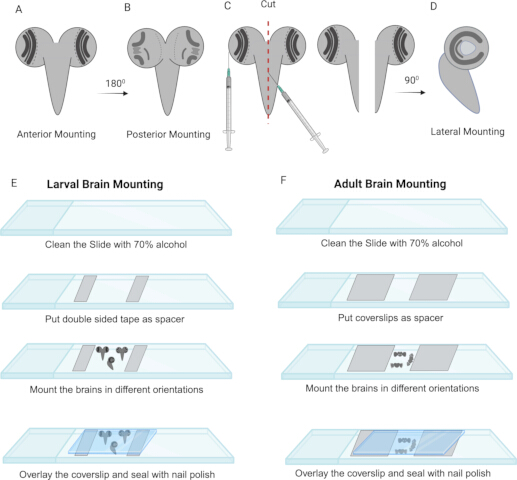
Figure 2: Mounting steps for the Drosophila larval and adult optic lobes. (A) Anterior mounting orientation of the larval brain. (B) Posterior mounting orientation of the larval brain. (C) Bilateral bisection of the anteriorly mounted brain using a syringe needle. (D) Lateral mounting orientation of the hemisected brain. (E) Representative steps for mounting the larval brain. (F) Representative steps for mounting the adult brain. Please click here to view a larger version of this figure.
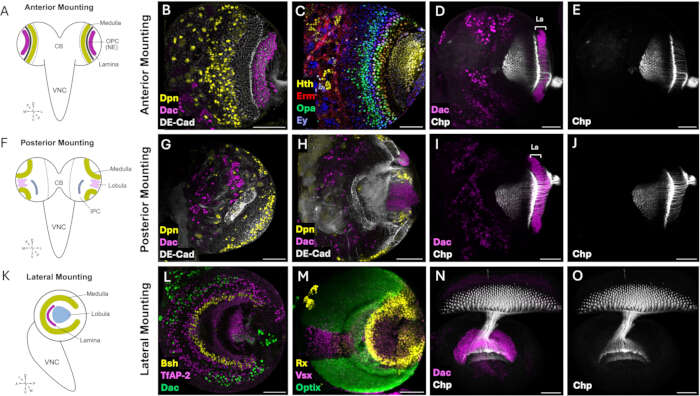
Figure 3: Mounting orientations for imaging the Drosophila larval visual system. (A) Schematic illustrating the anterior mounting orientation of the third instar larval brain, with the anterior surface facing the coverslip. (B) Representative confocal image of an anteriorly mounted larval brain showing the outer proliferation center (OPC) labeled with anti-DE-Cadherin (DE-CAD, gray), medulla neuroblasts labeled with anti-Deadpan (Dpn, yellow), and the developing lamina labeled with anti-Dachshund (Dac, magenta). (C) Image of the medulla NBs sequentially expressing the temporal transcription factors Homothorax (Hth), Odd-paired (Opa), Earmuff (Erm), and Eyeless (Ey) during neuroblast development. (D-E) Representative image of photoreceptor axons projecting from the eye imaginal disc into the developing lamina and medulla. (F) Schematic illustrating the posterior mounting orientation of the larval brain, with the posterior surface facing the coverslip. (G) Confocal image of the superficial posterior surface of the optic lobe showing the inner proliferation center (IPC) and medulla neuroblasts positioned at the tips of the OPC (tOPC). (H) Optical section acquired deeper within the posterior optic lobe, highlighting the IPC and the developing lobula. (I-J) Posterior view of photoreceptor axons projecting into the developing optic lobe. (K) Schematic illustrating the lateral mounting orientation of a hemisected larval brain, with the cut medial surface facing the coverslip to visualize the concentric organization of the developing medulla together with the lamina and lobula plug. (L) Representative confocal image showing the concentric arrangement of medulla neuronal populations, including Mi1 neurons labelled by Brain-specific homeobox (Bsh), Tm1, Tm2, Tm4, and Tm6 neurons labelled by TfAP-2, Dachshund (Dac)-positive Dm8 neurons in the ventral medulla, and DRA-Dm8 and Dm11 neurons in the dorsal rim area, illustrating the spatial organization of medulla neuron subtypes. (M) Maximum intensity projection of the outer proliferation center showing the spatial patterning domains defined by the transcription factors Vsx, Optix (Optix-GAL4>GFP), and Rx in the developing optic lobe. (N-O) Representative image of photoreceptor axons in the lateral mounting orientation, showing their projections and targeting within the developing lamina and medulla. Scale bar = 50 µm. Abbreviations: La = Lamina. Please click here to view a larger version of this figure.
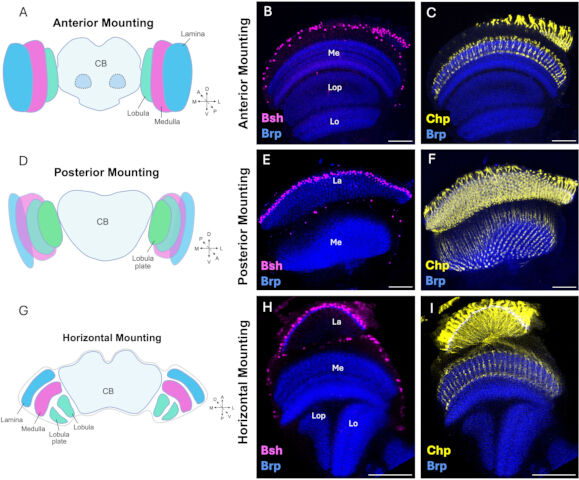
Figure 4: Mounting orientations for imaging the adult Drosophila visual system. (A) Schematic illustrating the anterior mounting orientation of the adult brain, with the anterior surface facing the coverslip. (B) Representative confocal image of an anteriorly mounted adult brain showing Brain-specific homeobox (Bsh)-positive Mi1 neurons (magenta) within the medulla cortex and neuropils labelled with anti-Bruchpilot (Brp, blue). This orientation provides an anterior view of the peripheral lamina, medulla, lobula, and lobula plate. (C) Representative image of photoreceptor axons labelled with anti-Chaoptin (Chp, yellow) projecting to the lamina and medulla neuropils. (D) Schematic illustrating the posterior mounting orientation of the adult brain, with the posterior surface facing the coverslip. (E) Representative confocal image of the posteriorly mounted adult visual system, highlighting the deeper layers of the medulla neuropil labeled with anti-Brp. (F) Posterior view of photoreceptor axons labeled with anti-Chaoptin (Chp, yellow) showing their targeting within the medulla neuropil. (G) Schematic illustrating the lateral mounting orientation of the adult brain, with one optic lobe positioned parallel to the coverslip to visualize the overall organization of the visual system. (H) Representative lateral view of the adult optic lobe showing Bsh-positive lamina neurons (L4 and L5) and medulla Mi1 neurons (magenta), together with neuropils labelled with anti-Brp (blue), revealing the spatial organization of the lamina, medulla, lobula, and lobula plate. (I) Representative image of photoreceptor axons labeled with anti-Chaoptin (Chp, yellow) projecting into the lamina and medulla neuropils labeled with anti-Brp (blue). Scale bar = 50 µm. Abbreviations: Me = Medulla; La = Lamina; Lo = Lobula; Lop = Lobula plate. Please click here to view a larger version of this figure.
Discussion
This protocol provides a reliable method for dissecting, immunostaining, and mounting larval and adult Drosophila visual systems for high-resolution confocal imaging. The procedure preserves the structural integrity and morphology of the developing and mature optic lobes while providing mounting orientations that enable optimal visualization of key developmental processes, neuronal populations, and neuropil structures. Representative examples described include the neuroepithelium-to-neuroblast (NE-to-NB) transition, spatiotemporal patterning within the medulla, photoreceptor axon targeting in the optic lobe, and the organization of adult visual system neuropils9,10,13,14,23. This protocol therefore offers a flexible framework that can be readily adapted to visualize other processes or cell types at any developmental stage.
Compared with previously published methods, this protocol combines optimized procedures for both larval and adult Drosophila visual systems and offers multiple mounting orientations tailored to different experimental questions. Although several published protocols describe Drosophila brain dissection and immunostaining28,29,30,31,32, relatively few focus specifically on the visual system in the context of developmental processes27. The protocol describes an alternate larval dissection method that uses readily available 1 mL syringes instead of specialized fine forceps. Although this approach requires a steeper learning curve, it offers a clean, inexpensive, rapid alternative that may be particularly valuable for teaching laboratories and research groups with limited access to specialized dissection equipment. To our understanding, this dissection method is less strenuous on the brain than the forceps method, which pulls the brain during dissection and often results in injury. Moreover, our immunostaining protocol judiciously uses antibody cocktails in reduced volumes without compromising staining quality, thereby conserving often expensive commercial antibodies. Together, these features provide practical advantages in terms of accessibility, dissection, and mounting, while allowing the protocol to be readily adapted to different experimental requirements.
Successful implementation of the protocol depends on careful attention to several key steps. Common challenges can generally be addressed by adjusting the dissection, fixation, staining, or mounting procedures. Excessive mechanical stress during dissection, rocking, or pipetting may cause tissue damage or fragmentation. Therefore, perform dissections rapidly in ice-cold PBS, using gentle movements when removing surrounding tissues and during subsequent rocking and pipetting. Poor fixation, indicated by tissue distortion, loss of morphology, or inconsistent staining, may result from insufficient fixation time or an inadequate fixative solution. Using freshly prepared formaldehyde solution and fully immersing the tissue during fixation helps maintain tissue morphology and staining consistency. Weak or uneven staining may result from insufficient permeabilization, inadequate antibody penetration, or suboptimal antibody incubation. Increasing permeabilization or antibody incubation time, and where appropriate extending primary antibody incubation at 4 °C, may improve antibody penetration and staining. High background staining may result from inadequate blocking or washing, or from excessive antibody concentration. Adequate blocking and washing, together with appropriate adjustment of antibody concentration, can help reduce nonspecific staining. Incorrect mounting orientation may obscure the region of interest or position it too far from the coverslip. Reorienting the brain according to the anatomical landmarks described in the Protocol and positioning the region of interest close to the coverslip can facilitate imaging of the correct anatomical feature.
Despite its versatility, the protocol may need adjustment for specific tissues, developmental stages, antibodies, and imaging requirements. For example, some tissues may benefit from shorter fixation on ice, whereas certain antibodies may require extended incubation at 4 °C for up to one week, or, conversely, shorter incubation at 22–25 °C. Fixation quality can be assessed by the preservation of overall brain and optic lobe morphology, distinct tissue boundaries, and minimal distortion, fragmentation, or detachment. Similarly, adequate permeabilization can be assessed by relatively uniform antibody staining throughout the tissue, indicating sufficient antibody penetration. These considerations allow flexibility to adjust fixation, permeabilization, staining, and mounting conditions to the specific experimental application while preserving the Drosophila visual system.
Disclosures
The authors declare no conflicts of interest. The authors reviewed and approved all final edits.
The language editing tool (Grammarly) was used to correct spelling and restructure sentences.
Acknowledgements
The Brp, Dac, DE-Cad, and Chp monoclonal antibodies were obtained from the Developmental Studies Hybridoma Bank, created by the NICHD of the NIH and maintained at the University of Iowa, Department of Biology, Iowa City, IA 52242. A.B., A.R., and C.S. were supported by Tamkeen through the NYU Abu Dhabi Research Institute Award to the NYU Abu Dhabi Center for Genomics and Systems Biology (ADHPG-CGSB) and by NIH RO1 EY017916 to C.D.
Materials
| Name | Company | Catalog Number | Comments |
|---|---|---|---|
| Austerlitz Insect Stabilisation Pins, 0.15mm | Fine Science Tools | 26002-15 | |
| Antibody: Mouse anti-Brp | Developmental Studies Hybridoma Bank | nc82 | Dilution 1:50 |
| Antibody: Mouse anti-Chp | Developmental Studies Hybridoma Bank | 24B10 | Dilution 1:50 |
| Antibody: Rat anti-DE-CAD | Developmental Studies Hybridoma Bank | DCAD2 | Dilution 1:20 |
| Antibody: Mouse anti-Dac | Developmental Studies Hybridoma Bank | mAbdac1-1 | Dilution 1:100 |
| Antibody: Sheep anti-GFP | BioRad | 4745-1051 | Dilution 1:200 |
| Antibody: Rabiit anti-Bsh | Desplan lab | - | Dilution 1:1000 |
| Antibody: Guinea pig anti-Hth | Desplan lab | - | Dilution 1:100 |
| Antibody: Guinea pig anti-TfAP-2 | Desplan lab | - | Dilution 1:500 |
| Antibody: Rabbit anti-Ey | Desplan lab | - | Dilution 1:200 |
| Antibody: Rat anti-Erm | Desplan lab | - | Dilution 1:100 |
| Antibody: Guinea pig anti-Rx | Desplan lab | - | Dilution 1:300 |
| Antibody: Rabbit anti-Vsx | Desplan lab | - | Dilution 1:100 |
| Antibody: Donkey anti-mouse IgG conjugated to Alexa Fluor 405 | Abcam | ab175658 | Dilution 1:250 |
| Antibody: Donkey anti-mouse IgG conjugated to Alexa Fluor 488 | Jackson ImmunoResearch | 715-547-003 | Dilution 1:400 |
| Antibody: Donkey anti-mouse IgG conjugated to Alexa Fluor 555 | ThermoFisher Scientific | A31570 | Dilution 1:500 |
| Antibody: Donkey anti-mouse IgG conjugated to Alexa Fluor 647 | Jackson ImmunoResearch | 715-605-151 | Dilution 1:250 |
| Antibody: Donkey anti-guinea pig IgG conjugated to Alexa Fluor 405 | Jackson ImmunoResearch | 706-475-148 | Dilution 1:250 |
| Antibody: Donkey anti-guinea pig IgG conjugated to Alexa Fluor 555 | Sigma-Aldrich | SAB4600297-5OUL | Dilution 1:500 |
| Antibody: Donkey anti-guinea pig IgG conjugated to Alexa Fluor 647 | Jackson ImmunoResearch | 706-605-148 | Dilution 1:250 |
| Antibody: Donkey anti-rabbit IgG conjugated to Alexa Fluor 405 | Abcam | ab175651 | Dilution 1:250 |
| Antibody: Donkey anti-rabbit IgG conjugated to Alexa Fluor 555 | Invitrogen | A31572 | Dilution 1:500 |
| Antibody: Donkey anti-rat IgG conjugated to Alexa Fluor 555 | Abcam | Ab150154 | Dilution 1:500 |
| Antibody: Donkey anti-sheep IgG conjugated to Alexa Fluor 488 | Jackson ImmunoResearch | 713-545-147 | Dilution 1:400 |
| BD 1ml Syringe Complete with 25g x 16mm Needle x 120 | BD | 303175 | |
| Bovine Serum Albumin (BSA), 30% | Sigma-Aldrich | A7284-50ML | |
| Coverslip Glass 18 x 18 mm | VWR | 631-0120 | |
| Coverslip Glass 24 x 24 mm | VWR | 631-0126 | |
| Double Side Tape 19mm x 33m | Scotch | AMS12354 | |
| Fly: Canton S | BDSC | 64349 | |
| Fly: Optix-GAL4 | Kyoto | 104266 | |
| Fly: nls-GFP/CyO-YFP | BDSC/ Desplan lab | 4775 | |
| Flystuff Drosophila Ultimate Flypads | Genesee Scientific Corporation | 59-172B | |
| Ice Bucket with Lid, Round, 4L, Blue | Corning | 432123 | |
| Image (FIJI) | (National Institutes of Health, Bethesda, MD, USA) | Fiji/ImageJ2 version 2.16.0/1.54p | |
| Kimtech Science Precision Wipes | Kimberly-Clark Professional | 05511 | |
| Laboratory Sealing film | Parafilm M | PM-996 | |
| Microscope slides | VWR | 8037/1 | |
| Mini Centrifuge | VWR | 521-2848 | |
| Nail polish | Mumuso | 2023/11/05 | |
| Normal Goat Serum | Sigma-Aldrich | G9023 | |
| Paint brush | Camlin | S-66 | |
| Paraformaldehyde (PFA) | Sigma | P6148 | |
| Petri dishes 100mm x 15mm | Falcon | 351029 | |
| Phosphate-Buffered Saline (PBS) | Sigma | P5493 | |
| PYREX® 9 Depression Glass Spot Plates | Corning | 7220-85 | |
| Rocker (benchtop) | Fisherbrand | 8861025 | |
| Safelock tubes 1.5mL | Eppendorf | O219706H | |
| Schneider's Insect medium | Sigma | S0146 | |
| Slowfade gold antifade | Invitrogen | S36936 | |
| Sylgard 184 Silicone Elastomer | Dow | 4019862 | |
| TritonX-100 | Sigma | 93426 | |
| Tungsten Needles 0.25 mm | Fine Science Tools | 10130-10 | |
| Tungsten Needles 0.5 mm | Fine Science Tools | 10130-20 | |
| UHU All Purpose Adhesive | UHU | 40815 | |
| Ultra-fine forceps | WPI | 500235 | |
| Vectashield antifade mounting media | Vector | H-1000 | |
| Vortex Mixer | VWR | VM-3000 |
References
- Nériec N, Desplan C. From the Eye to the Brain: Development of the Drosophila Visual System. Curr Top Dev Biol. 2016;116:247–71.
- Montell C. Drosophila visual transduction. Trends Neurosci. 2012;35(6):356–63.
- Currier TA, Pang MM, Clandinin TR. Visual processing in the fly, from photoreceptors to behavior. Genetics. 2023;224(2),1–28.
- Fischbach KF, Dittrich APM. The optic lobe of Drosophila melanogaster. I. A Golgi analysis of wild-type structure. Cell Tissue Res. 1989;258(3):441–75.
- Dorkenwald S, et al. Neuronal wiring diagram of an adult brain. Nature. 2024;634(8032):124–38.
- Matsliah A, et al. Neuronal “parts list” and wiring diagram for a visual system. bioRxiv: The Preprint Server for Biology. Preprint posted online April 2024.
- Younossi-Hartenstein A, Nassif C, Green P, Hartenstein V. Early neurogenesis of the Drosophila brain. J Comp Neurol. 1996;370(3):313–29.
- Zhang Y, Li X. Development of the Drosophila Optic Lobe. Cold Spring Harb Protoc. 2024;2024(3):108156.
- Apitz H, Salecker I. A Challenge of Numbers and Diversity: Neurogenesis in the Drosophila Optic Lobe. J Neurogenet. 2014;28(3-4):233–49.
- Egger B, Gold KS, Brand AH. Notch regulates the switch from symmetric to asymmetric neural stem cell division in the Drosophila optic lobe. Development. 2010;137(18):2981–7.
- Sato M, Yasugi T, Minami Y, Miura T, Nagayama M. Notch-mediated lateral inhibition regulates proneural wave propagation when combined with EGF-mediated reaction diffusion. Proc Natl Acad Sci U S A. 2016;113(35):E5153–62.
- Wang W, et al. Notch signaling regulates neuroepithelial stem cell maintenance and neuroblast formation in Drosophila optic lobe development. Dev Biol. 2011;350(2):414–28.
- Yasugi T, Sugie A, Umetsu D, Tabata T. Coordinated sequential action of EGFR and Notch signaling pathways regulates proneural wave progression in the Drosophila optic lobe. Development. 2010;137(19):3193–203.
- Bakshi A, Ben El Kadhi K, Desplan C. Decoding neuronal diversity: Mechanisms governing neural cell fate in Drosophila. Curr Opin Neurobiol. 2025;93.
- Holguera I, Desplan C. Neuronal specification in space and time. Science (1979). 2018;362(6411):176–80.
- Konstantinides N, et al. A complete temporal transcription factor series in the fly visual system. Nature. 2022;604(7905):316–22.
- Li X, et al. Temporal patterning of Drosophila medulla neuroblasts controls neural fates. Nature. 2013;498(7455):456–62.
- Suzuki T, Kaido M, Takayama R, Sato M. A temporal mechanism that produces neuronal diversity in the Drosophila visual center. Dev Biol. 2013;380(1):12–24.
- Chen YC, et al. Single-locus chromatin memory enables flexible spatial fate specification in the Drosophila visual system. bioRxiv. Published online August 21, 2026:2026.08.09.743789.
- Erclik T, et al. Integration of temporal and spatial patterning generates neural diversity. Nature. 2017;541(7637):365–70.
- Simon F, et al. Spatial, temporal and Notch determination of terminal selector expression controls neuronal cell fate in the Drosophila optic lobe. Nat Neurosci. 2026;29(5):1068–78.
- Bhattacharya A, Rao H, Sen SQ. Chromatin priming and Hunchback recruitment integrate spatial and temporal cues in Drosophila neuroblasts. eLife15:RP110150.
- Bostock MP, Prasad AR, Donoghue A, Fernandes VM. Photoreceptors generate neuronal diversity in their target field through a Hedgehog morphogen gradient in Drosophila. Elife. 2022;11:e78093.
- El-Danaf RN, et al. Morphological and functional convergence of visual projection neurons from diverse neurogenic origins in Drosophila. Nat Commun. 2025;16(1):1–15.
- Pinto-Teixeira F, et al. Development of Concurrent Retinotopic Maps in the Fly Motion Detection Circuit. Cell. 2018;173(2):485–98.
- Xu C, Ramos TB, Rogers EM, Reiser MB, Doe CQ. Homeodomain proteins hierarchically specify neuronal diversity and synaptic connectivity. Elife. 2023;12:RP90133.
- Arain U, Valentino P, Islam IM, Erclik T. Dissection, Immunohistochemistry and Mounting of Larval and Adult Drosophila Brains for Optic Lobe Visualization. J Vis Exp. 2021;(170):e61273.
- Zhang Y, Li X. Immunostaining of Drosophila Brains to Study Optic Lobe Development. Cold Spring Harb Protoc. 2024;2024(3):108157.
- Daul AL, Komori H, Lee CY. Immunofluorescent staining of Drosophila larval brain tissue. Cold Spring Harb Protoc. 2010;2010(7):pdb.prot5460.
- Sweeney ST, Hidalgo A, de Belle JS, Keshishian H. Dissection of adult Drosophila brains. Cold Spring Harb Protoc. 2011;2011(12):1472–4.
- Tito AJ, Cheema S, Jiang M, Zhang S. A Simple One-step Dissection Protocol for Whole-mount Preparation of Adult Drosophila Brains. J Vis Exp. 2016;(118):55128.
- Wu JS, Luo L. A protocol for dissecting Drosophila melanogaster brains for live imaging or immunostaining. Nat Protoc. 2006;1(4):2110–5.
Reprints and Permissions
This article has been published
Video Coming Soon