This video demonstrates a method to assess the bacterial load in Arabidopsis thaliana leaves infected with Pseudomonas syringae. Leaf discs from infected leaves are homogenized, serially diluted, and plated onto nutrient-rich agar to promote bacterial colony formation. Colony counts are then used to calculate colony-forming units (CFU) per leaf disc, providing a quantitative measure of the infection.
يتطلب اشتراك JoVE لعرض هذا المحتوى. تسجيل الدخول أو ابدأ نسخة تجريبية مجانية
مقالة منهجية
Assessing Pseudomonas syringae Infection Load in Arabidopsis thaliana Leaves
177 مشاهدة
⸱
يوليو 1, 2026
في هذه المقالة
الملخص
البروتوكول
The following text describes a stepwise protocol to perform an optimized Psm ES4326 syringe infiltration assay in Arabidopsis. Major procedures of this assay are represented in a simplified flowchart (Figure 1).
1. Plant Growth Conditions
- Sow seeds
- Prepare 2 pots (4 in diameter, 3.75 in tall) loosely filled with soil and water pots by soaking them from the bottom overnight (O/N) before draining the excess water.
- Sow 50-100 Arabidopsis seeds, wild-type Col-0 or npr1-1 mutant, on each pot with a folded 70 mm weighing sheet or other paper.
- Cover the pot with a water-sprayed transparent dome to increase the relative humidity to 80-90% (Figure 2A).
- Incubate the pot at 4 °C for 72 hr to allow for complete stratification and synchronous germination.
- Transfer the pot to the standard growth conditions (12 hr light/12 hr dark, 21 °C, light intensity 100 µmol/m2/sec, relative humidity 40%) to allow the seed to germinate. Crack the dome to generate a 2-3 in opening immediately after transfer to the growth room, which will help avoid water condensation.
- When the first true leaf reaches the size of 2-3 mm in length, transplant the seedlings from the pot to a 72-well flat filled with soil.
- Use a finger or a 1 ml pipette tip to create a 1-inch deep depression in the middle of the soil surface on the flat.
- Gently separate individual seedlings with as little root damage as possible. Carefully pick up seedlings that have intact roots with forceps.
- Place a single separated seedling together with the adhering soil clump to minimize transplantation shock into the depression, and gently pat down the surrounding soil to fill the depression. Discard the extra seedlings and soil into a biohazard waste container and dispose of it in accordance with the local biohazard waste disposal guidelines.
- Water transferred seedlings from the top and completely covered the flat with a water-sprayed transparent dome to maintain 80-90% humidity. Keep the dome on for 3 days, then crack the dome in the morning of day 4 and completely remove it by the end of that day.
Note: Sowing seeds can be alternatively performed by stratifying seeds in 1.5 ml centrifuge tubes containing 1 ml 0.1% agar for 48 hr at 4 °C, followed by transferring 2-3 seeds with a glass pipette onto a 72-well flat filled with soil. Flats need to be covered with a transparent dome that can be removed one week after germination. Extra seedlings can be removed to leave only one seedling per well.
- Water plants every two days by soaking flats in 1 inch of water for 20 min, then drain the excess water.
Note: The time interval for watering plants depends on the growth room humidity and needs to be determined based on continuous observation of the user’s plant growth facility. Check plants daily to make sure they are well watered. If only a few spots are drying, water those plants from the top with a squirt bottle. - Perform pathogen infection assays (Step 3-5) on plants that are at or near developmental stage # 3.50 (when rosette size is 50% final size), which corresponds to 3-5 weeks old, depending on growth conditions (photoperiod, temperature). Do not infect plants after inflorescence emergence (stage # 5) due to the onset of age-related resistance.
2. Preparation of Culture Media and Plates
- Make 1 L of King’s B (KB) liquid medium. Gently stir 20 g proteose peptone and 2 g potassium phosphate dibasic trihydrate using a magnetic stir bar with 1,000 ml deionized H2O until there is no visible pellet. Aliquot 100 ml into 150 ml glass bottles and autoclave on a 20-minute liquid cycle.
- Prepare culture plates with KB solid medium.
- Gently stir 20 g Proteose Peptone, 2 g Potassium Phosphate Dibasic Trihydrate, and 15 g Agar with 1,000 ml deionized H2O. Autoclave.
- Cool down the medium on a magnetic stir plate until it is cool to the touch to minimize future condensation and avoid degradation of antibiotics. Add 18 ml sterile 80% Glycerol and 5 ml sterile 1 M magnesium sulfate (MgSO4) to the medium. Given that Psm ES4326 carries resistance against streptomycin, add streptomycin into the cooled media to a final concentration of 50 µg ml−1.
- Pour the plates. Prepare two different sizes of KB media plates: 100 mm x 15 mm and 150 mm x 15 mm Petri dishes. The smaller Petri dish containing medium serves as the primary bacteria culture plate, and the larger Petri dish serves as a bacteria counting plate.
Note: For the bacteria counting plates, rectangular-shaped plates can be used to reduce the consumables cost since twice as many treatments can be plotted per plate compared to traditional round plates.- Pour the plates prior to the infection experiment. Store KB medium plates at 4 °C for up to 2-3 months since streptomycin sulfate gradually loses its antibiotic activity.
3. Enhanced Disease Susceptibility (EDS)
- Day 1 - Streak bacteria on a plate
- Two days before the EDS assay, streak Psm ES4326 from -80 °C glycerol stock on a KB-Strep bacterial culture plate and incubate at 28 °C for 24-48 hr.
- Day 2 - initiate liquid culture and water plants
- Initiate the liquid culture in a sterile test tube with 4 ml liquid KB medium containing 50 µg ml−1 streptomycin and shake at 250 rpm, 28 °C O/N.
Note: For the EDS infection assay, using 6 plants per genotype is recommended. For STI and MTI assays, 6 plants per genotype per treatment are recommended. For the bacteria inoculum, it is recommended to use a fresh liquid culture with an optical density at λ600nm between 0.3 and 0.6. - Mark the petioles of leaves number 5 and 6 with a blunt-end waterproof marker for easy identification of infected tissue at sampling (Figure 1). To enhance the opening of stomata and facilitate the entrance of pathogen solution into the leaf, water the plants well by soaking the flat from the bottom for 20 min, then drain the excess water.
Note: Alternatively, cover the flat with a transparent dome and soak it in water for 2-4 hr to increase the stomatal opening. - Day 3 - Pathogen dilution and syringe infiltration
Note: Pathogen infection during morning hours is optimal for pathogen proliferation and the development of the most pronounced disease symptoms on susceptible genotypes. Make every effort to keep the infection timing consistent to eliminate the effect of circadian rhythms and diurnal gene regulation, which helps reduce the variation among experimental replications.- Pellet the bacterial culture in a microcentrifuge 1.5 ml tube at 9,600 x g for 2 min at room temperature (RT) and discard the supernatant. Resuspend the bacterial pellet with 1 ml of sterile 10 mM magnesium chloride (MgCl2).
Note: Magnesium cations can enhance the motility and adhesion of P. syringae. Alternatively, use MgSO4 at the same concentration. Sterile water is an acceptable substitute for the Mg salt solutions. - Dilute the bacteria suspension with 9 ml of 10 mM MgCl2 in a 50 ml centrifuge tube and measure the optical density (OD) of bacteria with a spectrophotometer at λ=600 nm. Dilute the bacteria with 10 mM MgCl2 to the final OD600nm=0.0002 for the EDS infection assay.
- Infiltrate the leaf with a 1 ml blunt-end needleless syringe (commonly known as the insulin syringe) that contains the diluted bacterial solution.
- Do not fill the syringe up to its full capacity. Fill it up with 0.5-0.6 ml to allow for much better control during the infiltration process.
- Expose the lower surface of the leaf on the top of the index finger, and then gently adjust the leaf position with the help of the thumb. Position the syringe vertically against the leaf surface to ensure that pressure is evenly distributed. Try to avoid the midrib area during the infiltration to reduce leaf damage.
- Slowly push the plunger to infiltrate the bacterial solution; liquid entry into the leaf mesophyll will be visualized as indicated by the darker leaf color. Attempt to infiltrate the entire surface of the leaf. If this is not accomplished in a single attempt, choose another infiltration spot and repeat the actions described above until the entire leaf surface is covered.
- Once completed, gently blot the leaf with absorbent tissue to remove the extra pathogen solution. Visually inspect the infected leaf tissue for damage.
Note: The circular syringe impression should not be visible after the infiltration is complete. - Leave the infiltrated plants to dry for 1-2 hr before returning them to their original growth conditions. Next, spray a clear dome with water and cover the infected plants for 2 hr, then crack the dome to generate a 2-3 in opening and leave it on throughout the remainder of the infection experiment.
Note: Since P. syringae is not an airborne pathogen, there is no risk of spreading the infectious agent to other plants grown in the same facility. However, as an added precaution, avoid physical contact between infected plants and other experimental plants located nearby. Covering the flat with a transparent dome will increase the pathogen virulence and accelerate disease progression. The need for this step and the optimal duration of the covering period need to be determined based on the humidity conditions of the user’s plant growth facility.
- Pellet the bacterial culture in a microcentrifuge 1.5 ml tube at 9,600 x g for 2 min at room temperature (RT) and discard the supernatant. Resuspend the bacterial pellet with 1 ml of sterile 10 mM magnesium chloride (MgCl2).
- Day 5 - Pre-dry the media plates
- Take the 150 mm x 15 mm KB plates out of the cold storage unit and dry any pre-existing water condensation on the plate. Dry plates by keeping them at RT for roughly 24 hr. To speed up this process, place them in a laminar flow hood with their lids cracked for 30-60 min.
Note: This step is critical for the formation of a circular droplet on the surface of the plate in the next step.
- Take the 150 mm x 15 mm KB plates out of the cold storage unit and dry any pre-existing water condensation on the plate. Dry plates by keeping them at RT for roughly 24 hr. To speed up this process, place them in a laminar flow hood with their lids cracked for 30-60 min.
- Day 6 - Quantifying the pathogen growth
Note: The following pathogen quantification procedure may be performed at earlier time points after the infection to confirm equal amounts of bacteria are delivered into the leaf, especially when plants have altered leaf morphology.- Process the infected tissue after the emergence of chlorosis, indicated by the yellowing of the infected tissue in the susceptible genotypes, but before the development of necrotic lesions (Figure 2B).
Note: Suggested sampling time is three days after the pathogen inoculation. However, since pathogen growth depends on a number of environmental factors, the length of incubation may vary within a range of 2 ½-3 ½ days and needs to be determined by careful observations of the infection progression in the user’s plant growth facility.- Prepare 6 grinding tubes for each genotype (Figure 1). Place one stainless steel grinding ball and add 500 µl sterile 10 mM MgCl2 into each tube.
- Detach the infected leaf from the plant and punch a leaf disc with a 1-hole paper punch (Figure 1).
Note: To minimize the sampling error, try to punch each sampled leaf at the same position. Sampling of the leaf disc from the top of the leaf is recommended. - Randomly place 2 leaf discs (from two different plants) into each grinding tube using forceps.
- Seal the tube and homogenize the tissue with a high-throughput homogenizer at maximum speed (1,600 strokes per minute) for 10 min. Repeat this process if needed until the tissue is well homogenized, and the solutions turn green due to chlorophyll release from the infected leaves.
- While waiting for the homogenization, fill the first 6 rows of a 96-well culture plate with 180 µl 10 mM MgCl2 using a multi-channel pipette and a pipetting reservoir.
- After grinding, transfer 20 µl of ground tissue suspension into the first row of the 96-well plate and mix by repeatedly pipetting the liquid up and down. If small fragments of tissue clog the tip, clip it by 2-3 mm to help acquire the correct volume of the solution.
- To provide enough space for the droplet on the top of the plate, space the tissue from different genotypes in alternative rows (Figure 1). To prepare a ten-fold serial dilution, transfer 20 µl of liquid into the second row and repeat this procedure until the sixth dilution.
- Transfer 20 µl of the solution from the 96-well plate onto the 150 mm x 15 mm KB plate using divided pipette tips (Figure 1). Work from the most dilute suspension to the most concentrated.
Note: Proceeding from the most diluted to the most concentrated makes it unnecessary to change pipette tips between the dilutions. If the plate is well pre-dried, the transferred droplet should stay intact on the top of the medium until absorbed (usually 15-30 min). Drying time varies with the RT and humidity. - Dry the plate at RT with the lid cracked. Once no more liquid can be observed on the plate surface, close the lid, invert and incubate the plate at RT or a 28 °C incubator.
- Incubate plates for 40-60 hr until the colonies become visible. Confirm that the growth on the plates reflects the predictable 10-fold drop in colony-forming units (cfu) (Figure 2C). Count the bacteria before they overgrow and colonies fuse. Determine the number of bacteria in the lowest dilution that does not have overlapping colonies. Usually, the preferred dilution to be counted will contain between 10 and 50 colonies.
Note: Variation may be present among technical replicates; therefore, the lowest dilution for each replicate should be determined separately. - To calculate the levels of bacterial proliferation, document the number of the row (R) as well as the number of bacteria within each technical replicate (T) in writing. Determine the number of colony forming unit – cfu/leaf disc through the formula: cfu/leaf disc = (T × 10R / 20) × 500 / 2
- Type the data in the following spreadsheet template to produce a graph (Figure 1). Each data point is represented as the mean of six technical replicates on a logarithmic scale. Error bars represent 95% confidence interval of the mean (n = 6).
Note: The calculation of 95% confidence intervals needs to be adjusted based on the number of technical replicates.
- Process the infected tissue after the emergence of chlorosis, indicated by the yellowing of the infected tissue in the susceptible genotypes, but before the development of necrotic lesions (Figure 2B).
- Initiate the liquid culture in a sterile test tube with 4 ml liquid KB medium containing 50 µg ml−1 streptomycin and shake at 250 rpm, 28 °C O/N.
الوصول مقيد. يرجى تسجيل الدخول أو بدء فترة تجريبية لعرض هذا المحتوى.
النتائج
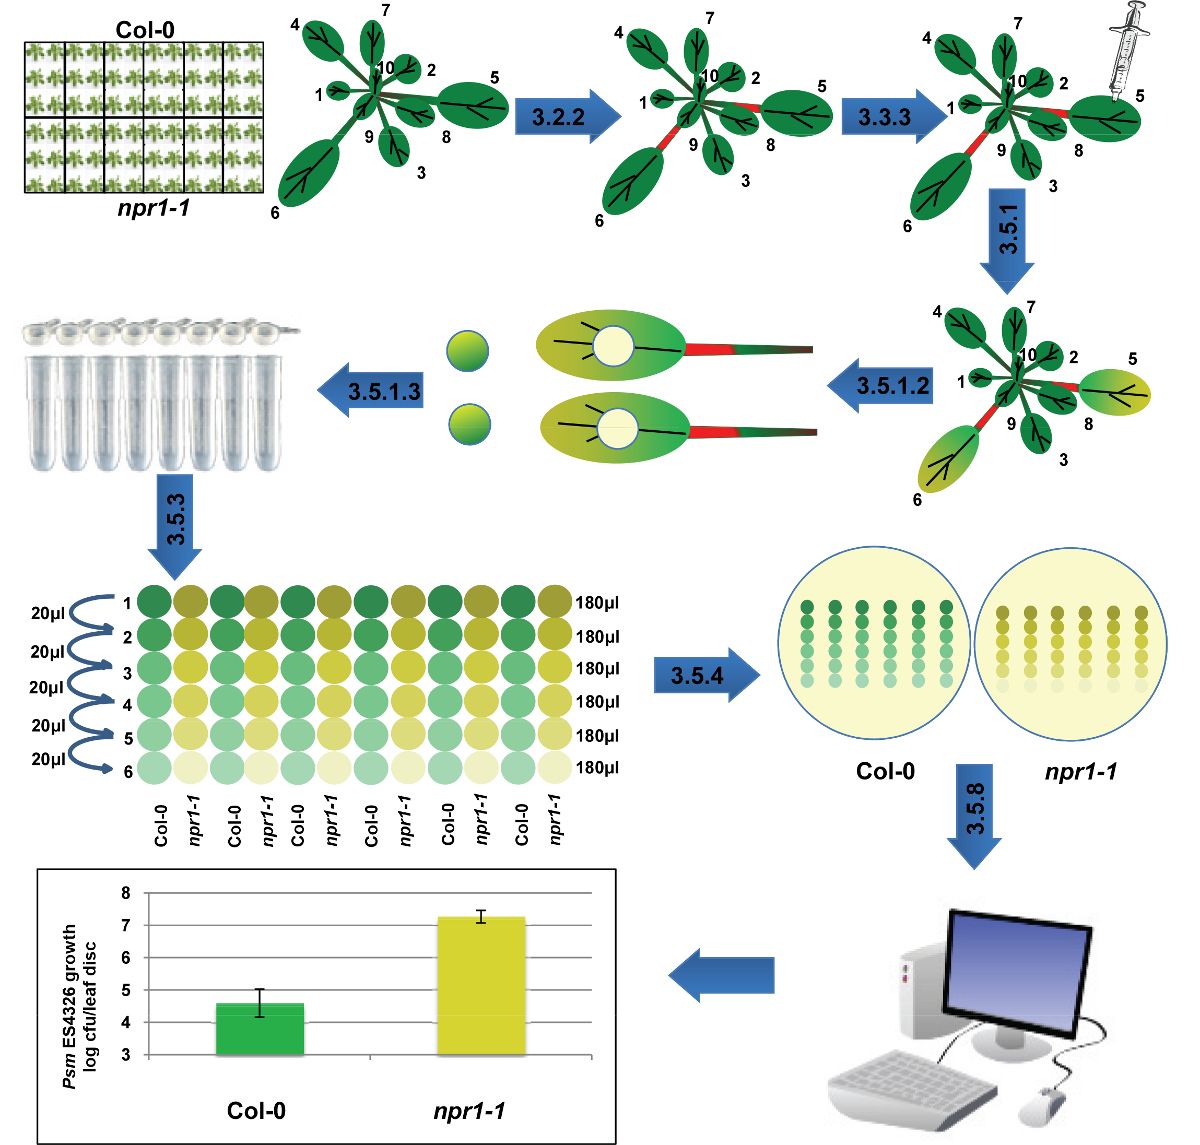
Figure 1. Schematic representation of Psm ES4326 syringe infiltration assay on Arabidopsis plants. Leaves number 5 and 6 of adult soil-grown Arabidopsis plants are marked and infected with Psm ES4326 through syringe infiltration. Af...
الوصول مقيد. يرجى تسجيل الدخول أو بدء فترة تجريبية لعرض هذا المحتوى.
المواد
| الاسم | الشركة | رقم فهرسي | التعليقات |
|---|---|---|---|
| MetroMix 360 | Grosouth | SNGMM360 | |
| Large pots | Grosouth | TEKUVCC10TC | |
| 12 x 6 Inserts | Grosouth | LM1206 | |
| 11x 21 Flats with no holes | Grosouth | LM1020 | |
| 11x 21 Flats with holes | Grosouth | LM1020H | |
| Vinyl propagation domes | Grosouth | CW-221 | |
| Proteose Peptone | Fisher Scientific | DF0122-17-4 | |
| Potassium Phosphate Dibasic Trihydrate | MP Biomedicals | 151946 | |
| Agar | Fisher Scientific | A360-500 | |
| Streptomycin sulfate | Bio Basic Inc | SB0494 | |
| 100 x 15 mm Petri dishes | Fisher Scientific | FB0875713 | |
| 150 x 15 mm Petri dishes | Fisher Scientific | R80150 | |
| Rectangular plate | Fisher Scientific | 12-565-450 | |
| MgCl₂ Hexahydrate | Bio Basic Inc | MB0328 | |
| Glycerol | Bio Basic Inc | GB0232 | |
| MgSO₄ | Bio Basic Inc | MN1988 | |
| 1 ml syringe | Fisher Scientific | NC9992493 | |
| Kimwipe | Fisher Scientific | 06-666-A | |
| Grinding tubes | Denville Scientific | B1257 | |
| Caps for grinding tubes | Denville Scientific | B1254 | |
| Stainless steel grinding ball | Fisher Scientific | 2150 | |
| 96-well plate | Fisher Scientific | 12-556-008 | |
| Sodium Salicylate | Sigma Aldrich | s3007-1kg | |
| flg22 (QRLSTGSRINSAKDDAAGLQIA) | Genescript | Made to order | |
| elf18 (Ac-SKEKFERTKPHVNVGTIG) | Genescript | Made to order | |
| Hole puncher | Staples | 146308 | |
| Biophotometer plus | Eppendorf | 952000006 | |
| PowerGen High-Throughput Homogenizer | Fisher Scientific | 02-215-503 | |
| Accu spin micro centrifuge | Fisher Scientific | 13-100-675 | |
| Multichannel pipette (10-100 µl) | Eppendorf | 3122 000.043 | |
| Multichannel pipette (30-300 µl) | Eppendorf | 3122 000.060 | |
| Pipette (20µl) | Eppendorf | 3120 000.038 | |
| Pipette tips | Fisher Scientific | 3552-HR | |
| Sharpie permanent marker | Staples | 507130 | |
| 1.5 ml tube | Eppendorf | 22363204 | |
| Forceps | Fisher Scientific | 08-890 |
