本方案为使用一种新型开源自动化技术进行黏性材料标准化且可重复混合的全面教程。文中详细介绍了新开发的开源工作站的操作方法、开源方案设计软件的使用,以及验证和确认可重复混合物的方法。
本文内容
摘要
摘要
目前,粘性材料的混合步骤依赖于重复且耗时的操作,主要以手动方式进行,通量较低。这些问题在工作流程中构成了缺陷,最终可能导致研究结果无法重现。基于手动操作的工作流程进一步限制了粘性材料的发展及其广泛应用,例如用于生物医学领域的水凝胶。通过采用具有标准化混合流程的自动化工作流程,可以克服这些挑战,从而提高实验的可重复性。本研究提供了逐步操作指南,介绍如何使用开源实验方案设计工具、操作开源工作站,并确定可重复的混合物。具体而言,该开源实验方案设计工具可引导用户完成实验参数的选择,并生成可直接用于操作工作站的协议代码。该工作站针对粘性材料的移液操作进行了优化,通过集成温度控制模块(适用于温敏性材料)、正置换式移液器(适用于粘性液体)以及可选的吸头触碰模块(用于去除移液头表面多余材料),实现自动化且高度可靠的样品处理。混合物的验证通过快速且低成本的橙黄G(Orange G)吸光度测定完成。本方案展示了制备80% (v/v) 甘油混合液、明胶甲基丙烯酰基(GelMA)的系列稀释液,以及5% (w/v) GelMA与2% (w/v) 海藻酸钠双网络水凝胶的结果。文中还包含故障排除指南,以帮助用户顺利采用该协议。所述工作流程可广泛应用于多种粘性材料,实现用户自定义浓度的自动化配制。
引言
可重复性与可再现性在科学研究中至关重要1,2,3,4然而,最近的证据表明,在基础科学以及转化研究中,重复高影响力生物医学研究存在显著挑战4,5,6,7导致结果不可重复的因素复杂多样,例如研究设计不佳或存在偏倚6,8统计功效不足3,9,未符合报告标准的要求7,10,11,发表论文的压力6或不可用的方法或软件代码6,9其中,协议中的细微变化以及 实验执行过程中的人为错误已被确认为导致不可重复性的另一因素4例如,手动移液操作会引入个体内部和个体之间的不精确性12,13 并增加人为错误的概率14. 尽管商用液体处理机器人能够克服这些缺点,并已在液体处理中展现出更高的可靠性15,16,17对于具有显著黏性特性的材料,其自动化操作仍然具有挑战性。
商用液体处理机器人通常使用气垫移液器,也称为空气活塞或空气置换移液器。试剂与活塞之间由一层气垫隔开,该气垫在分配过程中收缩,在吸取过程中膨胀。使用气垫移液器时,粘性材料进入和离开吸头的速度较慢,若移液器过早从液体中取出,可能导致吸入空气泡。在分配操作中,粘性材料会在吸头内壁留下一层液膜,该液膜在空气推动下流动缓慢甚至完全不流动。为解决这些问题,商业上引入了正置换移液器,通过实心活塞主动将粘性材料从吸头中推出。尽管正置换移液器能够实现对粘性材料的精确且可靠的处理,但配备正置换移液器的自动化解决方案在学术实验室环境中仍然过于昂贵,因此,大多数涉及粘性材料的工作流程仍完全依赖手动移液操作18。
通常,黏度被定义为流体对流动的阻力,而黏性材料则进一步被定义为黏度高于水(25 °C 时为 0.89 mPa·s)的材料。在生物医学应用领域,实验设置中通常包含多种黏度高于水的材料,例如二甲基亚砜(DMSO;25 °C 时为 1.99 mPa·s)、甘油(90% 甘油 [v/v],25 °C 时为 208.1 mPa·s)、Triton X-100(25 °C 时为 240 mPa·s)以及吸水溶胀的聚合物,即被称为水凝胶19,20。水凝胶是由亲水性聚合物网络以物理和/或化学方式交联而成,广泛应用于细胞包封、药物递送和软体驱动器等19,20,21,22。水凝胶的黏度取决于聚合物浓度和分子量19。常规用于生物医学应用的水凝胶其黏度值范围在 1 至 1000 mPa·s 之间,而某些特定的水凝胶体系报道的黏度值可高达 6 × 10⁷ mPa·s19,23,24。然而,水凝胶的黏度测量在测量方法和样品制备方面尚无统一标准,因此不同研究之间的黏度数值难以直接比较。
由于目前市场上尚无专为水凝胶设计的商业化自动解决方案,或相关设备过于昂贵,水凝胶的现有工作流程仍依赖于人工操作18。为了理解当前人工操作在水凝胶移液过程中的局限性,有必要了解其关键操作步骤18。例如,当一种新型水凝胶材料合成后,通常需要制备特定浓度或一系列不同浓度的稀释液,以确定可靠的合成方案和交联特性,并进一步分析其力学性能25,26,27,28。一般首先制备或购买储备液,随后将其与稀释剂和/或其他试剂混合,以获得所需混合物。这些混合操作通常不在孔板(或任何输出格式)中直接进行,而是先在单独的反应管中完成,该反应管通常称为母液混合管(master mix)。在准备过程中,需要多次进行吸取和分液操作,以转移黏稠材料、混合试剂,并将最终混合物转移至输出容器(例如96孔板)。这些操作耗费大量人力18,实验耗时长,且增加了人为错误的概率,可能导致结果不准确。此外,人工操作难以高效制备大量样品,从而限制了对多种参数组合进行详细表征的能力。人工处理还阻碍了水凝胶在高通量筛选中的应用,例如在药物研发过程中筛选有前景的化合物。现有的人工制备方法无法适用于包含数千种药物的化合物库筛选。因此,亟需自动化解决方案,以实现高效开发,并推动水凝胶在药物筛选应用中的成功转化。
为了从基于人工的操作流程转向自动化流程,我们通过集成适用于温敏材料的温控模块、采用市售的使用毛细活塞吸头的正排量移液器,以及可选的吸头触碰清洗模块,优化了一款商用开源移液机器人,以实现对黏性材料的高效处理。该移液机器人进一步被集成作为新开发的开源工作站中的移液模块,该工作站由即装即用且可定制的模块组成18,29。该工作站的详细组装说明,包括硬件和软件文件,均可在GitHub(https://github.com/SebastianEggert/OpenWorkstation)和Zenodo数据库(https://doi.org/10.5281/zenodo.3612757)免费获取。除硬件开发外,还开发并发布了一款开源实验方案设计应用程序,用于引导用户完成参数选择过程,并生成可直接使用的实验方案代码(https://github.com/SebastianEggert/ProtocolDesignApp)。该代码既可在商用开源移液机器人上运行,也可在所开发的开源工作站上运行。
本文提供了关于操作开源工作站以实现对粘性材料进行自动化混合任务的全面教程(图1)。本教程所涉及的具体实验步骤既可在所开发的开源工作站上执行,也可在商用开源移液机器人上实施。借助本研究团队自主开发的开源实验方案设计应用程序,实现了对甘油、甲基丙烯酰化明胶(GelMA)和海藻酸钠所需浓度的自动化混合与制备。本教程选择甘油作为对象,是因为其性质已被充分表征30,31,且价格低廉、易于获取,因此常被用作自动化移液操作中的粘性参考材料。作为生物医学应用中所用的水凝胶示例,本研究采用了GelMA和海藻酸钠水凝胶前体溶液进行自动化混合实验。GelMA是细胞包封研究中最常用的水凝胶之一32,33,而本研究选择海藻酸钠则是为了展示制备双网络水凝胶的能力34,35。本研究使用橙G(Orange G)作为染料,通过分光光度计建立了一种快速且低成本的方法,用于验证和确认混合结果16。
已将一款商用开源移液机器人作为移液模块集成到所开发的开源工作站中(图2a),因此下文将使用“移液模块”一词来描述该移液机器人。所安装硬件的详细说明不在本协议的范围内,相关信息可通过提供的代码仓库获取,其中也包含该开源平台总体组装的分步说明。移液模块可配备两个移液器(单通道或8通道移液器),分别安装在A轴(右侧)和B轴(左侧)(图2b)。移液模块提供符合美国国家标准协会/实验室自动化与筛选协会(ANSI/SLAS)标准的10个板位容量,板位上的位置定义如下:A1、A2、B1、B2、C1、C2、D1、D2、E1、E2(图2c)。为启动水凝胶溶液的光诱导聚合,需配备独立的交联模块,并已将其添加至工作站。该交联模块配备波长为400 nm的LED,因此当前系统可使用在可见光波长下激发的物质,例如锂苯基-2,4,6-三甲基苯甲酰基次磷酸盐(LAP)36,37。用户可在协议设计应用程序中设定LED的光强(单位为mW/cm2),以研究交联行为38。工作站还包含一个存储模块,以支持更高通量的研究;但本研究中未使用该模块,因此不再进一步描述。通常建议在生物安全柜内操作移液模块,以避免样品污染。用于操作移液模块的主电源电路为12 V电路,在大多数国家被视为低压应用。所有电气组件均置于专用控制箱内,防止用户接触电击危险源。
通过遵循这些标准化的混合方案,研究人员能够以自动化方式获得可靠且适用于高粘性及非高粘性材料的混合物。开源的方法允许用户优化混合序列,并与科研社区共享新开发的方案。最终,该方法将有助于筛选多种参数组合,以研究不同因素之间的相互依赖关系,从而加快高粘性材料在生物医学应用中的可靠应用与开发进程。
方案
注意:本方案首先介绍(1)软件和(2)硬件设置,以帮助用户熟悉所需的安装步骤及工作站系统。随后详细说明(3)材料准备和(4)协议设计应用程序的使用方法,接着重点介绍(5)移液模块的校准以及(6)自动化方案的执行过程。最后,描述了(7)验证与确认程序,包括吸光度读数和数据分析。各步骤组成的整体方案工作流程见图1。
1. 软件设置
注意:本节包含安装应用程序编程接口(API)以及所需协议设计应用程序和校准终端的详细说明。以下说明针对树莓派(RPi)单板计算机编写;但 API 及相关应用程序也可在 Windows 8、10 和 macOS 10.13 及以上系统上成功运行。
- 设置计算机环境。
注意:需熟悉 Python39 的基础知识、如何设置和使用树莓派(Raspberry Pi)40,41,以及如何连接互联网42。以下教程步骤聚焦于协议特定的操作,有关树莓派使用的更多详细信息可在线获取40。- 从任务栏或应用程序菜单中打开终端窗口。
- 更新系统软件包列表:
sudo apt-get update - 升级所有已安装的软件包:
sudo apt-get dist-upgrade - 重启树莓派:
sudo reboot - 检查已安装的 Python 版本:
python3 --version
确保已安装至少 Python 3.5;若未安装,请安装最新版本43。 - 安装 python pip,该工具用于通过 Python 软件包索引发布 Python 软件包44:
sudo apt-get install python3-pip - 安装依赖项:
pip install numpy
pip install python-resize-image
注意:如果使用 Windows 系统,需通过以下命令安装 windows-curses 软件包:python -m pip install windows-curses
- 安装应用程序编程接口(API)。
注意:该 API 提供了一个简单的 Python 框架,用于编写实验协议脚本并操作工作站。成功执行生成的协议代码需要以下两个 API。- 安装工作站 API:
pip install openworkstation - 安装用于操作移液模块的 Opentrons API:
pip install opentrons==2.5.2 - 验证 API 是否安装成功:
python3
>>> import openworkstation
>>> import opentrons
注意:API 和协议设计应用程序的大小分别为 2.2 MB 和 1.2 MB。在磁盘空间有限(200 MB)的情况下安装时未遇到任何问题。然而,实际磁盘空间需求取决于操作系统。
- 安装工作站 API:
- 选择文件下载目录(校准终端、协议设计应用程序等)。
注意:文件之后可复制并粘贴到其他位置。 - 从 GitHub 仓库克隆文件:
git clone https://github.com/SebastianEggert/OpenWorkstation
注意:“git clone”命令会将所有文件克隆并保存到当前终端所打开的目录中。由于该仓库还包括用于组装的硬件文件,因此执行本研究中所述协议并不需要整个仓库。所有用于复现实验的必要文件均可在 补充文件 中以及 GitHub 仓库的“/examples/publication-JoVE”路径下找到。 - 打开已下载的文件夹。如果已下载整个仓库,请通过以下命令进入“publication-JoVE”文件夹:
cd openworkstation/examples/publication-JoVE
注意:该文件夹包含操作工作站、使用协议设计应用程序以及校准终端所需的全部文件。
2. 硬件设置
- 将工作站放置在生物安全柜中,以避免样品污染。
- 在工作站上安装移液器。
- 根据实验设置选择移液器规格。通常,应选择待吸取体积位于量程较高一端的移液器。如果特定实验需要处理大于1 mL的液体体积(例如,吸取/分液2 mL),请选择最大吸取/分液体积为1,000 µL的M1000E,以减少移液步骤并节省时间。
注:空气置换移液器的详细操作说明可在线获取45。所开发的移液模块可兼容以下市售正置换移液器:M10E(1–10 µL)、M25E(3–25 µL)、M50E(20–50 µL)、M100E(10–100 µL)、M250E(50–250 µL)、M1000E(100–1,000 µL)。 - 使用M4内六角扳手松开和紧固螺丝。
- 将两个移液器固定板(白色亚克力板)安装到铝制导轨上,并先将M5螺丝轻轻拧紧。
- 将移液器插入两个移液器固定板中,并确保移液器的人体工学尾部紧靠亚克力安装板的对侧。
- 牢固拧紧两个移液器固定板上的四颗螺丝。
- 将固定在亚克力安装板上的两个方形紧固螺母滑入Z轴的槽口中,并拧紧螺丝。
注:务必牢固固定移液器,以避免运行过程中发生任何移动。
- 根据实验设置选择移液器规格。通常,应选择待吸取体积位于量程较高一端的移液器。如果特定实验需要处理大于1 mL的液体体积(例如,吸取/分液2 mL),请选择最大吸取/分液体积为1,000 µL的M1000E,以减少移液步骤并节省时间。
3. 材料准备
注意:本研究中使用的黏性材料(甘油、GelMA、海藻酸盐)用于实验,因此制备的体积和操作步骤(例如,在5 mL离心管中加入5 mL储备溶液)均针对本实验设置而设计。
- 甲基丙烯酰化明胶(GelMA)
注意:GelMA 的功能化、透析和冻干不在本文讨论范围内,相关逐步实验方案可参见 Loessner 等人的文献。33. 该方案首先使用 冻干 GelMA,可自行制备或商业购买。- 计算所需 GelMA 的质量(mGelMA)基于期望的最终储备浓度(cGelMA)和体积(VGelMA)使用以下公式:
mGelMA = cGelMA x VGelMA
注意:VGelMA 的用量取决于实验设置,建议制备 20−30% 的过量材料。本方案以 5 mL 的 20% (w/v) GelMA 作为储备液开始。 - 称取所需量的冻干 GelMA,加入 50 mL 反应管中,并加入所需量的磷酸盐缓冲液(PBS)。
- 将 GelMA 通过在 4 °C 下浸泡于溶剂中进行混合 °C,过夜或加热至60 °在水浴中 6 小时,温度为 C
注意:无菌 GelMA 溶液可在 4 ℃ 避光保存 °C,至少六个月。 - 将5 mL GelMA加入5 mL反应管中。
- 计算所需 GelMA 的质量(mGelMA)基于期望的最终储备浓度(cGelMA)和体积(VGelMA)使用以下公式:
- 光引发剂:苯基-2,4,6-三甲基苯甲酰基亚磷酸锂(LAP)
注意:避免暴露于室内光线,因为 LAP 对光敏感。- 计算所需 LAP 的质量(mLAP) 根据所需的最终储备浓度(cLAP)和所需体积(VLAP)使用以下公式:
mLAP = cLAP x VLAP
注意:建议配制3% (w/v)的储备液。 - 称取所需量的LAP,加入15 mL反应管中,再加入PBS。
- 用铝箔包裹试管,以防止光诱导分解。
- 将反应管置于37℃水浴中,使LAP溶解 °C 下 2 小时,或直至完全溶解。
- 在5 mL离心管中加入1 mL LAP储存溶液。
- 计算所需 LAP 的质量(mLAP) 根据所需的最终储备浓度(cLAP)和所需体积(VLAP)使用以下公式:
- 海藻酸盐
- 计算所需海藻酸钠的量(m海藻酸盐)基于期望的最终储备浓度(c海藻酸钠)和体积(V海藻酸盐)使用以下公式:
m海藻酸盐 = c海藻酸盐 x V海藻酸盐
注意:海藻酸钠(alginate)的用量取决于实验设置,建议制备20−30%过量的材料。本方案以5 mL 4% (w/v) 海藻酸钠作为起始储备溶液。 - 称取所需质量的海藻酸钠,加入50 mL反应管中,再加入PBS。
- 将海藻酸盐混合物放入37℃水浴中 °C,4 小时。
注意:使用涡旋混合器可加速溶解过程,但也会产生气泡。溶解后的海藻酸钠可在 4 ℃ 长期保存。 °C,至少六个月。 - 将5 mL海藻酸钠加入5 mL反应管中。
- 计算所需海藻酸钠的量(m海藻酸盐)基于期望的最终储备浓度(c海藻酸钠)和体积(V海藻酸盐)使用以下公式:
- 在5 mL离心管中加入5 mL甘油。
- 橙G溶液
- 在50 mL反应管中配制10 mg/mL的Orange G储备液。
注意:体积取决于实验次数。根据稀释剂类型,使用超纯水、PBS 或合适的稀释试剂配制储备液。在本研究所示实验中,甘油使用超纯水稀释,GelMA 和海藻酸钠使用 PBS 稀释。PBS 可用于稀释 GelMA 和海藻酸钠,可通过片剂配制或直接购买成品。 - 涡旋混合10秒。
- 用铝箔包裹试管,以防止光诱导分解。
注意:储备液需静置24小时后方可使用,以确保橙G充分溶解。 - 在50 mL反应管中将储备液稀释至1 mg/mL的工作液。
- 将工作液转移至适合实验设置的烧瓶/试管中。
注意:对于本实验,工作液被分装至5 mL离心管中。Orange G 储备液和工作液可在4℃保存 °C,并在配制后三个月内使用。 - 在5 mL离心管中加入5 mL的1 mg/mL Orange G工作溶液。
- 在50 mL反应管中配制10 mg/mL的Orange G储备液。
4. 使用实验方案设计应用程序生成实验方案代码
注意:步骤 4.2−4.7 中指定的参数在所有实验中均相同,仅材料的储备浓度和最终输出浓度除外。这些参数汇总于表 1中,下文所述参数用于制备含 5% (w/v) GelMA、2% (w/v) 海藻酸钠、0.15% (w/v) LAP 并以 PBS 作为稀释剂的双网络水凝胶。
- 通过运行“ProtocolDesignApp.html”打开协议设计应用程序。
注意:应用程序“ProtocolDesignApp.html”将引导用户完成实验参数的选择过程,并自动生成可用于操作工作站的现成协议。该用户界面可在所有常用互联网浏览器(如 Chrome、Firefox、Safari、Edge、Internet Explorer)上运行。 - 在设置页面中输入协议名称(例如,double-network-hydrogels)。
- 点击“继续”以确认协议名称并进入下一步。
- 通过从下拉菜单中选择“3x4 加热模块”并设置以下输入参数,定义输入板:
- 从下拉菜单中选择“Gel 1”,输入名称“GelMA”,输入储备浓度“20%”,将“样本数量”设为“3”以填满一列。点击“+添加”保存输入内容。
- 从下拉菜单中选择“Gel 2”,输入名称“Alginate”,输入储备浓度“4%”,将“样本数量”设为“3”以填满一列。点击“+添加”保存输入内容。
- 从下拉菜单中选择“Photoinitiator”,输入名称“LAP”,输入储备浓度“3%”,将“样本数量”设为“3”以填满一列。点击“+添加”保存输入内容。
- 从下拉菜单中选择“Diluent 1”,输入名称“PBS”,将“样本数量”设为“3”以填满一列。点击“+添加”保存输入内容。
注意:点击“+添加”后,输入板的可视化界面将自动更新。若添加的样本数超过板位容量,系统将向用户显示警告信息“样本过多,超出此板位容量”。
- 勾选“光交联”并输入交联时间(秒)“30”和光强 W/m2“2”,以定义交联参数。
- 点击“继续”完成输入设置。
- 在下拉菜单中选择“96 孔板”作为板类型,以定义输出板设置。
- 点击“Group1”以创建样本组,定义输出样本:
- 在各输入项对应的字段中输入目标浓度和样本体积,以指定输出组分:GelMA = “5”,Alginate = “2”,LAP = “0.15”,总体积 = “60”。
- 勾选复选框以启用高级混合协议。
- 在“样本数量”字段中输入“96”,以指定样本总数。
注意:点击“+添加组”后,样本板的可视化界面将自动更新。若添加的样本数超过板位容量,系统将向用户显示警告信息“样本过多,超出此板位容量”。 - 点击“继续”完成输出设置。
- 在甲板布局中选择板位位置,并相应准备平台:
- 勾选“SLOT A1”字段,并从下拉菜单中选择“Empty_Cell”。
- 勾选“SLOT A2”字段,并从下拉菜单中选择“Trash_Cell”。
- 勾选“SLOT B1”字段,并从下拉菜单中选择“Tips_Cell_100µL”。
- 勾选“SLOT B2”字段,并从下拉菜单中选择“Tips_Cell_1000µL”。
- 勾选“SLOT C1”字段,并从下拉菜单中选择“Input_Cell”。
- 勾选“SLOT C2”字段,并从下拉菜单中选择“Empty_Cell”。
- 勾选“SLOT D1”字段,并从下拉菜单中选择“Mixing_Cell”。
- 勾选“SLOT D2”字段,并从下拉菜单中选择“Output_Cell”。
- 通过勾选“左侧移液器”,从下拉菜单中选择“10-100µL 正排量”,并设置吸液速度 = “600”,排液速度 = “800”,以定义第一支移液器(M100E)的类型和特性。
- 通过勾选“右侧移液器”,从下拉菜单中选择“100-1000µL 正排量”,并设置吸液速度 = “800”,排液速度 = “1200”,以定义第二支移液器(M1000E)的类型和特性。
- 点击“生成协议”以确认设置并生成协议脚本。
注意:每当生成新协议时,所开发的协议设计应用程序会自动创建一个新文件夹。本实验及工作站运行所需的所有文件均保存在以协议名称命名的该文件夹中。该文件夹可复制到不同目录而不会引发问题。 - 请勿关闭该界面,因其将在后续步骤中用于执行协议(参见步骤 6.6)。
5. 移液模块的校准
注意:容器(例如,孔板、吸头架、废液槽)和移液器(例如,M1000E)必须在初次使用时进行校准。如果容器和/或移液器的位置发生修改或变动,必须对新位置重新进行校准。
- 导航至协议文件夹,并通过在终端窗口中执行 文件“calibrate.py”来打开校准终端(参见步骤 1.1.1):
phython.calibrate.py
注意:“calibrate.py”界面将引导用户完成台面设置和移液器的校准。请确保该文件与协议文件及模块文件位于同一文件夹中。该文件将在步骤 4.10 中自动生成。 - 使用数字小键盘(1−8)选择推杆在 x、y、z 方向上的移动增量:“1”对应 0.1 mm,“2”对应 0.5 mm,“3”对应 1 mm,“4”对应 5 mm,“5”对应 10 mm,“6”对应 20 mm,“7”对应 40 mm,“8”对应 80 mm。
- 校准移液器。
- 按下键盘快捷键 P 以选择移液器规格。
- 按下键盘快捷键 V 进入推杆校准模式。
注意:建议从小增量(2、5 和 10 mm)开始,以熟悉增量大小及移液头的运动操作。 - 对正置换移液器校准以下推杆位置:T–顶部 = 静止位置;B–底部 = 推杆压下直至遇到阻力;P–拾取 = 推杆压下至可安装活塞吸头的位置;E–弹出 = 推杆压下直至将已安装的吸头弹出。使用键盘上的上下箭头调节推杆位置,并使用键盘上的 S 键保存最终位置。
- 按下键盘快捷键 V 退出移液器推杆校准模式。
- 校准容器相对于移液器吸头的位置。
- 按下键盘快捷键 P 选择移液器类型。请确保所选移液器上已连接吸头。
- 按下键盘快捷键 C 选择容器类型。
- 选择合适的移动增量,并将移液器吸头移至以下位置:对于孔板,校准至底部“A1”孔位置;对于吸头架,校准至“A1”位置;对于废液槽,选择一个可将吸头弹入废液槽的位置(定义为一点)。
- 按下键盘快捷键 S 保存位置。
- 对所选移液器类型下“C”列表中的所有容器重复执行步骤 5.3.1−5.3.3。
- 对第二种移液器类型重复执行步骤 5.3.1−5.3.5。
- 关闭校准脚本。
6. 使用工作站执行方案
注意:协议文件可通过知识库获取,也可作为补充文件获取。
- 将废液容器、吸头架、输入托盘、混合托盘和输出容器放置在工作台面上(定义见步骤 4.3)。
- 按照第 5 节所述,校准移液器和仪器。
- 如有需要,打开温控模块,并为输入托盘和混合托盘设置所需温度。
注意:本教程中的实验在未启用温控条件下进行;甘油实验在 40 °C 下操作,明胶甲基丙烯酰基(GelMA)和海藻酸钠的移液在 37 °C 下进行。 - 根据选定的设置,将装有输入试剂的管子放置在温控模块的铝块中。
- 等待输入试剂达到设定温度。
注意:为确保温度均匀分布,建议 GelMA 和海藻酸钠孵育 30 分钟。 - 点击“RUN PYTHON SCRIPT”以运行协议文件。
注意:工作站将开始执行所选协议。配套视频展示了 GelMA 的自动化混合过程,以及将 60 µL 混合液分配至 96 孔板的操作。 - 当显示“Finished”时,运行完成。
7. 验证与确认过程
- 从工作站中取出孔板,并将含有样品的孔板转移至分光光度计。
- 使用分光光度计在 450 nm 波长下读取吸光度值。每块孔板重复读取 2 次,以比较结果并确保数据一致性。
- 导出并保存吸光度读数。
- 数据分析。
注意:实验数据可单独处理,也可复制粘贴至提供的模板中,使用电子表格软件计算平均值、标准差及变异系数(CV)值。- 打开补充文件“supplementary_template-analysis.xlsx”,该文件也可在 GitHub 仓库的“openworkstation/examples/publication-JoVE”路径下获取。
- 将吸光度读数复制到“原始数据”工作表中,确保所有表格中的单元格引用均正确定义,然后切换至“分析”工作表,查看平均值、标准差及变异系数(CV)值的相关信息。
注意:根据孔板上样品的分布情况,模板中提供以下预设评估类型:“Uniform”类型适用于所有样品组成相同的情况,“By rows”类型适用于不同行的样品组成不同的情况,“By columns”类型适用于不同列的样品组成不同的情况,“Customized”类型适用于用户自定义样品位置的情况。
结果
本教程展示了甘油(图3)以及 GelMA 与 LAP 和海藻酸钠(图4)实验的结果。
研究了在三种不同条件下制备80% (v/v) 甘油溶液的过程:无温度控制(室温,22 °C)且无吸头触碰(定义为设置1)、有温度控制(40 °C)但无吸头触碰(设置2),以及有温度控制(40 °C)并启用吸头触碰(设置3)(图3a-i)。选择这两个温度条件是为了评估操作差异,因为当甘油从22 °C(139.5 mPa·s)加热至40 °C(46.6 mPa·s)时,其黏度几乎降低至原来的三分之一30。将85% (v/v) 的甘油储备液稀释至终浓度为80%,并均匀分配至96孔板中(每种设置n = 96)。实验时间包括将各组分依次加入混合管、相应的混匀操作以及样品分配至96孔板,共计30分42秒。为识别不同稀释混合物之间的差异,使用含1 mg/mL 橙G的超纯水作为甘油的稀释剂。吸光度读数显示,温度控制与吸头触碰的引入对混合效果具有显著影响(p < 0.0001)。除进行双因素方差分析(ANOVA)外,还计算了变异系数(CV)以评估相对标准偏差。变异系数是衡量偏差程度相对于均值的标准指标,以百分比表示。当关注点并非样本均值本身,而是测量值内部的变异性时,变异系数可提供额外信息以识别可重复的混合效果46。在本实验的三种不同设置中,设置1、设置2和设置3的吸光度值对应的CV值分别为5.6%、4.2%和2.0%,表明温控模块和吸头触碰功能对获得可靠结果具有显著影响(图3a-ii)。绘制设置3的样品吸光度值(96孔板中样品编号#1至#96)显示,整个实验过程中未出现上升或下降趋势,因此表明样品位置对吸光度值无影响(图3a-iii)。通过热图可视化每块测定板的数据,可进一步识别特定行或列是否存在非均一性,以及在分配过程中吸光度值的变化情况。三种设置的热图可视化结果显示,从设置1到设置3,整块板的非均一性逐渐降低(图3b)。最后,在八次独立运行中评估了混合操作的可重复性(图3c-i,ii),每次运行耗时6分57秒。单次混合运行的CV值较低,介于1.1%至2.6%之间,表明各次运行中的混匀与分配操作高度可靠。八次运行的吸光度值总体CV值为3.3%,证明所建立的混合方案具有良好的可重复性。
通过将20% (w/v) 的 GelMA 储备液用 PBS 稀释至14%、12%、10%、8%、6%、4%、2% 和 0% (w/v),并加入 LAP 至终浓度恒定为 0.15% (w/v),制备 GelMA 梯度稀释系列(图4a-i),总耗时为 55 分 12 秒。根据实验方案脚本的要求,水凝胶在 400 nm 波长、2.0 mW/cm2 光强下交联 30 秒。为评估不同混合物之间的差异,将作为 GelMA 和海藻酸钠稀释剂的 PBS 配制为含 1 mg/mL 橙黄 G(Orange G)的溶液。因此,可通过分光光度计检测同一种混合物内各样本之间以及连续稀释梯度之间的吸光度差异。各浓度梯度的吸光度测量值之间差异显著(p < 0.0001),且各浓度梯度间的变异系数(CV)极低,介于 1.2% 至 3.4% 之间(每浓度梯度 n = 12)。线性回归分析显示拟合度高,R² 值达 0.9869(图4a-ii);热图分析进一步证实了各浓度下样品分布的均一性以及不同浓度之间的差异(图4a-iii)。采用自动化混合系统混合四种试剂,制备含 5% (w/v) GelMA、2% (w/v) 海藻酸钠、0.15% (w/v) LAP 并以 PBS 作为稀释剂的溶液,分别在不接触孔壁(setup 2)和接触孔壁(setup 3)的条件下进行操作(每组设置 n = 96),交联参数相同(30 秒,2.0 mW/cm2,400 nm)。四种材料的分配、混合及分装至 96 孔板共耗时 32 分 22 秒。所有涉及 GelMA 和海藻酸钠的实验均在 37 °C 下进行,以防止发生热致凝胶化,从而避免影响 GelMA 的移液操作。使用触碰吸头(touch tip)功能后,CV 值从 5.2% 降低至 3.4%,尤其可有效避免因吸头残留液体导致的低值异常值(图4b-i)。尽管 setup 2 和 setup 3 的平均值分别为 1.927 和 1.944,非常接近,但变异系数反映出相对于均值的偏差显著减小。通过热图可视化方式可对 96 孔板中的单一行进行相互比较,以检测行间和/或列间的差异(图4b-ii)。
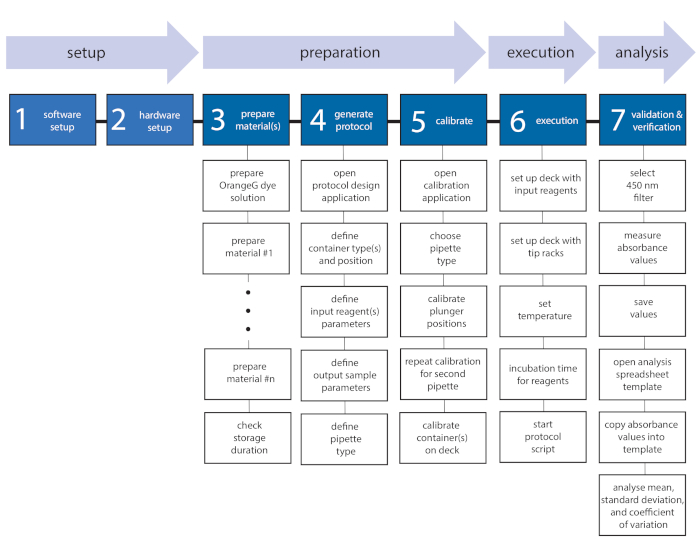
图1:包含各项任务的实验方案工作流程。 所述工作流程分为七个任务,分别归属于设置、准备、执行和分析阶段。首先,需完成软件(任务1)和硬件(任务2)的设置。在完成材料准备(任务3)和实验方案脚本生成(任务4)后,通过定义移液器和容器的位置对移液模块进行校准(任务5)。随后,在工作站上执行该方案脚本(任务6),并对混合物进行验证与确认(任务7),以评估混合物的质量。请点击此处查看此图的放大版本。
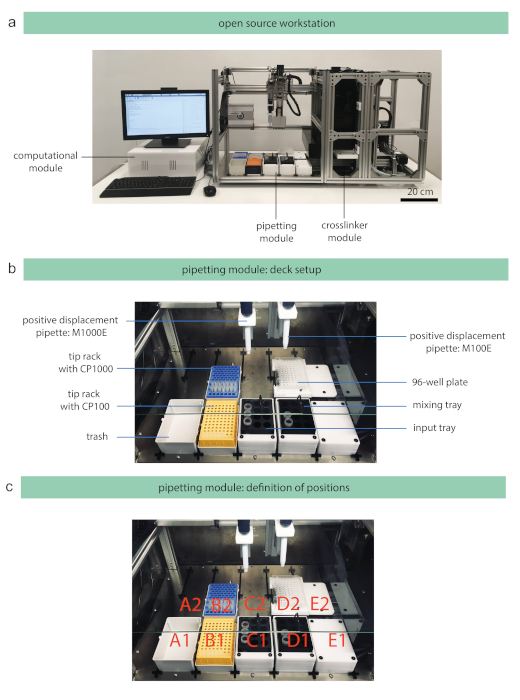
图 2:开源工作站及移液模块的甲板布局。 (a)所开发的工作站借鉴了流水线式设计思路,样品可在不同模块之间传送,其由以下模块组成:移液模块、交联模块、存储模块、传输模块和计算模块。(b)移液模块的甲板布局根据实验设计(例如,孔板类型、管体积等)进行配置。图中所示的甲板布局用于本研究中的实验,包括量程为 10−100 µL(M100E)和 100−1,000 µL(M1000E)的正向置换移液器、配备毛细活塞(CP)的 100 µL(CP1000)和 1,000 µL(CP1000)吸头架、废料容器、混匀托盘以及用于输入试剂的进样托盘。(c)可用的甲板位置由图中所示数字标示。请点击此处查看该图的放大版本。
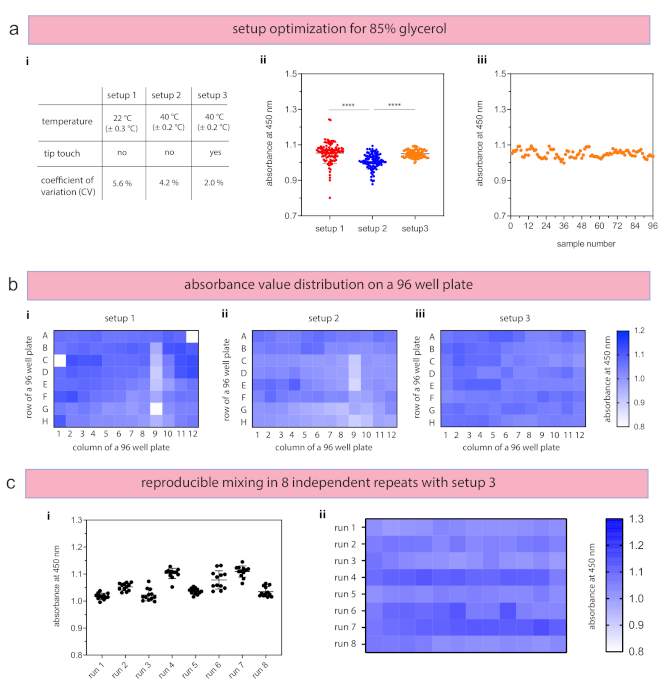
图 3:甘油混合物自动移液结果。(a)灵活的工作站设计可评估三种不同设置(i),以确定获得可重复结果的最佳参数。(ii)增加吸头触碰及物料加热后,设置3的变异系数(CV)值降低,混合物高度可重复。每次实验均使用96个样本。(iii)单个样本值的绘图显示移液顺序无影响。(b)各设置的实验结果通过热图可视化,以识别对行/列差异、边缘效应或母液混合的影响。(c)通过八次独立运行分析设置3的可重复性,使用(i)中位数、标准差、CV值以及(ii)热图进行评估。图 a-ii(n = 96)和 b-i(n = 12)中的数据以均值及单个数据点表示。统计学显著性定义为 ****p < 0.0001,采用双因素方差分析(ANOVA)。请点击此处查看本图的高清版本。
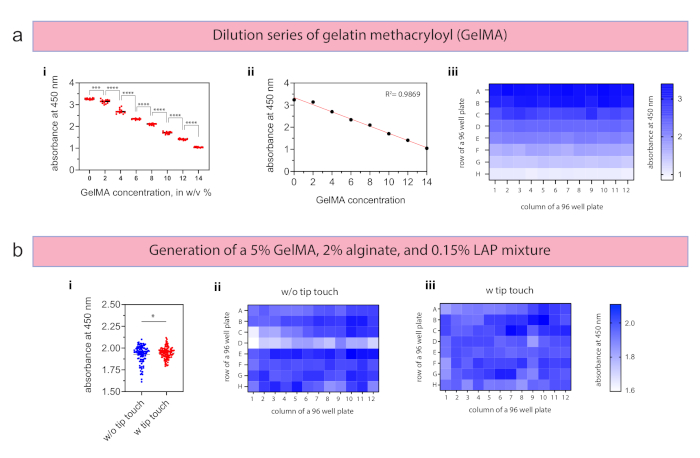
图 4:水凝胶混合操作的结果。 (a)从 20%(w/v)的明胶甲基丙烯酰(GelMA)储备溶液出发,在一次实验中使用 96 孔板制备了 14、12、10、8、6、4、2 和 0%(w/v)的系列稀释液(每种浓度 n = 12)。 (i)所配制各浓度的变异系数(CV)值在 1.2% 至 3.4% 之间波动,(ii)线性回归显示高度拟合,R² 值为 0.9869。(iii)通过生成的热图可直观确认稀释液的均一性。(b)采用 5%(w/v)GelMA、2%(w/v)海藻酸钠和 0.15%(w/v)LAP 制备双网络水凝胶,(i)在有或无触碰尖端(每种设置 n = 96)的情况下,于 400 nm 波长、2.0 mW/cm2 光强下光交联 30 秒。引入尖端触碰操作后,CV 值从 5.2% 降至 3.4%。(ii,iii)热图证实,通过尖端触碰去除针尖多余材料可减少偏差。图中 a-i 和 b-i 面板的数据以均值及单个数据点形式呈现。统计学显著性定义为 *p < 0.05,***p < 0.001,****p < 0.0001,采用单因素方差分析(ANOVA)。 请点击此处查看该图的高清版本。
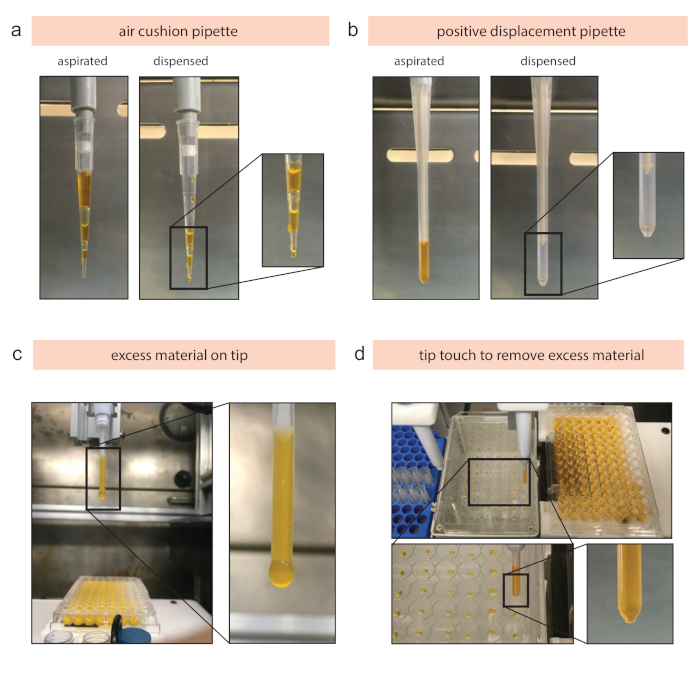
图5:移液器类型差异及黏性生物材料操作中的问题总结。(a)试剂与活塞之间由一层空气垫隔开,该空气垫在排液过程中收缩,在吸液过程中膨胀。当吸液和排液黏性材料时,缓慢的“流动”会引发气泡和移液行为不规则等问题。(b)正置换移液器通过在吸头内部使用活塞,可实现对黏性材料可靠地吸液和排液。(c)移取高黏性材料(例如,4% (w/v) 海藻酸钠)可能导致吸头表面残留过多材料,从而在整个实验过程中造成体积误差。(d)使用简单的吸头触碰托盘可有效去除吸头表面的多余材料,从而实现精确的吸液和排液体积。该方法可通过将放置于吸头架容器上的培养板盖内侧作为接触面来实现。请点击此处查看此图的高清版本。
| 材料 #1(储存浓度) | 材料 #1 的终浓度 | 材料 #2(储存浓度) | 材料 #2 的终浓度 | 材料 #3(储存浓度) | 材料 #3 的终浓度 | 稀释液(Orange G 工作溶液) | 混合物中 Orange G 的终浓度 | 图中显示 |
| Glycerol (85% (w/v)) | 80% (w/v) | water (1 mg/mL Orange G) | 0.059 mg/mL | 图 3a−c | ||||
| GelMA (20% (w/v)) | 0% (w/v) | LAP (3% (w/v)) | 0.15% (w/v) | PBS (1 mg/mL Orange G) | 1 mg/mL | 图 4a | ||
| GelMA (20% (w/v)) | 2% (w/v) | LAP (3% (w/v)) | 0.15% (w/v) | PBS (1 mg/mL Orange G) | 0.85 mg/mL | 图 4a | ||
| GelMA (20% (w/v)) | 4% (w/v) | LAP (3% (w/v)) | 0.15% (w/v) | PBS (1 mg/mL Orange G) | 0.75 mg/mL | 图 4a | ||
| GelMA (20% (w/v)) | 6% (w/v) | LAP (3% (w/v)) | 0.15% (w/v) | PBS (1 mg/mL Orange G) | 0.65 mg/mL | 图 4a | ||
| GelMA (20% (w/v)) | 8% (w/v) | LAP (3% (w/v)) | 0.15% (w/v) | PBS (1 mg/mL Orange G) | 0.55 mg/mL | 图 4a | ||
| GelMA (20% (w/v)) | 10% (w/v) | LAP (3% (w/v)) | 0.15% (w/v) | PBS (1 mg/mL Orange G) | 0.45 mg/mL | 图 4a | ||
| GelMA (20% (w/v)) | 12% (w/v) | LAP (3% (w/v)) | 0.15% (w/v) | PBS (1 mg/mL Orange G) | 0.35 mg/mL | 图 4a | ||
| GelMA (20% (w/v)) | 14% (w/v) | LAP (3% (w/v)) | 0.15% (w/v) | PBS (1 mg/mL Orange G) | 0.25 mg/mL | 图 4a | ||
| GelMA (20% (w/v)) | 5% (w/v) | Alginate (4% (w/v)) | 2% (w/v) | LAP (3% (w/v)) | 0.15% (w/v) | PBS (1 mg/mL Orange G) | 0.2 mg/mL | 图 4b |
表1:所进行实验的参数概览。
| 实验步骤 | 问题 | 可能原因 | 解决方案 |
| 1.1 | 软件无法安装或更新 | SD 卡磁盘空间不足 | 检查 SD 卡的磁盘空间。如有需要,删除不必要的文件、清空回收站,或使用容量合适的 SD 卡 |
| 1.2 | 无法安装 API | 用户安装权限受限(无 root 用户权限) | 在指定命令前使用“sudo”命令以获取管理员权限。在 Linux 系统中,此类访问权限称为超级用户(superuser) |
| 3.1 | GelMA 相关问题 | 功能化、透析或冷冻干燥过程问题 | 详细逐步操作方案及故障排除列表参见 Loessner 等人33 |
| 5.1 和 6.2 | 工作站对命令无响应 | 连接问题 | 关闭所有设备并关闭计算机。切断电源 10 秒后,重新启动计算机和工作站 |
| 5.1 和 6.2 | 工作站对命令无响应 | 连接问题 | 检查计算机是否识别到 USB 连接,以及 USB 端口是否正确配置。确保防火墙未阻止连接过程(参见表 2 下方链接) |
| 5.1 和 6.2 | 无法打开文件 | 目录错误 | 检查目录(文件夹路径),确保使用了正确的路径。如果某个文件(例如 interface.py)无法找到,可能是使用了错误的路径 |
| 6.6.2 | 吸头未正确安装或在移动过程中脱落 | 校准问题 | 重复移液器的校准步骤,并确保毛细管活塞与移液器正确连接 |
| 6.6.2 | 吸头未正确安装或在移动过程中脱落 | 安装问题 | 移液器未正确连接至移液轴,导致在移动过程中发生位移。请牢固拧紧螺丝以防止此问题 |
| 6.6.2 | 吸头在材料上方吸取液体 | 校准问题 | 重复对该类型储液槽进行校准,以正确定义高度 |
| 6.6.2 | 吸头在材料上方吸取液体 | 校准问题 | 检查管内液体体积,并确保其与实验方案设计软件中设定的体积一致 |
| 6.6.2 | 材料在移动过程中滴落 | 吸头上残留过多液体 | 启用吸头触碰功能;可选地,也可延长触碰时间 |
| 6.6.2 | 材料呈固态或过于黏稠,无法移液 | 材料的热响应特性 | 检查材料的热响应特性表征结果,并相应调整温控模块的加热/冷却温度 |
| https://support.opentrons.com/en/articles/2687601-c-having-trouble-connecting-try-this-basic-troubleshooting | |||
表2:已识别问题、可能原因及解决方案的故障排除表。
补充文件。请点击此处下载该文件。
讨论
移取黏性材料,尤其是用于生物医学应用的水凝胶19,20,21,33,47,是许多研究实验室中的常规操作,用于制备用户自定义浓度或不同浓度的稀释系列。尽管该操作具有重复性且执行过程相对简单,但目前大多仍依赖手动完成,样品通量较低18。本教程介绍一种开源工作站的操作方法,该工作站专为处理黏性材料设计,可实现黏性材料的自动化混合,从而可重复地生成目标浓度。该工作站针对水凝胶的移液操作进行了优化,通过集成温度控制模块(适用于温敏性材料)、正置换移液器(适用于黏性材料)以及可选的吸头触碰模块(用于去除吸头表面多余材料),实现自动化且高度可靠的样品处理。移液模块经过专门优化,可对黏性材料进行标准化和自动化处理。与空气垫移液器(图5a)相比,正置换移液器(图5b)在 dispensing 黏性材料时不会在吸头内残留材料,从而确保吸液和 dispensing 体积的准确性。可选的吸头触碰模块可去除吸头表面多余的样品材料(图5c,d),对于黏稠材料(例如 4% (w/v) 海藻酸钠)尤为有用。
该实验方案设计应用程序专为水凝胶实验而编程,可实现最多四种试剂(具有不同浓度)和最多两种稀释液的稀释操作。在此应用程序中,用户仅需选择目标浓度或连续稀释步骤,即可避免最终稀释比例计算过程中出现错误。所需的吸液和分液体积将自动计算,并保存至一个独立的文档文本文件中,随后填入实验方案脚本。该实验方案设计应用程序使用户能够完全控制所有实验参数(例如移液速度),并确保对关键参数进行内部记录。该应用程序会考虑储液区(例如孔)的液位高度,并相应调整吸液/分液高度,以防止吸头过度插入黏稠材料中。这一集成功能可避免液体在吸头外壁积聚,从而在整个实验过程中确保吸液和分液操作的可靠性。尽管该实验方案设计应用程序是为水凝胶的稀释步骤开发的,但它也可用于非黏稠液体的稀释,例如橙G染料。可通过仓库路径“/examples/publication-JoVE”访问的实验方案设计应用程序版本,即为本实验方案部分所解释并在视频中重点展示的版本。此版本将不再更新。然而,更新版本的实验方案设计应用程序可通过主仓库页面获取。校准终端最初由Sanderson48 开发,现已针对正向置换移液器的校准进行了优化。
如方案第4节所述,移液器以及容器必须在初始阶段进行校准。该校准过程对于定义并保存位置至关重要,这些位置随后用于计算移动增量。因此,成功执行方案依赖于明确定义的校准位置,因为错误的校准点可能导致吸头撞击容器。由于移液器的活塞位置必须手动校准,移液的准确性和精密度在很大程度上取决于所执行的校准质量。这些校准程序高度依赖用户对移液模块的操作经验,因此建议在初期由经验丰富的人员进行培训,以确保正确的校准流程。除了在移液模块上进行手动校准外,移液器本身也必须进行校准,以确保移液的准确性。建议至少每12个月校准一次移液器,以满足ISO 8655中规定的验收标准。如Stangegaard等16所述,可采用验证和确认方法对移液器校准进行内部评估。
为了获得可靠的数据集,必须使用高质量的试剂作为起始材料。这一点在水凝胶处理过程中尤为重要,因为试剂批次间的差异可能会影响本实验方案中所得的结果。除了批次间的变异外,小体积溶液配制过程中的微小变化也可能导致性能差异。为避免此类问题,建议配制较大体积的试剂溶液,并将其用于整个实验过程。
验证和确认过程依赖于使用染料来识别可靠的混合物。本方案描述了橙G的应用,但该通用方案和分析流程也可适用于荧光染料49,50。使用橙G可降低对分光光度计的技术要求,并避免荧光染料在光照后发生漂白所需采取的防护措施。在实验过程中,所用材料未观察到染料溶解行为异常或形成聚集体的问题,但在其他材料中可能出现此类情况。潜在的聚集体形成以及染料与材料之间的相互作用可通过显微镜轻松检测。
本教程介绍的流程和技术为当前粘性材料的操作流程增加了自动化能力,可实现高度可靠的实验任务,同时最大限度地减少人工操作。所提供的故障排除表(表2)列出了已识别的问题,并给出了可能的原因及相应的解决方案。该工作站已成功应用于多种天然(如明胶、结冷胶、基质胶)和合成(如聚乙二醇[PEG]、Pluronic F127、Lutrol F127)聚合物材料的自动移液操作。特别是,该开放源代码工作站与专为粘性材料设计的开放源代码实验方案设计应用程序相结合,将对从事生物医学工程、材料科学和微生物学领域研究的科研人员具有重要帮助。
披露
CM 和 DWH 是 Gelomics Pty Ltd 的创始人及股东。CM 还担任 Gelomics Pty Ltd 的董事。作者声明,对本文所述主题不存在相关利益冲突。除上述披露外,作者与任何对本文主题或所讨论材料具有经济利益或财务冲突的组织或实体均无其他相关关联或经济参与。
致谢
作者感谢昆士兰科技大学再生医学中心的成员,特别是 Antonia Horst 和 Pawel Mieszczanek 提供的有益建议和反馈。本研究得到了昆士兰科技大学研究生研究奖(SE)以及澳大利亚研究理事会(ARC)资助协议 IC160100026(ARC 增材生物制造产业转型培训中心)的支持。NB 获得了澳大利亚国家健康与医学研究理事会(NHMRC)Peter Doherty 早期职业研究员基金(APP1091734)的支持。
材料
| 姓名 | 公司 | 目录编号 | 评论 |
|---|---|---|---|
| 15 支反应管 | Fisher Scientific, Inc. (USA) | 14-959-53A | |
| 5 mL 离心管 | Pacific Laboratory Products Australia Pty. Ltd.(澳大利亚) | SCT-5ML | 大小取决于实验方案;也可使用Eppendorf管(0.5、1、1.5 mL)或Falcon管(15、50 mL);产品由Axygen, Inc.生产 https://www.pacificlab.com.au/shop/tubes-plastic/sct-5ml-tubewith-screwcap-blue-unassembled-5ml-self-standing/1/name |
| 50 mL 离心管 | Fisher Scientific, Inc. (USA) | 14-432-22 | |
| 70% w/w 乙醇 | LabChem, Inc. (USA) | aja726-5Lpl | |
| 96孔板 | Thermo Fisher Scientific, Inc. (USA) | https://www.thermofisher.com/order/catalog/product/168055 | |
| 海藻酸钠 | NovaMatrix | 4200001 | https://www.novamatrix.biz/store/pronova-up-lvg/ |
| 去矿质水或超纯水(MilliQ) | |||
| 甲基丙烯酰化明胶(GelMA) | 自行合成 | 详细方案(包括材料和参考文献)见 Loessner 等(2016),Nature Protocols。https://www.nature.com/articles/nprot.2016.037 | |
| 苯基-2,4,6-三甲基苯甲酰基亚磷酸锂(LAP) | Sigma-Aldrich, Inc. (USA) | 900889 | |
| M4 和 M5 内六角扳手 | OpenBuilds, inc. (USA) | 179, 190 | 也可在每家五金店购得。https://openbuildspartstore.com/allen-wrench/ |
| 橙G | Fisher Scientific (USA) | O267-25 | https://www.fishersci.com/shop/products/orange-g-certified-biological-stain-fisher-chemical/O26725 |
| 磷酸盐缓冲液(PBS) | Thermo Fisher Scientific, Inc. (USA) | 14190-144 | 替代方案:PBS片剂:18912014(Thermo Fisher Scientific) |
| 设备 | |||
| 用于温控舱的铝块 | Ratek Instruments Pty. Ltd.(澳大利亚) | SB16 | 适用于不同试管尺寸的模块均有提供。http://www.ratek.com.au/products/SB16-Block-with-12x16mm-holes.html |
| 分析天平 | 萨尔托瑞斯股份公司(德国) | ED224S | |
| 开源液体处理机器人:商业产品 | Opentrons Laboratories, Inc. (USA) | OT-One S Pro | https://shop.opentrons.com/products/ot-one-pro |
| 开源液体处理机器人:开源硬件 | 采用开源方式自主组装 | 硬件和软件文件可免费在 GitHub 和 Zenodo 上获取(提供链接);并附有构建说明。https://github.com/SebastianEggert/OpenWorkstation. https://zenodo.org/record/3612757#.XipEjBV7F24 | |
| 正位移移液器:MicromanE | Gilson, Inc. (USA) | FD10006 | 取决于所需尺寸。https://www.gilson.com/default/shop-products/pipettes/positive-displacement.html |
| 分光光度计 | BMG LABTECH GmbH (德国) | CLARIOstar | |
| 提示:毛细管活塞 | Gilson, Inc. (USA) | F148180 | 取决于所需尺寸。https://www.gilson.com/default/shop-products/pipette-tips.html?technique_en_ww_lk=191 |
参考文献
- Jarvis, M. F., Williams, M. Irreproducibility in Preclinical Biomedical Research: Perceptions, Uncertainties, and Knowledge Gaps. Trends in Pharmacological Sciences. 37 (4), 290-302 (2016).
- Collins, F. S., Tabak, L. A. Policy: NIH plans to enhance reproducibility. Nature. 505 (7485), 612-613 (2014).
- Freedman, L. P., Cockburn, I. M., Simcoe, T. S. The economics of reproducibility in preclinical research. PLoS Biology. 13 (6), 1-9 (2015).
- Niepel, M., et al. A Multi-center Study on the Reproducibility of Drug-Response Assays in Mammalian Cell Lines. Cell Systems. 9 (1), 35-48 (2019).
- Prinz, F., Schlange, T., Asadullah, K. Believe it or not: how much can we rely on published data on potential drug targets. Nature Reviews Drug Discovery. 10 (9), 712(2011).
- Baker, M. 1,500 scientists lift the lid on reproducibility. Nature. 533 (7604), 452-454 (2016).
- Begley, C. G., Ellis, L. M. Raise standards for preclinical cancer research. Nature. 483 (7391), 531-533 (2012).
- Sena, E. S., van der Worp, H. B., Bath, P. M. W., Howells, D. W., Macleod, M. R. Publication Bias in Reports of Animal Stroke Studies Leads to Major Overstatement of Efficacy. PLoS Biology. 8 (3), 1000344(2010).
- Ioannidis, J. P. A., Kim, B. Y. S., Trounson, A. How to design preclinical studies in nanomedicine and cell therapy to maximize the prospects of clinical translation. Nature Biomedical Engineering. 2 (11), 797-809 (2018).
- Enserink, M. Sloppy reporting on animal studies proves hard to change. Science. 357 (6358), 1337-1338 (2017).
- Freedman, L. P., Inglese, J. The Increasing Urgency for Standards in Basic Biologic Research. Cancer Research. 74 (15), 4024-4029 (2014).
- Lippi, G., Lima-Oliveira, G., Brocco, G., Bassi, A., Salvagno, G. L. Estimating the intra- and inter-individual imprecision of manual pipetting. Clinical Chemistry and Laboratory Medicine (CCLM). 55 (7), 962-966 (2017).
- Hentz, N. G., Knaide, T. R. Effect of Liquid-Handling Accuracy on Assay Performance. Journal of Laboratory Automation. 19 (2), 153-162 (2014).
- Reason, J. Understanding adverse events: human factors. Quality and Safety in Health Care. 4 (2), 80-89 (1995).
- Schober, L., et al. Cell Dispensing in Low-Volume Range with the Immediate Drop-on-Demand Technology (I-DOT). Journal of Laboratory Automation. 20 (2), 154-163 (2015).
- Stangegaard, M., Hansen, A. J., Frøslev, T. G., Morling, N. A Simple Method for Validation and Verification of Pipettes Mounted on Automated Liquid Handlers. Journal of Laboratory Automation. 16 (5), 381-386 (2011).
- Crombie, D. E., et al. Development of a Modular Automated System for Maintenance and Differentiation of Adherent Human Pluripotent Stem Cells. SLAS Discovery. 22 (8), 1016-1025 (2017).
- Eggert, S., Hutmacher, D. W. In vitro disease models 4.0 via automation and high-throughput processing. Biofabrication. 11 (4), 043002(2019).
- Malda, J., et al. 25th Anniversary Article: Engineering Hydrogels for Biofabrication. Advanced Materials. 25 (36), 5011-5028 (2013).
- Zhang, Y. S., Khademhosseini, A. Advances in engineering hydrogels. Science. 356 (6337), (2017).
- Kratochvil, M. J., et al. Engineered materials for organoid systems. Nature Reviews Materials. 4 (9), 606-622 (2019).
- Caliari, S. R., Burdick, J. A. A practical guide to hydrogels for cell culture. Nature Methods. 13 (5), 405-414 (2016).
- Pati, F., et al. Printing three-dimensional tissue analogues with decellularized extracellular matrix bioink. Nature Communications. 5, 1-11 (2014).
- Gao, G., Huang, Y., Schilling, A. F., Hubbell, K., Cui, X. Organ Bioprinting: Are We There Yet. Advanced Healthcare Materials. 7 (1), 1701018(2018).
- Schuurman, W., et al. Gelatin-Methacrylamide Hydrogels as Potential Biomaterials for Fabrication of Tissue-Engineered Cartilage Constructs. Macromolecular Bioscience. 13 (5), 551-561 (2013).
- Lim, K. S., et al. New Visible-Light Photoinitiating System for Improved Print Fidelity in Gelatin-Based Bioinks. ACS Biomaterials Science and Engineering. 2 (10), 1752-1762 (2016).
- Müller, M., et al. Development and thorough characterization of the processing steps of an ink for 3D printing for bone tissue engineering. Materials Science and Engineering C. 108, 110510(2020).
- Sewald, L., et al. Beyond the Modification Degree: Impact of Raw Material on Physicochemical Properties of Gelatin Type A and Type B Methacryloyls. Macromolecular Bioscience. 18 (12), 1-10 (2018).
- Eggert, S., Mieszczanek, P., Meinert, C., Hutmacher, D. W. A modular open source technology for automated in vitro workflows. Zenodo. , (2020).
- Volk, A., Kähler, C. J. Density model for aqueous glycerol solutions. Experiments in Fluids. 59 (5), 75(2018).
- Zhang, H., Grinstaff, M. W. Recent Advances in Glycerol Polymers: Chemistry and Biomedical Applications. Macromolecular Rapid Communications. 35 (22), 1906-1924 (2014).
- Klotz, B. J., Gawlitta, D., Rosenberg, A. J. W. P., Malda, J., Melchels, F. P. W. Gelatin-Methacryloyl Hydrogels: Towards Biofabrication-Based Tissue Repair. Trends in Biotechnology. 34 (5), 394-407 (2016).
- Loessner, D., et al. Functionalization, preparation and use of cell-laden gelatin methacryloyl-based hydrogels as modular tissue culture platforms. Nature Protocols. 11 (4), 727-746 (2016).
- Ansari, S., et al. Regulation of the fate of dental-derived mesenchymal stem cells using engineered alginate-GelMA hydrogels. Journal of Biomedical Materials Research Part A. 105 (11), 2957-2967 (2017).
- Axpe, E., Oyen, M. Applications of Alginate-Based Bioinks in 3D Bioprinting. International Journal of Molecular Sciences. 17 (12), 1976(2016).
- Ma, X., et al. 3D printed micro-scale force gauge arrays to improve human cardiac tissue maturation and enable high throughput drug testing. Acta Biomaterialia. 95, 319-327 (2019).
- Bas, O., et al. Rational design and fabrication of multiphasic soft network composites for tissue engineering articular cartilage: A numerical model-based approach. Chemical Engineering Journal. 340, 15-23 (2018).
- O'Connell, C. D., et al. Tailoring the mechanical properties of gelatin methacryloyl hydrogels through manipulation of the photocrosslinking conditions. Soft Matter. 14 (11), 2142-2151 (2018).
- LearnPython.org. , Available from: https://www.learnpython.org (2020).
- Raspberry Pi Foundation: Using your Raspberry Pi. , Available from: https://projects.raspberrypi.org/en/projects/raspberry-pi-using (2020).
- Raspberry Pi Foundation: Setting up your Raspberry Pi. , Available from: https://projects.raspberrypi.org/en/projects/raspberry-pi-setting-up/4 (2020).
- Raspberry Pi Foundation: Connect your Raspberry Pi. , Available from: https://projects.raspberrypi.org/en/projects/raspberry-pi-setting-up/3 (2020).
- Python Software Foundation: python.org. , Available from: https://www.pthon.org (2020).
- Python Software Foundation: pypi.org. , Available from: https://pypi.org (2020).
- Opentrons Labworks, Inc: Installing pipettes. , Available from: https://support.opentrons.com/en/articles/689945-installing-pipettes (2020).
- Kang, C. W., Lee, M. S., Seong, Y. J., Hawkins, D. M. A Control Chart for the Coefficient of Variation. Journal of Quality Technology. 39 (2), 151-158 (2007).
- Annabi, N., et al. 25th Anniversary Article: Rational Design and Applications of Hydrogels in Regenerative Medicine. Advanced Materials. 26 (1), 85-124 (2014).
- Theo Sanderson: OpenTronsTerminalCalibration. , Available from: https://github.com/theosanderson/OpentronsTerminalCalibration (2020).
- Rhode, H., et al. An Improved Method for Checking HTS/uHTS Liquid-Handling Systems. Journal of Biomolecular Screening. 9 (8), 726-733 (2004).
- Taylor, P. B., et al. A Standard Operating Procedure for Assessing Liquid Handler Performance in High-Throughput Screening. Journal of Biomolecular Screening. 7 (6), 554-569 (2002).
重印与许可
