在柏林亥姆霍兹中心进行的晶体学片段筛选采用了一套标准化流程,包括专用化合物库、晶体处理工具、快速数据采集设备 以及高度自动化的数据分析。本方案旨在最大化此类实验的产出,为后续基于结构的配体设计提供有前景的起点。
本文内容
摘要
摘要
片段筛选是一种有助于确定配体设计有希望起点的技术。如果目标蛋白的晶体可得,并且能够稳定地表现出高分辨率X射线衍射特性,则晶体学是片段筛选中最受青睐的方法之一,因其具有高灵敏度。此外,该方法是唯一能够提供片段结合模式详细三维信息的方法,这对于后续的化合物理性优化至关重要。该方法的常规应用依赖于合适的片段库、专门用于处理大量样品的设备、先进的同步辐射光束线以实现快速衍射测量,以及在很大程度上自动化的结果分析解决方案。
本文介绍了在柏林亥姆霍兹中心(HZB)开展晶体学片段筛选(CFS)的完整实验流程及相关工具。在启动该流程之前,需优化晶体浸泡条件和数据收集策略,以确保晶体学实验的可重复性。随后,通常在一天至两天内,使用一个包含96种片段化合物的CFS专用文库(以预装干燥板形式提供),对192颗晶体进行浸泡处理,并逐一进行快速冷冻。最终的衍射实验可在HZB位于柏林阿德勒斯霍夫(德国)运营的BESSY II电子储存环上的BL14.1和BL14.2光束线完成,这两条光束线支持机器人自动上样,通常一天内即可完成全部实验。晶体学数据处理、蛋白质结构精修及阳性片段的识别可通过专用服务器上的专业软件流程快速、高度自动化地完成,所需人工干预极少。
在HZB使用CFS工作流程可实现常规筛选实验。这有助于提高成功识别片段命中物的几率,从而为开发药理学或生物化学应用中的高效结合物提供起点。
引言
药物开发的第一步是针对特定靶点进行化合物筛选。传统上,制药行业会使用包含约100,000至1,000,000 个条目的大型化合物库,通过高通量生化实验进行筛选。这一策略后来被基于片段的药物设计(FBDD)所补充,该方法在过去20年中迅速发展,因其具有多种内在优势,已成为生成高质量先导候选化合物的主流策略1。术语"片段”指的是一类较小的有机分子,通常含有少于20个非氢原子或重原子(HAs)。因此,片段显著小于常规高通量筛选中所研究的药物样或先导样分子(通常少于30个HAs)。片段具有较弱的结合亲和力。然而,与较大的分子相比,片段更具多样性,因为即使数量较少的片段集合也能更好地代表相应大小分子的化学空间2。此外,将片段筛选命中化合物优化为先导分子,比优化已经较大的分子更为高效2,3,4,5。这意味着,只要检测方法具备足够的灵敏度,片段筛选便可高效实施,并为后续化合物优化提供高质量的起点。可用于片段筛选的多种生物物理方法中,最常用的包括核磁共振(NMR)、X射线晶体学、表面等离子共振(SPR)和热迁移实验。这些方法可并行或依次使用,旨在提高对筛选结果的信心,并分别减少假阳性或假阴性结果的数量。然而,最近一项比较研究6表明,由于不同方法之间的结果重叠度较低,应避免采用依次进行的筛选级联策略。
X射线晶体学是一种成熟的原子级结构测定方法,但近年来也已发展成为一种筛选工具7,8。由于蛋白质晶体能够耐受高浓度的片段分子(例如,100 mM),晶体学片段筛选(CFS)在片段筛选中可与其他生物物理方法相竞争,甚至作为初筛方法更具优势6,9。然而,CFS的一个关键前提是必须具备经过验证的、可重复获得具有优良衍射分辨率(通常优于2 Å)晶体的目标蛋白结晶体系。
与所有其他片段筛选方法相比,CFS 的一个独特优势在于能够提供所识别片段结合模式的详细三维信息。这种结构信息对于将片段命中物合理优化为高亲和力结合物至关重要。目前成熟的片段优化策略包括片段的生长、合并和连接5。通过这些策略 ,可以从初始阶段保持较高的配体效率,避免引入不必要的或空间上不合适的基团,从而降低化学合成成本。总体而言,CFS 作为药物设计的起始策略具有无可比拟的优势。
鉴于某一特定生物靶标满足CFS在晶体质量方面的高要求,存在 是一些 最大化的主要因素 此类筛查活动取得成功结果的可能性。 这取决于所用片段库的质量、在衍射实验前高效完成实验操作的工作流程、具备足够自动化程度和数据采集速度的同步辐射光束线,以及实现大规模自动化数据处理与分析的方法和手段。本文介绍了从晶体浸泡实验到命中片段鉴定的完整工作流程,该流程已在中国台湾同步辐射研究中心BESSY的生物大分子晶体学光束线上成功建立。 II图1)。该设施向学术界和工业界用户开放合作。此外,欧盟国家的学术用户 德国以外的申请人可直接通过iNEXT Discovery项目申请资助。
要启动CFS实验并实施本工作中所述的方案,必须满足若干不可或缺的先决条件:已获得能够大量重复生长、在常温下稳定、且使用不含高挥发性成分的 结晶鸡尾酒溶液制备的目标蛋白晶体,并且这些晶体具有良好的衍射能力。另一个先决条件是晶体晶格必须适用于该实验。在合适的晶格中,目标蛋白的感兴趣位点必须朝向溶剂通道,从而 可被接触。此外,为确保CFS实验流程的成功,建议在实验前进行可选但极为重要的一步:优化浸泡条件。关键的评估指标包括晶体的衍射能力以及在数据标定过程中确定的相关数据质量参数。通常需要优化的因素包括DMSO耐受性、缓冲液浓度 和冷冻保护剂的使用。尽管下文将详细说明DMSO作为共溶剂并非严格必需,但它有助于提高片段的溶解度。典型的测试应包括在过夜条件下分别使用0、3、6或10%(v/v)的DMSO进行浸泡。将缓冲液浓度提高至200或300 mM有助于防止因使用高浓度片段而可能引起的pH偏移,从而避免晶体衍射质量下降。最后,至关重要的是确定是否需要额外添加冷冻保护剂、具体使用哪种保护剂,以及是否 可将其预先加入浸泡条件中。然而在许多情况下,并不需要额外添加冷冻保护剂,因为DMSO本身即可充当冷冻保护剂。若如此,将在最终实验中节省一个操作步骤。大多数晶体在使用尺寸合适的环状载具进行快速冷冻时,所需冷冻保护剂更少,同时应尽可能减少或避免母液的残留。但在极少数情况下,保留一层母液确实有助于防止晶体在快速冷冻过程中受损。
在CFS实验中获得的命中数不仅取决于靶蛋白的可成药性以及晶体晶格的适用性(见上文),还取决于文库的质量。文库质量包含两个方面:化合物的筛选以及化合物的配制方式(即化合物在实验中所呈现的物理形态)。在化合物筛选方面 ,可采用多种策略。大多数文库设计均旨在最大化片段的化学多样性。一种策略性重点是考虑片段在后续设计中的化学可改造性,例如Diamond-SGC-iNEXT 文库中所采用的 策略 10。另一种文库设计策略则是通过基于形状和药效团的聚类方法,最大化商业可得片段化学空间的代表性,HZB开发的F2X文库即为此类策略的范例11。更具体而言,HZB已开发出包含1103个成员的F2X-Universal文库,以及用于初步CFS实验的96个化合物代表性子集,后者称为F2X-Entry Screen,并已成功完成验证11。F2X-Entry Screen是HZB开展CFS实验的首选文库。随后,可进一步使用F2X-Universal文库或包含1056个成员的EU-OPENSCREEN片段文库12开展更大规模的实验,后者同样在HZB提供。目前,这些文库可由柏林BESSY II同步辐射装置的生物大分子晶体学光束线用户在合作合同基础上免费使用。该政策同样适用于通过iNEXT Discovery提案申请的用户。此外,F2X-Entry Screen还可根据材料转移协议向所有感兴趣的科研人员提供。
就文库的物理呈现形式而言,通常采用两种方法:片段以DMSO储备溶液形式使用,或片段经干燥后固定于即用型板上。在HZB,F2X-Entry筛选库以及F2X-通用文库中的非挥发性化合物均以干燥形式固定于3透镜96孔MRC低剖面结晶板中。将片段固定于结晶板中具有两个关键优势:首先,可将筛选板运输至用户所在实验室,因此本文所述工作流程中的浸泡与晶体操作步骤(步骤1-3)可在任意地点进行;其次,可使用无DMSO溶液,从而便于对DMSO敏感的靶标进行筛选,并基本保持预期的命中率11。然而,DMSO确实能提高片段的溶解度,因此 如上所述,值得事先检测所选晶体系统对DMSO的耐受性。
以下方案将描述一个典型的96种化合物筛选实验,例如F2X-Entry筛选。为此,需要及时制备约250颗晶体,并确保其新鲜使用。强烈建议对全部96种化合物各制备两份浸泡样本。此外,可选地建议制备额外的对照浸泡样本,以便后续利用泛数据密度分析(PanDDA)方法进行数据分析以识别阳性结果13。对照浸泡是指在蛋白晶体上进行的浸泡实验,所用浸泡溶液和孵育时间与片段浸泡相同,但 不含任何片段分子。如果浸泡溶液与结晶条件相同,则可直接从结晶板中收获晶体。
根据机器人样品更换器的功能,可能需要使用不同的样品托盘格式。目前,HZB 运行的 BL14.1 光束线样品需采用 Unipuck 格式制备,HZB 运行的 BL14.2 光束线样品需采用 SPINE 托盘格式制备。本方案假设采用 Unipuck 格式进行样品制备。
方案
1. 浸泡晶体
- 取用筛选板(此处为 F2X-Entry Screen 板), 图2) 来自 -20 °将C冷冻机中的样品取出并置于实验台/桌面上约30分钟,使其预热至室温,从而避免冷凝水的产生。
- 将工作区域布置好,配备两台紧密排列的显微镜以及所需的所有工具(图 3A)。材料列于下文 材料表.
- 选择3-4个合适大小的环,用于转移待浸泡的晶体,并将其放置在显微镜附近。
- 用去离子水或蒸馏水填充玻璃点样板的凹孔。
- 准备5 mL浸润溶液。
- 将预热至室温的筛选板袋子剪开。
- 从筛选板上取下盖子和箔膜,同时保持筛选板放置在实验台/桌面上。
- 将5 mL浸润溶液从试剂储液槽中倾倒出。
- 向96个储液槽中的每一个加入40 µ使用12通道移液器加入L的浸泡溶液。
- 将 EasyAccess 框架置于筛选板顶部,并使用附带的夹子从设备左右两侧滑动固定。
注:EasyAccess Frame 是 HZB 开发的一种用于处理多个晶体的特殊装置14通过移动可滑动的板块,可方便地接触每个孔,同时保护其他孔免受蒸发。 - 将筛选板(含 EasyAccess 框架)置于第一台显微镜下,将含有待浸泡晶体的结晶板置于第二台显微镜下。
- 通过手指或随附的笔形工具移动 EasyAccess Frame 的相应亚克力玻璃片,滑开筛选板的 A1 孔。
- 加入 0.4 µ使用新的移液枪头,将 L 的浸泡溶液从储液槽转移至含有片段的孔中(左上角透镜位置)。通过显微镜检查液滴是否覆盖已干燥的片段,以确保其能够溶解。
注意:也可在组装 EasyAccess 装置前使用移液机器人完成此步骤,从而通过一次自动化操作将所有孔的浸泡液加入。然而,作者建议在浸泡步骤开始前直接加入浸泡溶液,以确保片段在晶体存在的情况下缓慢溶解,避免晶体在转移至高片段浓度液滴时受到突然冲击。 - 在第二个显微镜下,切开含有目标晶体的结晶板中某个孔位的密封箔。
- 使用安装在晶体操作杆上、尺寸合适的环状工具,在第一台显微镜下将两颗晶体转移至筛选板的A1孔中。
- 将环在预先准备好的玻璃点样板上清洗,并通过轻轻接触纸巾将其干燥。每次转移后均需执行此操作,以避免与含有片段的浸泡溶液发生交叉污染。
- 使用显微镜检查晶体是否已正确放置。
- 继续移至下一个孔(例如 B1)。
- 重复步骤 1.13-1.18,处理筛选板中的全部 96 个孔,直至每个浸泡液滴中含有两颗晶体。
- 将筛选板(包括 EasyAccess 支架)从显微镜下取出,放置于实验台/桌面。
- 从筛选板上移除 EasyAccess 框架。
- 用封板膜密封筛选板,并将其置于晶体生长所用的结晶培养箱或柜子中。
- 孵育至优化的浸泡时间。通常,过夜孵育较为方便。
- (可选)约40个无配体晶体的制备(即模拟浸泡)
- 取一个 MRC 3 镜头 96 孔低矮结晶板,用 40 µ使用12通道移液器向每孔加入L的浸泡溶液。
- 将 EasyAccess 框架置于结晶板顶部,并使用附带的夹子从装置左右两侧滑动固定。
- 滑开 A1 孔的亚克力玻璃盖板。
- 放置 0.4 µ每个孔的左侧两个凹槽中各加入 L 的浸泡溶液。
- 将2-3颗晶体转移至每个液滴中。每次转移后,用准备好的玻璃点样板清洗 loop,并轻轻接触滤纸将其擦干。
- 移至下一个孔(例如 B1)。
- 重复步骤 1.24.4–1.24.6,直至准备好约 40 颗晶体用于孵育。
- 将结晶板(包括 EasyAccess 框架)从显微镜下取出,放置于实验台/桌面,然后移除 EasyAccess 框架。
- 用封口箔密封结晶板,并将其放入前述的结晶培养箱或柜子中。
- 孵育时间与筛选板相同。
2. 收获晶体
- 从培养箱或橱柜中取出正在孵育的板。
- 在工作区域放置一台显微镜及所需全部工具(图 3B)。材料列于材料表中。
- 准备一个带有3个Unipuck盖子(即样品容器)的Unipuck泡沫杜瓦瓶,并装满液氮(LN₂)2).
注意:操作液氮(LN₂)时应遵守相应的安全防护措施2 (即佩戴安全护目镜并使用适当的防护装备)。最好使用新鲜的液氮2 在实验过程中需多次进行,以避免液氮中产生水凝结2 储存罐。在整个后续操作过程中,确保液氮2 泡沫杜瓦瓶中的液位始终应达到杜瓦瓶的上边缘。同时确保液氮2 无冰;频繁更换液氮2 (例如,每45分钟一次),或最迟在开始结冰时进行。然后,装满第二个泡沫杜瓦瓶,并将Unipucks转移至其中。清空结冰的泡沫杜瓦瓶,并用吹风机清除残留的冰和水分。 - 移除筛选板上的箔膜,并将 EasyAccess 支架置于其上。
- 滑开 A1 孔。
- 从液滴中取出两颗晶体,并在液氮中快速冷却2 (逐一)通过快速垂直浸入液氮中2 然后将样品插入适当的样品托位置。在样品追踪表上记录相关信息。
- 冷冻保护步骤(如果目标晶体需要)。在此情况下,执行此步骤以替代步骤 2.6。
- 放置 0.4 µ在孔板左下角的透镜上加入含冷冻保护剂的L型浸泡溶液。
- 将带有晶体的环从左上角透镜的液滴中缓慢穿过左下角透镜中的溶液,同时保持晶体在环内,随后在液氮中快速冷却2以这种方式收获两颗晶体。
注意:在步骤 2.6 和 2.7 中,须确保晶体置于环中并暴露于空气中的时间极短。浸入(即样品在液氮中的垂直下落)2装满液氮的杜瓦瓶)操作应尽快完成,以确保样品质量并防止数据中出现冰环。需对样品进行追踪记录(例如,注明晶体是否有损伤等),以便优先选择重复样品用于后续X射线测量,可使用相应模板进行记录。即使晶体因浸泡而产生裂纹、“毛发状”物或其他缺陷,仍可使用,且应始终收获。若晶体断裂成多块,应选取其中最大或外观最佳的两块进行收获。 图5 展示了一些此类晶体可能呈现的外观。所有所示晶体在相应的实验中仍获得了有用的数据集。11,这表明即使在浸泡处理后晶体形态发生显著变化,仍值得收集晶体。
- 前往下一个孔,重复步骤 2.5 - 2.6/2.7,直至所有三个载晶座均被填满。
- 将Unipuck底座置于盖子顶部,置于液氮中预冷后使用2.
- 将Unipucks存放在运输杜瓦瓶或储存杜瓦瓶中的储存架内。
- 重复上述步骤,直至筛选板中的所有孔均已完成处理。
- (可选)如果准备了模拟浸泡的晶体,请按照前述方法类似地收获晶体。
注意:如果筛选板的96种条件中每种条件均有两颗晶体完成快速冷冻,则可额外容纳32颗模拟浸泡的脱辅基(apo)晶体,以填满14个Unipuck样品托。 - 将Unipucks存放在液氮中2 直至测量开始。
3. 数据收集
- 将 Unipuck 转移至 BL14.1 光束线。如果在步骤 2 中使用了 SPINE 样品托,则将其转移至 BL14.2 光束线。
- 使用以下提供的具体建议,在光束线上执行标准测量。有关该设施及实验控制程序 MXCuBE2 的详细信息此前已有报道15,16。图 4 展示了 BL14.1 和 BL14.2 光束线实验舱内部情况,以及 BL14.1 光束线上 MXCuBE2 控制软件的示例截图。
- 为最大化时间效率和通量,跳过测试图像的采集。样品到探测器的距离将固定为适用于此前实验中确定的晶体系统分辨率上限的数值。若尚未预先优化数据采集策略,则采集 1800 张图像,每张图像的振荡角为 0.2 度,曝光时间为每张 0.1 秒。
- 理想情况下,应使用模拟浸泡的脱辅基晶体在前期实验中测试数据采集策略。对于更高对称性的空间群,采集 1200 张或甚至 900 张图像(即分别为 240° 或 180°),无论数据采集起始角度如何,通常已可获得具有良好统计性的完整数据集。
注意:更高的冗余度和更精细的角度切片可获得更优的数据质量17。然而,本文提出的“足够但不多余”策略在数据质量、采集时间以及后续分析所需的计算资源之间实现了良好平衡。按照所述方式,在 BL14.1 和 BL14.2 光束线上,24 小时内完成 200 次数据采集是完全可行的。尽管如此,仍应对样品进行优先级排序。 - 首先根据步骤 2.6/2.7 中的优先级顺序,针对每种片段条件的一个样品采集衍射数据集(即优先采集更高优先级的重复样品数据)。
- 对于步骤 3.2.3 中数据采集失败、衍射信号丢失或出现严重冰环的实验,采集相应片段条件第二个重复样品的衍射数据。
- 采集脱辅基晶体的衍射数据集(如按步骤 1.24 和 2.12 所准备)。
- 采集每种片段条件其余重复样品的衍射数据集。
- 在 MXCuBE2 程序中,将 CFS 筛选项目的数据集标识符匹配至如下模式:<蛋白>-<文库>-[ABCDEFGH][01][0123456789][ab](例如 MyProtein-F2XEntry-B05a,其中“B05”代表孔位(即筛选中的片段条件),后续的“a”代表第一个重复样品)。
4. 数据处理
- 对于CFS项目的数据分析,使用FragMAXapp——一种基于网络的解决方案,用于控制多重分析,以处理CFS数据的自动精修及PanDDA命中评估18 (Lima 等,FragMAXapp,未发表数据)。在 HZB 部署的 FragMAXapp 版本中,可使用的程序/流程包括:XDSAPP19,Xia2-DIALS 和 Xia2-XDS20,fspipeline7,DIMPLE21,Phenix LigFit22,PanDDA13,23使用一个经过良好精修的目标蛋白输入模型作为自动精修的输入;否则,对在本次实验中收集的一个高分辨率模拟浸泡晶体进行细致的精修。
注意:命中识别的关键要素是 PanDDA。相关细节见于相应的出版物。13,23简而言之,PanDDA 会自动计算 CFS 筛选项目中一组数据集的电子密度图。这些数据被假定为无片段结合的条件,并进行平均以生成所谓的基态模型。随后,利用体素相关的 Z-分数,将每个电子密度图与基态图进行比较,识别局部差异。接着,针对 Z-分数较高的区域,通过精细调节从相应图中减去基态密度,生成所谓的 PanDDA 图。这种方法显著增强了片段结合事件的可见性。 - 为最大化 PanDDA 的分析效果,采用两步法。首先,使用标准设置运行 PanDDA(pandda.analyse)。即使已收集了模拟浸泡晶体的数据,在此步骤中也不将其身份作为参数纳入(尽管该操作可行),以便 PanDDA 能基于所有可用数据无偏倚地生成基态模型。随后,用户通过 Coot 中所谓的 PanDDA 检查对输出数据进行评估。24此处应记录具有相对高置信度的命中结果,完成第一步。
- 其次,通过使用 --exclude_from_characterisation= 参数,在 pandda.analyse 步骤中重新运行分析,从基础状态模型中排除第一步确定的初步命中结果"<已绑定数据集ID列表>" 命令行选项。更多详细信息请参见 PanDDA 帮助页面(https://pandda.bitbucket.io/)。通过此方式,可排除那些明显为阳性结果的衍射数据集,因其若被纳入分析会干扰基态模型的准确性。该步骤有助于获得更优的基态模型,从而整体提升分析结果的质量。最后,通过全面的 PanDDA 检查完成阳性片段的鉴定。
注意:FragMAXapp 还包含输出选项,可用于保存建模的结合状态或准备 PDB 提交数据,更多详情请参见 FragMAX 网页(https://fragmax.github.io/)。
结果
作为此前报道的 F2X-Entry 筛选板验证实验11的一部分,共在 MAX IV 的 BioMAX 光束线开展了三次实验,在 HZB 的 BL14.1 光束线开展了一次实验。在后者实验中,针对酵母 Aar2 与酵母 Prp8 的 RNaseH 样结构域(AR)形成的蛋白-蛋白复合物,筛选了一组特定的 F2X-Entry 筛选板条件,该组条件采用不含 DMSO 的浸泡方式。所选条件集合包含了此前在含有 DMSO 的浸泡条件下对 AR 进行 F2X-Entry 筛选时发现的阳性结果11(即,在 HZB 开展的此次实验中,这些阳性结果在无 DMSO 条件下被重新筛选)。图 7 展示了使用 FragMAXapp 流程分析数据后获得的阳性结果概览,该流程包括采用 XDSAPP 进行数据处理、fspipeline 进行自动精修,以及随后使用 PanDDA 进行阳性结果识别。

图1:晶体学片段筛选(CFS)实验的工作流程示意图,重点展示德国亥姆霍兹柏林中心的特殊实验环境。 请点击此处查看该图的放大版本。
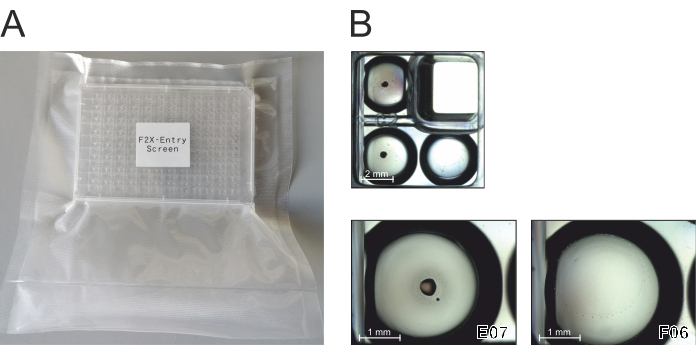
图2:F2X-Entry筛选试剂盒的配方与包装。 该96种化合物筛选试剂盒提供于一个3镜头96孔MRC低剖面板上,用铝箔密封并真空包装。每孔的三个镜头中有两个镜头内含有从DMSO溶液中干燥得到的96种筛选化合物。请点击此处查看该图的放大版本。
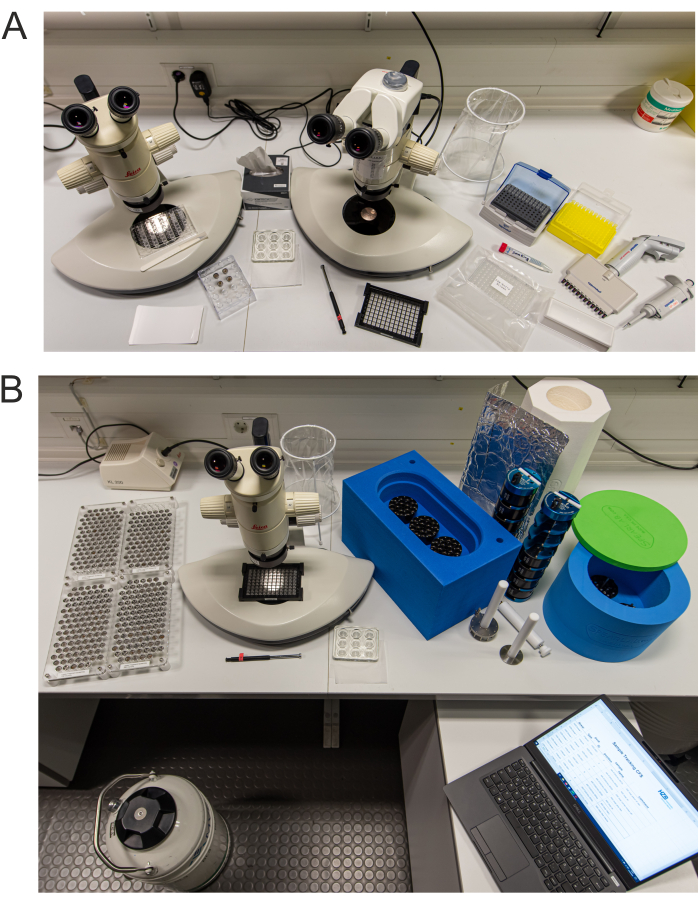
图3:HZB制备实验室中CFS工作台的实景照片。 图中展示了A)浸泡和B)晶体收获所需工具的组装配置。请点击此处查看该图的放大版本。
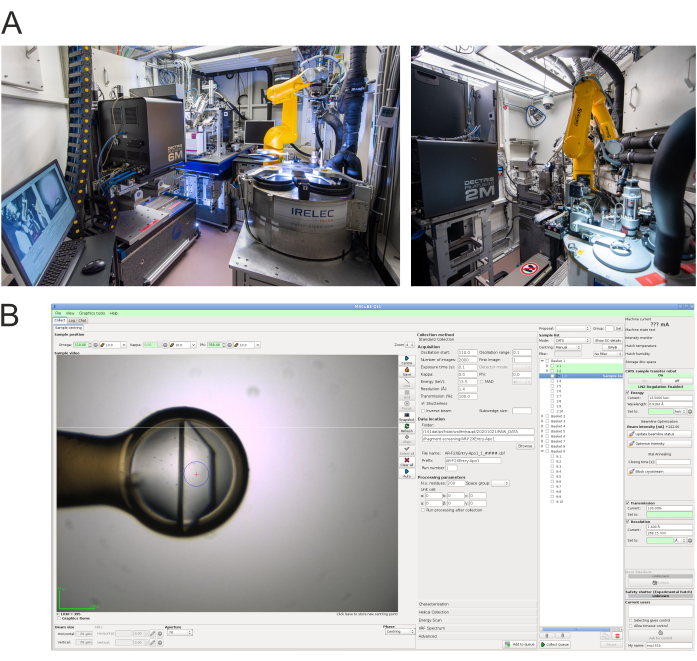
图4:数据采集终端站与控制软件。 A) HZB-MX光束线BL14.1(左)和BL14.2(右)实验站的实景照片15。 B) 在BL14.1用于衍射数据采集的MXCuBE2实验控制界面截图16,BL14.2使用非常相似的界面。 请点击此处查看此图的放大版本。
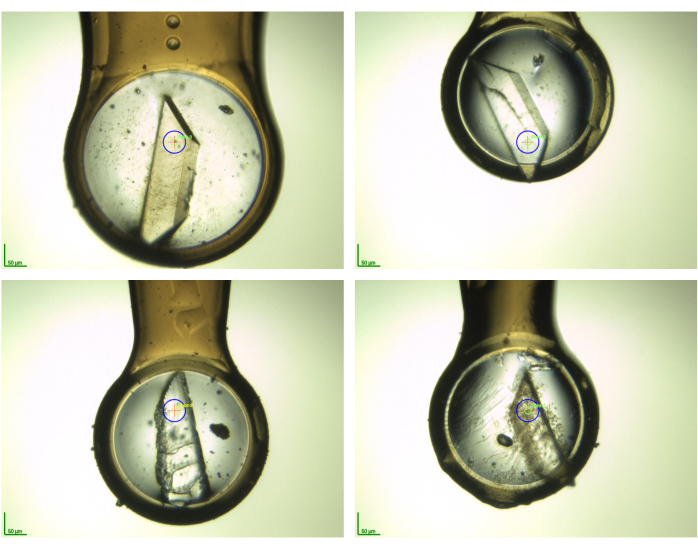
图5:数据采集前低温环境下部分晶体样品的摄影快照。 该图展示了在完成片段浸泡和晶体收获后,晶体形态的多样性。这些照片是在瑞典隆德的MAX IV同步辐射光源BioMAX光束线上拍摄的,用于在F2X-Entry筛选验证中采集的AR样品11。请点击此处查看此图的放大版本。
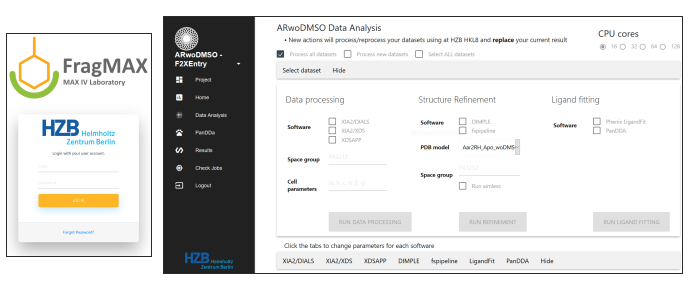
图6:在HZB安装的FragMaxApp18用于便捷数据分析的界面截图。详见Lima等人的研究,FragMAXapp,未发表数据。 请点击此处查看此图的放大版本。
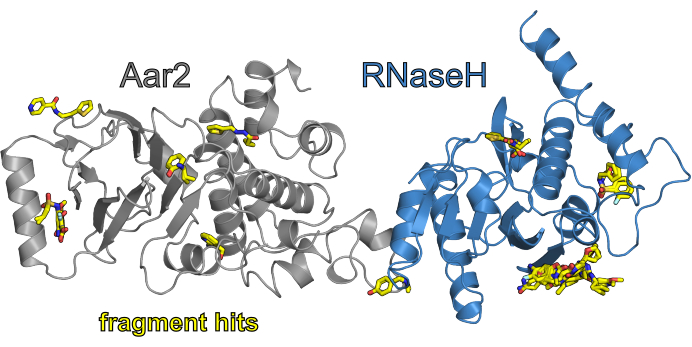
图7:CFS 筛选项目 F2X-Entry 与 AR(不含 DMSO)筛选结果概览。 AR 蛋白复合物以卡通图形式展示,其中 Aar2 以灰色表示,Prp8 的 RNaseH 样结构域以蓝色表示。筛选中获得的片段命中化合物以元素颜色着色(C - 黄色,O - 红色,N - 蓝色,S - 橙色,Cl - 浅青色)。请点击此处查看该图的放大版本。
样本追踪表模板。 请点击此处下载该文件。
讨论
要成功开展CFS实验,必须严格遵守所述的先决条件(参见引言)。需要一个可靠的结晶系统,以可重复地生长出大量衍射质量良好的晶体;同时,需要一个经过良好优化的结构作为自动化精修所需的输入脱辅基模型(apo model)。此外,必须确认目标蛋白位点(如活性位点或界面区域)在晶体晶格中对片段分子是可及的。预先优化浸泡条件也至关重要,以确保浸泡过程不会显著降低晶体质量。忽视这些因素极可能导致实验结果不理想,其应用价值将非常有限,最坏情况下甚至需要重复整个实验。
上述方案概述了标准片段筛选(CFS)实验过程中所遵循的操作步骤。如果所有先决条件均满足,至少90%的浸泡晶体应在衍射实验中显示出高分辨率衍射数据。若未达到此效果,可将浸泡时间缩短至数小时甚至数分钟。由于大多数片段具有良好的溶解性,这通常足以获得理想的占据率数值。此外,一次典型的CFS实验通常可获得约10%或更高的命中率。在F2X-Entry Screen验证实验11以及使用相同文库的持续用户实验中,已观察到更高的命中率(20%及以上,数据未显示)。
晶体学片段筛选的一个普遍局限性在于晶体接触位点的存在。这些位点可能遮蔽目标结合位点 先验的 已知的活性位点(在筛选前需进行检查,见上文),这些接触位点也常常形成片段可结合的口袋和热点。此类片段命中结果可能是晶体晶格的人工假象,很可能在溶液中并不与蛋白质结合。这类情况在浸泡实验中比共结晶实验中更常见(可能由于浸泡实验中使用的片段浓度较高)。然而,根据以往经验,它们通常仅占所获得命中结果的一小部分。例如,在使用内切蛋白酶(EP)和剪接体蛋白-蛋白复合物Prp进行的F2X-Entry筛选验证实验中8RNaseH 以及Aar2(AR),大多数命中位点出现在有希望的位点11对于EP,37个观察到的结合事件中有27个位于活性位点(即该蛋白酶的肽结合裂隙)。其余10个远端结合事件包括两个溶剂暴露表面的结合事件和八个晶体接触结合事件(对应五个独特命中)。排除这些晶体接触命中后,EP筛选实验的整体独特命中率仍为24%。还需注意的是,远离已知活性位点的结合事件(晶体接触结合除外)也可能具有潜在意义(例如揭示蛋白新的热点区域或变构位点)。在同一项研究报道的AR筛选实验中,23个观察到的结合事件里,有7个位于晶体接触界面,1个位于两个蛋白的直接相互作用界面,7个位于已知的蛋白质-蛋白质相互作用位点(这些位点在剪接体更大生物学背景中与其他结合伙伴相互作用,对应剪接体的不同组装阶段),另有8个结合事件揭示了AR上两个功能尚未明确的热点区域,其中一个位于Prp8的溶剂暴露表面。RnaseH因此,排除晶体接触处的事件以及Prp8RnaseH 单例情况下,潜在有用的结合事件数量为15(对应14个独特命中),因此命中率为15.6%。这些命中可作为设计蛋白-蛋白相互作用调节剂的起点,或作为探针化合物用于探索所发现的两个Aar2热点区域。综上所述,结合已开展的用户调研结果,晶体学片段筛选中通常仅有少量命中需被视为假象而舍弃。然而,这一比例在很大程度上取决于具体靶标。
如果命中率显著偏低,可能表明与靶标蛋白相关的以下问题之一。例如,在针对一种病毒半胱氨酸蛋白酶的CFS筛选中,仅观察到3%的命中率(数据未显示)。结果发现,所使用的蛋白可能在其活性位点发生了化学修饰。在这种情况下,更换不同的蛋白制备方式可能解决该问题。如果晶体对DMSO极度敏感,F2X-Entry筛选也可在不含DMSO的条件下进行,尽管结果可能在一定程度上有所不同。在含有DMSO时获得的大多数命中化合物在无DMSO时仍会出现;但也有一些化合物仅在含有DMSO时可被检测到,而在无DMSO时无法观察到;最后,还可能存在仅在无DMSO条件下才出现的少数化合物。
当蛋白质在结合配体时发生诱导契合运动时,会出现最严重的问题。晶体晶格很可能无法耐受蛋白质的构象变化,从而导致晶体解体。在这种情况下,唯一的选择是采用蛋白质与片段共结晶的方法。然而,这可能导致形成新的晶体形式。因此,整个流程的大部分自动化操作将不再能高效运行。幸运的是,到目前为止,在HZB开展的大多数CFS项目中,尚未遇到此类问题。这可能是因为片段的弱结合无法提供足够的能量来诱导蛋白质发生构象变化,特别是当晶体中的构象受到晶格堆积力稳定时。
作者迄今为止遇到的该方法另一个严重局限是,当结晶液(从而浸泡溶液)含有挥发性化合物时,几乎无法以有意义的方式完成所有晶体操作。
不同的蛋白质在不同程度上可能含有可成药的位点。例如,蛋白质-蛋白质相互作用通常由大面积的平坦表面介导,这类表面较难作为靶点。因此,片段结合的命中率可能取决于蛋白质分子表面的结构。在极端情况下,某些蛋白质可能不含有任何适合作为片段结合靶点的表面热点。因此,即使实验操作极为严谨,筛选过程也可能不会产生任何片段命中结果。然而,作者至今尚未遇到过这种情况。
原则上,根据上述方案,CFS 实验中的晶体浸泡和收获步骤可以在任何具备晶体操作条件的实验室中进行。这使得柏林亥姆霍兹中心(HZB)的方法与其他 CFS 设施有所不同,并在某些情况下具有优势。例如,当晶体难以在其他地点重新制备,或实验人员的出行受到限制时(如在全球性大流行病期间),HZB 的用户因此可获得全套设备(样品托盘、工具、EasyAccess 框架、样品架等),以便携带使用。
然而,大量样品架和低温存储空间的需求在专用的CFS设施中仍能更方便地得到满足。此外,由于需要收集大量衍射数据集,因此有必要将这些设施就近设置在专为高通量样品处理设计的光束线上。此类设施的实例包括位于英国Diamond Light Source的I04-1光束线及其关联的XChem设施8,25、法国ESRF的MASSIF光束线26,以及瑞典MAX IV同步辐射光源BioMAX光束线上的FragMAX设施18。
未来,有望设计出完全无需晶体操作的CFS实验。目前在此方向上已有一些初步进展。例如,通过声波液体转移技术,可在网格型样品载体上直接混合含晶体溶液与片段溶液27。另一种方法被用于基于XFEL的配体筛选:在一项原理验证实验中,批量制备晶体悬浊液,并在硅基固定靶芯片上完成浸泡及衍射数据收集28。然而,这些方法仍处于开发阶段,距离广泛适用于多种蛋白质靶标,或在CFS设施中作为常规手段应用,尚有较大差距。
本文详细阐述了在HZB(及其他机构)顺利开展CFS实验活动的具体操作步骤,并提供了准备和实施此类实验的通用指导以及实用的操作技巧,有助于显著提高实验成功率。最终,提升CFS筛选的成功概率和效率,将为后续工具化合物或候选药物的开发高效地提供起始点。
披露
关于EasyAccess框架的专利申请已由柏林亥姆霍兹中心向德国专利商标局提交,注册号为DE 10 2018 111 478.8。此外,还通过PCT途径基于该德国专利的优先权提交了国际专利申请。
致谢
我们感谢众多用户团队在HZB开展的CFS实验活动。他们的反馈推动了我们工作流程的逐步改进。我们特别感谢马尔堡大学的药物设计团队以及MAX IV的FragMAX团队,这些紧密的合作为CFS技术的多次重要发展奠定了基础。我们感谢德国联邦教育与研究部(BMBF)通过Frag2Xtal和Frag4Lead项目(编号05K13M1和05K16M1)提供的支持。此外,我们还衷心感谢iNEXT-Discovery项目(项目编号871037)的支持,该项目由欧洲委员会的“地平线2020”计划资助。
材料
| 姓名 | 公司 | 目录编号 | 评论 |
|---|---|---|---|
| 1 µL 移液器 | Eppendorf | EP3123000012 | |
| 12通道移液器,100 µL | Eppendorf | EP4861000791 | |
| 吹风机 | TH-Geyer | 9.106 788 | |
| 含晶体的结晶板 | 含有待浸泡的晶体 | ||
| 结晶培养箱 | 为结晶实验提供恒定温度,HZB处为20°C | ||
| 不同孔径尺寸的双厚度MicroLoops(LD) | MiTeGen | 多种,例如 M5-L18SP-75LD | 本方案需要适量尺寸的250个loop,可由HZB提供 |
| EasyAccess支架 | HZB | EasyAccess支架是一种用于处理多个晶体的专用装置,由HZB开发(Barthel等,2021)。 | |
| F2X-Entry筛选板 | HZB | 开发的F2X-Entry筛选剂(Wollenhaupt等,2020) | |
| 玻璃点样板 | VWR | MARI1406506 | |
| 液氮 | 至少一满5 L罐 | ||
| 液氮储存罐 | n.a. | n.a. | |
| 磁性取晶棒 | MiTeGen | M-R-1013198 | |
| 显微镜 | Leica | n.a. | |
| MRC 3镜头96孔低剖面结晶板 | SwissCI | 3W96TLP-UVP | 用于模拟浸泡晶体(可选) |
| 试剂储液槽 | Carl Roth | EKT6.1 | 25 ml容量 |
| 样品追踪模板 | https://www.jove.com/files/ftp_upload/62208/TemplateCFSHZBSampleTracking. xlsx | ||
| 手术刀 | B. Braun | BA825SU | |
| 微孔板密封膜 | GreinerBioOne | 676070 | |
| 带槽式提手的Unipuck运输杆(适用于Unipuck) | MiTeGen | M-CP-111-065 | 2根铝制提杆;可由HZB提供 |
| 浸泡溶液 | 至少需要5 ml | ||
| 含冷冻保护剂的浸泡溶液,150µL | 仅当浸泡溶液本身不含冷冻保护剂时才需要 | ||
| 擦拭纸巾 | Roth(Kimberly Clark Professional) | AA64.1 | |
| 运输用杜瓦瓶(Whartington干式运输罐) | MiTeGen | TW-CX100 | 2个运输杜瓦瓶,用于存放2根Unipuck提杆;也可使用VHC35型或类似型号的储存杜瓦瓶。 |
| 带盖Unipuck泡沫杜瓦瓶 | MiTeGen | M-CP-111-022 | 两个特别适用于本方案所述Unipuck操作的泡沫杜瓦瓶 若使用SPINE puck,则可能需要采用不同的泡沫杜瓦瓶。 |
| Unipuck初学者套装 | MiTeGen | M-CP-UPSK001 | 可由HZB提供 |
| Unipuck样品托 | MiTeGen | M-CP-111-021 | 14个Unipuck;可由HZB提供 |
参考文献
- Erlanson, D. A., Fesik, S. W., Hubbard, R. E., Jahnke, W., Jhoti, H. Twenty years on: the impact of fragments on drug discovery. Nature Reviews Drug Discovery. 15 (9), 605-619 (2016).
- Hall, R. J., Mortenson, P. N., Murray, C. W. Efficient exploration of chemical space by fragment-based screening. Progress in Biophysics and Molecular Biology. 116 (2-3), 82-91 (2014).
- Erlanson, D. A. Introduction to fragment-based drug discovery. Topics in Current Chemistry. 317, 1-32 (2012).
- Scott, D. E., Coyne, A. G., Hudson, S. A., Abell, C. Fragment-based approaches in drug discovery and chemical biology. Biochemistry. 51 (25), 4990-5003 (2012).
- Lamoree, B., Hubbard, R. E. Current perspectives in fragment-based lead discovery (FBLD). Essays in Biochemistry. 61 (5), 453-464 (2017).
- Schiebel, J., et al. Six Biophysical Screening Methods Miss a Large Proportion of Crystallographically Discovered Fragment Hits: A Case Study. ACS Chemical Biology. 11 (6), 1693-1701 (2016).
- Schiebel, J., et al. High-Throughput Crystallography: Reliable and Efficient Identification of Fragment Hits. Structure. 24 (8), 1398-1409 (2016).
- Krojer, T., et al. The XChemExplorer graphical workflow tool for routine or large-scale protein-ligand structure determination. Acta Crystallographica Section D: Structural Biology. 73 (3), 267-278 (2017).
- Radeva, N., et al. Active Site Mapping of an Aspartic Protease by Multiple Fragment Crystal Structures: Versatile Warheads to Address a Catalytic Dyad. Journal of Medicinal Chemistry. 59 (21), 9743-9759 (2016).
- Cox, O. B. A poised fragment library enables rapid synthetic expansion yielding the first reported inhibitors of PHIP(2), an atypical bromodomain. Chemical Science. 7 (3), 2322-2330 (2016).
- Wollenhaupt, J., et al. F2X-Universal and F2X-Entry: Structurally Diverse Compound Libraries for Crystallographic Fragment Screening. Structure. 28 (6), 694-706 (2020).
- EU OPENSCREEN fragment library. , Available from: https://www.eu-openscreen.eu/services/compound-collection/fragment-library.html (2020).
- Pearce, N. M., et al. A multi-crystal method for extracting obscured crystallographic states from conventionally uninterpretable electron density. Nature Communications. 8, 15123(2017).
- Barthel, T., Huschmann, F. U., Wallacher, D., Klebe, G., Weiss, M. S., Wollenhaupt, J. Facilitated crystal handling using a simple device for evaporation reduction in microtiter plates. Journal of Applied Crystallography. 54, (2021).
- Mueller, U., et al. The macromolecular crystallography beamlines at BESSY II of the Helmholtz-Zentrum Berlin: Current status and perspectives. The European Physical Journal Plus. 130 (7), 141(2015).
- Oscarsson, M., et al. MXCuBE2: The dawn of MXCuBE collaboration. Journal of Synchrotron Radiation. 26 (2), 393-405 (2019).
- Mueller, M., Wang, M., Schulze-Briese, C. Optimal fine φ-slicing for single-photon-counting pixel detectors. Acta Crystallographica Section D: Biological Crystallography. 68 (1), 42-56 (2012).
- Lima, G. M. A., et al. FragMAX: The fragment-screening platform at the MAX IV Laboratory. Acta Crystallographica Section D Structural Biology. 76 (8), 771-777 (2020).
- Sparta, K. M., Krug, M., Heinemann, U., Mueller, U., Weiss, M. S. XDSAPP2.0. Journal of Applied Crystallography. 49 (3), 1085-1092 (2016).
- Winter, G. xia2: an expert system for macromolecular crystallography data reduction. Journal of Applied Crystallography. 43 (1), 186-190 (2010).
- Winn, M. D., et al. Overview of the CCP4 suite and current developments. Acta Crystallographica Section D: Biological Crystallography. 67 (4), 235-242 (2011).
- Terwilliger, T. C., Klei, H., Adams, P. D., Moriarty, N. W., Cohn, J. D. Automated ligand fitting by core-fragment fitting and extension into density. Acta Crystallographica Section D: Biological Crystallography. 62 (8), 915-922 (2006).
- Pearce, N. M., Krojer, T., Von Delft, F. Proper modelling of ligand binding requires an ensemble of bound and unbound states. Acta Crystallographica Section D Structural Biology. 73 (3), 256-266 (2017).
- Emsley, P., Lohkamp, B., Scott, W. G., Cowtan, K. Features and development of Coot. Acta Crystallographica Section D: Biological Crystallography. 66 (4), 486-501 (2010).
- Collins, P. M., et al. Chapter Eleven - Achieving a Good Crystal System for Crystallographic X-Ray Fragment Screening. Methods in Enzymology. 610, 251-264 (2018).
- Bowler, M. W., et al. MASSIF-1: a beamline dedicated to the fully automatic characterization and data collection from crystals of biological macromolecules. Journal of Synchrotron Radiation. 22 (6), 1540-1547 (2015).
- Cuttitta, C. M., et al. Acoustic transfer of protein crystals from agarose pedestals to micromeshes for high-throughput screening. Acta Crystallographica Section D Biological Crystallography. 71 (1), 94-103 (2015).
- Moreno-Chicano, T., et al. High-throughput structures of protein-ligand complexes at room temperature using serial femtosecond crystallography. IUCrJ. 6 (6), 1074-1085 (2019).
重印与许可
