Herein, a minimally invasive surgical method is described to induce endometriosis in pigs via autologous transplantation of ex vivo labeled endometrial fragments into the peritoneal cavity. Progression of the disease is assessed through longitudinal monitoring and laparoscopic retrieval of endometriotic lesions.
方法文章
Laparoscopic Induction of Endometriosis in a Preclinical Swine Model by Autologous Endometrial Transplantation
本文内容
摘要
摘要
Pigs are increasingly used as models of human diseases, largely because their anatomy, physiology, and genetics more closely resemble those of humans. Given its relatively high prevalence and incompletely understood pathogenesis, endometriosis is an important condition to model in a large-animal model. This protocol describes the laparoscopic induction of endometriosis in a preclinical swine model via autologous transplantation of endometrial tissue into the peritoneal cavity. Endometrial fragments are isolated shortly after standing estrus, minced into uniform pieces, and optionally labeled ex vivo with fluorescein isothiocyanate (FITC) dye-doped silica nanoparticles to enable fluorescent identification of ectopic lesions. The labeled or unlabeled tissue fragments are reintroduced into the abdominal cavity under sterile surgical conditions. The procedure is then followed by longitudinal monitoring and laparoscopic retrieval of endometriotic lesions. Development and application of a laparoscopic approach that is less invasive than cavity-breaching surgery enables multiple procedures to be performed in the same experimental animal. This large-animal model provides a reproducible, translational platform for studying endometriosis pathophysiology, imaging approaches, and therapeutic interventions.
引言
Endometriosis is a chronic, multifactorial disorder characterized by the growth of endometrial-like tissue outside the uterine cavity. It affects up to 10% of reproductive-aged women worldwide1. Endometriosis exhibits diverse clinical manifestations, with approximately 90% of patients experiencing pelvic pain and 26% reporting infertility2. Although laparoscopic visualization with histologic confirmation has historically been regarded as the gold standard for diagnosing endometriosis, substantial diagnostic delay persists, with the interval from symptom onset to diagnosis ranging from 5 to 12 years2,3. Thus, improved approaches for earlier diagnosis and the development of more effective treatments remain important goals in endometriosis research.
Despite substantial advances in understanding the clinical and biological features of endometriosis, its etiopathogenesis remains unclear4. Studying disease mechanisms directly in human subjects is challenging due to ethical constraints on experimental manipulation, as well as logistical limitations and substantial individual variability. Therefore, well-characterized animal models serve as valuable tools for investigating disease pathophysiology and for evaluating potential diagnostic and therapeutic strategies. In this regard, pigs are an excellent biomedical model due to their anatomical, physiological, and genetic similarities to humans. Their large organ size facilitates the development and application of surgical techniques and imaging approaches that can be more readily translatable to patients. Additionally, pigs have comparable hormonal regulation and estrous cycle dynamics5, making them useful for studying hormone-dependent conditions such as endometriosis. Due to their size, pigs also enable repeated tissue sampling and longitudinal monitoring, which are critical for understanding early pathogenic mechanisms that are often inaccessible in human patients, as well as the development and progression of the disease. Because pigs do not normally develop endometriosis, the disease needs to be experimentally induced. A swine model in which endometriotic lesions can be induced, closely replicating the histopathological characteristics observed in women with endometriosis, was recently reported6. This represents an important step toward establishing a novel large-animal model for understanding disease pathogenesis and advancing translational research.
Herein, a minimally invasive laparoscopic technique for inducing endometriosis in a swine model is described, enabling subsequent monitoring and serial sampling of endometriotic lesions. The approach requires localization and resection of a segment of the uterine horn, followed by ex vivo mincing of the endometrium6. As an optional step, the endometrial tissue can be ex vivo labeled with FITC dye-doped silica nanoparticles to enable subsequent ex vivo fluorescent identification of ectopic lesions6. The endometrial tissue is then transplanted into the abdominal cavity, and lesion formation is monitored by subsequent laparoscopic surveillance. Successful implementation of these techniques requires trained personnel and specialized equipment, and is best facilitated through detailed protocols and visual demonstration of the complete procedure. Therefore, this article aims to provide a comprehensive resource for researchers modeling endometriosis or other related conditions in pigs.
方案
All animal procedures were approved by the University of Missouri-Columbia Institutional Animal Care and Use Committee (Protocol numbers 37561 and 65648), and adhered to the Guide for the Care and Use of Laboratory Animals. Pubertal female pigs (Large White by Landrace crossbred genetic background) were housed in the University of Missouri swine facilities in a room with sexually mature boars for the duration of the study. Animals received age-appropriate standard commercial feed with ad libitum access to water. Body weights varied from 80 to 130 kg. Female pigs were daily monitored for behavioral (i.e., increased vocalization, restlessness, and receptivity to mating response) and physical (i.e., vulvar swelling and mucous discharge) signs of estrus. Animals were considered in active estrus when exhibiting a characteristic immobility response to back pressure and/or boar exposure, defined as standing estrus. Endometriosis was induced in pubertal female pigs 1–2 days after the onset of standing estrus to ensure experimental standardization. Subsequent visualization of ovarian structures, including follicles, corpora hemorrhagica, and corpora lutea, during laparoscopy confirmed the stage of the estrous cycle.
Details of the materials, reagents, and equipment used in this protocol are provided in the Table of Materials.
1. Preparation for live-animal surgery
- Ensure that all surgical and medical instruments are properly sterilized using autoclaving and/or ethylene oxide sterilization.
NOTE: Certain laparoscopic instruments, such as cameras and rigid laparoscopes, are sensitive to heat and moisture; therefore, ethylene oxide sterilization is recommended for these devices. The manufacturer’s instructions should always be consulted to confirm the appropriate sterilization method. - Fast the animals for at least 12 h prior to surgery to prevent excessive gastrointestinal distension during the procedure.
- Prepare the recovery area by placing a heat lamp and a blanket, as well as instruments to monitor vitals such as a thermometer and a stethoscope.
2. Animal sedation and preparation
- Sedate the animals with an intravenous injection into an ear vein of ketamine (1–4.5 mg/kg) and xylazine (1–2 mg/kg) (combined in one syringe) using an 18-gauge winged infusion set.
- Transfer animals to the operating table and ensure appropriate heat support is provided by using heating pads.
- Place an endotracheal tube with an internal diameter of 8.0–10.5 mm in the animal’s airway. Inflate the cuff to secure the endotracheal tube in place, then connect the tube to the oxygen and gas anesthesia supply.
NOTE: Orotracheal intubation in adult pigs is aided by the use of an extra-long (300 mm) laryngoscope blade, which facilitates access to the laryngeal space. - Maintain the animals in a surgical plane of general anesthesia using 3–5% isoflurane in 100% oxygen.
NOTE: Although the anesthesia machine used for these procedures is equipped with a mechanical ventilator, the pigs subjected to these procedures to date have maintained spontaneous respiration throughout the procedure and therefore did not require mechanical ventilation. If mechanical ventilation is required, a respiratory rate of 12–20 breaths/min and a tidal volume of 8–10 mL/kg body weight are recommended. - Apply sterile ophthalmic ointment to prevent corneal dryness.
- Insert an 18–22-gauge peripheral venous catheter into an ear vein and provide 0.9% sodium chloride continuous fluid support at a rate of 2–3 mL/kg/h for the duration of the procedure.
- Position the animal in dorsal recumbency and tie the arms and legs with rope in an extended position.
- Place a monopolar electrocautery grounding pad on shaved skin on the animal’s right flank. Ensure proper contact between the pad and the skin.
- Prepare the surgical field by shaving the abdominal area (from the costal ridge to the pubis and to each inguinal fold), and performing an antiseptic scrub, alternating 10% povidone–iodine solution with 70% isopropyl alcohol applied in concentric circles.
- Cover the animal with a large sterile drape to maintain a sterile field.
3. Animal monitoring, analgesia, and systemic antibiotics
- Monitor and record the animal’s vital signs throughout the procedure, including heart rate, respiratory rate, peripheral oxygen saturation, and body temperature.
NOTE: The use of a standardized surgical record card is highly recommended for monitoring the animal and documenting physiological parameters during the procedure. - Ensure adequate anesthetic depth before the first incision and throughout the procedure by confirming the absence of palpebral and paw withdrawal reflexes.
- Administer intramuscular injections of flunixin meglumine (50 mg/mL) at a dosage of 2.2 mg/kg and ceftiofur crystalline free acid (100 mg/mL) at a dosage of 5 mg/kg at the start of surgery.
4. Pre-operative and laparoscopic instrument preparation
- Ensure that the surgeon and assistants perform surgical hand antisepsis and don sterile surgical gowns and gloves prior to the surgery.
- Set the surgical tools and laparoscope instruments on a table covered with a sterile drape.
- Transfer the laparoscope camera, rigid laparoscope, light cable, and insufflator tubing to the surgical field.
NOTE: These instruments can be secured to the surgical field drape using Backhaus clamps to prevent accidental displacement. - With the help of a non-sterile assistant, connect the camera, light cable, and insufflator tubing to their respective towers. Attach the rigid scope to the camera head.
- Connect the light cable and turn on the light source. White balance the camera according to the manufacturer's instructions.
- Connect the monopolar and bipolar cables to their respective forceps.
- With the assistance of a non-sterile assistant, connect the cables to the electrosurgical unit and verify proper function by briefly activating the cautery while touching the forceps to a wet gauze.
- Place the suction/irrigation tubing and probe on the surgical field and connect them to the suction/irrigation system supplied with 0.9% sodium chloride solution.
5. Laparoscopic partial hysterectomy for induction of endometriosis
NOTE: The laparoscopic procedure for partial hysterectomy and autologous transplantation typically takes approximately 2 h, from the initial incision to skin closure; however, the duration may vary depending on the experience of the surgical team.
- Using scissors, create a 20 x 30 cm rectangular opening in the surgical drape and place four Backhaus clamps to secure the surgical drape in place.
- For the first camera port, place two towel clamps approximately 1 cm lateral to each side of the umbilicus and elevate the abdominal wall to safely insert the initial trocar (Figure 1).
- Using a No. 22 scalpel blade, make a 10 mm incision at the midline of the umbilicus. Then, using a straight hemostat, bluntly dissect the subcutaneous tissue.
NOTE: Laparoscopic procedures were performed using a four-port technique consisting of two 10 mm trocars and two 5 mm trocars, as illustrated in Figure 1. Port A (10 mm) was used for the 10 mm laparoscope, whereas ports B (5 mm), C (10 mm), and D (5 mm) were used for surgical instruments. - While maintaining the skin and abdominal wall lifted, insert the trocar with its cannula and advance it until the peritoneal cavity is entered. Then, remove the trocar and insert the rigid telescope via the cannula.
- Upon confirmation that the peritoneal cavity is breached, connect the insufflator tubing to the cannula and open the stopcock. Induce pneumoperitoneum by pressurizing the abdomen with CO2 up to 12 mmHg.
- Once adequate abdominal insufflation is achieved, tilt the operating table and animal to Trendelenburg position (head approximately 20° below the sacrum).
NOTE: Abdominal insufflation helps create space between the abdominal wall and the viscera, while the Trendelenburg position shifts the viscera cranially. Together, these measures create a safer entry of trocars B, C, and D. - With the scope inserted in port A, scan the abdominal viscera to assess any pre-existing conditions or bleeding.
- With a scalpel blade, make 5 and 10 mm incisions for placement of trocars B and C, respectively, lateral to the midline (Figure 1). Use the scope to visually guide the placement of trocars, thereby avoiding organ perforation.
NOTE: Depending on animal size and body condition, the trocars and cannulas may need to be angled upon entry into the peritoneal cavity to reduce the risk of perforating organs. - Repeat the same procedure to insert trocar D (Figure 1).
- Insert atraumatic long-jaw graspers through ports B, C, and D to manipulate the uterine horns and locate the ovaries. Identify and record ovarian structures present (e.g., preovulatory follicles, corpora hemorrhagica, and corpora lutea).
NOTE: If the gastrointestinal tract is compromising visualization of the uterus, use a sweeping motion to carefully sweep the organs away from the operative field. - Once the right-sided ovary is located, identify the oviduct and the tip of the uterine horn. Grasp the uterine horn about 20 cm from the utero-tubal junction with one or two atraumatic graspers that were inserted through ports C and D.
- Insert the bipolar cautery forceps via port B and cauterize the uterine horn at the site of resection (Figure 2A). Use the monopolar cutting/cautery scissors to cut the uterine horn, ensuring hemostasis (Figure 2B,C).
NOTE: Sequential rounds of bipolar cauterization followed by monopolar cutting are required to achieve complete resection of the uterine horn. The resection area may be irrigated with 0.9% sodium chloride if the tissue becomes dry due to cauterization. - Grasp the uterine horn approximately 6–10 cm from the first resection site towards the utero-tubal junction. Repeat the procedure described in step 5.12 until the horn is cross-sectioned (Figure 2D,E). Cauterize and cut the mesometrium connecting the two resection sites (Figure 2F–I).
- Examine the resected areas for hemorrhage using camera visualization.
NOTE: This has not occurred to date. However, if bleeding is noted, determine the site of hemorrhage and provide appropriate hemostasis using cautery. - Insert a laparoscopic specimen retrieval bag via port C and place the resected uterine tissue into the pouch (Figure 3A,B).
- Remove the pouch by cinching the drawstring, bringing the bag neck through the trocar port without the cannula (Figure 3C,D). With the aid of small hemostats, carefully exteriorize the uterine tissue.
NOTE: Depending on the size of the uterine horn, the trocar port incision may need to be enlarged to allow the specimen to be extracted without damage. - Transfer the uterine tissue to a sterile beaker and proceed with tissue mincing as described in the following section.
- Cover the surgical field with a sterile surgical drape while the tissue is being prepared. This is important to prevent excessive drying and contamination of incision sites.
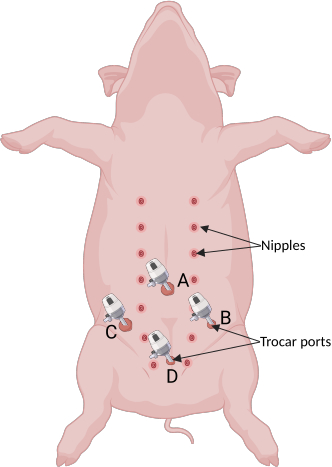
Figure 1: Trocar port placement on the abdomen. Port A (10 mm) is positioned at the midline of the umbilicus and is used for the laparoscope camera and insufflator. Ports B (5 mm) and C (10 mm) are located 8–10 cm lateral to the midline and caudal to port A. Port D (5 mm) is positioned on the midline, 8–10 cm caudal to ports B and C. Illustration created with BioRender.com. Please click here to view a larger version of this figure.
6. Endometrial fragments preparation and labeling
NOTE: Perform endometrial tissue dissection and mincing in a laminar flow cabinet while wearing sterile surgical gloves to minimize contamination. A detailed description of synthesis and preparation of labeled nanoparticles is described in Omenge et al. (2025)6. Mincing and processing of the tissue typically require 30–60 min, depending on whether ex vivo tissue labeling is performed. Because tissues are processed immediately after retrieval and inoculated immediately following preparation, the expected interval between tissue retrieval and inoculation is approximately 35–60 min.
- Using sterile instruments in a Petri dish, separate the endometrium from the myometrium until approximately 5 g of endometrial tissue is obtained. Mince the endometrial tissue into fragments of approximately 1 mm3 using surgical scissors.
NOTE: Mincing the endometrial tissue into small fragments is critical to prevent clogging of the cannula used to inoculate the fragments back into the peritoneal cavity. - For labeling, incubate the endometrial fragments in 1.2 mL of the FITC dye-doped silica nanoparticles suspension in a 6-well plate containing 0.8 mL RPMI-1640 medium supplemented with 10% fetal bovine serum, for a total volume of 2 mL. Incubate the tissue in an atmosphere-controlled incubator with 5% CO2 at 37 °C for 30 min.
NOTE: Ex vivo labeling of the tissue is an optional step. Detailed methods for the generation of FITC dye-doped silica nanoparticles and tissue labeling have been previously described in Omenge et al. (2025)6. Additionally, because the current laparoscopic imaging system is equipped only for the detection of indocyanine green (ICG), FITC-labeled tissues and lesions cannot be visualized in vivo and were therefore assessed ex vivo using a fluorescence imaging system, as previously described by Omenge et al. (2025)6. - Transfer the tissue suspension to a 50 mL conical tube. Transport the tube to the operating room for inoculation into the animal, as described in the following section.
7. Autologous inoculation of endometrial tissue for induction of endometriosis and surgical closure
NOTE: The final inoculum volume is generally 20 mL, including the minced endometrial tissue (approximately 5 g) and culture medium.
- Using a 5 mm diameter sump cannula and a sterile 60 mL syringe, aspirate the endometrial fragment suspension from the 50 mL conical tube and inoculate the tissue into the animal’s pelvic area (i.e., bladder and uterine horns) using port D. Visualize the inoculation location with the scope to ensure complete delivery.
- Before surgical closure, turn off the insufflator, remove trocar cannulas, and manually compress the abdomen to facilitate the escape of CO2 through the incision sites to prevent excessive bloating.
- Close the 10 mm incisions with 1 to 2 simple interrupted sutures in the abdominal (fascia) wall. Approximate the subcutaneous tissue in 10 mm and 5 mm incisions with 1 or 2 buried sutures.
NOTE: Use of a 2-0 absorbable suture with an appropriate surgical needle is recommended. - Apply skin glue (2-octyl-cyanoacrylate) to fully close the skin.
8. Laparoscopic procedure for surveillance and collection of endometriotic lesions
NOTE: The surveillance procedure typically takes approximately 1 h, from the initial incision to skin closure; however, the duration may vary depending on the experience of the surgical team and how many lesions are found.
- To examine location and progression of endometriotic lesions, perform longitudinal monitoring in induced animals.
NOTE: Timepoints will depend on the research questions. Development of endometriotic lesions has been observed as early as 1 month post-induction in the animals used in these studies. - Follow the procedures described in sections 2 and 3 for animal sedation, preparation, monitoring and analgesia, and the procedures described in section 4 for operating team and instrument preparation.
- Place trocar ports in the same fashion as described in steps 5.1 through 5.8.
- Upon entering the abdominal cavity, perform a detailed and standardized inspection to examine location and appearance of lesions.
NOTE: Frequent locations of lesion development include the peritoneal wall, the serosa of the bladder, uterus, and intestines. The standard procedure for lesion surveillance consists of systematic laparoscopic examination of the lower pelvic peritoneal wall, beginning on the right side and proceeding to the left side, followed by examination of the left and right abdominal peritoneal walls. The uterine horns are then examined for lesions, followed by the bladder and lower gastrointestinal tract. The entire procedure is recorded laparoscopically to aid in documentation and subsequent analysis. Identified lesions are also imaged laparoscopically to facilitate subsequent assessment, and observations are documented. - To obtain lesion biopsies, place the biopsy forceps via port B (Figure 1) on top of the selected lesion, open the forceps, and allow the margin to fall into the open jaws. Grasp the lesion by closing the biopsy jaws and, in a single motion, pull the forceps toward the port cannula.
- Transfer the biopsy specimen to a sterile gauze for examination and then place it into a 50 mL conical tube for further processing.
- Ensure that hemostasis is achieved at the biopsy site using camera visualization. Use the bipolar cautery forceps to aid hemostasis if necessary.
- Repeat steps 8.5 through 8.7 to obtain additional lesion biopsies.
NOTE: Lesions have been collected from the peritoneal wall and uterus. Collection of lesions from the intestinal serosa and bladder is not recommended due to the high risk of perforation. Three biopsies per animal per procedure are generally collected, which is sufficient for downstream analyses (e.g., histopathology and molecular analysis). - Perform surgical closure as described in steps 7.2–7.4.
NOTE: Repeated surveillance procedures were performed at intervals of at least 30 days and were limited to a maximum of three procedures, with the third procedure being terminal, in accordance with the Institutional Animal Care and Use Committee-approved protocol. The repeated-surgery intervals and number of surveillance assessments should be based on study-specific objectives and guided by the investigators’ respective Institutional Animal Care and Use Committee.
9. Animal recovery and post-operative monitoring
- Transfer the animal to a recovery area and provide heat support by using a heating mat or a heat lamp.
- Deflate the endotracheal tube cuff and extubate the animal upon the first signs of protective airway reflexes (e.g., swallowing, chewing, or coughing).
- Monitor the animals and record vitals until they become ambulatory and are returned to their pens. Provide feed and water.
- Administer intramuscular injections of flunixin meglumine (50 mg/mL; 2.2 mg/kg) 24 h after the procedure and as needed thereafter, and ceftiofur crystalline free acid (100 mg/mL; 5 mg/kg) 48 h after the procedure. Provide additional analgesia and antibiotic treatment as needed and outlined in the local Institutional Animal Care and Use Committee protocol and guidelines.
- Monitor the animal daily for 10 days following the procedure. Assess for behavioral changes (e.g., decreased appetite, lethargy, or reduced mobility) and examine incision sites for signs of inflammation (e.g., swelling, redness, warmth to the touch) or infection (e.g., discharge).
10. Study endpoint and euthanasia
NOTE: The study endpoint will vary depending on the objectives of the study. In the initial studies, an endpoint of 6 months post-induction was used.
- For euthanasia, administer an intravenous overdose (25 mL/100 kg of body weight) of pentobarbital sodium and phenytoin sodium solution (390 mg pentobarbital sodium and 50 mg phenytoin sodium per mL).
NOTE: Follow the procedures outlined in the institution’s approved Institutional Animal Care and Use Committee protocol for euthanasia. - Place the animal in dorsal recumbency and perform a midline abdominal incision.
- Perform a detailed and standardized necropsy to inspect for presence of lesions on pelvic and abdominal organs, as well as on the peritoneal walls.
- Use dissecting scissors and forceps to carefully excise the endometriotic lesions.
NOTE: Lesions can then be fixed for subsequent histopathological processing or snap-frozen for further molecular analyses.
结果
A swine model that develops endometriotic lesions histopathologically recapitulating those observed in human endometriosis has been previously reported6. Endometriotic lesions were typically observed on the serosal surfaces of the uterus, bladder, and intestines, as well as on the peritoneal wall (Figure 4A–D). Lesions measured approximately 3–10 mm in diameter and appeared red, black, or white, a morphological characteristic commonly reported in patients with endometriosis7. Histopathological and immunohistochemical examination further confirmed that endometriotic lesions retrieved from surgically induced pigs contained endometrial-like epithelial and stromal cells comparable to those observed in women with endometriosis6.
The previously reported model6 was further advanced by employing laparoscopic surgery tools to induce endometriosis. Compared to transperitoneal laparotomy, laparoscopy reduces the risk of surgical complications and tissue adhesions8. Repeated surgical procedures are generally discouraged by Institutional Animal Care and Use Committee guidelines due to animal welfare concerns; therefore, this approach may offer a suitable solution for longitudinal monitoring. The use of laparoscopy reduces the need for repeated major surgical procedures, thereby minimizing animal stress while allowing longitudinal assessment of lesion development. To date, laparoscopic induction has been performed in seven pigs; six animals successfully developed endometriotic lesions detectable at 1 and 2 months post-induction (Figure 4A–D), while one animal was euthanized. This animal experienced anesthesia-related complications; however, necropsy findings indicated that these complications were unlikely to be associated with the induction procedure (i.e., resection of the uterine horn), as no evidence of internal hemorrhage or organ perforation was observed. Consequently, endometriosis induction could not be evaluated in this animal.
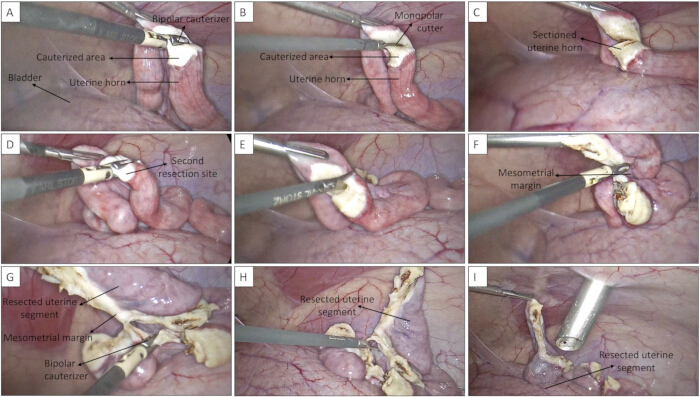
Figure 2: Laparoscopic resection of the uterine horn. (A) Bipolar cauterization of the uterine horn at the first resection site. (B) Monopolar cutting of the cauterized uterine horn. (C) Sectioned uterine horn following completion of the first resection. (D) Bipolar cauterization at the second resection site. (E) Monopolar cutting at the second resection site. (F) Cutting of the mesometrial margin connecting the resection sites. (G) Bipolar cauterization of the remaining mesometrial margin. (H) Completely resected uterine horn segment. (I) Resected uterine horn segment positioned within the abdominal cavity before retrieval. Please click here to view a larger version of this figure.
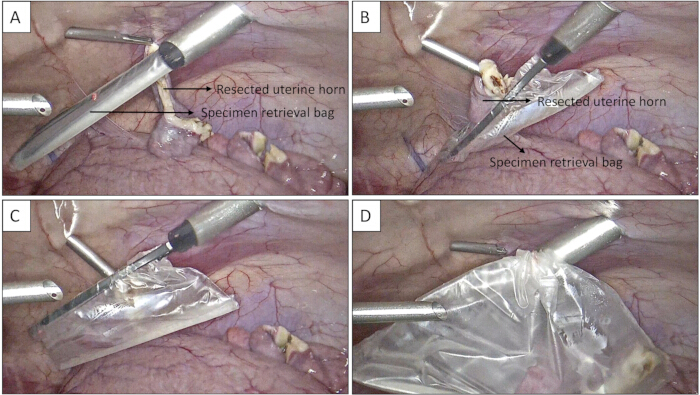
Figure 3: Laparoscopic retrieval of the resected uterine horn segment. (A) Introduction of the specimen retrieval bag into the abdominal cavity and positioning of the resected uterine horn segment for retrieval. (B) Placement of the resected uterine horn segment into the specimen retrieval bag. (C) Securing the resected uterine horn segment within the specimen retrieval bag. (D) Withdrawal of the specimen retrieval bag containing the resected uterine horn segment through the trocar port. Please click here to view a larger version of this figure.
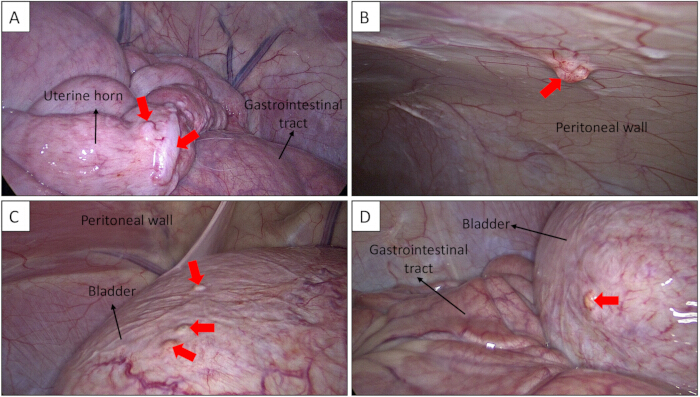
Figure 4: Laparoscopic identification of endometriotic lesions during surveillance. Representative endometriotic lesions are indicated by red arrows. (A) Endometriotic lesions on the uterine serosa. (B) Endometriotic lesion on the peritoneal wall. (C) Endometriotic lesions on the bladder serosa. (D) Endometriotic lesion on the bladder serosa. Please click here to view a larger version of this figure.
讨论
The anatomical and physiological similarities between pigs and humans, particularly in pelvic anatomy and hormonal regulation, make porcine models well-suited for studying uterine and reproductive disorders, such as endometriosis. While endometriosis does not naturally occur in pigs, successful induction of endometriosis by autologous transplantation of endometrial tissue has been reported6,9. Progressive endometriotic lesions with histopathological characteristics6 comparable to those seen in human patients support the suitability of pigs as a large-animal model for studying endometriosis development and progression, as well as for testing diagnostic tools and therapeutic interventions.
The present protocol describes laparoscopic procedures for the induction of endometriosis in a pig model and for longitudinal surveillance of endometriotic lesion development and progression. In general, laparoscopy is less invasive than open surgery, allowing animals to recover more quickly while also enabling multiple procedures to be performed over time in the same animal. Additionally, real-time laparoscopic imaging enables precise recording of the lesion location and characteristics, which can then be tracked and longitudinally compared. A number of critical factors that contribute to procedural success have been identified. Animals must be fasted prior to surgery, as gastrointestinal distension can otherwise increase procedural difficulty and compromise access of the laparoscope to the pelvic area. Equally important is the Trendelenburg positioning of the animal to shift the gastrointestinal tract more cranially10. Performing procedures via laparoscopy, however, has limitations, including the need for specialized equipment and trained personnel. Several rounds of practice on cadavers were required for the surgical team to become fully trained to perform the procedures. Once the techniques were established, the procedures were carried out on several animals without complications. Also noteworthy, due to the risk of perforation, endometriotic lesions developing on the intestines or bladder were not biopsied during surveillance procedures. It is also important to acknowledge the inherent limitations associated with surgical induction of endometriosis in the pig model, including the potential effects of uterine horn resection, cauterization, and postoperative adhesion formation on subsequent lesion development. In the previous report6, however, sham-operated female pigs were included to isolate the effects of the surgical procedure itself. These animals underwent the same surgical protocol as the induced counterparts, with the exception that no endometrial fragments were introduced into the peritoneal cavity. Notably, sham-operated controls did not develop endometriotic lesions, suggesting that the surgical procedure itself does not account for the observed endometriotic phenotype.
Compared with humans and non-human primates, pigs exhibit anatomical and physiological differences that must be considered11. First, the porcine uterus is bicornuate, with two long uterine horns. Second, pigs have an estrous cycle of approximately 21 days, consisting of follicular and luteal phases, whereas women have a 28-day menstrual cycle. In addition, porcine endometrial cells do not undergo decidualization, an important step in the establishment and maintenance of pregnancy in humans. Compared with rodents, the use of swine models may also present several disadvantages, including higher costs associated with housing, feeding, and veterinary care, the need for specialized and trained personnel, and more complex ethical concerns among the general public. While these limitations should be considered when designing experiments and interpreting results from swine models, pigs remain a valuable large-animal model for selected translational studies of reproductive diseases, particularly those requiring human-scale anatomy.
Lastly, an ex vivo labeling approach using FITC dye-doped silica nanoparticles has previously been validated6. This validated method enables investigators to distinguish endometriotic lesions from surrounding normal tissue; however, its application requires specialized equipment for the detection and visualization of fluorescence signals. The potential effects of the nanoparticles on the formation and development of endometriotic lesions, as well as the duration and stability of the fluorescence signal, warrant further investigation. Additionally, because the current laparoscopic imaging system is equipped only for the detection of ICG, FITC signal needs to be assessed ex vivo6. Future efforts will focus on developing an ICG-based labeling approach to enable in vivo detection and visualization of lesions during laparoscopic surveillance.
In conclusion, this study describes the development of a preclinical swine model of endometriosis by transplanting autologous endometrial tissue into the peritoneal cavity. Laparoscopic procedures proved effective and safe for resection of the uterine horn segment and inoculation of endometrial tissue for induction of endometriosis, as well as for longitudinal monitoring and serial sampling of lesions as early as 1 month post-induction.
披露
No conflicts of interest declared.
致谢
Funding for the National Swine Resource and Research Center is from the National Institute of Allergy and Infectious Disease, the National Institute of Heart, Lung and Blood, and the Office of the Director (U42OD011140). The authors thank the NSRRC animal care staff for their assistance with animal husbandry.
材料
| 姓名 | 公司 | 目录编号 | 评论 |
|---|---|---|---|
| 0.9% Sodium chloride solution | Henry Schein | 5075201 | Miscellanous supplies |
| (3- aminopropyl)-triethoxysilane | Sigma-Aldrich Chemicals | 440140 | Nanoparticles sythesis |
| 10 mL syringe | Becton, Dickinson and Company | 302995 | Miscellanous supplies |
| 3 mL syringe | Becton, Dickinson and Company | 309657 | Miscellanous supplies |
| 30 mL syringe | Becton, Dickinson and Company | 302832 | Miscellanous supplies |
| 3M Steri Vac GS8X - For ethlyene oxide sterilization | 3M | GS8X | Sterilization |
| 3M Tegaderm 2 3/8" x 2.75" | Medline | 1624W (MMM1624W) | Miscellanous supplies |
| 3M Tegaderm 4" x 4.75" | Medline | 1626 (MMM1626H) | Miscellanous supplies |
| 5 mL syringe | Medline | SYR105010PC | Miscellanous supplies |
| Aluminium Hub Needles 18G x 1" | Ideal Instruments Neogen | 9409AL | Miscellanous supplies |
| Anti-fog solution for endoscope | Medline | M-A6505 | Miscellanous supplies |
| Bipolar footswitch | Covidien | E6019 | Laparoscopic instruments |
| Bipolar high frequency cord for valleylab, 300 cm | Karl Storz | 26176LV | Laparoscopic instruments |
| Bovie pencil | Medline | VALE2450H | Miscellanous supplies |
| Clickline biopsy forceps, 5mmX36cm | Karl Storz | 66321DB | Laparoscopic instruments |
| Clickline duval grapsing forceps kit, 10 mm x 36 cm | Karl Storz | 33532DU | Laparoscopic instruments |
| Clickline grasping forceps kit, 5mm x 36 cm | Karl Storz | 33352ON | Laparoscopic instruments |
| Clickline kelly dissecting/grasping forceps, 5 mm x 36 cm | Karl Storz | 33310MD | Laparoscopic instruments |
| Clickline metzenbaum scissors kit, 5 mm x 36 cm | Karl Storz | 34321MS | Laparoscopic instruments |
| Cold light fountain power LED rubina high performance rubina/NIR | Karl Storz | TL400 | Laparoscopic instruments |
| Digital thermometer | BluePoint Laboratory | 11001 | Equipment |
| Dual Port I.V. Administration Set with Universal Adapter 88" (2.25 m) | Vetoquinol | 427099 | Miscellanous supplies |
| Endo pocket | Henry Schein | SB957 | Laparoscopic instruments |
| Enzymatic Presoak Cleaner/Detergent, Multi-Enzyme for swine | Medline | MDS88128ME | Sterilization |
| Euthasol (pentobarbital sodium and phenytoin sodium) | Virbac | 51311-050-01 | Drugs |
| Excede (ceftiofur crystalline free acid) 100 mg/mL | Zoetis | 40042358 | Drugs |
| Fetal bovine serum | Gibco | 16000044 | Cell/Tissue Culture |
| FiveTen-K Endotracheal Tube | VetOne | 600533 | Miscellanous supplies |
| FiveTen-K IV Catheter 20G x 1.25" 1.1 x 32 mm 58mL/min | VetOne | V1 670124 | Miscellanous supplies |
| Fluorescein 5(6)-isothiocyanate (FITC) | Sigma-Aldrich Chemicals | 46950 | Nanoparticles sythesis |
| Fluriso (Isoflurane, USP) | VetOne | V1 502017 | Drugs |
| Gas-chex indicator tabs for EtO | Medline | 26900100 | Sterilization |
| Gauze Sponges 4" x 4" | BluePoint Laboratories | 10335 | Miscellanous supplies |
| GE HealthCare Carestation 750 | Anesthesia Key | - | Equipment |
| Heat Therapy Pad | Adroit Medical Services | HTP-1500 | Equipment |
| Hopkins straight FWD rubina NIR/ICG enlarge view, 10 mm x 31 cm | Karl Storz | 26003ARA | Laparoscopic instruments |
| Image1 S 4U Rubina, opal1 NIR/ICG rubina camera head | Karl Storz | IMAGE1S-4U-KT | Laparoscopic instruments |
| Infusion Pump | JorVet | J1060Q | Equipment |
| Insufflation tubing set, F/endoflator | Karl Storz | 031210-10 | Laparoscopic instruments |
| Ketamine 100mg/mL | Dechra | 17033-101-10 | Drugs |
| Lidocaine hydrochloride oral topical solution | Advagen | 72888-125-26 | Drugs |
| Light cable, 4.8mmX250cm | Karl Storz | 495NCS | Laparoscopic instruments |
| Lightweight trocar with silicone leaflet valve, 6mmX10.5cm | Karl Storz | 30160GP | Laparoscopic instruments |
| Liners for sunction irrigation canister 1500cc | Medline | MEJ0770083 | Laparoscopic instruments |
| Monopolar high frequency cord for valleylab, 300cm | Karl Storz | 26006M | Laparoscopic instruments |
| Monopolar standard footswitch | Covidien | E6008 | Laparoscopic instruments |
| OB lubricant | VetOne | V1 605032 | Miscellanous supplies |
| Opticlose esential surgical adhesive, 0.55mL | Medline | MSC091040H | Miscellanous supplies |
| Optixcare eye lube | Aventix | 17911 | Miscellanous supplies |
| Prevail (flunixin meglumine) 50 mg/mL | VetOne | 13985-018-02 | Drugs |
| Pulse Oximeter | Masimo | 3000168811 | Equipment |
| Pump: Vario 18 suction pump, continuous/intermittent, AC/DC | Medline | MEJ0268122 | Laparoscopic instruments |
| Reusable suction canister, 1.5L | Medline | MEJ0770082 | Laparoscopic instruments |
| Robi clermont-ferrand bipolar forceps kit, 5mmX36cm | Karl Storz | 38651OM | Laparoscopic instruments |
| Rompun (xylazine) 100 mg/mL | Dechra | 17033-099-05 | Drugs |
| RPMI-1640 media | Gibco | 2240089 | Cell/Tissue Culture |
| Sani-cloth prime germicidal disposable wipes for swine | Medline | NPKU13195 | Sterilization |
| Suction cannulas | Medline | 60-6001-205 | Laparoscopic instruments |
| Suction irrigation handle | Medline | 60-6005-500 | Laparoscopic instruments |
| Tetraethyl orthosilicate | Sigma-Aldrich Chemicals | 86578 | Nanoparticles sythesis |
| Triethylamine | Sigma-Aldrich Chemicals | T0886 | Nanoparticles sythesis |
| Trocar + cannula W/multifunction valve pyramidal tip, 11 mm x 10.5 cm | Karl Storz | 30103MP | Laparoscopic instruments |
| ValleyLab FT10 Energy Platform | Covidien | VLFT10GEN | Laparoscopic instruments |
| ValleyLab REM grounding pad | Henry Schein | 1942181 | Miscellanous supplies |
| Veterinary I.V. Polyurethane Catheter 18G x 1-1/4" 32 mm 103 ml/min | Monoject | 1832 PUR | Miscellanous supplies |
| Vicryl Plus Suture 2-0 27" Triclosan/Polyglactin 910 Braid UR-6 Violet | Henry Schein | VCP602H | Miscellanous supplies |
| Wet-Proof Multi-Heat Electrical Pad | Kaz Incorporated | 562B/E26869 | Equipment |
| Winged IV Infusion Set 21G x 0.75" 0.8 x 19mm (12", 30 cm tubing) 21 mL/min, V = 0.6 mL | VetOne | V1 670130 | Miscellanous supplies |
| Wireless Hair clippers | Oster | E10536 | Equipment |
参考文献
- Della Corte L, et al. The burden of endometriosis on women’s lifespan: a narrative overview on quality of life and psychosocial wellbeing. Int J Environ Res Public Health. 2020;17(13):4683.
- As-Sanie S, et al. Endometriosis: a review. JAMA. 2025;334(1):64-78.
- De Corte P, Klinghardt M, von Stockum S, Heinemann K. Time to diagnose endometriosis: current status, challenges and regional characteristics—a systematic literature review. BJOG. 2025;132(2):118-130.
- Zale M, Lambert E, LaNoue MD, Leader AE. Shedding light on endometriosis: patient and provider perspectives on a challenging disease. J Endometr Pelvic Pain Disord. 2020;12(2):69-76.
- Soede NM, Langendijk P, Kemp B. Reproductive cycles in pigs. Anim Reprod Sci. 2011;124(3-4):251-258.
- Omenge H, et al. The development of a preclinical swine model for endometriosis. Biol Reprod. 2025;113(2):321-330.
- Nisolle M, Donnez J. Peritoneal endometriosis, ovarian endometriosis, and adenomyotic nodules of the rectovaginal septum are three different entities. Fertil Steril. 1997;68(4):585-596.
- Chen MD, et al. Laparoscopy versus laparotomy: an evaluation of adhesion formation after pelvic and paraaortic lymphadenectomy in a porcine model. Am J Obstet Gynecol. 1998;178(3):499-503.
- Varughese EE, et al. Development of a domestic animal model for endometriosis: surgical induction in the dog, pigs, and sheep. J Endometr Pelvic Pain Disord. 2018;10(2):95-106.
- Mulier JPJ, Dillemans B, Van Cauwenberge S. Impact of the patient’s body position on the intraabdominal workspace during laparoscopic surgery. Surg Endosc. 2010;24(6):1398-1402.
- Mordhorst BR, Prather R. Pig models of reproduction. Animal Models and Human Reproduction. 2017:213-234.
重印与许可
本文已发表
视频即将推出