All procedures involving animal models have been reviewed by the local institutional animal care committee and the JoVE veterinary review board.
1. Preparation
- Preparation of solutions and culture media
- Prepare all culture media and buffer according to the Table of Materials.
- Preparation of instruments
- Set up a water bath (>10 L) at 42 °C, a peristaltic pump with variable speed, and clamps for holding flasks. Prepare curved scissors and forceps (Figure 1).
- On or adjacent to the water bath, set up a baking sheet (about 38 x 26 cm) with a Styrofoam pad (50 mL conical rack), overlaid with an absorbent underpad cut into a 20 x 20 cm piece (Figure 1).
- Place a piece of masking tape (5–8 cm) nearby. Place a 20 cm polyester sewing thread nearby that is cut and ready to use. Obtain a plastic catheter with a retractable needle (7 mm x 19 mm, Figure 1).
- Preparation of glassware
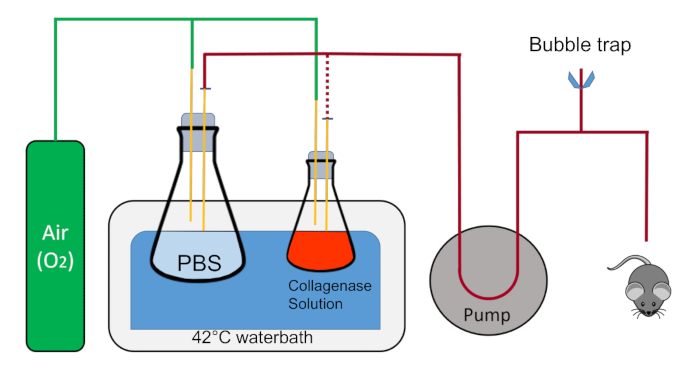
- Using clamps, place and immobilize a 1 L flask in the water bath containing 200 mL of 1x PBS with a stopper that has two 1 mL pipettes going into the solution. The rubber cork is notched to allow recirculation of fluid in a closed circuit.
- With another clamp, place a 125 mL flask containing 45 mL of Buffer 2 along with a stopper that has two 1 mL pipettes, one of which is in the liquid near the bottom of the flask and the other which stays above the liquid and blows oxygen into the flask.
NOTE: Each pipette in the stoppers will have a quick disconnect adaptor attached to the end for easy switching of the tubing. Oxygen will be gently flowing into both flasks via the pipette in the stopper that is not immersed in the liquid.
- Set aside two sterile crystallizing dishes.
2. Animal Procedure
- Warm up the PBS and Buffer 2 solutions to 42 °C in the water bath and circulate PBS for at least 20 mL/min in the tubing in a closed circuit to keep the liquid lines warm. Immerse any excess tubing in the water bath to remain as close as possible to 42 °C. Drain the male end of the tubing into the 1 L flask containing PBS.
- Place a cotton ball on the absorbent underpad and add about 2 mL of 30% isoflurane (made up in polyethylene glycol 200 which decreases the evaporation rate of isoflurane) on the cotton ball using a transfer pipette.
- Pick up the mouse by the tail, place it in one of the crystallizing dishes, and then quickly overturn the dish onto the cotton ball so that the mouse has a small space in which to inhale the anesthesia. Observe the breathing rate of the mouse and ensure the mouse is effectively under anesthesia.
NOTE: The breathing rate should be slower and deeper, the tail flaccid, and the paws nonresponsive to the pinch test under anesthesia; see IACUC guidelines for additional details.
- While the mouse is going under anesthesia (this takes 1–2 min), prepare the barrel of a 10 mL syringe by pulling out the plunger and inserting a small cotton ball. Add 1–2 mL of 30% isoflurane with a transfer pipette to the cotton ball inside the barrel and place the barrel open-end down on a table while waiting for the mouse to become unconscious.
- Quickly take off the crystallizing dish, flip the mouse on its back and place the syringe barrel over its nose. Double-check the breathing rate, toe pinch, and flaccid tail. Any responses to the toe pinch and flaccid tail indicate that the mouse is not fully under anesthesia. Keep the syringe barrel over the snout to maintain unconsciousness.
- Place thumb tacks through the paws of the mouse, with the limbs outstretched in supine position. Wet the abdomen and rib cage with 70% isopropanol or ethanol.
- With the straight forceps in one hand, lift up the skin near the base of the abdomen. With scissors in the other hand, cut the tented skin and peritoneum. The incision should be horizontal or across the base of the tented skin. Be sure to cut through all layers of skin and peritoneum in order to gain access to the gut. Cut laterally around the abdomen up to the rib cage on both sides without nicking any of the organs.
- Cut off the flap of skin by cutting across the lower rib cage. Move the intestines to the right with the back of the forceps to expose the portal vein.
NOTE: Bleeding from the animal should be minimal; the animal should still be breathing and under deep anesthesia.
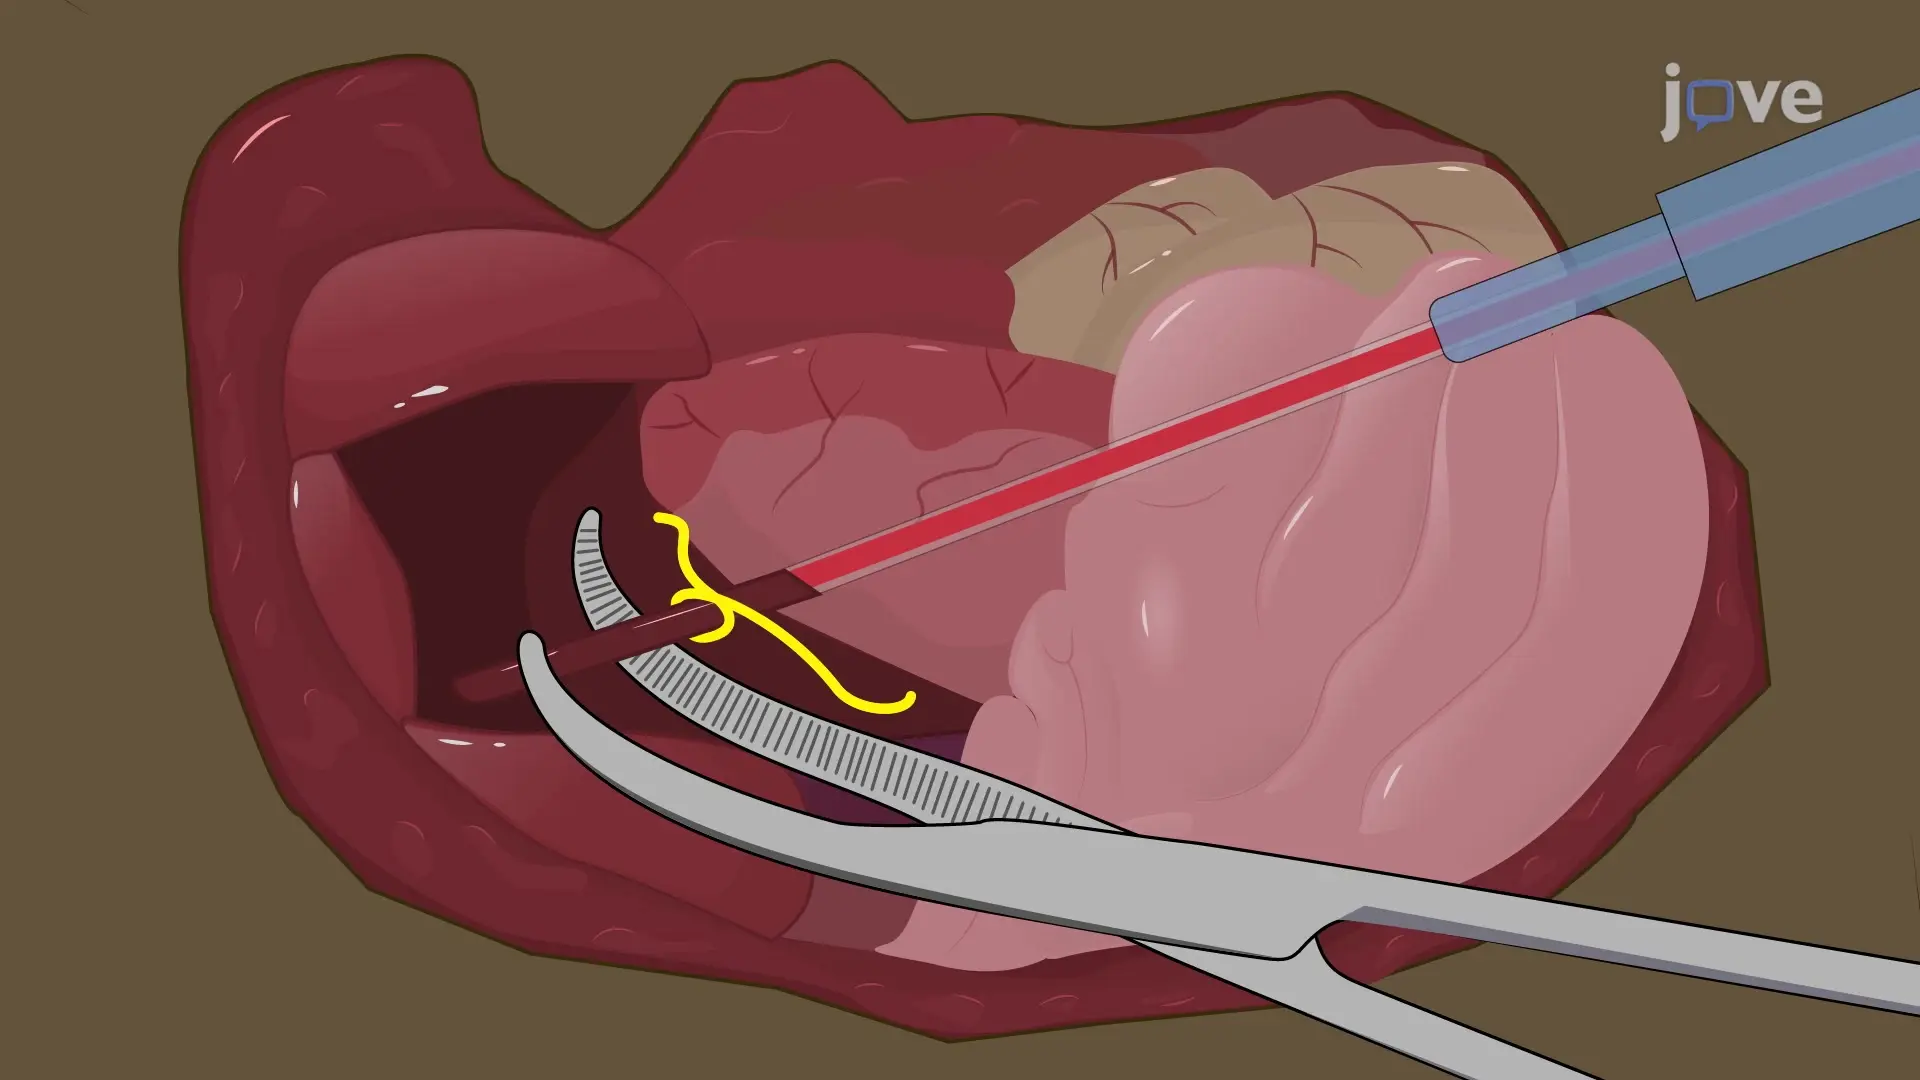
- Place the closed curved forceps underneath the portal vein between the liver and superior pancreaticoduodenal vein (Figure 2 arrow).
- Open the forceps while underneath the portal vein. Grasp the thread and carefully pull it through so that it is centered underneath the portal vein. Tie an overhand knot around the portal vein without cinching it down.
- Place the curved forceps under the portal vein and gently pull it towards the tail of the mouse to straighten out the vein (Figure 3A).
- With the catheter in the other hand, place the bevel of the needle face-up and parallel with the lower part of the portal vein near the forceps (Figure 3B).
- Gently puncture the vein with the needle (Figure 3C). Ensure the bevel of the needle is in the lumen of the vein. Retract the spring-loaded needle and continue to push the polymer catheter through the vein until the bevel is near the venous branched area. This is within the liver. If the catheter is placed correctly, a back-flow of blood will be visible. (Figure 3D).
- Tighten the overhand knot and pull it down on the catheter to help stabilize it. Immediately turn down the pump rate from 20 mL/min to 4 mL/min and cut another major blood vessel for drainage. Cut the aorta abdominalis for optimal results.
- Place the male end of the tubing to the female end of the catheter (Figure 4A). Ensure that there are no air bubbles in the line. Be careful that the catheter is not either pushed into the liver or out of the vein. Placement of the thread is not essential, though it helps prevent back-flow out of the vein and helps keep the catheter in the correct position (Figure 4B, C).
- Use masking tape to immobilize the tubing onto the underpad. Use the straight forceps to squeeze the effluent blood vessel to inflate the liver a few times to ensure all the blood has drained out (Figure 4D).
NOTE: Standard laboratory tape may not work; however, masking tape will remain stuck to the underpad, even in wet conditions.
3. Liver Perfusion
- While the liver is flushing with PBS, measure out about 24 mg of Collagenase Type IV and place it in the flask containing 45 mL of Buffer 2 in the water bath. Be sure to swirl the liquid in the flask so that the collagenase is fully dissolved and place the flask back in the clamp so that the liquid containing portion of the flask is fully submerged in the water.
- Observe the change in color of the liver as it is flushed with PBS. Change the outflow tubing from the 1 L flask to the 125 mL flask. Do not allow air bubbles to flow into the liver.
- Once the perfusion buffer reaches the liver, briefly squeeze tight the effluent blood vessel to build up some pressure within the vessel and allow this liquid to fill all lobes of the liver. Be sure not to cut off drainage too long, as that may burst the thin connective tissue surrounding the liver (Glisson's capsule) and destroy the perfusion or flow of liquid within the capillary bed of the liver.
- Allow Buffer 2 with collagenase to perfuse through the liver until all 45 mL have flowed through the tissue.
NOTE: If successful, the Glisson's capsule should be separated from the parenchyma or the liver tissue and the liver itself should appear amorphous.
- Add about 10 mL of Buffer 1 to the other crystallizing dish and place it next to the mouse.
- Remove the catheter and turn the pump off.
- With the straight forceps and scissors, cut the liver from the mouse. If the collagenase digestion was very efficient, it may be necessary to have a clean, sterile spoon on hand to scoop the liver from the mouse and place it in Buffer 1.