

Summary
A methodology to isolate high molecular weight and high quality genomic DNA from soil microbial community is described.
Abstract
The soil microbiome is a vast and relatively unexplored reservoir of genomic diversity and metabolic innovation that is intimately associated with nutrient and energy flow within terrestrial ecosystems. Cultivation-independent environmental genomic, also known as metagenomic, approaches promise unprecedented access to this genetic information with respect to pathway reconstruction and functional screening for high value therapeutic and biomass conversion processes. However, the soil microbiome still remains a challenge largely due to the difficulty in obtaining high molecular weight DNA of sufficient quality for large insert library production. Here we introduce a protocol for extracting high molecular weight, microbial community genomic DNA from soils and sediments. The quality of isolated genomic DNA is ideal for constructing large insert environmental genomic libraries for downstream sequencing and screening applications.
The procedure starts with cell lysis. Cell walls and membranes of microbes are lysed by both mechanical (grinding) and chemical forces (β-mercaptoethanol). Genomic DNA is then isolated using extraction buffer, chloroform-isoamyl alcohol and isopropyl alcohol. The buffers employed for the lysis and extraction steps include guanidine isothiocyanate and hexadecyltrimethylammonium bromide (CTAB) to preserve the integrity of the high molecular weight genomic DNA. Depending on your downstream application, the isolated genomic DNA can be further purified using cesium chloride (CsCl) gradient ultracentrifugation, which reduces impurities including humic acids. The first procedure, extraction, takes approximately 8 hours, excluding DNA quantification step. The CsCl gradient ultracentrifugation, is a two days process. During the entire procedure, genomic DNA should be treated gently to prevent shearing, avoid severe vortexing, and repetitive harsh pipetting.
Protocol
Part I: Extraction of DNA
Procedure
1. 8 hours are required, for processing 6 samples excluding quantification of DNA.
Before you start the extraction, you will need to pre-chill mortar, pestle and spatula in a -20 °C freezer or using liquid nitrogen. Also, pre-chill 50 ml tubes containing 20 ml chloroform isoamyl alcohol (24:1) on ice. Set the hybridization oven to 65 °C to pre-heat. Check CTAB solution, if it is crystallized warm to 60 °C to melt the crystals. Complete the denaturing solution and extraction buffer by adding the last ingredients just before you start the extraction (see the recipe below). Conduct all extraction procedures in a fume hood.
2. Prepare the denaturing buffer and extraction buffer.
Note: To maximize the DNA yield, it is critical to precisely make buffers following the instructions.
3. Place 2 g of soil in a pre-chilled mortar.
Note: Soil collected in the field should be frozen on dry ice for transport and stored at -80 °C. Thaw and sieve soil using a 2 mm sieve prior to DNA extraction. You can increase the starting amount of soil up to 10 g.
4. Add 1 ml of denaturing solution to the soil.
5. Freeze and grind the soil in liquid N2 using a pestle until the soil particles look powdery and homogenous. Repeat freezing and grinding twice.
Note: Keep the soil sample frozen during the grinding, using enough liquid nitrogen to fully cover the soil sample. Slight melting during the grinding is acceptable.
6. Transfer the ground soil to a 50 ml conical tube using a pre-chilled spatula.
Note: The ground soil sample can be stored at -80 °C at this point, if necessary.
7. Add 9 ml of extraction buffer. To mix the solution and soil, vortex briefly at low speed.
Note: To ensure the buffer is homogeneous, warm it at 60 °C for 10-15 minutes before use. Keep the rest of buffer at 60 °C throughout the extraction. Vortex at speed 8 (on a scale where 10 is the maximum).
8. Incubate for 40 min at 65°C in a hybridization oven. During the incubation, continuously rotate the tubes at the lowest speed, or gently invert the tubes every 10 min.
Note: Place the tube horizontally in a hybridization oven to allow buffer to contact soil over a large surface area. The solution may look a bit viscous during incubation.
9. Centrifuge at 1800 xg, for 10 min at 10 - 14 °C. Transfer supernatant into the pre-chilled 50 ml conical tube containing 20 ml chloroform-isoamyl alcohol (24:1), keep on ice.
Note: When you transfer supernatant, be careful not to disturb the organic layer (bottom layer). Leave 1-2 ml of supernatant if it is necessary in order to collect only clean supernatant. You often can see a beige layer (approximately 1-3 mm in thickness) on top of the supernatant. Do not disturb this layer when collecting the supernatant. Try to slide the tip along the tube wall to prevent breakage of this beige layer. If the supernatant is too turbid, repeat the chloroform-isoamyl alcohol extraction one more time on the supernatant. Do not use disposable plastic pipettes when transferring chloroform, as chloroform will melt the plastic. Use a glass pipette, or a glass graduated cylinder, or pour chloroform directly into 50 ml conical tubes.
10. Extract the soil pellets 2 more times;
10.1. Add 5 ml extraction buffer to the soil pellets, gently mix using 1 ml tip followed by brief vortexing at low speed.
Note: Shake and mix the buffer before use.
10.2. Incubate at 65°C for 10 min in hybridization oven. Centrifuge at 1800 xg, for 10 min at 10 - 14 °C.
Transfer supernatant to the tube at step 9. Keep the tube with collected supernatant and chloroform-isoamyl alcohol on ice during the extraction.
Note: Make sure you add the supernatant to the same tube without cross mixing between the samples.
10.3. Repeat 9.1 and 9.2 one more time.
11. Using a rotating plate, very gently rock the tube that contains the collected supernatant (14-19 ml) and chloroform-isoamyl alcohol at 1.25 rpm for 10 min.
Note: Close the lid very tightly to prevent leakage. Lay a paper towel on the rocking plate before you place the tube so any leaks can be readily detected.
12. Centrifuge at 1800 xg, for 20 min at 10 - 14 °C.
13. Transfer aqueous phase to a new tube.
Note: Do not disturb the interphase between the aqueous phase (top layer) and organic layer (bottom layer) when you transfer the supernatant. Leave approximately 1.5- 2 ml supernatant to ensure collection of only clean supernatant.
14. Recover the DNA using isopropyl alcohol (step 15.a - 21.a). Alternatively, use Amicon® Ultra-15 Centrifugal Filter Devices (step 15.b - 21.b) if you expect very low amount of biomass in your sample, which will produce hardly visible pellet by isopropyl alcohol precipitation that is difficult to recover.
15.a. Place the supernatant to a new tube ultracentrifuge.
16.a. Add isopropyl alcohol to the collected supernatant at a volume ratio of 0.6:1. Invert the tubes gently a few times to mix.
17.a Incubate for 30 min at room temperature.
18.a. Centrifuge at 16000 xg, for 20 min at 20 - 25 °C. Ensure the weights of all the tubes are balanced well before the centrifugation step.
Note: Mark the direction of centrifugal force on the tube, so you can detect the DNA pellet more easily when the DNA yield is low.
19.a. Remove isopropyl alcohol by decanting or vacuum suctioning. Be careful not to disturb the DNA pellet.
Note: Remove isopropyl alcohol as soon as centrifugation is completed. Be very careful not to lose the DNA pellet. The size of DNA pellet can vary widely depending on the soil type, from a clearly visible (~9 mm diameter) to hardly visible. It is recommended to remove the residue of isopropyl alcohol by suctioning along the wall of the tube carefully so as not to suction out the DNA pellet.
20.a. Dry DNA pellet at room temperature for 5 - 20 min.
Note: Do not over dry DNA pellet, otherwise it will be difficult to redissolve the DNA.
21.a. Resuspend the DNA pellet in 200 μl TE. Mix it by gentle tapping. Transfer the DNA solution into 1.5 ml tube. Keep the tube at 4°C overnight in order to fully dissolve DNA.
Note: Depending on the size of pellet, you can adjust the volume of TE to add. Usually 200 - 400 μl of TE works well.
*Alternatively follow the steps 15.b - 21.b.
15.b. Pre-wash an Amicon® Ultra-15 Centrifugal Filter Devices; add 15 ml TE to the device and centrifuge at 3500 xg, for 10 min. Discard the flow-through.
16.b. Place the DNA solution from step 13 to the pre-washed Amicon filter. Centrifuge at 3500 xg until the DNA volume is reduced to 200 - 500 μl. Discard the flow-through.
17.b. Wash the DNA with TE twice; add 10 ml TE to the Amicon filter devices. Centrifuge at 3500 xg until the DNA volume is reduced to approximately 200 μl. Discard the flow-through. Repeat one more time.
18.b. Transfer the DNA solution on the filter to a new 1.5 ml tube.
19.b. Add 40 μl TE to the Amicon filter. Wash both side of filter membranes by pipetting up and down in order to recover any DNA residue on the filter. Add this wash solution to the tube at step 18.b.
20.b. If necessary, the DNA can be further concentrated by Microcon® Ultracel YM-30 Centrifugal Filter Unit; pre-wash the filter by adding 200 μl TE and centrifuging at 10000 xg for 7 minutes. Add the DNA solution to the filter and centrifuge at 5000 xg for 1 min. Repeat centrifugation until the amount of DNA solution on the filter reduced to 50 μl approximately.
Note: Maximum initial sample volume for Microcon filter is 500 μl. Do not centrifuge at speeds over 14000 x g. Do not over centrifuge until the membrane dries completely. Ensure that some liquid still covers the filter after centrifugation. If you over centrifuged and the membrane is dry, then add 15 μl TE, agitate gently for 30 seconds, and proceed to step 21.b.
21.b. Place the filter unit upside down in a new Microcon tube and centrifuge at 1000 x g for 3 min to recover the DNA.
22. Quantify DNA by TAE gel (0.8%, 0.5xTAE, 50 V for 4 hours), and by Nanodrop spectrophotometer or Pico-green assay and plate reader.
Note: DNA amount can be estimated by comparing the sample band to the marker band with known concentration (High molecular DNA marker or λHindIII) on the gel.
23. Check the integrity of high molecular weight DNA using Pulsed Field Gel Electrophoresis (PFGE) with 1%, 1xTAE gel (For more details see the Step II, part2 at https://www.jove.com/index/details.stp?id=1387, doi: 10.3791/1387 by Taupp et al. 2009).
Note: You can use regular agarose gel for this QC purpose instead of low melting agarose. In brief, electrophoresis conditions are as follows: 2-250 kb, 6 volts, initial switching time: 5 sec, final switching time: 15 sec, run for 12 hrs at 14 °C. SYBR Gold staining for one hour to visualize the DNA on the gel.
24. If the molecular weights of extracted DNA are satisfactory, then proceed to the following CsCl gradient centrifuge step. Alternatively, DNA can be stored at -20 °C or -80 °C before the CsCl centrifuge.
The median size of the DNA should be the equal or exceed 36 Kb, if you want to construct a large insert metagenomic DNA library.
Part II. DNA purification using cesium chloride gradient ultracentrifugation
Preparation of centrifuge: 1.5 - 2 hours
Centrifugation step: 18 hours
Removing ethidium bromide (EtBr) and concentrating DNA after centrifugation: 3 hours
Procedure
For details, refer Wright et al. 2009. https://www.jove.com/index/details.stp?id=1352, doi: 10.3791/1352
Representative Results/Outcome
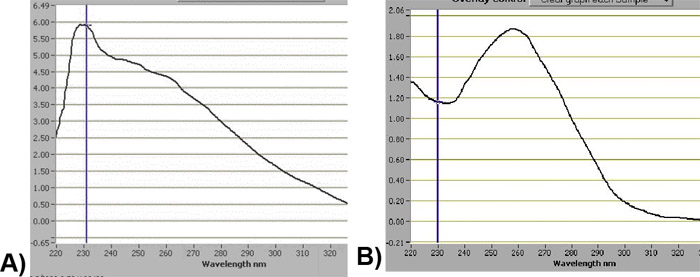
The total amount of genomic DNA isolated from 2 g of forest soil organic (O horizon) and mineral horizons (Ae, AB, and Bt horizons) (sampled from the Long Term Soil Productivity (LTSP) site located at Skulow lake, BC, Canada and managed by BC Ministry of Forests and Range) ranged from 10 mg to 180 mg. The median size of isolated DNA was usually between 40 - 60 kb (Figure 1). The ratio of absorbance at 260 nm/280 nm was between 1.3-1.6 and there was a peak at 230 nm, which may indicate humic acid contamination often observed in soil samples. The CsCl gradient centrifugation drastically reduced this contamination and also increased the ratio of 260/280 to 1.8 - 1.9 as shown in Figure 2a and 2b.

Figure 1. PFGE pictures of the extracted genomic DNA before CsCl ultracentrifugation. lane1: 1 kb marker 100 ng, lane 2: λHind III marker 100 ng, lane 3: λHind III marker 250 ng, lane 4: λHind III marker 500 ng, lane5: Fosmid 36 kb marker 100 ng, lane 6 and 7: genomic DNA isolated from the mineral soil horizon Ae, lane 8 and 9: genomic DNA isolated from the mineral soil horizon AB at the LTSP site located Skulow lake, BC

Figure 2. Chromograms of genomic DNA detected by spectrophotometer before (A) and after CsCl ultracentrifugation (B). Note the reduction in the absorbance value at the 230 nm wavelength after CsCl ultracentrifugation, which indicates improvement in the genomic DNA quality. Please click here to see a larger version of figure 2.
Subscription Required. Please recommend JoVE to your librarian.
Acknowledgments
We would like to thank the Canadian Foundation for Innovation, the British Columbia Knowledge Development Fund, Genome British Columbia and the British Columbia Ministry of Forests and Range for supporting ongoing studies of forest soil productivity. S.L was supported by a fellowship from the TULA foundation funded Centre for Microbial Diversity and Evolution.
Materials
| Name | Company | Catalog Number | Comments |
| *Denaturing solution: 10 ml in total | |||
| Guanidine isothiocyanate (MW 118.16), 4.73 g | |||
| 1M Tris-HCl (pH 7.0), 100 μl | |||
| 0.5M EDTA, 20 μl | |||
| Add water to 9.95 ml in total. | |||
| Autoclave. | |||
| Add 50 μl 2-mercapt–thanol just before use. (5 μl of 2-mercapt–thanol per 1 ml Denaturing Solution) | |||
| Note: Keep the Denaturing solution at 4 °C. Do not use buffer older than one week. If possible, make fresh buffer to use. | |||
| **Extraction Buffer | |||
| 1M Sodium phosphate buffer [pH 7.0]*, 100 ml | |||
| 1M Tris-HCl [pH 7.0], 100 ml | |||
| 0.5M EDTA [pH 8.0], 200 ml | |||
| 5 M NaCl, 300 ml | |||
| Autoclave and keep it at room temperature. | |||
| Add 200ml, 5% Hexadecyltrimethylammonium bromide (CTAB, autoclaved) and 100 ml, 20% SDS (autoclaved) just before use. If CTAB was crystallized, melt it at 60 °C. | |||
| * 1M Sodium phosphate buffer: 57.7 ml, 1M Sodium phosphate monobasic (NaH2PO4) and 42.3 ml, 1M Sodium phosphate dibasic (NaH2PO4). Adjust pH to 7.0 | |||
| Note: Do not use 20 % SDS if it has precipitation. It is normal to see milky suspension when you add SDS to the solution. Once you add SDS, place the extraction buffer at 60 °C to ensure SDS is well suspended. | |||
References
- Hurt, R. A., Qiu, X., Wu, L., Roh, Y., Palumbo, A. V., Tiedje, J. M., Zhou, J. Simultaneous recovery of RNA and DNA from soils and sediments. AEM. 67 (10), 4495-4503 (2001).
- Wright, J. J., Lee, S., Zaikova, E., Walsh, D. A., Hallam, S. J. DNA extraction from 0.22 μM Sterivex filters and cesium chloride density gradient centrifugation. JoVE. , (2009).
- Taupp, M., Lee, S., Hawley, A., Yang, J., Hallam, S. J. Large insert environmental genomic library production. J Vis Exp. , (2009).
