This video demonstrates the in-utero nano-injection method for neural plate targeting in an embryonic mouse model. A high-titer lentiviral solution is injected into the amniotic cavity, where it integrates into neural plate cells, enabling stable gene manipulation for neurodevelopmental research and therapeutic applications.
A subscription to JoVE is required to view this content. Sign in or start your free trial.
Method Article
Neural Plate Cell Manipulation Through In Utero Nanoinjection in an Embryonic Mouse Model
576 views
⸱
August 29th, 2025
In This Article
Abstract
Protocol
All procedures involving animal models have been reviewed by the local institutional animal care committee and the JoVE veterinary review board.
1. Injections
NOTE: All instruments used in this procedure are sterilized before surgery and between each mouse.
- Anesthetize the first female with ideal-sized cavities.
- Place and fixate the female on the table.
- Apply eye gel to the eyes to prevent corneal desiccation and inject painkillers subcutaneously.
NOTE: Recommended analgesics: Buprenorphine (0.05-0.1 mg/kg body weight) or Flunixin (2.5 mg/kg) or similar in accordance with local animal welfare regulations. Multimodal perioperative analgesia is maintained with injected analgesics and isoflurane. - Aseptically prepare the lower abdomen by wiping with a cloth soaked with 0.5 mg/ mL chlorhexidine solution (or similar) and dry the skin. Use surgical scissors to make a 1.5-2.0 cm vertical midline skin incision in the lower abdomen.
NOTE: Prepare the surgical area following locally approved disinfection routines. - Lift the skin gently and free the skin from the underlying muscle layer, approximately 1cm around the incision point, to facilitate suturing after the surgery.
- Make a 1 cm vertical midline incision into the muscle layer.
- With a pair of forceps, lift one side of the skin and muscle layer, and with the other pair, look for the uterine horns.
NOTE: The deciduas are arranged like beads on a necklace, while the intestine is one long, continuous tube (Figure 1A). - With forceps, carefully pull out both uterine horns from the abdomen. Hold the tissue between embryos; do not directly squeeze them (Figure 1B).
NOTE: The uterus is attached to the body at the cervix, and the two ovaries/oviducts are attached via ligaments. Do not pull/detach the uterus from these anchor points. - Count and make a note of the number of embryos on the left and right sides.
- Number the embryos either from the ovary to the cervix or from the cervix to the ovary.
NOTE: This is especially important if injected embryos will be collected at embryonic stages. - With a moist cotton swab, gently push all embryos back into the abdominal cavity except the first three to be injected.
- Place a drop of PBS (phosphate-buffered saline) onto the elastic in the Petri dish and hold it immediately above the embryos.
- Insert closed forceps into the incision of the elastic and release the forceps to open the elastic incision so the liquid drops onto the embryos.
NOTE: This ensures rehydration of the embryos and that the elastic membrane adheres to the wet skin of the female, preventing leakage of PBS in the next steps. - Pull a section of the uterus, corresponding to three embryos, through the elastic with forceps, and gently perch the Petri dish on the abdomen of the female.
- With the forceps and a moist cotton swab, adjust the uterus positioning and the elastic to ensure that the elastic is sealed to the skin of the female to prevent PBS leakage.
- Use the four clay feet to secure and fasten the Petri dish immediately above the abdomen, reducing pressure on the female and sensitivity of imaging to the breathing and heartbeat of the female.
- Press the modeling clay cylinder down to the right of the embryos/uterus to fixate the uterus (Figure 1C).
NOTE: This orientation instruction assumes that the needle is to the left of the female and that the embryos of the female's left uterine horn are exposed. The side of the uterus (left or right uterine horn) is crucial as the Amniotic (AC) either faces the needle (left horn; Figure 1D) or faces the stabilizing clay cylinder (right horn; Figure 1E). - To inject embryos from the right uterine horn, place the clay cylinder on the left side of the embryos (Figure 1F) and turn the heating table 180° (Figure 1G) to achieve the correct orientation. If the needle can be moved instead, adapt as appropriate for the relevant setup.
- Add PBS to the Petri dish until the embryos and uterus are covered with PBS.
- Lower the ultrasound probe into the PBS and adjust the mouse/surgical table so that the first embryo is aligned with the ultrasound probe to facilitate the recording of the injections.
NOTE: "First" refers to the numbering of embryos from the ovary to the cervix. - Scan through all three embryos and inspect the ACs. Determine the injection volume as follows:
- Measure the diameter of the AC with the ultrasound machine. Inject 69 nL if the AC diameter is ≤0.2 mm; inject 2 x 69 nL (= 138 nL) if the AC diameter is >0.2 mm and ≤0.29 mm; and inject 3 x 69 nL (= 207 nL) if the AC diameter > 0.29 mm (Figure 1H).
NOTE: Previous experiments have shown that up to 207 nL injection volumes are well tolerated at E7.5. Successful injections with minimal impact on survival are achieved when the relative volume increase of the AC does not exceed 90%. Variation in AC size between littermates or mouse strains is common and may require further optimization.
- Measure the diameter of the AC with the ultrasound machine. Inject 69 nL if the AC diameter is ≤0.2 mm; inject 2 x 69 nL (= 138 nL) if the AC diameter is >0.2 mm and ≤0.29 mm; and inject 3 x 69 nL (= 207 nL) if the AC diameter > 0.29 mm (Figure 1H).
- Set the injection volumes with the injection controller.
- Set the injection speed to slow with an injection rate of 23 nL/s.
NOTE: Different equipment models can result in different injection forces. - Lower the needle into the PBS using the main wheels on the rail system (x- and z-planes, Figure 1I) and press Empty on the nanoinjector controller until the liquid reaches the needle tip.
NOTE: If the needle has clogged, pressing Empty can dissolve the clog and/or expel the clog. - Lift the needle out of the PBS and press Inject. Verify that a drop of the approximate desired volume is discharged.
- Lower the needle into the PBS and align it with the ultrasound probe and embryo by moving the nanoinjector with the y-plane wheel on the micromanipulator (Figure 1J).
NOTE: The needle tip is perfectly aligned when it appears as a bright spot on the ultrasound image (Figure 1K,L). The needle can be moved in all three planes of direction with the micromanipulator. - Adjust the needle angle with the inject angle wheel to ensure a near-perpendicular angle of injection relative to the uterine wall. Insert the needle into the AC in one motion by using the inject wheel on the micromanipulator (Figure 1J-M). Keep an eye on the needle tip brightness. If the needle tip disappears from the ultrasound image, move the ultrasound probe forward or backward to bring the needle back in focus.
NOTE: Once the needle is inside the AC, minor modifications to the needle position and focus can be made without harming the embryo (adjustments within ~0.3 mm). Do not adjust the needle position more than this. - Press Inject (for 207 nL, set the volume at 69 nL, and inject three times). After injection, wait for an additional 5-10 s before retracting the needle in one gentle movement.
- Move the stage to the next embryo and repeat steps 1.22-1.26 for the other two embryos if they have suitable AC sizes.
- Lift the ultrasound probe and needle out of the PBS using the micromanipulator. Turn the needle away from the operator to avoid damage and injury.
- With forceps, direct the 1st and 2nd embryos back into the abdomen of the female by gently pushing them through the elastic. Gently grasp the tissue adjacent to the 3rd embryo and pull the uterus towards the upper end of the elastic incision. Gently pull up the 4th-6th embryos with forceps and allow the 3rd embryo to re-enter the abdomen.
NOTE: This step can be done without changing the PBS or removal of the Petri dish. - Repeat as needed until all embryos with optimal ACs have been injected or the time limit has been reached.
- Gently push the embryos/uterus back into the abdomen of the female.
- Aspirate the PBS and remove the Petri dish. If a virus has been used, handle it as infectious waste.
- Sew together the muscular layer with Vicryl (USP 6-0, needle length 13 mm, 3/8 Circle) in simple continuous or interrupted sutures and close the skin with 1-2 clips (see the Table of Materials).
- Switch off the isoflurane pump.
- Remove the surgical tape and place the female in the prone position (belly down) in a clean cage on a 40 °C heating plate.
NOTE: The female is expected to regain consciousness and be mobile within 10 minutes. Ensure that the procedure is completed within 30 minutes. The genetic background, age, and weight of the female may influence sensitivity to anesthesia. Monitor the mice during surgery for signs of slow breathing (slow breathing means anesthesia is too deep) or movement (anesthesia is too light). Buprenorphine (0.05-0.1 mg/kg body weight) or Flunixin (2.5 mg/kg) or similar, in accordance with local animal welfare regulations, can be provided 8 hours after the first injection if needed. - If another female is to be injected, prepare the surgical area while monitoring the awakening of the first one.
- Wipe the surgical tools with 70% ethanol to remove any residual blood or tissue and sterilize them in the preheated glass bead sterilizer for 10 s. Discard the cotton swabs and use tissue paper. Wipe the Petri dish and clay pieces dry with tissue paper.
- Repeat steps 1.1-1.35 until all females have been injected.
- Empty and discard the needle.
- If there is a virus or injection solution left in the needle, press Empty on the nanoinjector and empty the needle's content on tissue paper.
- Retract the metal plunger completely by pressing Fill until there is a double beep from the controller, which indicates that the plunger is completely retracted.
- Loosen the collet and slide the needle off the metal plunger. Discard the needle into the sharps waste container.
- Clean the BSL-2 (Biosafety Level 2) bench.
- If a virus were used, spray the entire surgical field with disinfectant (see the Table of Materials). After 15 min, wipe off the disinfectant and clean the entire surgical field with 70% ethanol. If no virus was used, clean all surfaces with 70% ethanol.
- Wipe off any remaining PBS from the ultrasound probe with dry, soft, lint-free tissue paper.
- Discard waste according to biosafety guidelines.
- Switch off the ultrasound machine, heating table, BSL2 bench, and O2 supply.
Access restricted. Please log in or start a trial to view this content.
Results
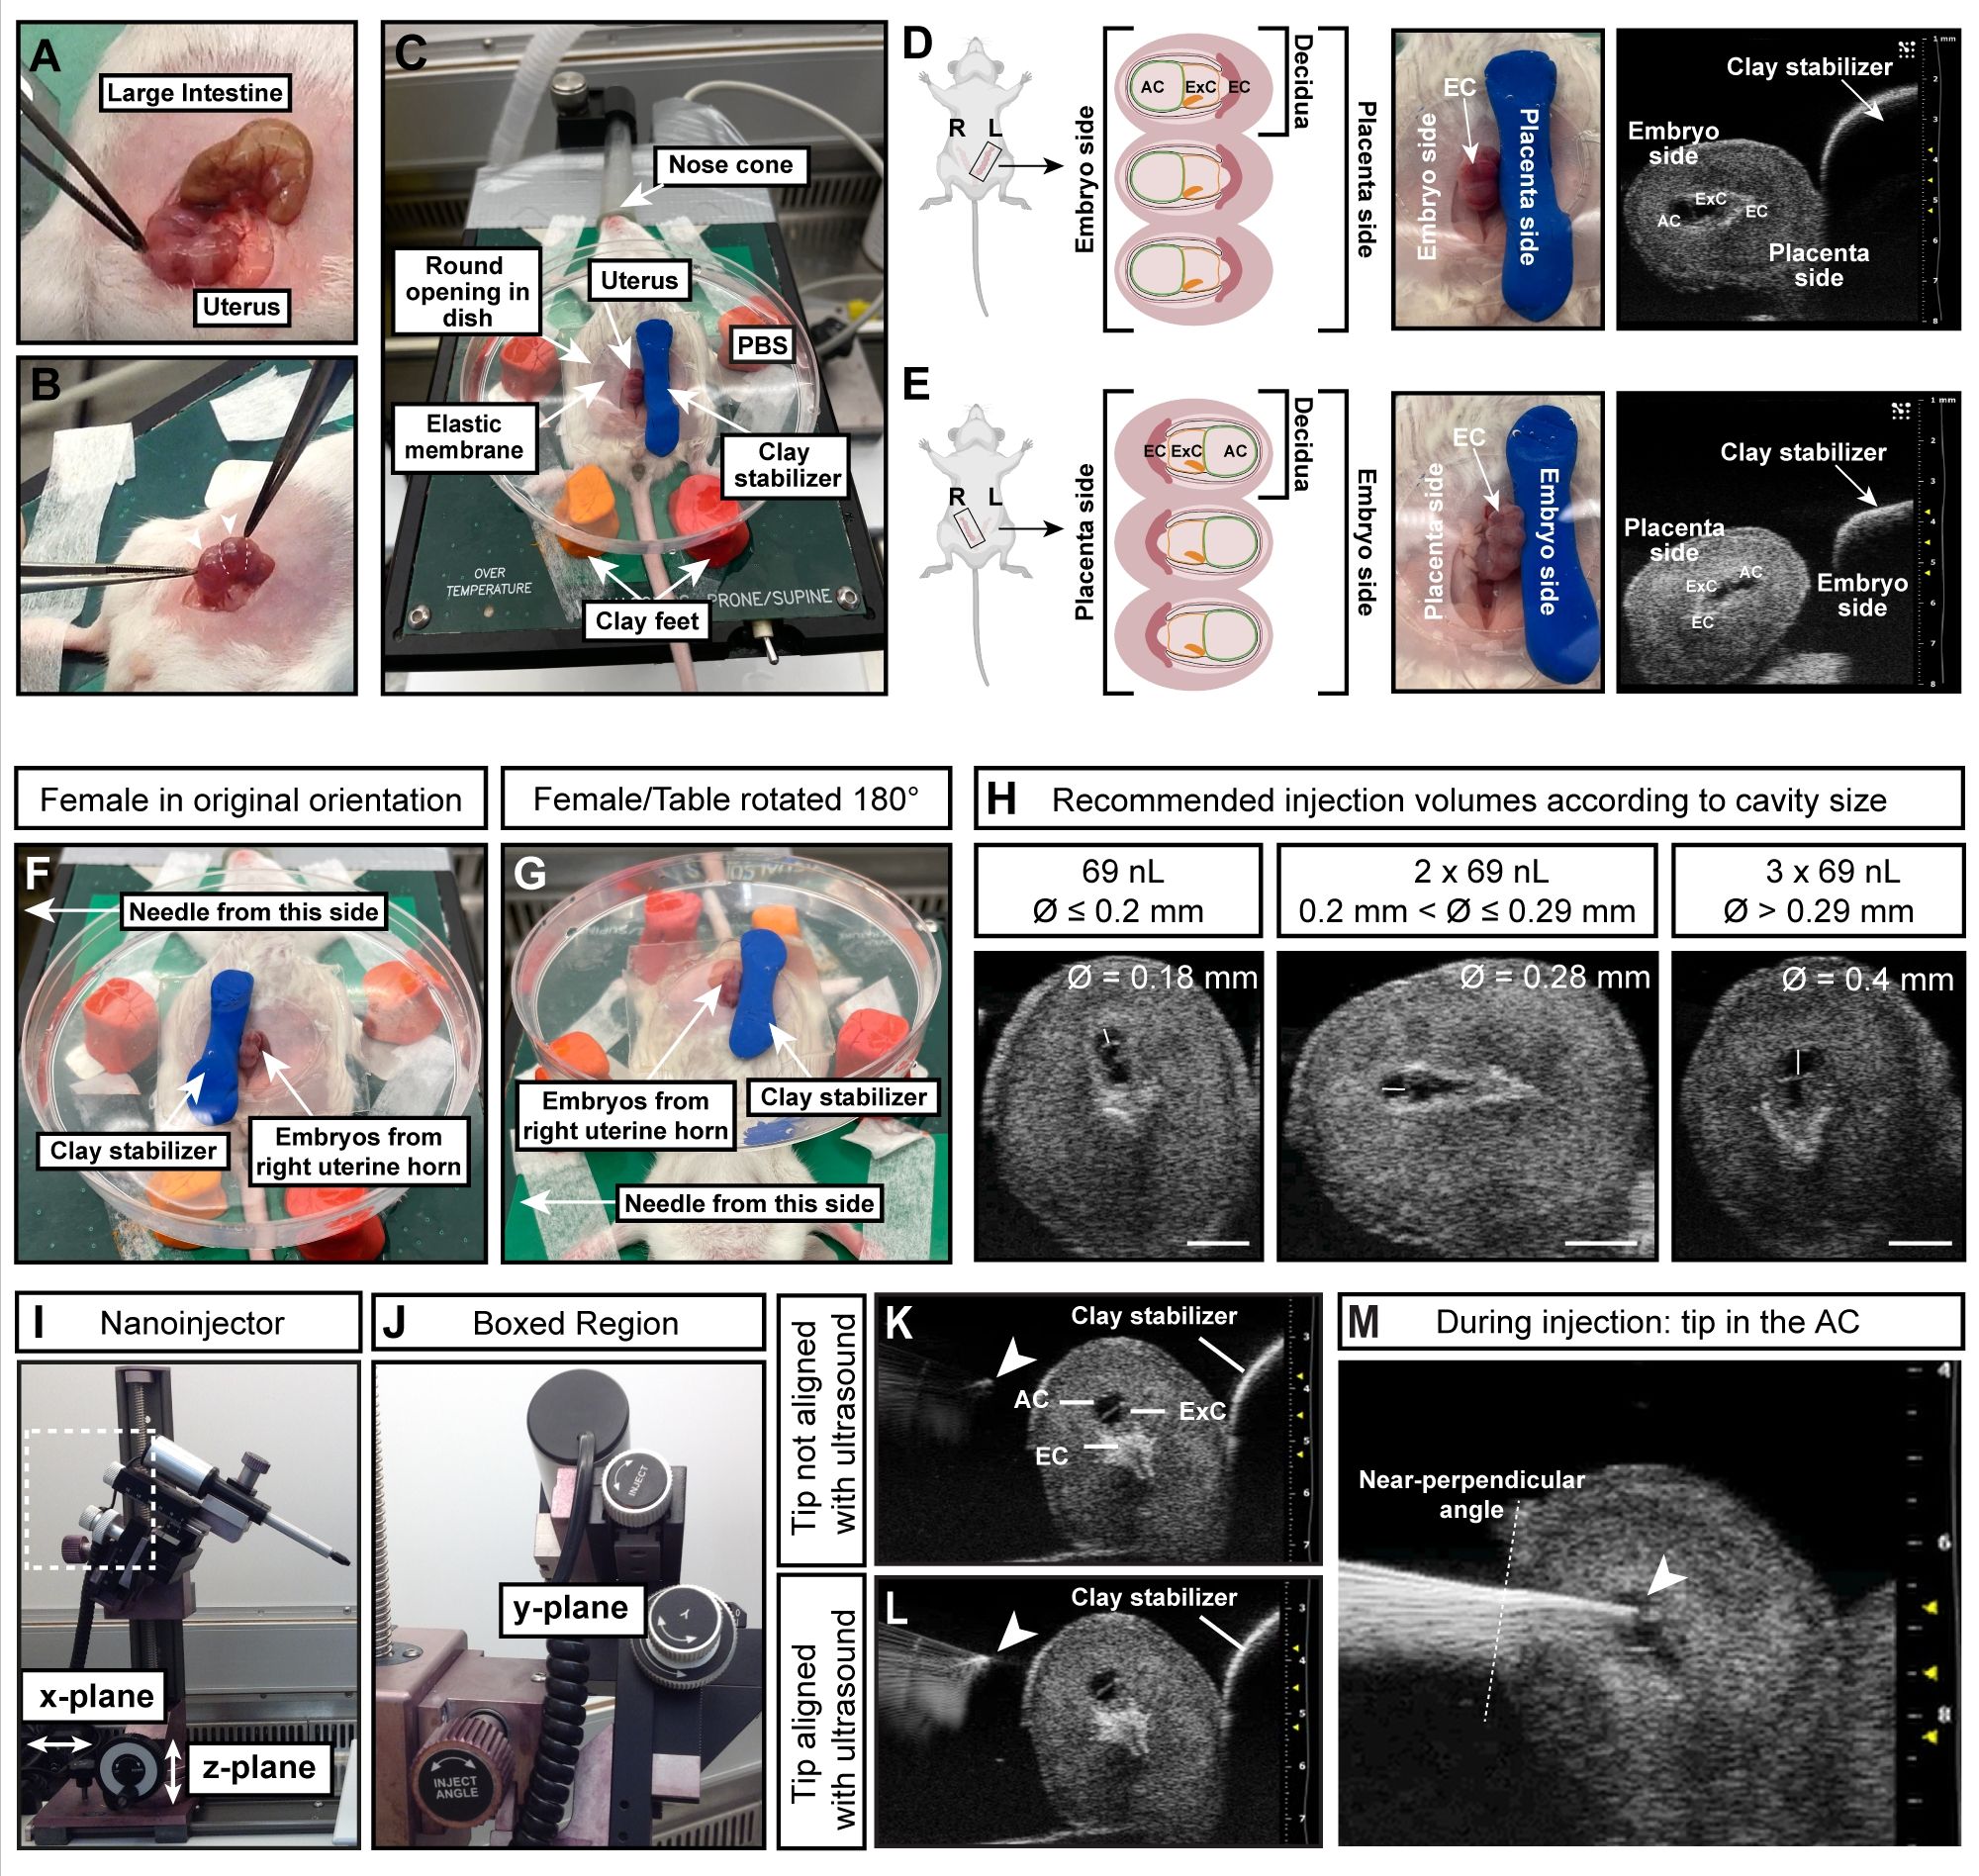
Figure 1: Optimal size and orientation of the amniotic cavity for successful injections. (
Access restricted. Please log in or start a trial to view this content.
Materials
| Name | Company | Catalog Number | Comments |
|---|---|---|---|
| 1 mL Syringe | BD Bioscience | 309628 | |
| 27 G Needle | BD Bioscience | 300635 | |
| 3.5 inches capillaries | Drummond Scientific | 3000203G/X | Were used to pull in house needles |
| 70 MHz MS Series transducer | Visual Sonics | MS700 | |
| Aquasonic clear ultrasound gel | Parker Laboratories | Mar-50 | |
| Autoclip Applier 9 mm | Angthos | 12020-09 | |
| CD1 mice | Charles River, Germany | Crl:CD1(ICR) | Females: from age of 8 weeks oldMales: from the age of 12 weeks old |
| Cotton Swab | OneMed Sverige AB | 120788 | |
| DPBS | Gibco | 14190094 | |
| Dressing forceps delicate straight 13 cm | Agnthos | 08-032-130 | |
| EZ clips 9 mm | Angthos | 59027 | Clips |
| Iris Scissors, Super Cut, straight, 9 cm | Agnthos | 307-336-090 | |
| Isofluorane | Baxter Medical AB | EAN: 50085412586613 | Purchased from Swedish Pharmacy |
| Kimwipes | Kimberly Clarke | 7557 | |
| Membrane Tape | Visual Sonics | SA-11053 | |
| Micropipette Puller | Sutter Instrument | P-97 | |
| Modeling Clay | Sense AB | 10209 | |
| Mouse Handling Table | Visual Sonics | 50249 | |
| Nanoject II Auto Injector Kit | Drummond | 3-000-205A | |
| Parafilm | Bemis | HS234526C | |
| Petri dish with central opening (low wall) | Visual Sonics | SA-11620 | |
| Petri dish, (ØxH): 92 x 16 mm | Sarstedt | 82.1472.001 | |
| Rely+On Virkon | DuPont | 130000132037 | disinfectant |
| Silicone membrane | Visual Sonics | SA-11054 | |
| Steri 250, hot bead sterilizer | Angthos | 31100 | |
| Surgical Tape (1.25 cm x 9.14 m) | Medicarrier | 67034 | |
| Vevo Compact Dual (Med. Air & O2) Anesthesia System | Visual Sonics | VS-12055 | |
| Vevo Imaging Station 2 | Visual Sonics | VS-11983 | |
| Vevo2100 | Visual Sonics | VS-20047 | |
| Vicryl 6-0; C-3 needle, 45 cm purple filament | Agnthos | J384H |
