$$\rightleftharpoonup{xx}$$
$$\longleftharp{xx}$$,
$$\longrightharp{xx}$$,
All procedures involving animal models have been reviewed by the local institutional animal care committee and the JoVE veterinary review board.
1. Cervical Aneurysm Clip Contusion/Compression Model
- Before surgery, autoclave instruments and keep them sterile during the entire surgical procedure by putting them in a 70% alcohol bath.
- Anaesthetize Wistar rats (250-270 g) with a combination of oxygen (O2), nitrous oxide (N2O) (1:1), and 1.8-2.2% Isoflurane and support spontaneous breathing via a gas anesthesia mask. For induction of anesthesia, start with 5% Isoflurane for 1 minute and reduce afterward. Before starting surgery, control the depth of anesthesia by giving a painful stimulus (e.g., at the paws). Apply fatty ointments in the eyes to avoid dryness and to prevent subsequent infections.
- Put the rats onto a heating cushion (37 °C) and fix the head into a stereotactic frame.
- Shave the surgical region around the cervical spine and disinfect with povidone-iodine and 70% alcohol.
- Make a midline incision above the spine from the cervical vertebra (C2) reaching the prominent processus of the thoracic vertebral body 2 (T2).
- Cut through the outer layer of the vertebral muscles directly on the midline (to avoid bleeding) in a cranio-caudal direction and further dissect the deeper muscle layers bluntly until you reach the processus spinosus and the laminae. Insert retractors.
- Orientate the prominent processus spinosus of the vertebral body T2 to observe the targeted levels for laminectomy. After identification and micro-surgical preparation of the selected laminae, cut through the ligamenti flavae to loosen the laminae and the processus spinosus. Finally, cut through the laminae with a bone clipper lateral to the spinal cord and remove those gently, avoiding any compression of the spinal cord itself.
NOTE: The most common levels are C5/6, C6/7, or C7/T1. The perioperative mortality rate increases the more rostral the level of injury. Bleeding from the paravertebral venous sinus is common and can be addressed by careful compression with a sponge. - Before inserting the clip to traumatize the cord, identify emerging nerve roots to spare them from clipping (especially at levels C5/6).
- In order to ensure smooth clip induction, loosen the ventral dura from the dorsal side of the vertebral bodies with a hook and prepare a corridor for the clip.
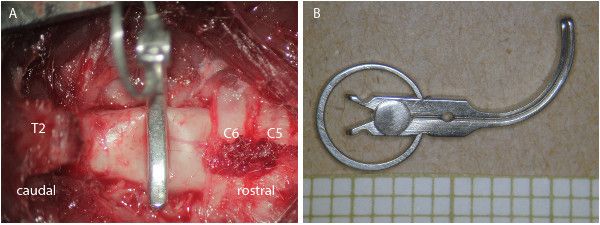
- Finally, insert the open clip and let it snap shut (rapid closure) to achieve a contusion injury. The clip closing force and duration of clip closure determine the intensity of the trauma and the extent of compression. Commonly used are clip forces of between 15-35 g and a clipping duration of, e.g., 1 min. (Figure 1).
- After removal of the clip, adapt muscles in 2 layers and close the wound.
- Stop anesthesia and let the animal wake up under your continuous observation until it regains sufficient consciousness for sternal recumbency. Finally, put the rat in a single cage and follow post-operative treatment guidelines.
- Since animals struggle with the severity of this type of injury, you must pay special attention to post-operative treatments:
- Administer painkillers (Buprenorphine and Meloxicam for 3 days and 5 days, respectively, and according to the clinical symptoms).
- Give additional saline solution subcutaneously for 3 days (2 times a day, 5-10 milliliter (ml)).
- Provide antibiotics in the drinking water 2 days prior to and until 7 days post-surgery (e.g., Moxifloxacine)
- Squeeze the urinary bladder 2-3 times a day until recovery of bladder function is constantly apparent.
- Observe neurological deficits and physiological condition of the operated animals at least once a day.
2. Injecting SAPs and NPCs (14 days after injury)
- Induce anesthesia as described in 1.1 to 1.3, fix the rat's head in a stereotactic frame, remove the stitches or wound clips, and disinfect the wound and the surgical area with povidone-iodine and 70% alcohol.
- Carefully dissect the paravertebral muscles, insert retractors, remove scar tissue microscopically from the dura, and re-expose the lesion site.
- Prepare SAPs in a concentration of 1% (w/v) to perform an extracellular matrix gel. QL6 SAPs have a physiologically compatible pH and do not need to be buffered prior to injection. For visualization of SAPs in the spinal cord, use a fluorescent derivative of QL6 (QL6-fluorescein isothiocyanate [FITC]).
- Inject SAPs (5 microliter (μl) into the center of the lesion, distributed in 2 portions, each 2.5 μl bilaterally of the midline. Use a Hamilton syringe connected to the stereotactic frame with a micro glass capillary (100 micrometers (μm) outer diameter [OD]). Open the dura carefully with the tip of a sharp needle, and insert the glass capillary stereotactically 2 millimeters (mm) into the traumatized spinal cord.
- After injecting 1/3 of the volume, remove the needle to 1.5 mm depth, and after a further 1/3 to 1 mm. After injection of the entire volume, and before removal of the syringe, wait 5 minutes to stabilize gel formation.
- To generate NPCs, use adult discosoma red fluorescent protein (DsRed) mice (or yellow fluorescent protein [YFP]-positive mice, green) and isolate and cultivate them from the paraventricular zone.
- Assess the viability of NPCs by Trypan Blue staining, which indicates the presence of ~90% live cells in the cell suspension. Dilute the cells in a growth medium (50 x 103 live cells/μl) and then use them for cell transplantation.
- Make four 2 μl (8 μl total volume, containing 4 x 10⁵ NPCs) intraspinal injections bilaterally at 2 mm rostral and caudal of the injury site. After opening the dura, insert the Hamilton micro glass capillary 1.5 mm below the dorsal surface of the spinal cord and inject 2 μl of the cell suspension. Choose an injection rate of about 0.5 μl /min (min).
- At the end of each injection and before removal of the capillary from the cord, wait for at least 1 min, allowing tissue stretching to accommodate the new cell volume. (Figure 2)