This video demonstrates the procedure of delivering an inducer drug into the cisterna magna of an anesthetized mouse. The injection selectively induces fluorescent marker expression in brain surface cells accessible via cerebrospinal fluid, confirmed by fluorescence imaging.
A subscription to JoVE is required to view this content. Sign in or start your free trial.
Method Article
Targeted Drug Delivery in a Mouse Model via Cisterna Magna Injection
2.3K views
⸱
August 29th, 2025
In This Article
Abstract
Protocol
All procedures involving animal models have been reviewed by the local institutional animal care committee and the JoVE veterinary review board.
1. Positioning of the Animal for the Procedure
- Fix the animal's head onto the head holder. To improve accessibility to the cisterna magna, position the animal's body at approximately 30° from the surface of the table and the head titled downwards, to establish an angle of 120° with the rest of the body and extend the back of the neck to facilitate access to the cisterna magna (Figure 1A).
- Add paper towels underneath the animal to support its body throughout the procedure.
- Secure anesthesia delivery through the mouthpiece and reduce the isoflurane concentration to 2.5% and air delivery to 200 ml/min.
- Apply ophthalmic ointment.
2. Exposure of the Cisterna Magna
- Shave the back of the animal's neck and sanitize the area with 70% ethanol and Betadine.
- Using surgical scissors, perform a midline incision (ca. 7 mm in length) starting at the level of the occipital bone and extending it posteriorly.
- Gently separate superficial connective tissue and neck muscles, pulling sidewise from the midline with fine-tip tweezers. This will expose the dural membrane overlaying the cisterna magna, shaped as an inverted triangle.
- Use sterile absorption spears or cotton swabs to control any resultant bleeding.
- Position a small surgical separator to maintain the neck muscles pulled aside and enable visualization of the cisterna magna throughout the procedure.
3. Intracisternal Injection
- To gain access to the cisterna magna, identify the caudal end of the occipital bone and insert the needle that was previously bent immediately underneath.
NOTE: There will be a sudden drop in resistance as the dural membrane is punctured. However, the tip of the needle will only penetrate slightly underneath the meningeal surface, thanks to its hooked shape. - Once the dura has been perforated, allow the bent tip of the needle to penetrate underneath the dural surface by gently pulling the syringe upwards and parallel to the animal's body, in order to "hook" the needle to the skull (see Figure 1B). This will ensure better stability and will prevent the needle from penetrating deeper, thus avoiding the risk of damaging the underlying cerebellum or medulla.
- Inject the compound slowly to avoid interference with the cerebrospinal fluid's natural flow.
NOTE: Depending on the purpose of the experiment, the infusion rate may vary. If a slow and steady infusion rate is required (e.g., when using the procedure to trace cerebrospinal fluid movement), it may be advisable to use an automatized microinfusion system in combination with the syringe. - After the injection, let the needle rest in the site for 1 minute and carefully remove it. Use fine-tipped forceps to aid in the retraction of the needle from its hooked position.
NOTE: The use of a thin needle (e.g., 30 G) does not lead to substantial damage to the meningeal membrane and consequent outflow of the cerebrospinal fluid. If larger needle sizes are required, we recommend stopping the leaking of fluid by applying pressure at the injection site using a sterile cotton tip.
Access restricted. Please log in or start a trial to view this content.
Results
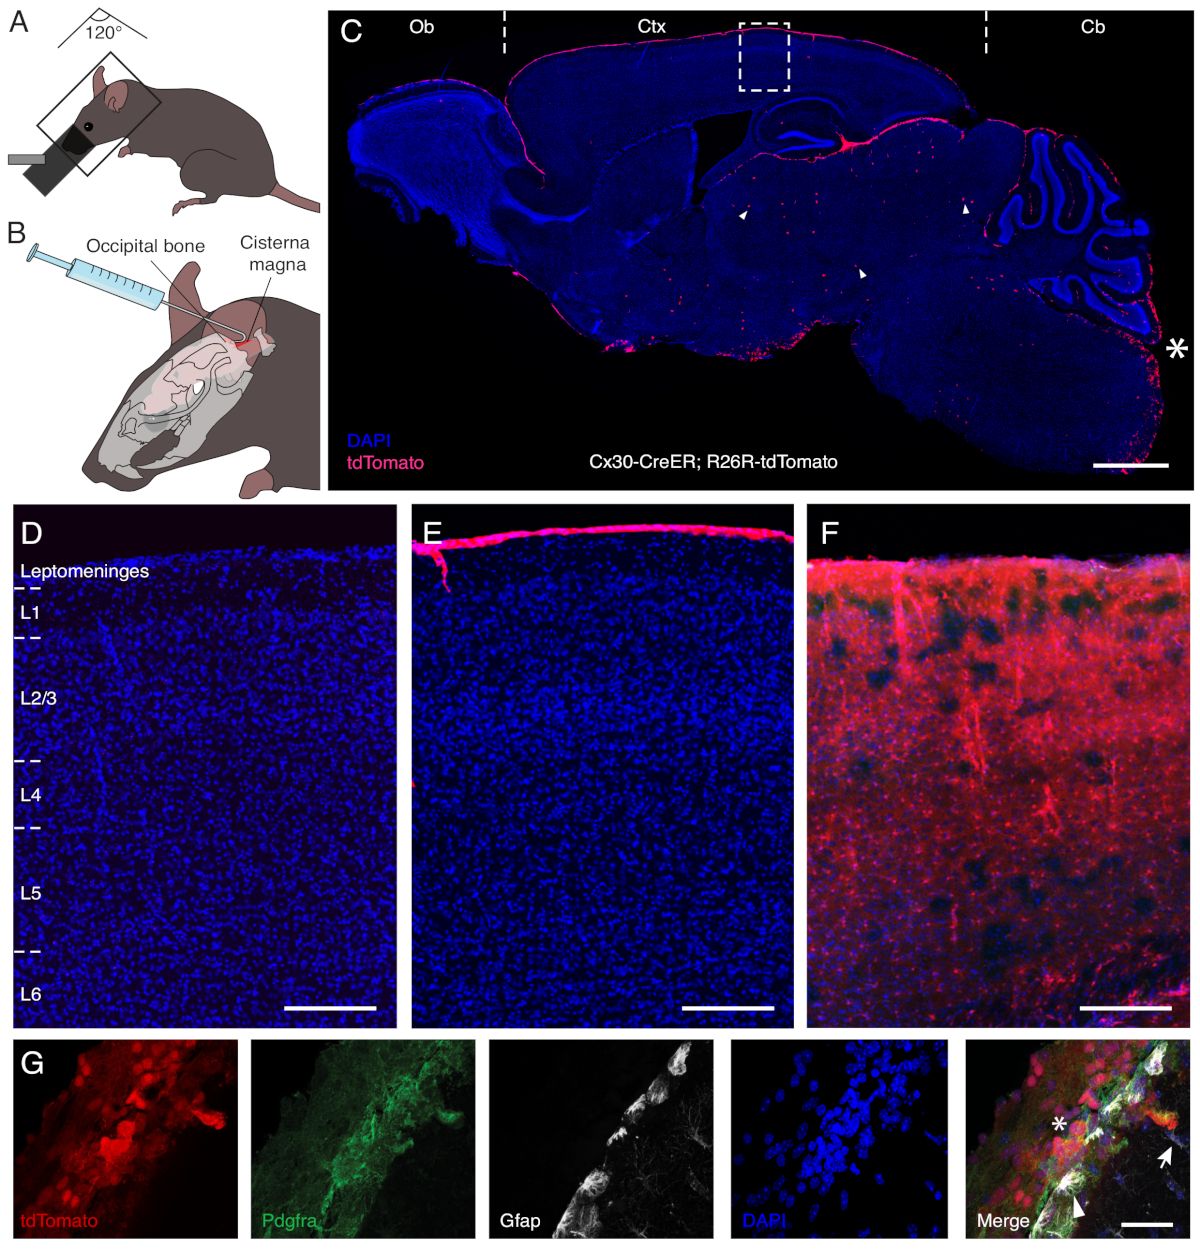
Figure 1: Specific labeling of leptomeningeal cells via intracisternal injection of endoxifen. Panel...
Access restricted. Please log in or start a trial to view this content.
Materials
| Name | Company | Catalog Number | Comments |
|---|---|---|---|
| Anesthesia unit | Univentor 410 | 8323102 | Complete of vaporizer, chamber, and tubing that connects to chamber and mouse head holder |
| Anesthesia (Isoflurane) | Baxter Medical AB | 890 | |
| Betadine | Sigma-Aldrich | PVP1 | |
| Endoxifen | Sigma-Aldrich | E8284 | |
| Ethanol 70% | Histolab | 1370 | |
| Hamilton syringe (30G beveled needle) | Hamilton | 80300 | |
| Mouse head holder | Narishige International | SGM-4 | With mouth piece for inhalational anhestetics. Alternatively, use a stereotactic frame |
| Scissors | Fine Science Tools | 15009-08 | |
| Shaver | Aesculap | GT420 | |
| Sterile absorption spears | Fine Science Tools | 18105-01 | Sterile cotton swabs are also a good option |
| Surgical separator | World Precision Instrument | 501897 | |
| Tweezers | Dumont | 11251-35 |
