This video demonstrates the setup of concurrent transcranial alternating current stimulation (tACS) and electroencephalography (EEG) experiments to deliver rhythmic electrical signals to the brain while recording brain activity. The procedure ensures electrode isolation and prevents gel bridging for accurate stimulation and clean EEG signals.
A subscription to JoVE is required to view this content. Sign in or start your free trial.
Method Article
Establishing Concurrent Transcranial Alternating Current Stimulation and Electroencephalography for Recording Human Brain Activity
670 views
⸱
August 29th, 2025
In This Article
Abstract
Protocol
All procedures involving human participants have been performed in compliance with the institutional, national, and international guidelines for human welfare and have been reviewed by the local institutional review board.
NOTE: Figure 1 illustrates montages and the design of the transcranial alternating current stimulation (tACS) electrodes and electroencephalography (EEG) cap. We use an elastic EEG cap (Figure 1D) to hold the tACS electrode attached to the scalp.
1. Montages
NOTE: The representative results are obtained from the following tACS electrode montages.
- Montage 1: Place both electrodes on the scalp, at the left dorsolateral prefrontal cortex (DLPFC) (F3 electrode) and left posterior parietal cortex (PPC) (P3 electrode) (Figure 1A).
- Montage 2: Place one tACS electrode on the scalp at the left DLPFC (F3 electrode), and place another tACS electrode on the left shoulder (Figure 1B).
- Montage 3: Place one tACS electrode on the scalp at the left PPC (P3 electrode), and place another tACS electrode on the left shoulder (Figure 1C).
2. Preparation of tACS Electrodes
- If a reference tACS electrode will be placed on the shoulder (Montage 2 and 3), do this first.
- Before placing the shoulder electrode, prepare the skin with an abrasive skin-preparing gel for EEG and electrocardiography. Use a gauze pad to scrub the skin lightly with the gel.
- Apply EEG gel on the tACS electrode and place the electrode on the shoulder.
- Secure the electrode on the shoulder with adhesive tape.
- Put on the EEG cap. Adjust the cap's position according to the international 10-20 system for electrode positioning, and fasten the chin strap.
- Mark spots to indicate where the tACS electrode will be positioned on the scalp. Use a water-based red pen, first because the pen's color material reduces the insulating effects, and second, it can be easily washed away with water.
- If the pen does not reach the scalp for marking due to the holes in the EEG cap for gel insertion being too tight (Figure 1D), use a wooden stick, such as the wooden handle of a cotton swab.
- Paint the tip of the stick thoroughly and use this tip to mark the scalp.
- Remove the EEG cap and check if the marking was successful. If needed, fill in the marking so that it can easily be spotted later.
- Perform the following steps (2.5.1-2.5.4) depending on the length of the participant's hair. If the participant has short hair (up to about 10 centimeters), skip the following steps (it should also be noted that certain hairstyles, such as dreadlocks, make the application of tACS electrodes impossible). If the participant has longer hair:
- Place the tACS electrode with its center marked by the red spot on the scalp. Note that no EEG gel should be put on the tACS electrode at this moment.
- Thread out all the hair inside the inner ring of the tACS electrode.
- Bind the threaded-out hair with cable binders. Pay attention to ensure that the hair around the tACS electrode does not get bound up with it by the cable binders.
- After the hair has been bound, remove the tACS electrode.
- Apply EEG gel to the scalp of the tACS electrode.
- Before applying the gel, connect the scalp and shoulder tACS electrodes to the stimulator, but do not turn on the stimulator yet. Apply a thin layer of EEG gel onto the tACS electrode. A sparse application of gel is important.
- Carefully place the tACS electrode back on the head.
- If the participant has longer hair, thread the bound hair back through the inner hole of the tACS electrode, without it touching the EEG gel on the tACS electrode.
- While placing the tACS electrode, pay close attention to the red mark on the scalp being kept in the middle of the tACS electrode. Once the tACS electrode has been placed on the scalp, its position may no longer be changed.
- Remove the cable binders from the hair once the tACS electrode has been placed.
- Turn on the stimulator and monitor the impedance. While carefully putting some pressure on the tACS electrode, pay very close attention that the red marking spot is always kept in the middle of the tACS electrode.
- Carefully lift the edges of the tACS electrode and apply some more EEG gel beneath the hair, not between the tACS electrode and the hair (Figure 2). This is especially important if the participant has a lot of hair (see discussion).
- Continue putting pressure on the tACS electrode until impedance is stably below 10 kΩ. Monitor the impedance of the tACS electrode by the tACS stimulator.Carefully add additional EEG gel if necessary, but always sparsely.
NOTE: The impedance of the tACS electrode monitored by the tACS stimulator is measured between the tACS electrodes, which has the drawback of not providing separate impedance value information for each electrode. Depending on the EEG amplifier system, it might also be possible to measure the impedance of the tACS electrodes through this, and then be able to measure the impedance for each electrode separately. - Pay attention to any gel escaping from the tACS electrode, and remove excess EEG gel with a cotton swab.
3. Mounting the EEG Cap
- After the impedance of the tACS electrodes reaches below the threshold of 10 kΩ, mount the EEG cap again. Put on the EEG cap very gently and carefully, particularly if the material of the EEG cap is elastic, since it is otherwise easy to move the position of the scalp tACS electrode during this step.
NOTE: The shift of the tACS electrode spreads out the EEG gel beneath the tACS electrode and causes the EEG gel to bridge with the EEG electrodes. It is important not to pull down an elastic cap with force, as this may cause it to rebound afterward, which would also result in moving the tACS electrode. - Fasten the strap of the EEG cap.
4. Preparation of EEG Electrodes
- Apply EEG gel of appropriate viscosity (as discussed in detail in the discussion) to the EEG electrodes to create contact between the scalp and the EEG electrodes. Begin with the ground and reference EEG electrodes. Then, proceed to the electrodes located in the vicinity of the tACS electrode. Then continue to the remaining electrodes (see Discussion).
- For EEG electrodes surrounding the tACS electrode, inject gel with the needle tip pointing in a direction away from the tACS electrode. Gently push down the EEG electrodes while applying gel, so that the gel does not escape from beneath the electrodes.
- Use a wooden stick to increase the contact between the EEG electrodes and scalp, as illustrated in Figure 3. Don't use the needle tip for this purpose, as it will scrape the participant's scalp, and is furthermore not as effective for this purpose.
- Push down the gel with the stick towards the scalp, and very gently rub the scalp with the top of the stick in a rotating motion. For electrodes located in a close vicinity of the tACS electrode, try to keep the angle of the stick orthogonally to the scalp, as sideways movements of the stick will spread out the gel under the electrode. If needed, apply some more EEG gel, and then use the wooden stick to further improve the impedance.
- To avoid bridging via leaking gel (Figure 4), be thrifty when applying the gel to lower the impedance of the EEG electrodes in the immediate vicinity of the tACS electrode. Instead, try to lower the impedance as much as possible using only the wooden stick before considering adding more gel.
- Once good impedance has been achieved with the wooden stick, carefully insert and bring down the needle until the tip touches the scalp. Then, gently apply gel while pulling the needle out, thereby helping to stabilize the contact between the EEG electrode and the scalp.
- Aim for EEG electrode impedances below 5 kΩ for optimal data, as this reduces noise interference and signal distortion.
- Once the impedances have been lowered to the appropriate level, test whether a bridge has been created between the tACS electrode and surrounding EEG electrodes due to leaking gel.
- Apply brief sinusoidal stimulation, with an intensity of experimental interest (e.g., 1 mA peak-to-peak).
NOTE: Due to limitations of some systems (see table of materials), it is not possible to check for bridging online, but only through applying stimulation and then checking whether any channel of the EEG amplifier becomes saturated. - See whether any channel is saturated while stimulating.
NOTE: As evident from the representative results, bridging via leaking gel between the tACS and EEG electrodes will saturate this channel of the EEG amplifier and rule out recording data from these electrodes. Once a bridging via leaking gel has been established, it is not possible to undo it. The only option is to interrupt the experiment.
- Apply brief sinusoidal stimulation, with an intensity of experimental interest (e.g., 1 mA peak-to-peak).
- Check impedances once more. Then begin recording.
Access restricted. Please log in or start a trial to view this content.
Results
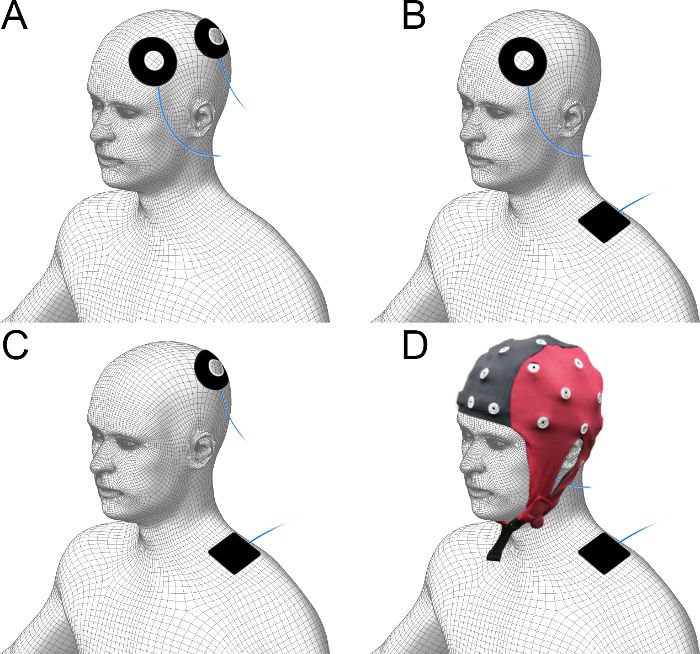
Figure 1. Illustration of montage. (A) Montage with two tACS electrodes placed on the scalp (...
Access restricted. Please log in or start a trial to view this content.
Materials
| Name | Company | Catalog Number | Comments |
|---|---|---|---|
| Stimulator for tACS: Eldith DC-Stimulator plus | NeuroConn GmbH, Germany | For remote input, be sure to order a model with this feature enabled | |
| Analog output board for sending triggers: Static and waveform analog output board, model NI PCI-6723 | National Instruments, USA | 13-bit, 32 channels. | |
| Matlab and data acquisition toolbox | The MathWorks, Inc., USA | The 'Data acquisition toolbox' available for MATLAB provides functions to control data acquisition hardware such as an analog output board, produced by several manufacturers. | |
| EEG system: eegosports, with a 32 channel waveguard EEG cap | ANT neuro, Netherlands | ||
| tACS electrodes | NeuroConn GmbH, Germany | 305090-05 305050 | Materials: conductive-rubber electrodes.Dimensions of scalp electrodes: Outer Ø: 60 mm, Inner Ø:25 mm (Part# 305090-05) Cut from the original size Ø 75mmDimensions of shoulder electrode:50 x 50 mm (Part# 305050) |
| EEG gel | Inselspital, Bern, Switzerland | Electrode paste, containing abrasives (i.e. pumice) which scrub the skin, improving the electrode-to-skin contact. | |
| Abrasive skin preparing gel for EEG and electrocardiography: Nuprep | Weaver and Company, USA | ||
| Cotton swabs, wooden handle | Salzmann MEDICO, Switzerland | Dimensions:150 x 1.5 mm; wooden handle Ø 2.2 mm | |
| Adhesive tape: Leukofix | BNS medical GmbH, Germany | 04.107.12 |
