A subscription to JoVE is required to view this content. Sign in or start your free trial.

Method Article

Oxygen Flux Measurements to Evaluate Mitochondrial Respiration in Living and Permeabilized Cells

1.1K views

⸱

March 13th, 2026

In This Article

Abstract

Source: Elettra Leo1, Luiza H.D. Cardoso1, Sabine Schmitt1, Erich Gnaiger1

1Oroboros Instruments

This video explains how oxygen flux is used to assess mitochondrial respiration in living and permeabilized mammalian cells. It demonstrates the sequential use of digitonin, metabolic substrates, ADP, an uncoupler, and an inhibitor to characterize different respiratory states. The resulting oxygen flux profile reveals mitochondrial function and energy-coupling efficiency under defined conditions.
Protocol

1. Adding HEK 293T cells to the high-resolution respirometry chamber

  1. Add mitochondrial respiration medium MiR05 into the clean Oroboros chamber. Close the chamber by inserting the stopper and siphon off the excess medium from the stopper receptacle using the suction system.
  2. To add HEK 293T cells to the chamber by partial volume replacement, calculate the volume of the cell stock suspension required to reach an experimental cell concentration of 1 million/mL.
  3. Remove the stopper from the chamber.
  4. Remove a volume of MiR05 from the chamber corresponding to the calculated volume of the cell stock suspension using a pipette.
  5. Resuspend the cell stock suspension thoroughly with a pipette.
  6. Add the calculated volume of the cell stock suspension to the chamber.
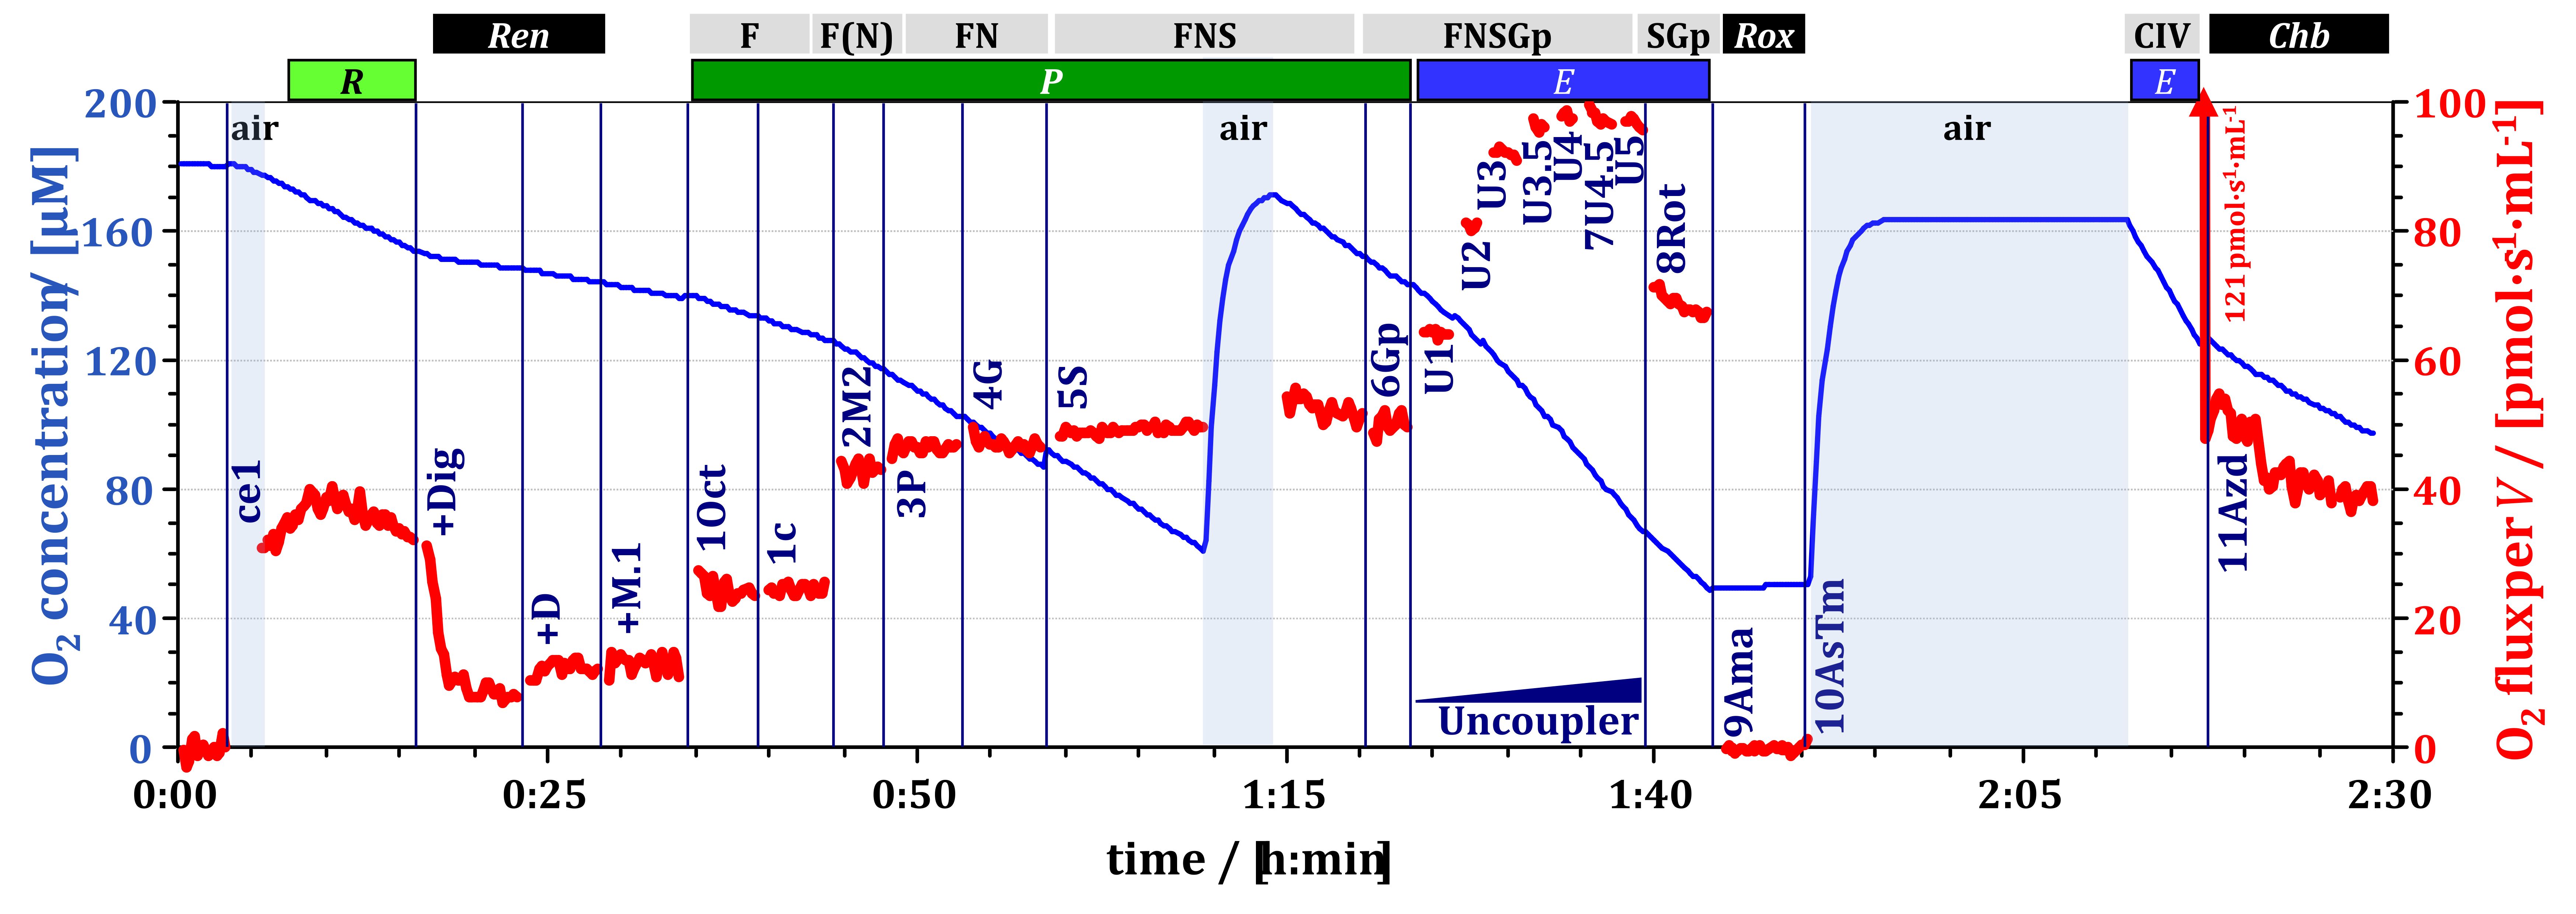
    NOTE: The respirometry chamber should be clean and filled with MiR05, the polarographic oxygen sensor should be calibrated at stable temperature, and a Substrate-uncoupler-inhibitor titration (SUIT) protocol should be loaded in the software DatLab beforehand. Experimental sample/cell concentration may vary depending on the specific sample or cell type. Figure 1 shows an example of high-resolution respirometry of HEK 293T cells.
  7. Close the chamber by inserting the stopper and ensuring that no bubbles are trapped inside the chamber.
    1. Siphon off any excess liquid from the stopper receptacle.
  8. Wait for the stabilization of oxygen flux, which typically takes about 15 min.

2. Microsyringe handling

  1. Prepare the microsyringes.
    1. Select and clean the appropriate microsyringe based on the type of chemical and volume to be titrated. Place the microsyringe on the syringe rack.
    2. Fill the syringe, taking care to avoid including gas bubbles.
      NOTE: If gas bubbles form, eliminate them by moving the plunger slowly upward and swiftly downward several times.
  2. Check the SUIT protocol for the required volume of the chemical to be titrated.
    1. Fill the syringe with at least 1 µL more than the required volume.
    2. Press the plunger until the desired mark on the glass barrel is reached, ensuring that a small drop appears at the needle tip (priming).
    3. Wipe off the drop on the wall of the chemical vial before proceeding with titration.

3. Titration of chemicals following the SUIT protocol

  1. Titrate the chemicals indicated by the SUIT protocol.
    NOTE: Open the DatLab event window by clicking on the event in the protocol sidebar before titrating.
    1. Insert the needle completely through the stopper capillary until the termination of the glass barrel is in contact with the stopper.
    2. Inject the chemical into the chamber swiftly.​
      NOTE: After an injection, a rapid, transient titration artifact may appear as a spike in the O2 flux (Figure 2A).
    3. Add digitonin to a final concentration of 5 µg/mL.
      CAUTION: Digitonin is toxic if swallowed.
    4. Click on OK in the event window to set the corresponding event.
    5. Siphon off excess liquid from the stopper receptacle.
    6. Wait for the stabilization of oxygen flux and record for at least 2 min.
    7. Add pyruvate to the chamber to reach a final concentration of 5 mM. Click on OK in the event window to set the corresponding event.
      NOTE: Perform the next titration without delay.
    8. Add malate immediately after pyruvate to reach a final concentration of 2 mM. Click on OK in the event window to set the corresponding event.
    9. Siphon off excess liquid from the stopper receptacle, wait for flux stabilization, and record for about 2 min.
    10. Add adenosine diphosphate (ADP) to a final concentration of 2.5 mM. Click on OK in the event window to set the corresponding event.
    11. Siphon off excess liquid from the stopper receptacle, wait for flux stabilization, and record for about 2 min.
      NOTE: Following ADP addition, flux may continue increasing slowly, taking up to 20 min to stabilize.
    12. Add carbonyl cyanide m-chlorophenylhydrazone (CCCP) in 0.5 µM increments to reach maximum flux. Click on OK in the event window to set the corresponding event after each titration.
      CAUTION: CCCP is toxic if swallowed.
      NOTE: Perform CCCP titrations in a fast series (about 1.5-min intervals). Stop titration when the subsequent addition does not further increase flux. Modify the name of each CCCP titration in the event window by replacing * with the cumulative CCCP concentration.
    13. Siphon off excess liquid from the stopper receptacle and record for about 2 min.
    14. Add antimycin A to reach a final concentration of 2.5 µM.
      CAUTION: Antimycin A is fatal if swallowed.
      NOTE: The response time may vary depending on the sample.
    15. Siphon off excess liquid from the stopper receptacle and record for about 2 min.
    16. Click on the button labelled Stop measurement.

4. Data analysis

  1. Analyze the data.
    1. Set marks on stable and representative sections of the flux plot.
      NOTE: Avoid including titration artifacts in the analysis of the traces (Figure 2B).
  2. Select Marks from the top menu, then choose Mark Statistics. Select the desired statistics mode and click on Copy to Clipboard to transfer the data for further analysis.

Access restricted. Please log in or start a trial to view this content.

Results

Oxygen consumption graph, O2 concentration over time, experimental data analysis, metabolic rate.

Figure 1: High-resolution respirometry of HEK 293T cells. Trace of O2 concentration [&#...

Access restricted. Please log in or start a trial to view this content.

Materials

List of materials used in this article
NameCompanyCatalog NumberComments
ADPMerck, Germany117105
Antimycin ASigma-Aldrich, USAA8674CAUTION H300 Fatal if swallowed, H400 short-term (acute) aquatic hazard
BSA fatty acid-freeSigma-Aldrich, USAA 6003Bovine serum albumin
CCCPSigma-Aldrich, USAC2759Carbonyl cyanide m-chlorophenyl hydrazone CAUTION H301 + H311 + H331 Toxic if swallowed, in contact with skin or if inhaled
DigitoninSigma-Aldrich, USAD5628CAUTION H301 Toxic if swallowed
MalateSigma-Aldrich, USAM1000CAUTION H319 Causes serious eye irritation.
MiR05-KitOroboros Instruments, Austria60101-01Mitochondrial respiration medium
PyruvateSigma-Aldrich, USAP2256CAUTION H317 May cause an allergic skin reaction
HEK 293T cellsAmerican Type Culture CollectionCRL-3216Obtained through LGC Standards (Wesel, Germany)

Explore More Articles

Digitonin TreatmentSubstrate Uncoupler Inhibitor TitrationADP StimulationCCCP UncouplingAntimycin A InhibitionOroboros RespirometerHEK 293T Cells