A subscription to JoVE is required to view this content. Sign in or start your free trial.

Method Article

Preparation of a Microfluidic Plate with Bacterial Cells

453 views

November 28th, 2025

In This Article

Abstract

Source: Sutlief, A. L., et al. Live Cell Analysis of Shear Stress on Pseudomonas aeruginosa Using an Automated Higher-Throughput Microfluidic System. J. Vis. Exp. (2019).

This video demonstrates the preparation of a microfluidic plate for shear stress studies in bacterial cultures. After priming the channels with media, bacterial cells are introduced into the experimental channel and incubated for attachment. Residual media and culture are removed to prepare the system for subsequent shear stress experiments.

Protocol

1. Media Preparation

  1. Prepare minimal media (MM) with 0.25% glucose. To make 1 L of MM with 0.25% glucose, add 200 mL of sterile M9 salt solution, 2 mL of sterile 1 M magnesium sulfate (MgSO4), 100 µL of sterile 1 M calcium chloride (CaCl2), and 12.5 mL of sterile 20% (w/v) glucose to water (dH2O) at a final volume of 1 L.
  2. Transfer required media to a sterile bottle using sterile techniques. Prepare the amount required depending on the number of channels being used. Typically, each channel requires 200 µL for priming, 300 µL for seeding and 1300 µL for the 24 h experiment.
  3. Place the bottle in an incubator or water bath set at the experimental temperature. The media should be at the experiment temperature before use to avoid bubbles forming in the microchannels.

2. Preparation of an Overnight and Experimental Culture of Pseudomonas aeruginosa strain PA01 that expresses an enhanced green fluorescent protein (PA01-EGFP).

  1. Place 15 mL of experimental media into a sterile sidearm flask and inoculate with one or two colonies from an agar plate streaked with PA01-EGFP. Expand the culture for 12-16 h on an incubator/shaker table at 37 °C and 180-220 rpm.
  2. Measure the OD600 of the overnight culture. When the OD600 is greater than 0.80, dilute the overnight culture to a final OD of 0.8 using fresh MM. Place the experimental culture in an incubator or water bath at 37 °C until needed for seeding the microfluidic channels. Check the OD600 again immediately before seeding to ensure that it has not changed significantly from the target OD600, 0.8 in this case.

3. Equipment Startup

  1. Set up the system station according to the user guide, similar to the setup in Figure 1. To avoid an error in the connection of the instrument to the software, turn on the instrument in the following order:
    PC Workstation
    Fluorescence Module. Make sure the fluorescence shutter is ON (blue light by the shutter button on)
    Hardware Controllers
    Imaging system Controller (see Table of Materials)
    CCD Camera
    Imaging Station (Microscope)
    NOTE: The temperature of the heated plate should be adjusted to the desired experimental temperature.
  2. Start the control application and enter the plate number located on the label on the side of the plate.
    NOTE: After the control application starts, there will be two separate application windows, one for the software that controls the microscope/imaging software and one for the control module that controls the pump and the well-plate interface.

4. Priming and Seeding the Microfluidic Plate

NOTE: The priming, seeding, bacterial attachment, and growth are illustrated in Figure 2.

  1. Remove the 48-well microfluidic plate from the packaging making sure to not touch the glass surface at the bottom of the plate. Clean the glass slide at the bottom of the plate well with a lens tissue, a lint free cloth, or a low-lint wipe.
  2. To prime the microfluidic channels, pipette 200 µL of 37 °C MM into the output well, being careful to avoid bubbles. Place the plate into the plate stage and wipe the interface with ethanol, allowing it to dry, before sealing it onto the plate stage.
  3. In Manual Mode on the Control Module, set Fluid as
    luria-bertani (LB) at 37 °C and Max Shear at 5.00 dyne/cm2. Click the output wells to activate flow from the output to the input well, priming the channels. After the 5-minute priming, pause the flow to prepare for seeding. Carefully remove the plate from the stage and pipette residual media from the output, but do not remove any of the media from the inner circle that leads to the microfluidic channels.
  4. To seed the experimental channels, first pipette 300 µL of MM into the input well followed by pipetting 300 µL of the bacterial culture into the output well into the output well. Place the plate back into the plate stage, making sure to wipe the interface before placing it on the plate.
  5. On the Control Module, focus on a single channel using the live camera feed after placing the plate stage onto the microscope stage. While visually monitoring by the live feed, resume flow at 1.00-2.00 dyne/cm2 for approximately 2-4 s to allow cells to enter the experimental channel, but not in the serpentine channels. Leave the plate on the temperature-controlled stage for 1 h to allow for cell attachment. During the 1 h incubation, the Control Module and Montage software can be set up for the autorun.
    NOTE: The amount of time needed for seeding will vary with media and organism, so it should be monitored closely by the live feed until optimized and used as a general time frame. Seeding throughout the plate may vary, which would require more time for the applied flow to certain columns of channels for complete seeding.
  6. After the attachment period, gently remove the plate from the stage and pipette the bacteria from the output first, avoiding disturbing the channel. With a new pipette tip, remove the media from the input wells.

Access restricted. Please log in or start a trial to view this content.

Results
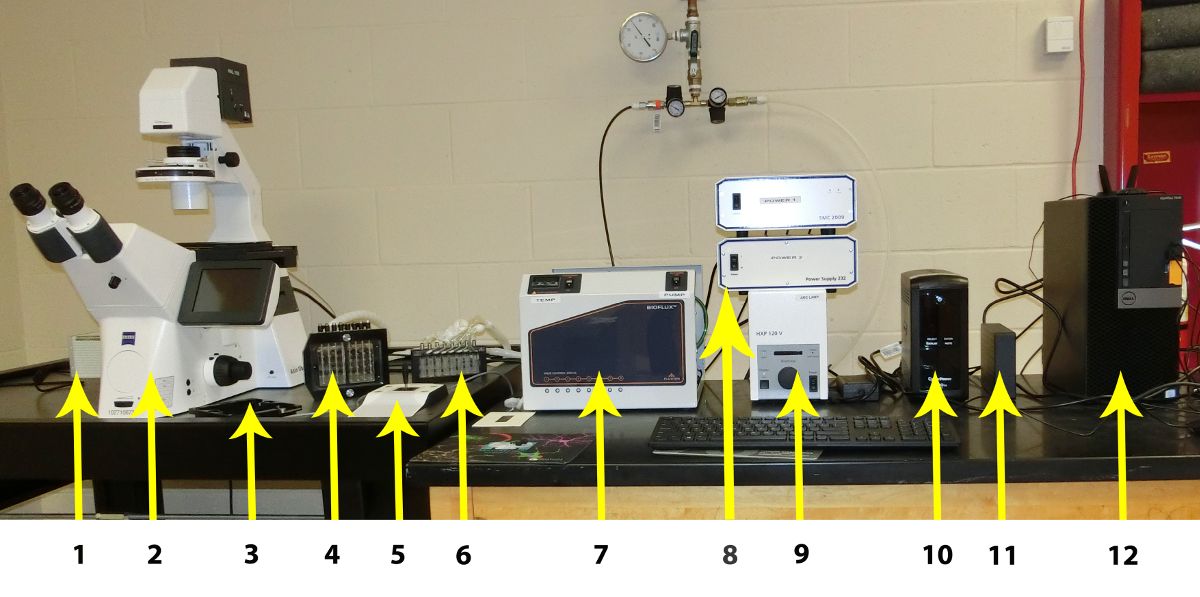
Microscopy and spectroscopy setup for photonics research; includes microscope, power supplies.

Figure 1: Individual components of the Microfluidic System. The individual components are listed from left to...

Access restricted. Please log in or start a trial to view this content.

Materials

List of materials used in this article
NameCompanyCatalog NumberComments
Ammonium Chloride, ACSVWRBDH9208-500GPart of the minimal media composition
BioFlux 1000 48 Well Low Shear PlateFluxion Biosciences910-0047
BioFlux 1000Z Microfluidic Imaging SystemFluxion BiosciencesBF 1000Z
Calcium Chloride Dihydride, ACD GradeVWR97061-904Part of the minimal media composition
Dextrose, Anhydrous, ACSVWRBDH9230-500GPart of the minimal media composition
Magnesium Sulfate ACS GradeVWREM-MX0070-1Part of the minimal media composition
Potassium Phosphate Monobasic, ACS GradeVWRBDH9268-500GPart of the minimal media composition
Pseudomonas Aeurginosa GFPATCC15692GFPPseudomonas aeurinosa bacterial strain PA01 with GFP modification used for this study.
Sodium Chloride, ACSVWRBDH9286-500GPart of the minimal media composition
Sodium Phosphate, Monobasic, Anhydrous, Reagent GradeVWR97061-942Part of the minimal media composition

Tags

Bacterial CultureShear StressChannel PrimingCell AttachmentFlow RateMicroscopy ObservationMedia FlushExperimental ChannelSerpentine Channels