The fallopian tube (FT) is emerging as an alternative site of origin for serous ovarian carcinoma (SOC). This protocol describes a novel method for the isolation and ex vivo culture of fallopian tube epithelial cells. This system recapitulates the in vivo epithelium and allows the study of SOC pathogenesis.
Method Article
Ex Vivo Culture of Primary Human Fallopian Tube Epithelial Cells
Opens in a new tab
In This Article
Summary
Loading...
$$\rightleftharpoonup{xx}$$
$$\longleftharp{xx}$$,
$$\longrightharp{xx}$$,
Abstract
Loading...
$$\rightleftharpoonup{xx}$$
$$\longleftharp{xx}$$,
$$\longrightharp{xx}$$,
Epithelial ovarian cancer is a leading cause of female cancer mortality in the United States. In contrast to other women-specific cancers, like breast and uterine carcinomas, where death rates have fallen in recent years, ovarian cancer cure rates have remained relatively unchanged over the past two decades 1. This is largely due to the lack of appropriate screening tools for detection of early stage disease where surgery and chemotherapy are most effective 2, 3. As a result, most patients present with advanced stage disease and diffuse abdominal involvement. This is further complicated by the fact that ovarian cancer is a heterogeneous disease with multiple histologic subtypes 4, 5. Serous ovarian carcinoma (SOC) is the most common and aggressive subtype and the form most often associated with mutations in the BRCA genes. Current experimental models in this field involve the use of cancer cell lines and mouse models to better understand the initiating genetic events and pathogenesis of disease 6, 7. Recently, the fallopian tube has emerged as a novel site for the origin of SOC, with the fallopian tube (FT) secretory epithelial cell (FTSEC) as the proposed cell of origin 8, 9. There are currently no cell lines or culture systems available to study the FT epithelium or the FTSEC. Here we describe a novel ex vivo culture system where primary human FT epithelial cells are cultured in a manner that preserves their architecture, polarity, immunophenotype, and response to physiologic and genotoxic stressors. This ex vivo model provides a useful tool for the study of SOC, allowing a better understanding of how tumors can arise from this tissue, and the mechanisms involved in tumor initiation and progression.
Protocol
Loading...
$$\rightleftharpoonup{xx}$$
$$\longleftharp{xx}$$,
$$\longrightharp{xx}$$,
1. Collagen Preparation and Filter Coating.
- To prepare human placental collagen, tweeze out 30 mg of human placental collagen and put on top of 50 ml of distilled water (dH2O) in a 500 ml beaker with stir bar.
- Add 100 μls of glacial acetic acid directly onto collagen to make it easier to dissolve. Warm to 37°C and stir it to dissolve the collagen. It should dissolve in 20-30 minutes. If collagen strands remain in solution, filter sterilization will be difficult.
- Dilute the 50 ml stock with 450 ml of dH2O and filter-sterilize with a 0.2 μm membrane. This is the final working solution. Store at 4°C.
- Prepare Transwell filter membranes by coating them with collagen (50-100 μl) overnight. Chilled collagen must be warmed to RT and then added to the upper compartment to cover the membrane overnight and at RT. Before plating the dissociated primary fallopian tube (FT) epithelium (see below) onto the Transwell filters, wash the filters three times in 1X phosphate buffered saline (PBS) at least 1 hour before use to remove excess collagen.
2. Tissue Collection and Dissociation.
- Fresh fallopian tube (FT) fimbria should be collected in sterile 1X PBS in a 50 ml centrifuge tube and kept on ice prior to prompt processing in a sterile tissue culture hood.
- Wash the tissue sample once in 20 ml chilled 1X PBS (if sample has been collected in another type of media or is bloody wash at least 3X to get rid of as much blood and foreign media as possible as this might interfere with plating efficiency).
- Using sterile tweezers transfer FT to a 10 cm tissue culture dish with a little PBS and, using a sterile scalpel and sterile tweezers, cut longitudinally to maximize the exposure of the epithelial cells. Open up the fimbria so that it is no longer a tube but an almost flat sheet of tissue. Then cut into smaller but still retrievable pieces (about 3 mm in diameter).
- Transfer pieces to 45 ml of chilled dissociation media (MEM containing 1.4 mg/ml Pronase and 0.1 mg/ml DNAse) in a 50 ml tube.
- Rock gently at 4°C for 24 to 72 hours. (from experience, 48 hours is optimal). To check amount of dissociation, put a drop of dissociation media on a slide and check amount of clumping and tissue viability (beating ciliated cells). You want to see both single cells and some small clumps.
3. Fallopian Tube Plating.
- When the amount of epithelial cell dissociation is optimal, inactivate the media by adding 10% volume of FBS. Invert a few times to dislodge the cell suspension into smaller aggregates.
- Allow large tissue clumps (stromal tissue) to settle in the bottom the tube. Remove media containing epithelial cells into a second 50 ml tube.
- Add 50 ml of cold MEM (no FBS) to the original 50 ml tube. Invert to collect additional cells. Collect media into a third 50 ml tube (if the sample is very large and a high number of cells is expected, this step can be repeated to maximize cell collection). The large pieces of stromal/extracellular tissue can now be discarded. You now have two 50 ml tubes of cell suspension. Centrifuge at 1000 rpm for 5 minutes and aspirate dissociation media from cell pellets.
- Resuspend in about 5-10 ml of USG media (DMEM:F12 supplemented with 2% USG and 1% Pen Strep) warmed to 37°C. Pipette GENTLY. Be careful not to pipette too vigorously as this may damage the epithelial cells and reduce the quality of cultures. There should be single cells and small clumps (Figure 1).
- Transfer onto Primaria culture dishes and incubate for a minimum of 1 hour or up to 3 hours. Fibroblasts and red blood cells will stick to the plastic but the FT epithelial cells will not. Take a look at the plate after an hour to see if anything is sticking. The presence of ciliated cells can be seen by noting the beating of the cilia.
- During this incubation, collagen coated filters can be washed and made ready for cell plating (See step 1.4)
- After 1-3 hours of incubation on the Primaria plates, transfer the cell suspension to a 15 ml tube and rinse the Primaria plate with 5 ml USG media, transfer this media to the tube to make a final volume of 15 ml. Centrifuge at 1000 rpm for 5 minutes.
- Carefully aspirate media and avoid disrupting the cell pellet. Judging by the pellet size, resuspend in the appropriate amount of USG media. (Usually between 1-3 ml) Less is better in the beginning so that you can dilute further if you need to. Resuspend gently.
- Add 10 μl of the resuspended cells to a hemacytometer and determine the cell density. Tips: You are looking for epithelial cells that have a distinctly dark cell membrane and are non-columnar. You can also count ciliated cells that are definitely moving. Smaller cells that have a halo appearance are red blood cells and should not be counted. There will be some clumping, so you need to estimate that into you cell count. The seeding target is 1.65 x10⁵ cells/membrane, or at least 75% filter coverage (Figure 1). If cells are plated too sparsely, cells will not be able to form a complete epithelial layer.
- Add 500 μl of the USG media to bottom of the well of a 24 well plate and insert Transwell. The required volume of FT cell suspension (see above) can then be added onto each membrane, this is typically 100 μl.
- Incubate and grow for 1-2 days without disturbing top of membrane. You can change the media on the basal side during those days if necessary. After 1-2 days, you can carefully rinse the top with USG media and add a small amount (50-100 μl) of media on top of membrane. It is easier to determine the confluence of cell cultures if media is removed from the apical side of the filters before microscopy. The lower compartment should always contain media. Once cultures are fully confluent (normally within 5 days), the amount of media that travels up through the filters from the basal to apical sides should be negligible.
- Change the basal media once every two days for the first 10 days. The lower compartment must always have media to keep cells alive. Once the cells have formed a tight epithelial layer (Figures 1 and 2) they can be used in further studies, such as immunofluorescence (IF) or immunohistochemistry (IHC).
4. Membrane Processing.
- Membrane processing is dependent on the type of study that will be performed, but typically involves removal of the filter from the Transwell inserts.
- The filters are typically washed 3 times in 200 μl of 1X PBS before removal.
- Aspirate PBS from apical and basal side of the filters. This should be done 1 well at a time to prevent the membranes from drying out.
- Remove the insert from the plate, flip it upside down and use a sterile scalpel to cut around the membrane. Try to remove the membrane in one piece by making straight cuts around the membrane edge, instead of dragging the scalpel around the edge.
- Use tweezers to remove the filter from the insert, keeping track of which side the cells are on. The filter can then be processed for IF, IHC, etc. as appropriate.
- Example: for IF studies, the filter (after fixation, permeabilization, blocking and incubation with appropriate antibodies, according to standard IF procedures) should be placed on a slide, cells facing UP, Vectashield with DAPI is dropped onto the filter and covered with a glass coverslip.
5. Representative Results:
The transwell filters can be readily removed to examine the ex vivo epithelium by both immunohistochemistry (IHC) and immunofluorescence (IF). Using lineage specific markers, one can image and quantify the secretory (Pax8 positive) and ciliated (Sall2 positive) cell compartments in these cultures (Figure 3). Moreover, using these markers, one can monitor how each cell type responds to different physiologic cues 10. This system has been used to characterize the changes in the secretome and intracellular phosphoproteome of FT epithelium in response to various stimuli.
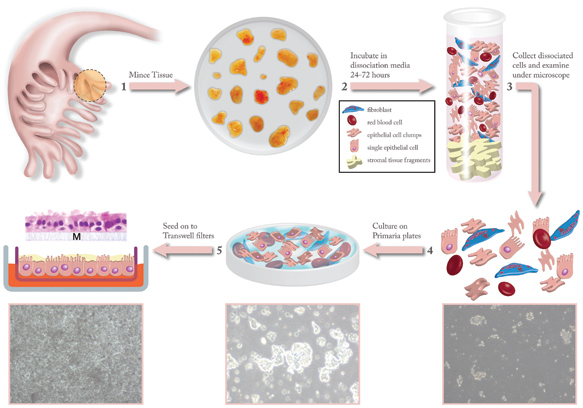
Figure 1. Illustration depicting how ex vivo cultures are generated from primary human fallopian tube tissue. Fallopian tube fimbrial tissue is obtained from the surgical suite and minced to generate small fragments 1 that are washed and incubated with dissociation media for 24-72 hours 2. After dissociation is complete, the tissue fragments are allowed to settle to the bottom of the incubation tube and the media containing the dissociated epithelial cells is harvested 3. The efficiency of dissociation can be monitored by examination under a phase-contrast microscope 4. The dissociated epithelial cells are then cultured on Primaria plates to help remove fibroblast and hematopoietic cells that invariably admixed with the epithelial cells 5. Once the non-epithelial cells are adequately removed, the epithelial cells are seeded onto transwell filters that are coated with human placental collagen 5. The media is provided by diffusion through the transwell from below. The cultures are incubated for 24-48 hours and then the apical media is removed. The ex vivo cultures are then allowed to grow for 5-8 days to form a full, complete lawn on the transwell filters. The ex vivo cultures can be maintained viably in this state for up to 4 weeks. The cartoon 5 shows a representation of the fully grown ex vivo culture with an example of a filter removed from the insert and stained with hematoxylin and eosin (H&E) to demonstrate the polarity and architecture of the ex vivo epithelium.
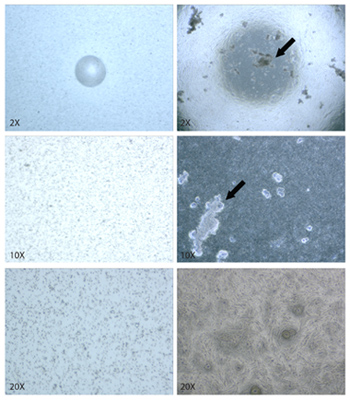
Figure 2. Bright field microscopy of FT ex vivo cultures. Transwell inserts are coated with human placental collagen 0.4μm pores are visible (a). FT epithelial cells are cultured on the collagen coated inserts (b), where they form an epithelial layer (c). Some debris is normally observed adhering to cells in the epithelial culture (indicated by arrows), most often to ciliated cells.
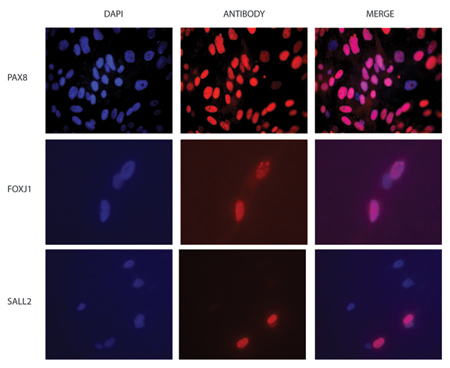
Figure 3. FT ex vivo culture immunofluorescence (IF). Examples of IF images of ex vivo cultures fixed and stained with antibodies against (a) secretory (Pax8) and (d) ciliated cell (Sall2) markers. DAPI is used as a control for location of cell nuclei (blue) (b and e) and merged antibody and DAPI staining is also shown (c and f). The number of cells depends on the length of time the cells are in culture (Pax8 staining, 7 days; Sall2 staining, 3 days).
Discussion
Loading...
$$\rightleftharpoonup{xx}$$
$$\longleftharp{xx}$$,
$$\longrightharp{xx}$$,
The identification of the FT as a candidate site of origin for SOC provides the opportunity for basic and translational research aimed at deciphering the mechanisms linking known risk factors and the actual serous carcinogenic process. Critical for this is the development of tractable model systems that will enable us to begin testing the hypothesis that the FTSEC is a cell-of-origin for pelvic serous carcinomas. The ex vivo culture model described herein is a novel system that permits the isolation and co-culture of primary FT secretory and ciliated cells in a manner that preserves the morphology and biology of native FT epithelium. Using this system, we recently characterized the secretome of this epithelium and how the epithelium responds to mechanical and genotoxic injury 10. Ovulation, a major risk factor associated with ovarian tumorigenesis, is characterized by a combination of tissue injury, inflammatory mediators, growth factors, and hormones 11. This system could be used to study the effect of an ovulatory milieu on the response and viability of secretory and ciliated cells. In addition, the impact of other cell types (i.e. inflammatory cells) could be examined to allow a better understanding of the events that drive cell-type differentiation and the factors that contribute to the neoplastic transformation of these cells. Similar models have been described in other tissues where polarized epithelium is present. For instance, in polarized primary cultures of airway epithelium, the effect of heregulin on cell growth and response to cellular injury was assessed 12. These types of model systems provide a new and useful way to study the initiation and pathogenesis of tumors which arise from epithelial tissues, and this is of critical importance in tissues such as the FT where no cell lines currently exist, and where there is a great need for the identification of key pathways and development of novel treatment strategies.
Disclosures
Loading...
$$\rightleftharpoonup{xx}$$
$$\longleftharp{xx}$$,
$$\longrightharp{xx}$$,
Dr. Drapkin is a consultant to Novartis Pharmaceuticals. No other authors declare any potential conflicts of interest.
Acknowledgements
Loading...
$$\rightleftharpoonup{xx}$$
$$\longleftharp{xx}$$,
$$\longrightharp{xx}$$,
We thank the faculty, fellows, residents, and physician assistants of the Brigham and Women's Hospital, Department of Pathology for making tissue available for these studies. This work was supported by research grants from the NIH/National Cancer Institute (P50 CA105009, K08 CA108748, U01 CA152990), Ovarian Cancer Research Fund, The May Kay Foundation, Novartis Pharmaceuticals, Robert and Deborah First Fund, Randi and Joel Cutler Ovarian Cancer Research Fund, Marsha Rivkin Foundation - Scientific Scholar Award, AACR - George and Patricia Sehl Fellowship for Cancer Genetics Research, and the American Physician Fellowship for Medicine in Israel - Claire and Emmanuel G. Rosenblatt Foundation Grant.
Materials
| Name | Company | Catalog Number | Comments |
|---|---|---|---|
| Collagen from human placenta (Bornstein and Traub Type IV) | Sigma-Aldrich | C7521 | |
| DMEM:F12 media | Cellgro | 15-090-CV | |
| Ultroser G | Crescent Chemical Company | 67042 | Add 20 ml of DMEM:F12 to stock bottle and use 10mls per 500 ml of media (2% final concentration) |
| Pen Strep | Invitrogen | 15140-122 | |
| BD Primaria culture plates | BD Biosciences | 353802 | |
| 24 well Transwell Permeable supports | Corning | 3470 | Clear, 6.5 mm insert, 0.4 μm pore size, treated polyester |
| MEM (Minimal Essential Media) | Cellgro | 10-010-CV | |
| Pronase | Roche Group | 11459643001 | |
| DNAse | Sigma-Aldrich | DN25 | |
| Sall2 antibody | Harvard - T. Benjamin Lab | Gift | 1:20 dilution |
| Pax8 antibody | Proteintech | 10336-1-AP | 1: 1000 dilution |
References
Loading...
$$\rightleftharpoonup{xx}$$
$$\longleftharp{xx}$$,
$$\longrightharp{xx}$$,
- Jemal, A., Siegel, R., Xu, J., Ward, E. Cancer statistics. CA Cancer J. Clin. 60, 277-300 (2010).
- Markman, M., Walker, J. L. Intraperitoneal chemotherapy of ovarian cancer: a review, with a focus on practical aspects of treatment. J. Clin. Oncol. 24, 988-994 (2006).
- Liu, J., Matulonis, U. A. New advances in ovarian cancer. Oncology (Williston Park). 24, 721-728 (2010).
- Cannistra, S. A. Cancer of the ovary. N. Engl. J. Med. 351, 2519-2529 (2004).
- Kurman, R. J., Shih, I. M. The origin and pathogenesis of epithelial ovarian cancer: a proposed unifying theory. Am. J. Surg. Pathol. 34, 433-443 (2010).
- Fong, M. Y., Kakar, S. S. Ovarian cancer mouse models: a summary of current models and their limitations. J Ovarian Res. 2, 12-12 (2009).
- Shan, W., Liu, J. Epithelial ovarian cancer: focus on genetics and animal models. Cell Cycle. 8, 731-735 (2009).
- Levanon, K., Crum, C. P., Drapkin, R. New insights into the pathogenesis of serous ovarian cancer and its clinical impact. J. Clin. Oncol. 26, 5284-5293 (2008).
- Karst, A. M., Drapkin, R. Ovarian cancer pathogenesis: a model in evolution. J Oncol. 2010, 932371-932371 (2010).
- Levanon, K., Ng, V., Piao, H. Y., Zhang, Y., Chang, M. C., Roh, M. H., Kindelberger, D. W., Hirsch, M. S., Crum, C. P., Marto, J. A., Drapkin, R. Primary ex vivo cultures of human fallopian tube epithelium as a model for serous ovarian carcinogenesis. Oncogene. 25, 1103-1113 (2010).
- Landen, C. N. Jr, Birrer, M. J., Sood, A. K. Early events in the pathogenesis of epithelial ovarian cancer. J. Clin. Oncol. 26, 995-1005 (2008).
- Vermeer, P. D., Einwalter, L. A., Moninger, T. O., Rokhlina, T., Kern, J. A., Zabner, J., Welsh, M. J. Segregation of receptor and ligand regulates activation of epithelial growth factor receptor. Nature. 422, 322-326 (2003).
Reprints and Permissions
Request permission to reuse the text or figures of this JoVE article
Request Permission