All procedures involving animal models have been reviewed by the local institutional animal care committee and the JoVE veterinary review board.
1. Mice Preparation and Intubation
- Anesthetize young C57B1/J6 mice (20–25 g) by inhalation of 8% sevoflurane with 0.5–1.0 L/min 100% O2 in a cone tube.
- Check the anesthesia depth using the toe pinch withdrawal reflex.
- Place the mouse at dorsal recumbency on an inclined plate and proceed to orotracheal intubation.
- Move the mouse to the heating pad and quickly connect the orotracheal tube to the ventilator to initiate the mechanical ventilation.
- Adjust the ventilator parameters to a frequency of 160 breaths/min and a tidal volume of 10 mL/kg.
2. Preparation for Surgery (for Both Banding and Debanding Surgeries)
- Shave and apply the depilatory cream from the neckline to mid-chest level of the mice.
- Apply ophthalmic gel to the animals' eyes to prevent drying out of the cornea.
- Place a rectal probe and the oximeter at the paw or tail for monitoring temperature and blood oxygenation, and heart rate, respectively.
NOTE: Anesthesia induces significant hypothermia, therefore, it is important to maintain normal body temperature during surgery to avoid a rapid decrease in heart rate.
- Maintain anesthesia with sevoflurane (2.0–3.0%). Check the correct level of anesthesia by the lack of the toe-pinch reflex.
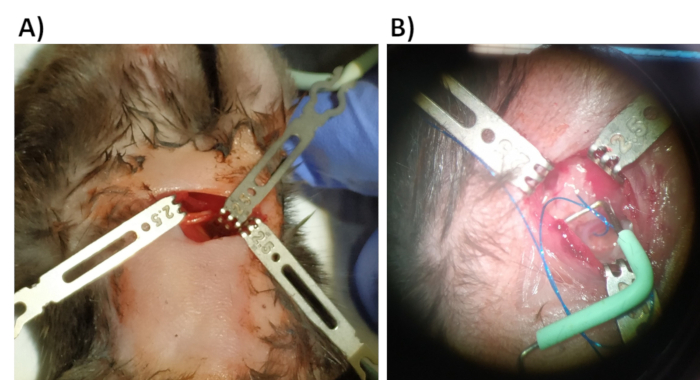
- Place the mice in right-lateral decubitus on a heating pad and secure the limbs to the magnetic fixator retraction system with a tape to keep the animal in the correct position during the surgery (Figure 1, Figure 2A).
- Disinfect the mouse chest with 70% alcohol followed by povidone-iodine solution.
3. Ascending Aortic Banding Surgery
- With a disposable blade, perform a small (~0.5 cm) skin incision on the left side immediately below the axilla level and dissect the skin.
- Gently dissect and separate the pectoralis muscle and other muscle layers until the ribs become visible. Use fine forceps and avoid cutting the muscle.
- Under a microscope, identify the intercostal spaces and open a small incision between the 2nd and 3rd intercostal space with fine forceps.
- Retract the ribs by placing the chest retractor (Figure 1A).
- Use small forceps to gently dissect and separate the thymic lobes until ascending aorta becomes visible.
NOTE: Cotton applicators should be handy in case of bleeding. Warm sterile saline should be given subcutaneously in case of significant bleeding (e.g., the mammary artery).
- Use small forceps to gently dissect the aorta.
NOTE: Aorta is considered to be dissected when there are no fat or other adhesions around it and it is possible to easily encircle the vessel with a small curve forceps.
- After aortic dissection, place a 7-0 polypropylene ligature around aorta by using ligation aid and curved forceps (Figure 1B).
- Position the blunted 26 G needle parallel to the aorta (tip pointed towards the mice head) (Figure 1B). For mice weighing 20–25 g, this needle induces a reproducible 65–70% aortic constriction.
- Make 2 loose knots around the aorta and the 26 G needle with the help of 2 forceps (Figure 1B).
- Tighten the 1st knot and, quickly after, the 2nd knot. Briefly confirm the right positioning of the constriction and quickly remove the needle to restore aortic blood flow. Finally, make a 3rd knot (BA group).
- Reposition the thymus and the muscles into their initial position.
- Perform the sham procedure identical to the constriction procedure but keeping the suture loose around the aorta (SHAM group).
- Cut the ends of the suture and remove the chest retractor.
NOTE: Short suture ends may increase the probability of knots loosening with aortic pressure, while long ends make the debanding procedure riskier since adhesions can occur between the suture and the left atrium.
- Close the chest wall using 6-0 polypropylene suture with a simple interrupted or continuous suture using the lowest number of stitches possible. Tighten the last chest knot with the lungs inflated at end inspiration by pinched off the outflow of the ventilator for 2s to re-inflate the lungs.
- Close the skin with a 6-0 silk/polypropylene suture in a continuous suture pattern.
NOTE: If a more recent ventilator is used, it is possible to programme it to pause in inspiration (Setup-Advanced-Pause-Inspiration)
4. Post-operative Care
- Apply povidone-iodine solution to the skin suture site.
- For proper analgesia, administer buprenorphine subcutaneously 0.1 mg/kg, twice daily, until the animal fully recovers (usually 2–3 days after surgery).
- Inject sterile saline intraperitoneally to prevent dehydration in case of significant bleeding during the surgery.
- Turn off the anesthesia (without deintubating the mouse) and wait until the animal recover the reflexes (whiskers movements are an awakening signal) and starts to breathe spontaneously.
- Remove the tracheal cannula.
- Let the animal recover in an incubator at 37 °C.
- Return the animal to a 12 h light/dark cycle room after full recovery.
5. Aortic Debanding Surgery
- Seven weeks later, perform the debanding of the aorta in half of the BA animals.
- Repeat all the steps 1.1 to 2.6 mentioned above.
- Gently dissect the tissues, adhesions, and fibrosis around the aorta until its constriction becomes visible.
- Carefully dissect the aorta and separate the suture from the aorta. Cut the suture with angled one-probed spring scissors (Figure 2B).
- Close the chest wall using 6-0 polypropylene suture with a simple interrupted or continuous suture using the minimum number of stitches possible.
NOTE: Try to tighten the last chest suture when lungs are inflated to avoid pneumothorax.
- Close the skin with a 6-0 silk/polypropylene suture in a continuous suture pattern.
- Perform all post-operative care procedures as mentioned in step 4.