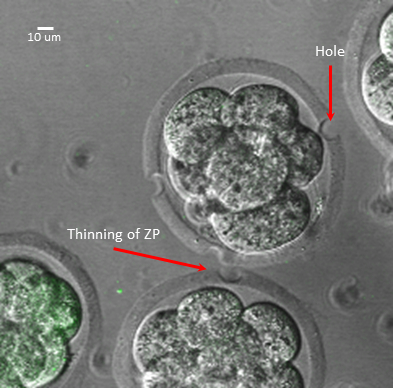
1. Perforation of Mouse Fertilized Eggs with XYClone Laser
- Setup and calibrate XYClone laser according to the manufacturer's recommendation. Other lasers, typically used for in vitro fertilization, can be substituted for XYClone laser to perforate fertilized eggs.
- Attach the laser controller box wire to the laser apparatus on the microscope.
- Attach the laser controller box to the computer running the laser software via a USB port. 3.1.3. Plug in the laser controller and switch it on.
- Looking through the eyepiece, perforate a test sample (e.g. dry-erase markings on a glass slide).
- Use a small screw driver (included in the laser kit) to adjust the X and Y position of the laser to match the LED light visible through the microscope eyepiece and calibrate the laser.
- Place a KSOM drop plate containing mouse fertilized eggs on the microscope stage. Do not keep the plate outside of the incubator for longer than 15 min.
- Look through the microscope eyepiece and ensure that the embryo's zona pellucida is in focus and the laser LED light is visible.
- Move the microscope stage to target the zona with the LED light/laser.
- Using the computer software set XYClone laser to 250 μs.
- Adjust the LED light size to desired dimensions (setting 5 in this experiment).
- Perforate the zona of each fertilized egg thrice with the laser. The zona can be either pierced or thinned. Using the above settings, the laser will produce a hole with a diameter of 10 μm (Figure 1).
NOTE: Aiming close to the polar body keeps laser away from the embryonic cell.
- Allow fertilized eggs to recover for 2 h in the tissue culture incubator before moving to the next step.
2. Transduction of Mouse Fertilized Eggs Following XYClone Laser Perforation
- Pipet 2 μL of concentrated lentivirus (greater than 1e8 TU/mL titer) into the 50 μL KSOM drop. Do not pipet up and down. Fertilized eggs readily attach to the pipet tip. Based on our experience, 1e5-5e5 transducing units of lentivirus in a volume less than 3 μL is optimal for gene delivery.
- Allow fertilized eggs to develop into blastocyst for 4 days in the incubator. No need to change the media.
3. Non-surgical Transfer of Transduced Mouse Embryos to Pseudo-pregnant Mice
- Use pseudopregnant mice, 3.5 day after mating.
- Use Non-Surgical Embryo Transfer (NSET) device to implant mouse embryos into pseudopregnant mice.
- Using a surgical or dissecting microscope, insert a vaginal speculum to visualize the cervix.
- Insert the Non-Surgical Embryo Transfer (NSET) device approximately 5 mm into the cervix and deposit embryos in a volume of approximately 2 μL.
NOTE: A sterile NSET device is used for each transfer and discarded after the procedure. All reagents used in the manipulation of the embryos must be sterile.
- Transfer 10–15 healthy blastocyst in 2 μL volume of KSOM to each pseudopregnant mice.
- Continue to monitor and measure the weight gain in pseudopregnant mice in following days to determine whether the NSET was successful.
- Recover pups by allowing the pregnant mice to give birth naturally or performing a caesarean section 17 days after the embryo transfer. A C-section is often necessary if very few embryos are present and they grow too large for natural birth.
- Collect tissue from pups for genotyping to determine the rate of transgenesis.