All procedures involving animal models have been reviewed by the local institutional animal care committee and the JoVE veterinary review board.
1. Preparation of Materials for Injection
- Sterilize a 33 G needle and syringe: disassemble and autoclave at 115 οC. Prepare needles for injection by rising in sterile phosphate-buffered saline (PBS).
- Thaw fluorescently labeled particles at room temperature for 5 - 10 min. Prepare particle solution for injection by reconstituting to a 50 mg/ml solution in sterile PBS with calcium ion and magnesium ion (Ca2+/Mg2+).
NOTE: AF488-labeled particles of fungal origin that have been validated for phagocytosis assays are used in this protocol. For optimal uptake, prepare particles fresh and immediately before injection.
NOTE 2: Particle concentrations may be optimized for each specific experiment.
2. Intravitreal Injection of Bead Solution
NOTE: Two people are required to perform the injection, in a way such that the person performing the injection can hold the mouse and maintain the focus on the eyeball, while the other person passes the loaded syringe and pushes the plunger.
- Anesthetize the rodent by intraperitoneal injection of 100 mg/ml ketamine and 10 mg/ml xylazine at a dose of 20 µl/10 g of body weight. Before injection, use a toe pinch to assess the level of anesthesia.
NOTE: Isoflurane has a profound effect on myeloid cell function, thus, its use throughout this assay should be avoided.
- Load the needle with 0.5 µl of fluorescently labeled particle solution.
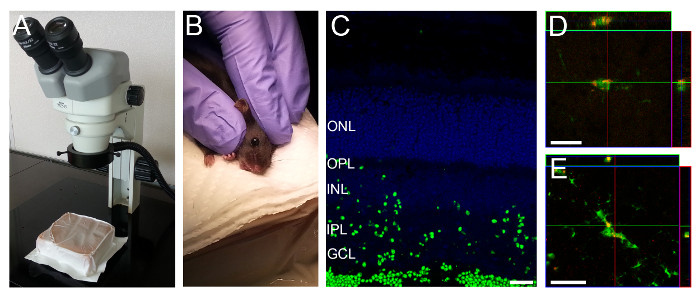
- Lay the mouse sideways under a surgical microscope (Figure 1A-B). Use a soft material, e.g., a gel pack, for better positioning of the mouse. For young mice in which the eyes are not yet open, gently open the eyelids with the help of fine 45o angled forceps by creating a fissure along the slit from which the eyelids will eventually open.
- With the help of fine 45o angled forceps carefully apply pressure around the eyelid, so that the eyeball pops slightly out of the socket. Hold the head with two fingers just above the ear and by its jaw and gently stretch the skin in parallel to the eyelids to keep the eye slightly out of the socket. Be careful not to grasp too close to the throat (Figure 1B).
- To puncture the eyeball, insert the syringe's needle in the corneal limbus (where the cornea and sclera connect). This is visible as a gray circle in pigmented mice. Retract the needle slightly to expel a small volume of vitreous fluid and then inject. The person performing the injection should gently hold the mouse with one hand and the needle with the other; the second person should slowly push the plunger.
- Retract the syringe slowly. Apply eye moisturizing drops to keep the eye hydrated.
- Let the rodent recover in a cage over a heat pad and continue to monitor the animal. If working with pups, do not return the animal to a cage with other alert animals until it is breathing and capable of spontaneous movement. If working with adults, do not return the rodent to a cage with other alert animals until it regains sternal recumbence.
3. Harvesting of Retinal Tissue
NOTE: Retinal tissue from eyes not injected with fluorescently labeled particles should be collected as a control for flow cytometric analysis. Though the assay can be performed using a single retina, for best performance, two retinas should be pooled together.
- Collect retinal tissue 3 hr after intravitreal injection of fluorescently labeled particles.
NOTE: While the time after injection of the particle solution may be optimized for each specific experiment, we found that 3 hr after injection, particle uptake could be seen throughout most layers of the retina (Figure 1C-D).
- Sacrifice mice by cervical dislocation.
- Collect the eyeballs by gently pressing against the eyelid with the help of fine 45o angled forceps to proptose the eyeball. Position the forceps behind the eyeball and pull.
- Dissect the retina under a dissecting microscope. Transfer the eyeball to a Petri dish containing a small amount of PBS with Ca2+/Mg2+. In a dry area of the Petri dish, perforate the eyeball in the corneal limbus with the tip of superfine forceps.
- Hold the eyeball with the help of fine 45o angled forceps and use spring scissors to cut around the corneal limbus, until roughly half of the corneal limbus circumference is cut.
- Hold the eyeball with the fine 45o angled forceps and bring the eyeball into PBS. With a second pair of fine 45o angled forceps tear the cornea and sclera apart. The lens and retina will come out intact.
- Separate the lens and retina. Collect the retina and transfer it to a 5.4 ml polystyrene test tube containing 2 ml of PBS with Ca2+/Mg2+.
4. Preparing a Single Cell Suspension
- Prepare single-cell suspensions using a neuronal tissue dissociation kit with minor modifications to the manufacturer's instructions. Briefly, triturate retinas by pipetting up and down with a P1000 pipette and performing an enzymatic digestion at 37 oC without shaking.
5. Staining Single Cell Suspensions for Flow Cytometric Analysis
- Resuspend cells in 200 µl of staining buffer (Dulbecco's phosphate-buffered saline with 0.2% bovine serum albumin (BSA) and 0.09% sodium azide) and transfer to a U-bottom 96-well plate. Centrifuge for 5 min at 130 x g.
NOTE: Sodium azide is harmful to humans and the environment. Use appropriate personal protective equipment and discard waste in accordance with local regulations.
- Invert the plate over a sink to discard the supernatant. To block Fc receptors, resuspend cells in 25 µl of stain buffer containing 5 µg/ml of anti-mouse CD16/CD32 antibody per well. Incubate for 5 min at room temperature.
- Add 25 µl of staining buffer containing 0.5 µg/ml of anti-mouse Ly6C-APC-Cy7, 0.5 µg/ml of anti-mouse Ly6G-Pe-Cy7, and 2.5 µg/ml of anti-mouse CD11b-BV650. Incubate for 15 min at room temperature in the dark.
- Centrifuge for 5 min at 130 x g. Invert the plate to discard the supernatant. Wash by resuspending cells in 200 µl of staining buffer.
- Centrifuge for 5 min at 130 x g. Resuspend in 200 µl of stain buffer containing 0.5 µg/ml of propidium iodide (PI). Transfer to 1.2 ml microtiter tubes.
- Wash wells with an additional 100 µl of staining buffer containing 0.5 µg/ml of PI and pool with the previous 200 µl in the 1.2 ml microtiter tubes. A total volume of 300 µl of stained cells is obtained.
6. Flow Cytometric Analysis
- Using a conventional three laser (violet, blue, and red laser), avoid PE, PerCP-Cy5.5, BV510, and PI dyes due to significant spillover from the extremely bright fluorescent AF488-particles. Use a fourth (yellow) laser to optimize this assay, as it allows for PE-labeled antibodies and PI (in the mCherry channel instead of the PerCP-Cy5.5 channel) to be used (Figure 2).
NOTE: If a yellow laser is not available, use a dead cell exclusion dye in another channel.
- Gate on PI negative cells (PI-) to exclude dead cells (Figure 2B).
- After excluding dead cells, gate on CD11b positive cells (CD11b+), this will include all myeloid cells (Figure 2C).
- Within the CD11b+ population, gate on Ly6C-/Ly6G- to exclude neutrophils (CD11b+/Ly6G+) and monocytes (CD11b+/Ly6C+; Figure 2D). After gating on microglia (here defined as CD11b+/Ly6C-/Ly6G- for simplicity), two clear populations should be visible; one negative and one positive for the fluorescently labeled particles. Phagocytic cells will have taken up particles and are, therefore AF488+ (Figure 2E).
NOTE: Ly6C positive or Ly6G positive populations can also be analyzed to measure particle uptake using this staining approach. The percentage of phagocytic CD11b+ cells correlates well with the percentage of phagocytic microglia (Figure 2F). For researchers without flow cytometry experience, a simpler analysis with CD11b staining alone can be performed, albeit this will include phagocytic neutrophils and monocytes, as well as microglia. Within this CD11b+/Ly6C-/Ly6G- population, these cells are > 99% microglia as judged by staining with the markers F4/80 and CX3CR1; these markers can be added but are not necessary in our hands.