All procedures involving animal models have been reviewed by the local institutional animal care committee and the JoVE veterinary review board.
1. Brain removal with intact auditory nerve root for stimulation
NOTE: Mice for these experiments were obtained by crossing ChAT-IRES-Cre transgenic mice on a C57BL/6J background with tdTomato reporter mice (Ai14). Mice used for histology and electrophysiology were post-hearing onset (P14-P23), which is around P12 in mice. Neurons expressing tdTomato in the ventral nucleus of the trapezoid body (VNTB) have been previously characterized as medial olivocochlear (MOC) neurons in this mouse line.
- Euthanize (e.g., CO2 asphyxiation) and decapitate the animal using approved institutional procedures.
- Using a razor blade, cut the skin at the midline of the skull from the nose to the back of the neck. Peel back the skin to expose the skull.
- Using small scissors, make an incision in the skull through the midline, starting at the base (caudal end near the spinal cord) of the skull and continuing towards the nose.
- At the lambda suture, make cuts in the skull from the midline, lateral toward the ear on both sides. Peel back the skull to expose the brain.
- Starting at the rostral end, gently lift the brain away from the skull with a small lab spatula or blunt forceps. Cut the optic nerve and continue to gently work the brain backward, exposing the ventral surface.
- Cut the trigeminal nerves by pinching them with fine forceps near the ventral surface of the brainstem.
NOTE: Do this carefully, as the vestibulocochlear nerve lies just below this and needs to be intact for eventual stimulation.
- Place the preparation in a glass Petri dish filled with cold slicing solution. Place the dish under a dissecting microscope. Gently bubble with carbogen.
- Trim the facial nerve close to the brainstem and expose the vestibulocochlear nerve.
- Using fine forceps, push the tips into the foramina where the vestibulocochlear nerve exits the skull as far as possible and pinch the nerve to sever it, leaving the nerve root attached to the brainstem. Repeat this on the other side.
- Once both nerve roots are free, remove the meninges and vasculature from the ventral surface of the brainstem near the trapezoid body.
- Free the brain completely from the skull by pinching the remaining cranial nerves and connective tissue taking care to preserve the remaining spinal cord if possible.
2. Block and mount brain on stage (magnetic disc)
- Prepare the surface of the brain to fix to the stage by blocking the brain at the level of the optic chiasm.
- With the ventral surface up, stabilize the brain using a blunt tool to gently immobilize the spinal cord so that the brain does not tilt during the following step.
- At the level of the optic chiasm, use open forceps to create the plane for blocking the brain by inserting through the brain down to the bottom of the dish. Insert the forceps at an angle of approximately 20˚ from vertical so that the tips exit the dorsal surface of the brain caudal to the optic chiasm.
- Cut along the forceps using the razor blade.
- Glue the brain to the surface of the stage.
- Prepare a small block (~1 cm3) of 4% agar for supporting the brain.
- Place a small drop of glue on the stage and spread it into a rectangle so both the brain and agar block can be glued down.
- Using forceps, carefully lift the brain and gently dab the excess liquid using the edge of a paper towel. Place the blocked surface onto the glue, the ventral surface will be towards the blade during slicing.
- Push the agar block gently against the dorsal surface of the brain to support it during slicing and to ensure proper brain positioning (i.e., angle).
3. Slice brain to create wedge slice
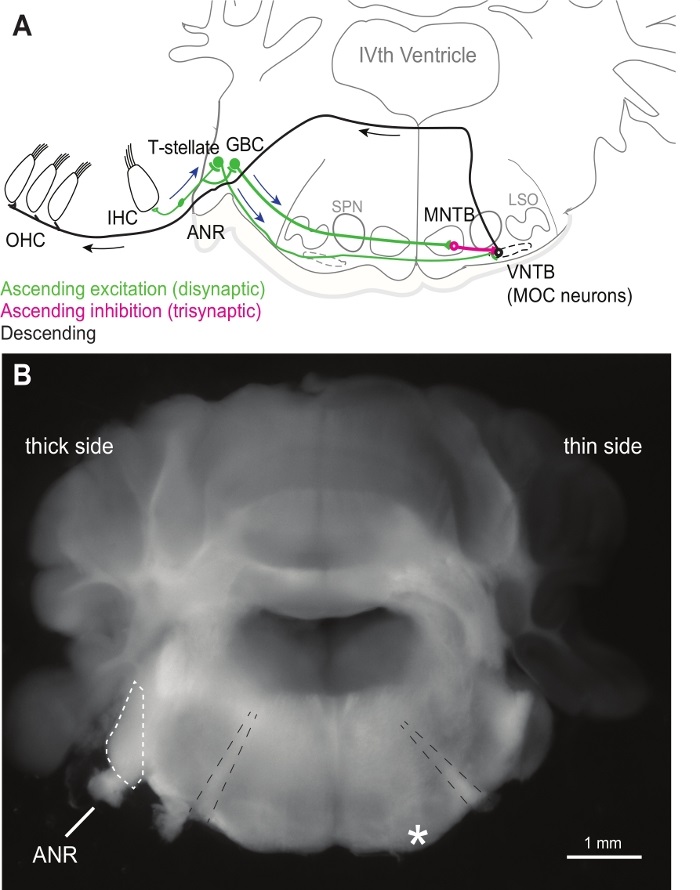
NOTE: Prepare a brain slice using a vibratome that has the cochlear nerve root on the thick side and medial olivocochlear (MOC) neurons and the medial nucleus of the trapezoid body (MNTB) on the thin side.
- Place the magnetic disc with the attached brain onto the stage base and place it in the slicing chamber with the ventral surface of the brain oriented towards the blade.
- Fill the chamber with ice cold slicing solution and bubble with carbogen.
- Lower the blade into the solution and cut slices caudal to the region of interest to make sure the slices are symmetrical. If the slices appear asymmetrical, tilt the stage slightly to obtain symmetry.
NOTE: Blade speeds between 0.05-0.10 mm/s were effective for cutting healthy slices and may vary depending on animal age and brain region.
- Once the slices are symmetrical, shift the stage ~15˚ (corresponding to approximately 3 concentric rings on the stage base) to one side.
NOTE: Shift the stage away from the auditory nerve root that you want to preserve in the slice.
- Continue slicing carefully until the auditory nerve root is close to the surface on one side, and the facial nerve can be seen at the surface of the other side.
- Shift the stage back 15˚ to the original position.
- Move the blade away from the tissue and spin the stage base 90° so that the lateral edge of the thin side is facing the blade. Lower the blade several hundred microns and then slowly bring the blade close to the edge of the tissue. Repeat this until the blade touches the lateral edge. Lower the blade to the desired thickness of the thin edge of the slice, here an additional two hundred microns.
NOTE: The resulting slice is ideally ~300 mm thick at the level of the ventral nucleus of the trapezoid body (VNTB) on the side where patch clamping will take place.
- Move the blade back away from the tissue and spin the stage base back so that the ventral surface is facing it.
- Make the cut that designates the rostral surface of the wedge slice. Transfer the slice to a piece of interface paper (1 cm2) caudal surface down. Move the slice to the incubation chamber or other suitable incubation apparatus for recovery (30 min at 35 °C).
NOTE: The facial nerve should be visible on both hemispheres of the slice on the rostral surface (see Figure 1B).