$$\rightleftharpoonup{xx}$$
$$\longleftharp{xx}$$,
$$\longrightharp{xx}$$,
1. Ablation of a Subpopulation of Neurons Using a Two-photon Laser Microscope
NOTE: If users plan on performing Ca imaging following ablation, use the UAShspzGCaMP6s line. If users plan on performing behavioral recording following ablation, use the UAS:EGFP line, as the ablation of EGFP-positive cells is easier to perform than of GCaMP6s-expressing cells.
- Begin by setting up the mating of a Gal4 line that labels specific neurons to be studied and UAS:EGFP or UAShspzGCaMP6s. Be sure to use the nacre background for both parents so that nacre homozygotes can be obtained.
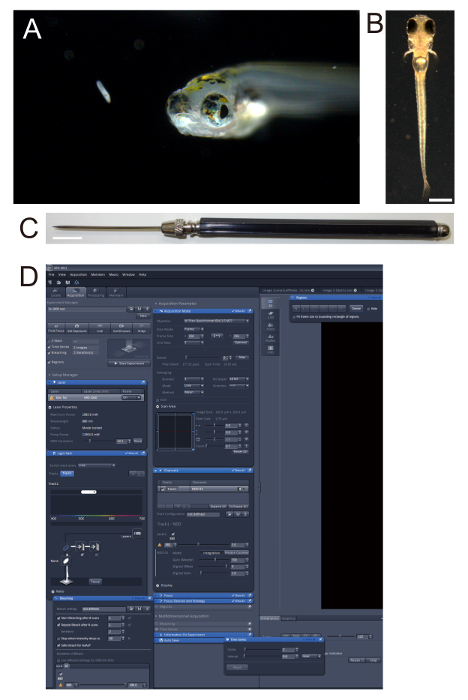
NOTE: Homozygotes of nacre contain no melanophores on the body surface (Figure 1B). In the present study, a Gal4 line gSAIzGFFM119B (which labels the pretectum) and another Gal4 line hspGFFDMC76A (which labels the ILH) are used.
- On the following day of the mating setup, collect the zebrafish eggs, and raise them to the larval stage at which point the neurons of interest will express fluorescent reporters.
- Mount the zebrafish larva in 2% low melting point-agarose (Figure 1B).
- Begin by preparing a 2% agarose stock solution: Dissolve 2 g of low melting-point agarose powder in 100 mL system water (i.e., the water used to maintain adult zebrafish in a circulating water system) or E3 water by heating the water to the boiling point in a microwave and mixing vigorously.
- Microwave the 2% low melting-point agarose stock until it boils. Pour 3.5-4.0 mL of the agarose onto the lid of a 6-cm Petri dish. Wait until the agarose cools so that it is warm to the touch before proceeding.
- Next, place a single larva (not anesthetized at this step) in the agarose. Keep adjusting the position and orientation of the larva so that it is upright, using a dissecting needle (Figure 1C), until the agarose solidifies to ensure the proper positioning of the larva.
NOTE: The larva will continue to swim around while the agarose solidifies.
- Once the larva is positioned, allow 5 min for the agarose to solidify completely.
- Pour 5 mL of tricaine solution (0.4% at 1x working concentration) over the agarose.
NOTE: To avoid movements by the larvae during laser ablation, the larvae must be kept anesthetized throughout the ablation procedure.
- Ablate the larva using the bleaching function in a two-photon laser microscopy system.
- Place the agarose-embedded larva under a two-photon laser scanning microscope and start the microscopy system.
- Start the image acquisition software and click the "On" button on the "Laser" tab to turn on the laser (Figure 1D). Wait for the "Status" of the laser to change from "Busy" to "Mode-locked."
- On the "Channels" tab, set the laser's wavelength at 880 nm (maximum power: approximately 2,300 mW) for EGFP ablation, or at 800 nm (maximum power: approximately 2,600 mW) for GCaMP ablation.
- Select the 20X objective lens by manually moving the lens revolver. Click the "Locate" tab, click "GFP" to change the optical pathways, and directly view the fluorescence by eye.
- Locate the zebrafish larval brain at the center of view; then click the "Acquisition" tab to go back to the two-photon microscopy.
- As a record of the 'before ablation' condition, take a z-stack image with the 20X objective lens at fast scanning-speed (to avoid heat-damage). Later compare the images taken before and after ablation experiments (Figure 2A). To obtain a z-stack, click "Z-Stack" to select the z-stack option and expand the tab. Set the lower limit (click the "Set First" button") after focusing on the ventral end of the larval brain, and set the upper limit (click the "Set Last" button) after focusing on the dorsal most-surface of the brain. Then, click the "Start Experiment" button to run the z-stack image acquisition.
- Select the 63X objective lens by manually moving the lens revolver.
- Click the "Locate" tab to switch to the epi-fluorescent microscopy, locate the cells to be ablated at the center of view by eye, then click the "Acquisition" tab to go back to laser scanning microscopy.
- On the "Acquisition Mode" tab, set the "Frame Size" at 256 x 256. Click "Live" and observe the neurons of interest.
- Starting from the dorsal-most side, find a focal plane in which the cells to be ablated are in focus.
- Mark a small, circular area about one third the cell's size in diameter on each neuron as a region of interest (ROI) using the "Regions" function.
- Set the scan speed to 13.93 s/256 x 256 pixels (134.42 µm x 134.42 µm), which corresponds to a laser dwell time of approximately 200 µs/pixel, or 200 µs/0.5 µm. Also, set 4 repetitions ('Iteration cycle: 4'). Alternatively, optimize the number of iterations and scanning speed so that sufficient ablation is achieved.
- Perform the 'Bleaching' function for ablation, in combination with the 'Time series (2 cycles)' to image the sample (before and after ablation) and 'Regions' (to set the ROIs) or equivalent functions in the software used (Figure 1D).
- By comparing the first image (before ablation) and the second image (after ablation) in the Time series cycle, ensure that after bleaching, the fluorescence in the targeted cells decreases to that observed at the background level (Figure 2B).
- If fluorescence is still present after ablation, increase the number of iterations.
- Next, move the focal plane slightly deeper (i.e., towards the ventral side), and choose the next focal plane where un-ablated cells appear.
- Perform the bleaching function as described above (step 1.9). Repeat these steps until all the cells in the neural structure of interest have been ablated.
- After going through all the focal planes covering the neural structures to be ablated, check the cells for abolished fluorescence. If some cells are found to still be fluorescent due to insufficient ablation, laser-irradiate them again as described above.
- If the larva needs to be recovered from agarose after laser irradiation, do not try to force it out of the agarose because this might damage the larva. Instead, carefully make tiny cuts in the agarose around the larva perpendicularly to the surface of its body. Then, wait for the larva to swim out of agarose on its own when the anesthetic wears off.
- Proceed to the next larva for ablation or perform control experiments using another population of neurons that are uninvolved in the behavior under investigation.
NOTE: Here, as a control, olfactory bulb neurons in UAS:EGFP; gSAIzGFFM119B larvae were laser-ablated using the same protocol described above (Figure 2A, right).
- Allow several hours or 1 day for recovery before proceeding to Ca imaging (Section 2) or behavioral recording (Section 3). During this recovery time, check the larval health (i.e., normal spontaneous swimming, no apparent heat-damage around the ablated area, etc.) and remove larvae showing any signs of poor health.
2. Calcium Imaging to Record Prey-evoked Neuronal Activity in the Pretectum-ablated Zebrafish Larvae
- To prepare a recording chamber, put a secure-seal hybridization chamber gasket on a glass slide, with the adhesive side facing on the glass, and remove the top seal.
NOTE: This creates a small recording chamber that is 9 mm in diameter and 0.8 mm in depth (Figure 3A).
- Next, place a nylon mesh (size of opening: 32 µm) on a 50-mL tube that has the bottom cut open. Use the cap to attach the mesh on the tube (Figure 3B).
- Prepare the paramecia (which is the prey to be used as the visual stimulus for larva).
NOTE: Prepare the Paramecium culture (steps 2.3.1 and 2.3.2) beforehand.
- Obtain paramecia seed culture from commercial sources or academic bio-resource centers in advance.
- Culture the paramecium for several days in water containing autoclaved rice straw and a pellet of dry beer-yeast (Figure 3C).
- Pour the paramecium culture through 2 sieves successively (one with a 150-µm aperture, followed by another with a 75-µm aperture) to remove debris from the culture.
- Collect paramecia in the flow-through from the previous step on a nylon mesh (13-µm aperture).
- Re-suspend the paramecia on the nylon mesh into a glass beaker using a squeeze bottle of system water (Figure 3D).
- Rinse the mesh (Figure 3B) in system water 2x (Figure 3E).
NOTE: The purpose of this step is to remove any possible odorants and tastants contained in the paramecium culture medium, as the goal of the present study is to observe visually driven neuronal activity.
- Place a zebrafish larva in the tricaine solution to anesthetize.
- Mount a single larva in 2% low melting-point agarose.
- First, microwave 2% low melting-point agarose and add 1/10 volume of 10x concentrated tricaine to the agarose.
- Place one drop of the tricaine-containing agarose onto the recording chamber (Figure 3A).
- After confirming the agarose is not too hot, place the anesthetized larva (from step 2.5) into the agarose, immediately removing any excess agarose so that the surface of the agarose looks slightly convex.
- Quickly orient the larva into an upright position with a dissecting needle (Figure 1C).
NOTE: These procedures must be completed within several seconds before the agarose solidifies.
- Once the larva is properly positioned, allow 5 min for the agarose to solidify completely. Then, pour a drop of 1x tricaine solution on the agarose.
- Remove the agarose around the head of the zebrafish larva and make space for the paramecium to swim using a surgical knife. To do this, first, make a few small cuts in the agarose (Figure 3F). Then, carefully remove the excess agarose by gently pouring system water on the chamber.
NOTE: At this step, the tricaine will be washed out.
- Next, put one paramecium in the recording chamber to serve as a visual stimulus.
NOTE: When the paramecium swims near the head of the zebrafish larva, it will evoke a neuronal response (Figure 3G).
- Place the recording chamber under an epi-fluorescence microscope equipped with a scientific CMOS camera (Figure 3H) and select a 2.5X objective lens (Figure 3I).
- Collect time-lapse recordings of the GCaMP fluorescence signals.
- Start the image acquisition application for the equipped camera.
- Click "Sequence Pane" and select "Hard Disk Record" on the pane. In the Scan Settings section, set the "Frame Count" to 900 or any other total frame number desired.
NOTE: If available, use time-lapse recording software with a module (here, "Hard Disk Record") that enables efficient saving of the data onto a hard drive.
- In the "Capture" pane, set the exposure time at 30-ms (i.e., 33.3 fps), and Binning 2 x 2.
- On the microscope controlling touch panel, choose a filter set for GFP, as the GCaMP has similar excitation/emission spectra to GFP.
- Click "Live" on the Capture pane to locate the larva in the camera view and focus (Figure 4A), and then click "Stop Live" and click the "Start" button. Save the movie in .cxd or any other format that holds information about the acquisition condition.